> ## Documentation Index
> Fetch the complete documentation index at: https://knowledge.komo.tech/llms.txt
> Use this file to discover all available pages before exploring further.
# Matterport Card
> Instructions on how to embed Matterport 3D walkthroughs in your Hub.
## Watch it come to life
## What is it?
Matterport allows you to share 3D virtual tours on your Hub.
## **Things to note**
* Only **Public** Matterport models can be embedded.
* You'll need to copy the embed code following clicking the play button
* The Matterport experience is different between desktop and mobile devices.
* On desktop browsers, visitors to your Hub will be able to interact with Matterport without leaving the Hub. They can interact with the 3D space directly in the Matterport embed card.
* On mobile browsers, visitors to your hub will be taken to the dedicated Matterport viewer page for the embedded space.
* This limitation is applied by Matterport and cannot currently be changed.
* [Don't have a Matterport account? Click here to check it out. ](https://matterport.com/)
## How do I build one?
* [Step 1: Add a Matterport Embed card to your Hub](#step-1-add-a-matterport-embed-card-to-your-hub)
* [Step 2: Paste the link to the card](#step-2-paste-the-link-to-the-card)
* [Step 3: Publish your card](#what-is-it)
### Step 1: Add a Matterport Embed card to your Hub
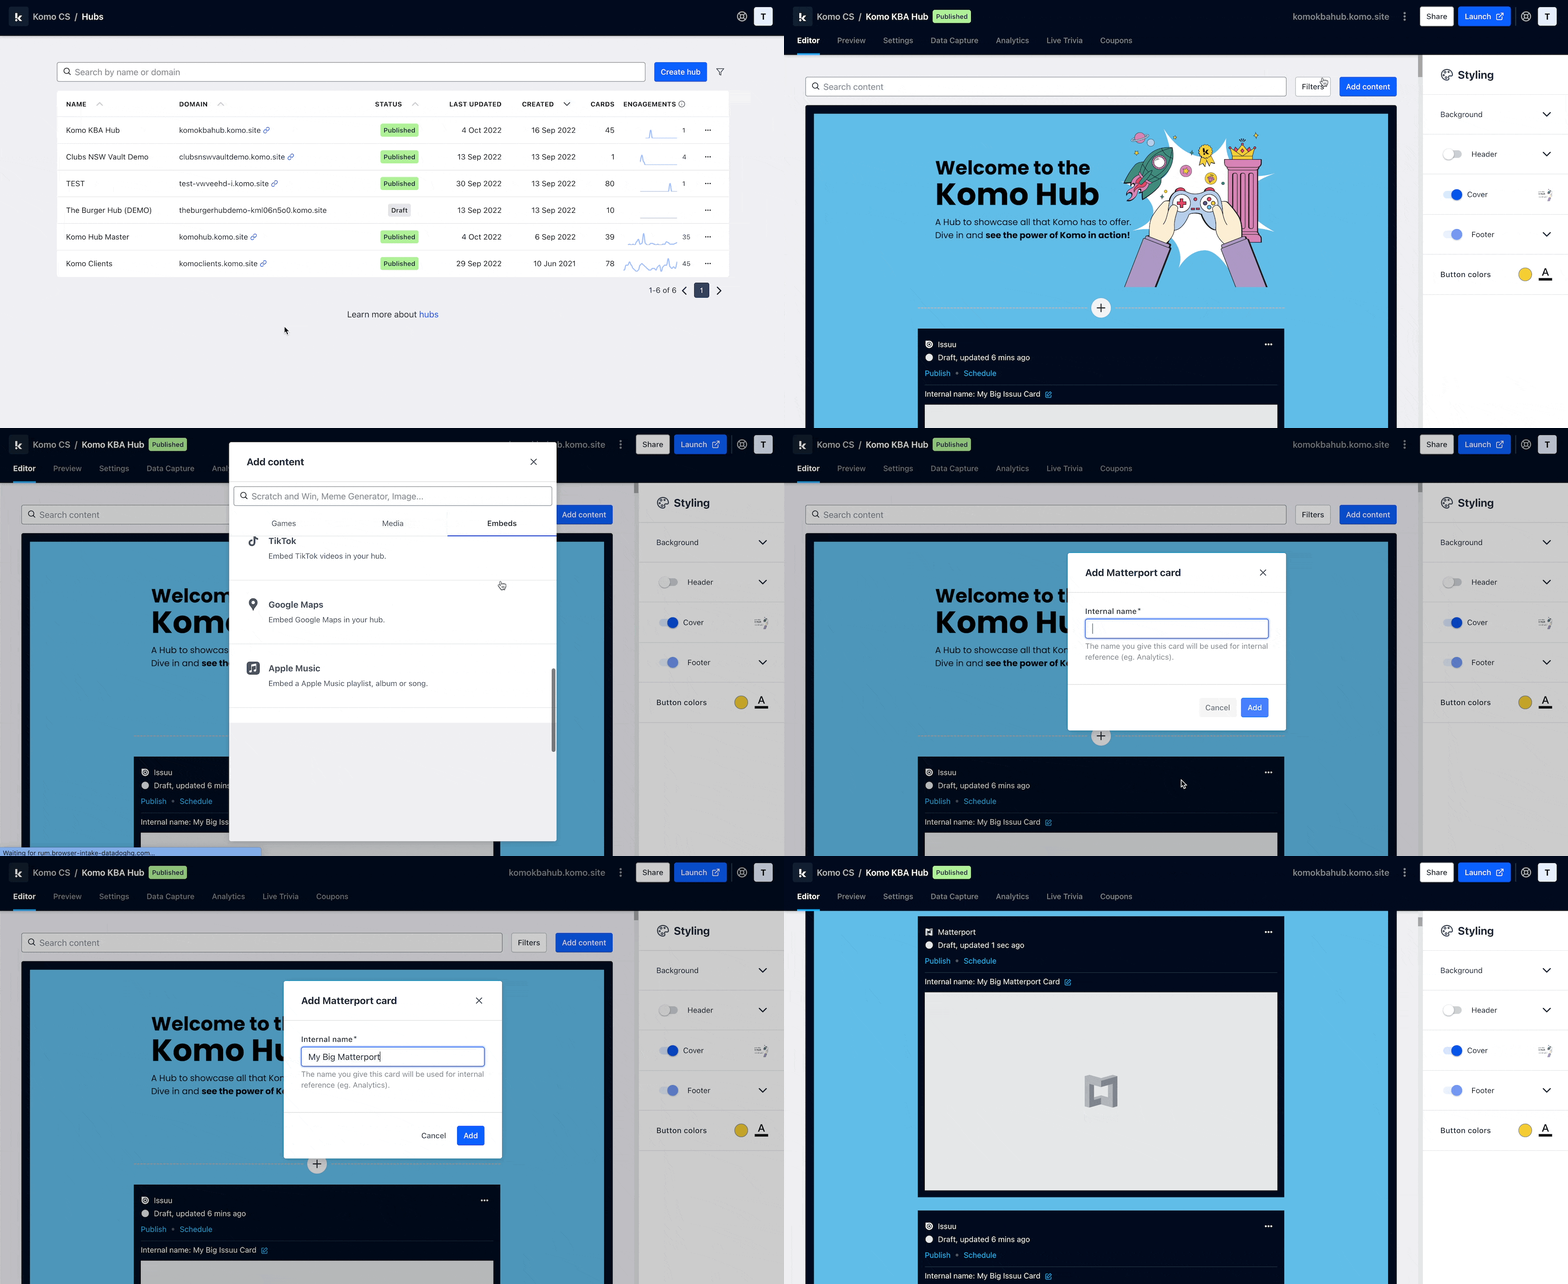 * Navigate to your **Engagement Hub**.
* Once there click **Add Content,** from here select **Embeds** and then **Matterport.**
* You will then see your new card has been added to your Hub.
### Step 2: Paste the link to the card
* Navigate to your **Engagement Hub**.
* Once there click **Add Content,** from here select **Embeds** and then **Matterport.**
* You will then see your new card has been added to your Hub.
### Step 2: Paste the link to the card
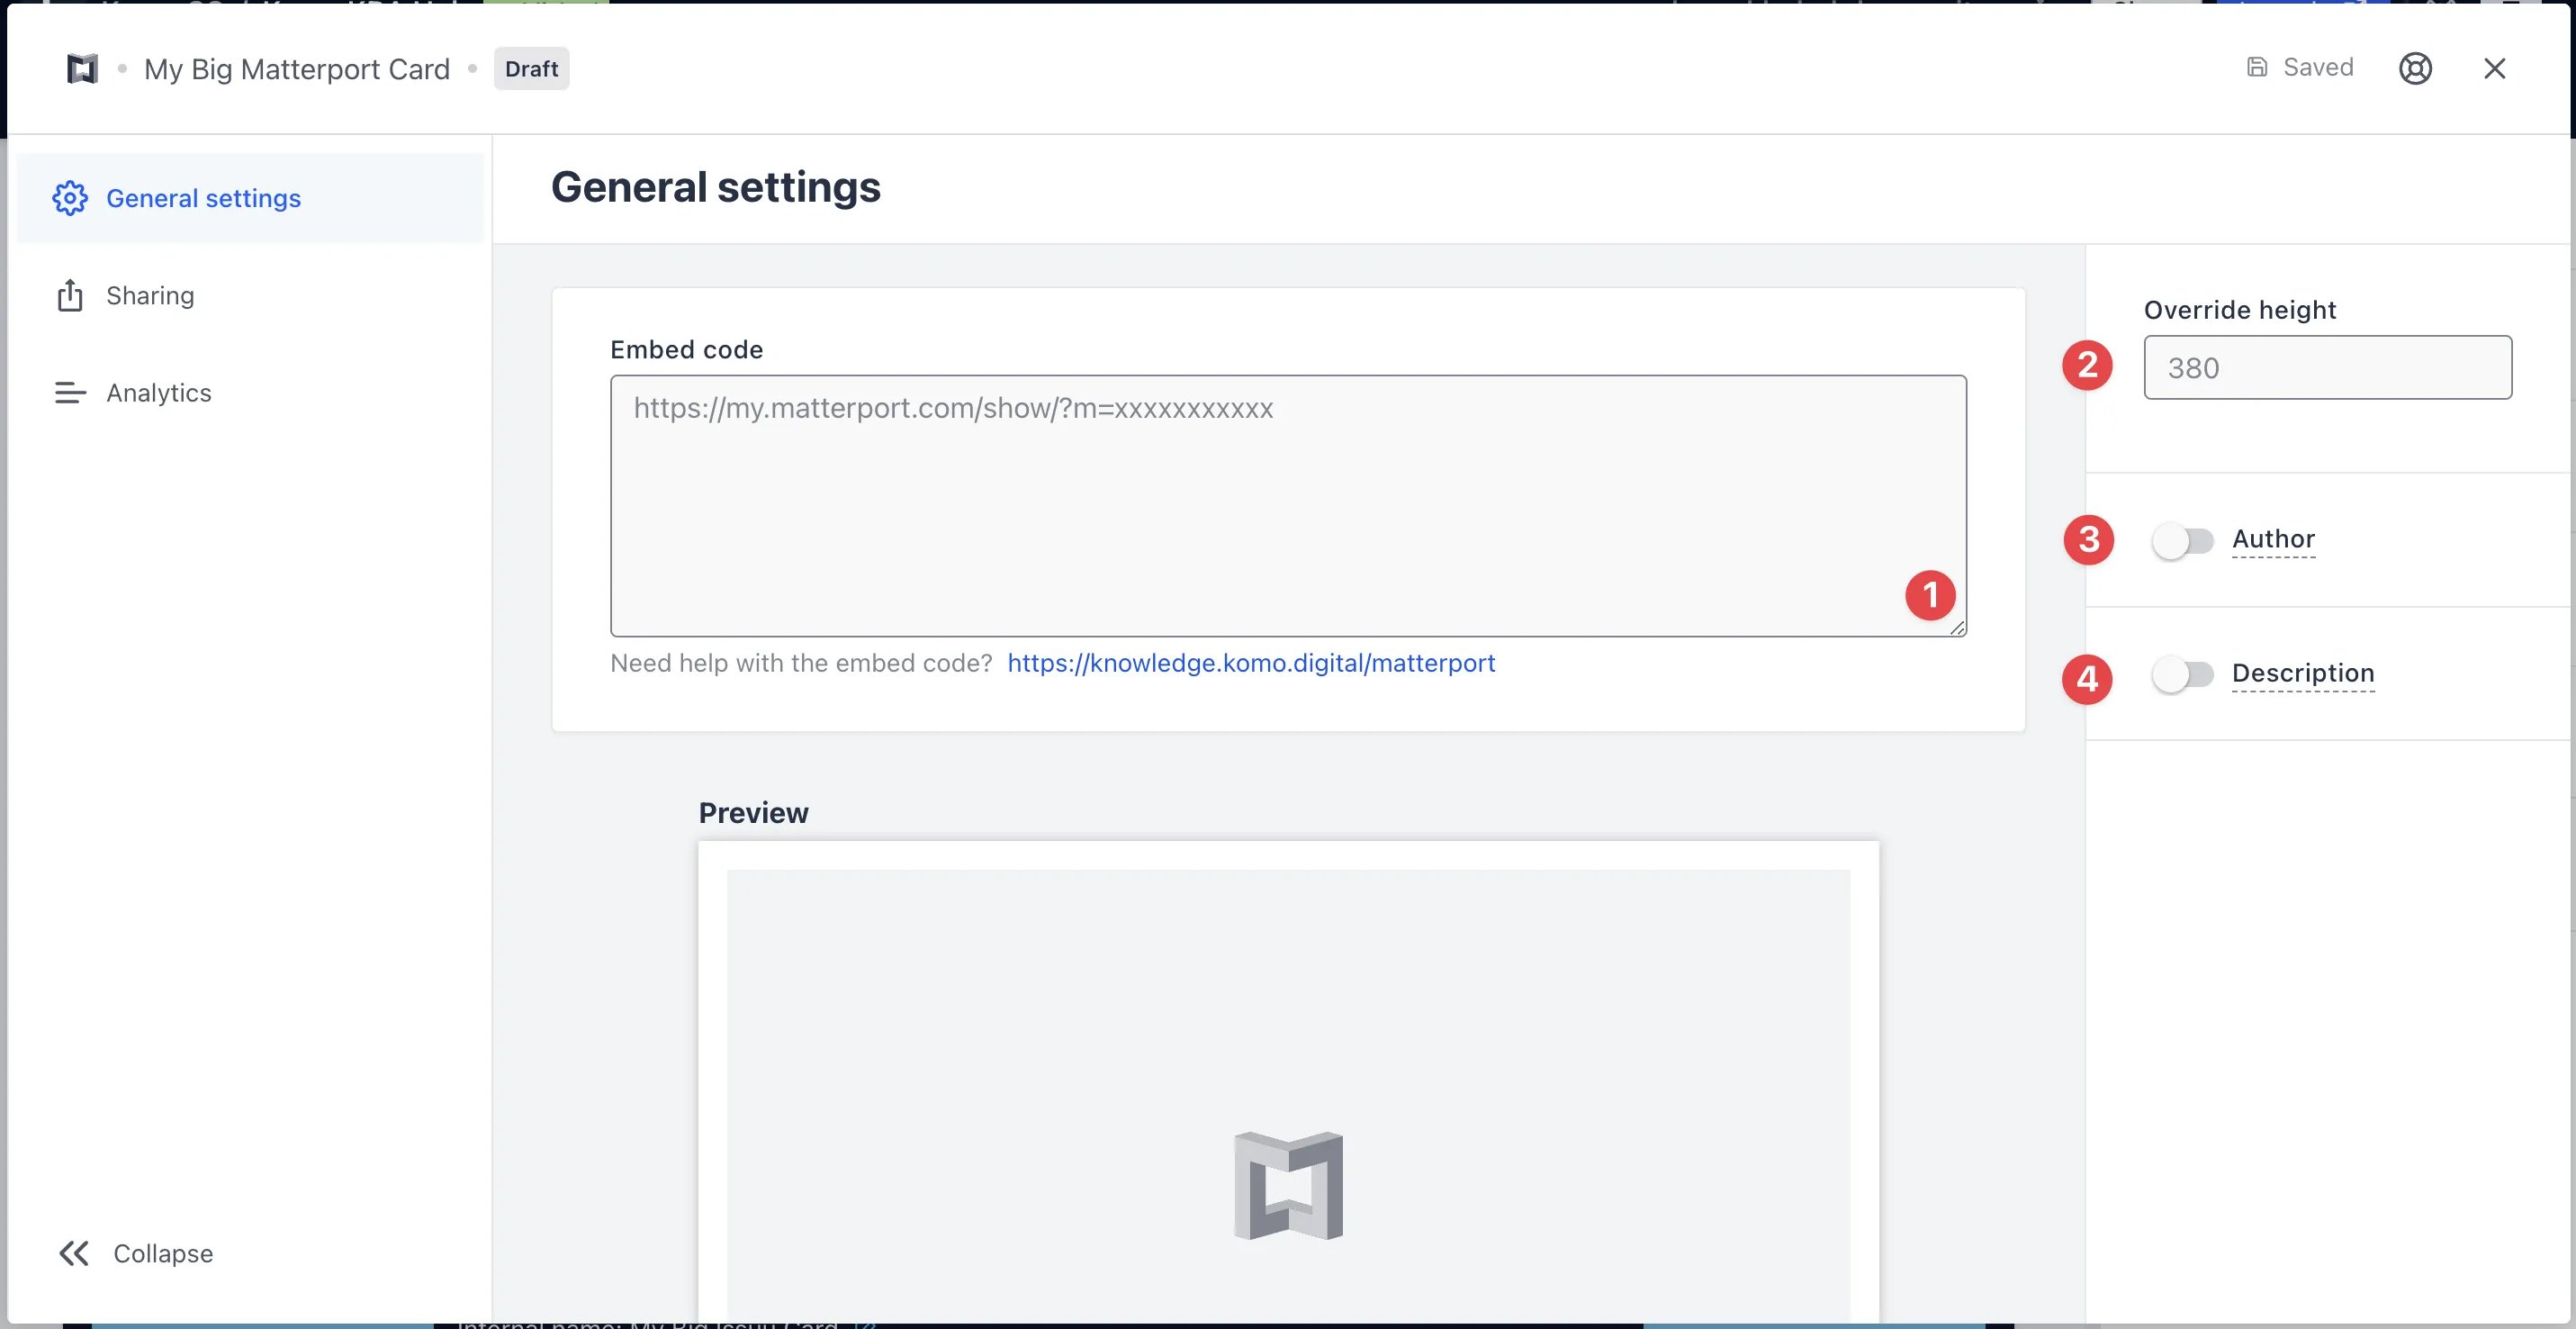 * Clicking on **Matterport** will open the editing module.
* **(1)** Get the **embed code** and paste it here and a preview will appear below.
Once you start the 3D experience, by clicking the large play button icon, you can then click on the **"Share this Space"** button at the bottom right.
* Clicking on **Matterport** will open the editing module.
* **(1)** Get the **embed code** and paste it here and a preview will appear below.
Once you start the 3D experience, by clicking the large play button icon, you can then click on the **"Share this Space"** button at the bottom right.
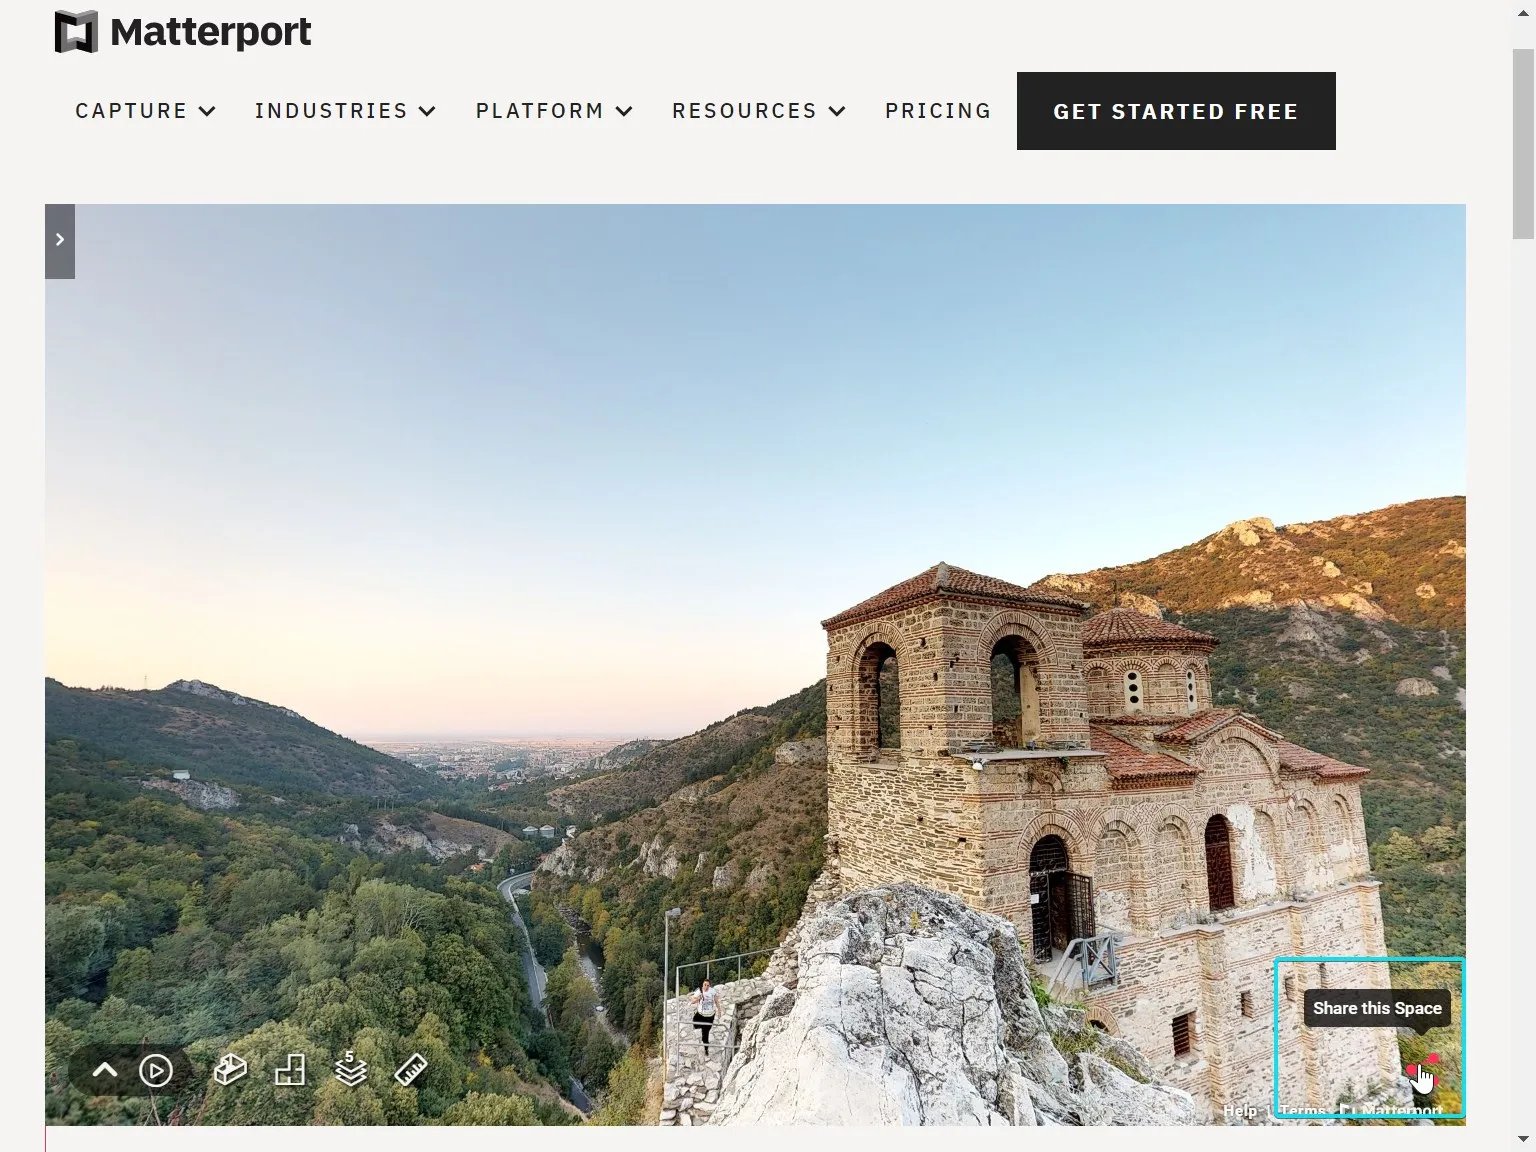 The link should be in the format [**https://my.matterport.com/show/?m=xxxxxxxxxxx**](https://my.matterport.com/show/?m=xxxxxxxxxxx)
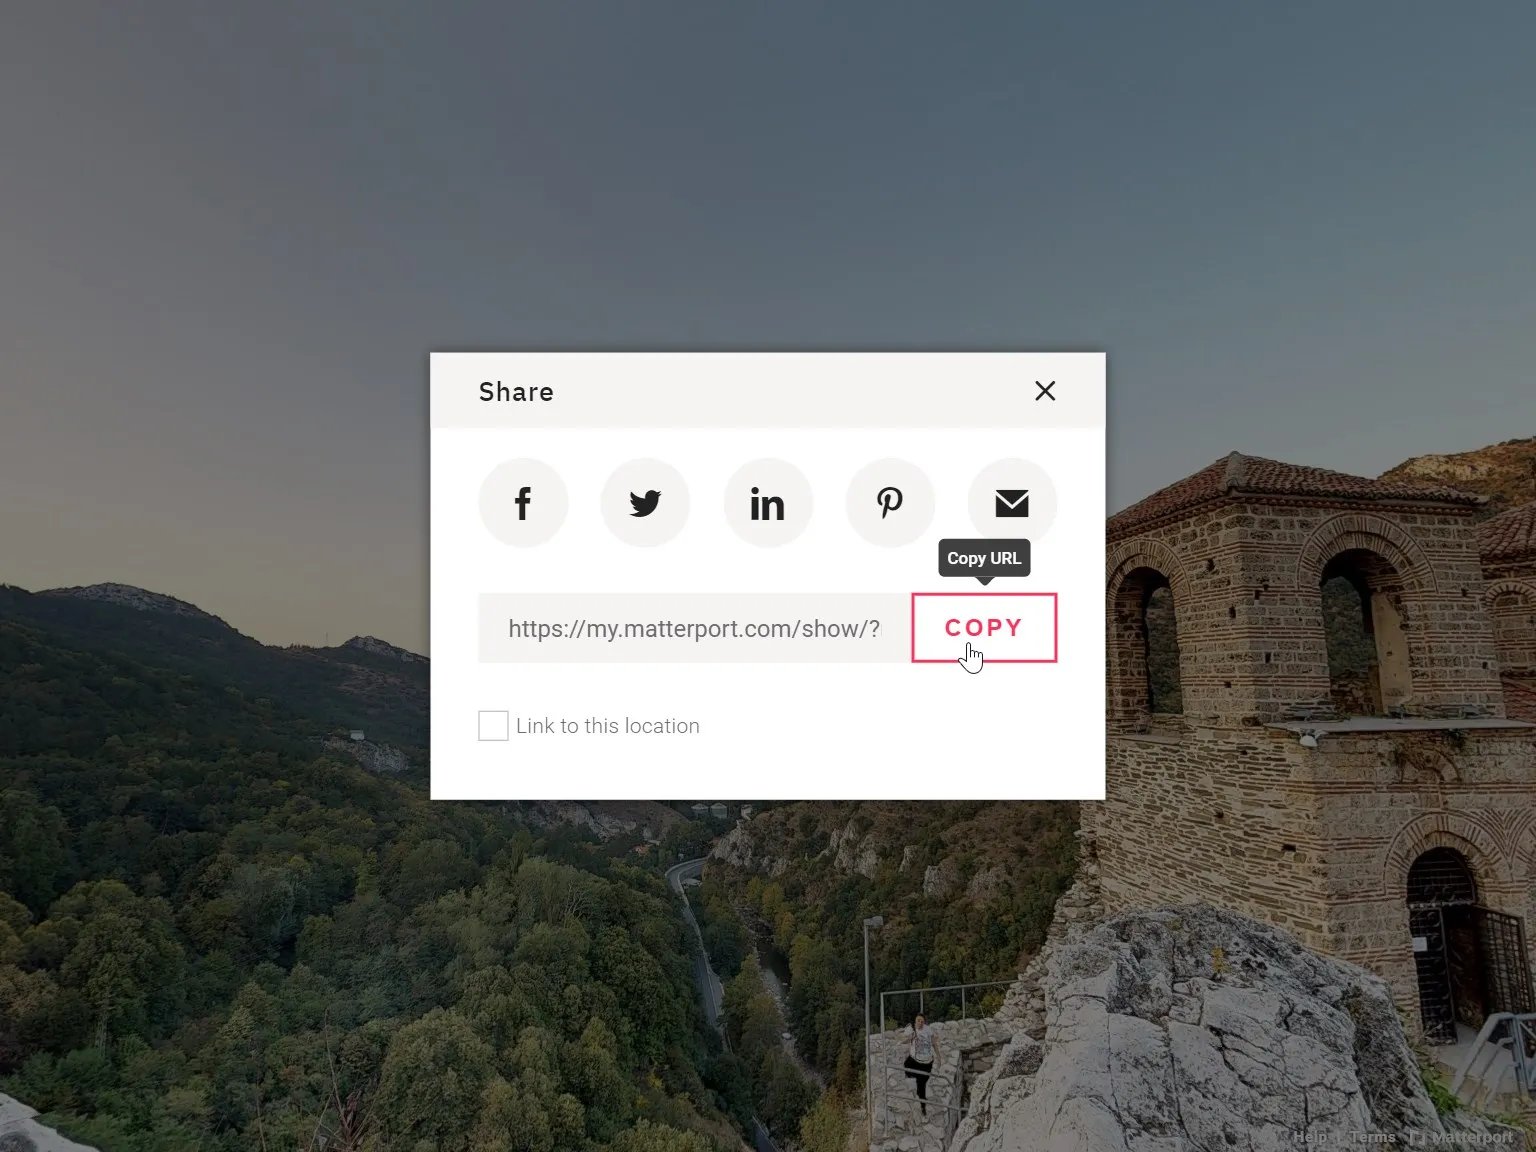
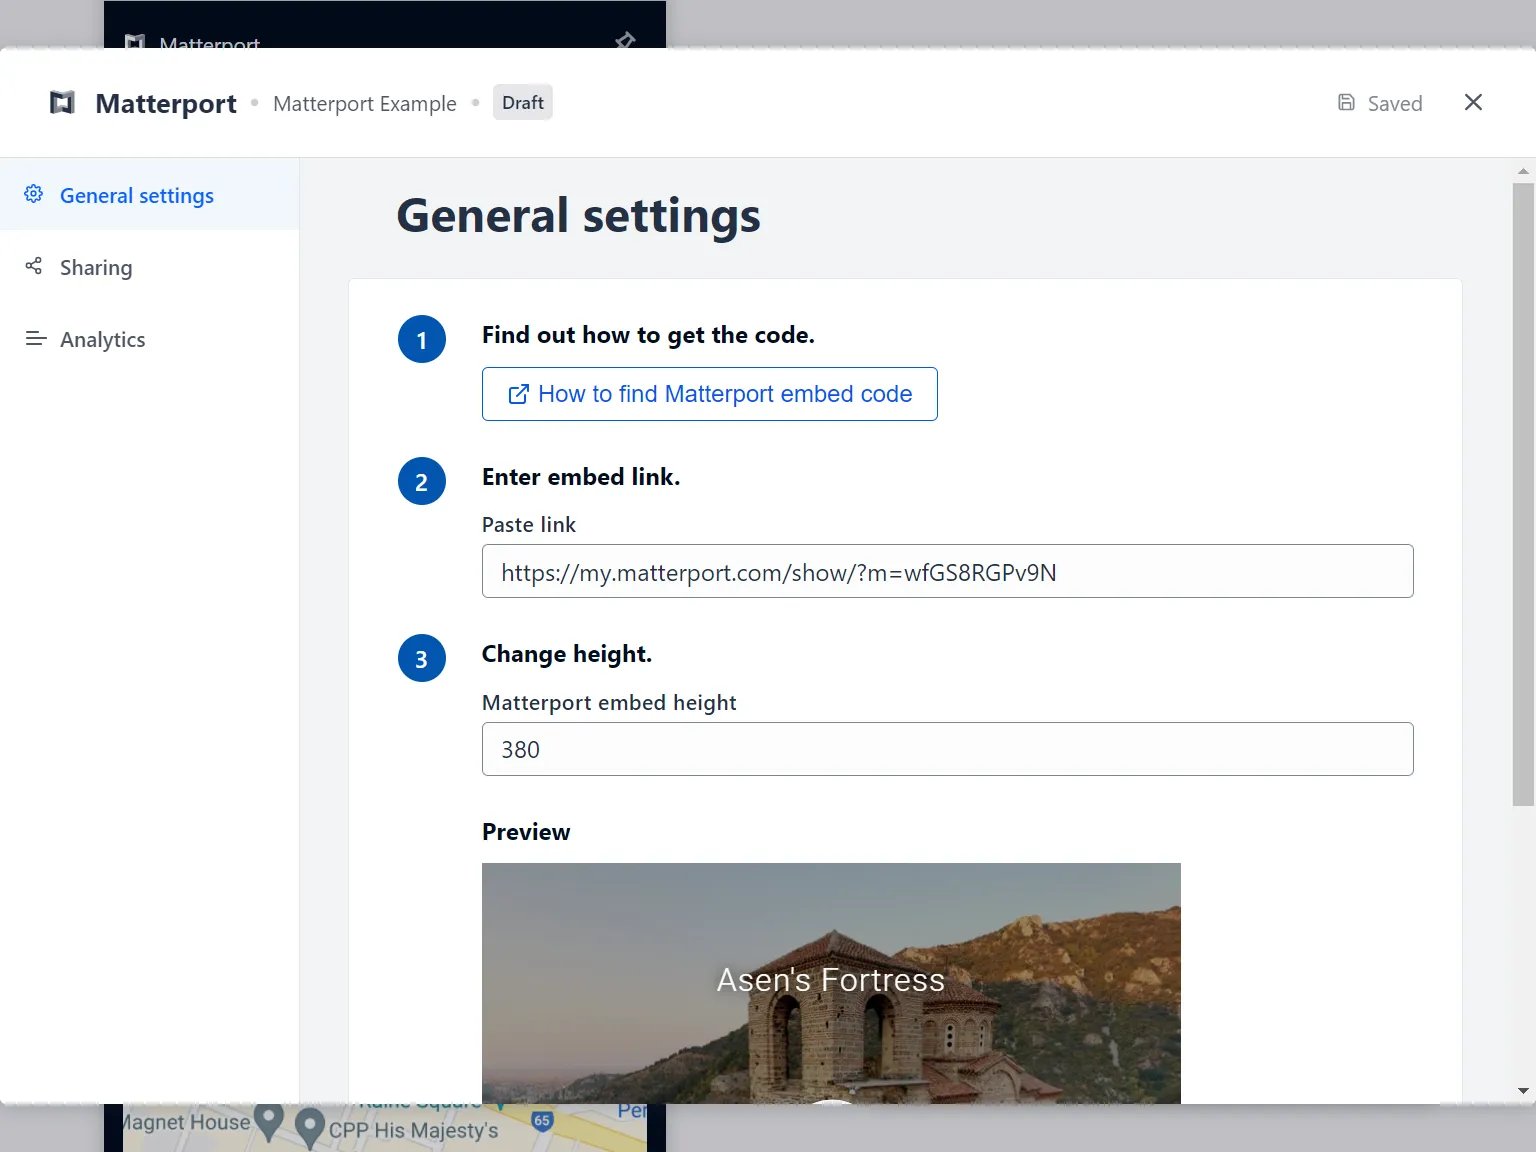 You may get a different sharing screen, depending on how you are viewing the Matterport space. In either case, you should be able to choose a "copy link to clipboard" option that will give you a link with the required format.
* **(2)** You can also adjust the **height** of the embedded card here. Keep in mind the different experiences between desktop and mobile as called out at the start of this article.
* **(3)** You can add an **author** tag by displaying the brand or person who's responsible for the card content.
* **(4)** Add a **description** to the card.
### Step 3: Publish your card
You may get a different sharing screen, depending on how you are viewing the Matterport space. In either case, you should be able to choose a "copy link to clipboard" option that will give you a link with the required format.
* **(2)** You can also adjust the **height** of the embedded card here. Keep in mind the different experiences between desktop and mobile as called out at the start of this article.
* **(3)** You can add an **author** tag by displaying the brand or person who's responsible for the card content.
* **(4)** Add a **description** to the card.
### Step 3: Publish your card
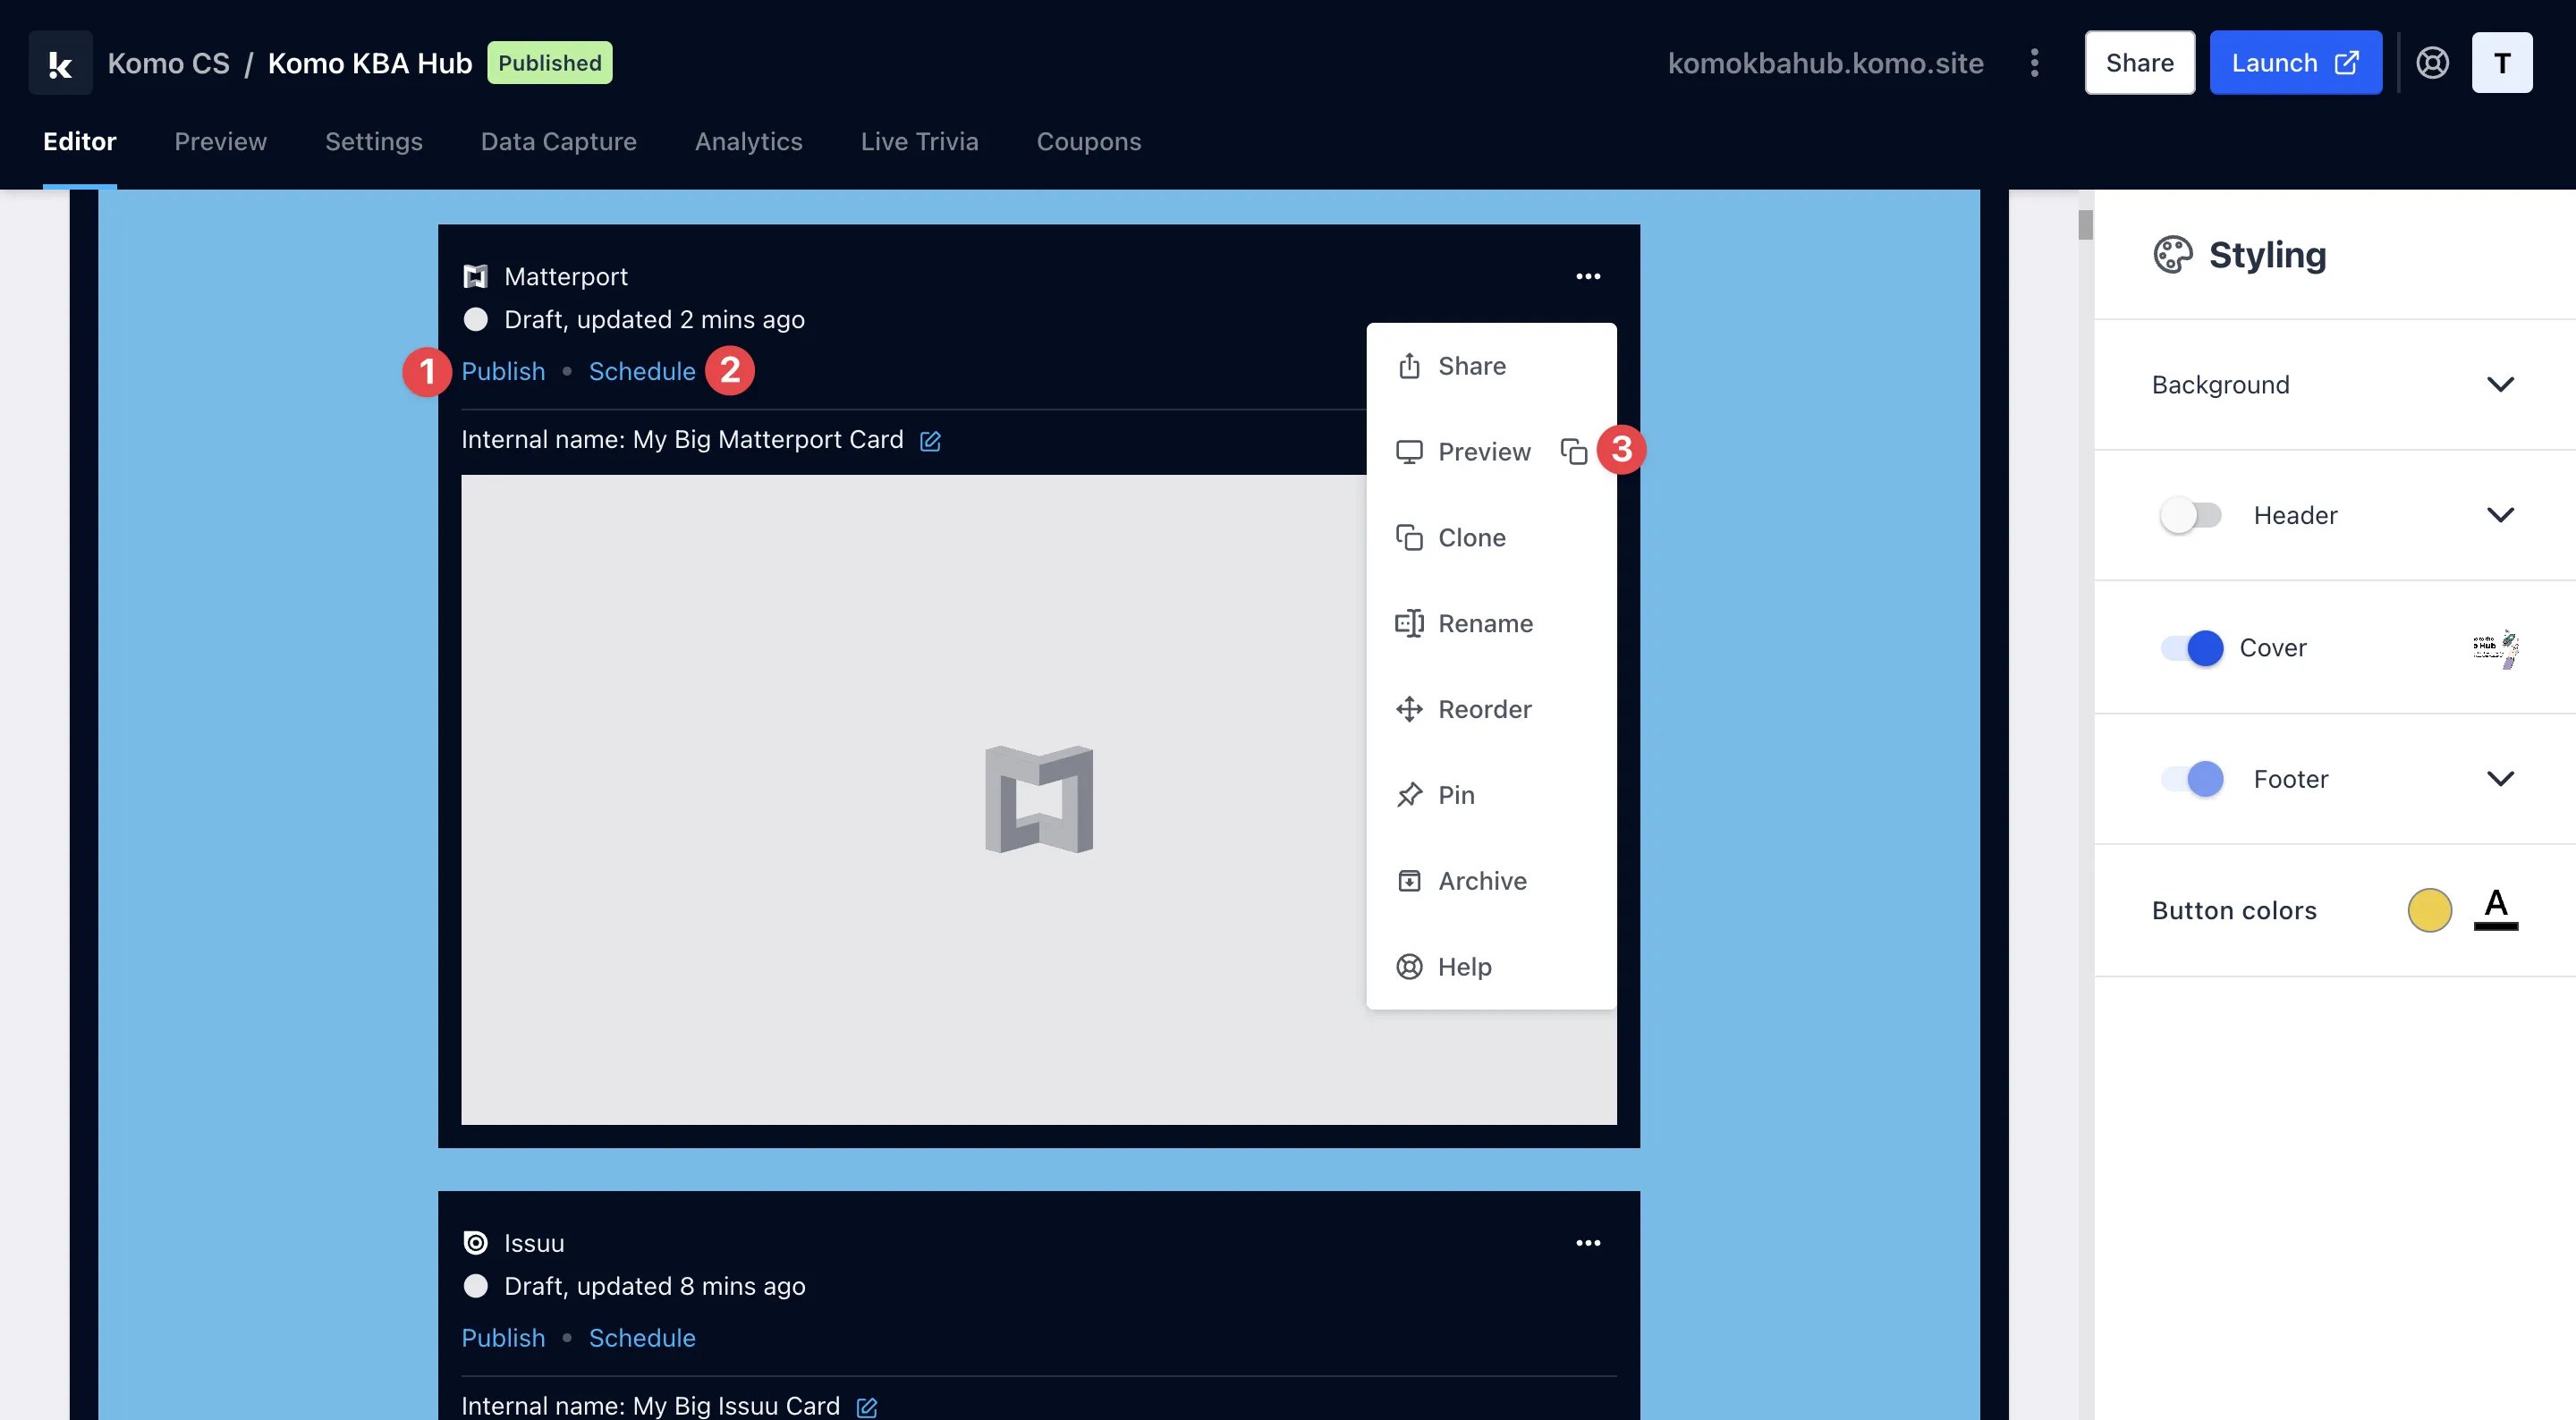 **Once you've completed all of these steps and are happy with all the aspects, it's time to get your card live!**
* **(1)** **Publish** your card manually and instantly for the world to see.
* **(2)** **Schedule** your card to be published and unpublished at set dates and times.
* **(3)** Click on **...** to **Preview** and interact with the card on the front end from a user's perspective before publishing it.
All competition entries will be recorded and will impact the card analytics.
**Once you've completed all of these steps and are happy with all the aspects, it's time to get your card live!**
* **(1)** **Publish** your card manually and instantly for the world to see.
* **(2)** **Schedule** your card to be published and unpublished at set dates and times.
* **(3)** Click on **...** to **Preview** and interact with the card on the front end from a user's perspective before publishing it.
All competition entries will be recorded and will impact the card analytics.