> ## Documentation Index
> Fetch the complete documentation index at: https://knowledge.komo.tech/llms.txt
> Use this file to discover all available pages before exploring further.
# Contact Properties
## What is it?
A Contact Property is a persistent value that lives on the Contact. An example is their email, their name, their date of birth, or even anything custom—say their favorite flavor of Coke.
## How do I use it?
* [Step 1: Navigate to the Properties](#step-1-navigate-to-the-properties)
* [Step 2: Create a Property](#step-2-create-a-property)
* [Step 3: Add the Property to your Card](#step-3-add-the-property-to-your-card)
* [Step 4: View the Property on Contacts](#step-4-view-the-property-on-contacts)
### Step 1: Navigate to the Properties
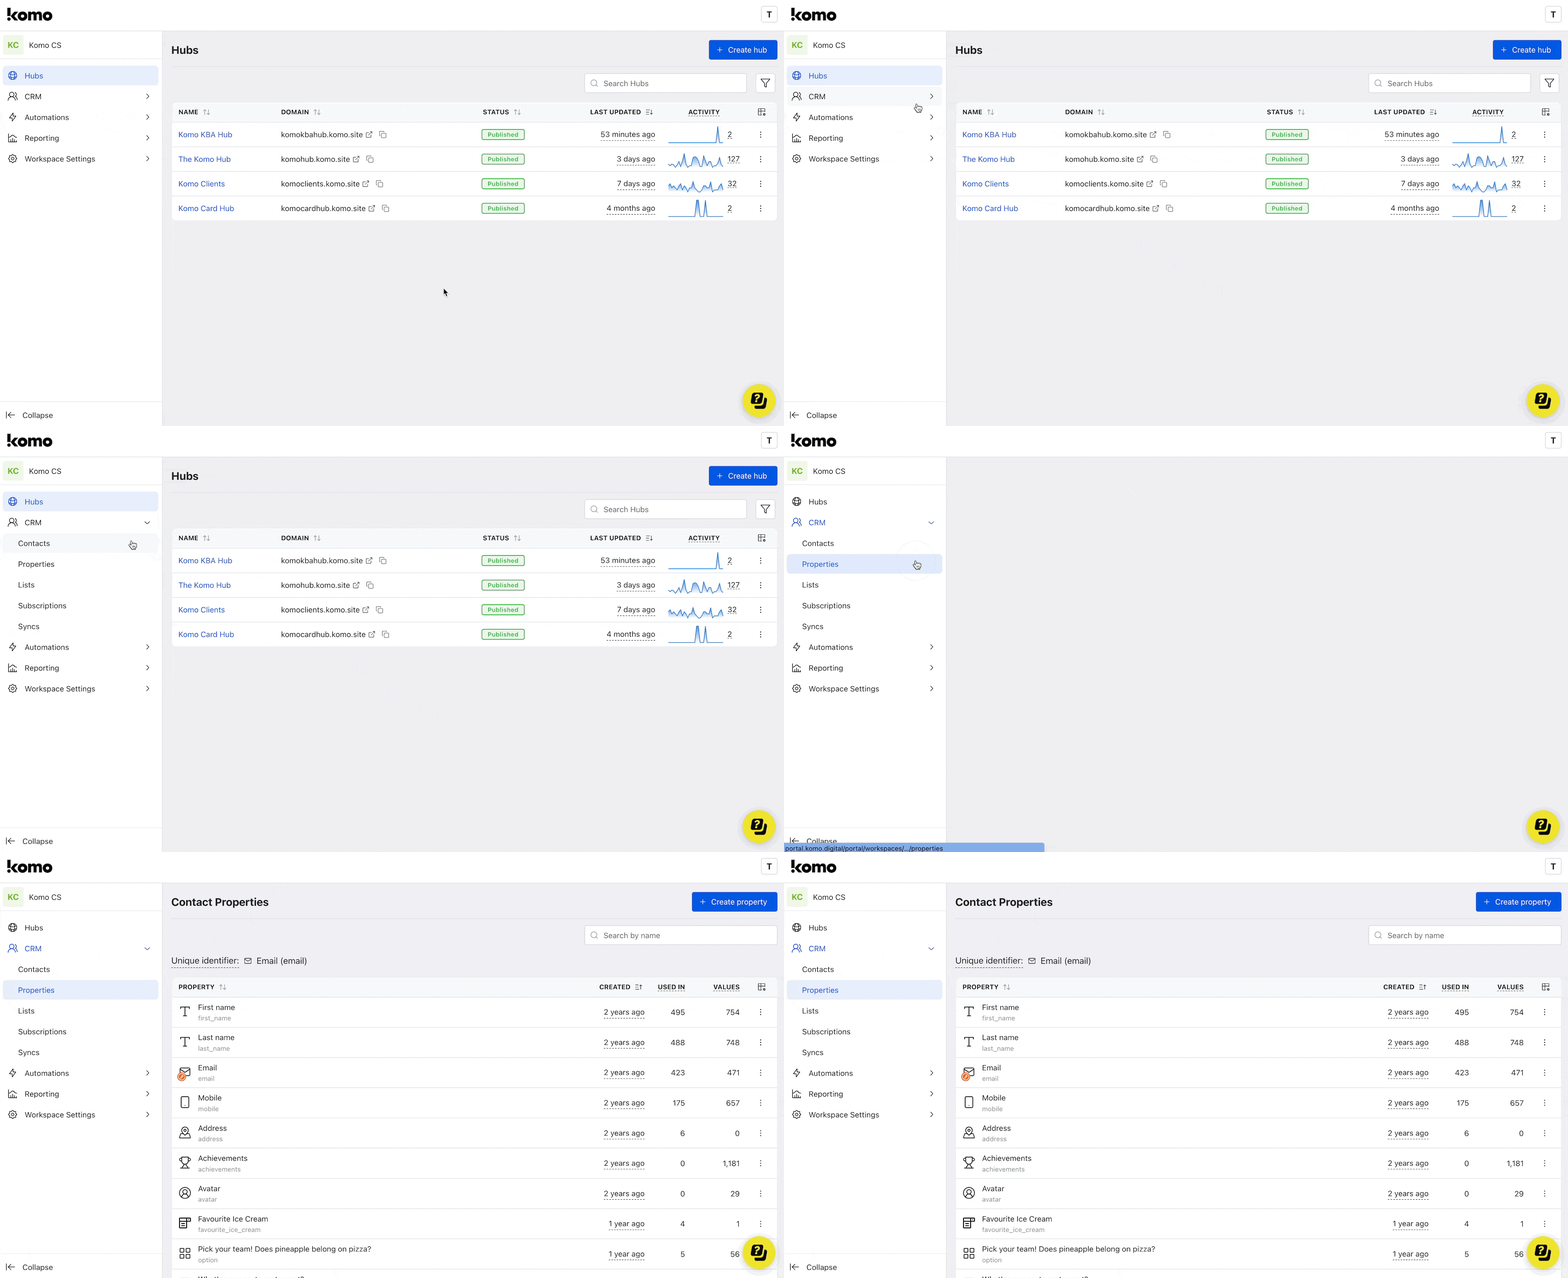 * Click on **CRM** on the left side-bar.
* Head to the **Properties** tab to create your contact properties.
### Step 2: Create a Property
* Click on **CRM** on the left side-bar.
* Head to the **Properties** tab to create your contact properties.
### Step 2: Create a Property
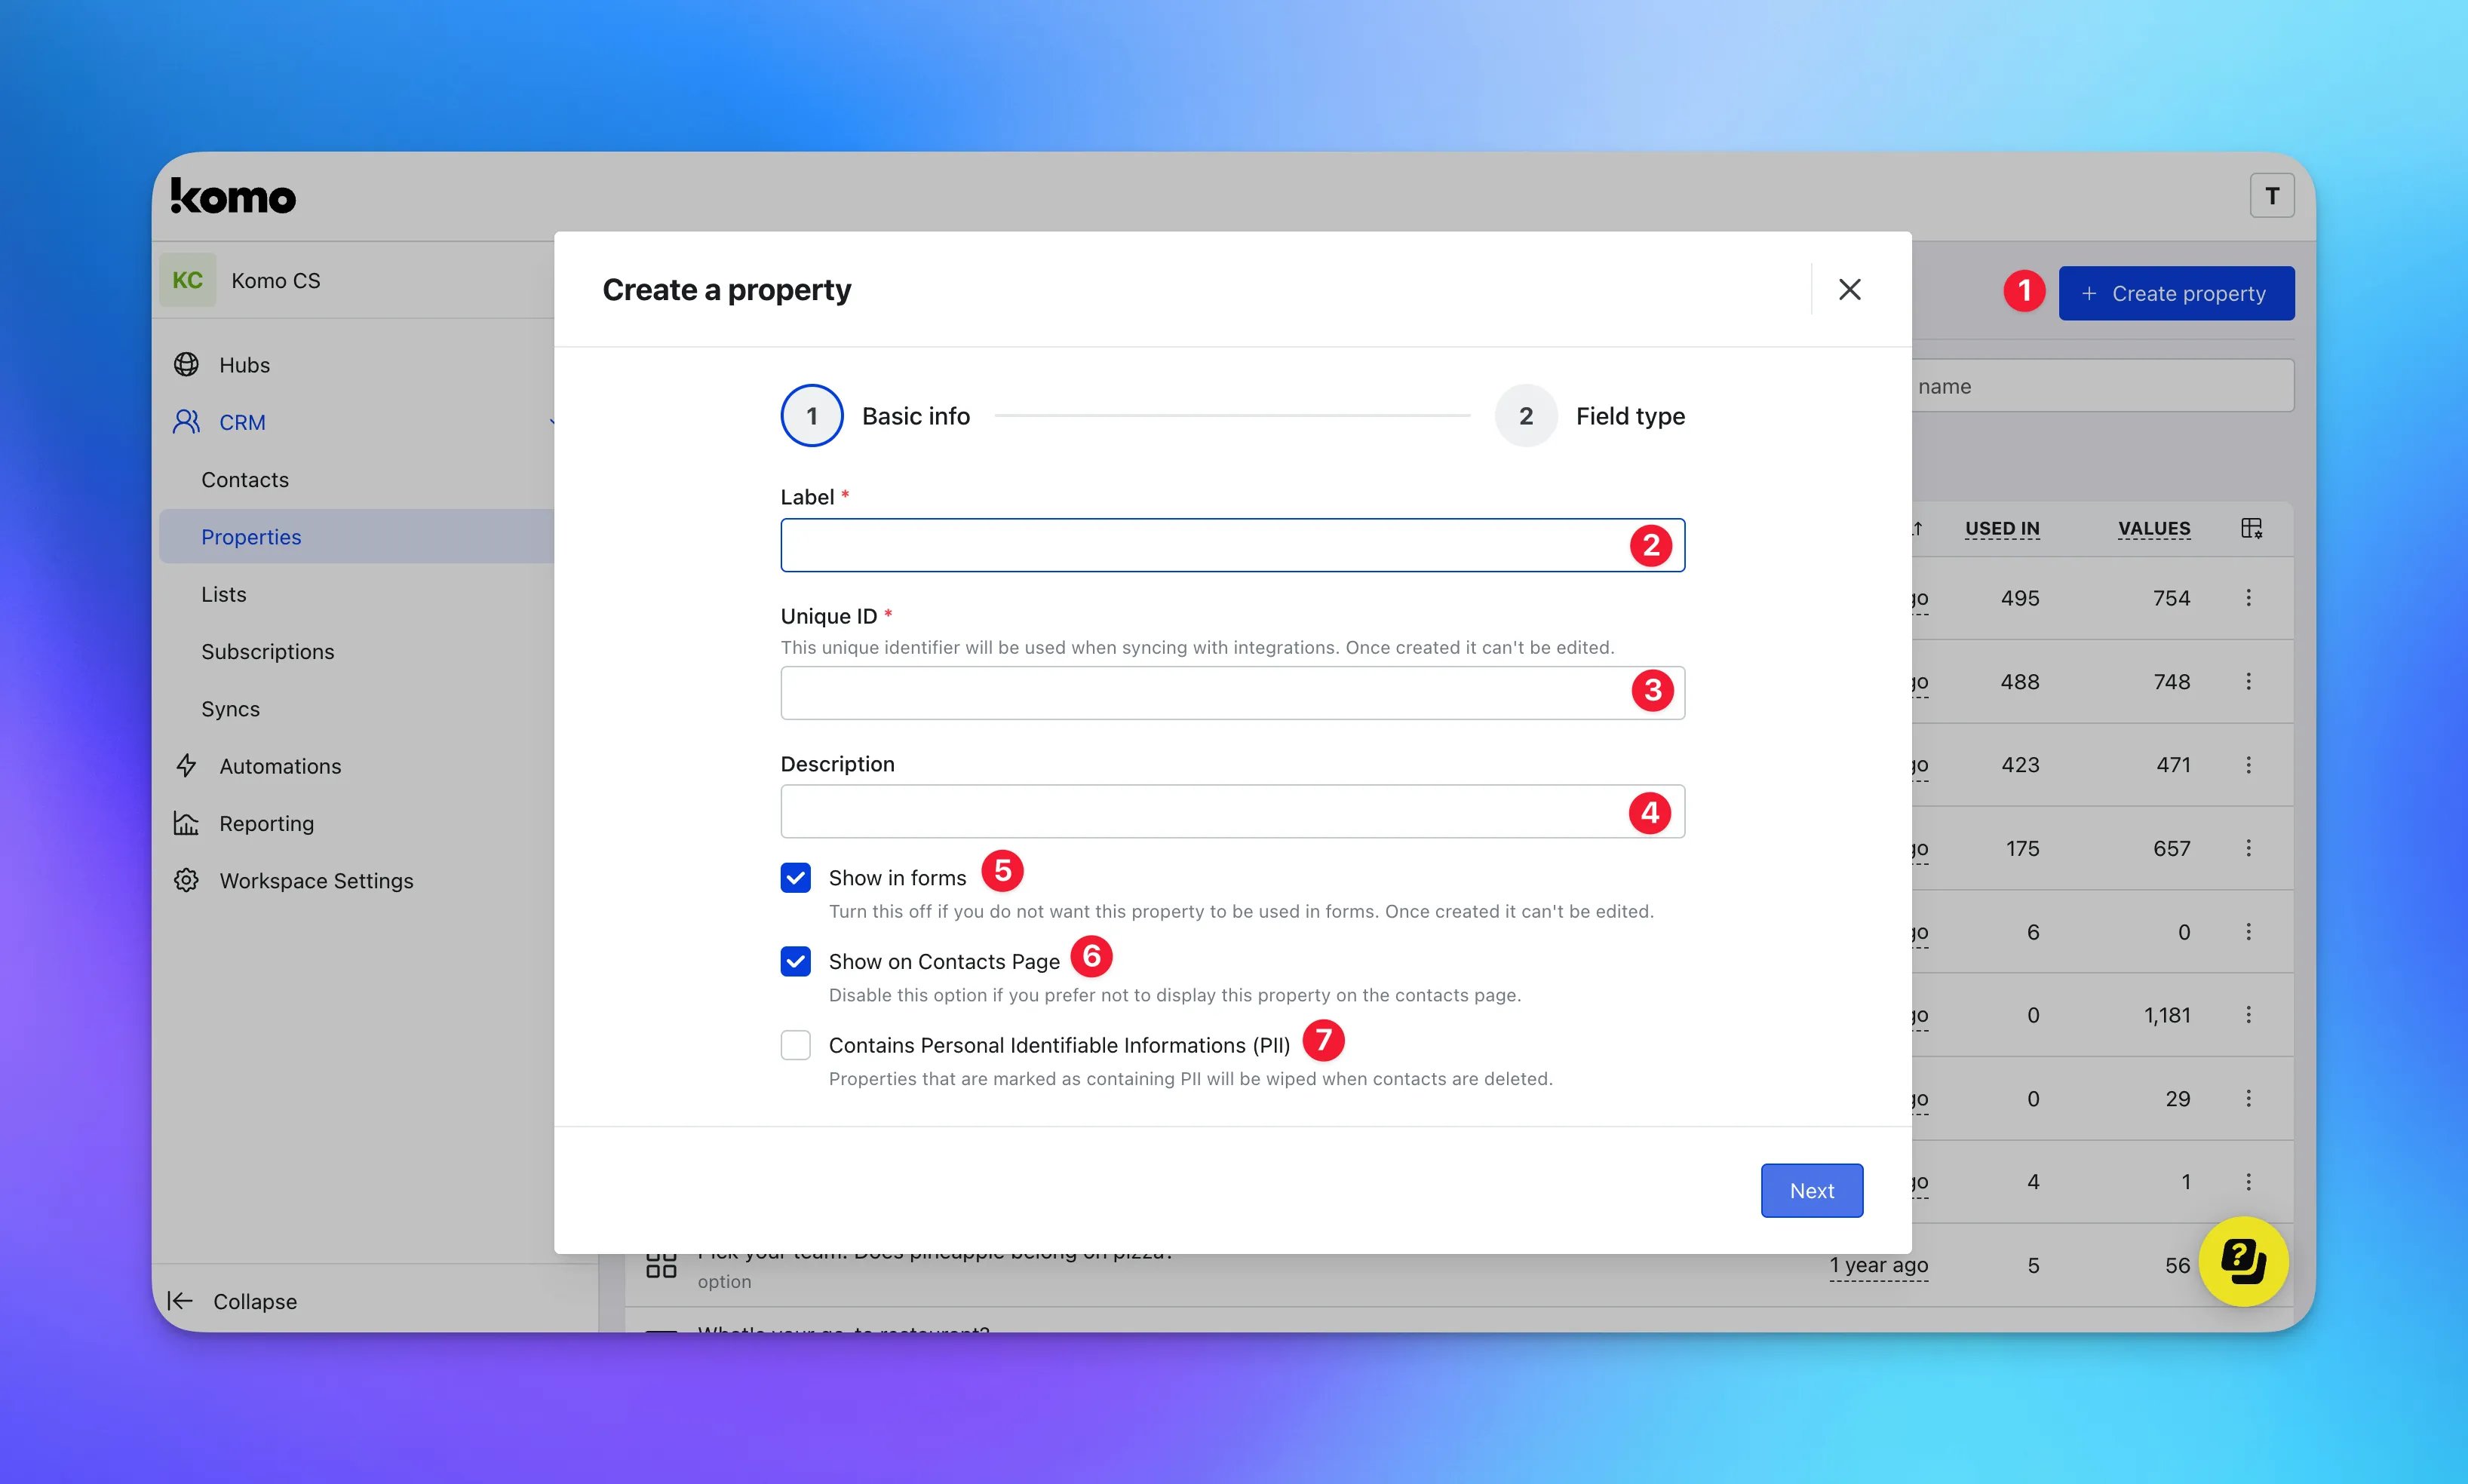 * **(1)** Click on **Create property**.
* **(2)** Give your new Contact Property a **Label**. This will be the label that appears on any forms with this property, as well as the label of this property on your Contacts table.
* **(3)** Give the Contact Property a **unique identifier.**
This cannot be edited after this step.
* **(4)** Give your Contact Property an **internal description**.
* **(5)** Choose if you would like this property to be available to add to your **Data Capture forms.**
* **(6)** You have the option to **not display** this property on a contact profile
* **(7)** Enabling the property as **PII** means all information collected from this property will be removed when a contact is deleted.
* **(1)** Click on **Create property**.
* **(2)** Give your new Contact Property a **Label**. This will be the label that appears on any forms with this property, as well as the label of this property on your Contacts table.
* **(3)** Give the Contact Property a **unique identifier.**
This cannot be edited after this step.
* **(4)** Give your Contact Property an **internal description**.
* **(5)** Choose if you would like this property to be available to add to your **Data Capture forms.**
* **(6)** You have the option to **not display** this property on a contact profile
* **(7)** Enabling the property as **PII** means all information collected from this property will be removed when a contact is deleted.
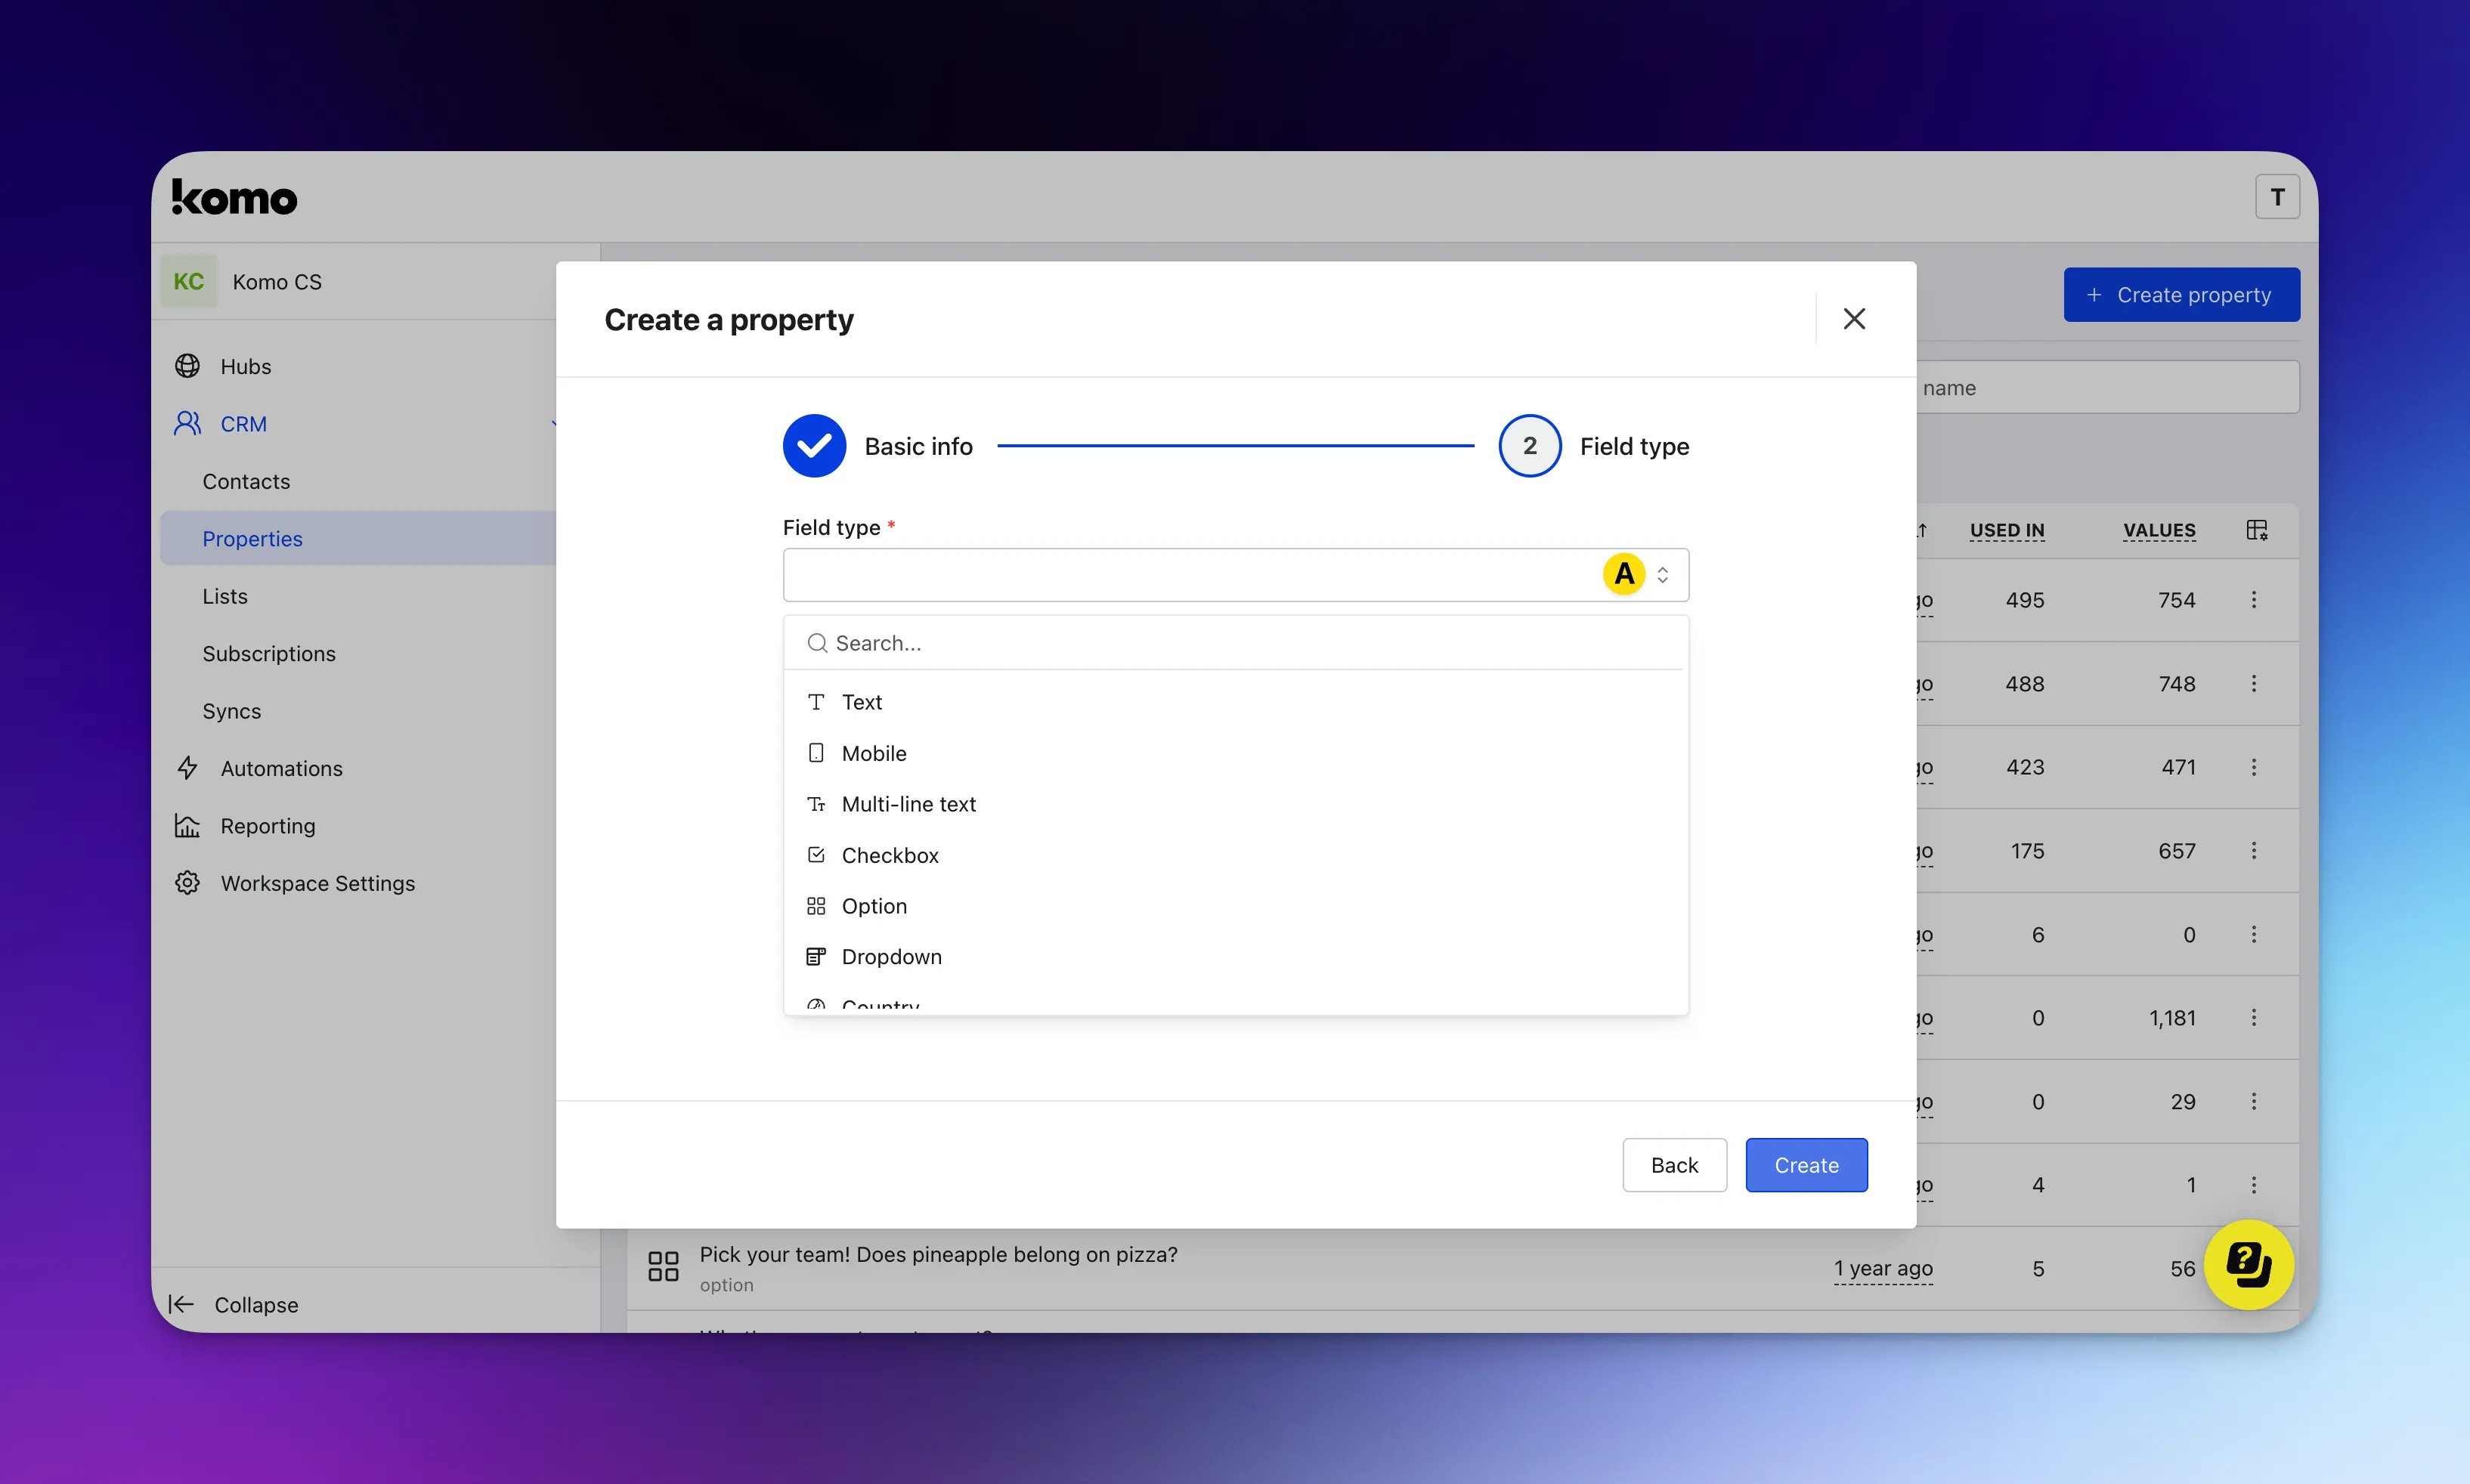 * **(A)** Select your **field type** from the dropdown menu. This can be text input, option, dropdown, country, number, date, birthday, etc., then click **Create**.
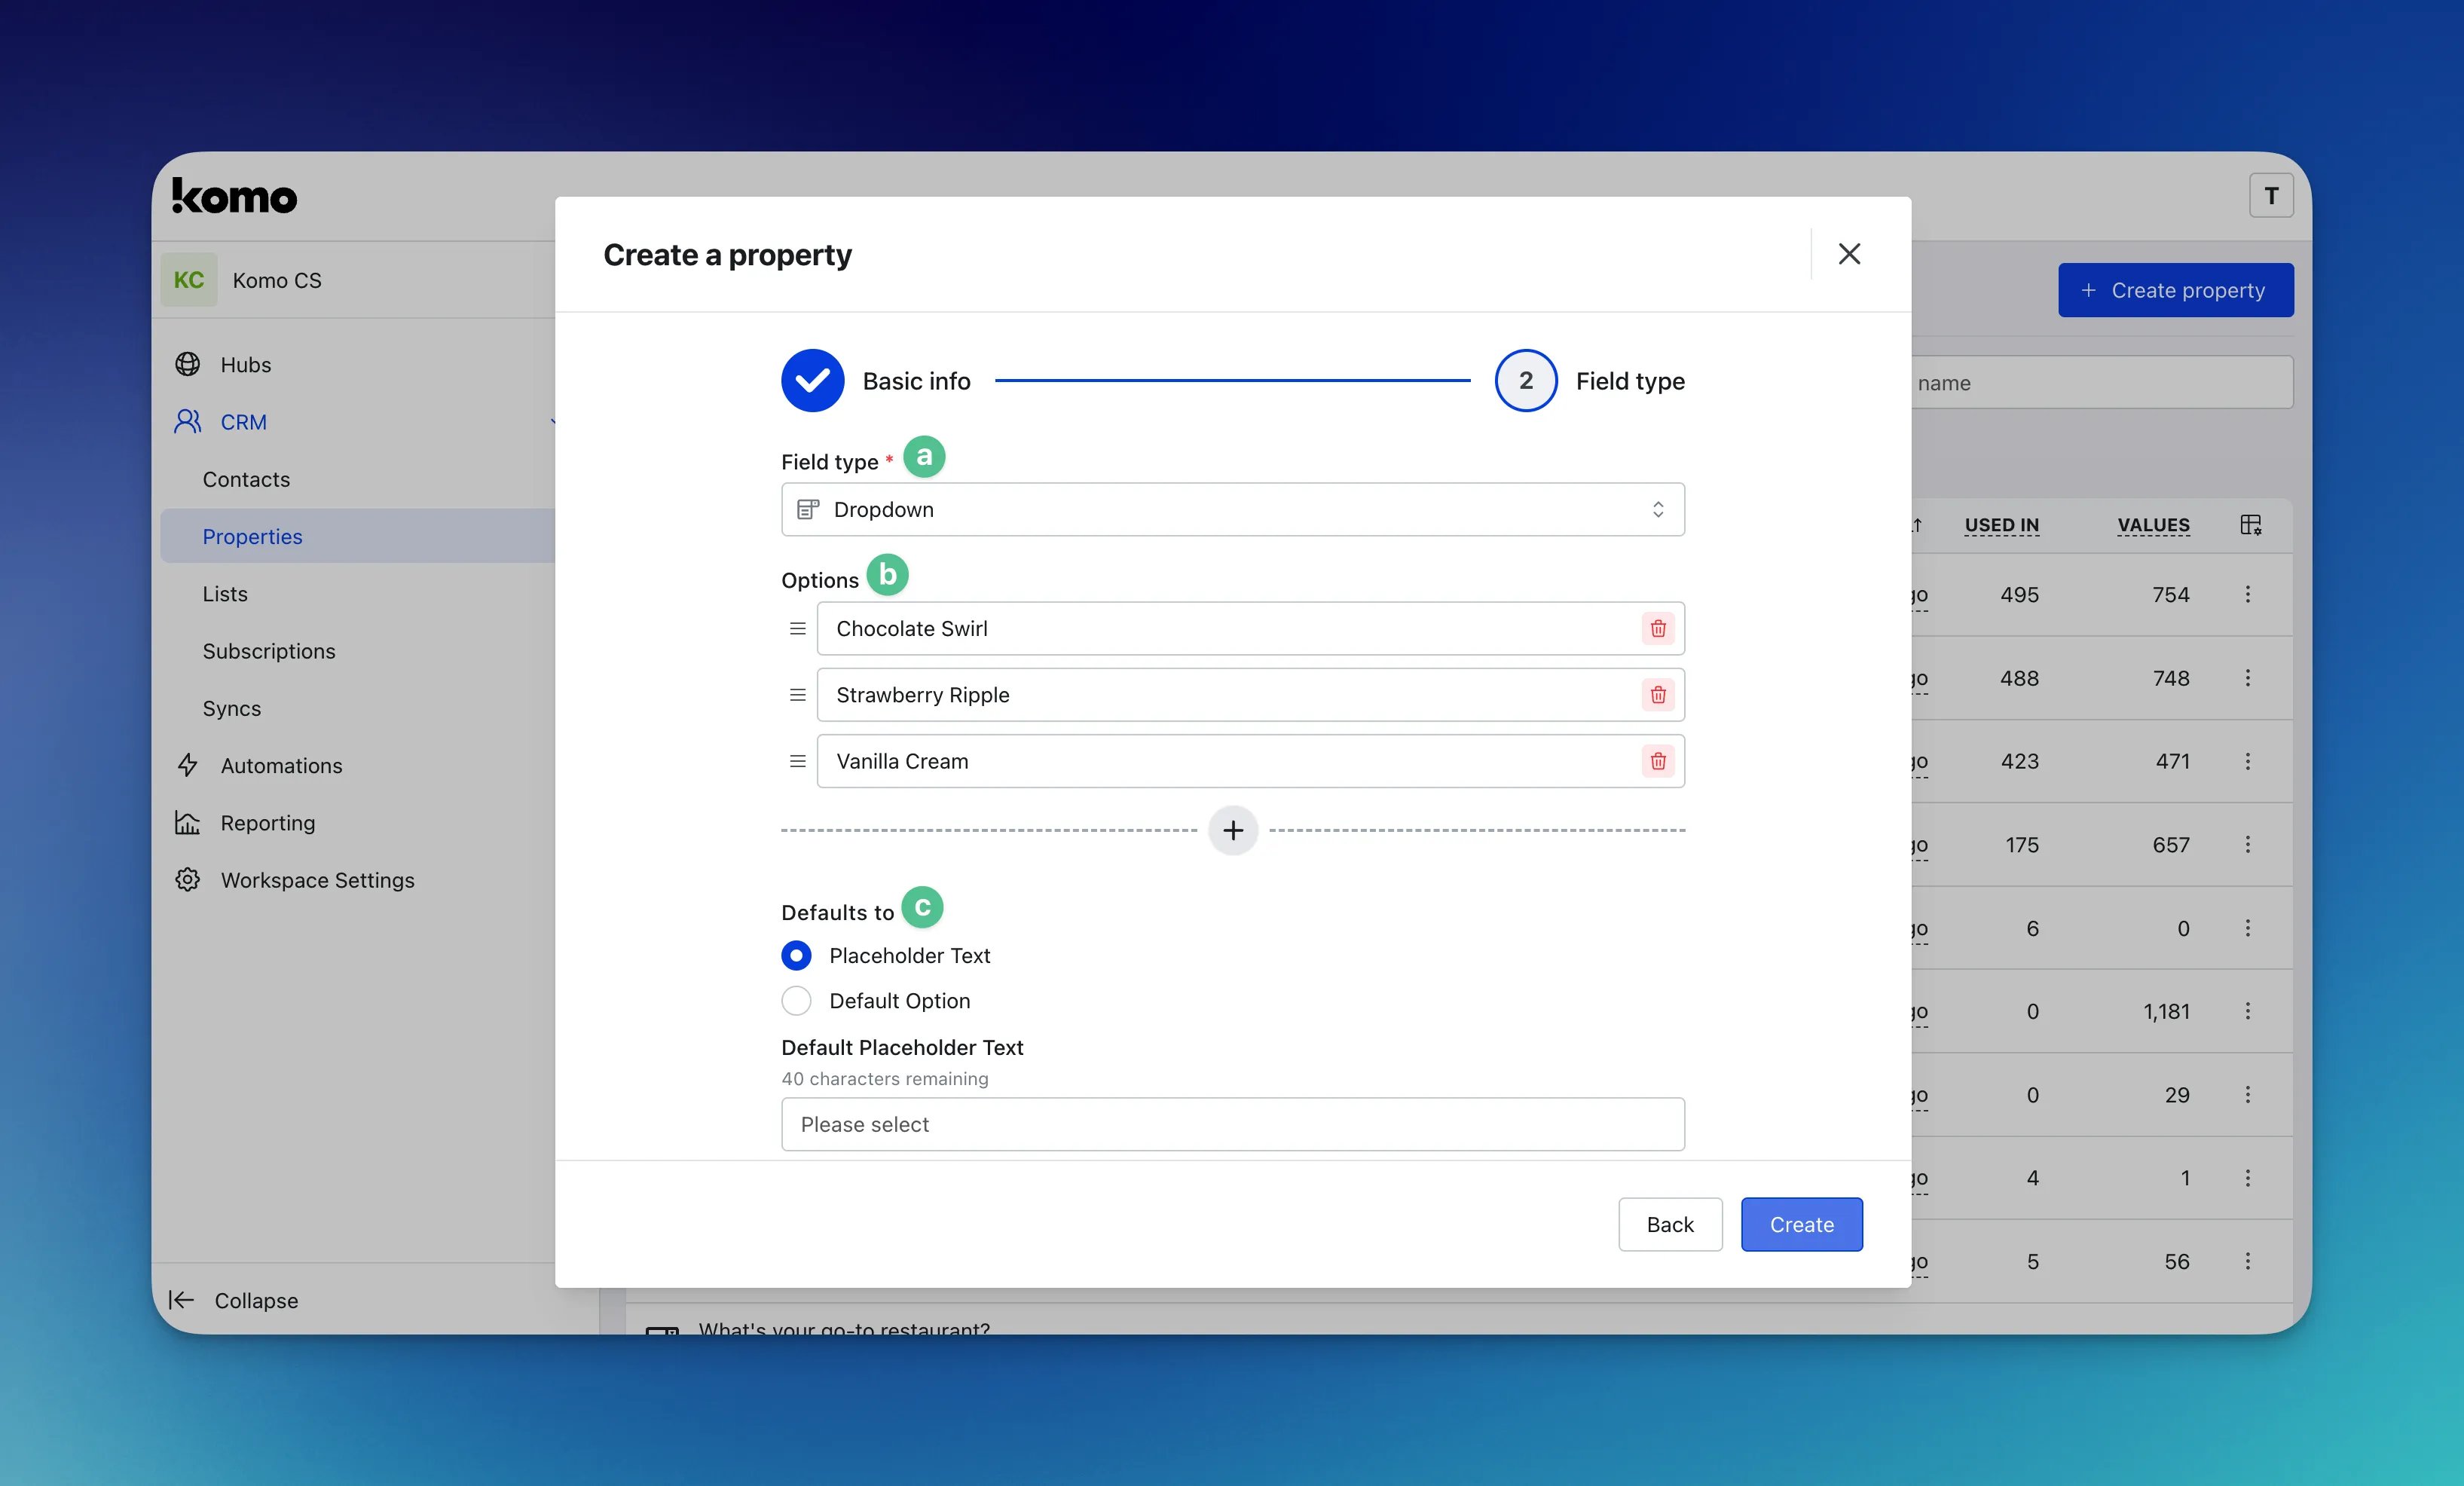 * **(A)** You can update the **field type** here.
* **(B)** Depending on your selection, fill in the relevant **details** if applicable.
* **(C)** Choose your **default option** - This is either the default placeholder text or a default option based on your field type.
### Step 3: Add the Property to your Card
* **(A)** You can update the **field type** here.
* **(B)** Depending on your selection, fill in the relevant **details** if applicable.
* **(C)** Choose your **default option** - This is either the default placeholder text or a default option based on your field type.
### Step 3: Add the Property to your Card
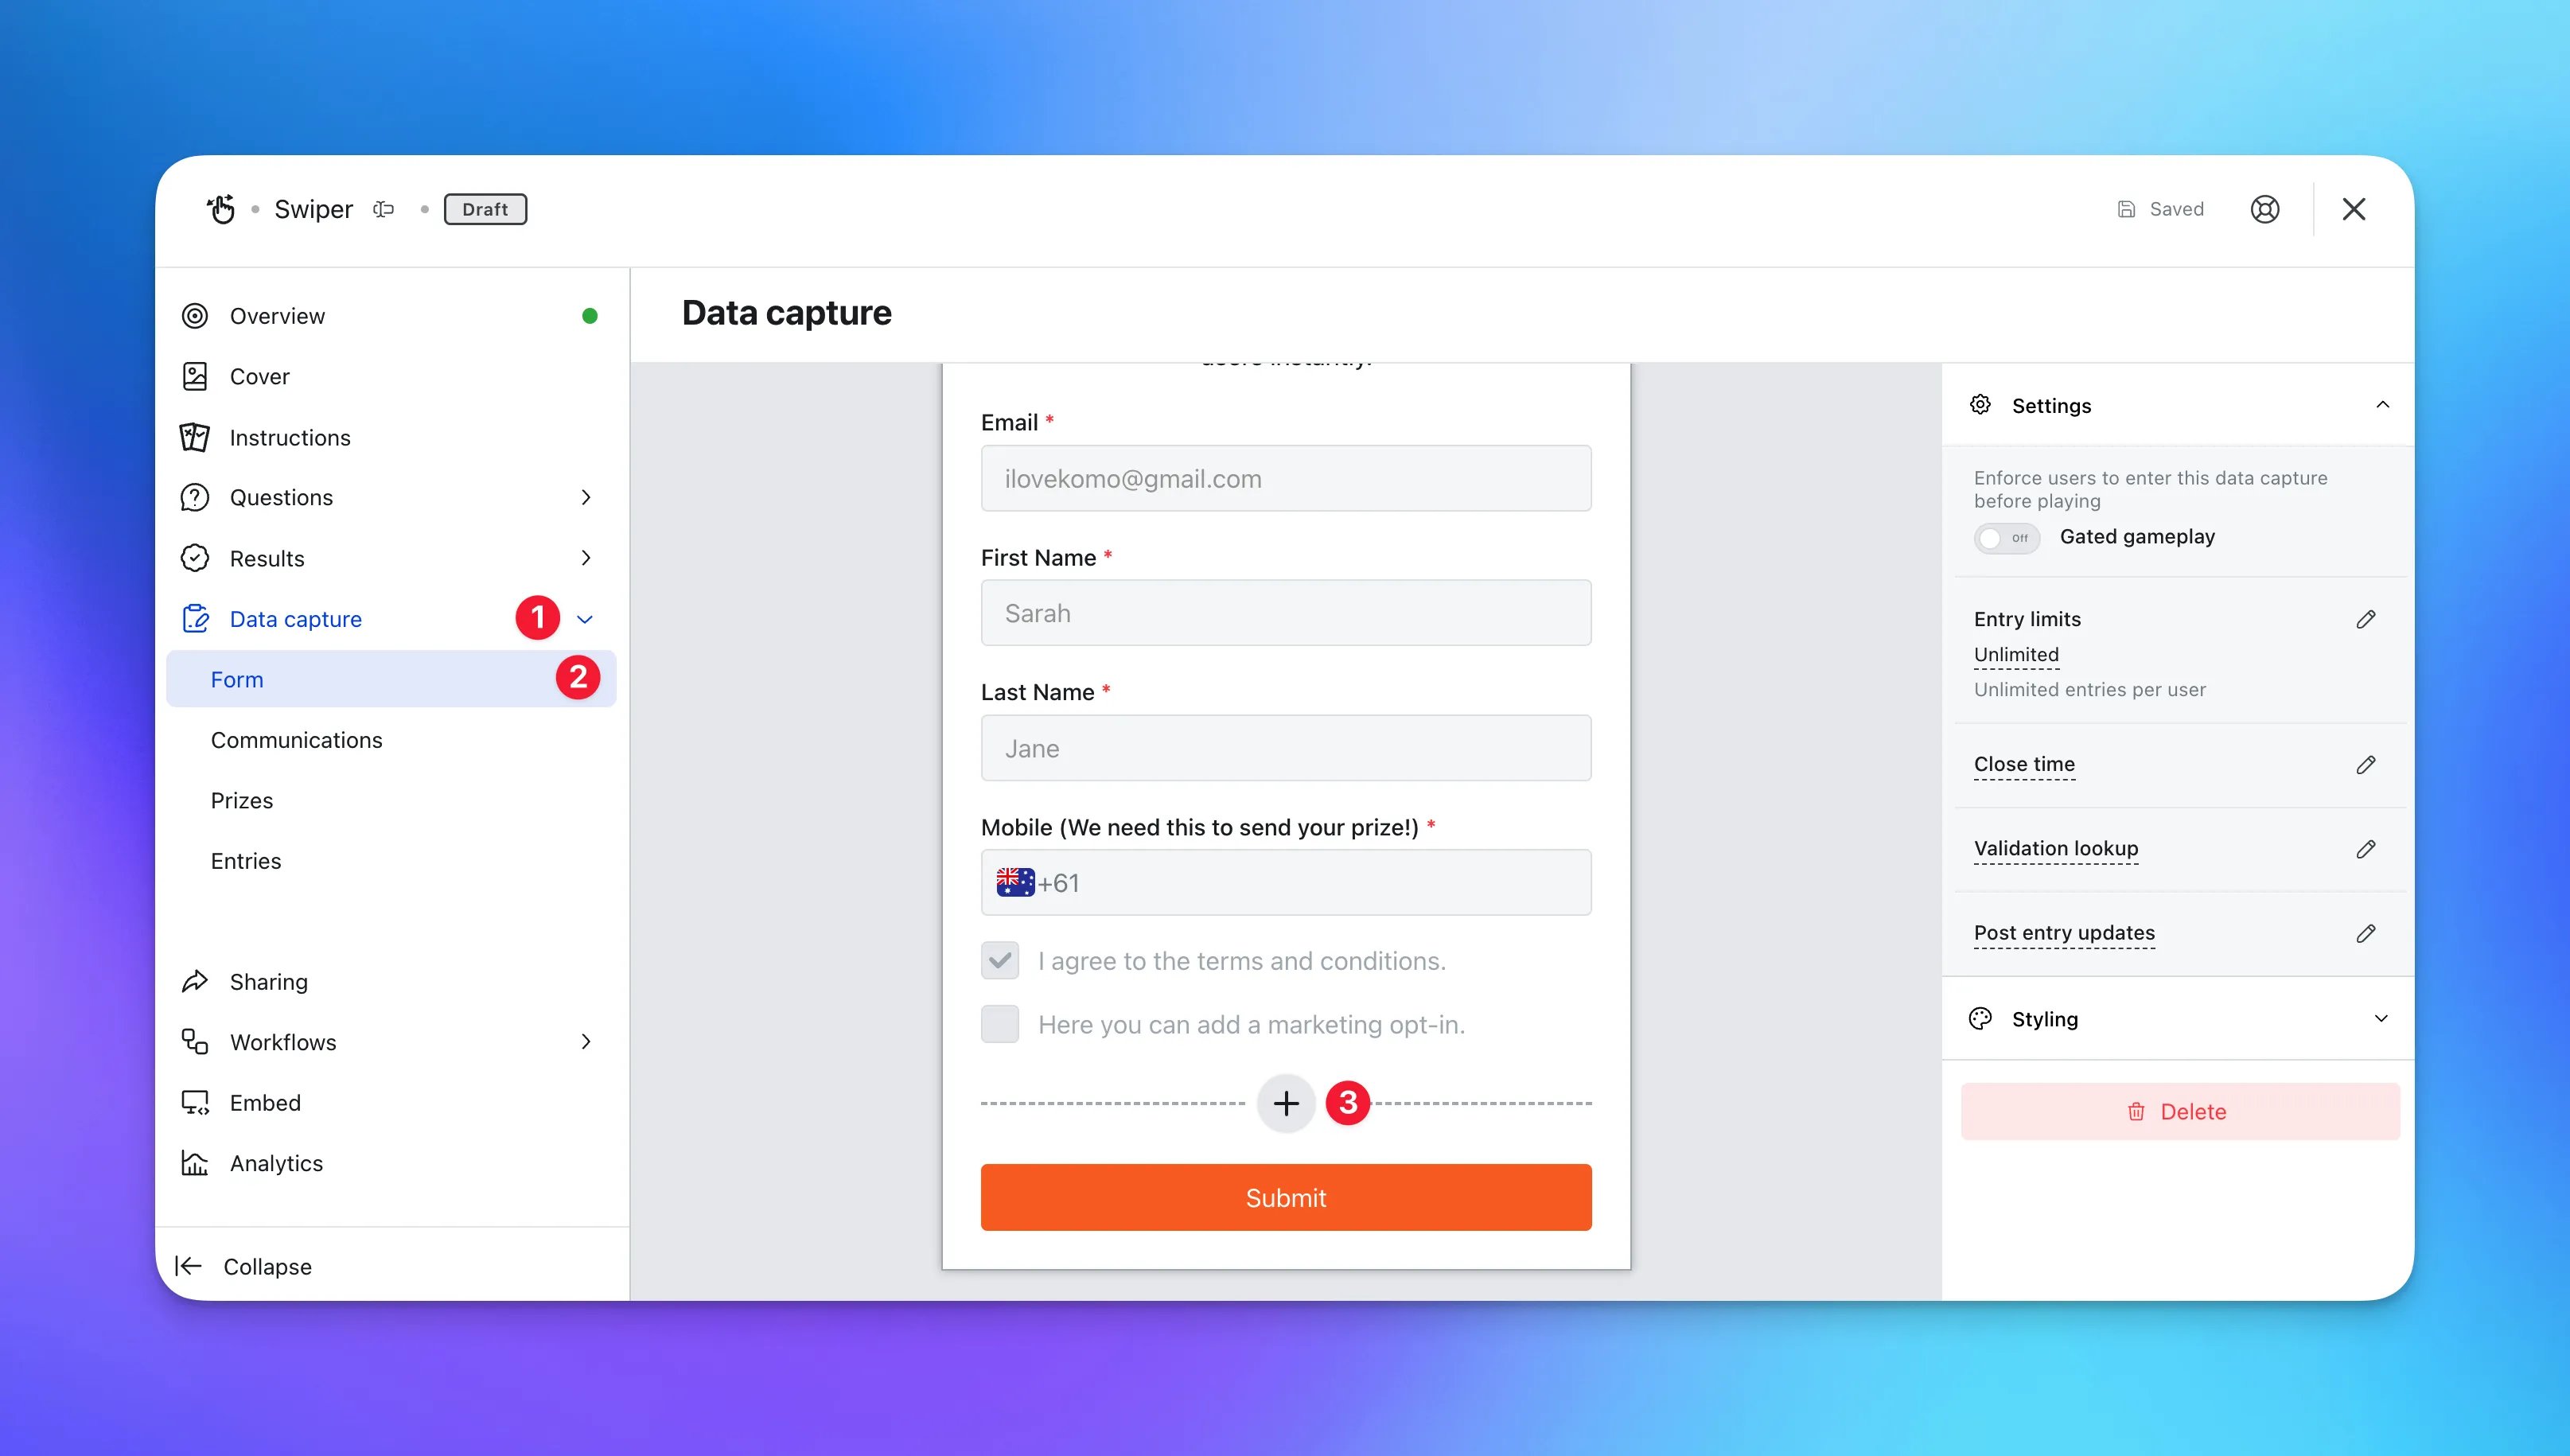 * Navigate to your **Engagement Hub.**
* Go to the card you want to apply the property to.
* **(1)** Click on **Data capture.**
* **(2)** Then go to **Form.**
Follow the steps in [this article](/competitions-promotions/setup-management/prizes-and-comms) to learn how to set up Data Capture.
* **(3)** Add the property by clicking on the **plus icon** on the form.
* Navigate to your **Engagement Hub.**
* Go to the card you want to apply the property to.
* **(1)** Click on **Data capture.**
* **(2)** Then go to **Form.**
Follow the steps in [this article](/competitions-promotions/setup-management/prizes-and-comms) to learn how to set up Data Capture.
* **(3)** Add the property by clicking on the **plus icon** on the form.
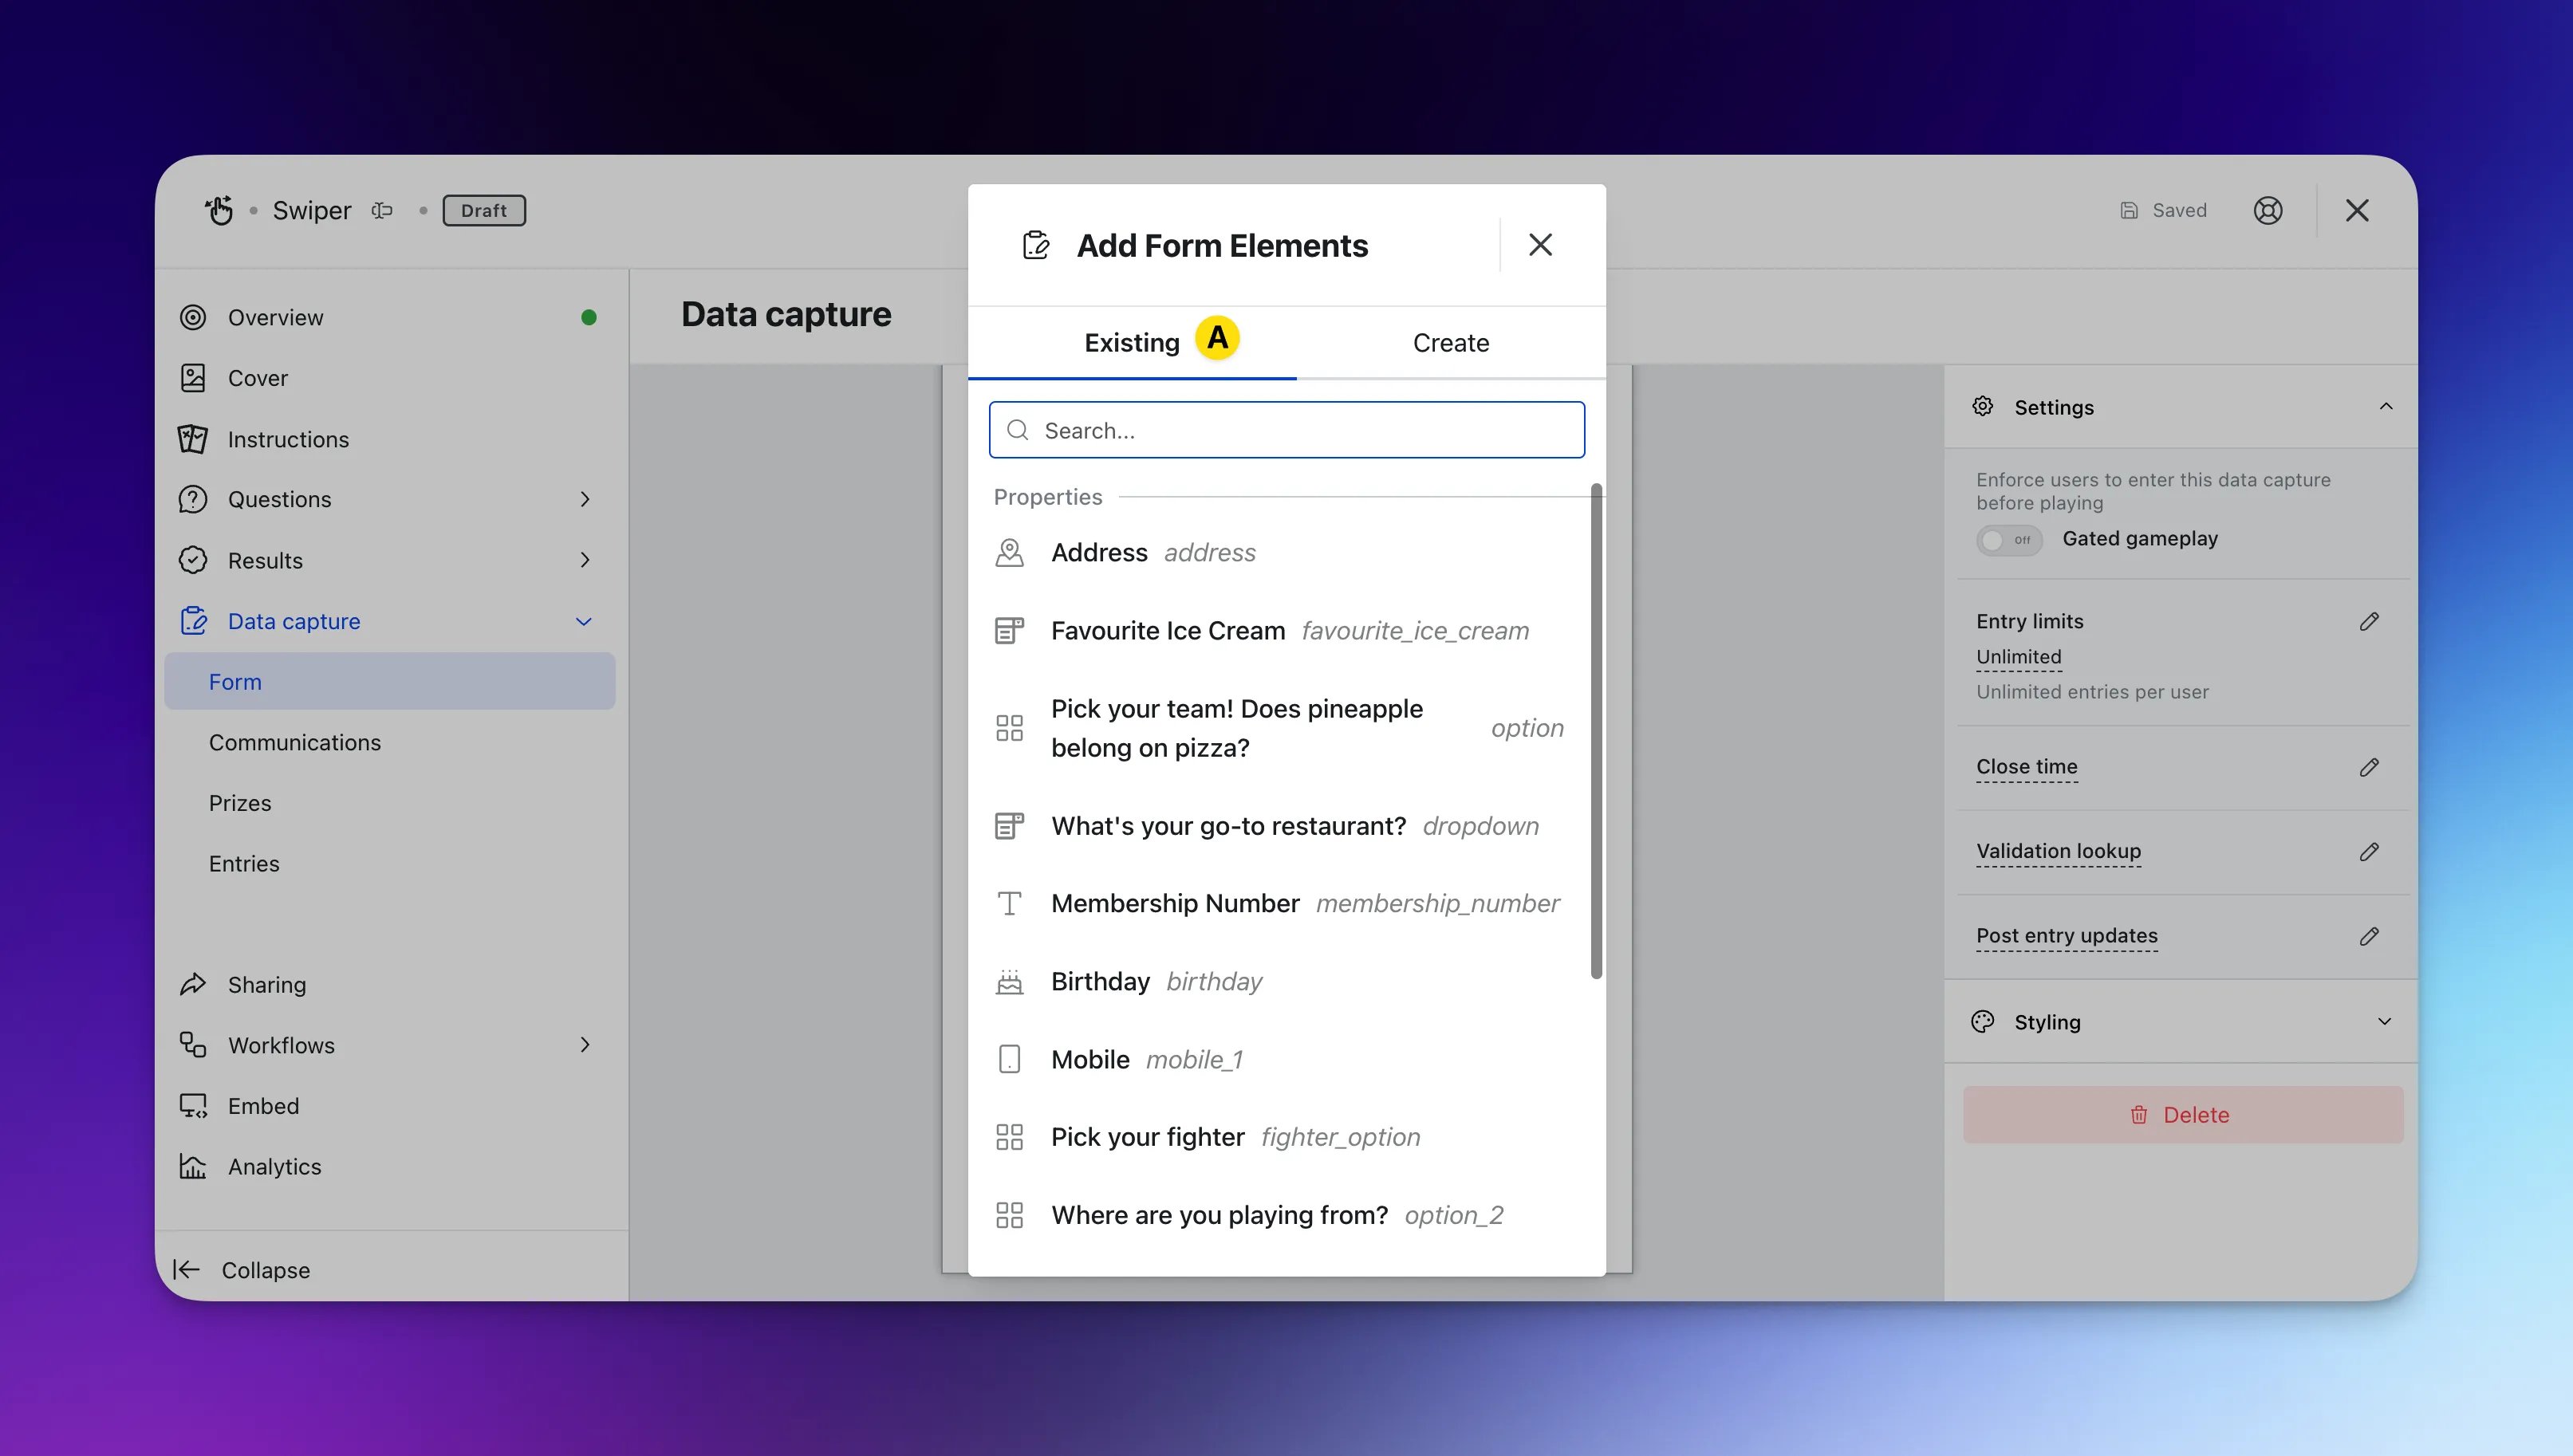 * **(A)** Here you will find the Contact Property you created in [Step 2](#step-2-create-a-property). Click on any property to continue.
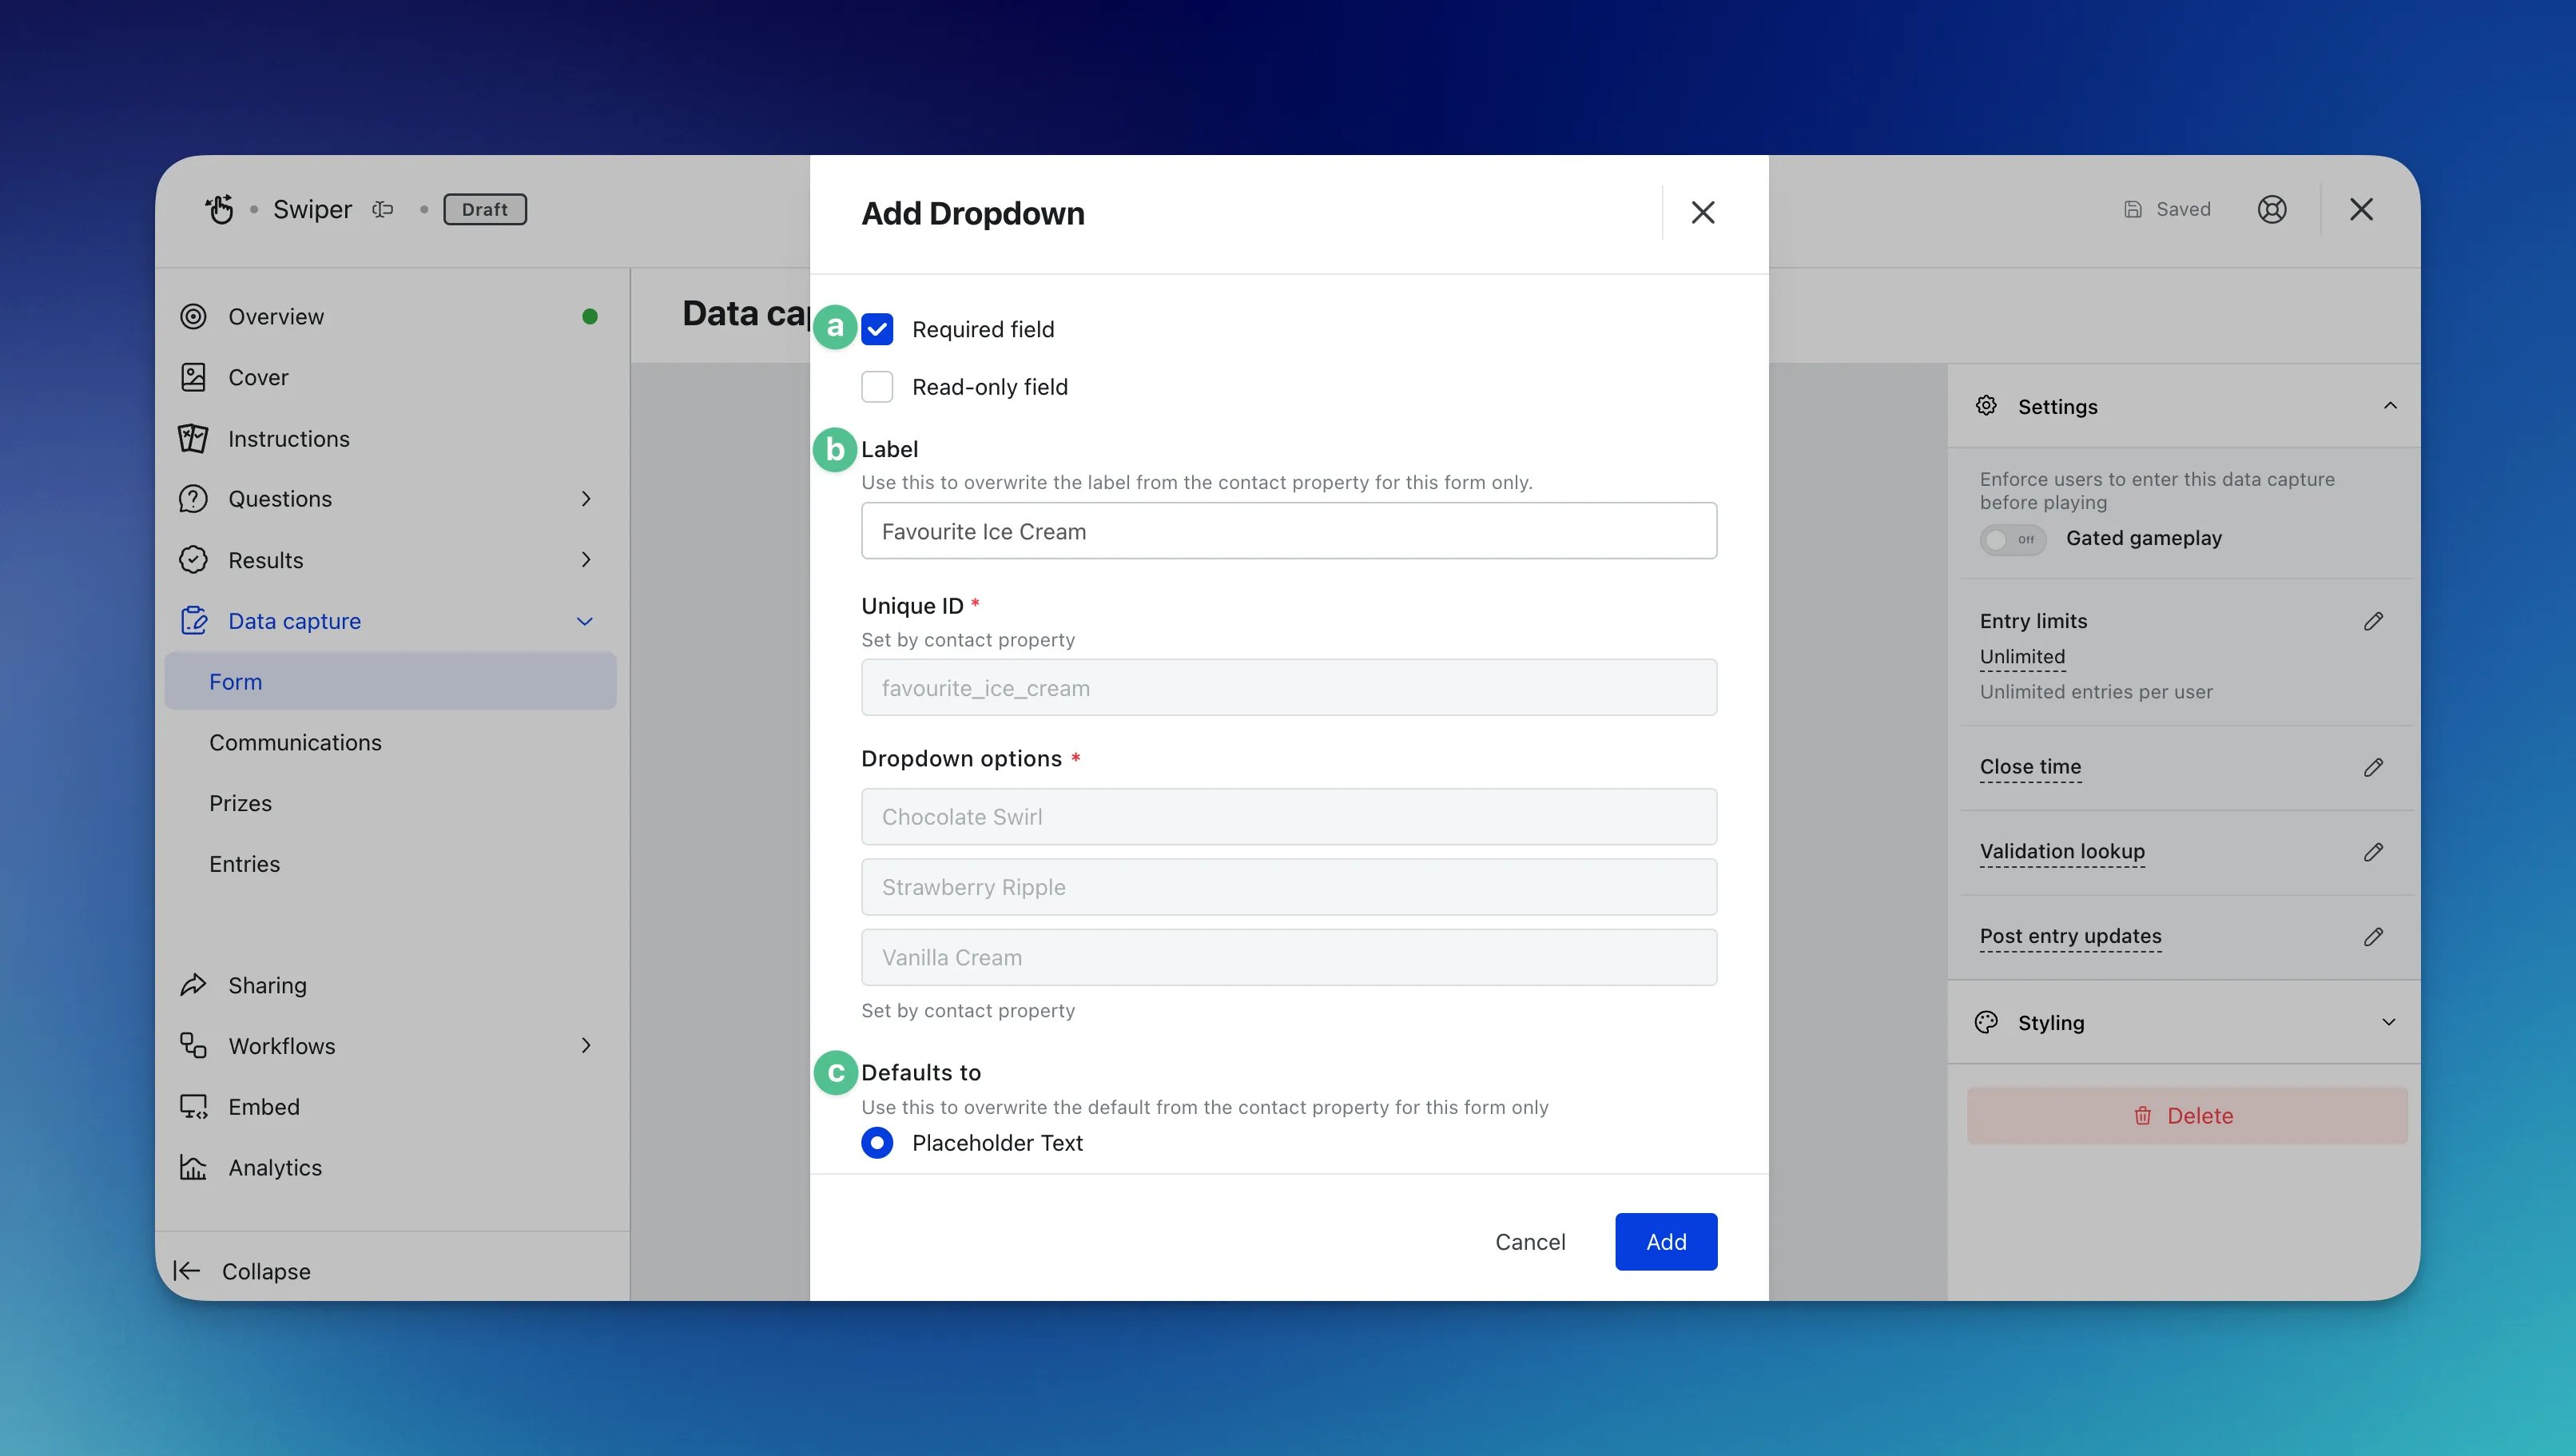 * **(A)** Choose whether you wish for this field to be **required**.
* **(B)** Here you can update the **label name** for the property.
* **(C)** Select what is **presented** on the field - placeholder text or a default option then click **Add**.
### Step 4: View the Property on Contacts
* **(A)** Choose whether you wish for this field to be **required**.
* **(B)** Here you can update the **label name** for the property.
* **(C)** Select what is **presented** on the field - placeholder text or a default option then click **Add**.
### Step 4: View the Property on Contacts
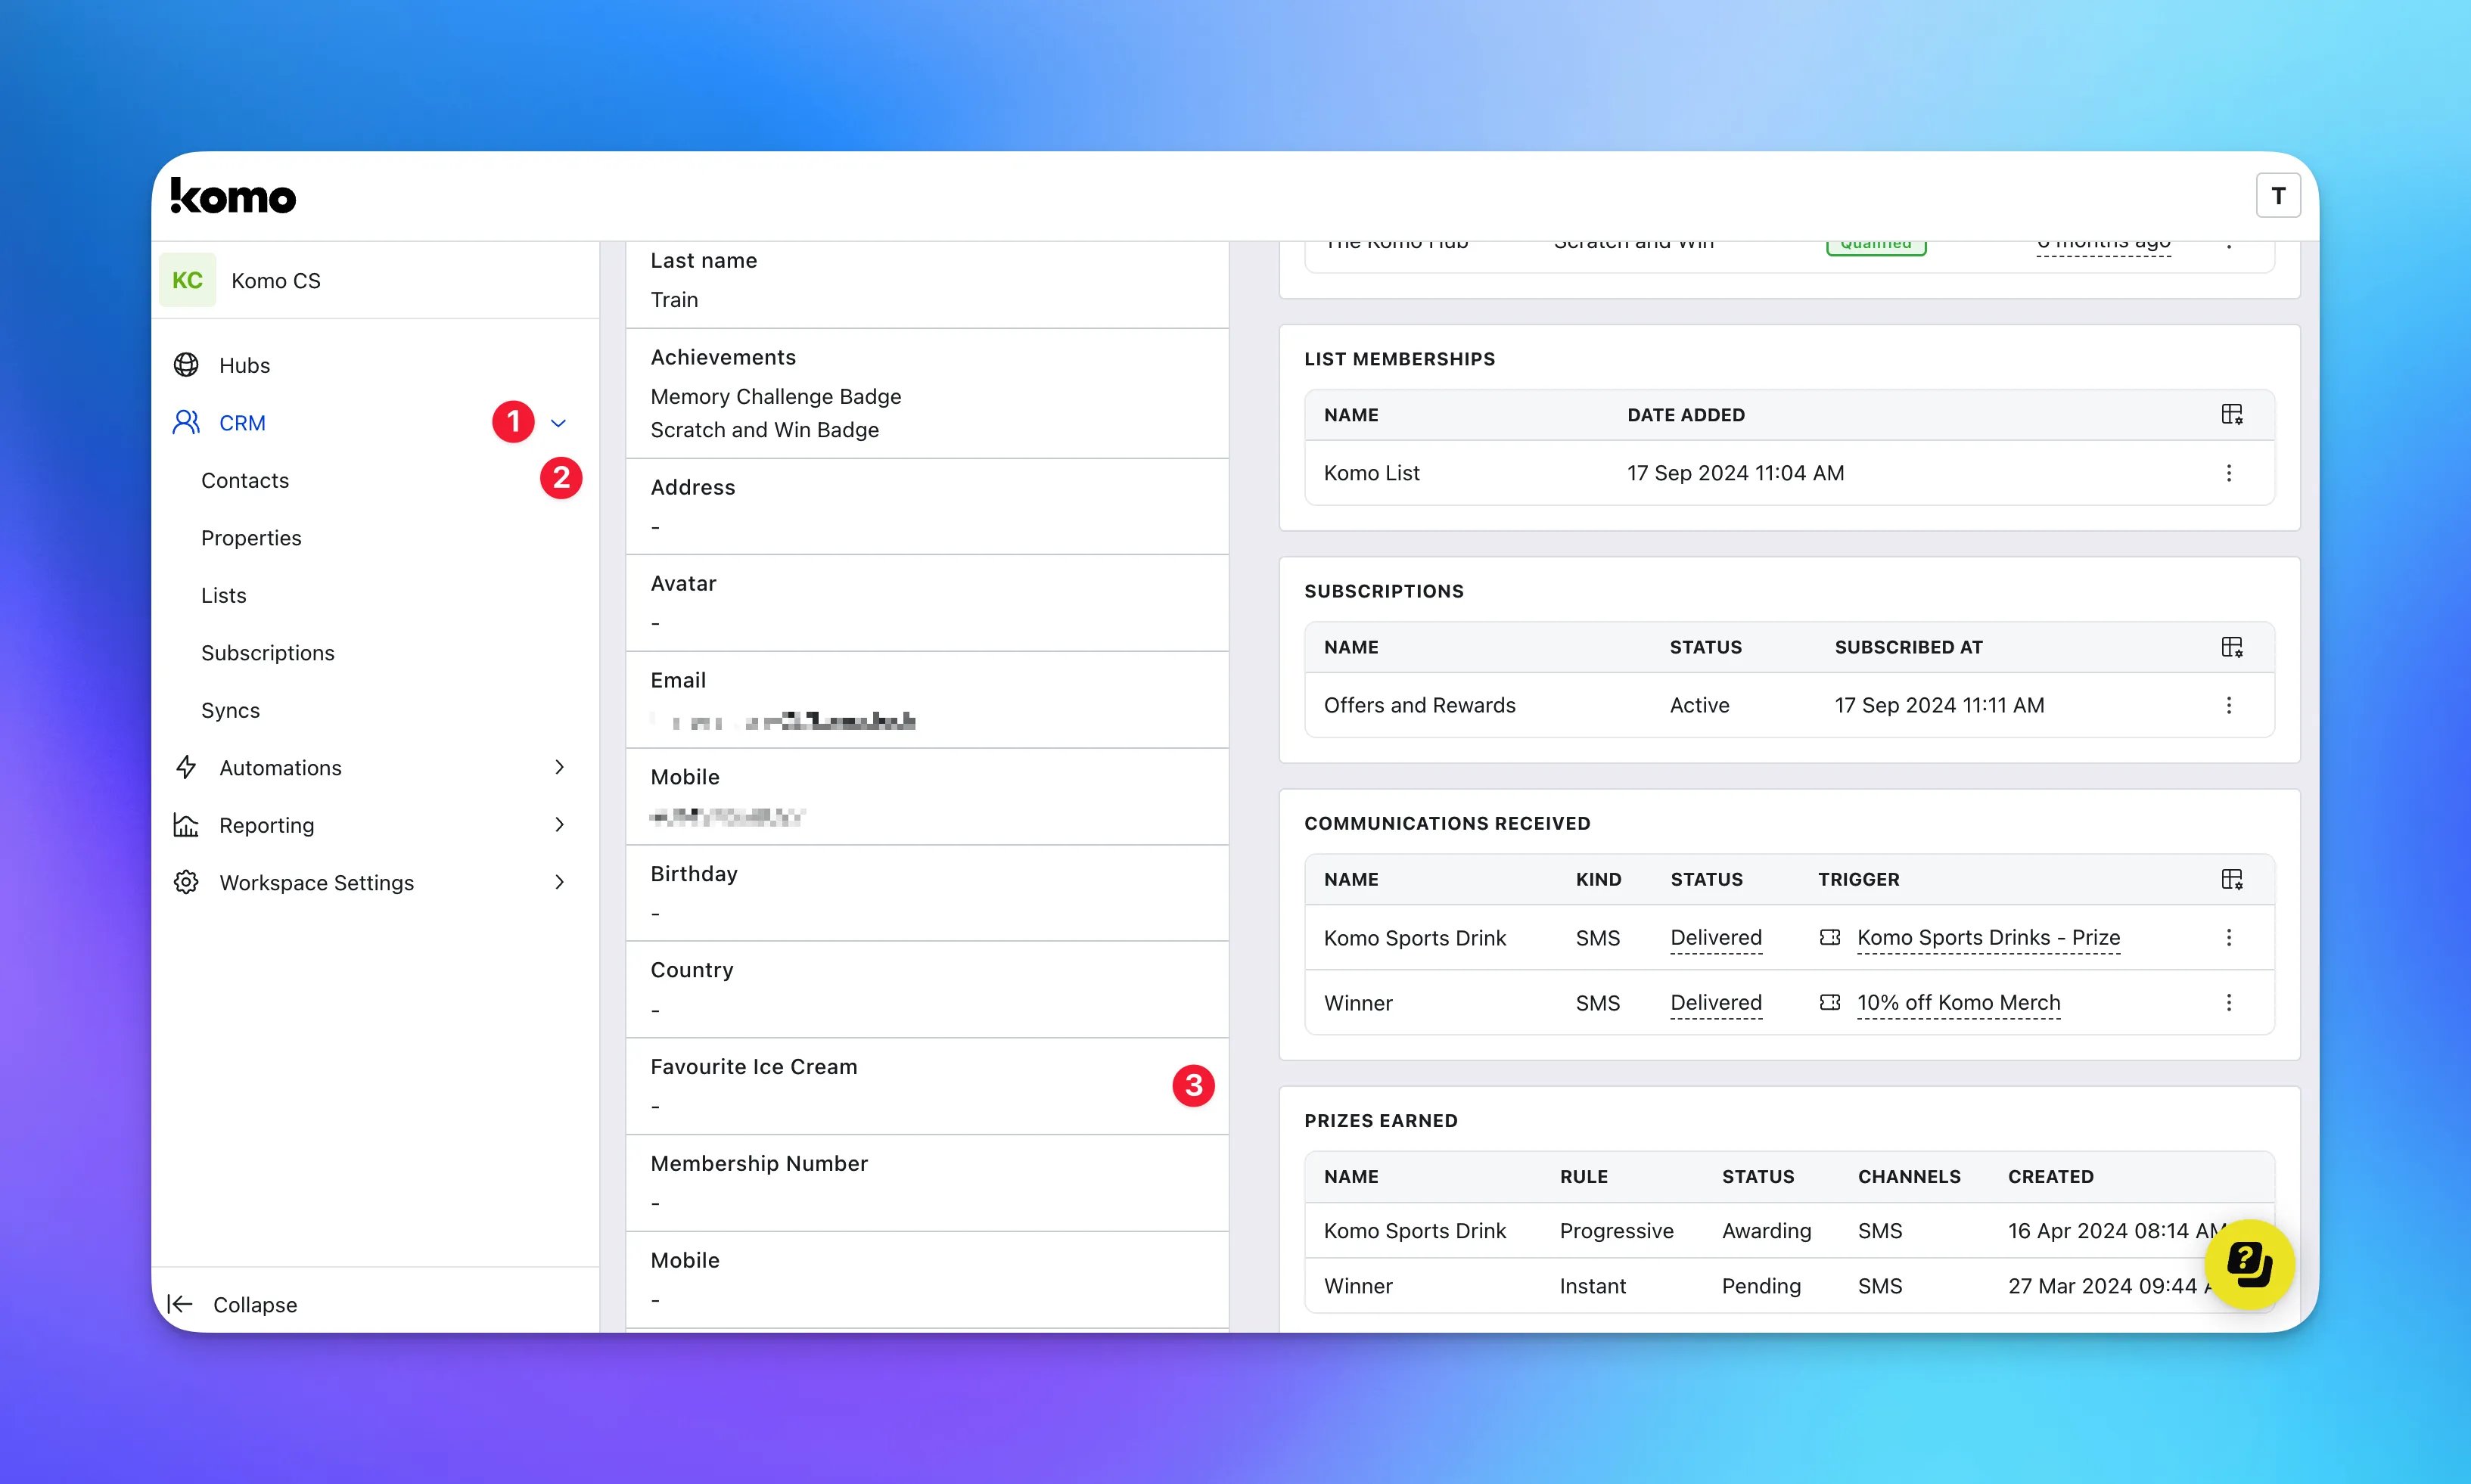 * **(1)** Navigate to contacts by clicking on **CRM.**
* **(2)** Click on **Contacts** and click on a contact to view their profile.
* **(3)** Under the **About this contact** section, you can see the responses to all the contact properties created.
## FAQ
**When should I create a contact property?**
We recommend creating a property for all the information you will consistently request from your audience as this will save time when creating competitions and allows you to collect the most recent response, updating the contacts profile each time.
**Can I delete properties?**
You can only delete properties if they have not been added to any cards or have any data associated with it.
**I want to include additional options in my already created property, can I update it?**
Yes, you can update existing properties under the Properties section. Click on the property, make your changes and then hit save.
We highly recommend only making changes if you are adding more options. If you remove or make changes to existing options with data collected, this will not be accurate information stored against your users.
* **(1)** Navigate to contacts by clicking on **CRM.**
* **(2)** Click on **Contacts** and click on a contact to view their profile.
* **(3)** Under the **About this contact** section, you can see the responses to all the contact properties created.
## FAQ
**When should I create a contact property?**
We recommend creating a property for all the information you will consistently request from your audience as this will save time when creating competitions and allows you to collect the most recent response, updating the contacts profile each time.
**Can I delete properties?**
You can only delete properties if they have not been added to any cards or have any data associated with it.
**I want to include additional options in my already created property, can I update it?**
Yes, you can update existing properties under the Properties section. Click on the property, make your changes and then hit save.
We highly recommend only making changes if you are adding more options. If you remove or make changes to existing options with data collected, this will not be accurate information stored against your users.