> ## Documentation Index
> Fetch the complete documentation index at: https://knowledge.komo.tech/llms.txt
> Use this file to discover all available pages before exploring further.
# Salesforce — CRM Contact Sync
> Set up an on-demand data sync to push and sync contacts from Komo to your CRM.
## What is it?
You can now have confidence that the contact data within your Salesforce CRM is up-to-date with CRM Contact Sync. Through direct integration with your Salesforce instance, Komo can now push new contacts and contact updates directly to Salesforce, on-demand, so you can eliminate manual and painful contact management processes.
If you are using Salesforce Marketing Cloud, you'll want to refer to another article [here](/crm/syncs/salesforce-marketing-cloud-crm-contact-sync).
## How do I set it up?
* Step 1: Connect the Salesforce Connected App
* Step 2: Create CRM Sync
* Step 3: Complete Sync configuration
* Step 4: Run the CRM Sync
* Step 5: Review the CRM Sync
### Step 1: Connect the Salesforce Connected App
 In order to connect to Salesforce, you need to create a connected app in Salesforce. Make sure you use the **OAuth 2.0 Client Credentials Flow**. For info on how to set this up visit [Salesforce help](https://help.salesforce.com/s/articleView?id=sf.connected_app_client_credentials_setup.htm) or contact your customer success manager.
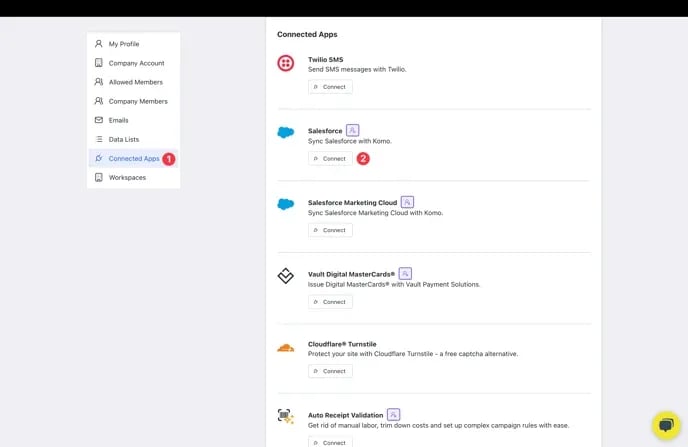
* Navigate to **Account Settings** by clicking the **Workspace initials** in the top right corner and clicking **Account Settings.**
* **(1)** Click **Connected Apps.**
* **(2)** Select **Connect** next to the Salesforce Connected App.
In order to connect to Salesforce, you need to create a connected app in Salesforce. Make sure you use the **OAuth 2.0 Client Credentials Flow**. For info on how to set this up visit [Salesforce help](https://help.salesforce.com/s/articleView?id=sf.connected_app_client_credentials_setup.htm) or contact your customer success manager.
* Navigate to **Account Settings** by clicking the **Workspace initials** in the top right corner and clicking **Account Settings.**
* **(1)** Click **Connected Apps.**
* **(2)** Select **Connect** next to the Salesforce Connected App.
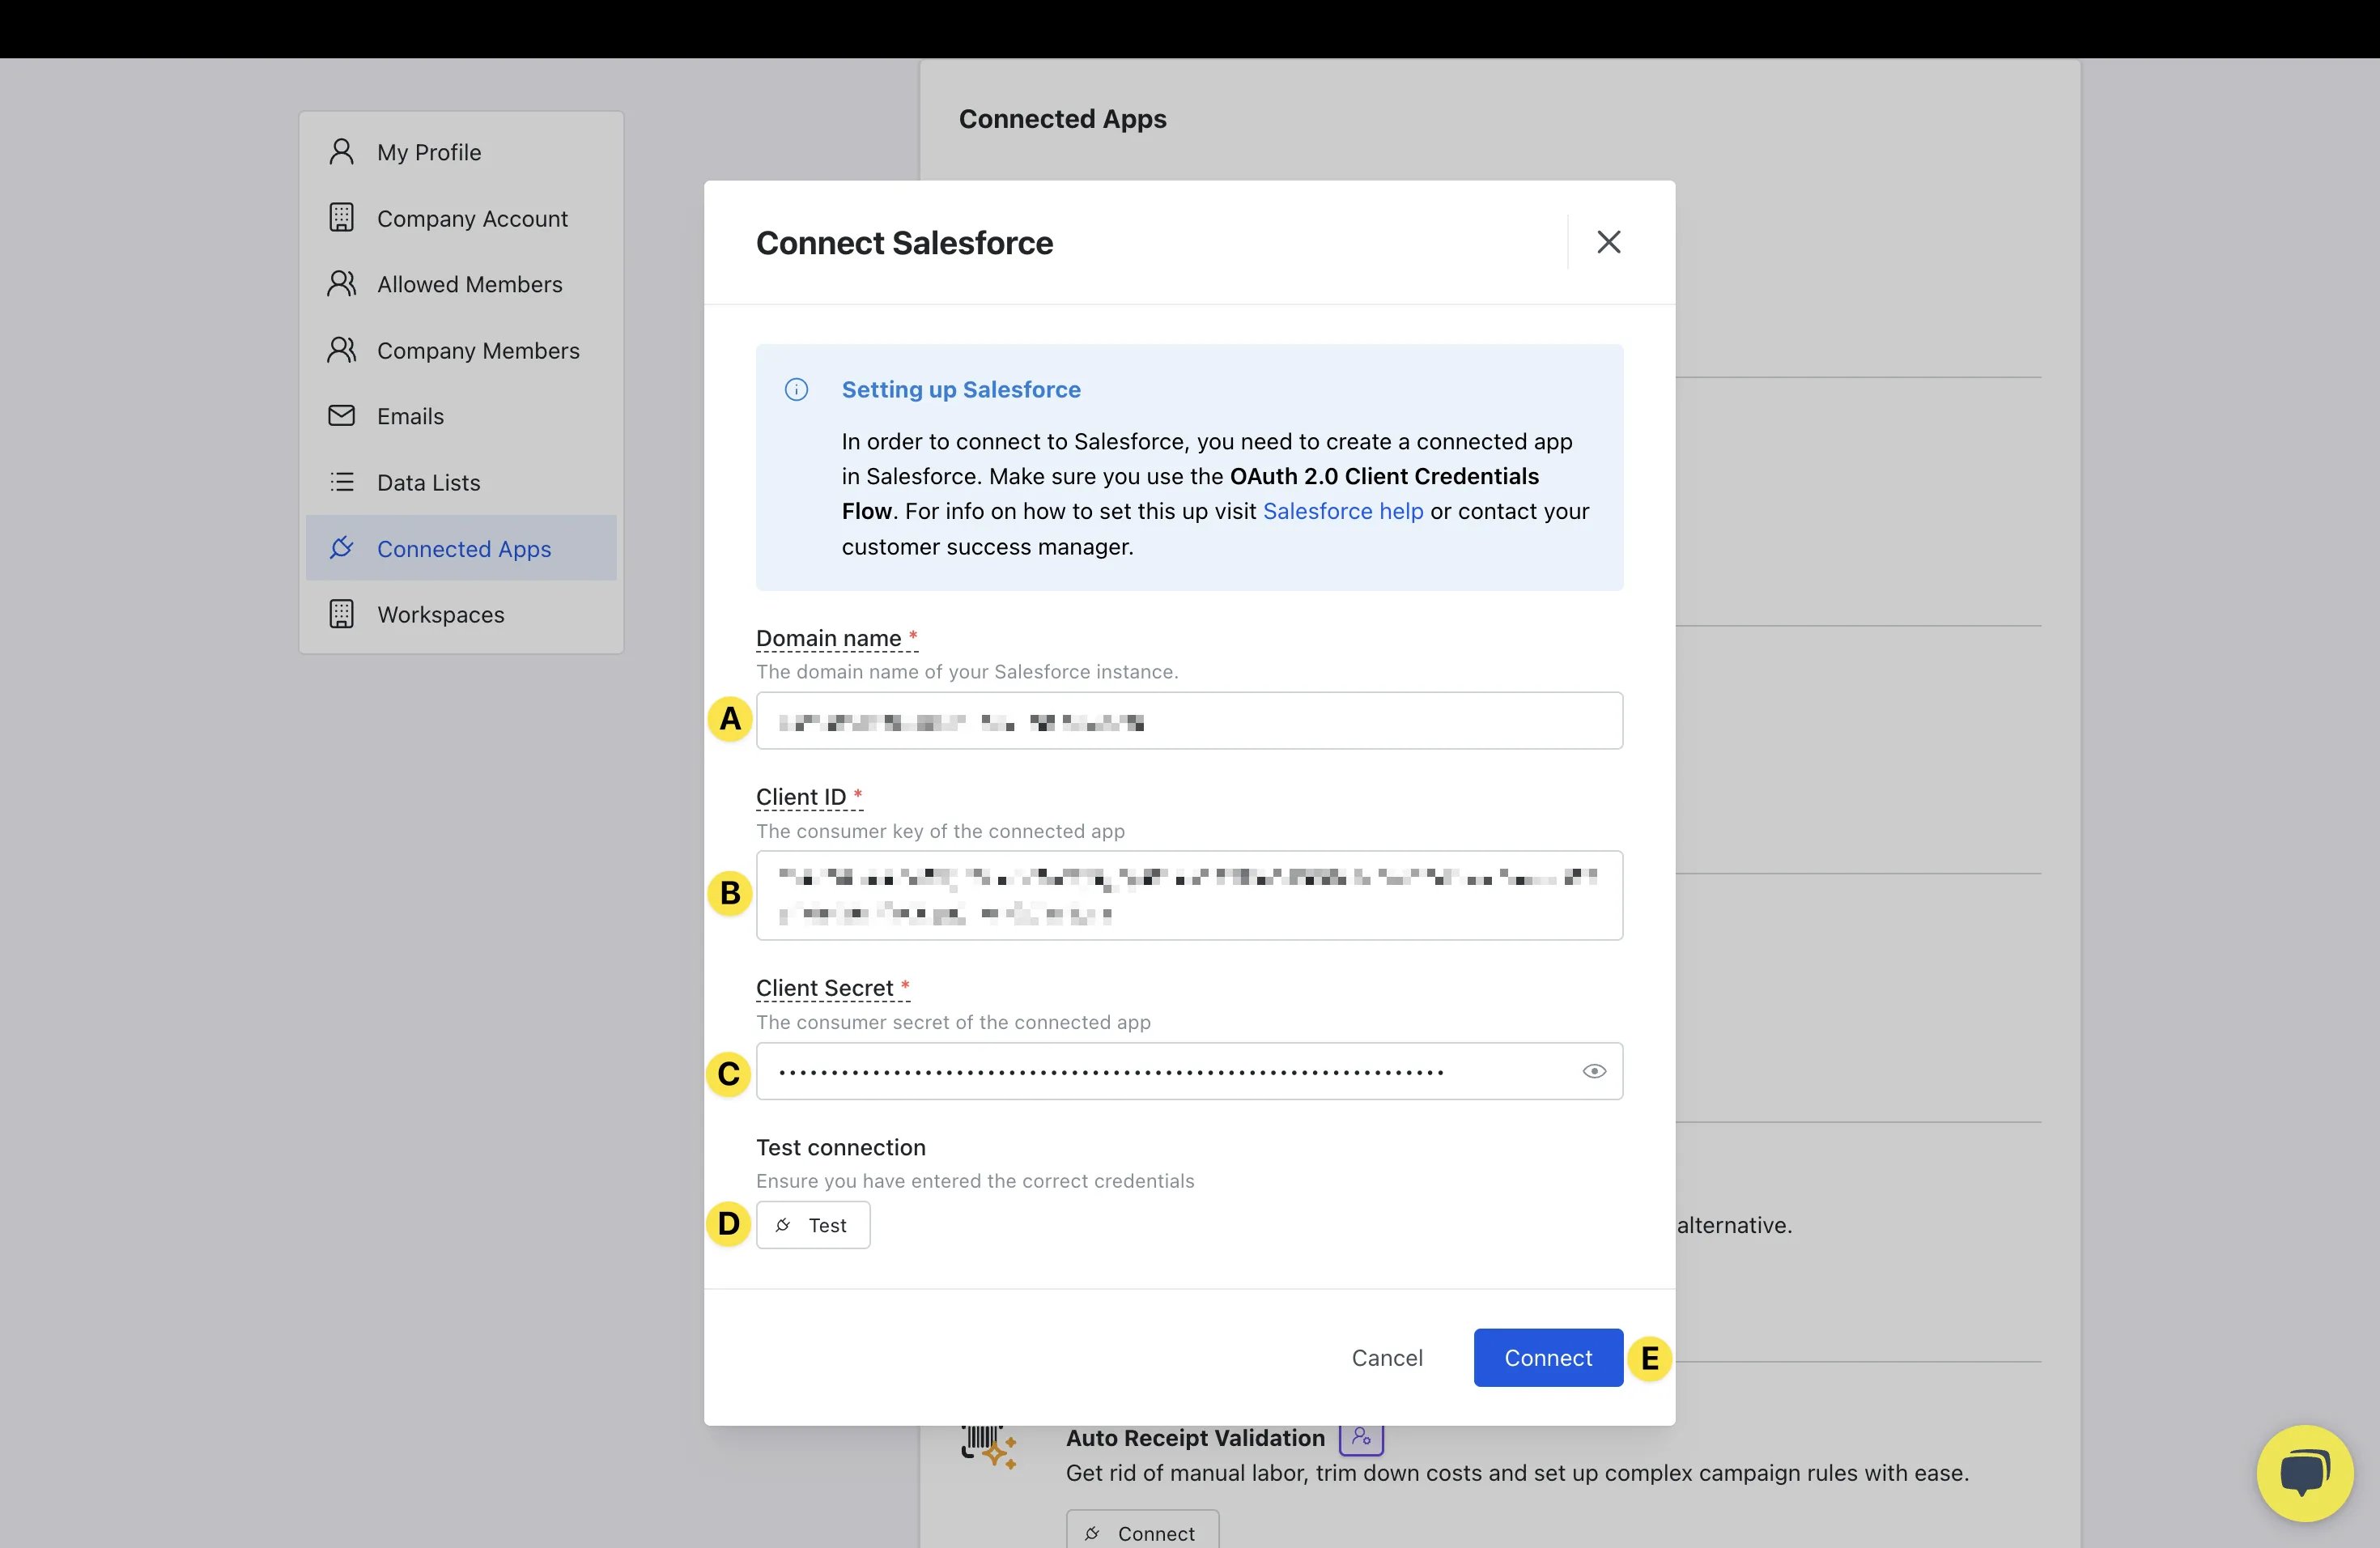 * **(A)** Here you can insert the **CRM Domain Name** from your CRM instance.
* **(B)** Insert the **Client ID/consumer key** from the connected CRM.
* **(C)** Here you can paste in the **Client Secret** of the connected CRM.
* **(D)** Click **Test** under Test Connection. If the connection is successful, you will see a green **Connection Successful** message.
* **(E)** Click **Connect.**
### Step 2: Create CRM Sync
* **(A)** Here you can insert the **CRM Domain Name** from your CRM instance.
* **(B)** Insert the **Client ID/consumer key** from the connected CRM.
* **(C)** Here you can paste in the **Client Secret** of the connected CRM.
* **(D)** Click **Test** under Test Connection. If the connection is successful, you will see a green **Connection Successful** message.
* **(E)** Click **Connect.**
### Step 2: Create CRM Sync
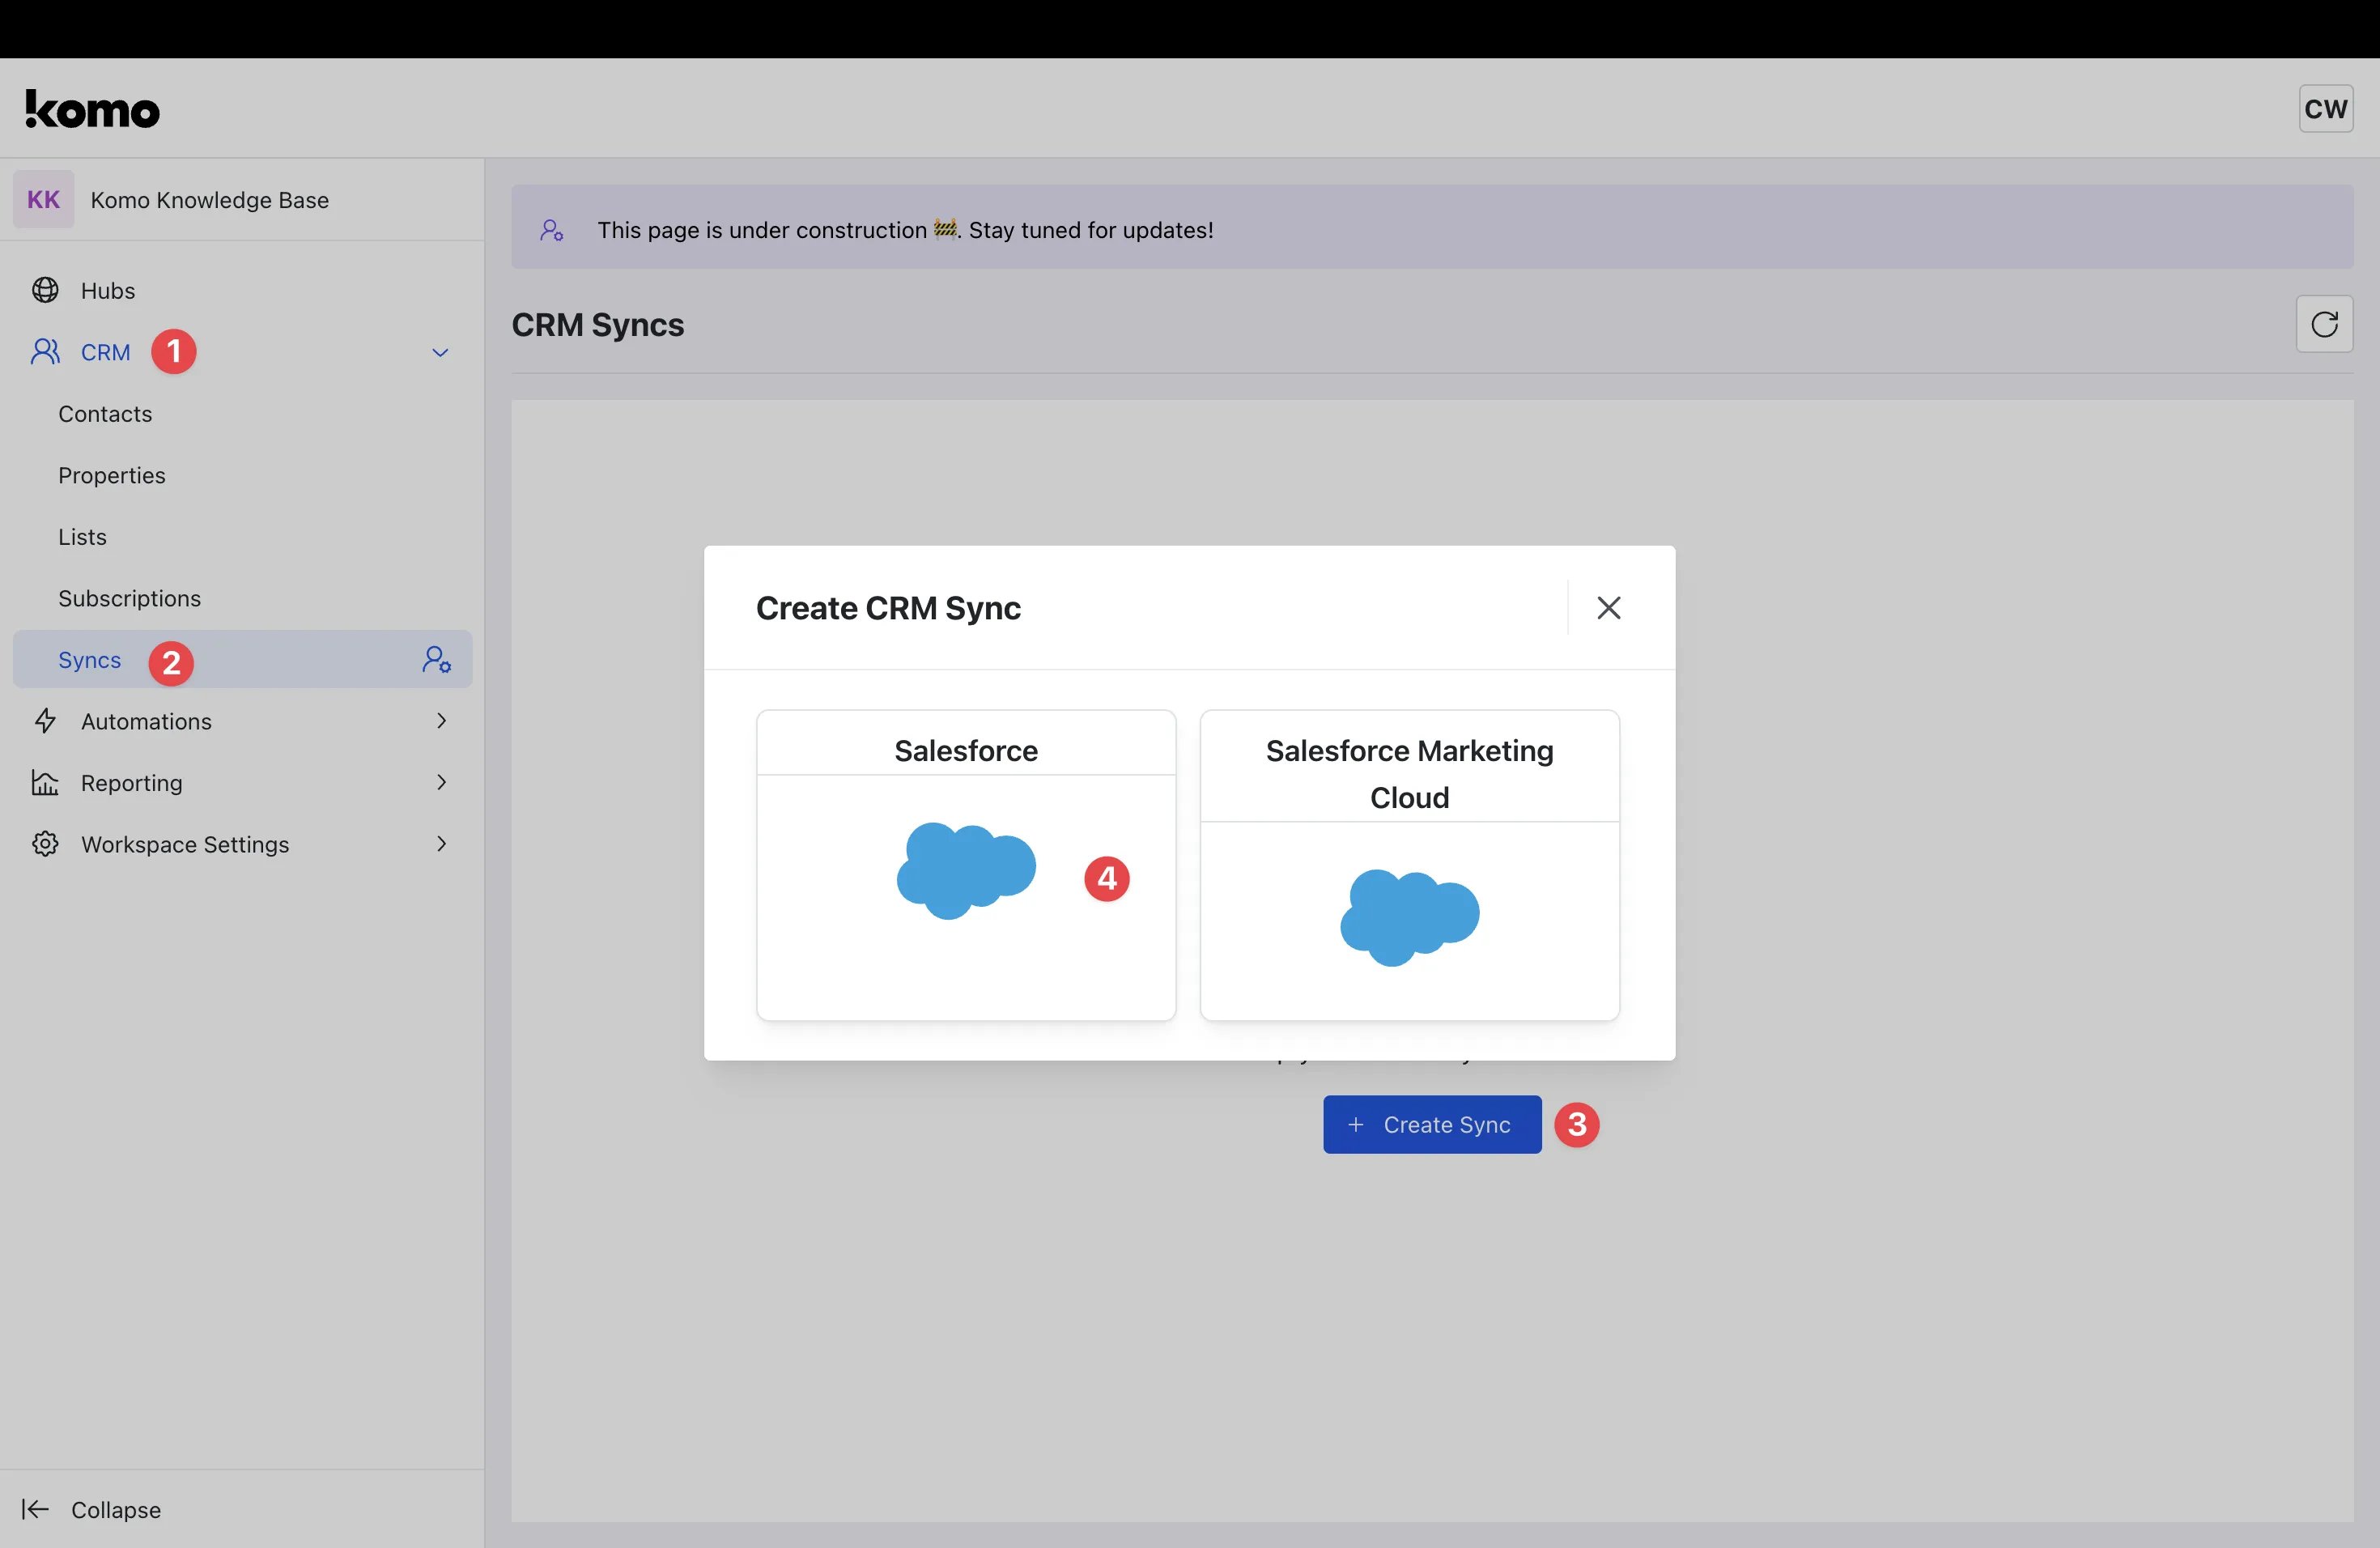 * **(1)** Navigate back to your workspace and click on **CRM.**
* **(2)** Click **Syncs.**
* **(3)** Click the **+ Create Sync** button.
* **(4)** Select the **CRM** you would like to sync with.
### Step 3: Complete Sync configuration
* **(1)** Navigate back to your workspace and click on **CRM.**
* **(2)** Click **Syncs.**
* **(3)** Click the **+ Create Sync** button.
* **(4)** Select the **CRM** you would like to sync with.
### Step 3: Complete Sync configuration
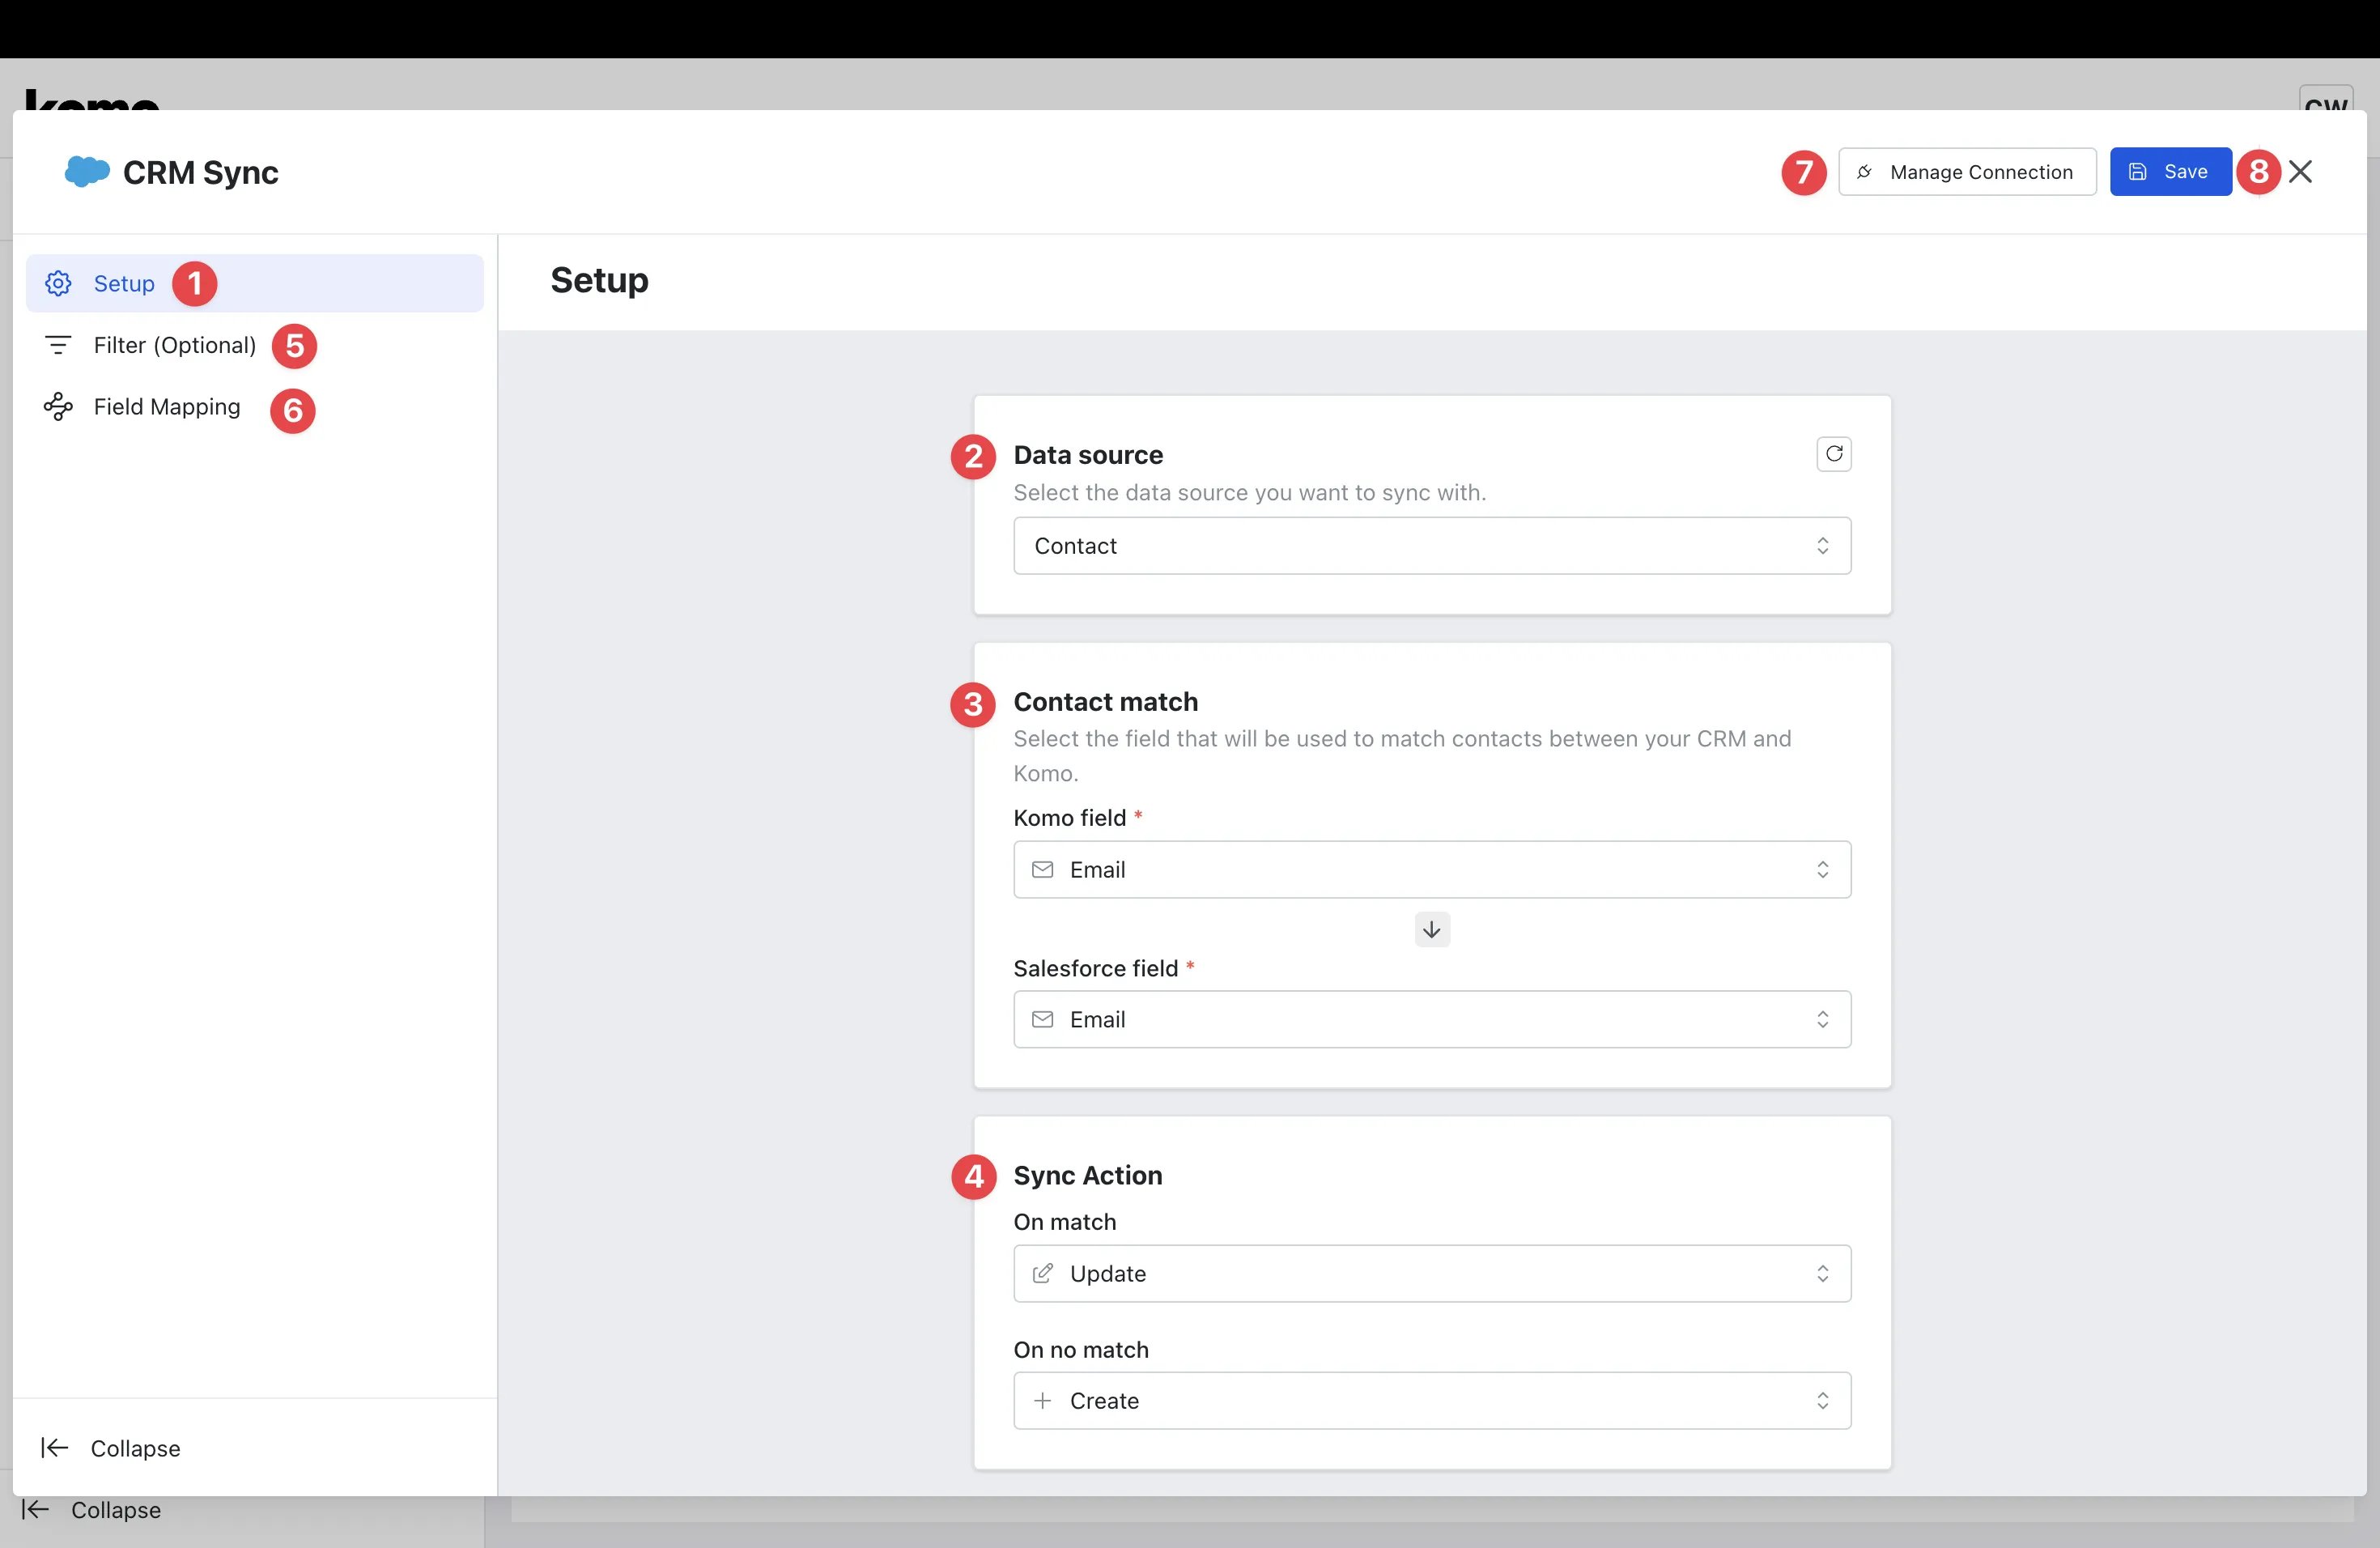 * **(1)** Here you can configure the CRM Sync **Setup.**
* **(2)** Select whether the **Data source** to sync should be **Contact** or **Lead.**
* **(3)** Select the field within **Komo** and your **CRM** which will be used to match contacts between the two platforms.
* **(4)** Set the desired **Sync Actions** to be performed when there is a **match** and when there is **no match.**
* **(5)** Click on **Filter (optional)** if you would like to add filters to your sync.
* **(1)** Here you can configure the CRM Sync **Setup.**
* **(2)** Select whether the **Data source** to sync should be **Contact** or **Lead.**
* **(3)** Select the field within **Komo** and your **CRM** which will be used to match contacts between the two platforms.
* **(4)** Set the desired **Sync Actions** to be performed when there is a **match** and when there is **no match.**
* **(5)** Click on **Filter (optional)** if you would like to add filters to your sync.
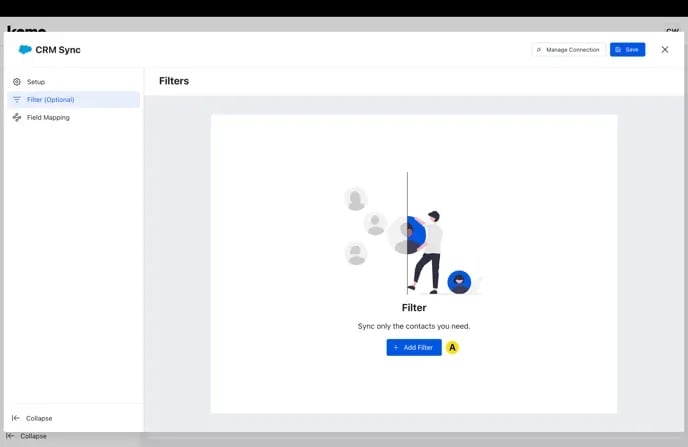 * **(A)** Click **+ Add Filter.**
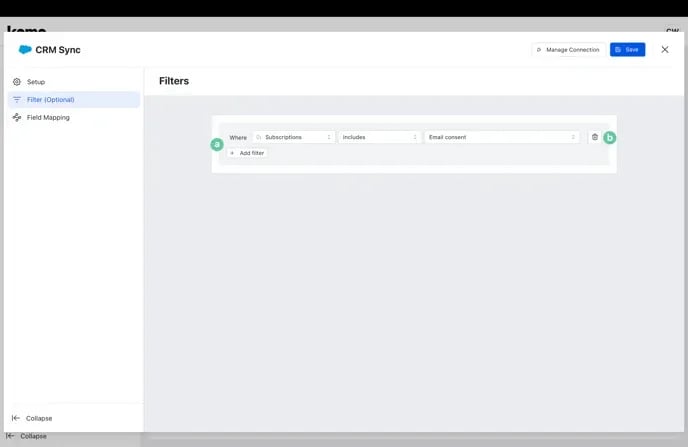 * **(a)** Here you can configure your **Filters** as required.
* **(b)** Click the bin to **delete** any filters you have created.
* **(6)** Click on **Field Mapping** to ensure contact fields in Komo are properly mapped to the fields in your CRM.
* **(a)** Here you can configure your **Filters** as required.
* **(b)** Click the bin to **delete** any filters you have created.
* **(6)** Click on **Field Mapping** to ensure contact fields in Komo are properly mapped to the fields in your CRM.
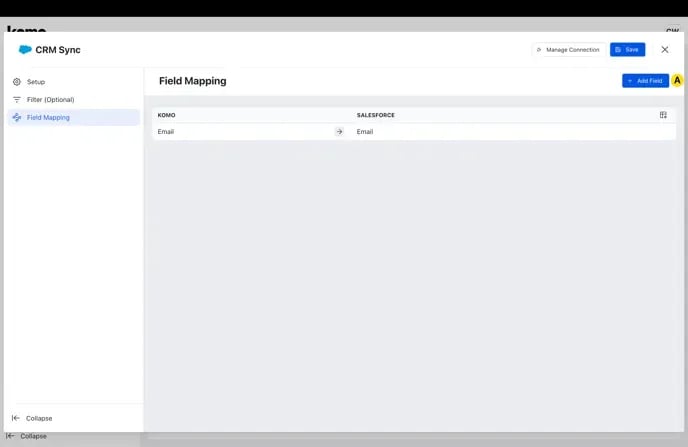 * **(A)** Click **+ Add Field.**
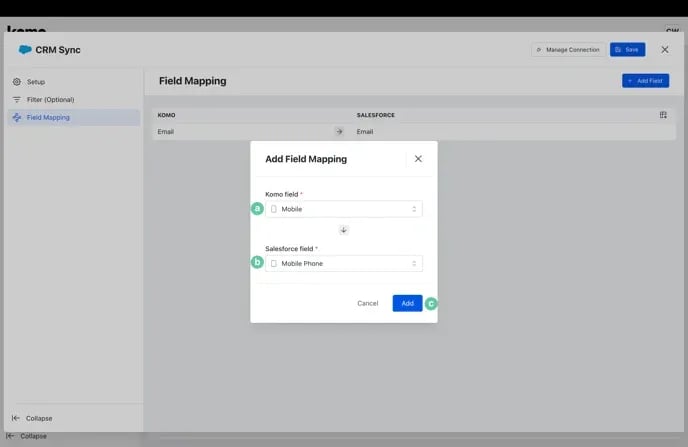 * **(a)** Select the desired **Komo field** to be mapped.
* **(b)** Select the corresponding **CRM field** that the Komo field should be mapped to.
* **(c)** Click **Add.**
### Step 4: Run the CRM Sync
* **(a)** Select the desired **Komo field** to be mapped.
* **(b)** Select the corresponding **CRM field** that the Komo field should be mapped to.
* **(c)** Click **Add.**
### Step 4: Run the CRM Sync
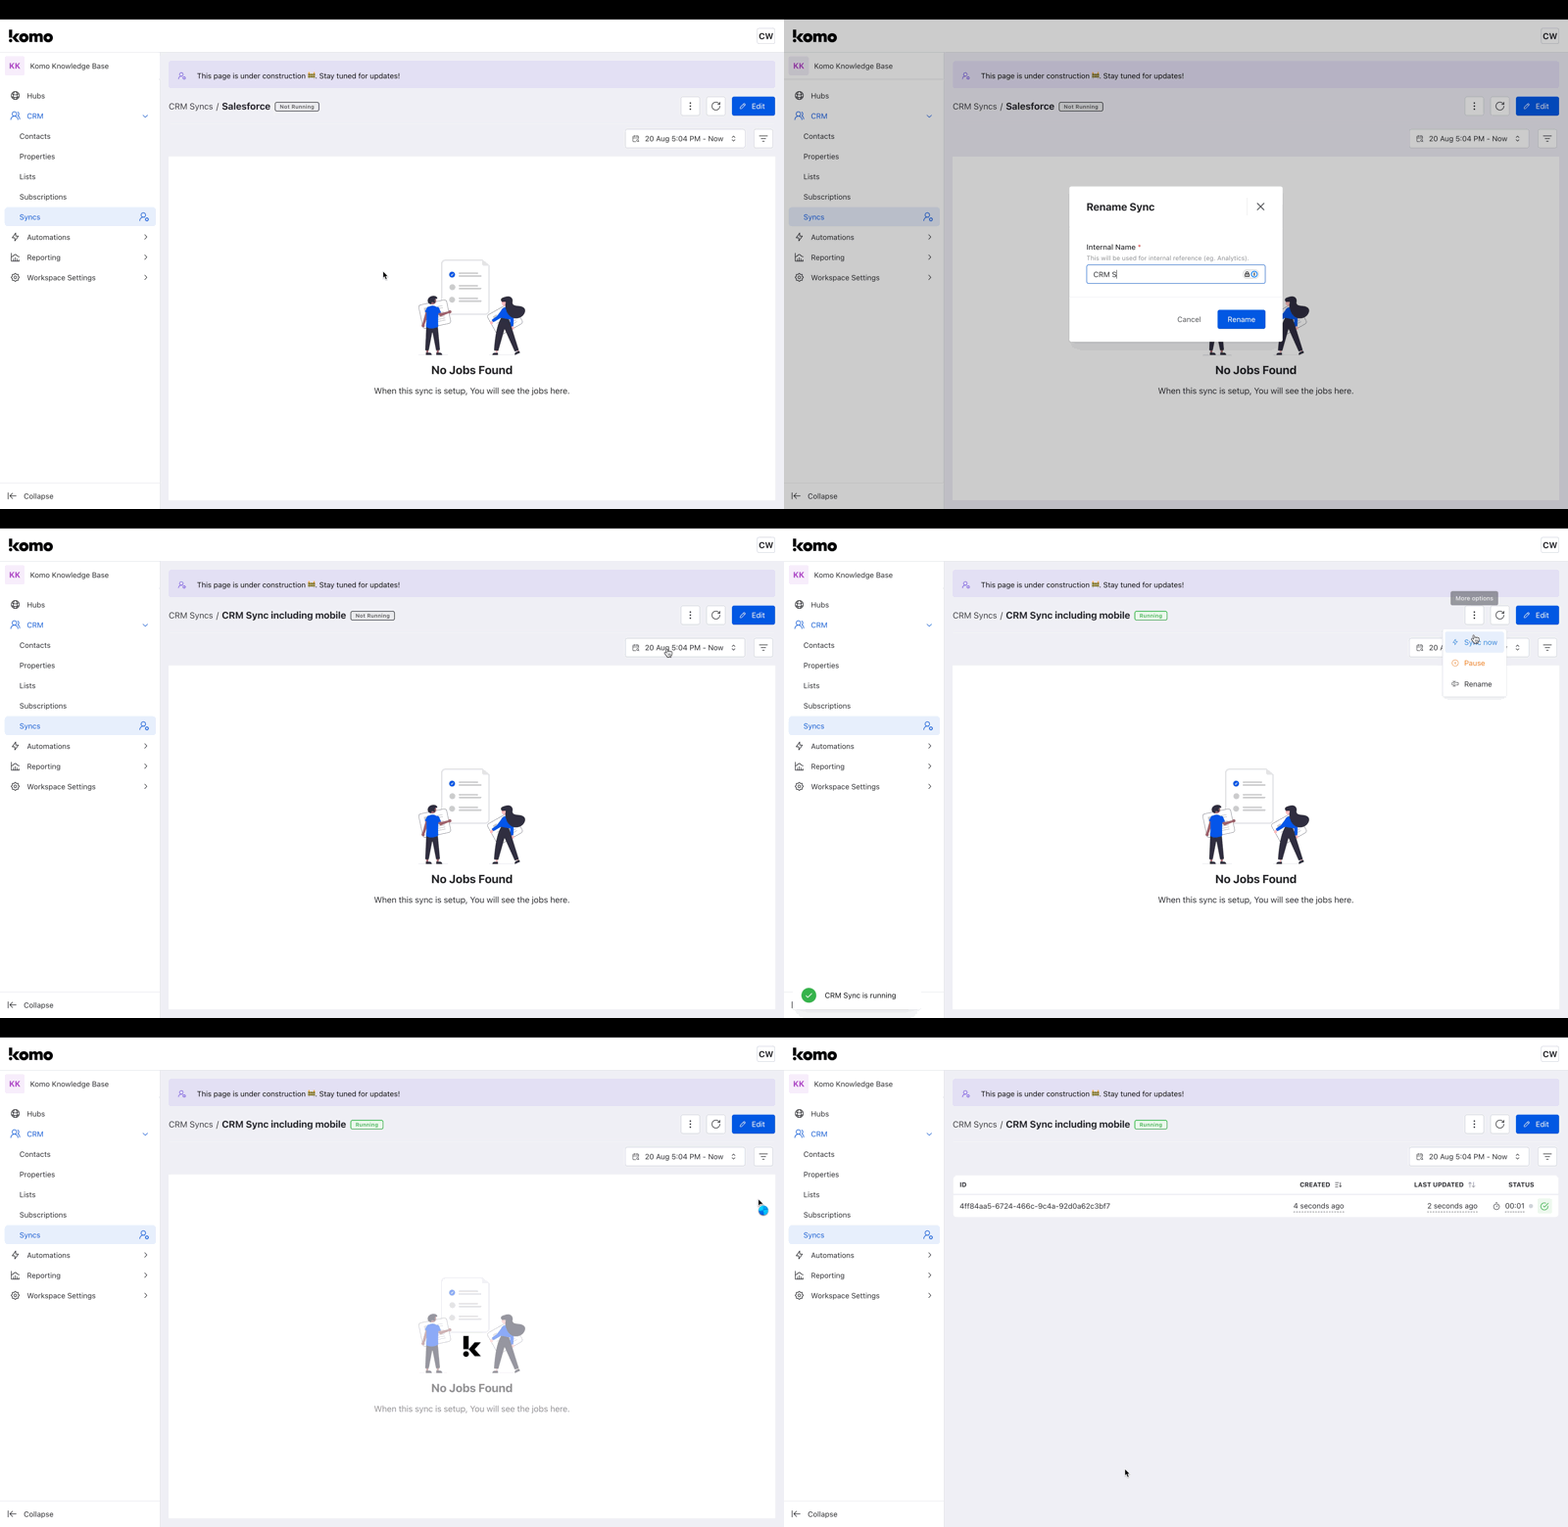 * Once your CRM Sync settings are configured, it's time to run the sync.
* Click the **3 dots** at the top right of the screen.
* Click **Rename,** give the sync a more easily identifiable **Internal** **Name** and click the **Rename** button.
* Click the **3 dots** again and select **Start.** The sync will now display as **Running.**
* Click the **3 dots** once again and select **Sync now.** You will now see details of the sync that has just been initiated.
You can repeat the **Sync now** step every time you want the sync to run/be updated.
### Step 5: Review the CRM Sync
* Once your CRM Sync settings are configured, it's time to run the sync.
* Click the **3 dots** at the top right of the screen.
* Click **Rename,** give the sync a more easily identifiable **Internal** **Name** and click the **Rename** button.
* Click the **3 dots** again and select **Start.** The sync will now display as **Running.**
* Click the **3 dots** once again and select **Sync now.** You will now see details of the sync that has just been initiated.
You can repeat the **Sync now** step every time you want the sync to run/be updated.
### Step 5: Review the CRM Sync
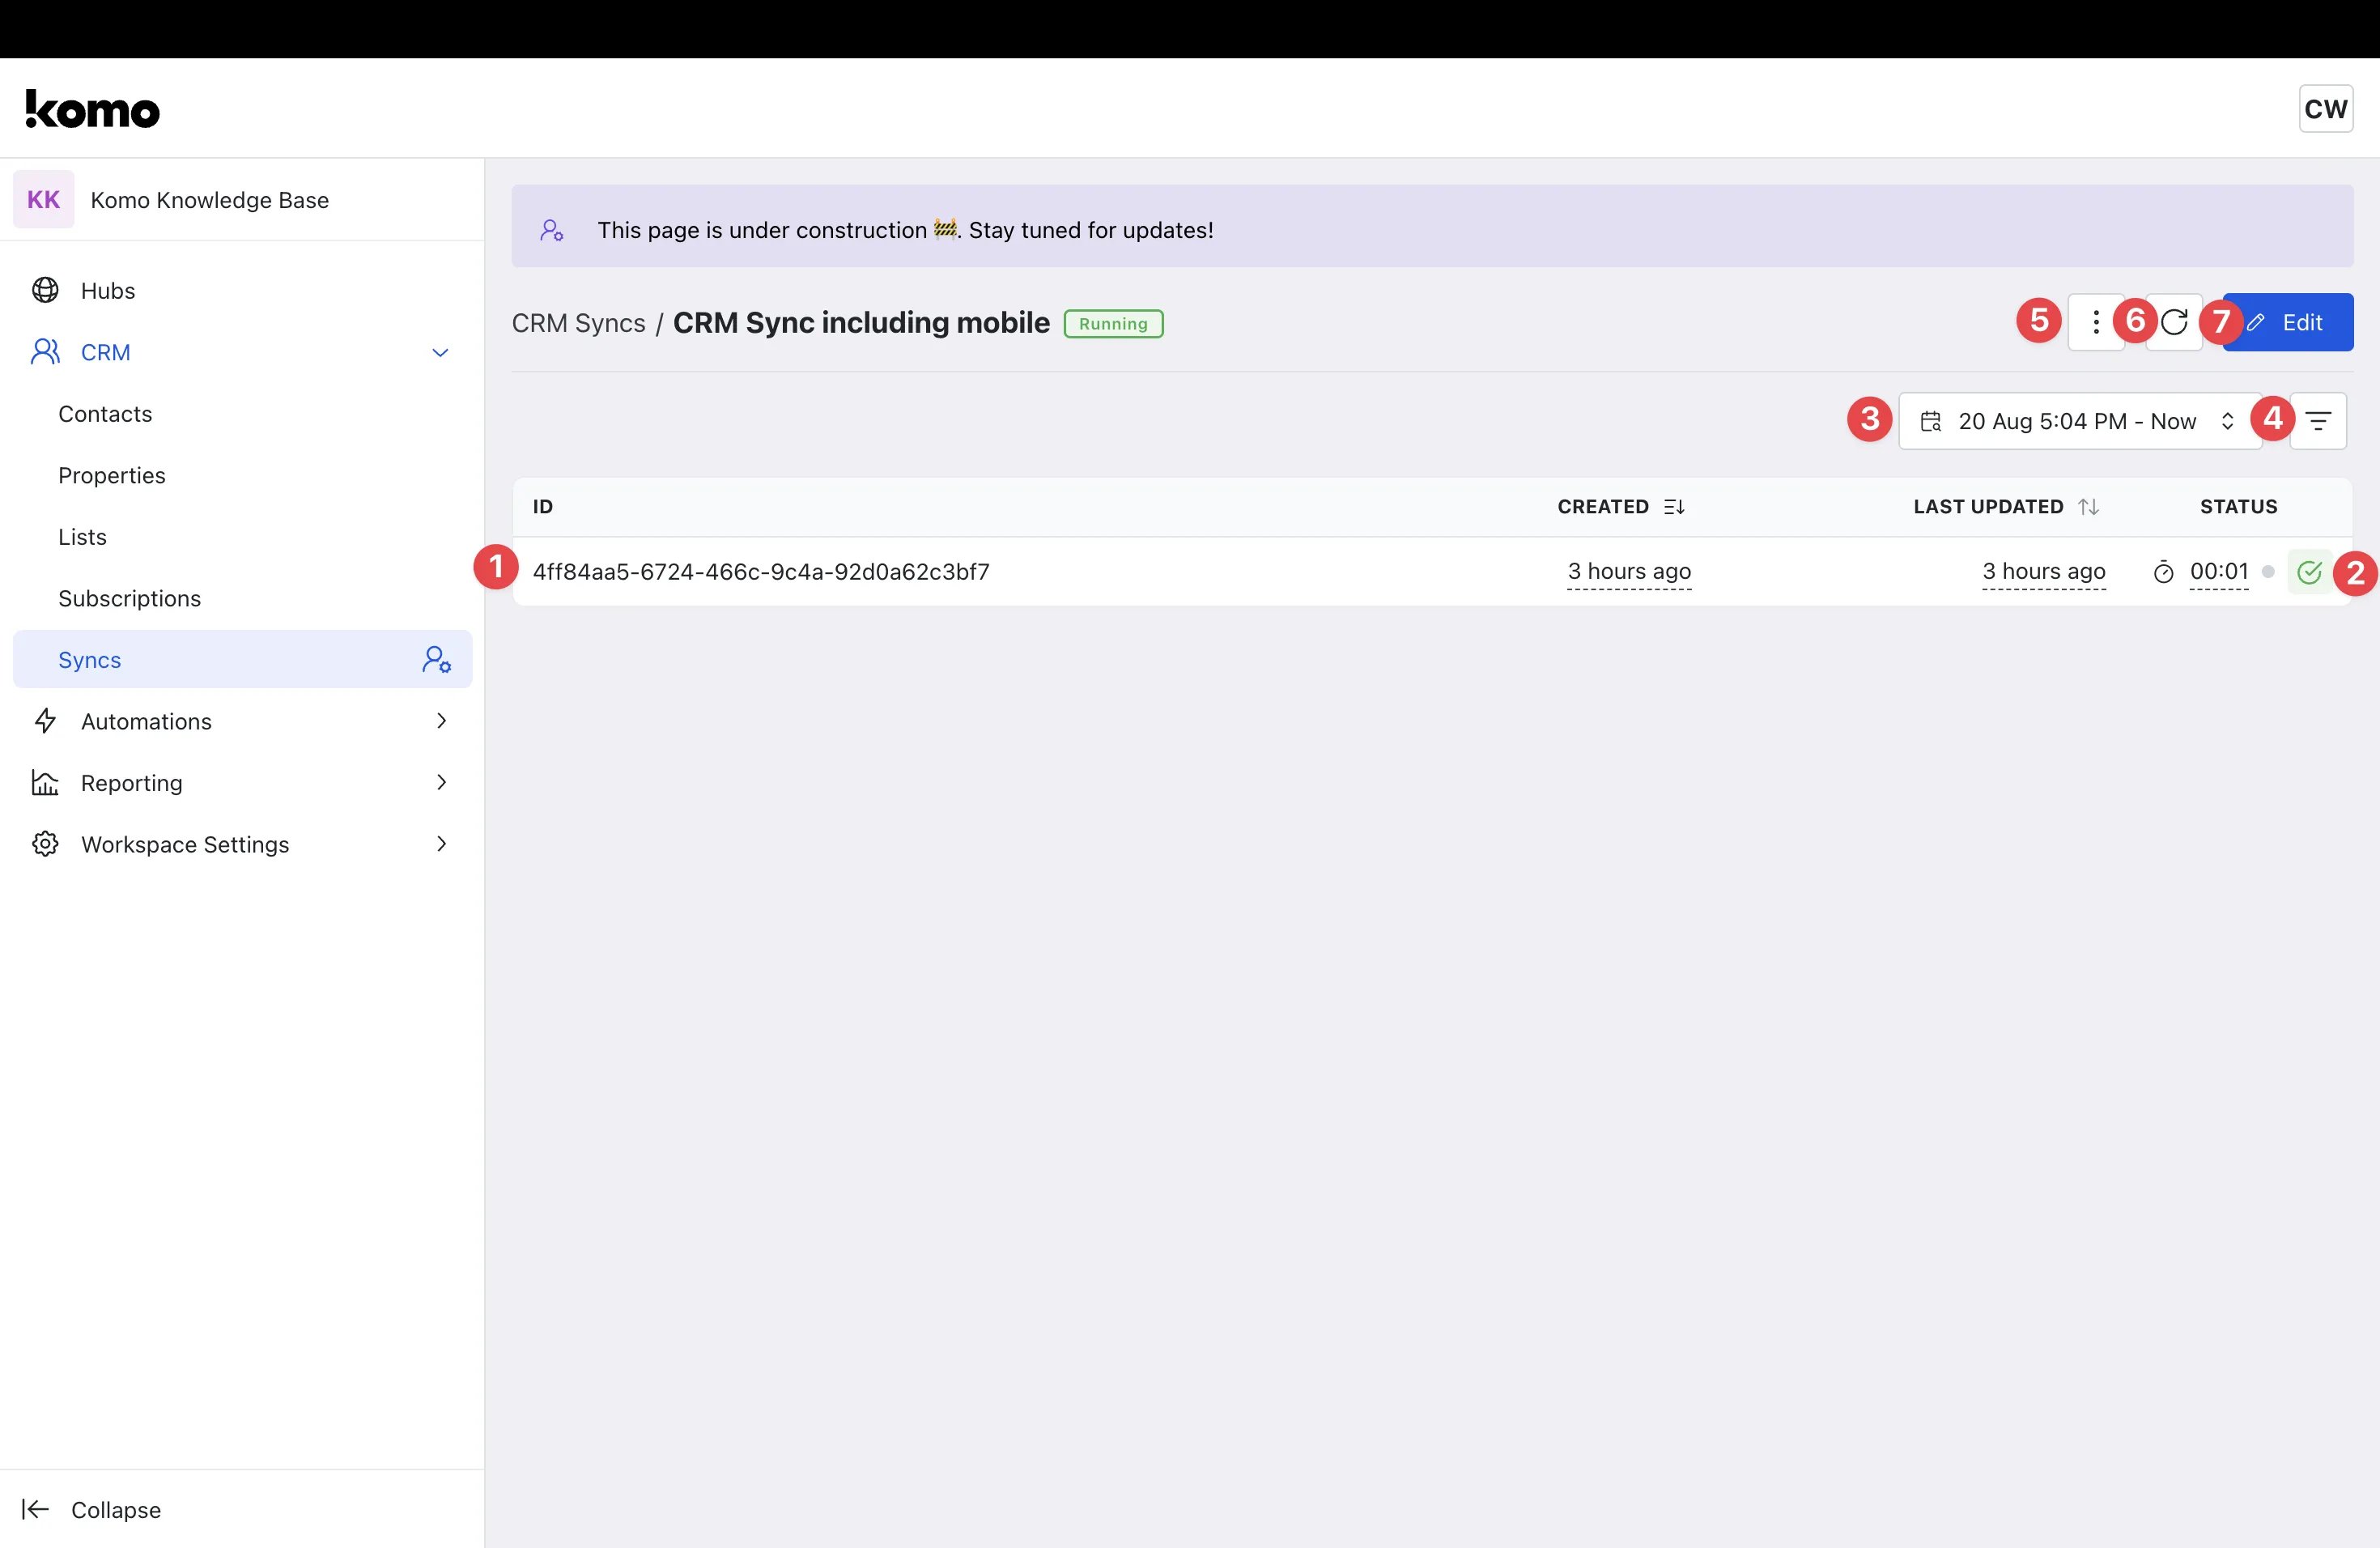 * You can now review the sync to ensure it's performing as expected.
* **(1)** Here you can view all details relating to the sync including **ID,** when it was **Created** and **Last Updated,** the **Run duration** and **Status.**
* **(2)** Click on the **Green tick** to view more detailed information on the **Sync Run.**
* You can now review the sync to ensure it's performing as expected.
* **(1)** Here you can view all details relating to the sync including **ID,** when it was **Created** and **Last Updated,** the **Run duration** and **Status.**
* **(2)** Click on the **Green tick** to view more detailed information on the **Sync Run.**
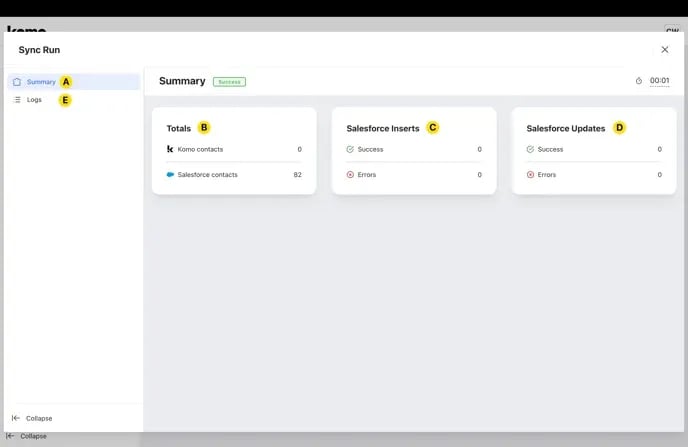 * **(A)** Here you will be able to see a **Summary** of the key **Sync Run details.**
* **(B) Totals** displays the total number of contacts within your Komo and CRM instances.
* **(C) CRM Inserts** displays how many contacts the sync successfully imported into the CRM and how many errors were encountered.
* **(D) CRM Updates** displays how many contacts the sync successfully updated in the CRM and how many errors were encountered.
* **(E)** Click **Logs** to view in depth logs of the executed sync.
* **(A)** Here you will be able to see a **Summary** of the key **Sync Run details.**
* **(B) Totals** displays the total number of contacts within your Komo and CRM instances.
* **(C) CRM Inserts** displays how many contacts the sync successfully imported into the CRM and how many errors were encountered.
* **(D) CRM Updates** displays how many contacts the sync successfully updated in the CRM and how many errors were encountered.
* **(E)** Click **Logs** to view in depth logs of the executed sync.
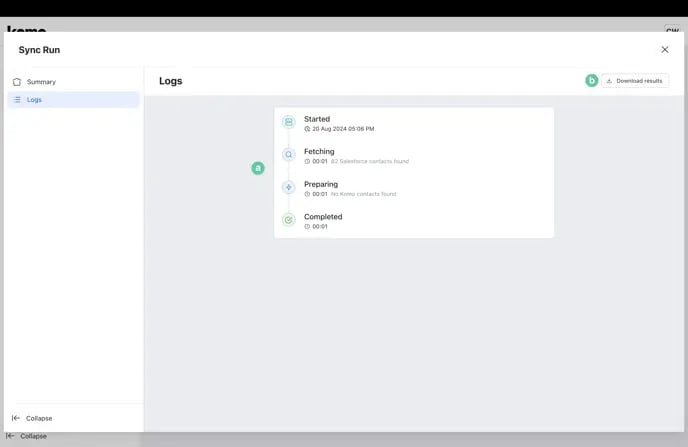 * **(a)** Here you can view a log of the various actions that took place within the sync.
* **(b)** Click **Download results** to export a CSV of the syng logs.
## FAQ
**Is the CRM Contact Sync a two-way sync (ie. push and pull)?**
At this stage, the CRM Contact sync is a one way sync (push) from Komo to the CRM. This means that any any updates to contacts within Komo will automatically be pushed to the CRM to ensure the CRM remains in sync with the changes made in Komo. In the instance where a contact is updated in the CRM initially, the change will not be reflected in Komo. We will be rolling out a true two-way (push and pull) sync in a future release.
**How often will the CRM Contact Sync run?**
The sync is completely on-demand so you can run the sync as often or as little as you require. To do so, you simply need to click **Sync now** as detailed in [Step 4.](#how-do-i-set-it-up-step-1-connect-the-salesforce-connected-app).
**Is this available for all CRMs?**
At this stage, the CRM Contact Sync has only been rolled out for Salesforce and Salesforce Marketing Cloud. We will be rolling out this functionality for additional CRMs in the near future.
**Can this be managed by all users?**
The CRM Contact Sync can only be managed by Super Users at this point in time. We will be making this functionality available to additional users in the near future.
**How many CRM Contact Syncs can I create?**
You can create as many different syncs as you require!
* **(a)** Here you can view a log of the various actions that took place within the sync.
* **(b)** Click **Download results** to export a CSV of the syng logs.
## FAQ
**Is the CRM Contact Sync a two-way sync (ie. push and pull)?**
At this stage, the CRM Contact sync is a one way sync (push) from Komo to the CRM. This means that any any updates to contacts within Komo will automatically be pushed to the CRM to ensure the CRM remains in sync with the changes made in Komo. In the instance where a contact is updated in the CRM initially, the change will not be reflected in Komo. We will be rolling out a true two-way (push and pull) sync in a future release.
**How often will the CRM Contact Sync run?**
The sync is completely on-demand so you can run the sync as often or as little as you require. To do so, you simply need to click **Sync now** as detailed in [Step 4.](#how-do-i-set-it-up-step-1-connect-the-salesforce-connected-app).
**Is this available for all CRMs?**
At this stage, the CRM Contact Sync has only been rolled out for Salesforce and Salesforce Marketing Cloud. We will be rolling out this functionality for additional CRMs in the near future.
**Can this be managed by all users?**
The CRM Contact Sync can only be managed by Super Users at this point in time. We will be making this functionality available to additional users in the near future.
**How many CRM Contact Syncs can I create?**
You can create as many different syncs as you require!