> ## Documentation Index
> Fetch the complete documentation index at: https://knowledge.komo.tech/llms.txt
> Use this file to discover all available pages before exploring further.
# Hub Settings
> Set up your default settings and save time later on!
As you begin your Hub-building journey, your Hub settings are a great place to start. These default settings will save you time and energy in the long run and set you up for success from the start!
## Hub Settings
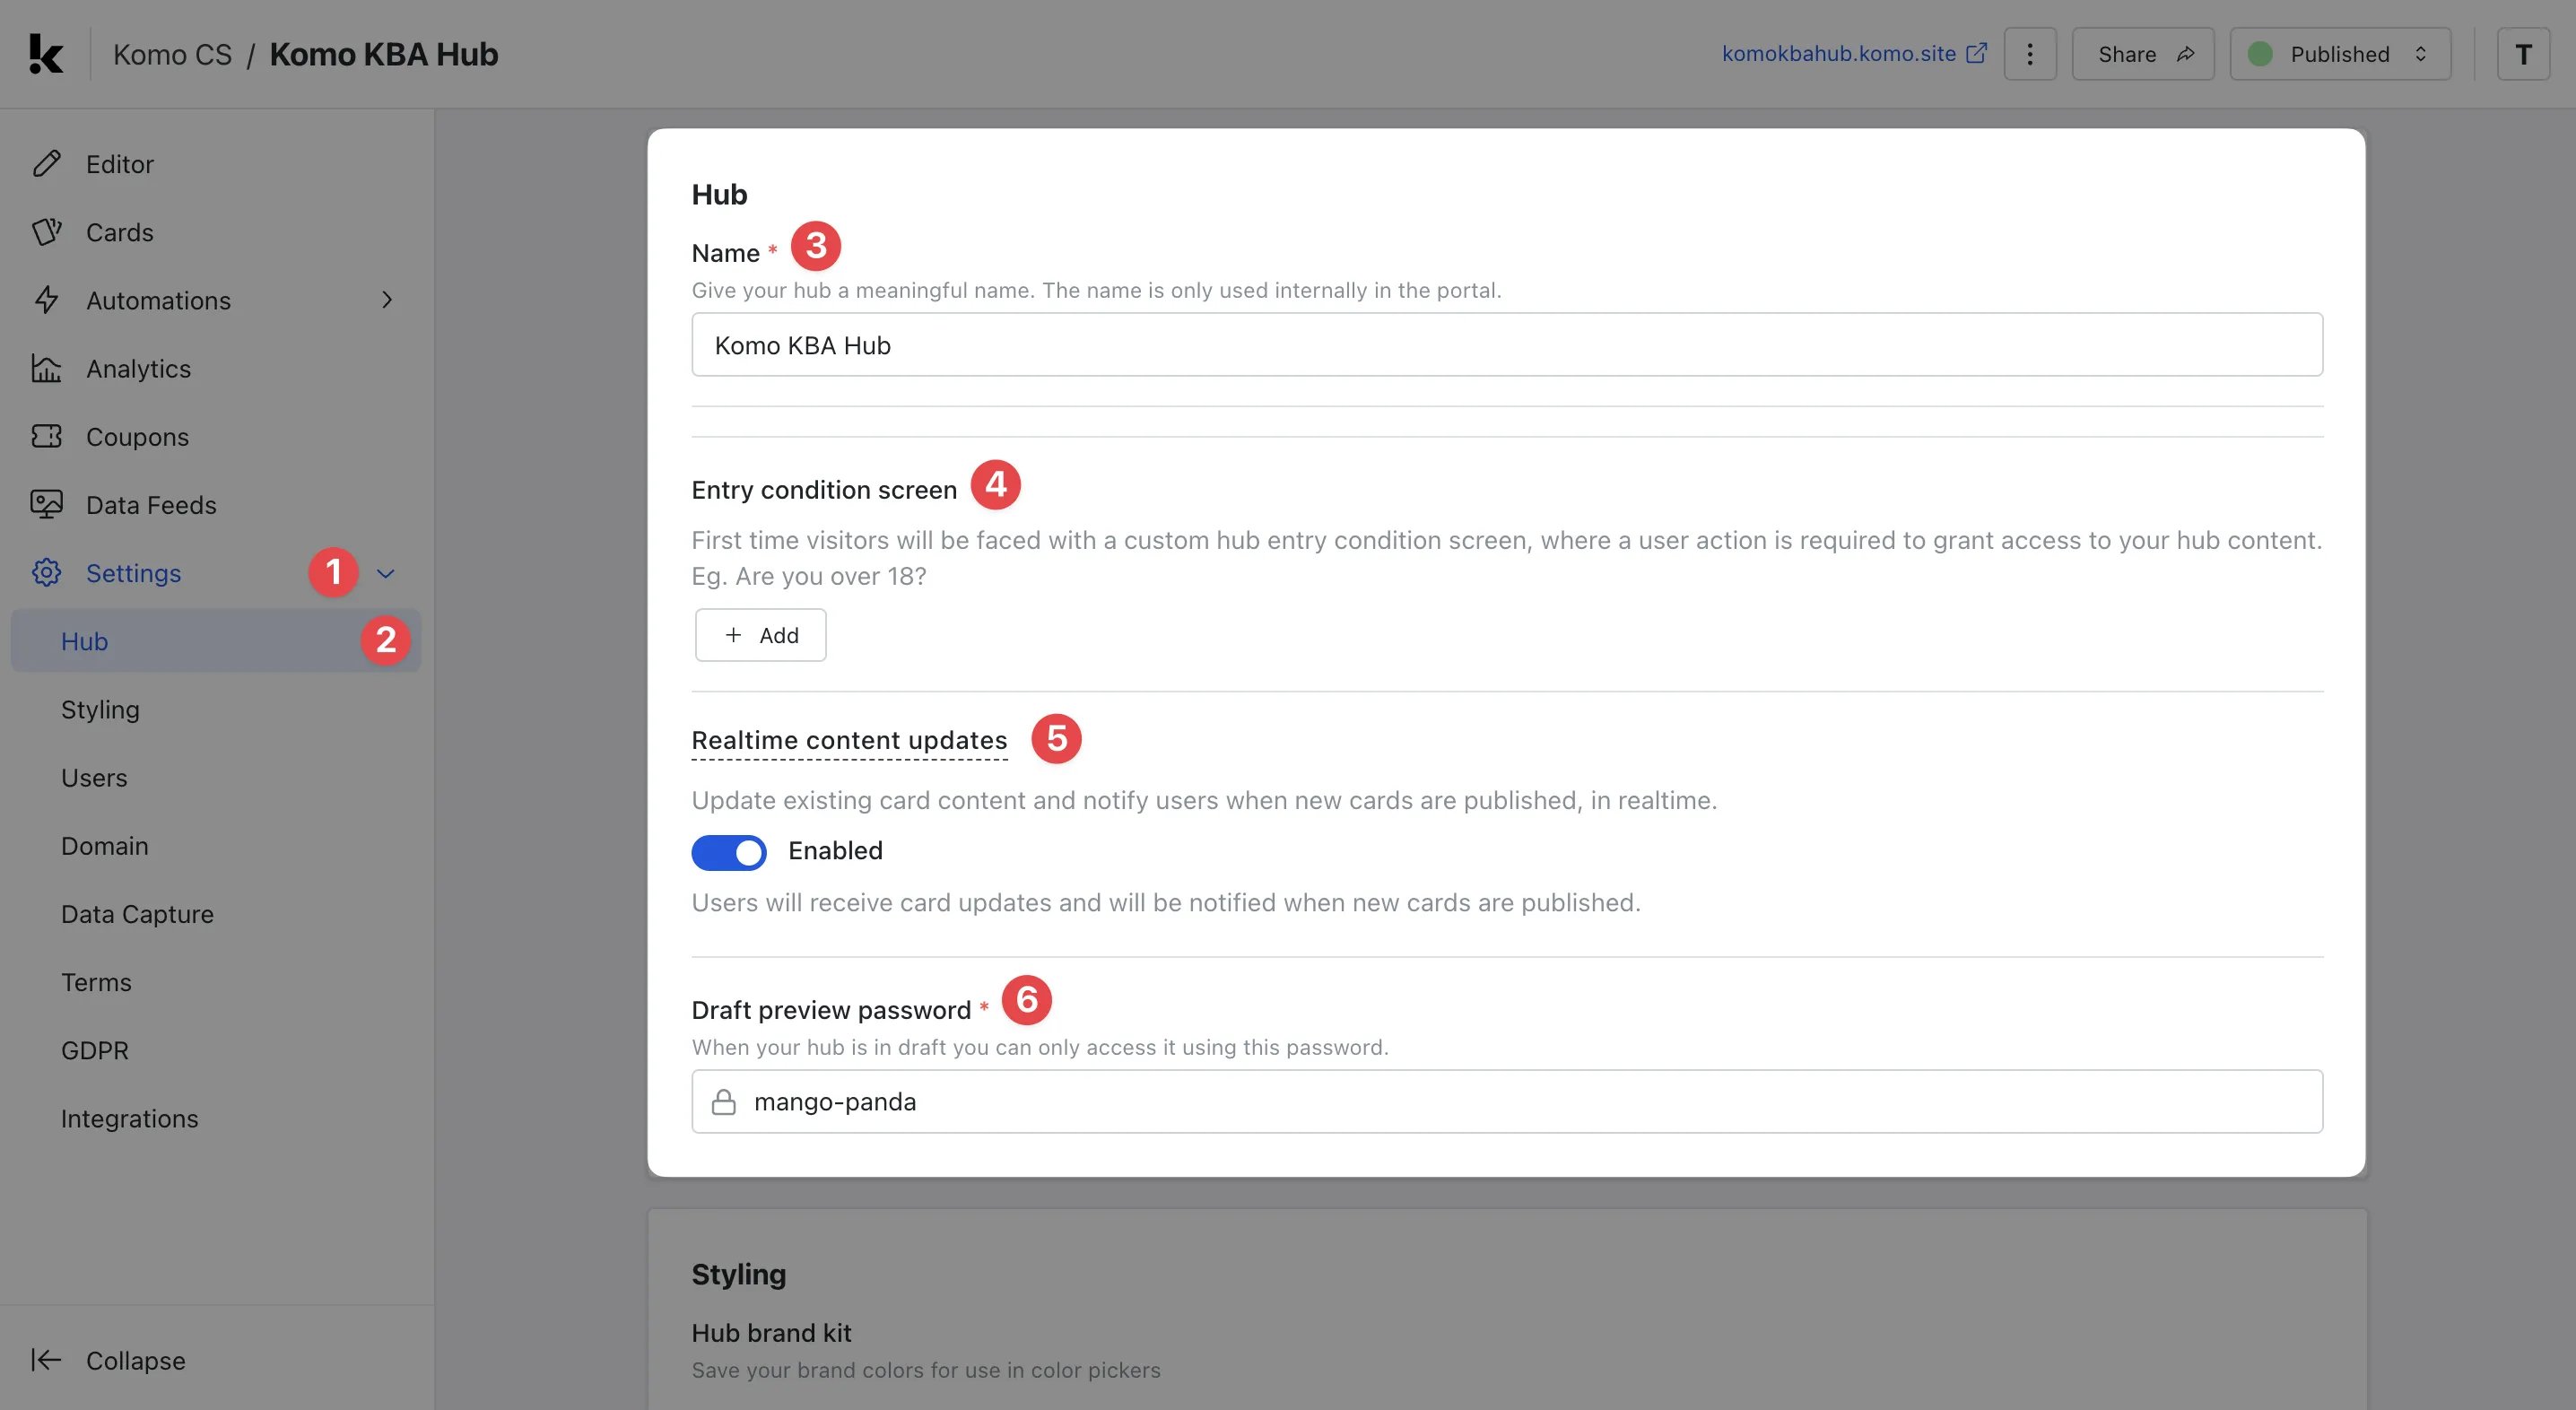 * **(1)** Head to the **Settings** tab and **(2)** click on **Hub** to access the settings.
* **(3)** Edit the **Internal Name** of the Hub you have just created.
* **(4)** Add a custom **Hub entry condition screen.** As an example, some of our customers use this to ensure users are over 18 before they're granted entry to their Hub. This will appear as soon as a user tries to access your Hub and content. [**Click here to learn more.**](/interactive-features/features/entry-condition-screen/index)
* **(5)** Enable **real-time content updates** , which will update content on your Hub and alert your users of this new content in real-time with a **'new content available'** notification.
* **(6)** Set your **draft preview password**, allowing your internal team or clients to view your completed Hub as a draft without using an open URL that could be accessed by your consumers before you're ready. We provide a pre-generated one for you, but you can always change it!
## Styling Settings
* **(1)** Head to the **Settings** tab and **(2)** click on **Hub** to access the settings.
* **(3)** Edit the **Internal Name** of the Hub you have just created.
* **(4)** Add a custom **Hub entry condition screen.** As an example, some of our customers use this to ensure users are over 18 before they're granted entry to their Hub. This will appear as soon as a user tries to access your Hub and content. [**Click here to learn more.**](/interactive-features/features/entry-condition-screen/index)
* **(5)** Enable **real-time content updates** , which will update content on your Hub and alert your users of this new content in real-time with a **'new content available'** notification.
* **(6)** Set your **draft preview password**, allowing your internal team or clients to view your completed Hub as a draft without using an open URL that could be accessed by your consumers before you're ready. We provide a pre-generated one for you, but you can always change it!
## Styling Settings
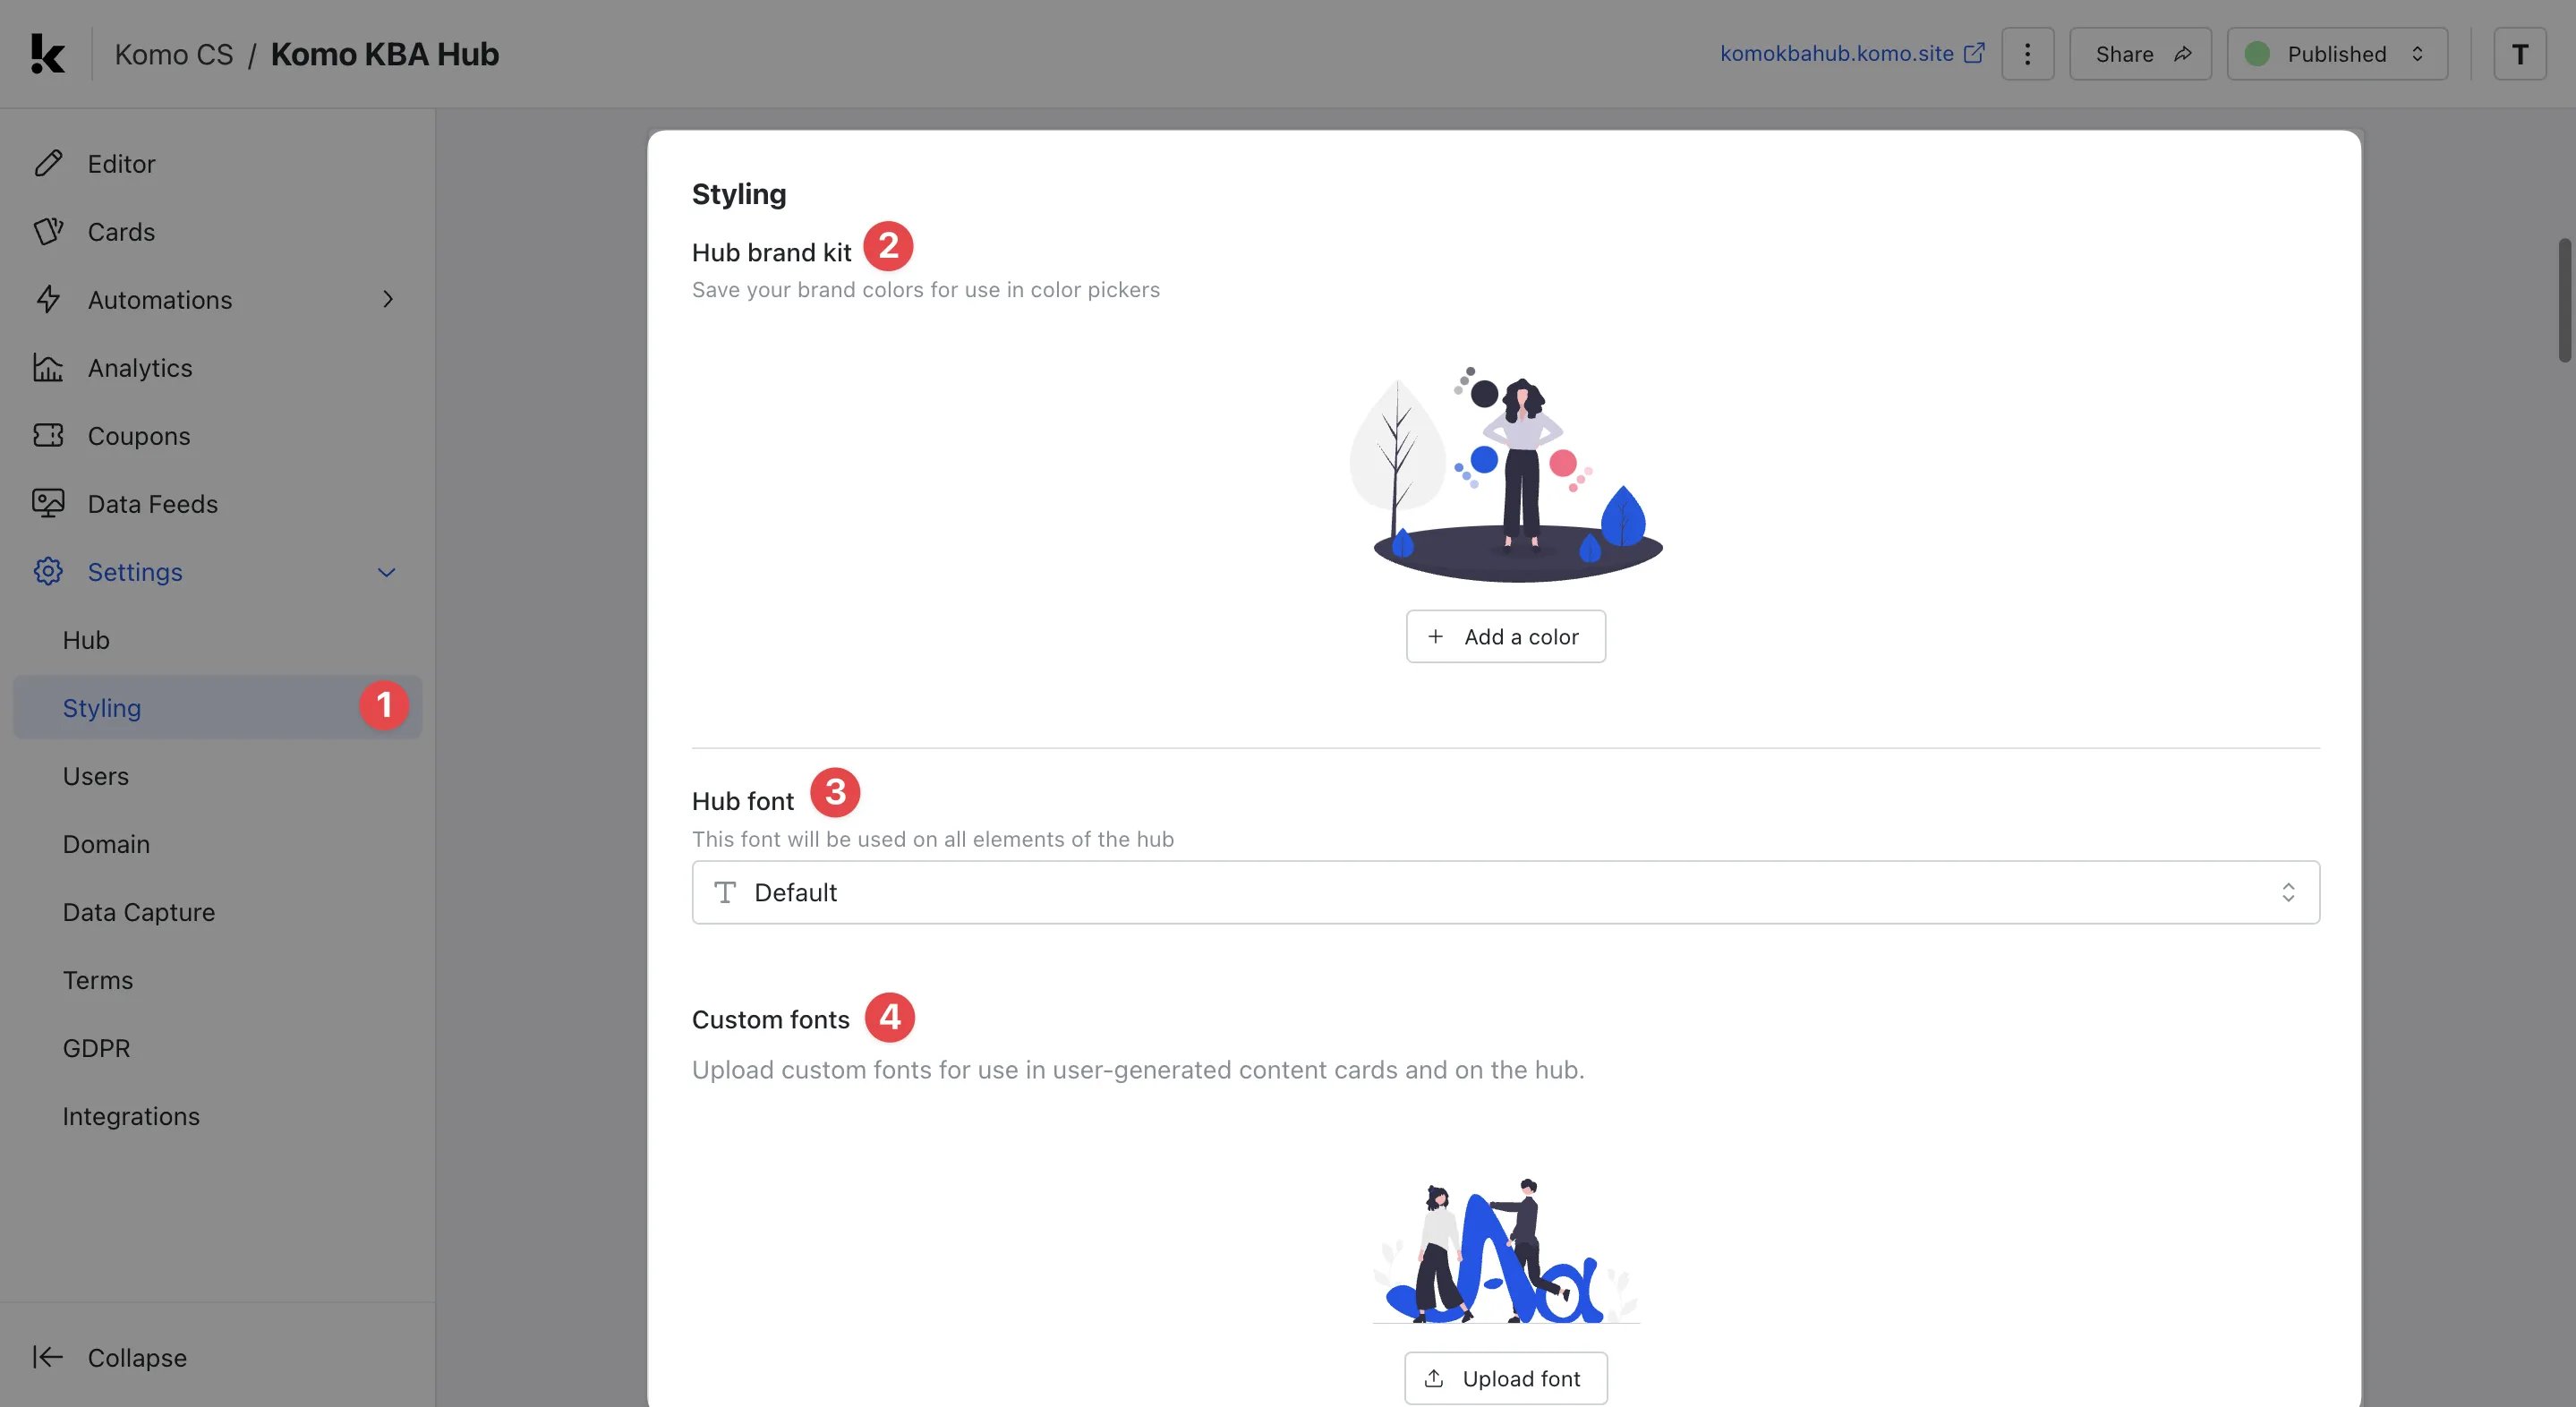 * **(1)** Click on **Styling** to navigate to these settings.
* **(2)** Here you can add your **brand colors** making styling your Hub easier.
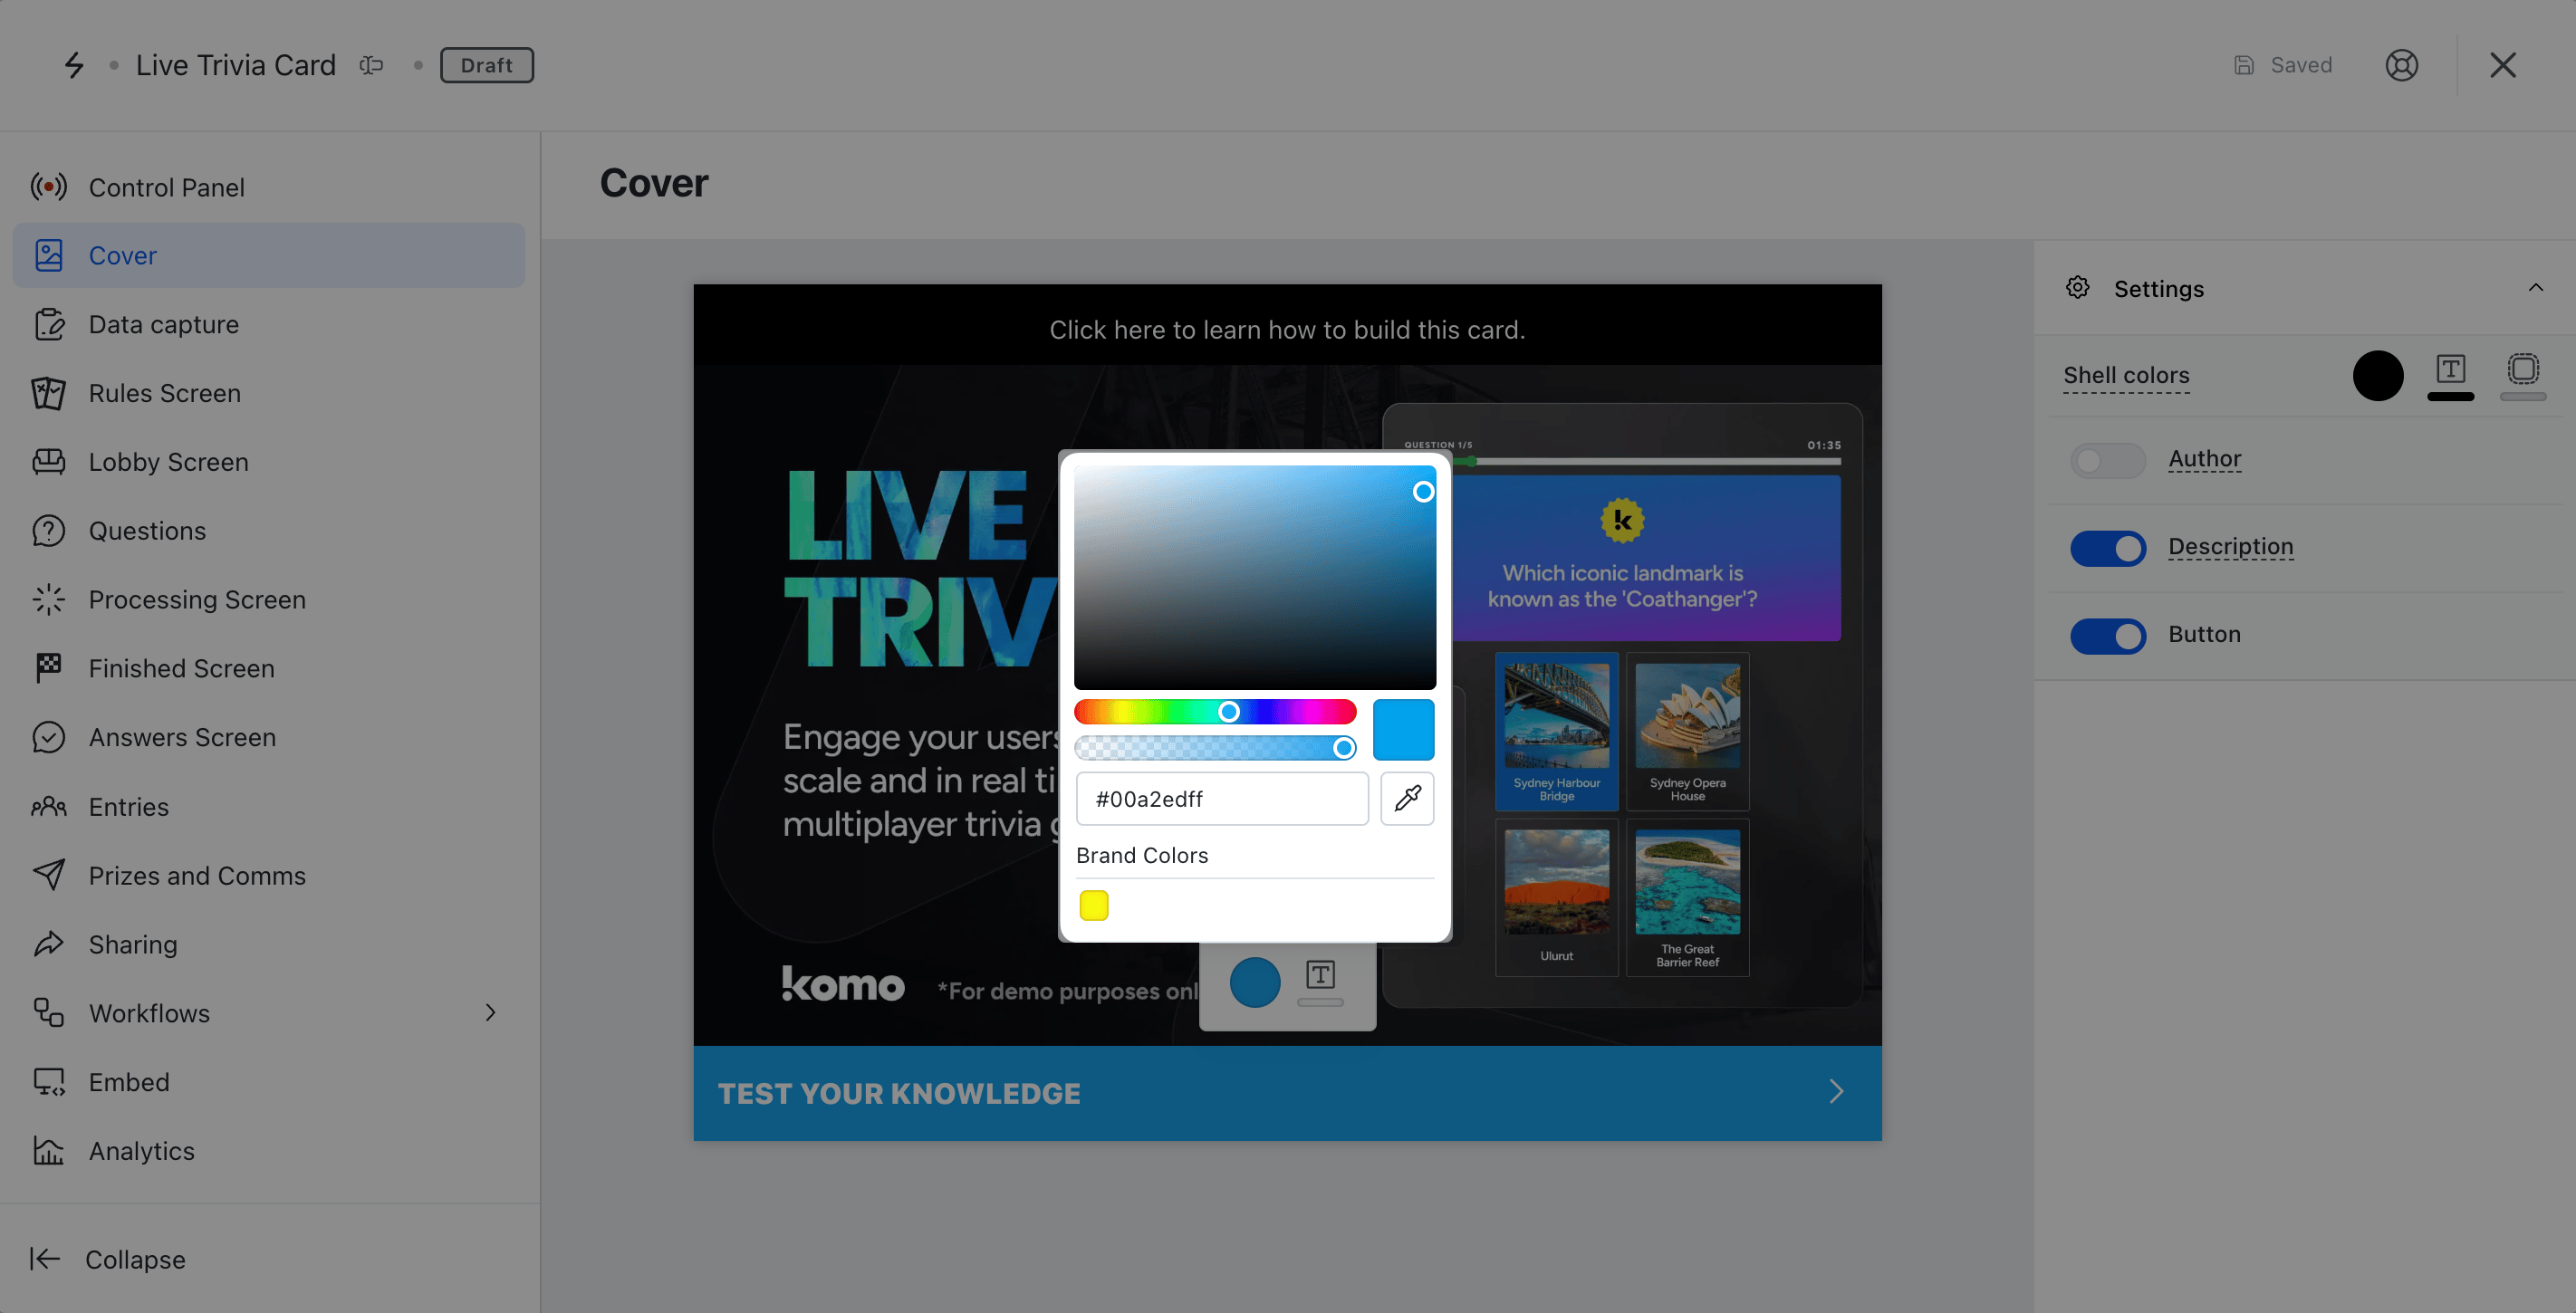
When you alter colors on the Hub, your brand colors will appear as options to select from.
* **(1)** Click on **Styling** to navigate to these settings.
* **(2)** Here you can add your **brand colors** making styling your Hub easier.
When you alter colors on the Hub, your brand colors will appear as options to select from.
 * **(3)** Select the **font** for the text on your Hub to display in. You can read more about setting this up [**here.**](/getting-started/hub-setup/hub-fonts/index)
* **(4)** Upload **custom fonts**. This will allow you to use your own brand's font instead of one of the fonts we have provided for you. You can read more about setting this up [**here**](/getting-started/hub-setup/hub-fonts/index).
## User Settings
* **(3)** Select the **font** for the text on your Hub to display in. You can read more about setting this up [**here.**](/getting-started/hub-setup/hub-fonts/index)
* **(4)** Upload **custom fonts**. This will allow you to use your own brand's font instead of one of the fonts we have provided for you. You can read more about setting this up [**here**](/getting-started/hub-setup/hub-fonts/index).
## User Settings
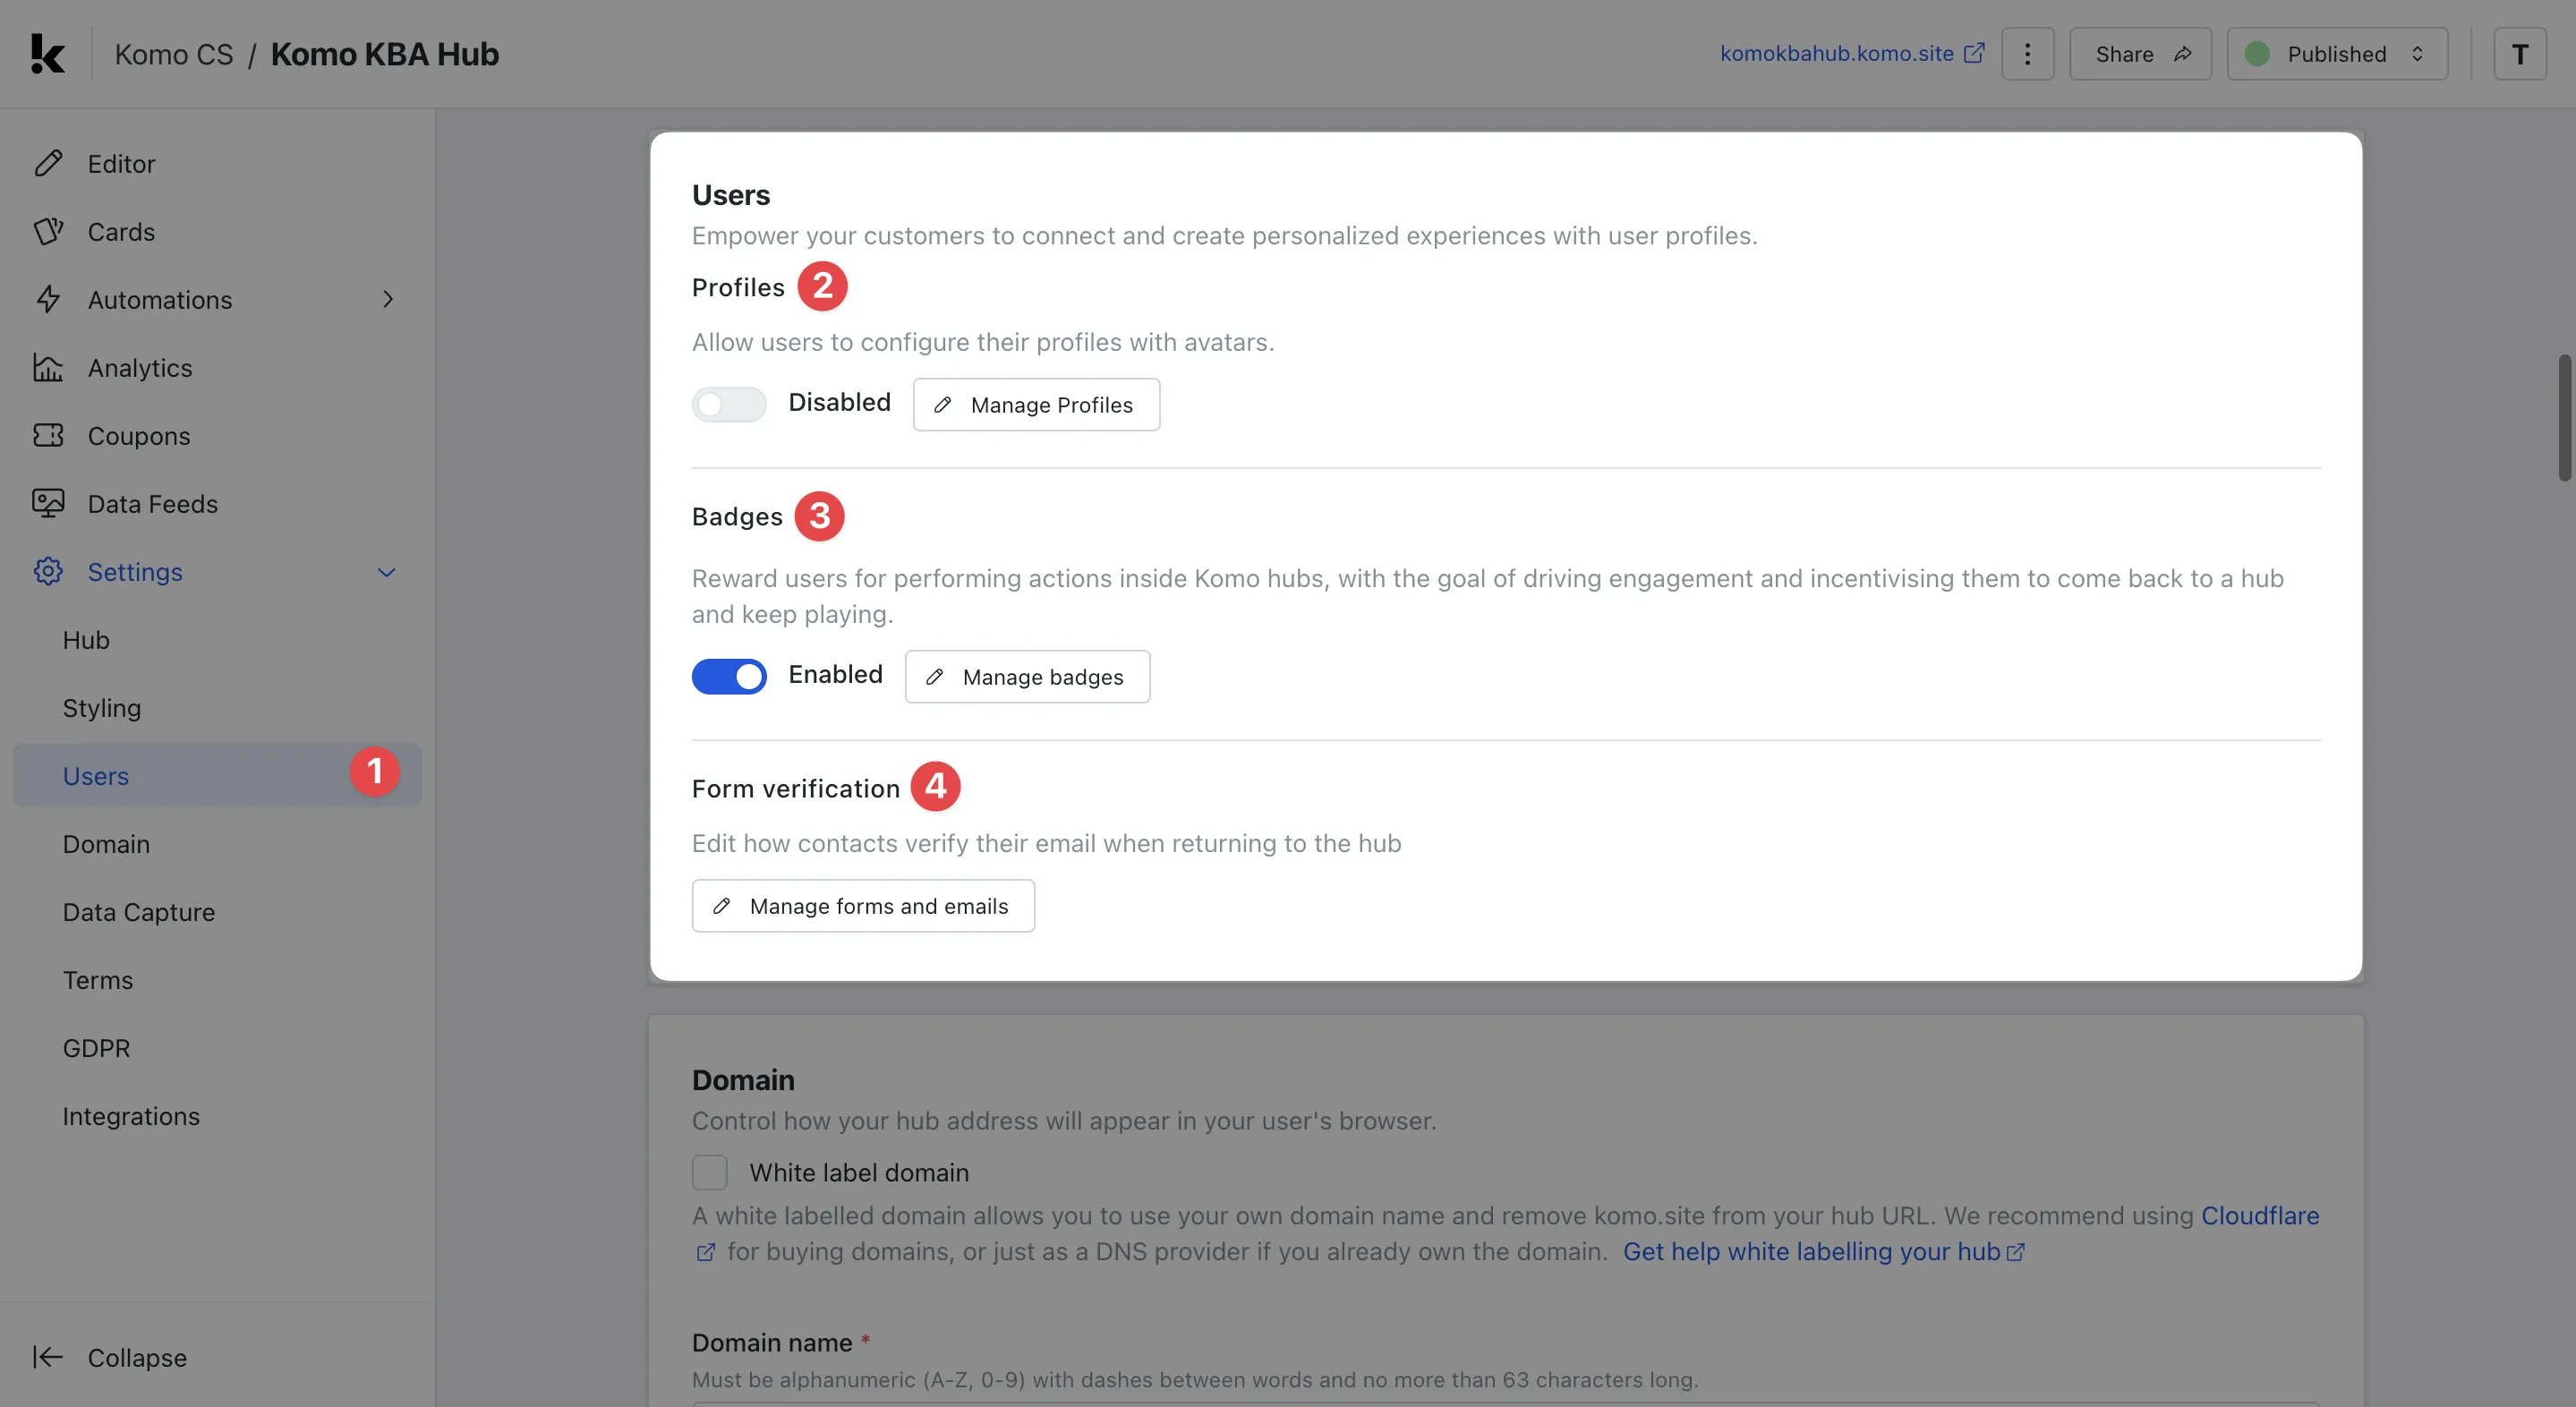 * **(1)** Click **Users** to enter the settings.
* **(2)** Here you can **enable Profiles** allowing users to identify themselves with an avatar while they engage with the games across your hub. You can read more about setting up this feature [here](/interactive-features/features/badges-and-workflows#step-8-enable--configure-profiles-optional).
* **(3)** Enable **Badges** allowing you to assign achievements to certain users based on their activity within your hub. You can read more about setting up this feature [here](/interactive-features/features/badges-and-workflows/index).
* **(4)** Edit the **contact verification process.** It's a way to verify that a person is who they say they are so we can keep all customer data secure (our first priority) and provide a smooth experience for returning contacts. You can learn more about setting up this feature [here](/crm/contacts/contact-verification/index).
## Site Domain
* **(1)** Click **Users** to enter the settings.
* **(2)** Here you can **enable Profiles** allowing users to identify themselves with an avatar while they engage with the games across your hub. You can read more about setting up this feature [here](/interactive-features/features/badges-and-workflows#step-8-enable--configure-profiles-optional).
* **(3)** Enable **Badges** allowing you to assign achievements to certain users based on their activity within your hub. You can read more about setting up this feature [here](/interactive-features/features/badges-and-workflows/index).
* **(4)** Edit the **contact verification process.** It's a way to verify that a person is who they say they are so we can keep all customer data secure (our first priority) and provide a smooth experience for returning contacts. You can learn more about setting up this feature [here](/crm/contacts/contact-verification/index).
## Site Domain
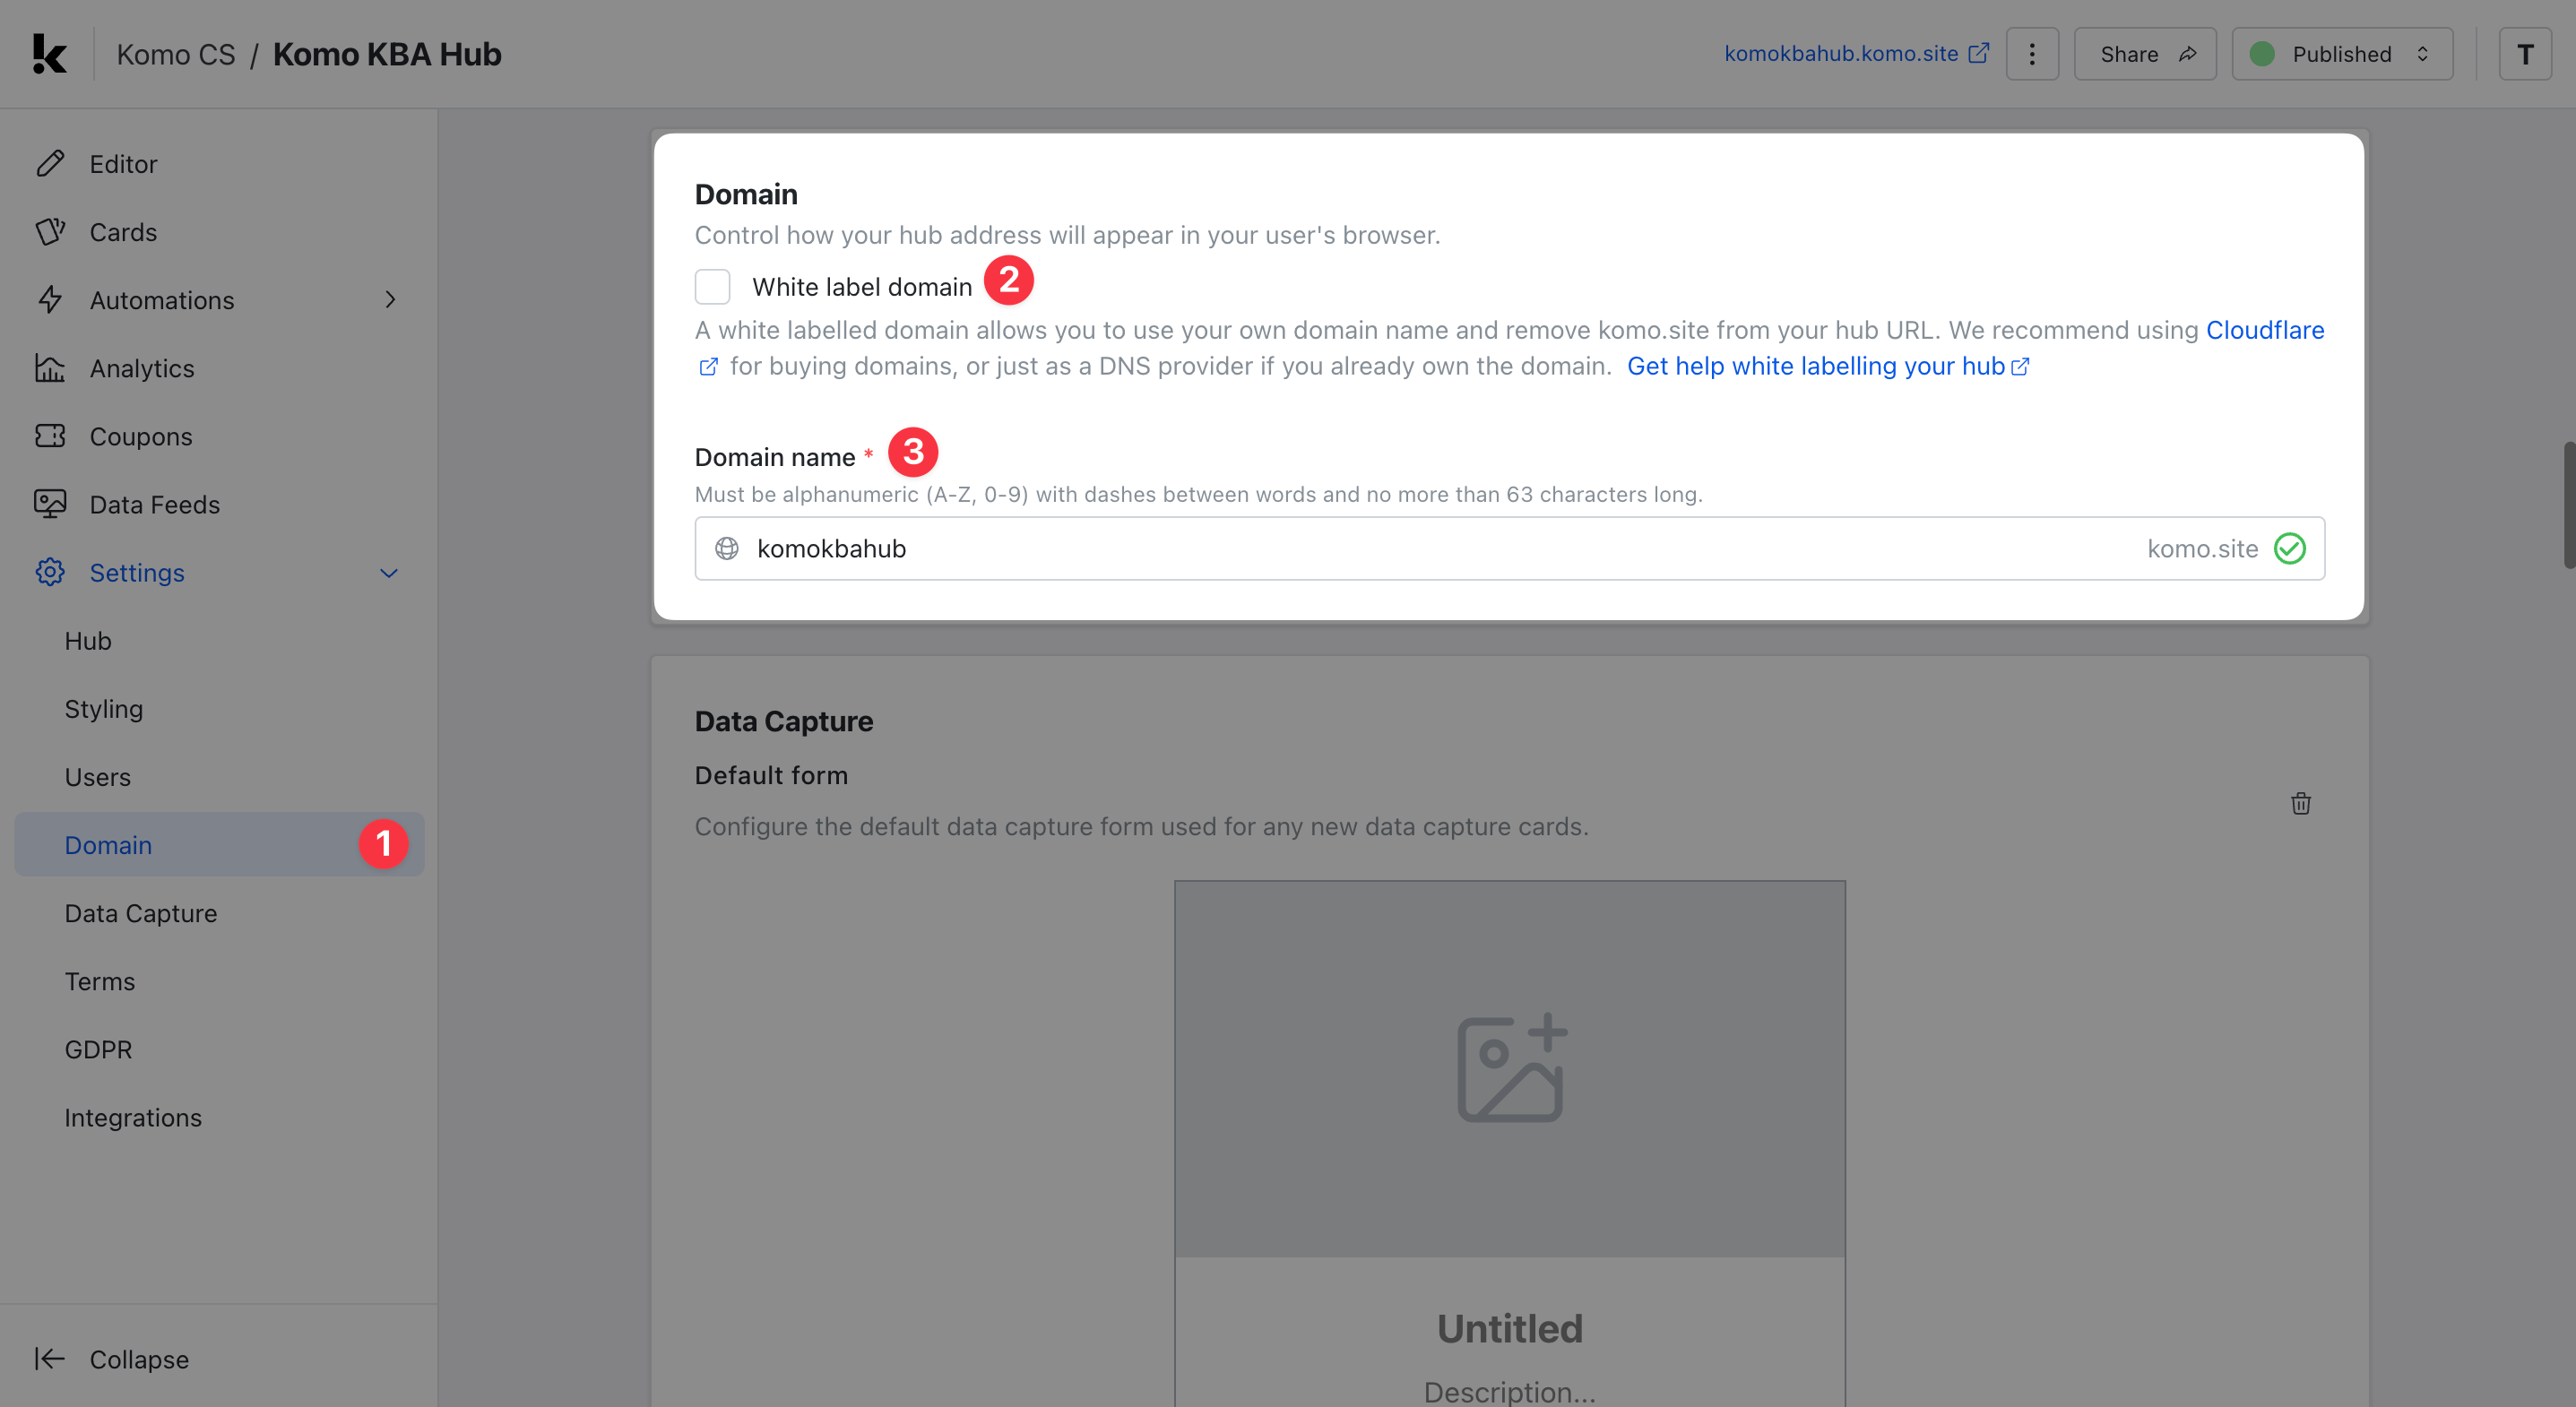 * **(1)** Head to the **Domain tab** of your Hub Settings.
* **(2)** **White label** if you wish to purchase a new URL for your Hub (e.g. [ACME.com](http://ACME.com)). This is where you can configure this. [Click here to learn more about this.](/getting-started/hub-setup/white-labeling-your-domain)
* **(3)** Set or edit the **.[komo.site](http://komo.site)** domain name.
## Data Capture Settings
* **(1)** Head to the **Domain tab** of your Hub Settings.
* **(2)** **White label** if you wish to purchase a new URL for your Hub (e.g. [ACME.com](http://ACME.com)). This is where you can configure this. [Click here to learn more about this.](/getting-started/hub-setup/white-labeling-your-domain)
* **(3)** Set or edit the **.[komo.site](http://komo.site)** domain name.
## Data Capture Settings
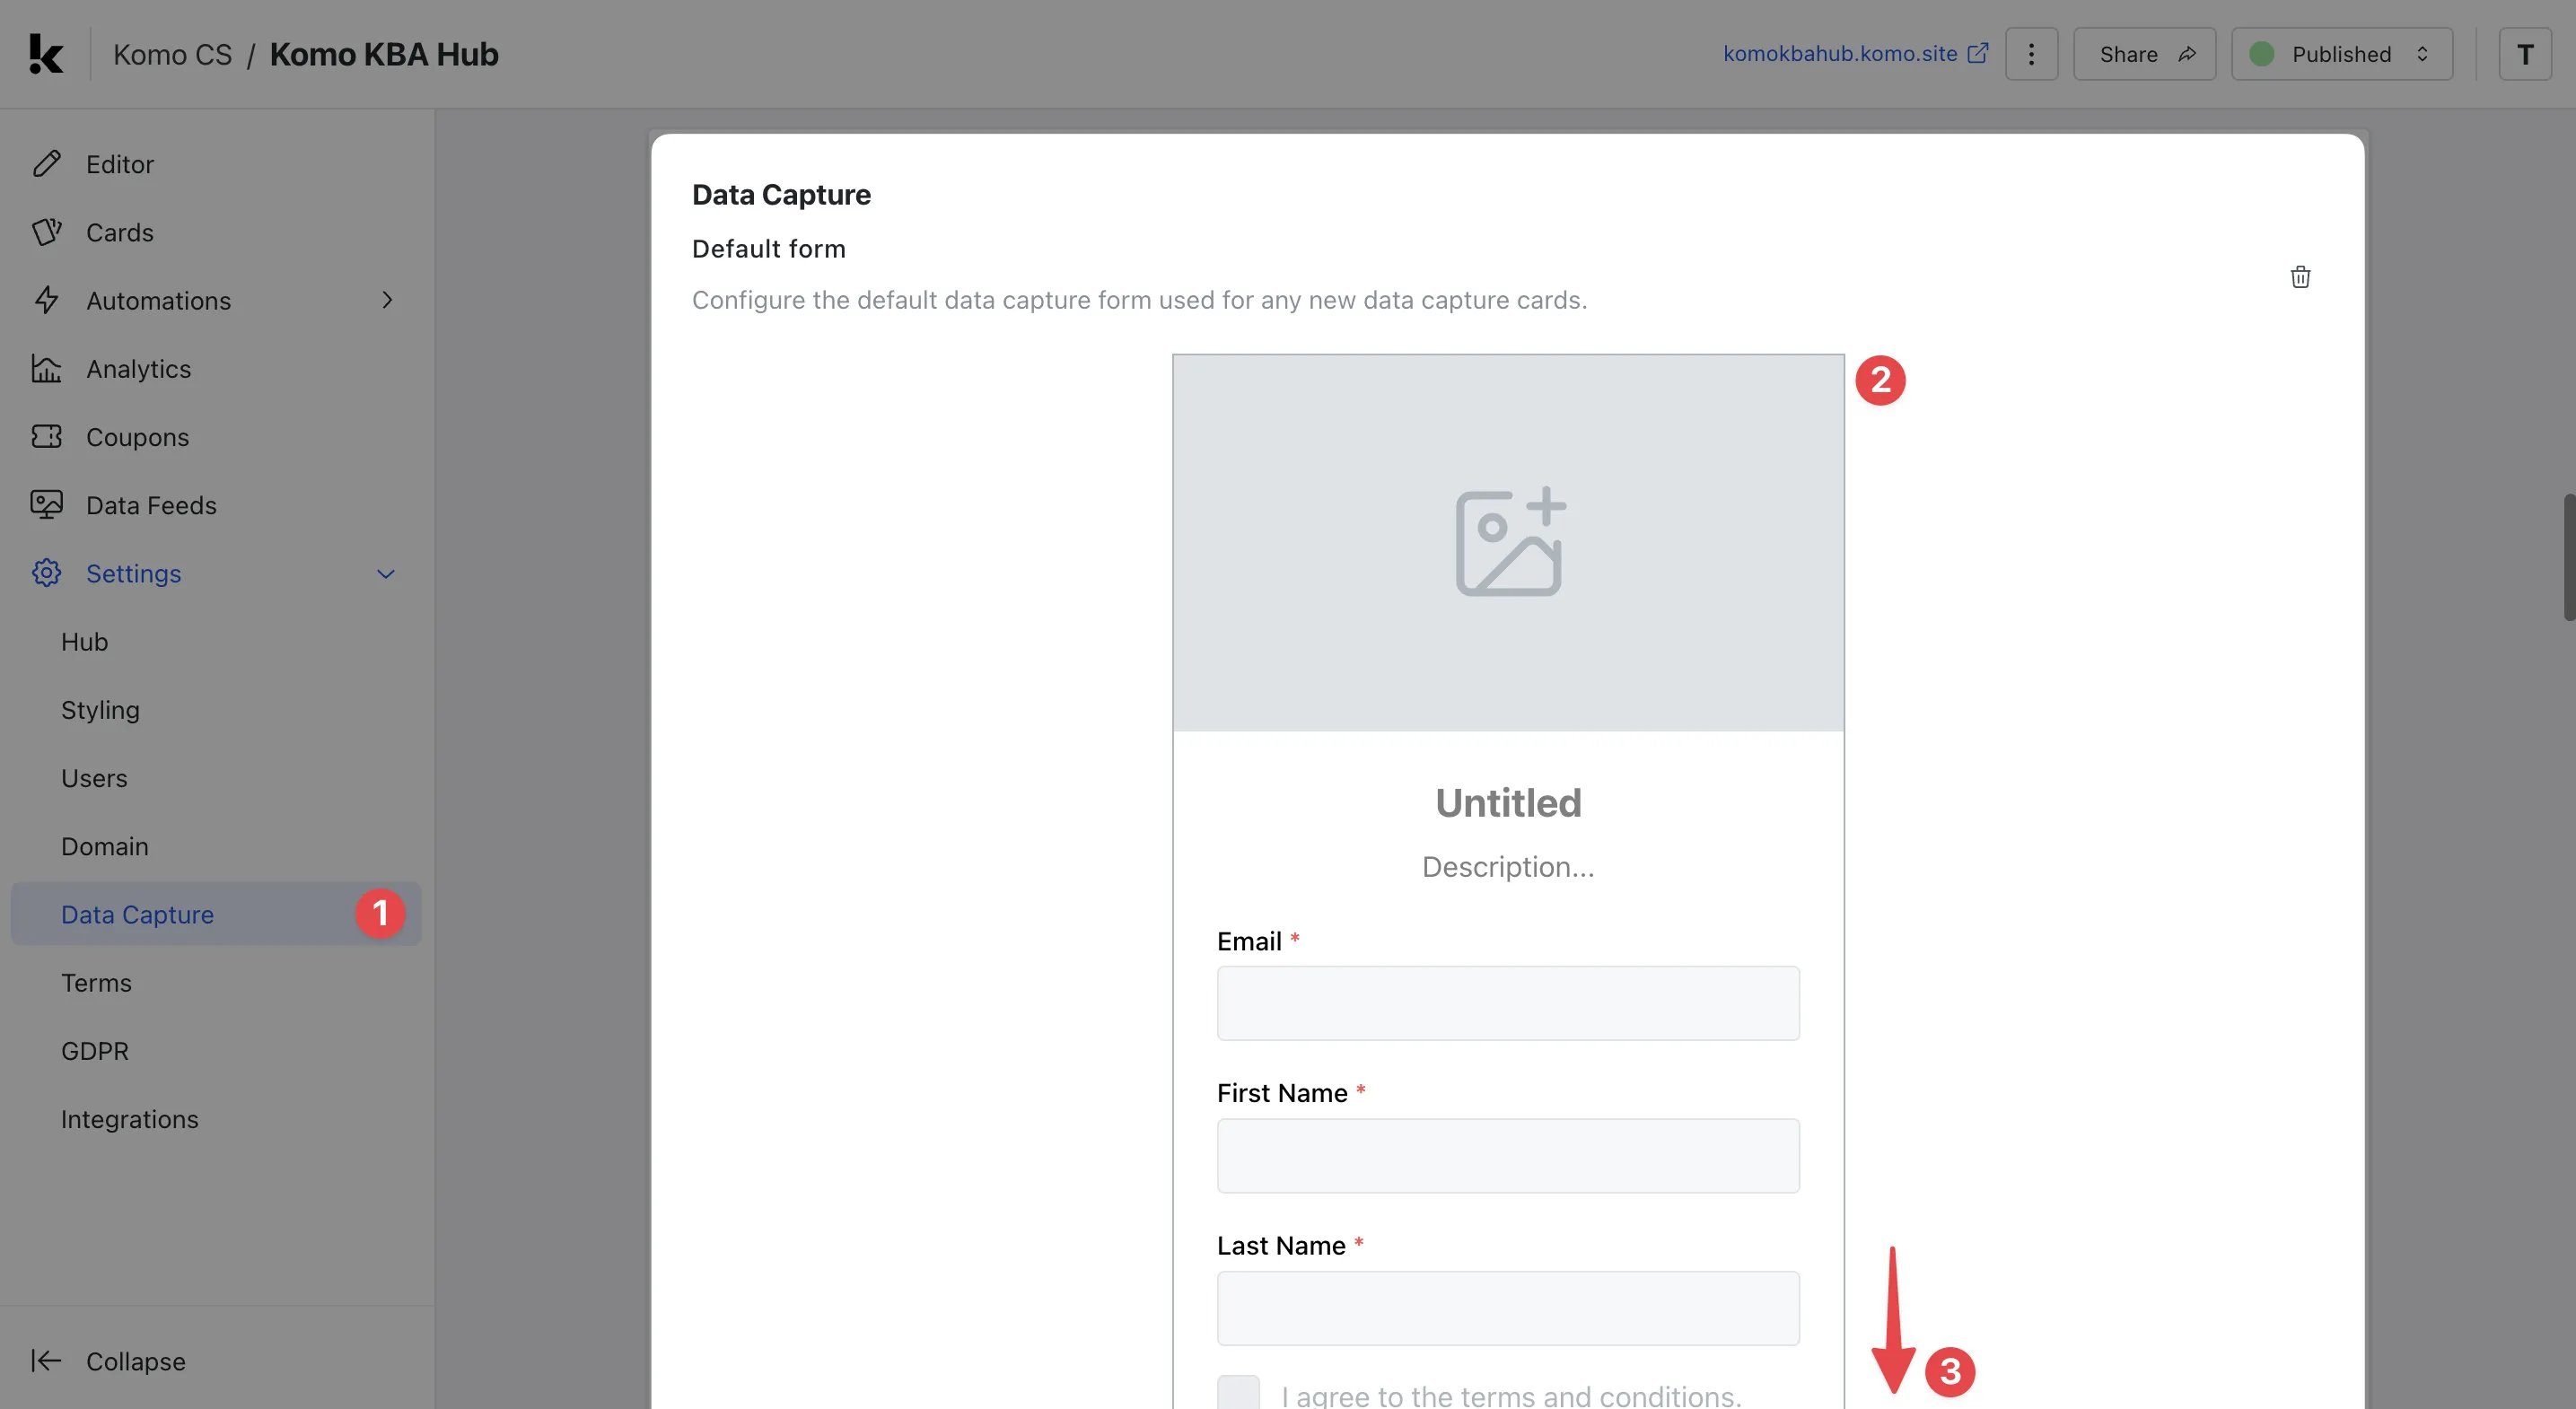 * **(1)** Head to the **Data Capture** tab of your Hub Settings.
* **(2)** Create the **Default Form** that will be added to any Data Capture you create after this point. [Click here to learn more about this](/getting-started/hub-setup/default-data-capture-form/index).
We highly recommend setting up your Default Form prior to building content cards - it will save you a lot of time in the long run!
* **(3)** Scrolling down, you can configure your reference table validation \[optional]. You can learn more about this [**here.**](/crm/communications/reference-tables/index)
## Terms and Conditions
* **(1)** Head to the **Data Capture** tab of your Hub Settings.
* **(2)** Create the **Default Form** that will be added to any Data Capture you create after this point. [Click here to learn more about this](/getting-started/hub-setup/default-data-capture-form/index).
We highly recommend setting up your Default Form prior to building content cards - it will save you a lot of time in the long run!
* **(3)** Scrolling down, you can configure your reference table validation \[optional]. You can learn more about this [**here.**](/crm/communications/reference-tables/index)
## Terms and Conditions
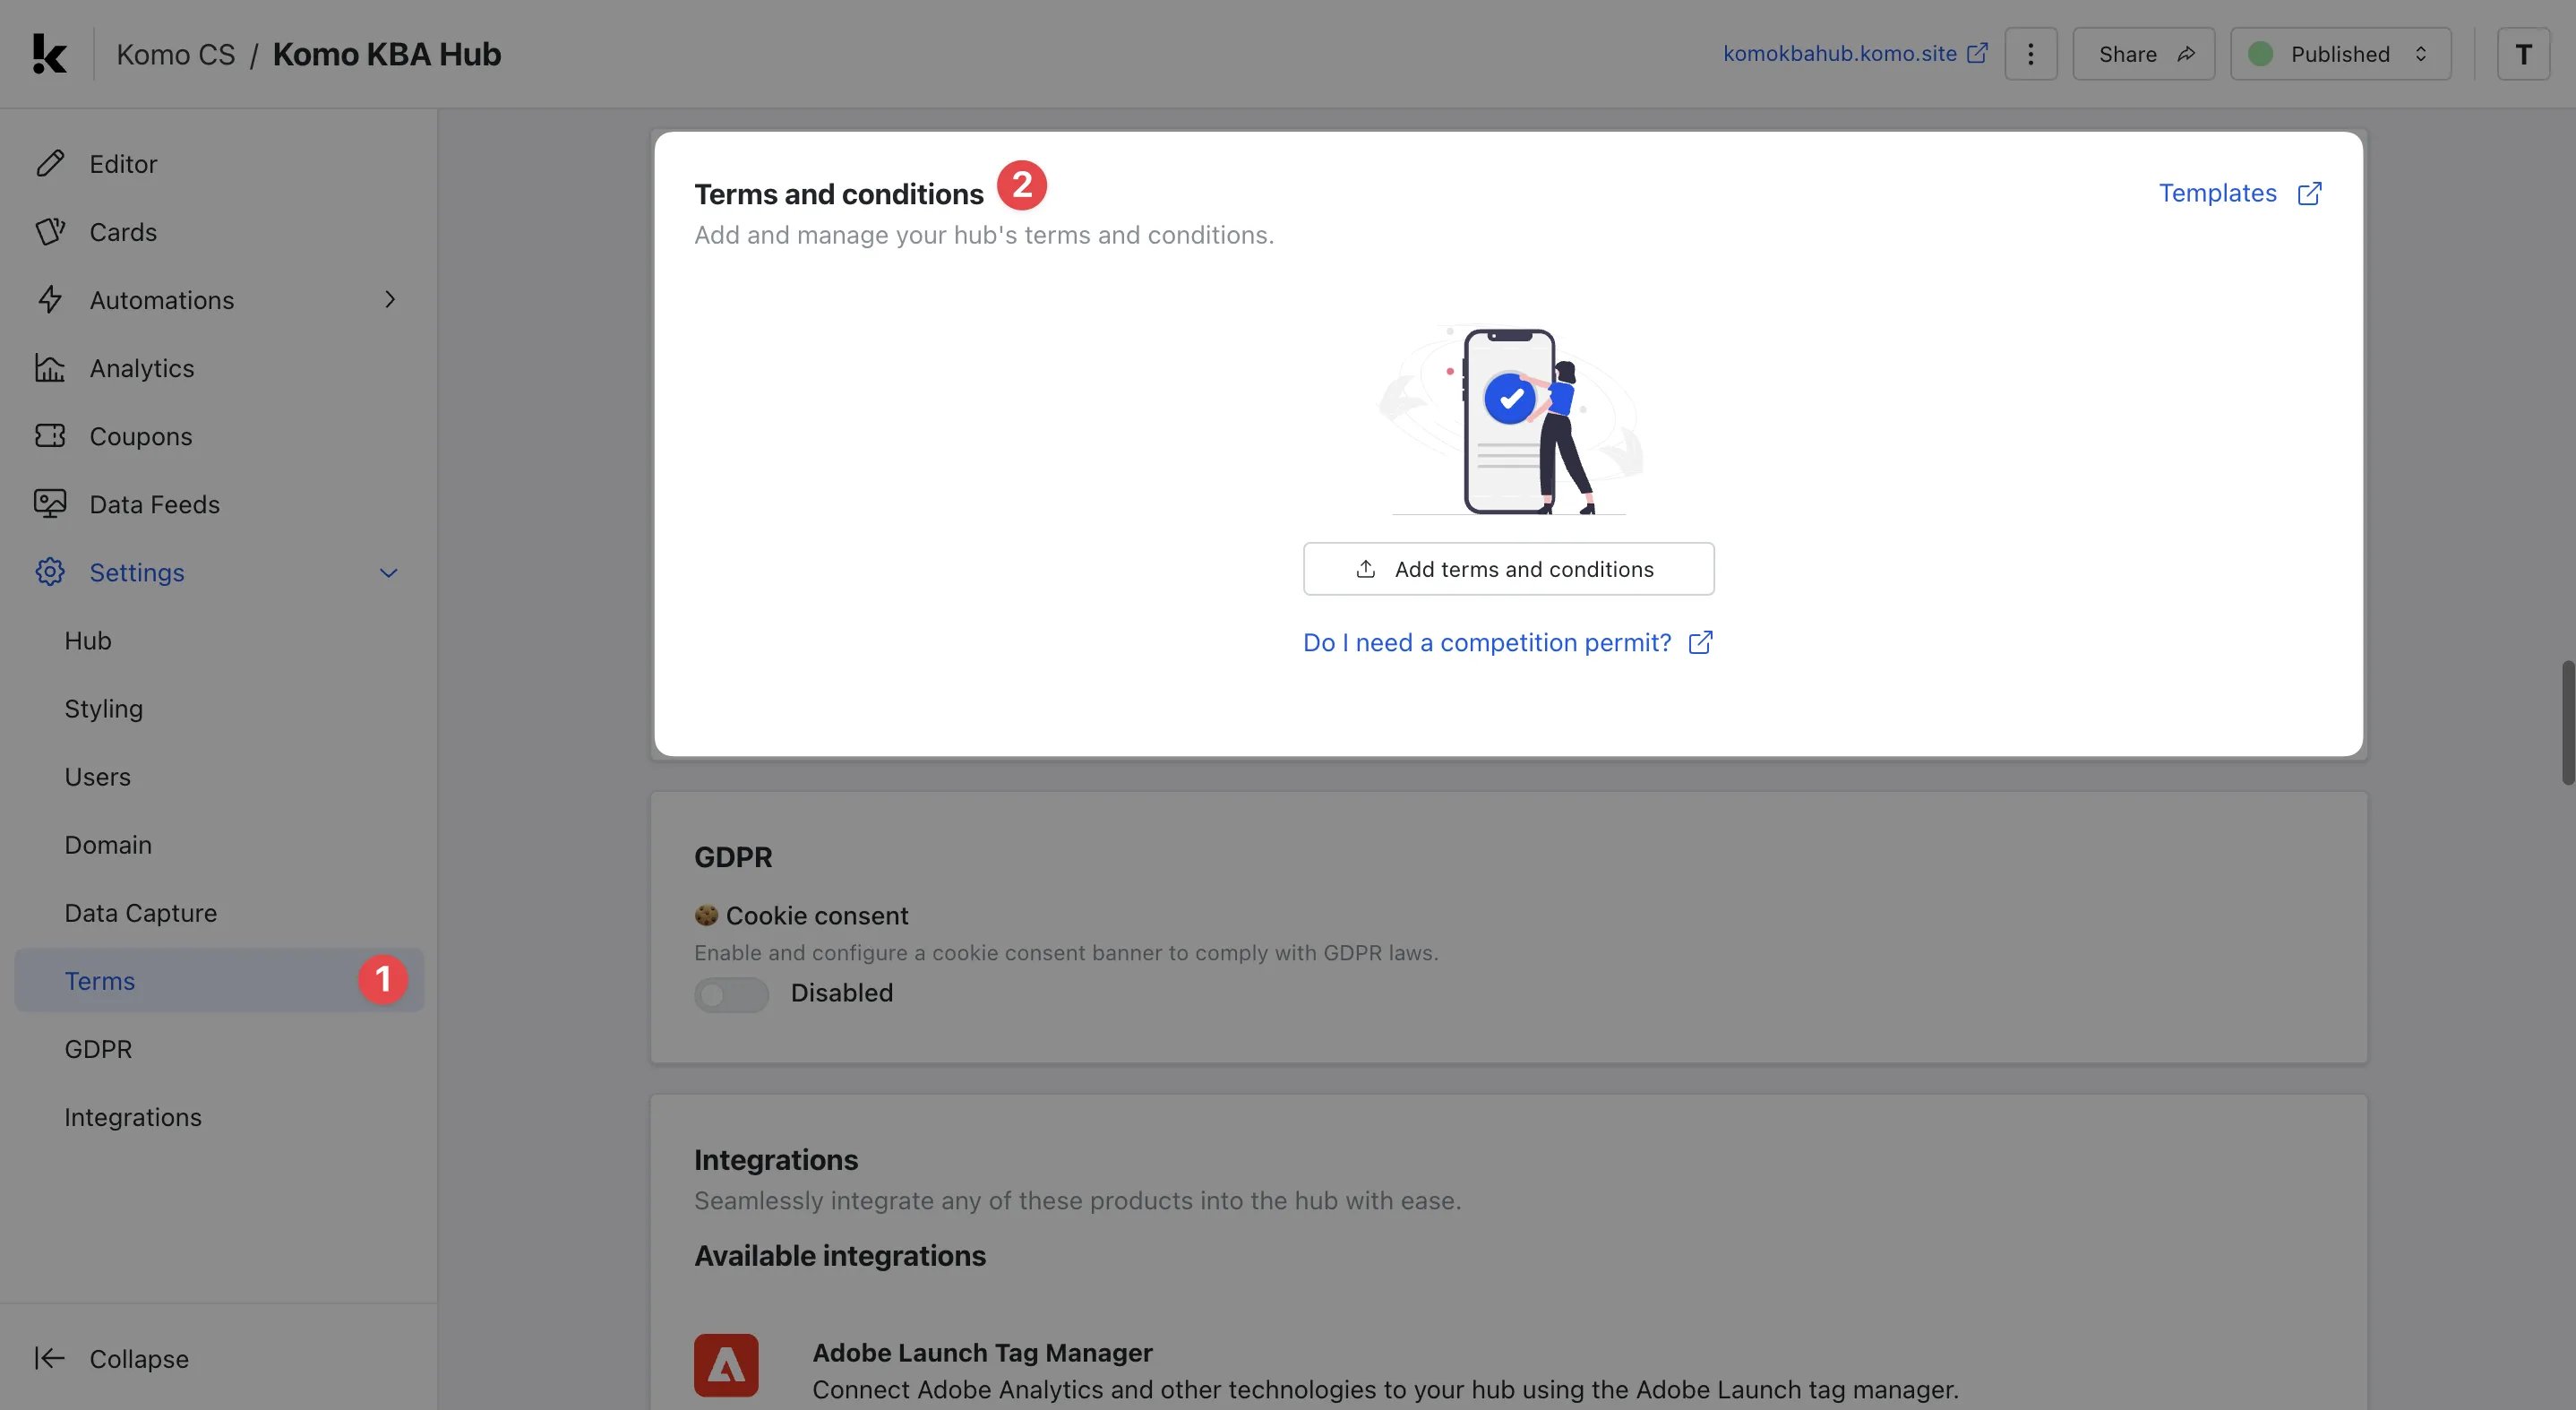 * **(1)** Head to the **Terms** tab of your Hub Settings.
* **(2)** Upload your terms and conditions to the Hub and hyperlink these terms to your competitions. [Click here to learn more about this](/getting-started/resources/terms-conditions/index).
## GDPR Settings
* **(1)** Head to the **Terms** tab of your Hub Settings.
* **(2)** Upload your terms and conditions to the Hub and hyperlink these terms to your competitions. [Click here to learn more about this](/getting-started/resources/terms-conditions/index).
## GDPR Settings
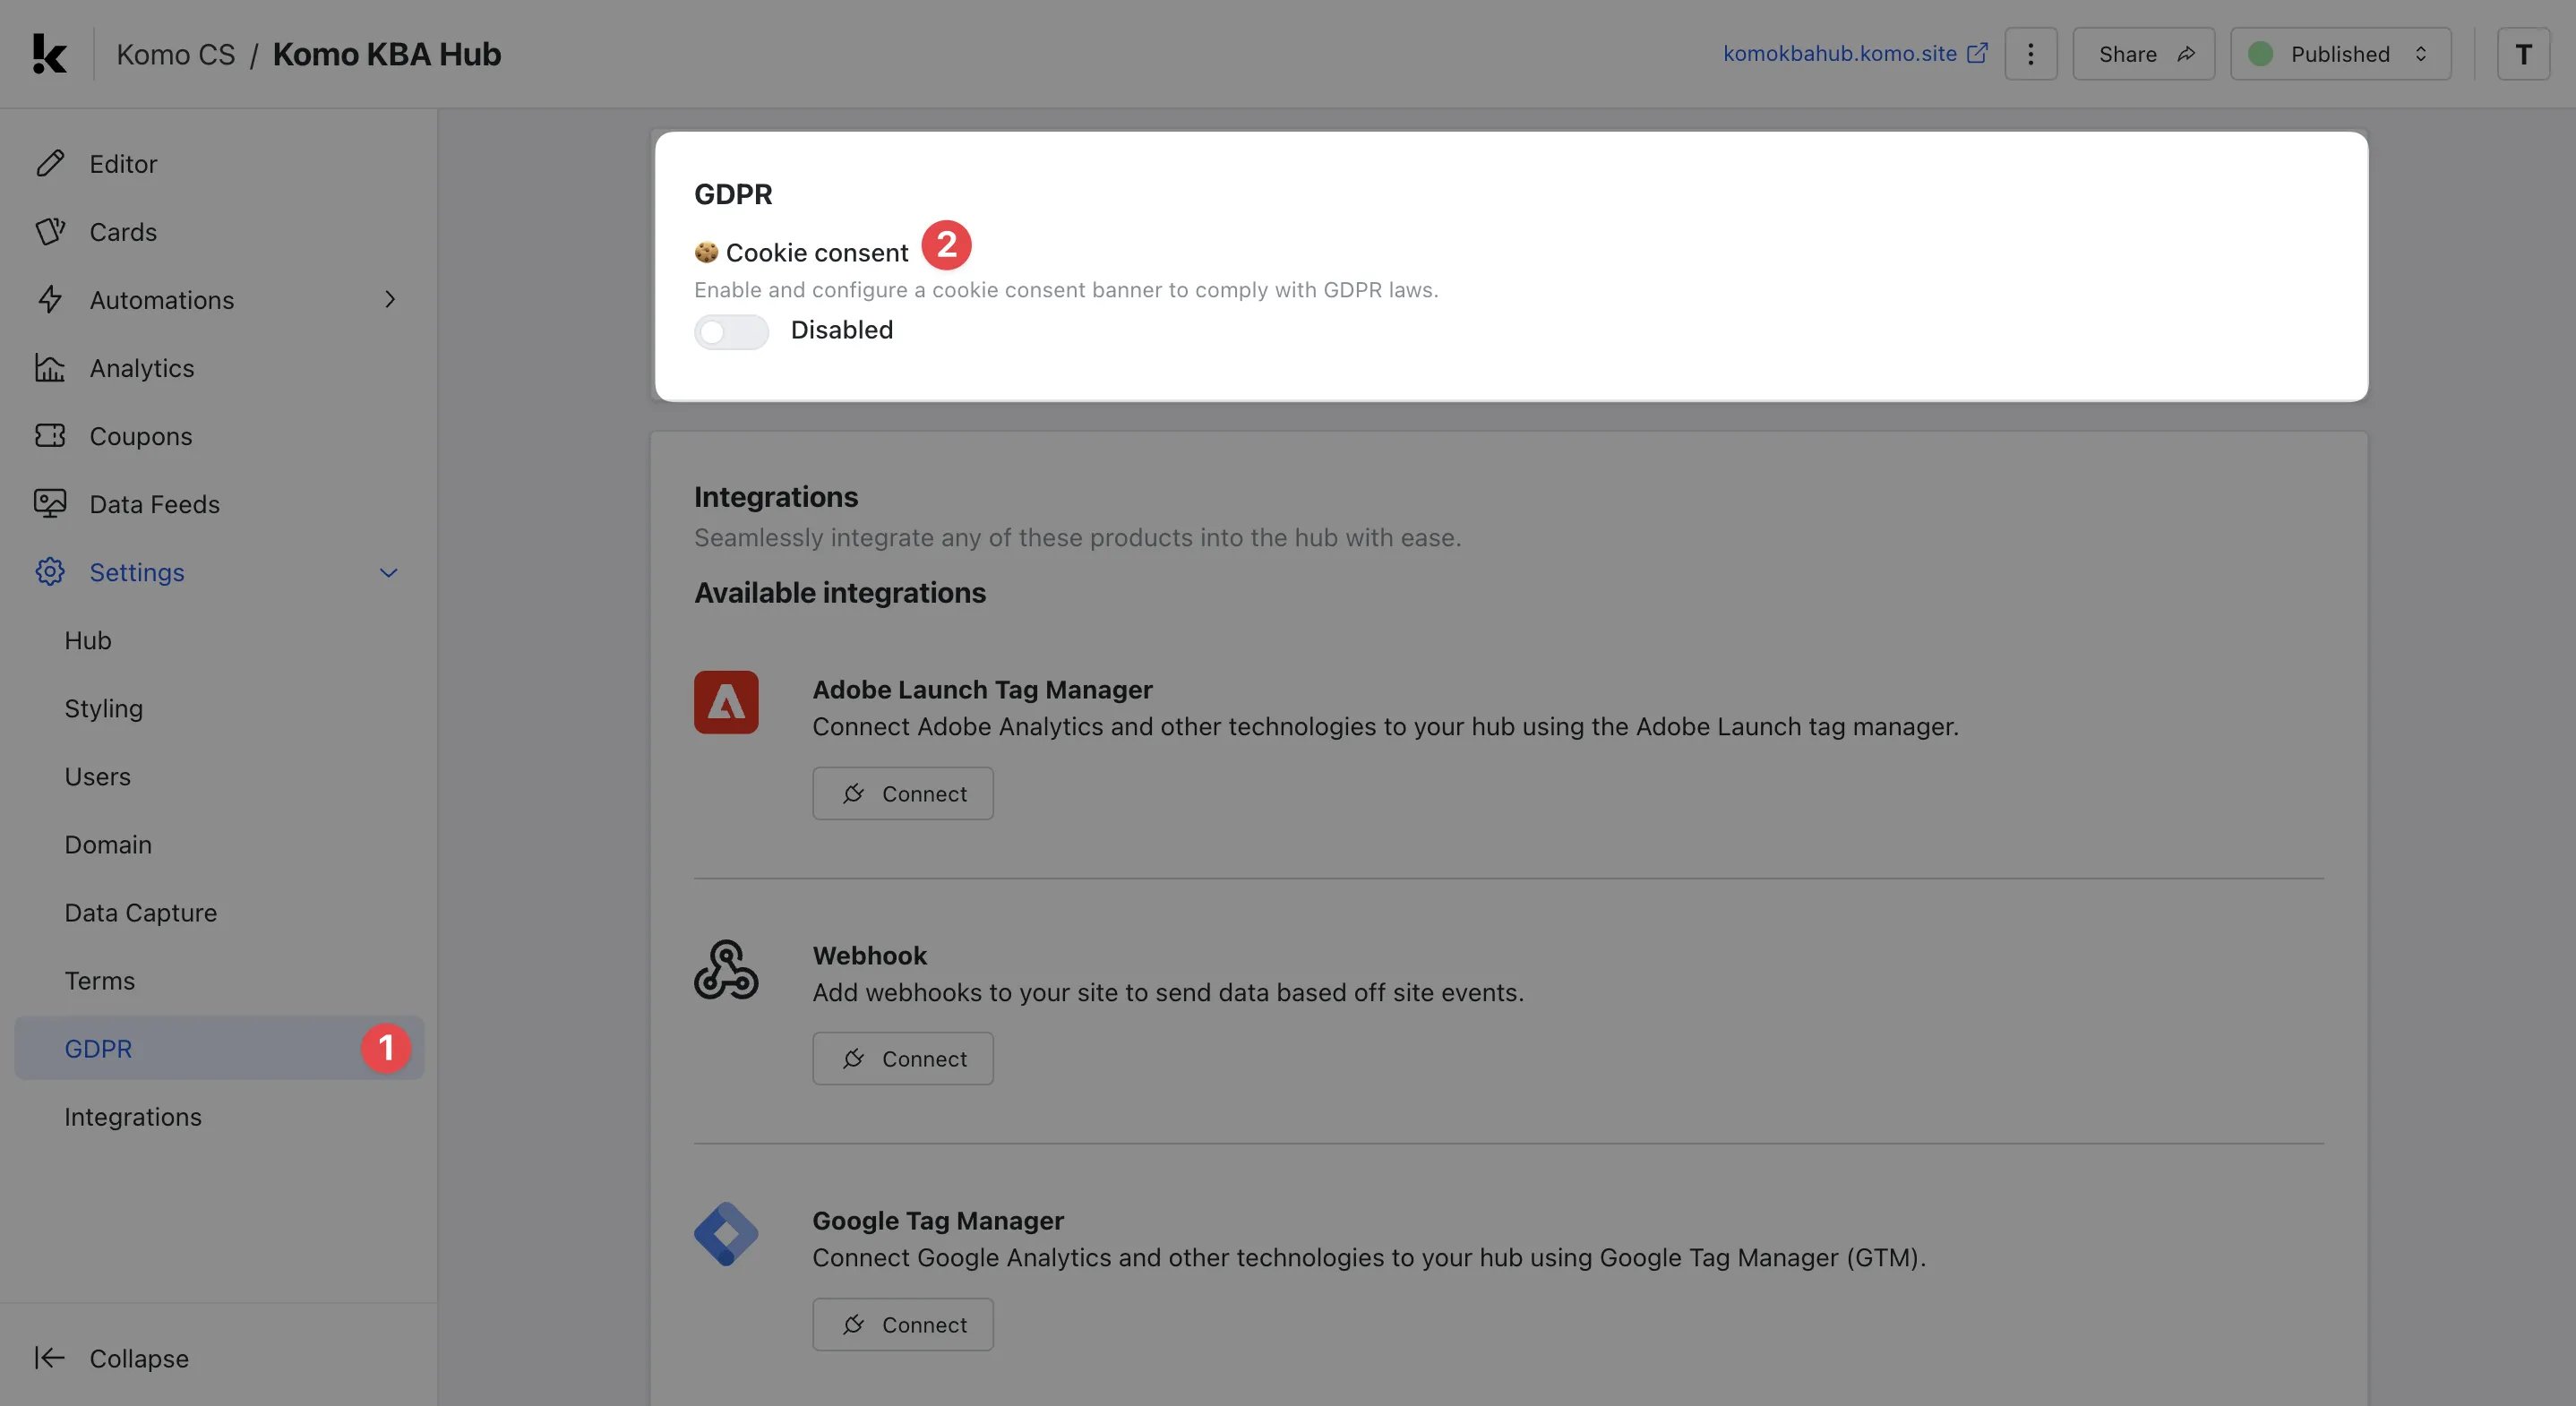 * **(1)** Head to the **GDPR** tab of your Hub Settings.
* **(2)** Enable and configure your **Cookie Consent banners**.
Once enabled, click the **Edit Cookie Consent Banner** button and follow the steps below:\\
* **(1)** Head to the **GDPR** tab of your Hub Settings.
* **(2)** Enable and configure your **Cookie Consent banners**.
Once enabled, click the **Edit Cookie Consent Banner** button and follow the steps below:\\
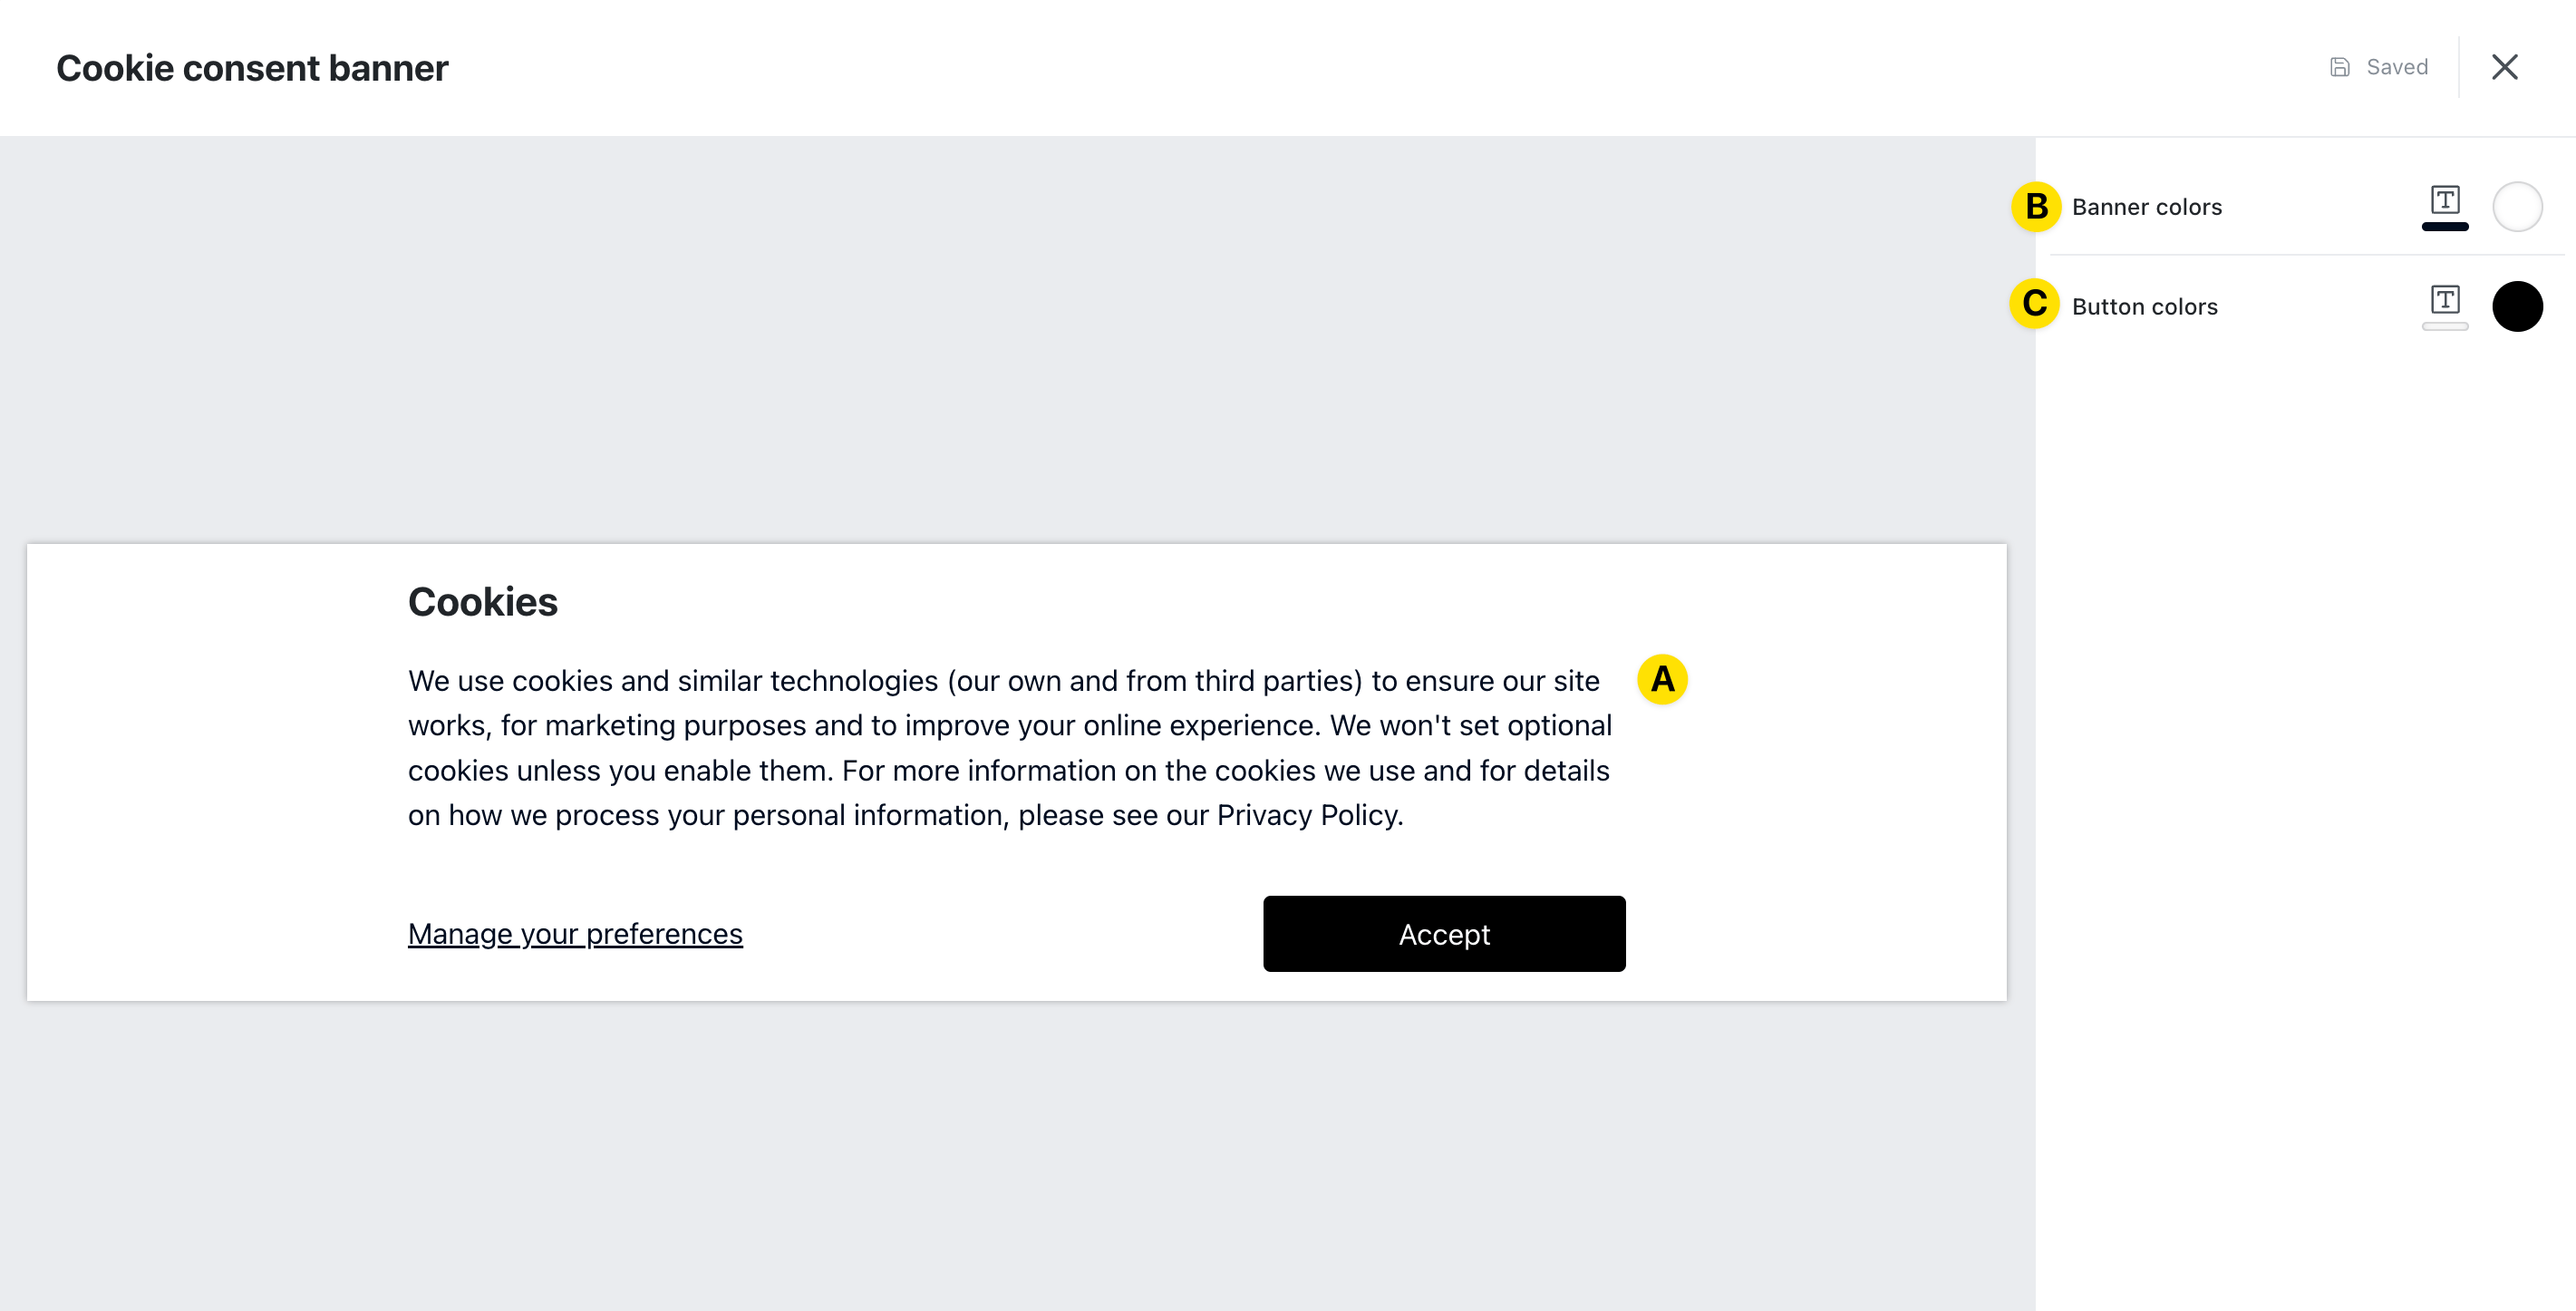 * **(A**) To edit the copy of the banner, click on the text input modal.
* **(B)** Here you can edit the background and text colors of your banner.
* **(C)** Here you can edit the text and background colors of the CTAs.
## Integrations
* **(1)** Head to the **Integrations** tab of your Hub Settings.
* **(2)** Connect your Google Tag Manager, Webhooks, Slack, Zaps, external CRM, and other external software to the Komo ecosystem. Click [**here**](/integrations-automation/tag-management) to learn more about integrations and webhooks.
**Once you've got all your Settings ready it's time to start building your Engagement Hub!**
Head back to the **Editor** tab, look for the **Add Content** button, and start playing around with the ever-growing list of Komo content cards and begin engaging your community!
* **(A**) To edit the copy of the banner, click on the text input modal.
* **(B)** Here you can edit the background and text colors of your banner.
* **(C)** Here you can edit the text and background colors of the CTAs.
## Integrations
* **(1)** Head to the **Integrations** tab of your Hub Settings.
* **(2)** Connect your Google Tag Manager, Webhooks, Slack, Zaps, external CRM, and other external software to the Komo ecosystem. Click [**here**](/integrations-automation/tag-management) to learn more about integrations and webhooks.
**Once you've got all your Settings ready it's time to start building your Engagement Hub!**
Head back to the **Editor** tab, look for the **Add Content** button, and start playing around with the ever-growing list of Komo content cards and begin engaging your community!