> ## Documentation Index
> Fetch the complete documentation index at: https://knowledge.komo.tech/llms.txt
> Use this file to discover all available pages before exploring further.
# White Labeling your Domain
> Set up a personalized URL for your Hub.
## What is it?
By default, your new Hub's URL will be (your Hub name)**.[komo.site](http://komo.site)**. For example, [**komohub.komo.site**](http://komohub.komo.site)
You have the ability to fully customize and white label your Hub domain and remove the domain **.[komo.site](http://komo.site)**.
## Option 1: komo.site
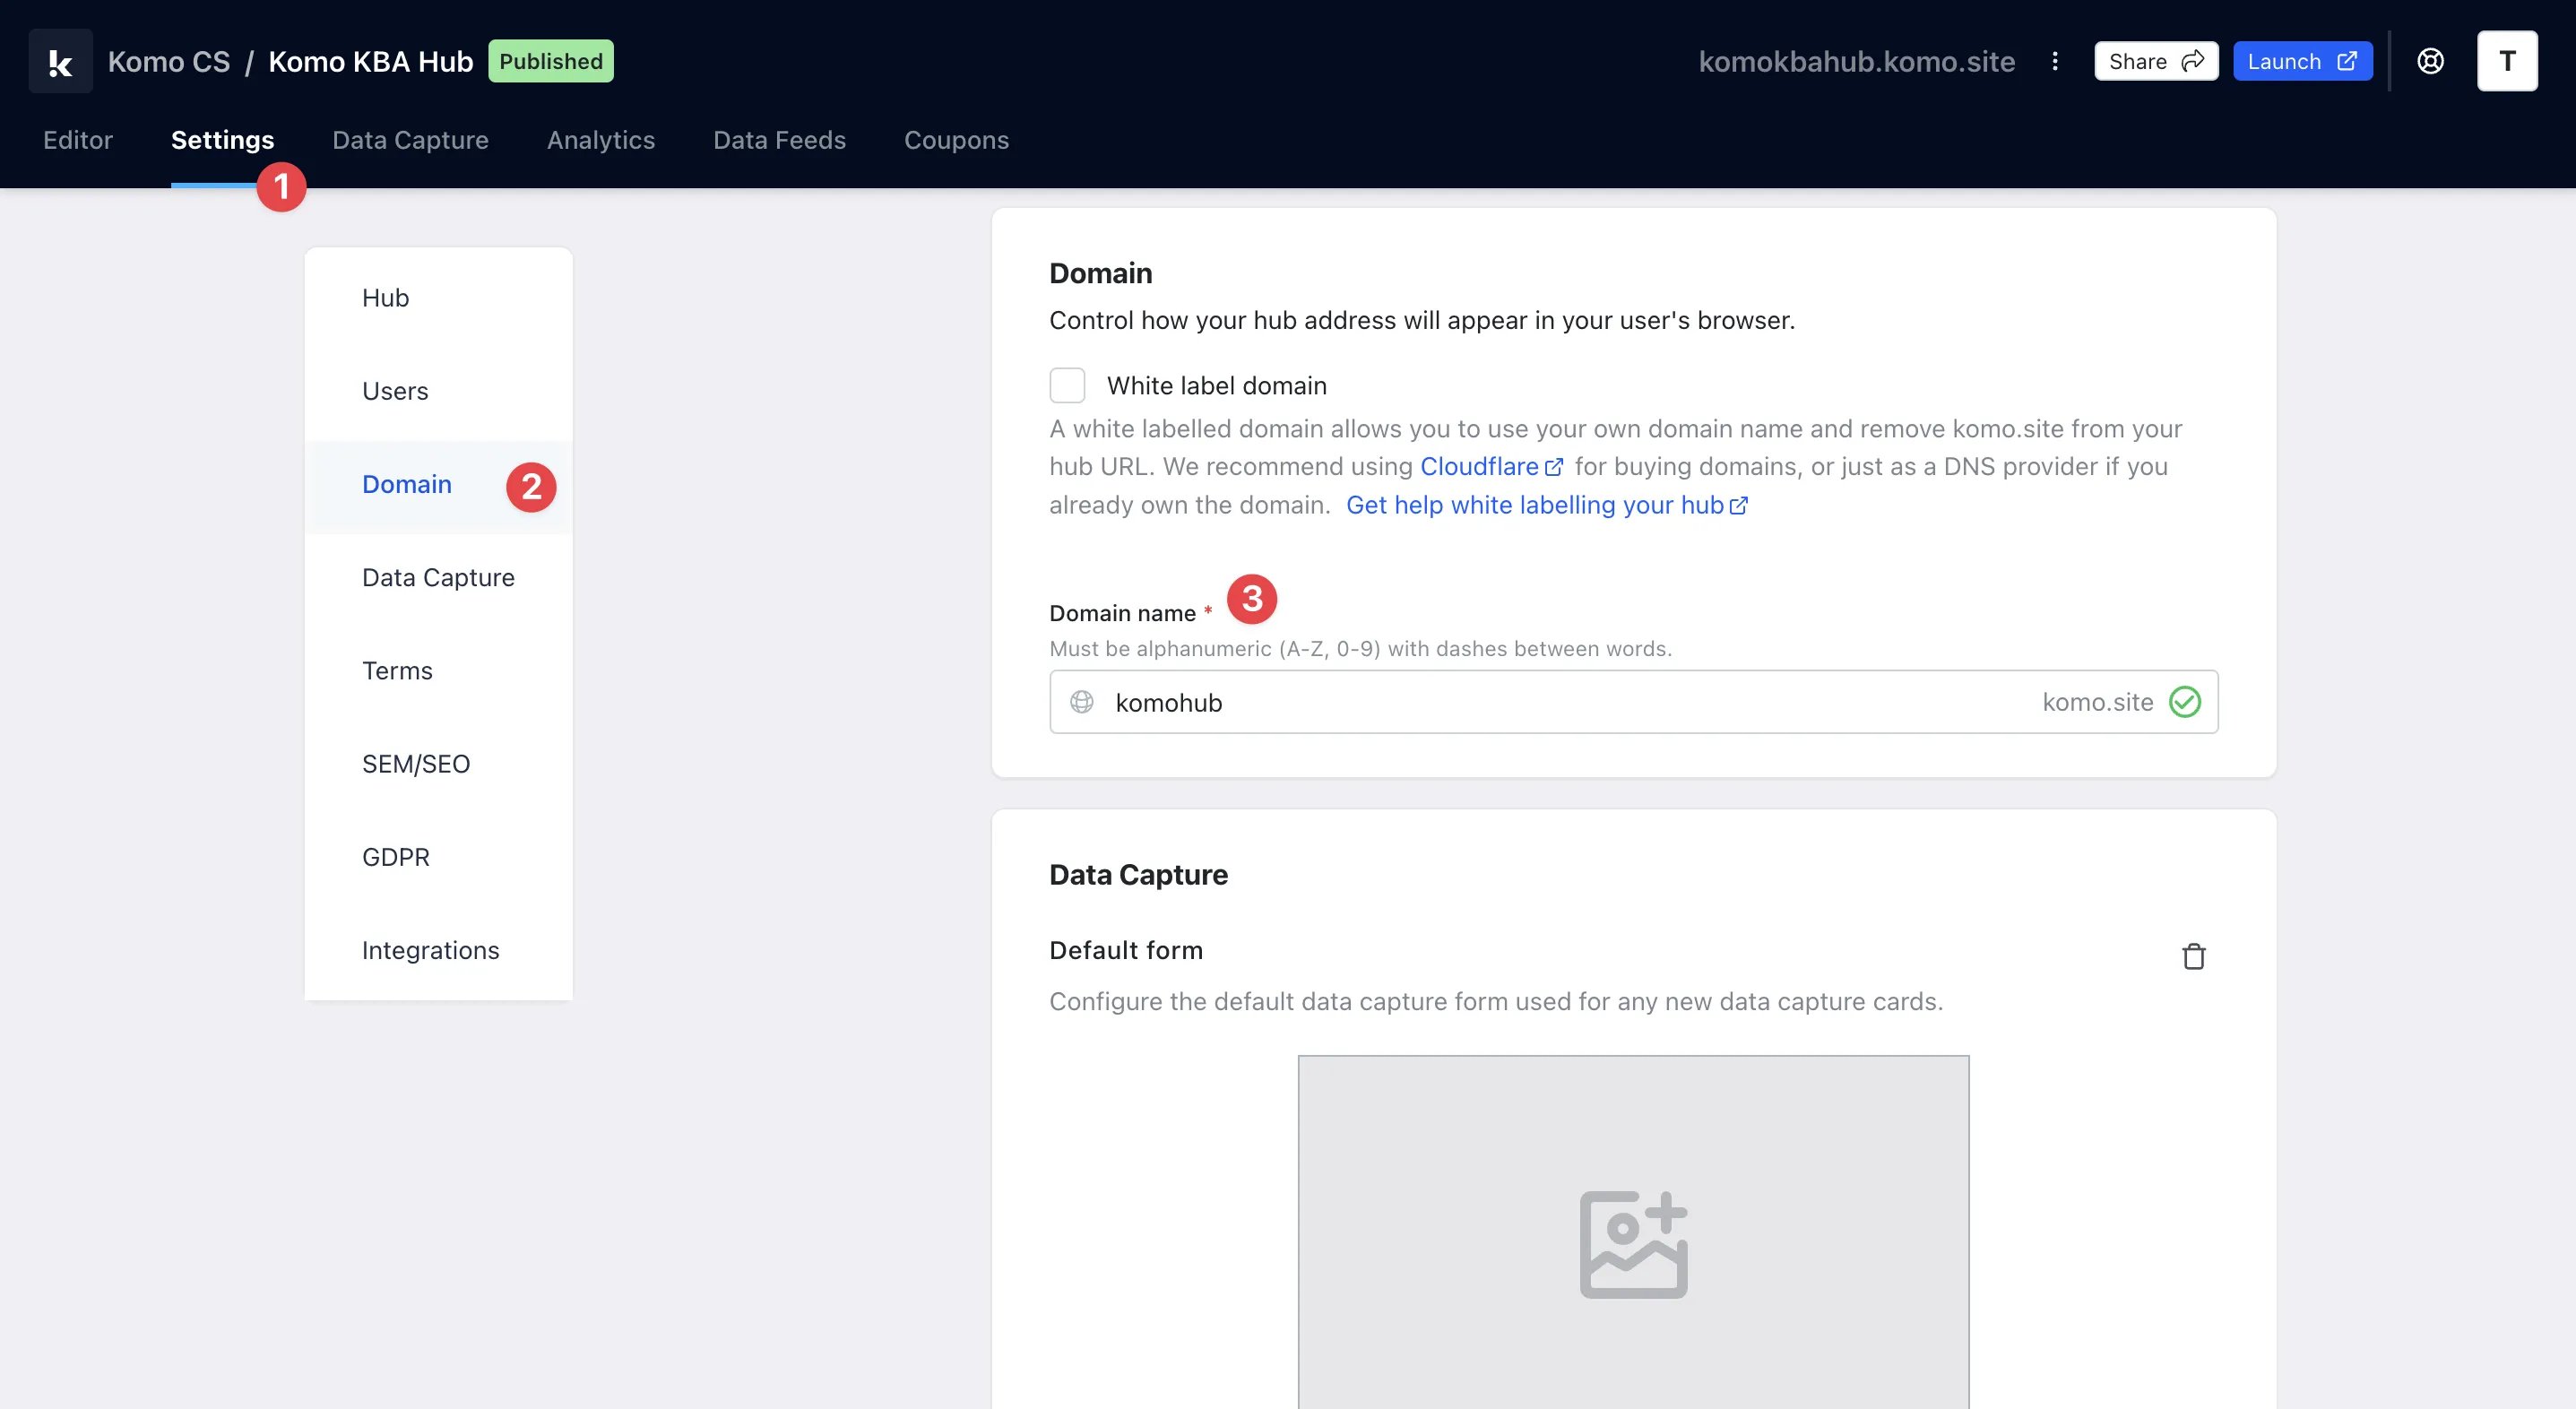 * Navigate to your **Engagement Hub**.
* **(1)** Click on **Settings** and then **(2)** **Domain** on the left sidebar.
* **(3)** You can customize your default (Hub) domain without purchasing another domain by simply changing the text within the box. You will then get a pop-up to confirm this change.
## Option 2: Custom domain
* Navigate to your **Engagement Hub**.
* **(1)** Click on **Settings** and then **(2)** **Domain** on the left sidebar.
* **(3)** You can customize your default (Hub) domain without purchasing another domain by simply changing the text within the box. You will then get a pop-up to confirm this change.
## Option 2: Custom domain
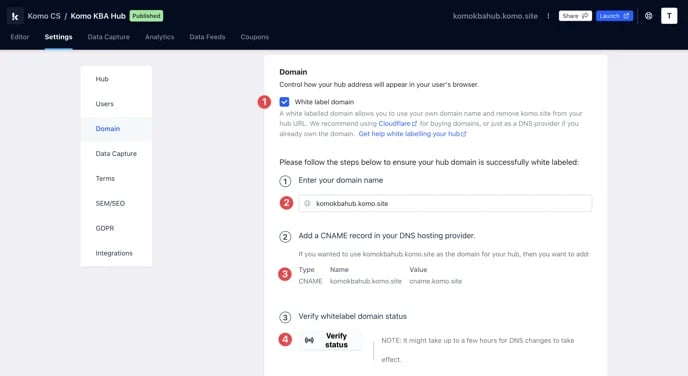 * **(1)** Tick the **White label domain** box. This will open a drop-down menu with all the steps to fully white label your Hub.
For more help white labeling using Cloudflare click [here](#add-a-new-site-to-cloudflare).
* **(2)** Enter your **pre-purchased domain** in the box.
* Once you have completed these steps, we will provide you with a CNAME record.
* You will have to enter your DNS configuration within the next 48 hours.
You cannot white label a Hub at the Apex (root) of a domain unless the DNS provider (e.g. Cloudflare) supports CNAME flattening.
For example, you cannot white label '[mydomain.com](http://mydomain.com)' with GoDaddy (which doesn't support CNAME flattening), it would need to be '[www.mydomain.com](http://www.mydomain.com)' (a subdomain). However, '[mydomain.com](http://mydomain.com)' could be used with Cloudflare which does support CNAME flattening. If you require further assistance with CNAME flattening, reach out to your Customer Success Specialist.
* **(3)** Next, create your custom **CNAME record**.
* Go to your DNS provider’s website (e.g. [**Cloudflare**](https://www.cloudflare.com/dns/) ). If you’re choosing one for the first time, go with one that supports SSL.
* Create a new CNAME (‘canonical name’) record for your custom domain.
* Point it at Komo's host domain - [**cname.komo.site**](http://cname.komo.site)
### Add a new site to Cloudflare
On Cloudflare, begin by adding a new site to your account.
If you are using an external registrar, follow the steps Cloudflare provides for updating your Registrar's **nameserver** settings to point at the Cloudflare servers.
If you buy a domain through Cloudflare, you won't need to change any nameserver settings.
#### **Update the DNS Settings**
Once your new site is added to Cloudflare, go to **DNS** on the side menu and add the following DNS management records:
* **(1)** Tick the **White label domain** box. This will open a drop-down menu with all the steps to fully white label your Hub.
For more help white labeling using Cloudflare click [here](#add-a-new-site-to-cloudflare).
* **(2)** Enter your **pre-purchased domain** in the box.
* Once you have completed these steps, we will provide you with a CNAME record.
* You will have to enter your DNS configuration within the next 48 hours.
You cannot white label a Hub at the Apex (root) of a domain unless the DNS provider (e.g. Cloudflare) supports CNAME flattening.
For example, you cannot white label '[mydomain.com](http://mydomain.com)' with GoDaddy (which doesn't support CNAME flattening), it would need to be '[www.mydomain.com](http://www.mydomain.com)' (a subdomain). However, '[mydomain.com](http://mydomain.com)' could be used with Cloudflare which does support CNAME flattening. If you require further assistance with CNAME flattening, reach out to your Customer Success Specialist.
* **(3)** Next, create your custom **CNAME record**.
* Go to your DNS provider’s website (e.g. [**Cloudflare**](https://www.cloudflare.com/dns/) ). If you’re choosing one for the first time, go with one that supports SSL.
* Create a new CNAME (‘canonical name’) record for your custom domain.
* Point it at Komo's host domain - [**cname.komo.site**](http://cname.komo.site)
### Add a new site to Cloudflare
On Cloudflare, begin by adding a new site to your account.
If you are using an external registrar, follow the steps Cloudflare provides for updating your Registrar's **nameserver** settings to point at the Cloudflare servers.
If you buy a domain through Cloudflare, you won't need to change any nameserver settings.
#### **Update the DNS Settings**
Once your new site is added to Cloudflare, go to **DNS** on the side menu and add the following DNS management records:
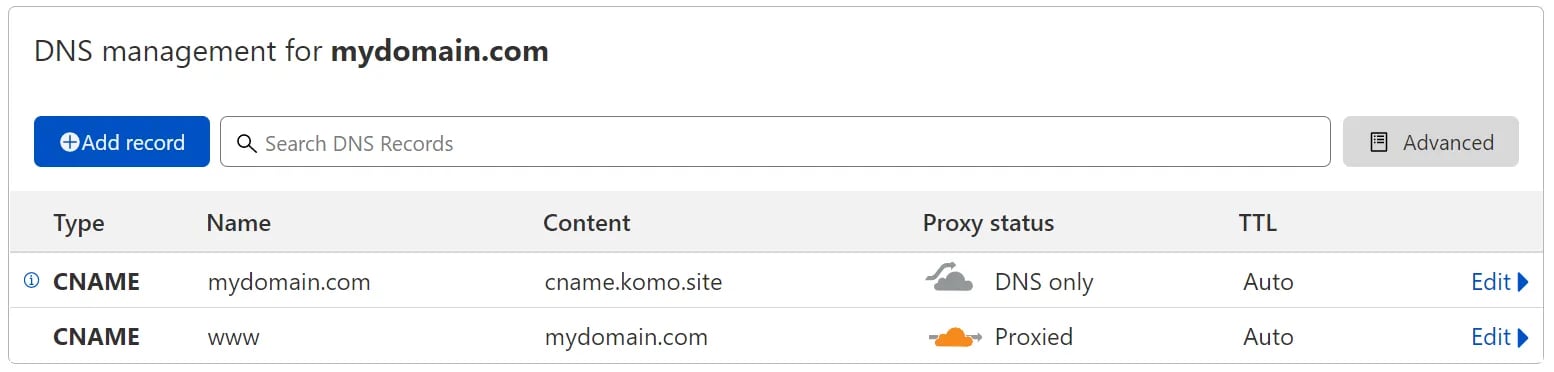 Make sure to replace "[*mydomain.com*](http://mydomain.com)" with your own domain (**without** the "[*www.*](http://www)").
#### **Add Page Rules**
On the Cloudflare menu, select **Rules > Page Rules**. Here we will be adding a rule so that any requests for "[*www.domain.com*](http://www.domain.com)" get redirected to "[*domain.com*](http://domain.com)".
Click on **Create Page Rule** then follow the procedure below:
Make sure to replace "[*mydomain.com*](http://mydomain.com)" with your own domain (**without** the "[*www.*](http://www)").
#### **Add Page Rules**
On the Cloudflare menu, select **Rules > Page Rules**. Here we will be adding a rule so that any requests for "[*www.domain.com*](http://www.domain.com)" get redirected to "[*domain.com*](http://domain.com)".
Click on **Create Page Rule** then follow the procedure below:
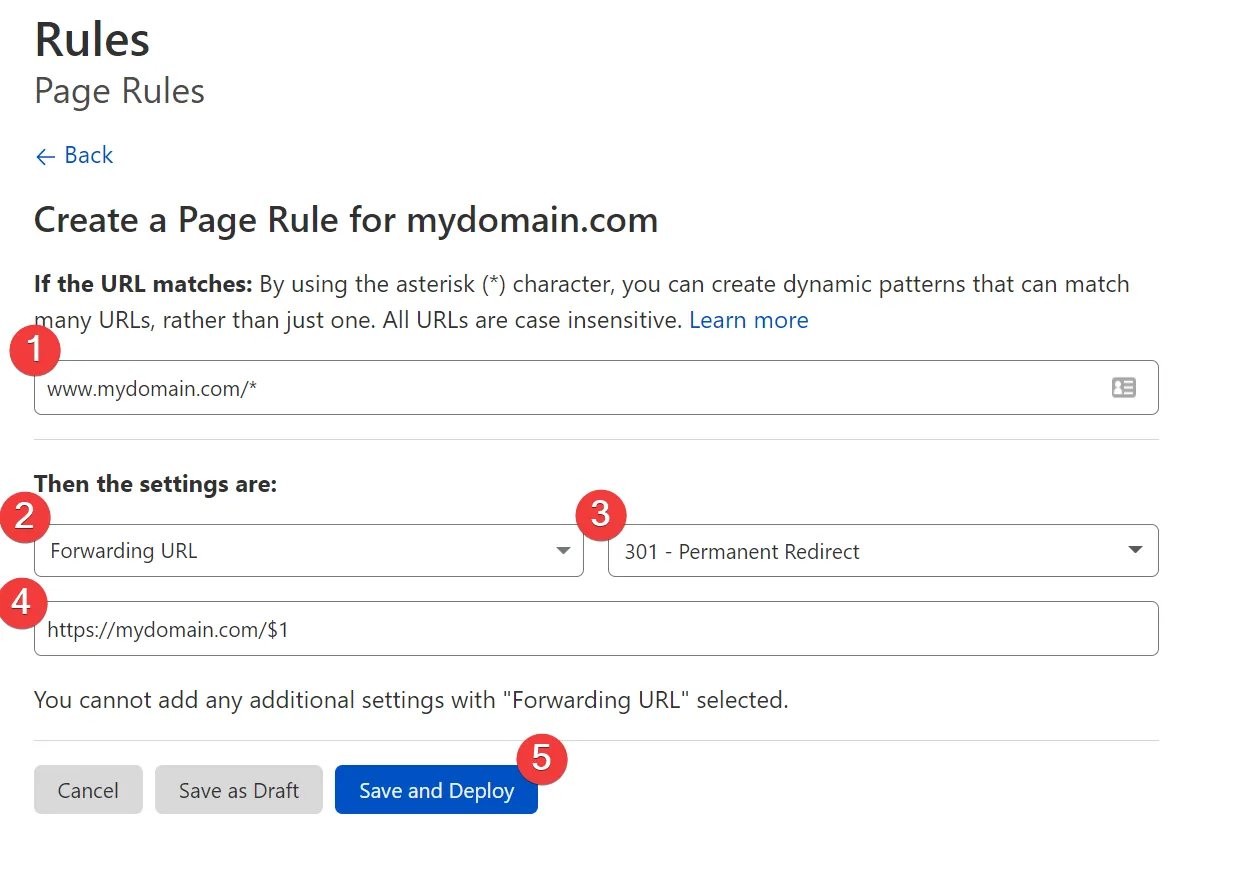 #### **How do I set this up?**
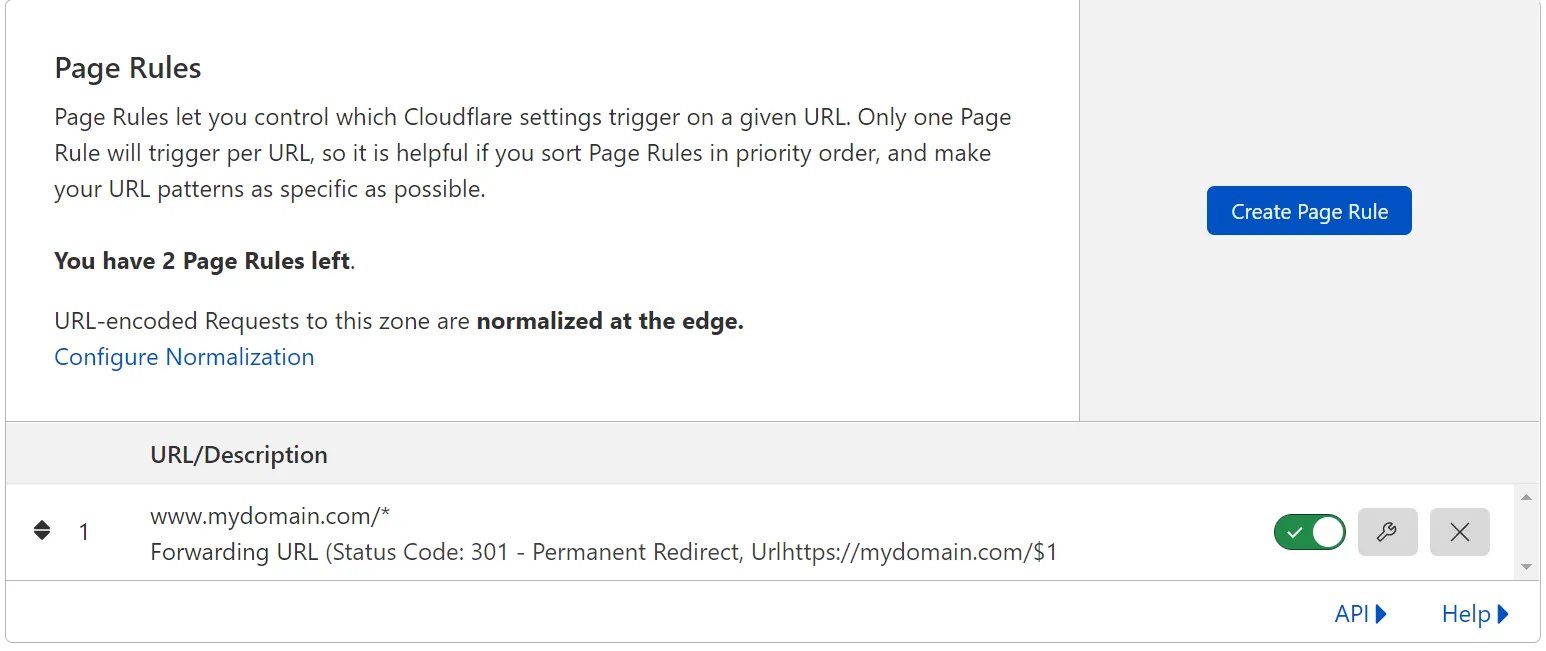
This should result in a rule that looks like the following:
#### **How do I set this up?**
This should result in a rule that looks like the following:
 * **(4)** Finally, verify the status of your white label. Once the CNAME has been pointed toward the Komo portal, click the **Verify Status** button to confirm the white label domain status and link to your domain.
This may take a few hours to update.
* **(4)** Finally, verify the status of your white label. Once the CNAME has been pointed toward the Komo portal, click the **Verify Status** button to confirm the white label domain status and link to your domain.
This may take a few hours to update.