> ## Documentation Index
> Fetch the complete documentation index at: https://knowledge.komo.tech/llms.txt
> Use this file to discover all available pages before exploring further.
# Workflows for Contact Lists
> Easily update contact lists using automated workflows.
## What is it?
Using workflows, you can remove the hassle from managing contact lists by automating the addition and removal of contacts from lists when your pre-determined conditions are met. Read on to discover how to build out a workflow for yourself.
## How do I do it?
### Step 1: Build your workflow
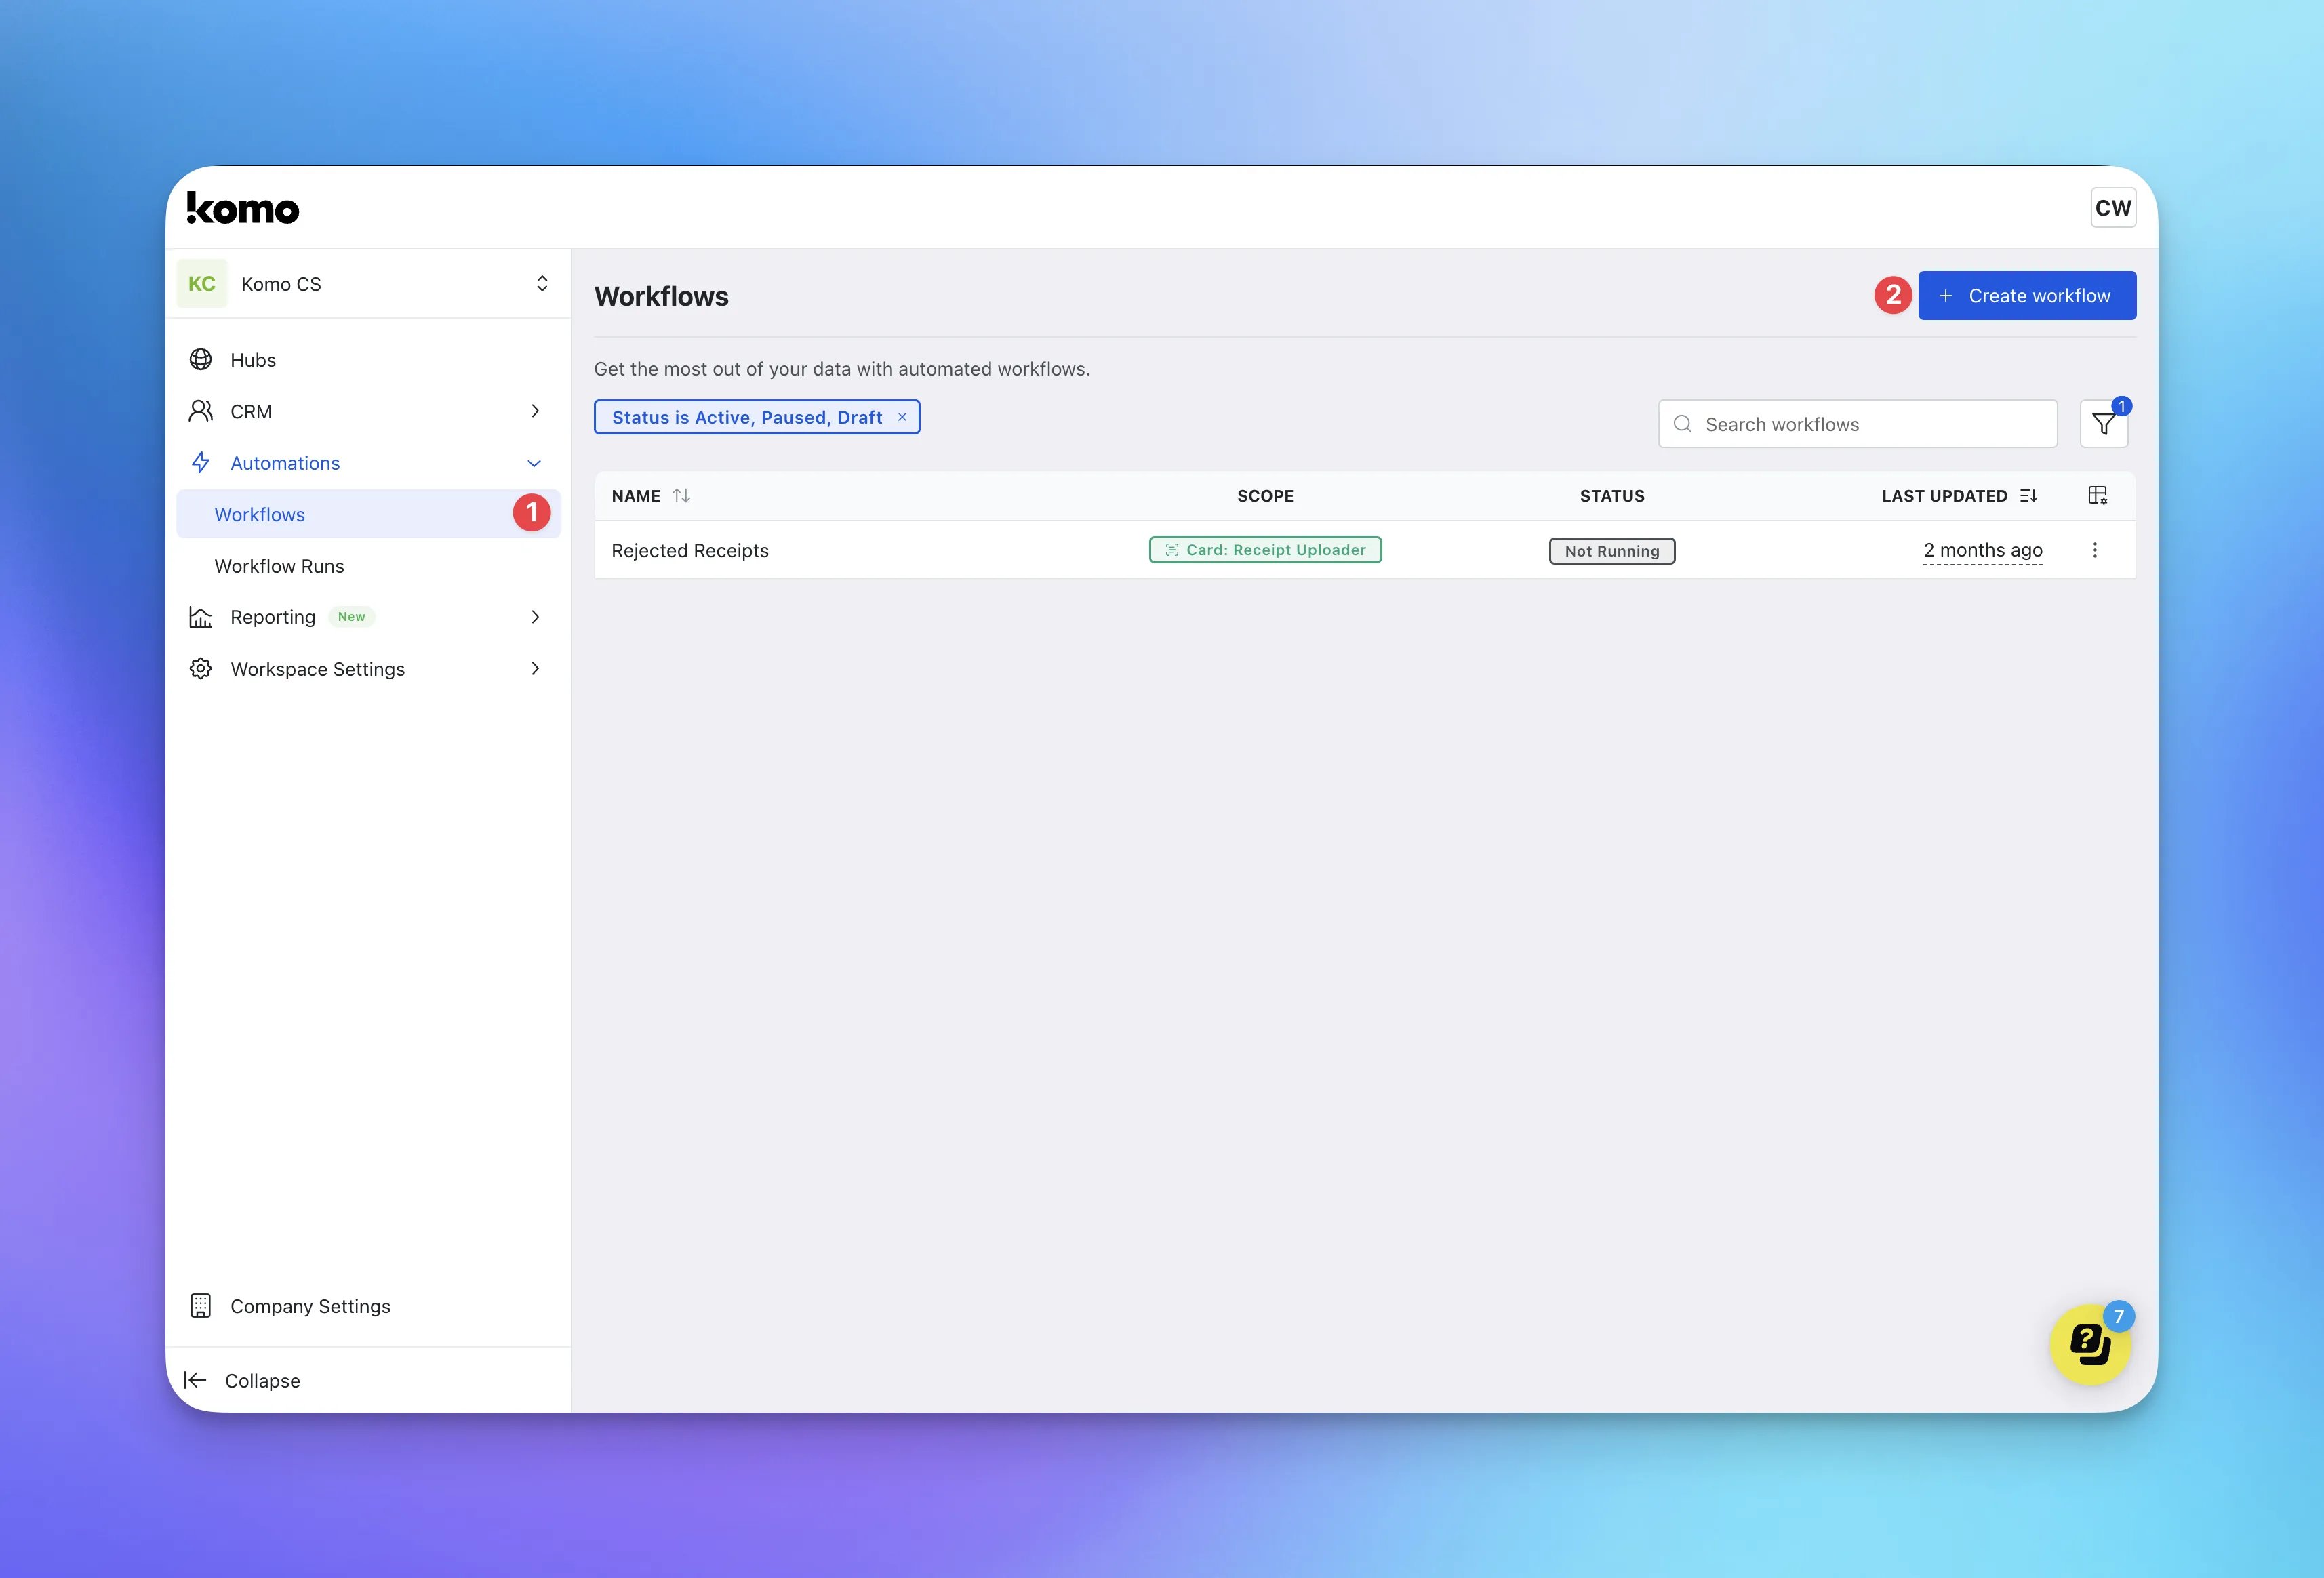 * Workflows can be accessed both at the workspace and card level. This article will cover creating workflows from the workspace level. The process is the same if creating at the card level although you will need to access workflows within the lefthand toolbar within the card editor.
When creating workflows to manage contact lists, you need to ensure the appropriate lists and contact properties are created prior to setting up the workflow.
* **(1)** Within your workspace, navigate to **Workflows** which is located under the **Automations** dropdown.
* **(2)** Click **+ Create workflow.**
* Workflows can be accessed both at the workspace and card level. This article will cover creating workflows from the workspace level. The process is the same if creating at the card level although you will need to access workflows within the lefthand toolbar within the card editor.
When creating workflows to manage contact lists, you need to ensure the appropriate lists and contact properties are created prior to setting up the workflow.
* **(1)** Within your workspace, navigate to **Workflows** which is located under the **Automations** dropdown.
* **(2)** Click **+ Create workflow.**
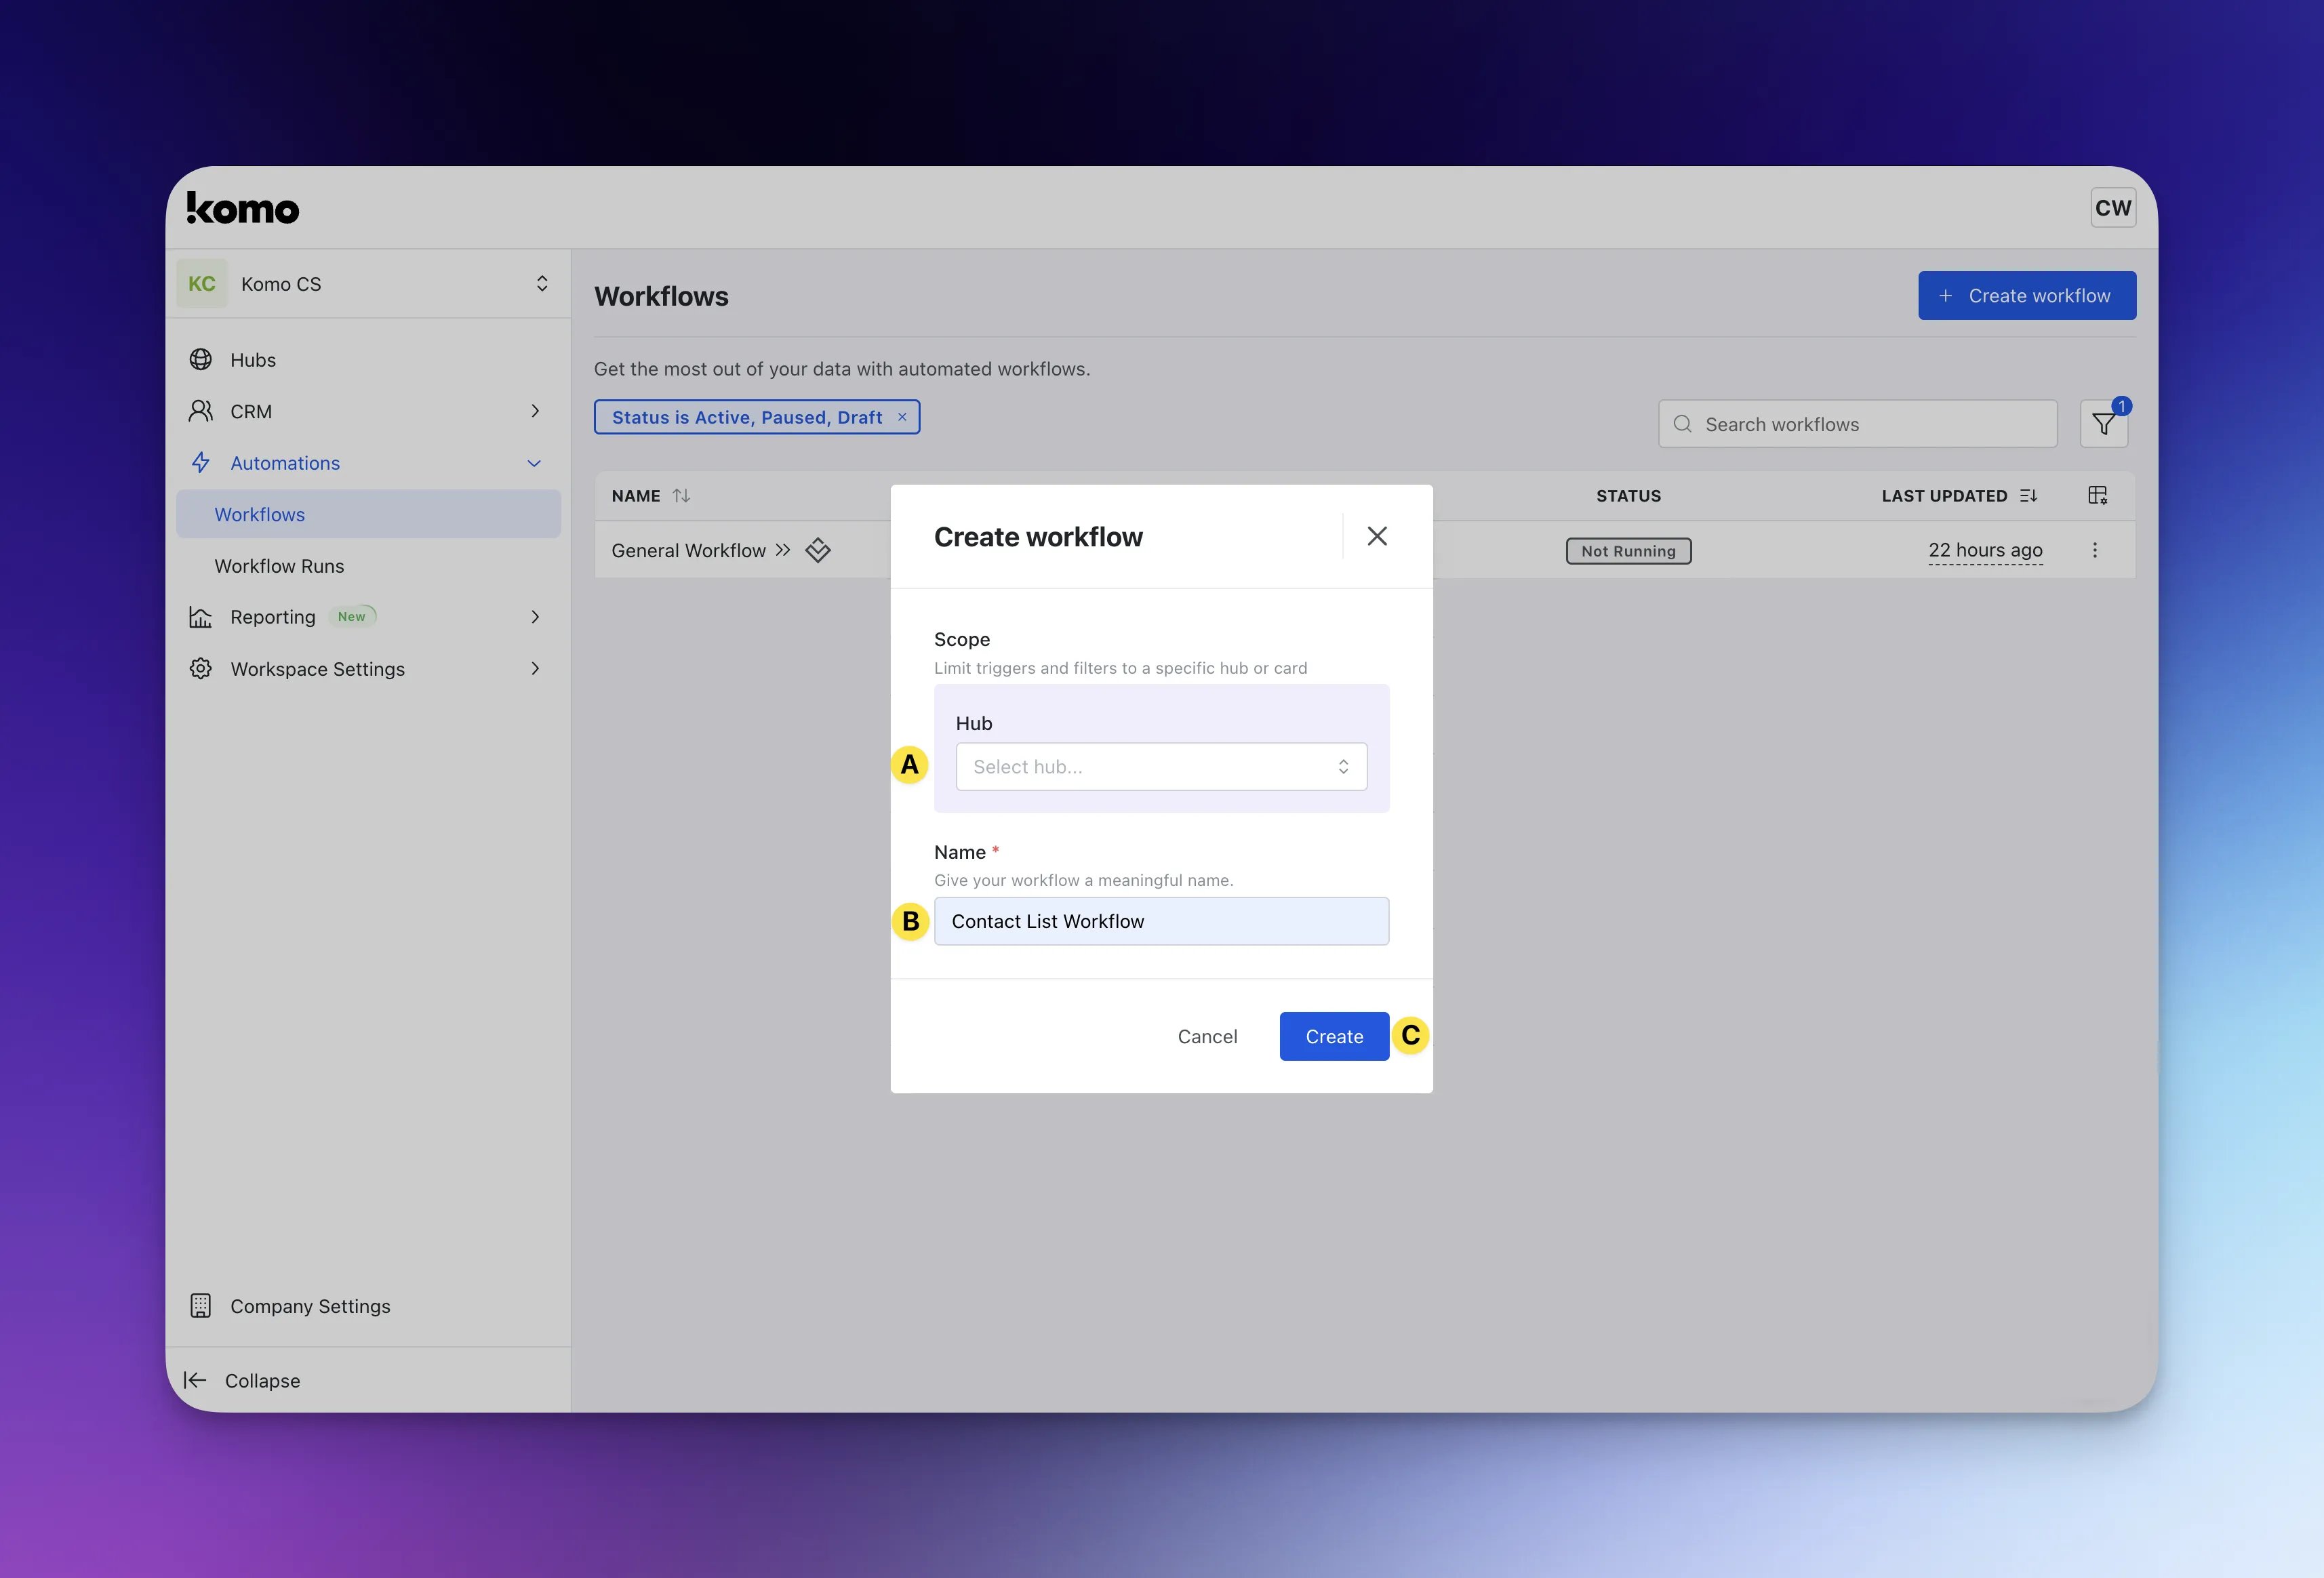 * **(A)** Here you can select if you would like your workflow to be connected to a specific **Hub** and **Card**. You can also leave this blank if you would like to create a **global workflow** that operates across all Hubs.
* **(B)** Give your workflow a meaningful **Name**.
This is internal only but we recommend that the naming aligns with the workflow for clarity.
* **(C)** Click **Create.**
* You can now start building out your workflow.
* Select the **pencil icon** next to Trigger.
* Select the event that will trigger your workflow from the **Execute flow on** dropdown. In this case, we will select **Data captured.**
* Click **+ Add filter,** to attach conditional logic to the trigger (if required).
* Click **Save** and exit the modal by clicking **X.**
* Drag the **Contact Filter** module and drop it below the **Trigger module.**
* Click on the **Output node** at the bottom of the **Trigger module, drag** and **drop** on the **Input node** of the **Contact Filter module**.
* Select the **pencil icon** at the top of the **Contact Filter module**.
* Set the **Contact** **Filter** conditions that must be met for the action to take place.
* Click **Save** and then exit the modal by clicking **X.**
* Drag the desired **Contact action module** and drop it below the **Contact Filter module.** In this instance we are using **Add to List,** however this will depend entirely on your use case.
* Click on the **Success Output node** at the bottom of the **Contact filter module, drag** and **drop** on the **Input node** of the **Action module (Add to List)**.
* Click the **Pencil icon** at the top of the **Action module.**
* **Choose the list** you would like the contact to be **added to (or removed from)** from the dropdown.
* Click **Save** and then exit the modal by clicking **X.**
* Create a fallback action by dragging another **Action module** and dropping it below the **Contact Filter module.**
* Click on the **Fallback Output node** at the bottom of the **Contact filter module, drag** and **drop** on the **Input node** of the new **Action module (Add to List)**.
* Click the **Pencil icon** at the top of the **Action module.**
* **Choose the list** you would like the contact to be **added to (or removed from)** from the dropdown.
* Click **Save** and then exit the modal by clicking **X.**
* Finish building your workflow by clicking **Save** in the top right-hand corner.
### Step 2: Activate your workflow
* **(A)** Here you can select if you would like your workflow to be connected to a specific **Hub** and **Card**. You can also leave this blank if you would like to create a **global workflow** that operates across all Hubs.
* **(B)** Give your workflow a meaningful **Name**.
This is internal only but we recommend that the naming aligns with the workflow for clarity.
* **(C)** Click **Create.**
* You can now start building out your workflow.
* Select the **pencil icon** next to Trigger.
* Select the event that will trigger your workflow from the **Execute flow on** dropdown. In this case, we will select **Data captured.**
* Click **+ Add filter,** to attach conditional logic to the trigger (if required).
* Click **Save** and exit the modal by clicking **X.**
* Drag the **Contact Filter** module and drop it below the **Trigger module.**
* Click on the **Output node** at the bottom of the **Trigger module, drag** and **drop** on the **Input node** of the **Contact Filter module**.
* Select the **pencil icon** at the top of the **Contact Filter module**.
* Set the **Contact** **Filter** conditions that must be met for the action to take place.
* Click **Save** and then exit the modal by clicking **X.**
* Drag the desired **Contact action module** and drop it below the **Contact Filter module.** In this instance we are using **Add to List,** however this will depend entirely on your use case.
* Click on the **Success Output node** at the bottom of the **Contact filter module, drag** and **drop** on the **Input node** of the **Action module (Add to List)**.
* Click the **Pencil icon** at the top of the **Action module.**
* **Choose the list** you would like the contact to be **added to (or removed from)** from the dropdown.
* Click **Save** and then exit the modal by clicking **X.**
* Create a fallback action by dragging another **Action module** and dropping it below the **Contact Filter module.**
* Click on the **Fallback Output node** at the bottom of the **Contact filter module, drag** and **drop** on the **Input node** of the new **Action module (Add to List)**.
* Click the **Pencil icon** at the top of the **Action module.**
* **Choose the list** you would like the contact to be **added to (or removed from)** from the dropdown.
* Click **Save** and then exit the modal by clicking **X.**
* Finish building your workflow by clicking **Save** in the top right-hand corner.
### Step 2: Activate your workflow
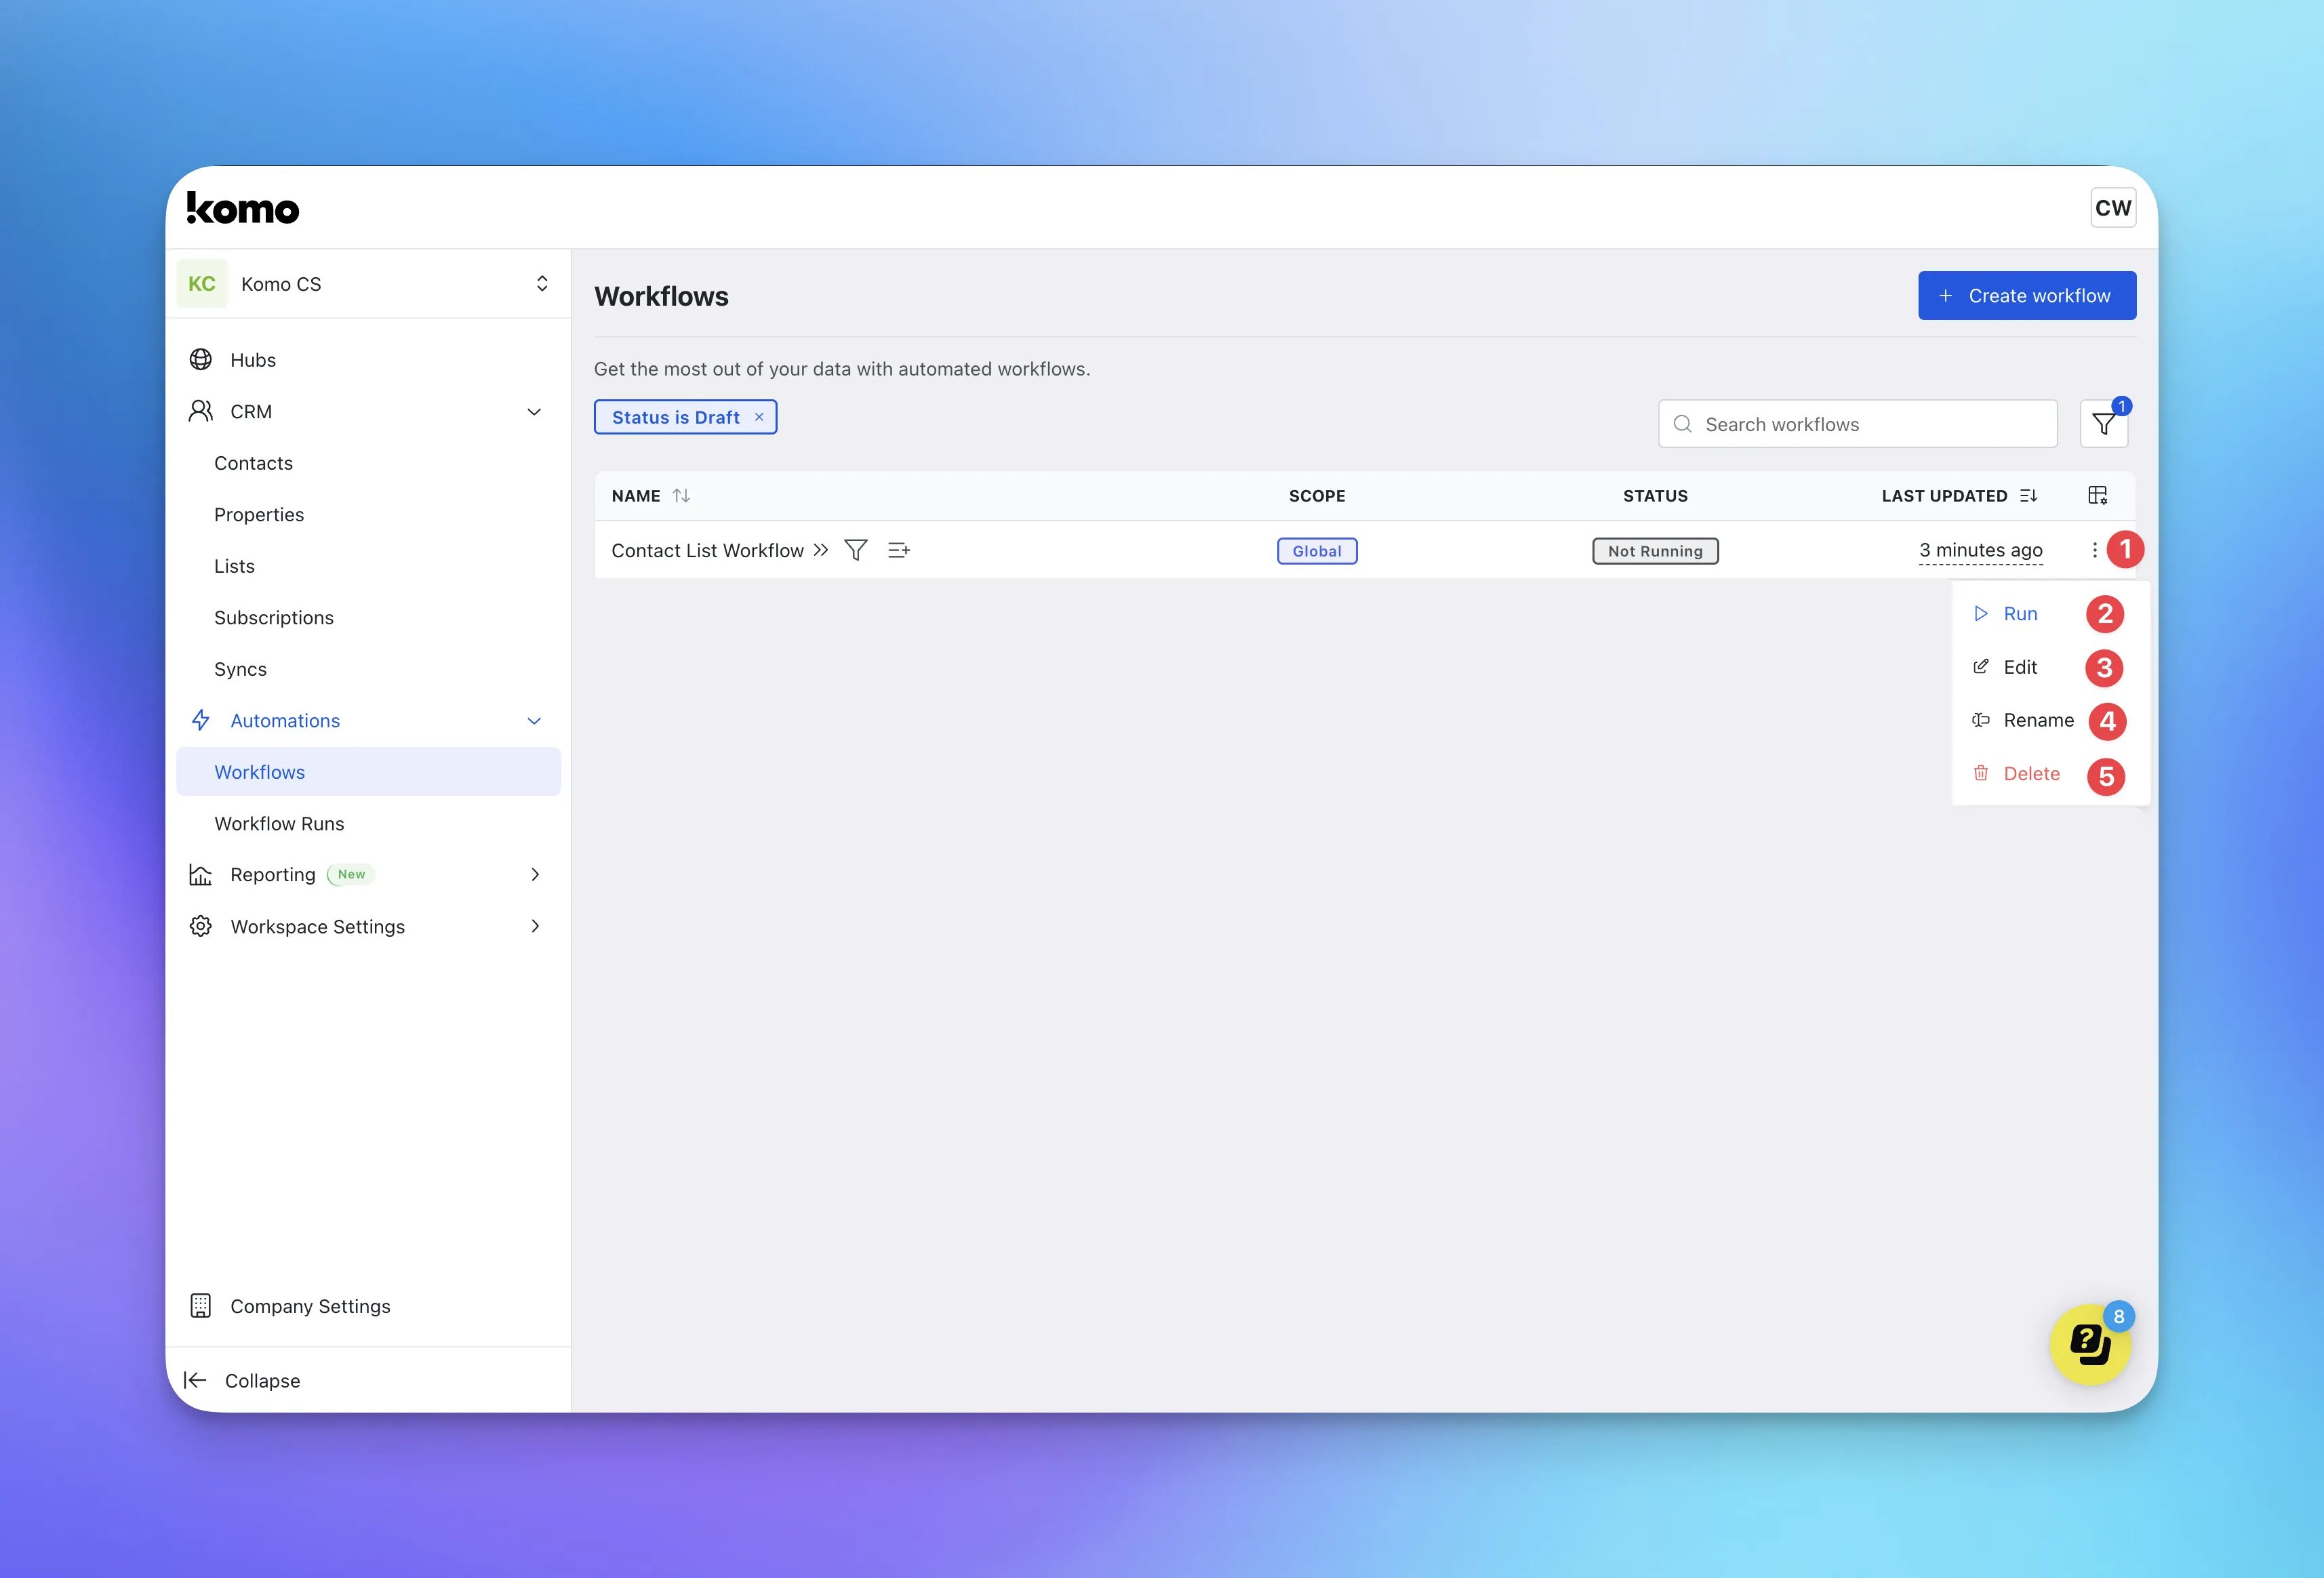 * You will now have to **Run** your workflow for it to begin working.
* **(1)** Click the **three dots** to access the additional actions.
* **(2)** **Run -** Click this to **run** your workflow.
* **(3) Edit -** Here you can make **edits** to the workflow you set up.
* **(4) Rename -** Select this if you would like to **rename** your workflow.
* **(5) Delete -** Click this if you would like to **delete** your workflow.
* Once you have selected **Run,** your workflow will be live and you can move onto testing!
### Step 3: Test your workflow
* You will now have to **Run** your workflow for it to begin working.
* **(1)** Click the **three dots** to access the additional actions.
* **(2)** **Run -** Click this to **run** your workflow.
* **(3) Edit -** Here you can make **edits** to the workflow you set up.
* **(4) Rename -** Select this if you would like to **rename** your workflow.
* **(5) Delete -** Click this if you would like to **delete** your workflow.
* Once you have selected **Run,** your workflow will be live and you can move onto testing!
### Step 3: Test your workflow
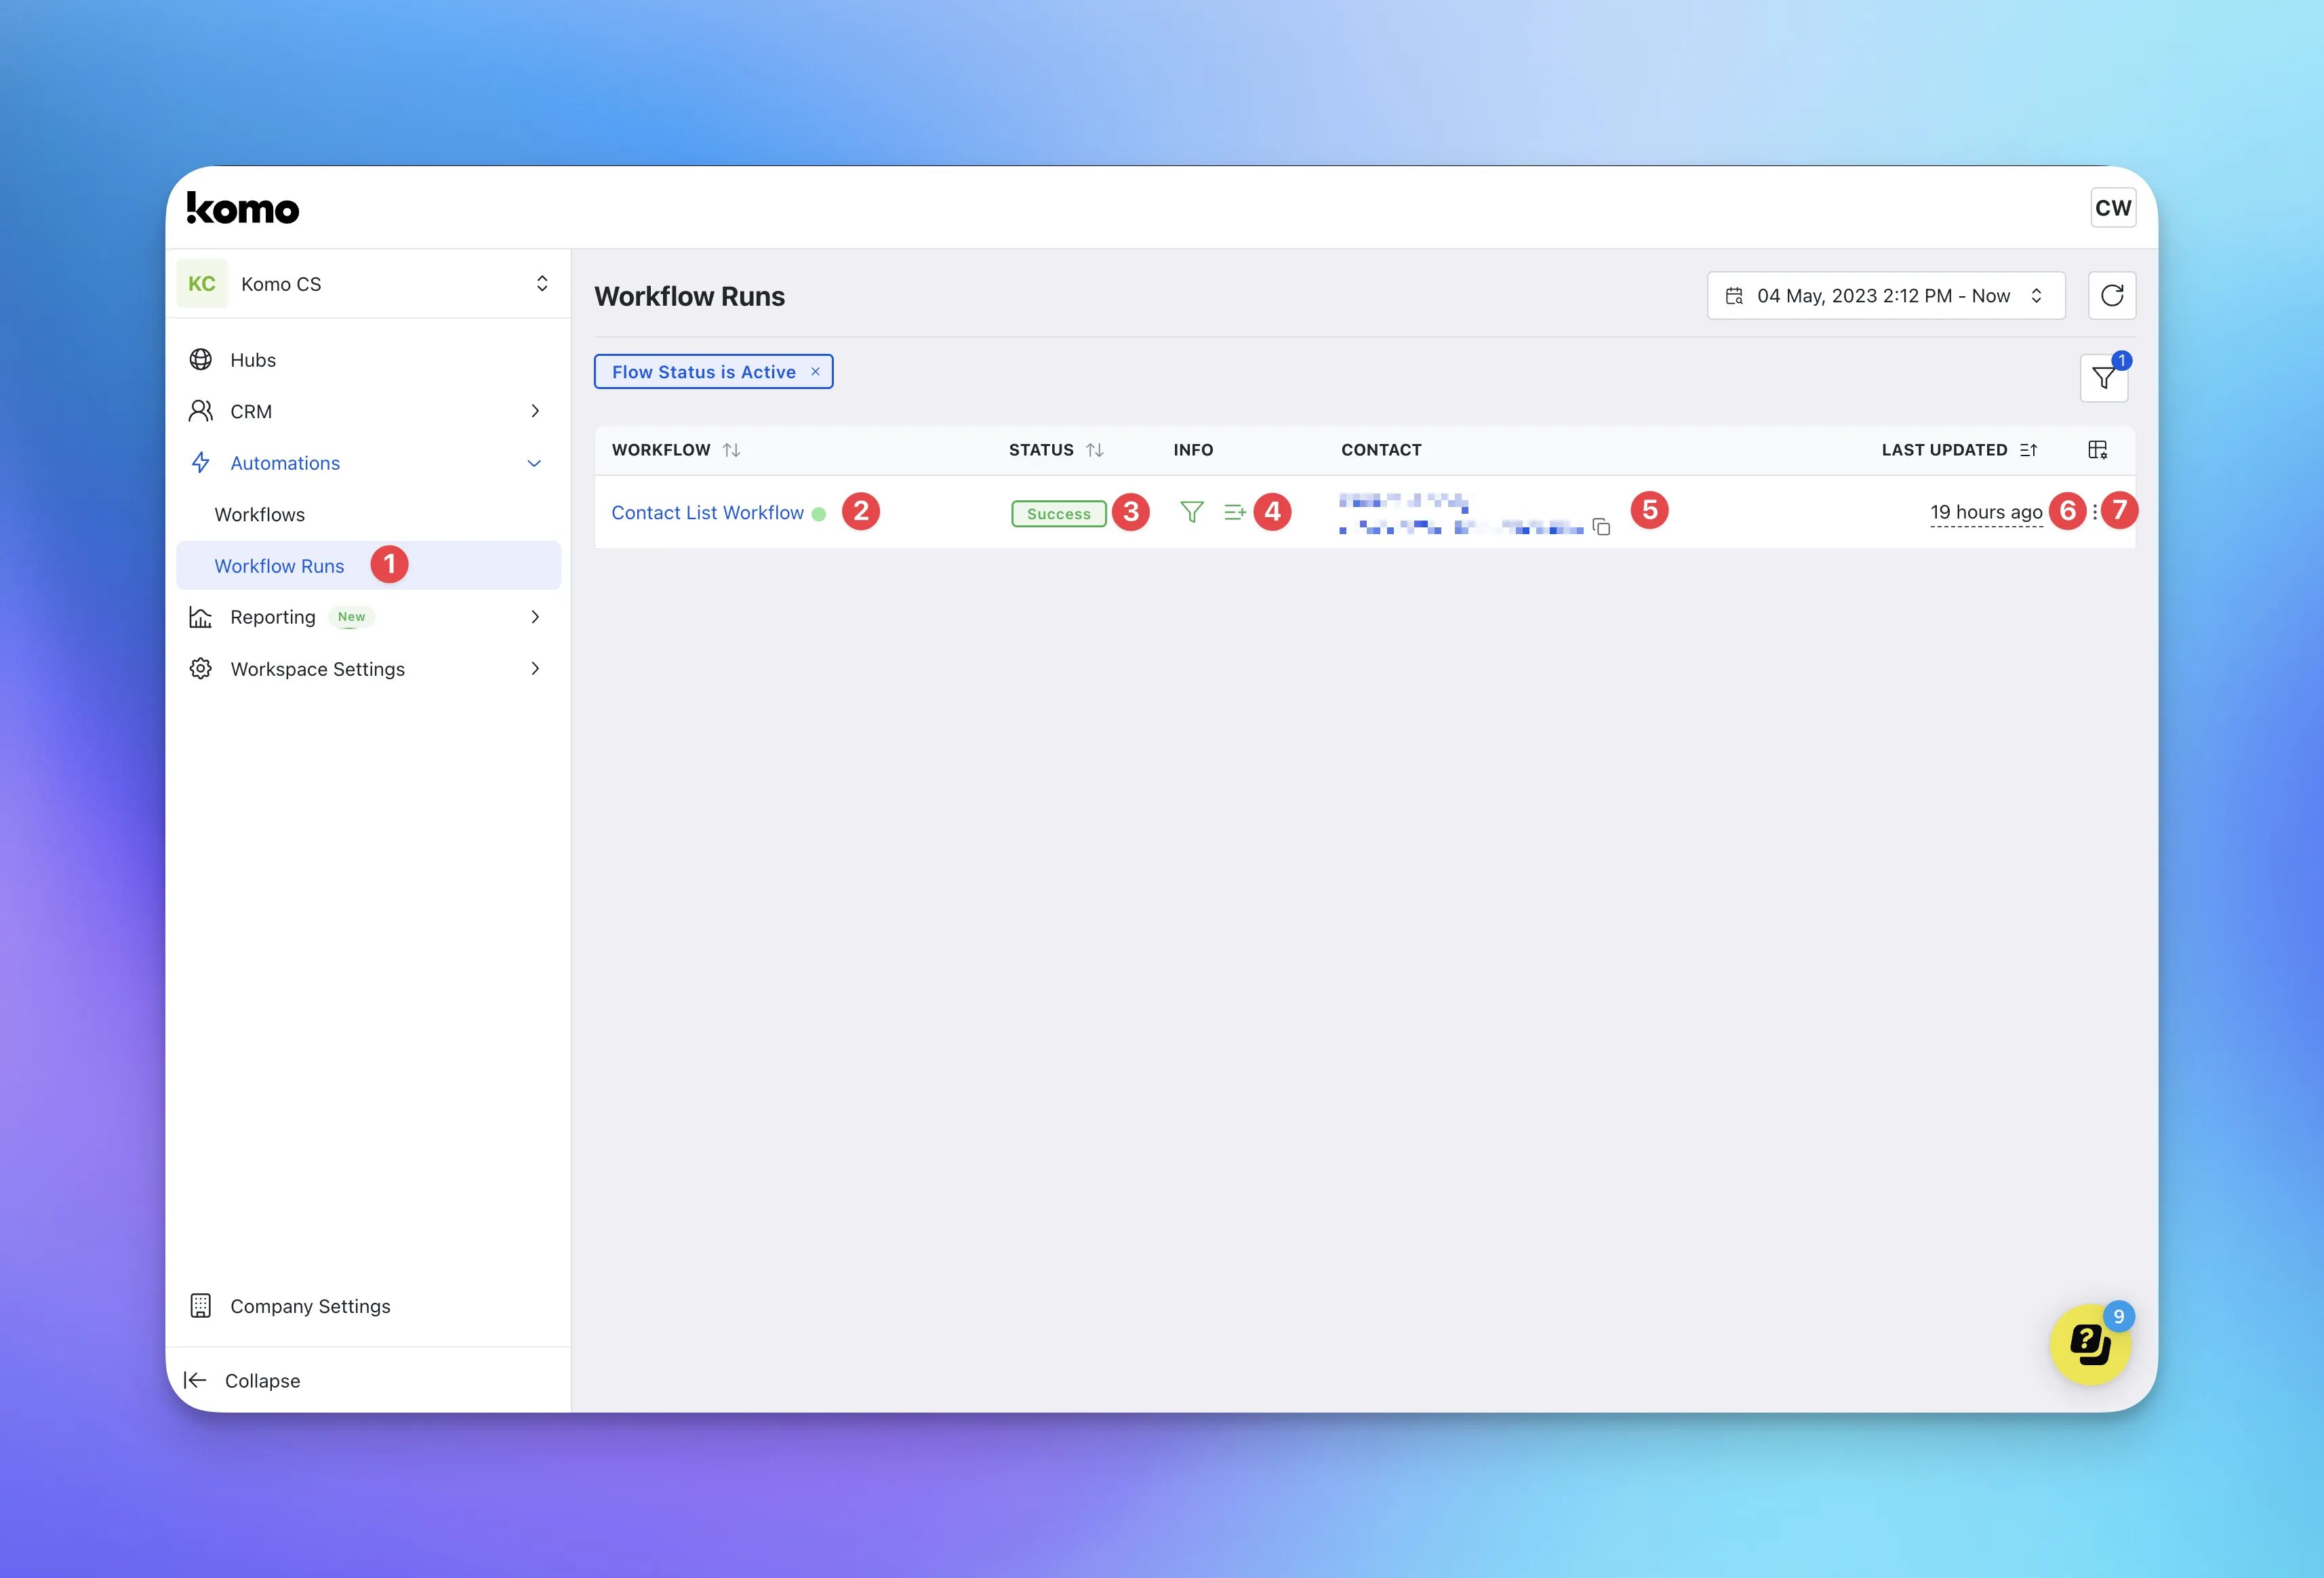 * To test your workflow you will first need to preview and interact with a card that contains the relevant contact property. For information on how to preview a card, [read this article](/getting-started/hub-setup/card-testing).
* **(1)** Once you have interacted with a card, navigate back to your workspace and click **Workflow Runs** under the **Automations** dropdown.
* **(2)** Here you can see the name of the **workflow that was triggered.**
* **(3)** Here you will see a tag that indicates whether your workflow was executed **successfully.**
* **(4)** By hovering over the **icons** you can see the various **workflow steps** that were executed.
* **(5)** Here you can see the name of the **contact** who was added or removed from the list.
* **(6)** Here you can see the **timestamp** for the workflow run.
* **(7)** By clicking the **three dots** you can see a log breakdown of the workflow steps performed.
## FAQ
**When setting up the actions, why can't I can't see the list I'd like to add the contact to?**
If you can't see the list you're looking to add the contact to, it's likely that the list hasn't been created prior to setting up the workflow. Please ensure you create your required lists prior to building the workflow.
**When setting up the contact filter, why can't I can't see the property I'd like to trigger the action?**
If you can't see the contact property you're using to trigger the workflow, it's likely that it hasn't been created prior to setting up the workflow. Please ensure you create your required contact properties prior to building the workflow.
* To test your workflow you will first need to preview and interact with a card that contains the relevant contact property. For information on how to preview a card, [read this article](/getting-started/hub-setup/card-testing).
* **(1)** Once you have interacted with a card, navigate back to your workspace and click **Workflow Runs** under the **Automations** dropdown.
* **(2)** Here you can see the name of the **workflow that was triggered.**
* **(3)** Here you will see a tag that indicates whether your workflow was executed **successfully.**
* **(4)** By hovering over the **icons** you can see the various **workflow steps** that were executed.
* **(5)** Here you can see the name of the **contact** who was added or removed from the list.
* **(6)** Here you can see the **timestamp** for the workflow run.
* **(7)** By clicking the **three dots** you can see a log breakdown of the workflow steps performed.
## FAQ
**When setting up the actions, why can't I can't see the list I'd like to add the contact to?**
If you can't see the list you're looking to add the contact to, it's likely that the list hasn't been created prior to setting up the workflow. Please ensure you create your required lists prior to building the workflow.
**When setting up the contact filter, why can't I can't see the property I'd like to trigger the action?**
If you can't see the contact property you're using to trigger the workflow, it's likely that it hasn't been created prior to setting up the workflow. Please ensure you create your required contact properties prior to building the workflow.