> ## Documentation Index
> Fetch the complete documentation index at: https://knowledge.komo.tech/llms.txt
> Use this file to discover all available pages before exploring further.
# Badges and Workflows
> Features that work in tandem to drive repeat engagement, help you capture and analyse customer data with ease and in real time.
## What is it?
Badges allow users to earn badges for taking action across your Hub. Whether it's engaging with content, playing games, or completing forms, Badges provide incentives for customers to return to your Hub repeatedly.
To support the Badges feature, contacts allow you to assign achievements to certain users based on their activity within your hub! Contacts also support Profiles, allowing users to identify themselves with an avatar while they engage with the games across your hub.
With Workflows, you can set up customised user flows that are triggered when a user fills out a form or completes a game. These triggers lead to actions that can be used to assign achievements (a.k.a. Badges) to certain users.
## How do I build one?
* [Step 1: Turn on Accounts in Hub Settings](#step-1-turn-on-accounts-in-hub-settings)
* [Step 2: Turn on Badges in Hub Settings](#step-2-turn-on-badges-in-hub-settings)
* [Step 3: Set up your Badges](#step-3-set-up-your-badges)
* [Step 4: Configure your Badge Variants \[Optional\]](#step-4-configure-your-badge-variants-optional)
* [Step 5: Customise the Style of your Badges](#step-5-customise-the-style-of-your-badges)
* [Step 6: Edit the Badge Album \[Optional\]](#step-6-edit-the-badge-album-optional)
* [Step 7: Create Workflows to Award Badges](#step-7-create-workflows-to-award-badges)
* [Step 8: Enable & Configure Profiles \[Optional\]](#step-8-enable--configure-profiles-optional)
### Step 1: Turn on Accounts in Hub Settings
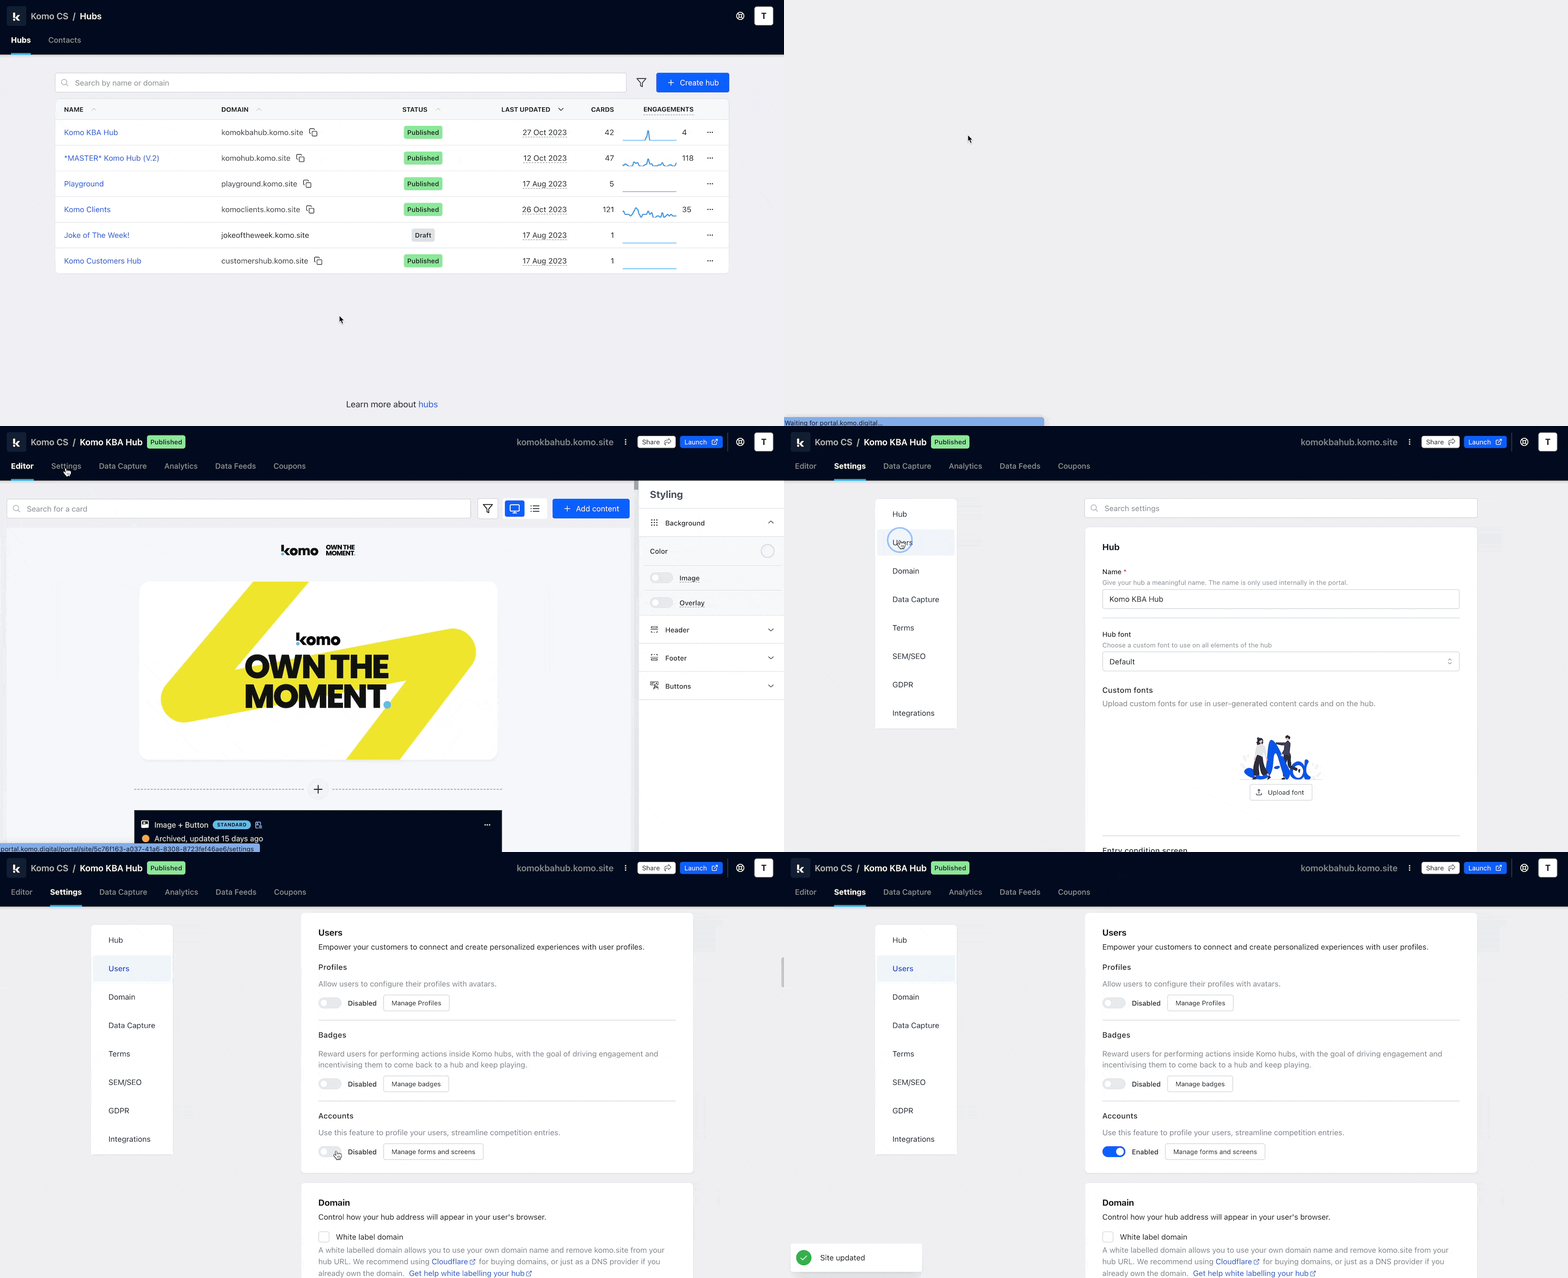 * Navigate to your **Engagement Hub** and then head to the **Settings** tab
* Click on **Users** on the left sidebar
* Toggle on the **Accounts** Feature. [Learn more about the Accounts feature here](/getting-started/hub-setup/data-capture)
User Accounts are not technically required, however, if you do not enable User Accounts, a Contact's badges will be tied to one device/browser session only. If it's important that the Badges persist over time, across devices, then enable User Accounts.
### Step 2: Turn on Badges in Hub settings
* Navigate to your **Engagement Hub** and then head to the **Settings** tab
* Click on **Users** on the left sidebar
* Toggle on the **Accounts** Feature. [Learn more about the Accounts feature here](/getting-started/hub-setup/data-capture)
User Accounts are not technically required, however, if you do not enable User Accounts, a Contact's badges will be tied to one device/browser session only. If it's important that the Badges persist over time, across devices, then enable User Accounts.
### Step 2: Turn on Badges in Hub settings
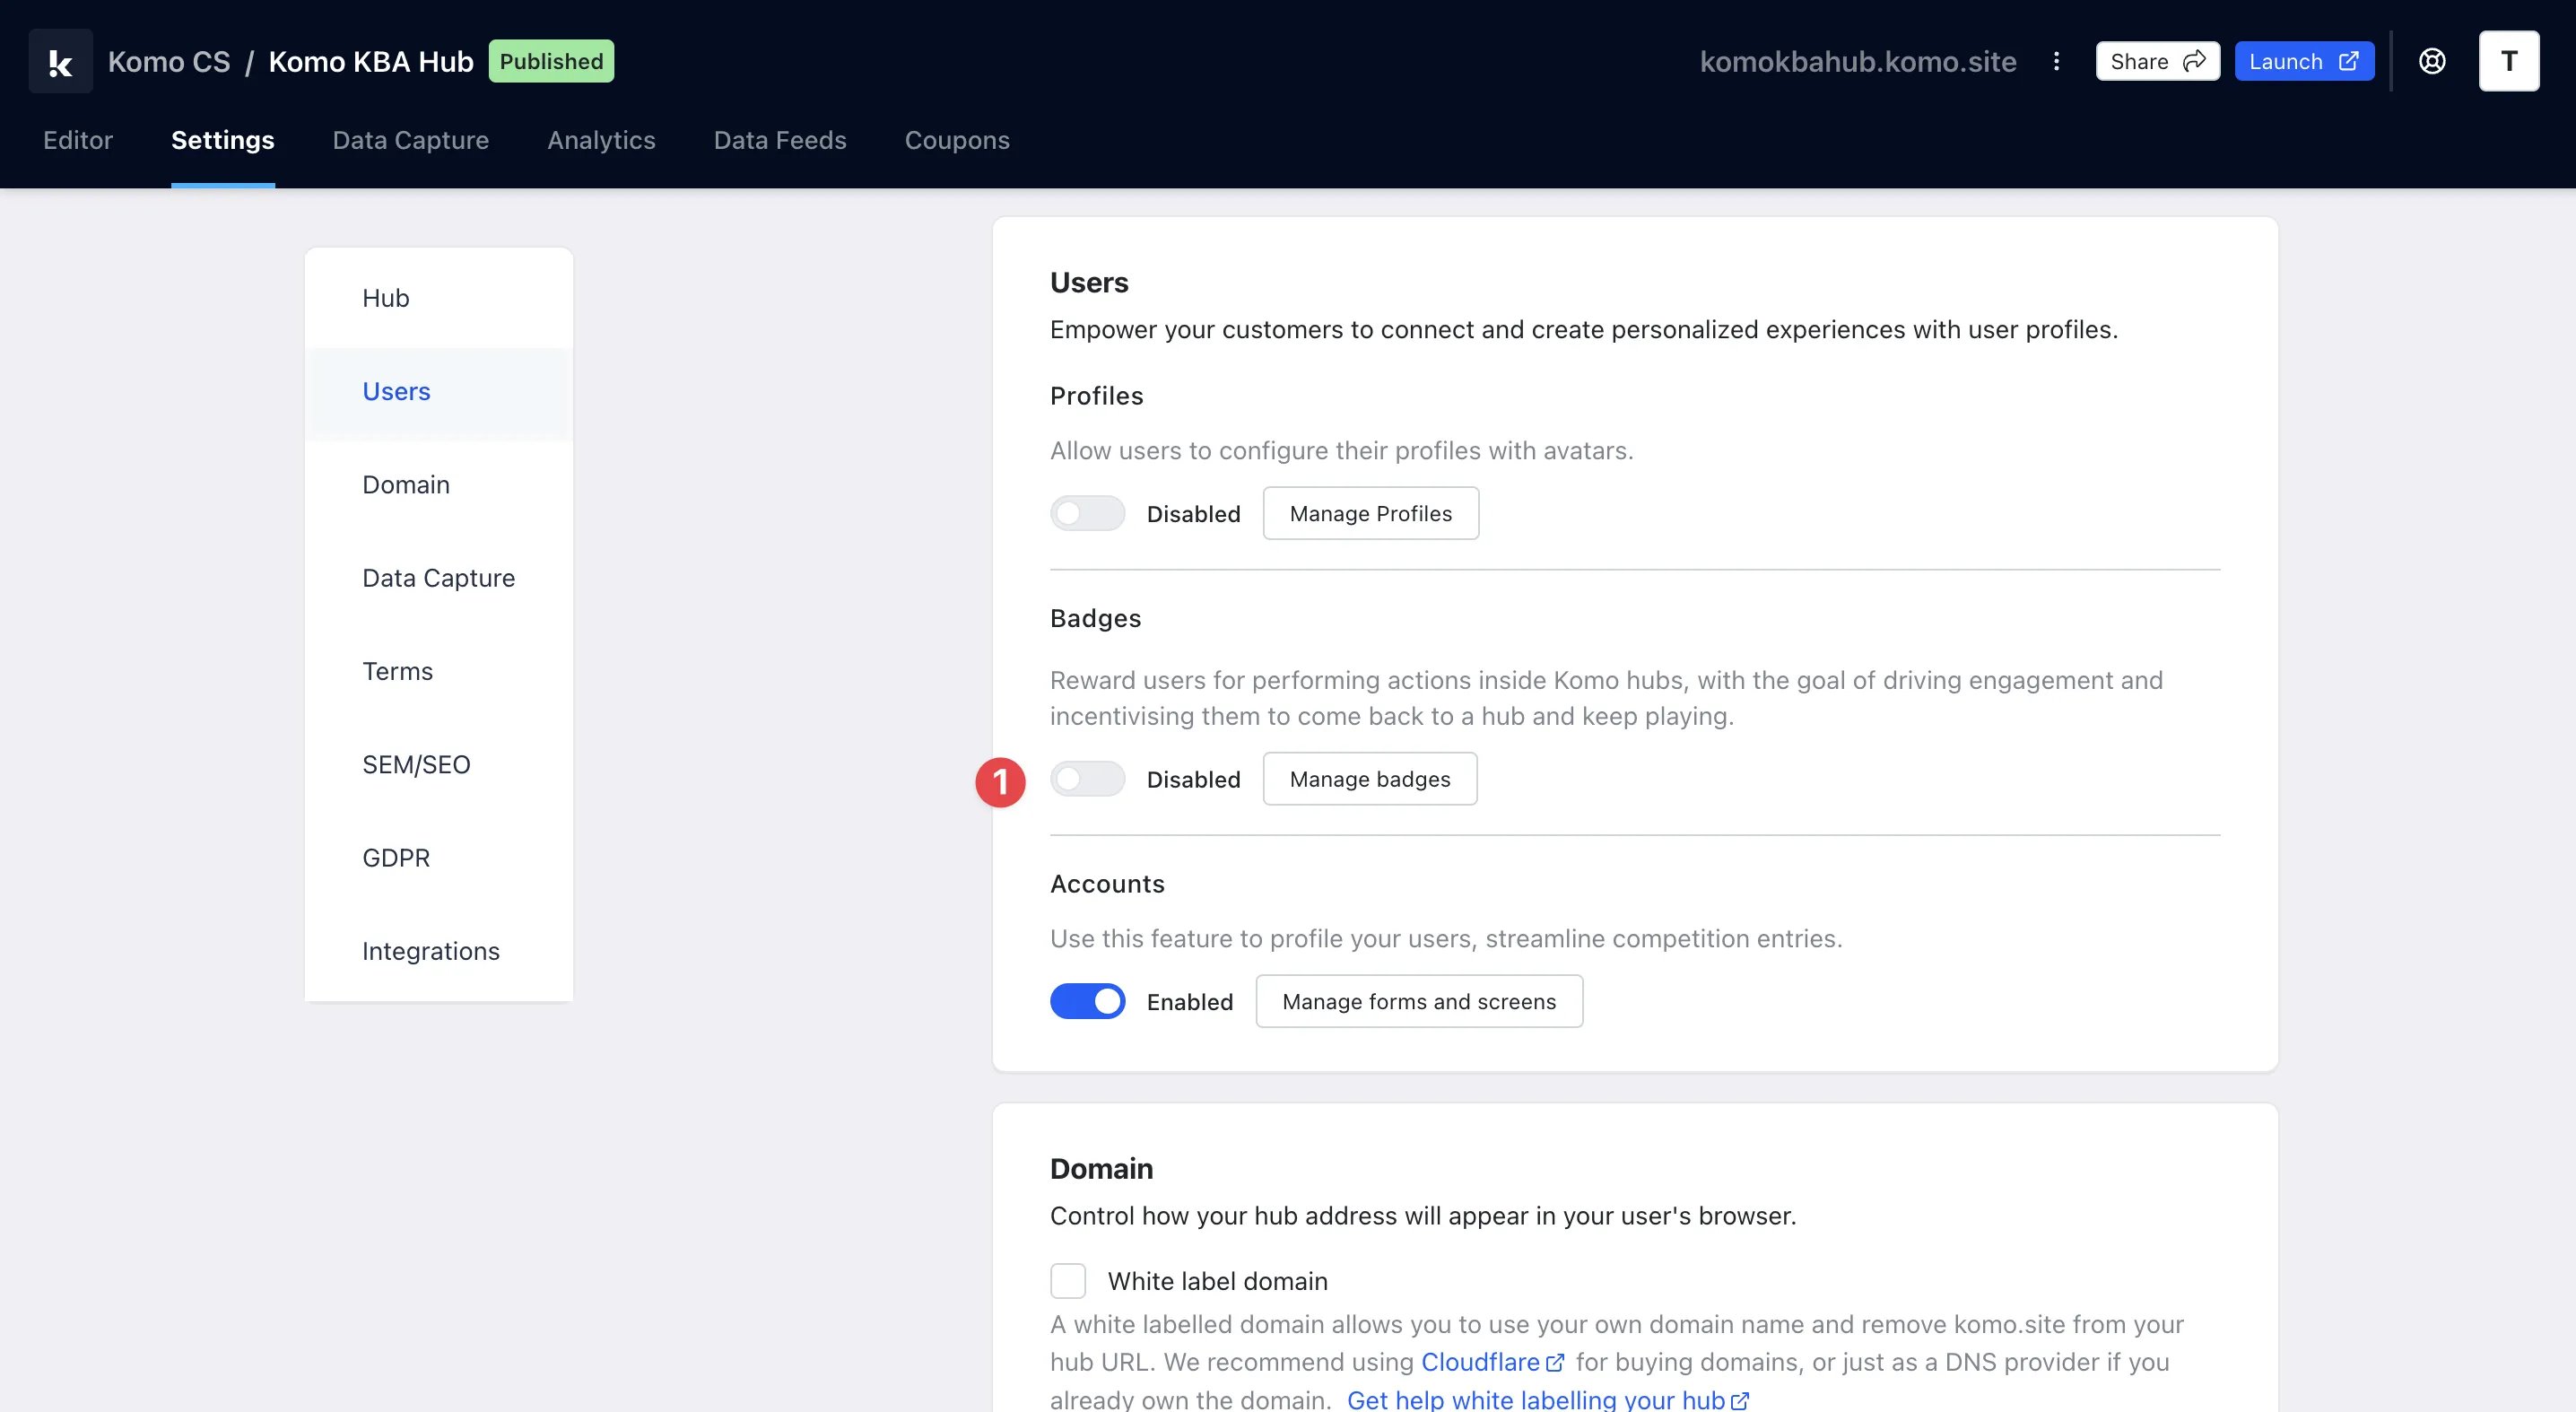 * **(1)** While you're still in **Settings**, enable the **Badges** Feature
### Step 3: Set up your Badges
* **(1)** While you're still in **Settings**, enable the **Badges** Feature
### Step 3: Set up your Badges
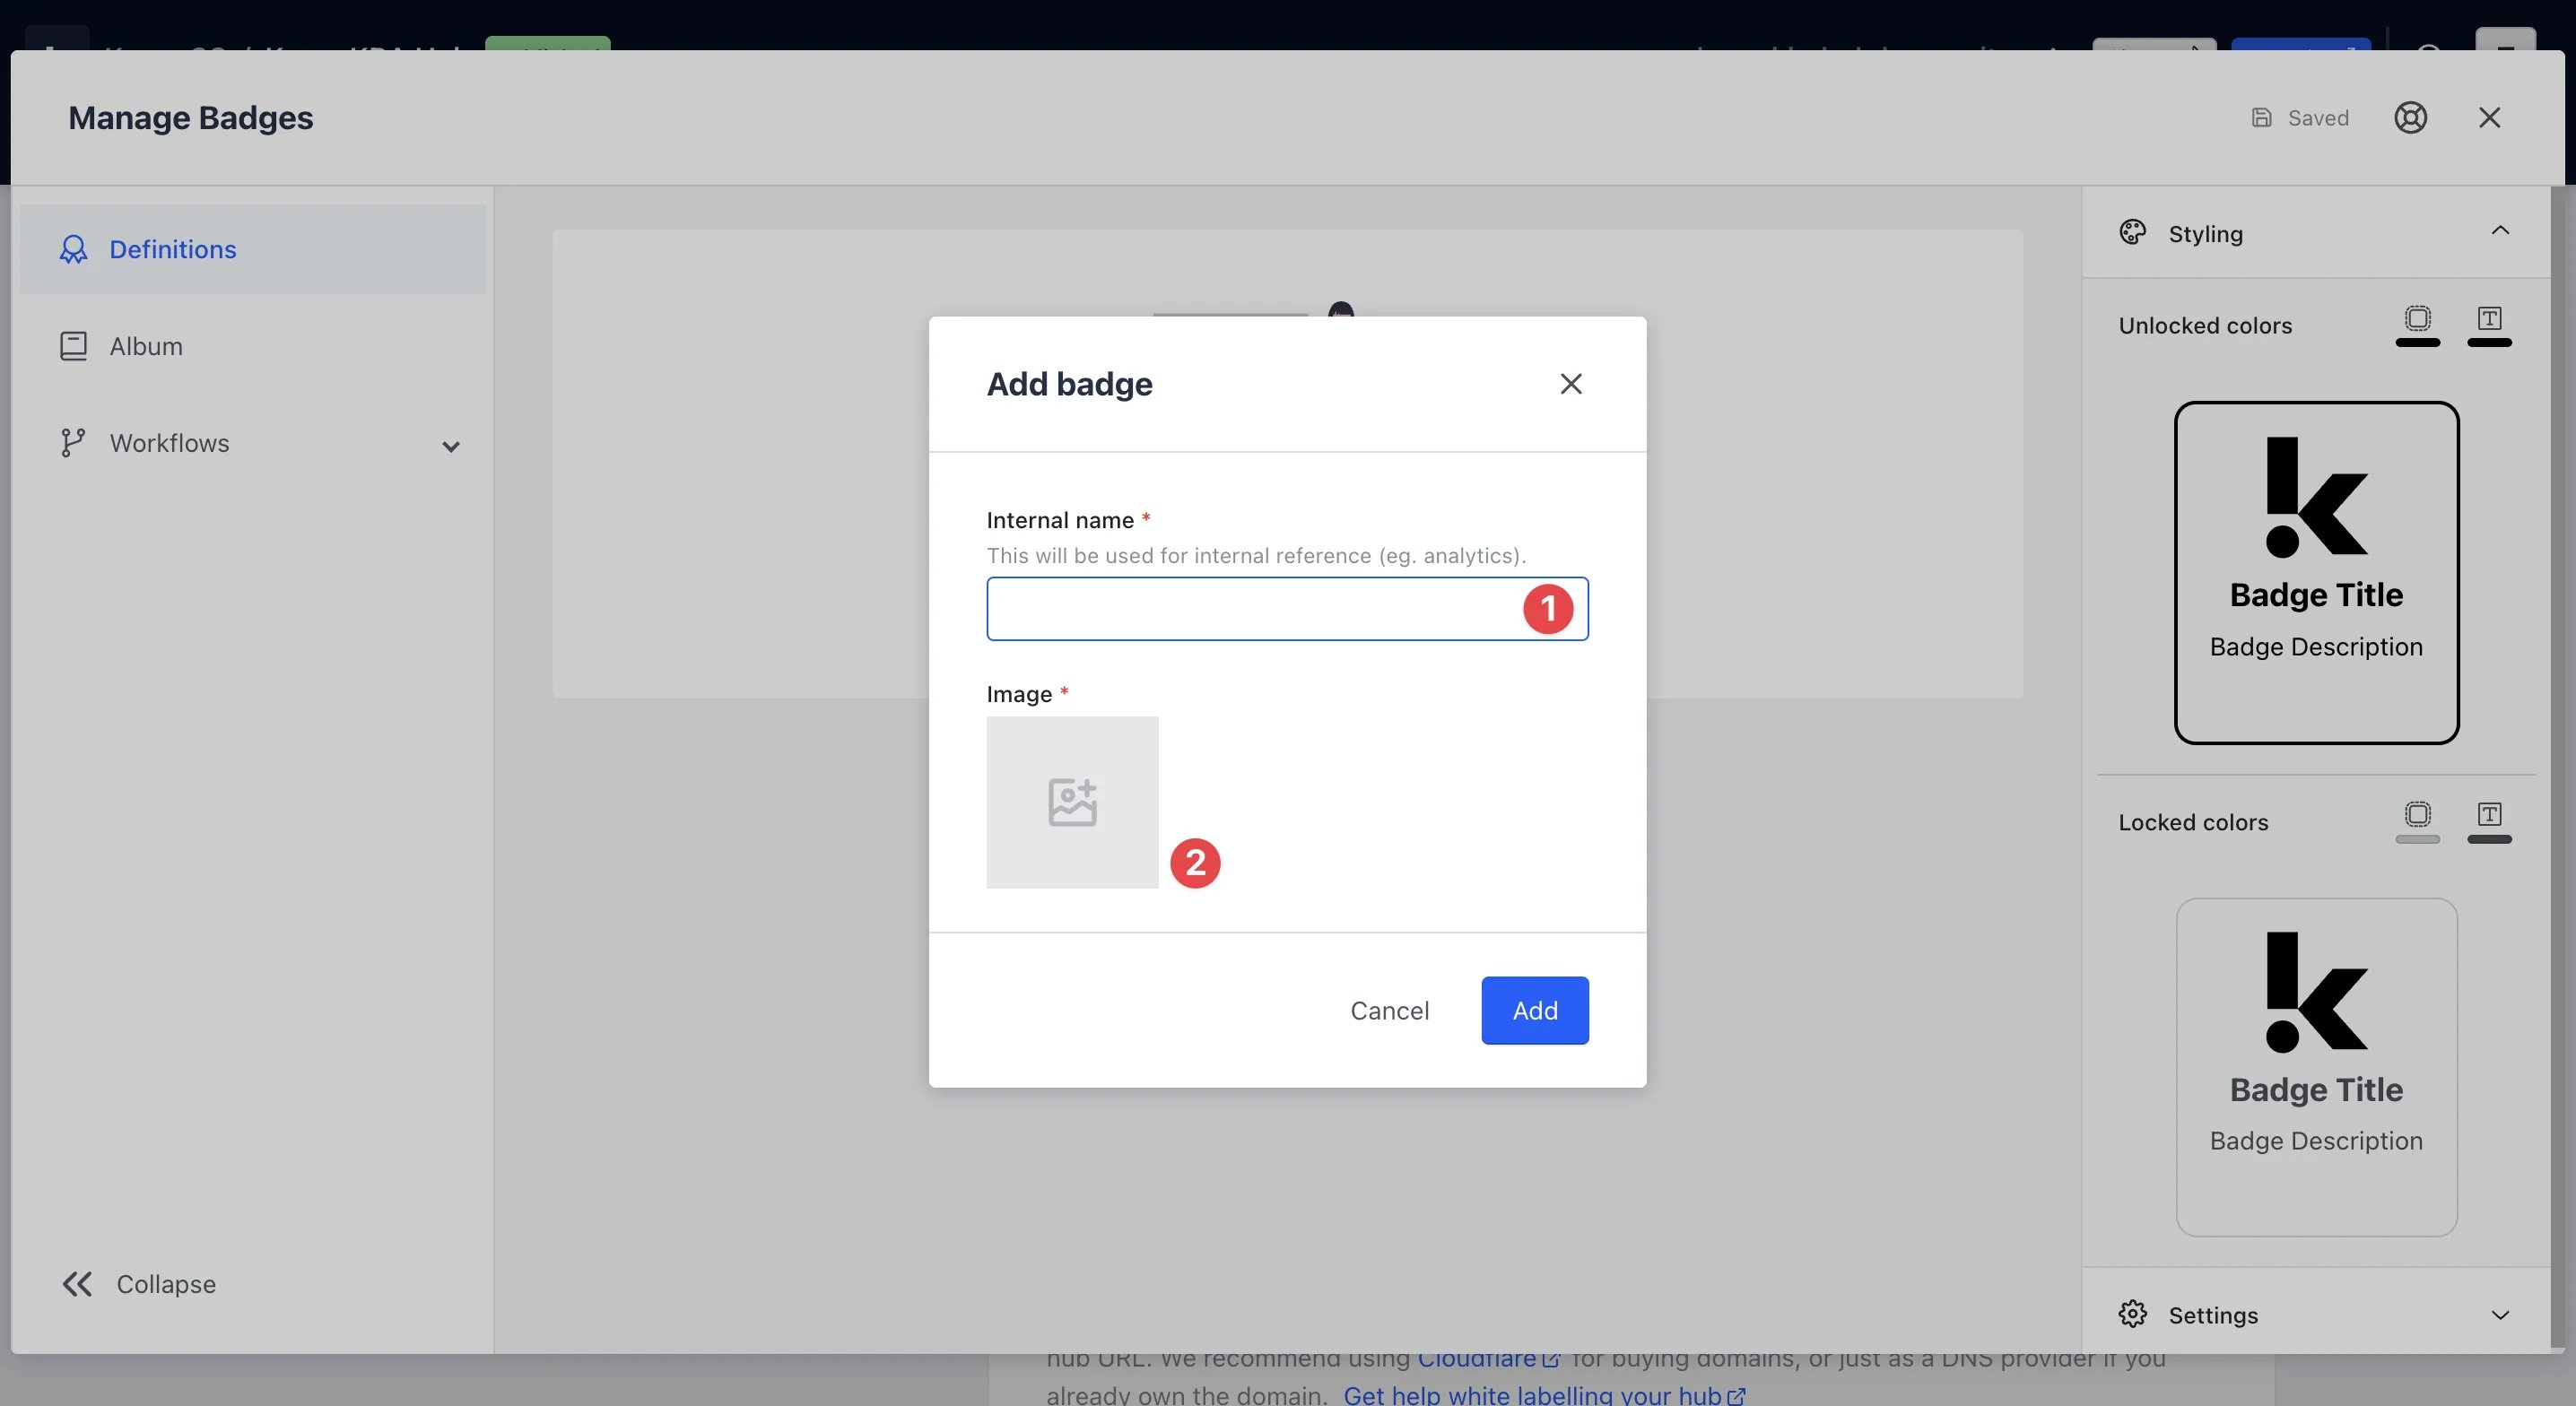 * Click on **Manage badges** and then **Create badge**
* **(1)** Here you will input an **Internal name** for the badge
* **(2)** Upload an **image** of your badge
We highly recommend uploading an image with a transparent background.
* Click on **Manage badges** and then **Create badge**
* **(1)** Here you will input an **Internal name** for the badge
* **(2)** Upload an **image** of your badge
We highly recommend uploading an image with a transparent background.
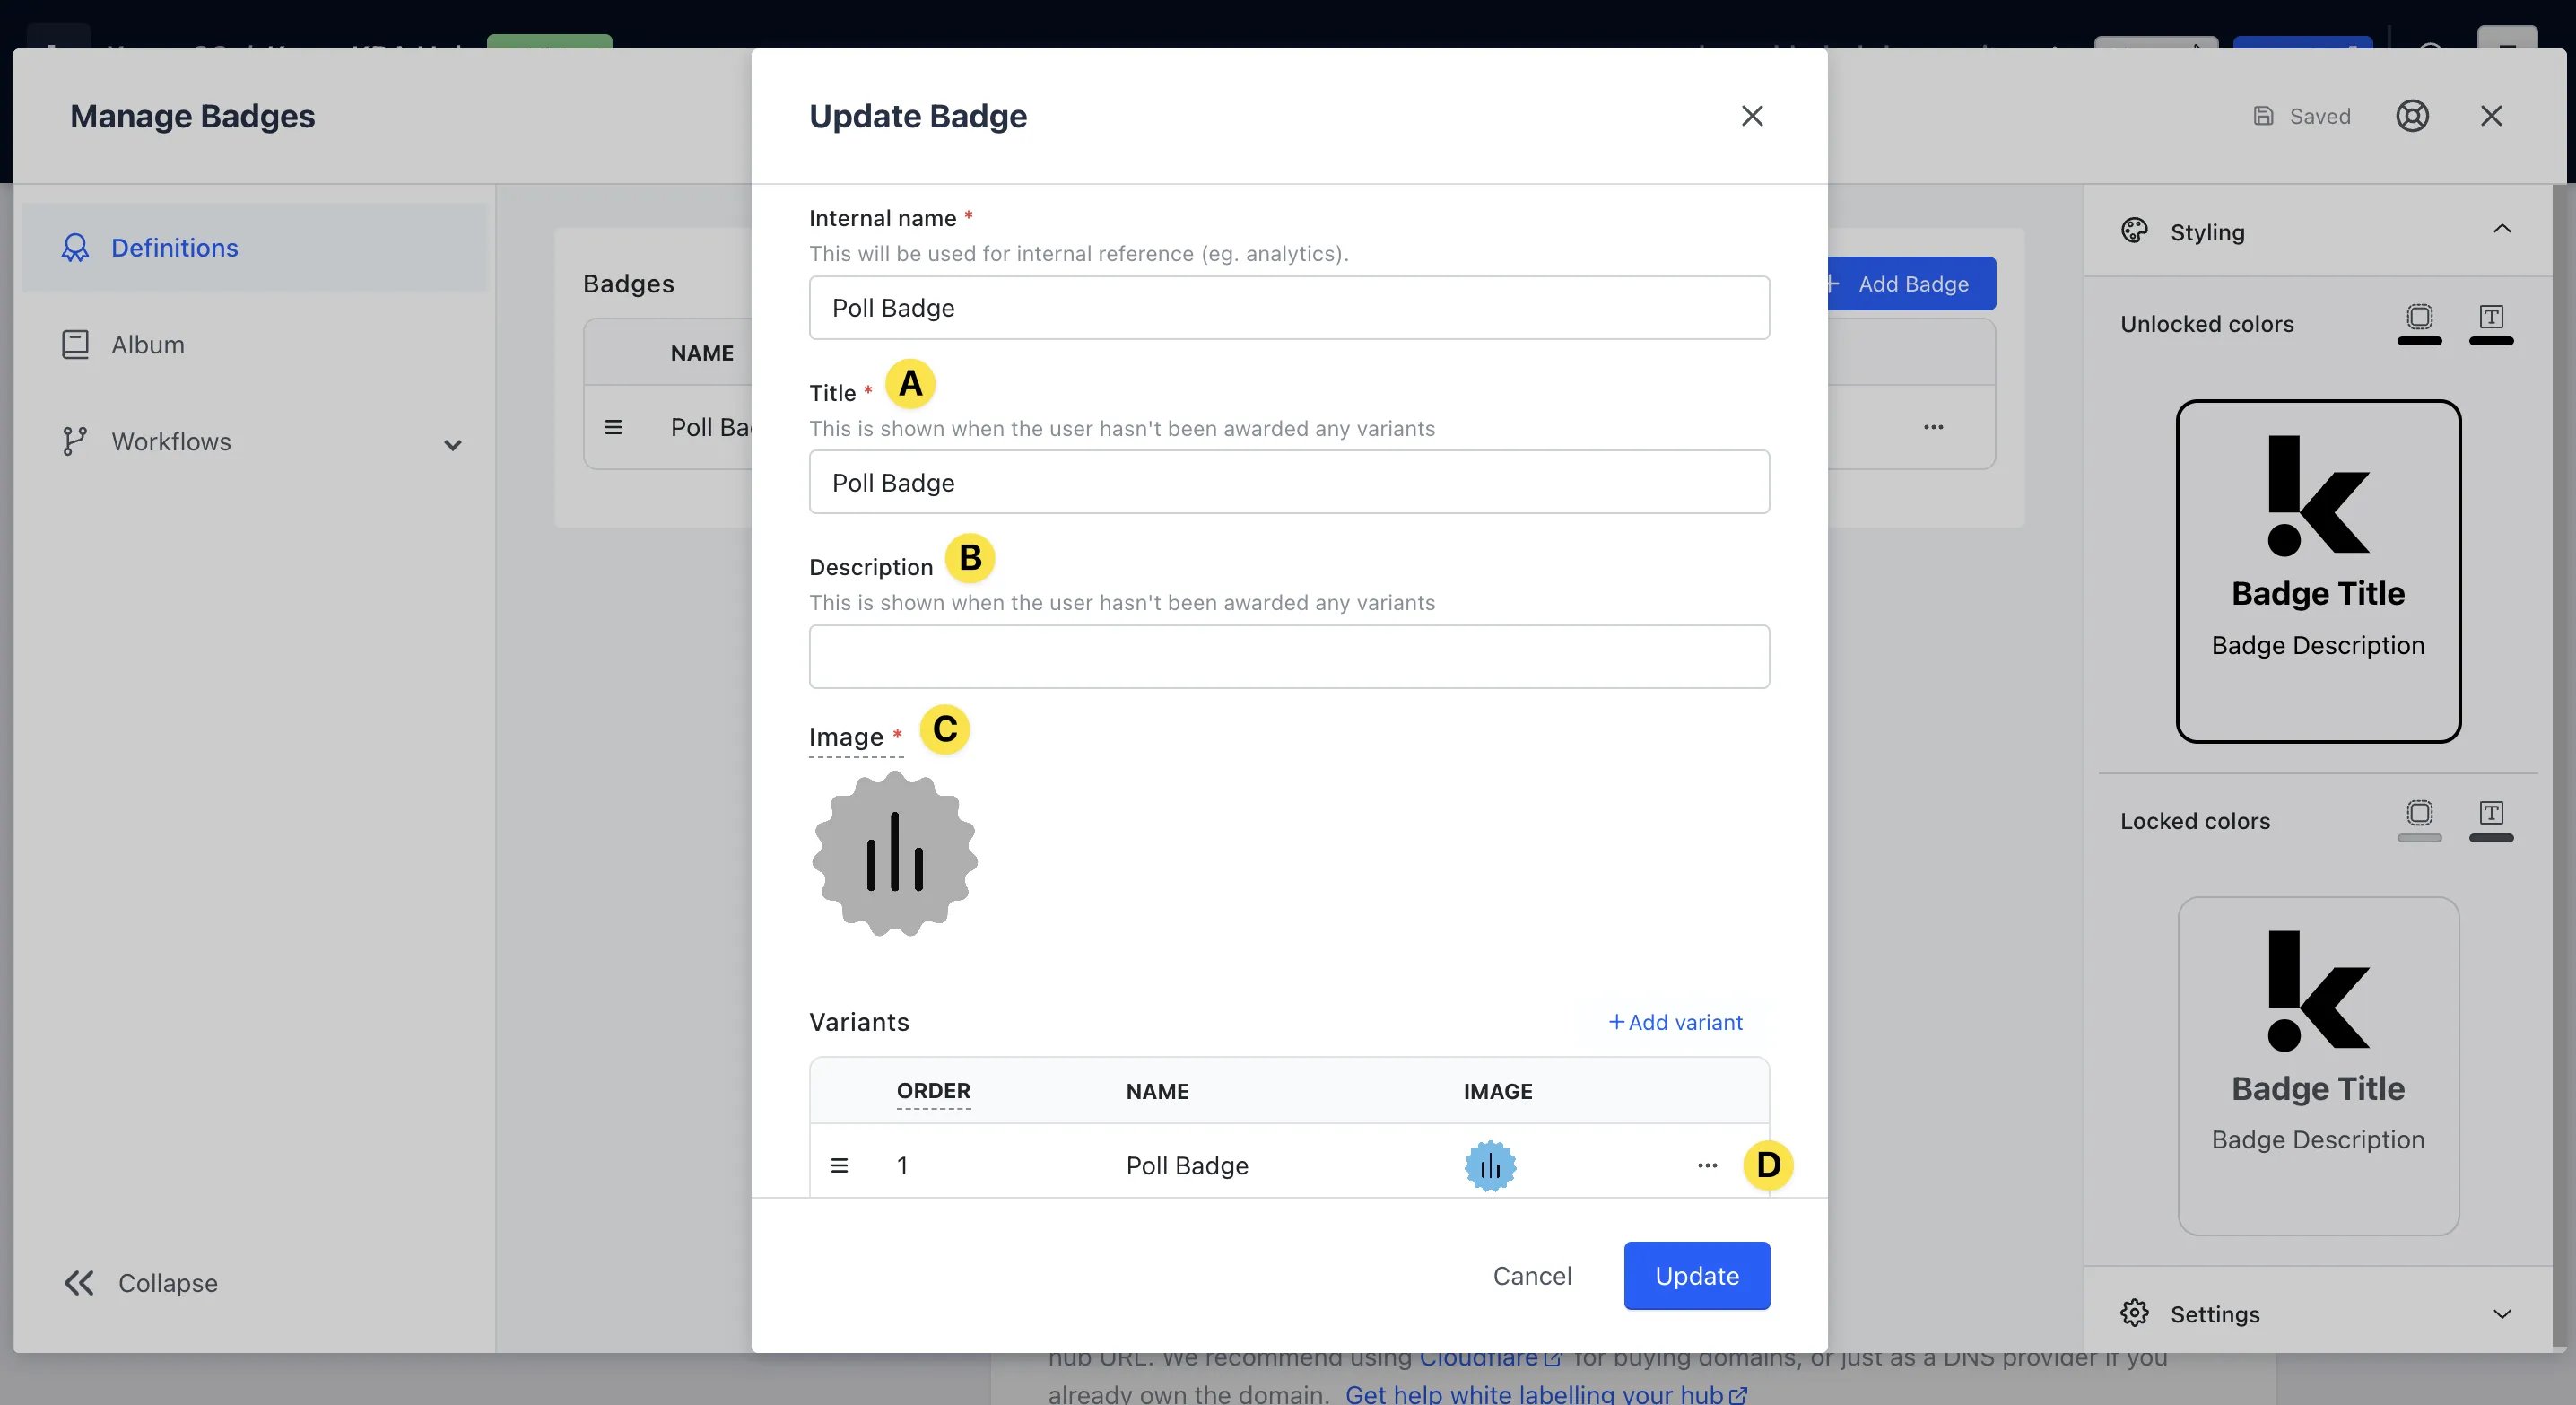 * **(A)** Update the **Title of the badge** that will be displayed to users on the Hub
* **(B)** Add a **Description** for the badge. Here is where you'll provide more detail on how to earn this badge. For example, Cast your vote in the controversial poll to unlock this badge!
* **(C)** This is the image of the **badge** you uploaded in Step 3. We automatically greyscale these badges to show they're locked
* **(D)** Clicking on the **...** you can **edit** the earned badge settings
* **(A)** Update the **Title of the badge** that will be displayed to users on the Hub
* **(B)** Add a **Description** for the badge. Here is where you'll provide more detail on how to earn this badge. For example, Cast your vote in the controversial poll to unlock this badge!
* **(C)** This is the image of the **badge** you uploaded in Step 3. We automatically greyscale these badges to show they're locked
* **(D)** Clicking on the **...** you can **edit** the earned badge settings
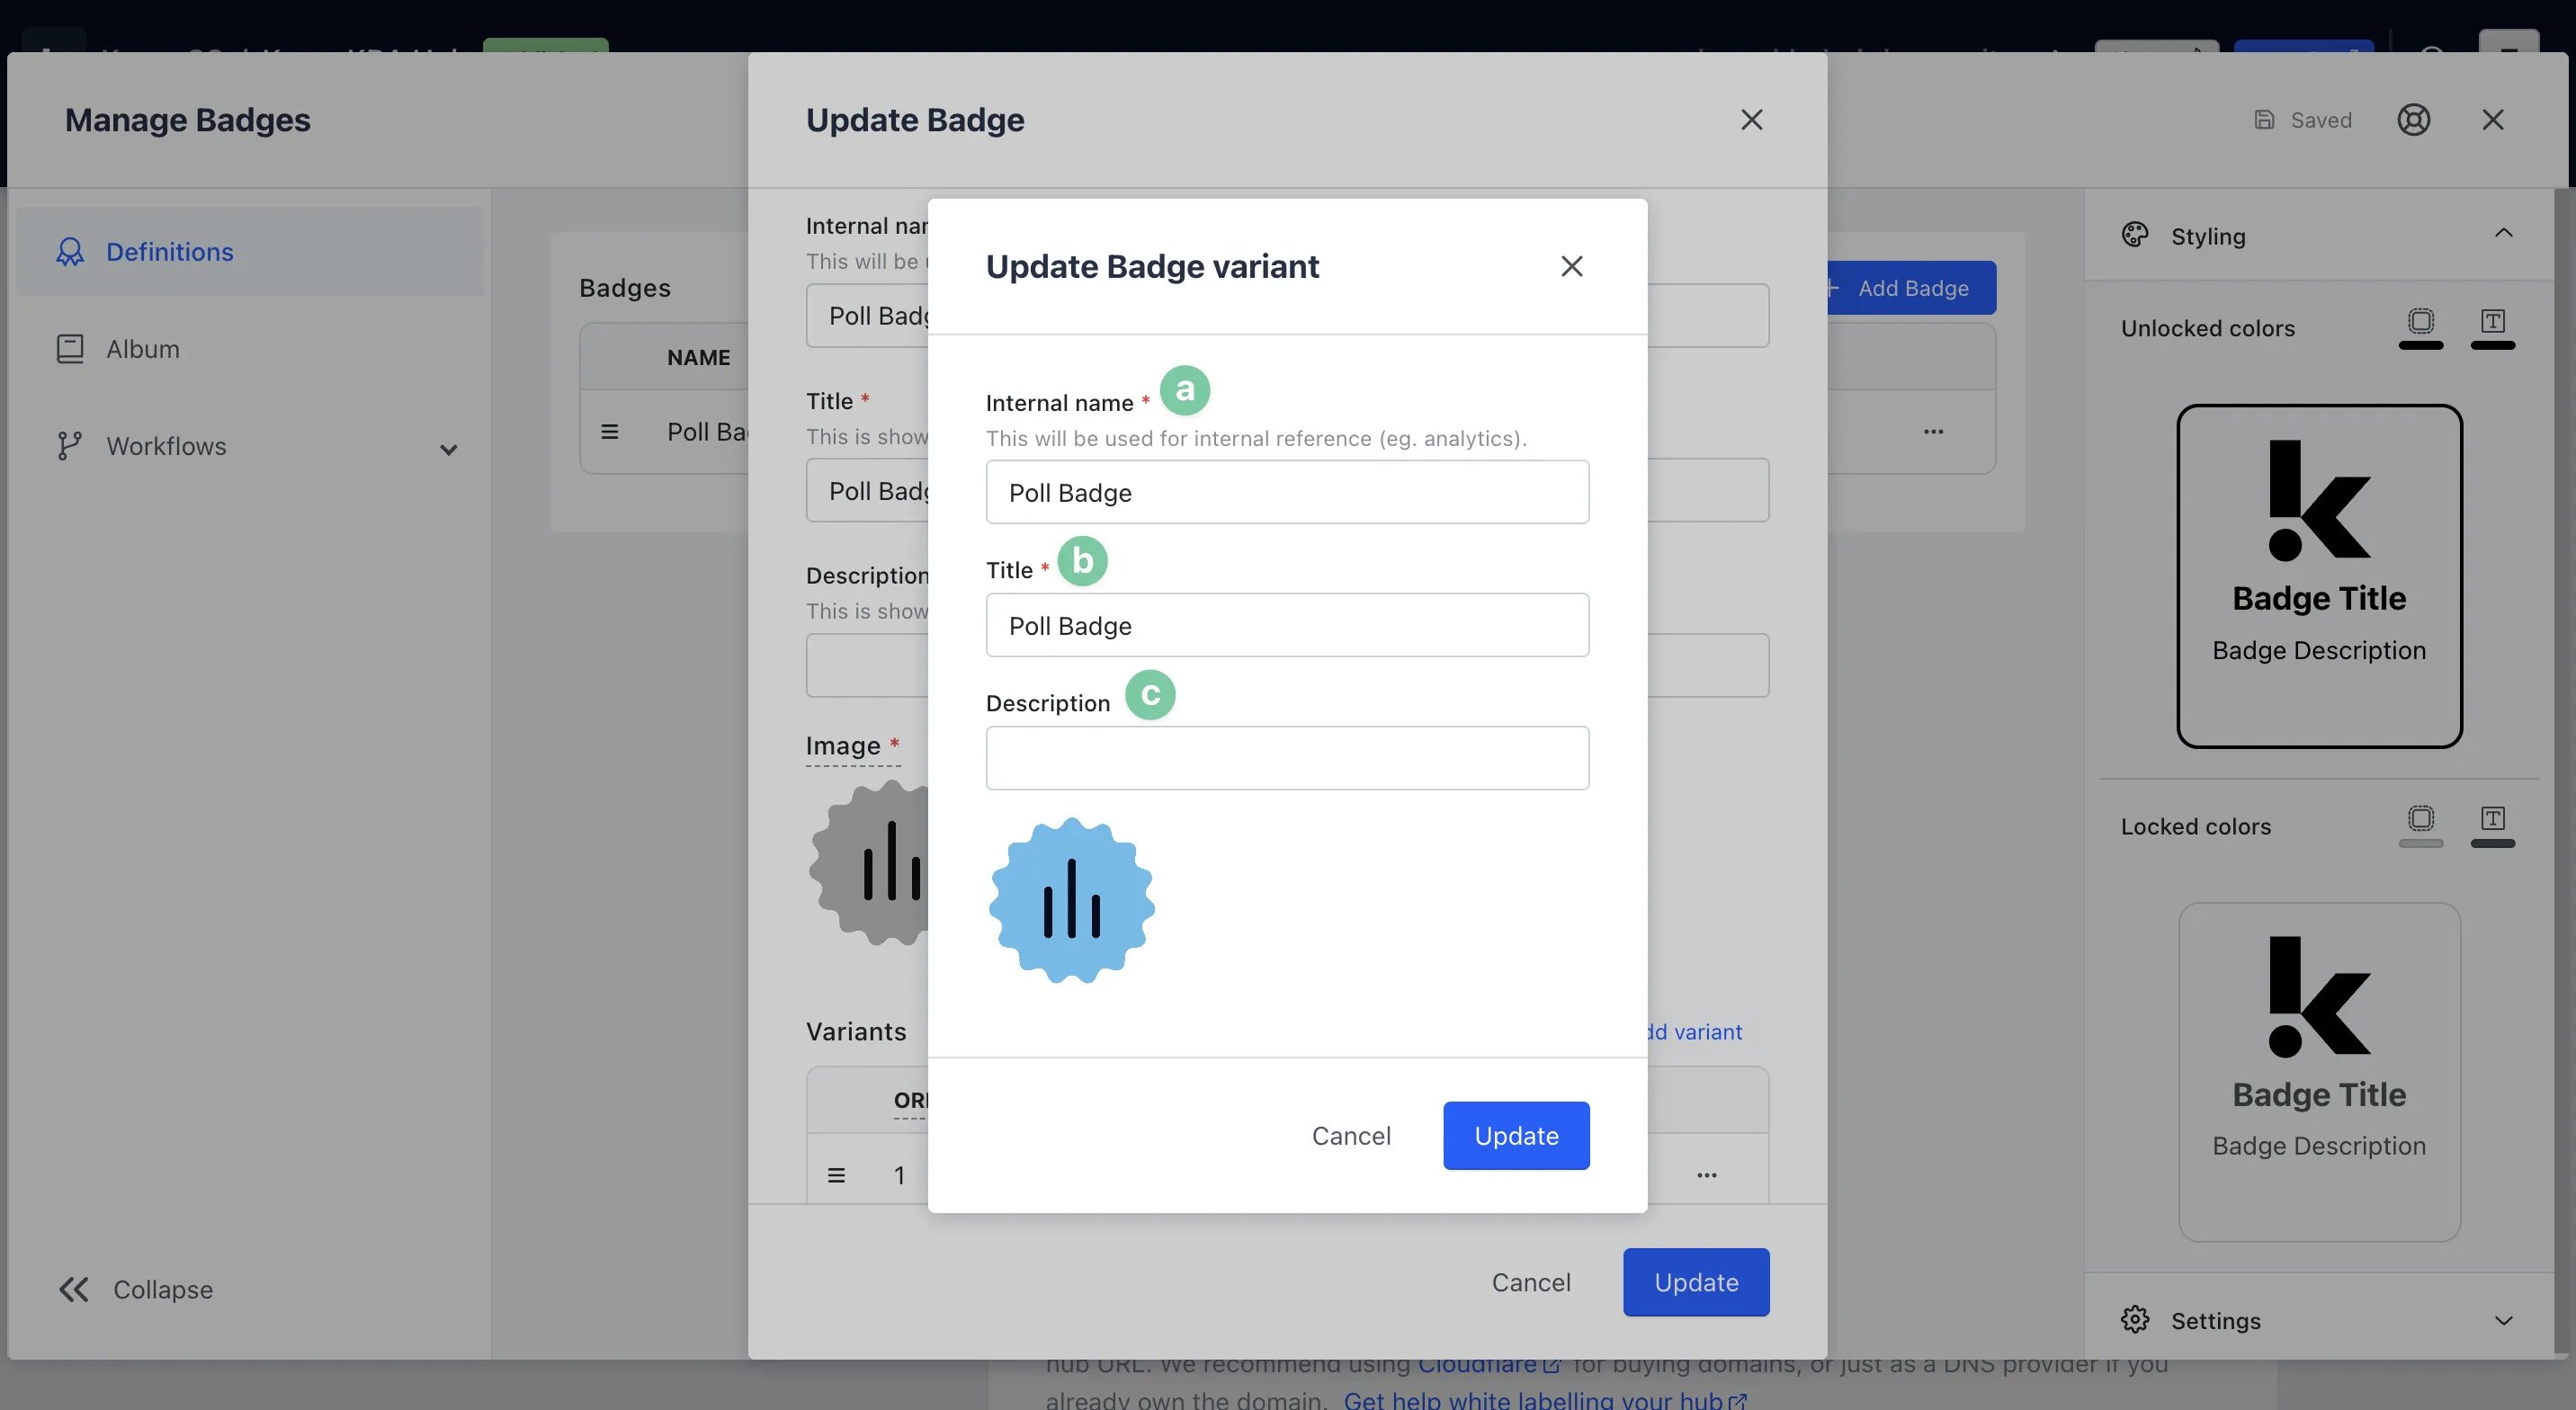 * **(a)** This is the **Internal name** for the badge set in Step 3(1)
* **(b)** Here is the **Title of the badge** set up in Step 3A
* **(c)** Enter a **Description** for when the badge is unlocked. For example, Congrats! You've unlocked this badge!
* After clicking on **Update**, you will see your badge is in **draft mode**. To make this live, click on **...** next to the badge and select **Publish**. This will make the badge visible on the Hub and to users
### Step 4: Configure your Badge Variants \[Optional]
* **(a)** This is the **Internal name** for the badge set in Step 3(1)
* **(b)** Here is the **Title of the badge** set up in Step 3A
* **(c)** Enter a **Description** for when the badge is unlocked. For example, Congrats! You've unlocked this badge!
* After clicking on **Update**, you will see your badge is in **draft mode**. To make this live, click on **...** next to the badge and select **Publish**. This will make the badge visible on the Hub and to users
### Step 4: Configure your Badge Variants \[Optional]
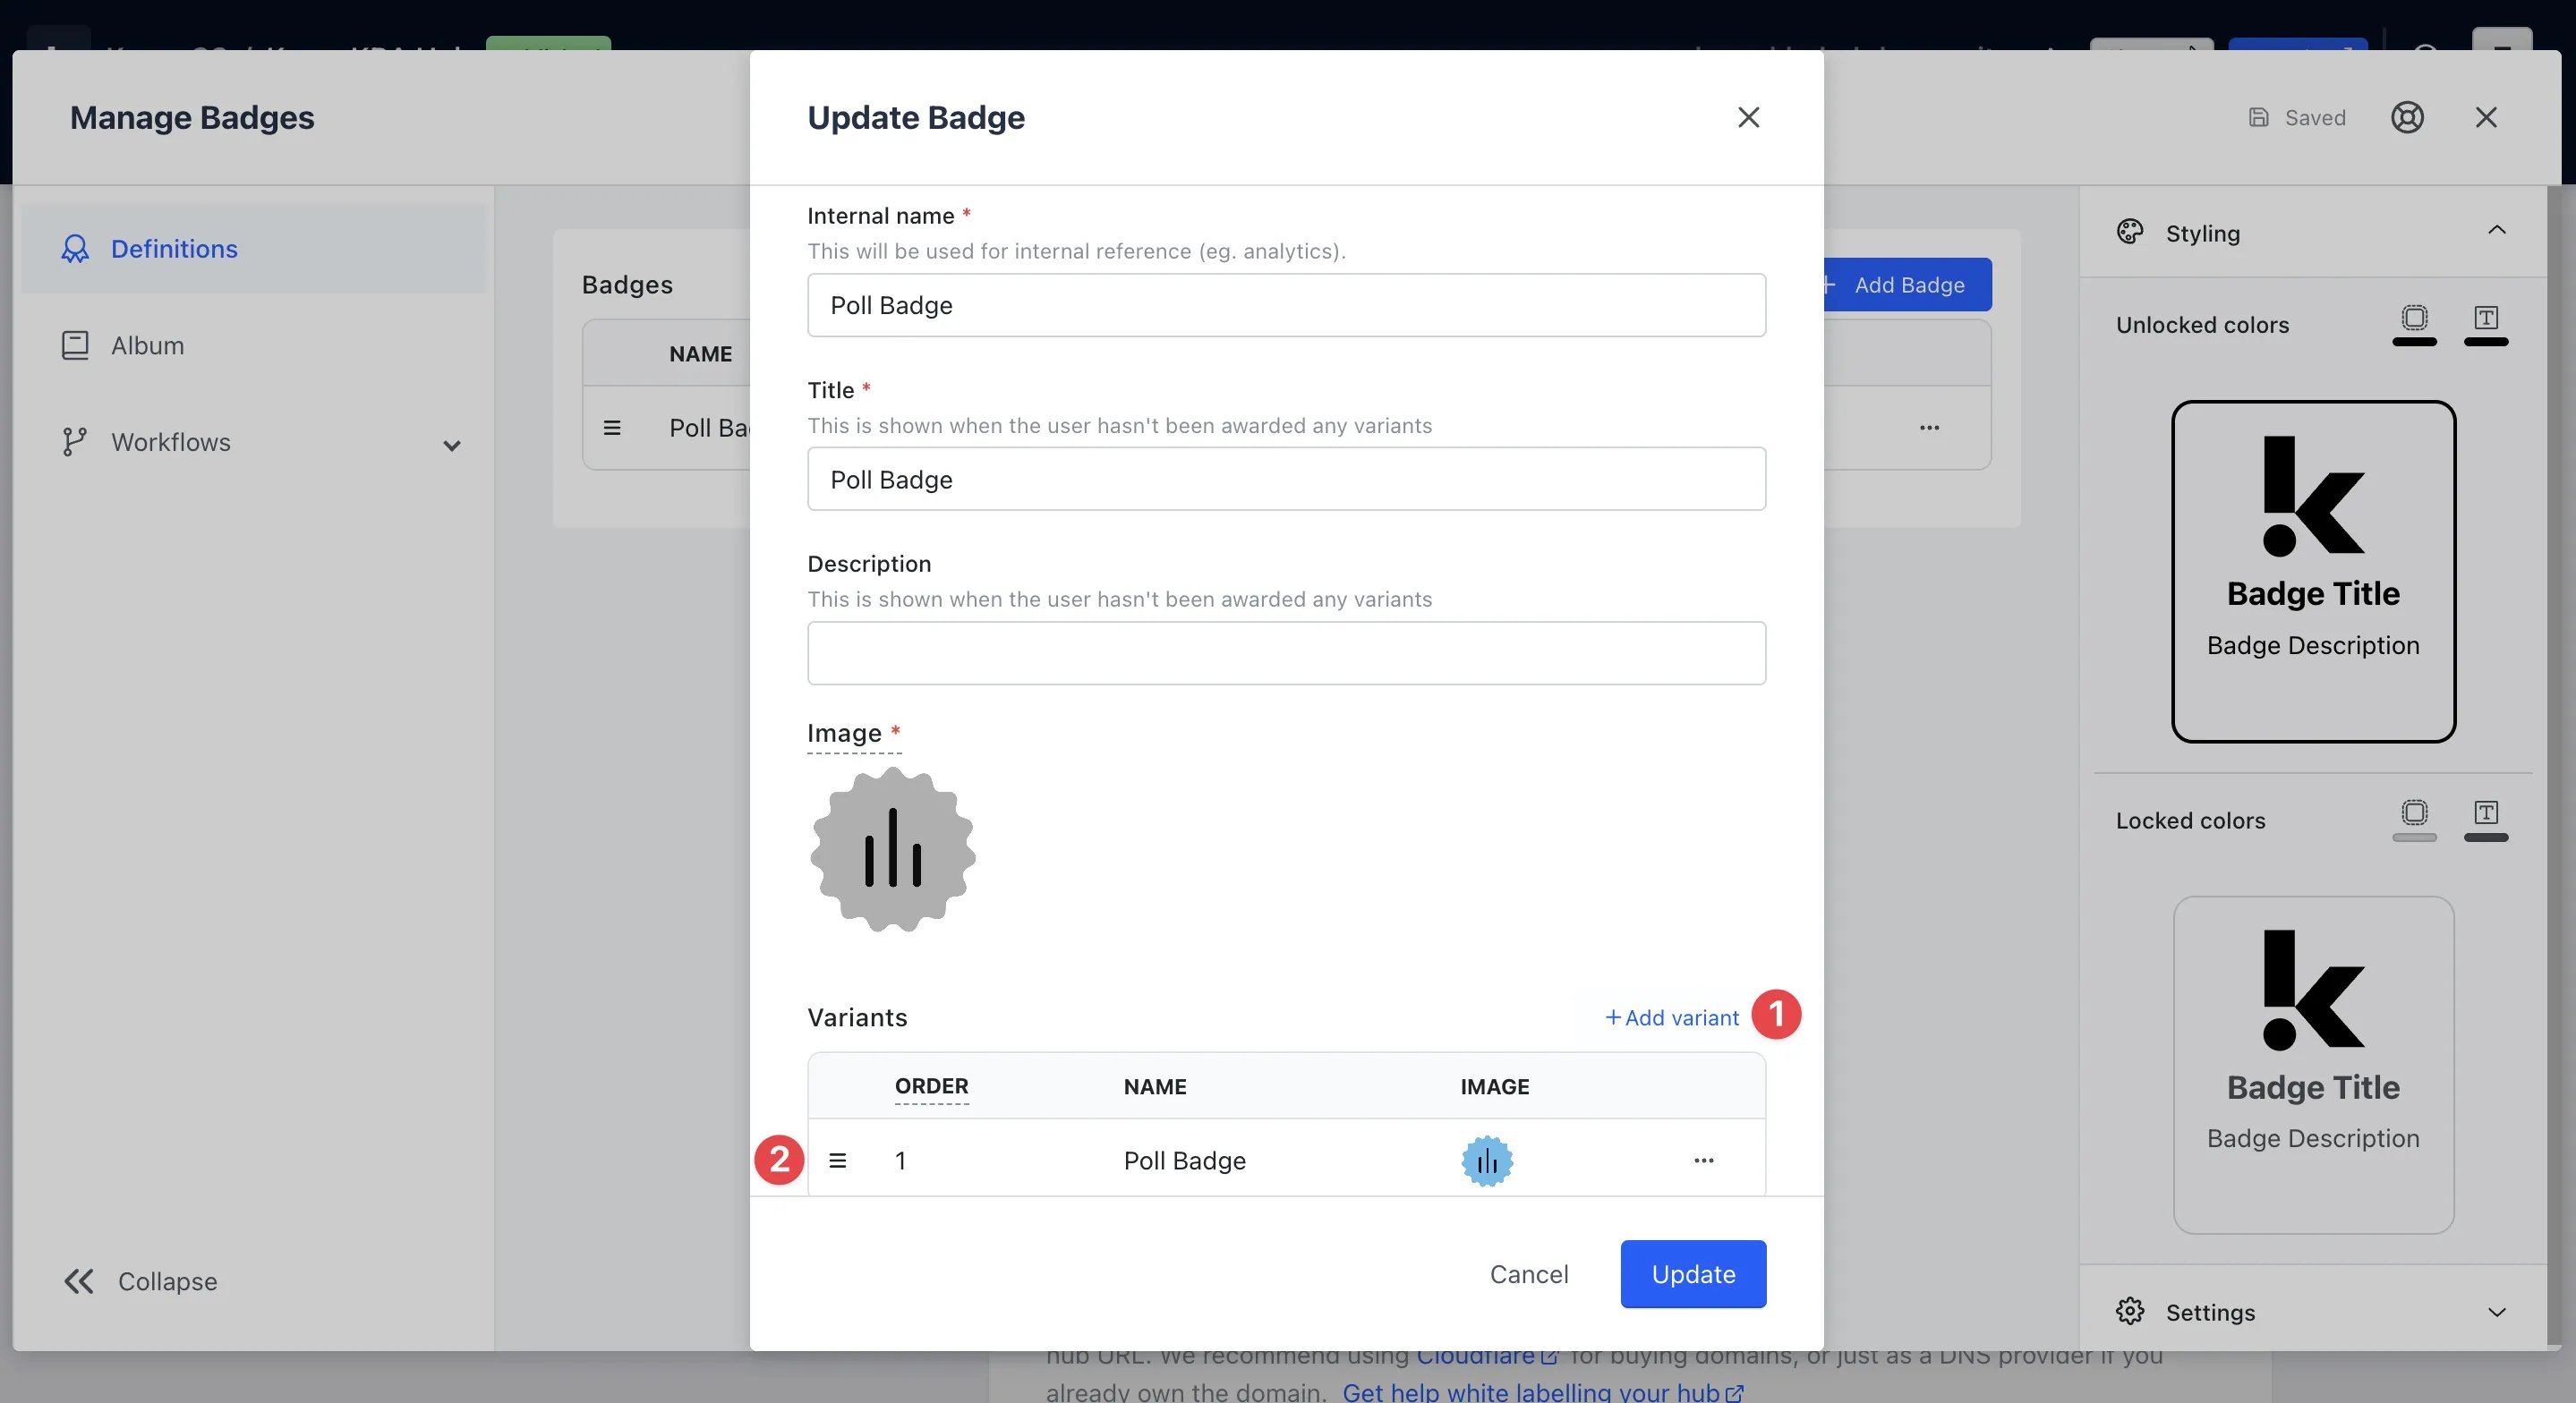 **Badge Variants** are an easy way to group relevant badges and create a tiered structure where a user can earn different levels of badges within a group.
Should you wish to group certain Badges, under the **Definitions** tab, click on a Badge you've created and navigate to the **Variants** section of the modal.
**(1)** Click on the **Add variant** button
**Badge Variants** are an easy way to group relevant badges and create a tiered structure where a user can earn different levels of badges within a group.
Should you wish to group certain Badges, under the **Definitions** tab, click on a Badge you've created and navigate to the **Variants** section of the modal.
**(1)** Click on the **Add variant** button
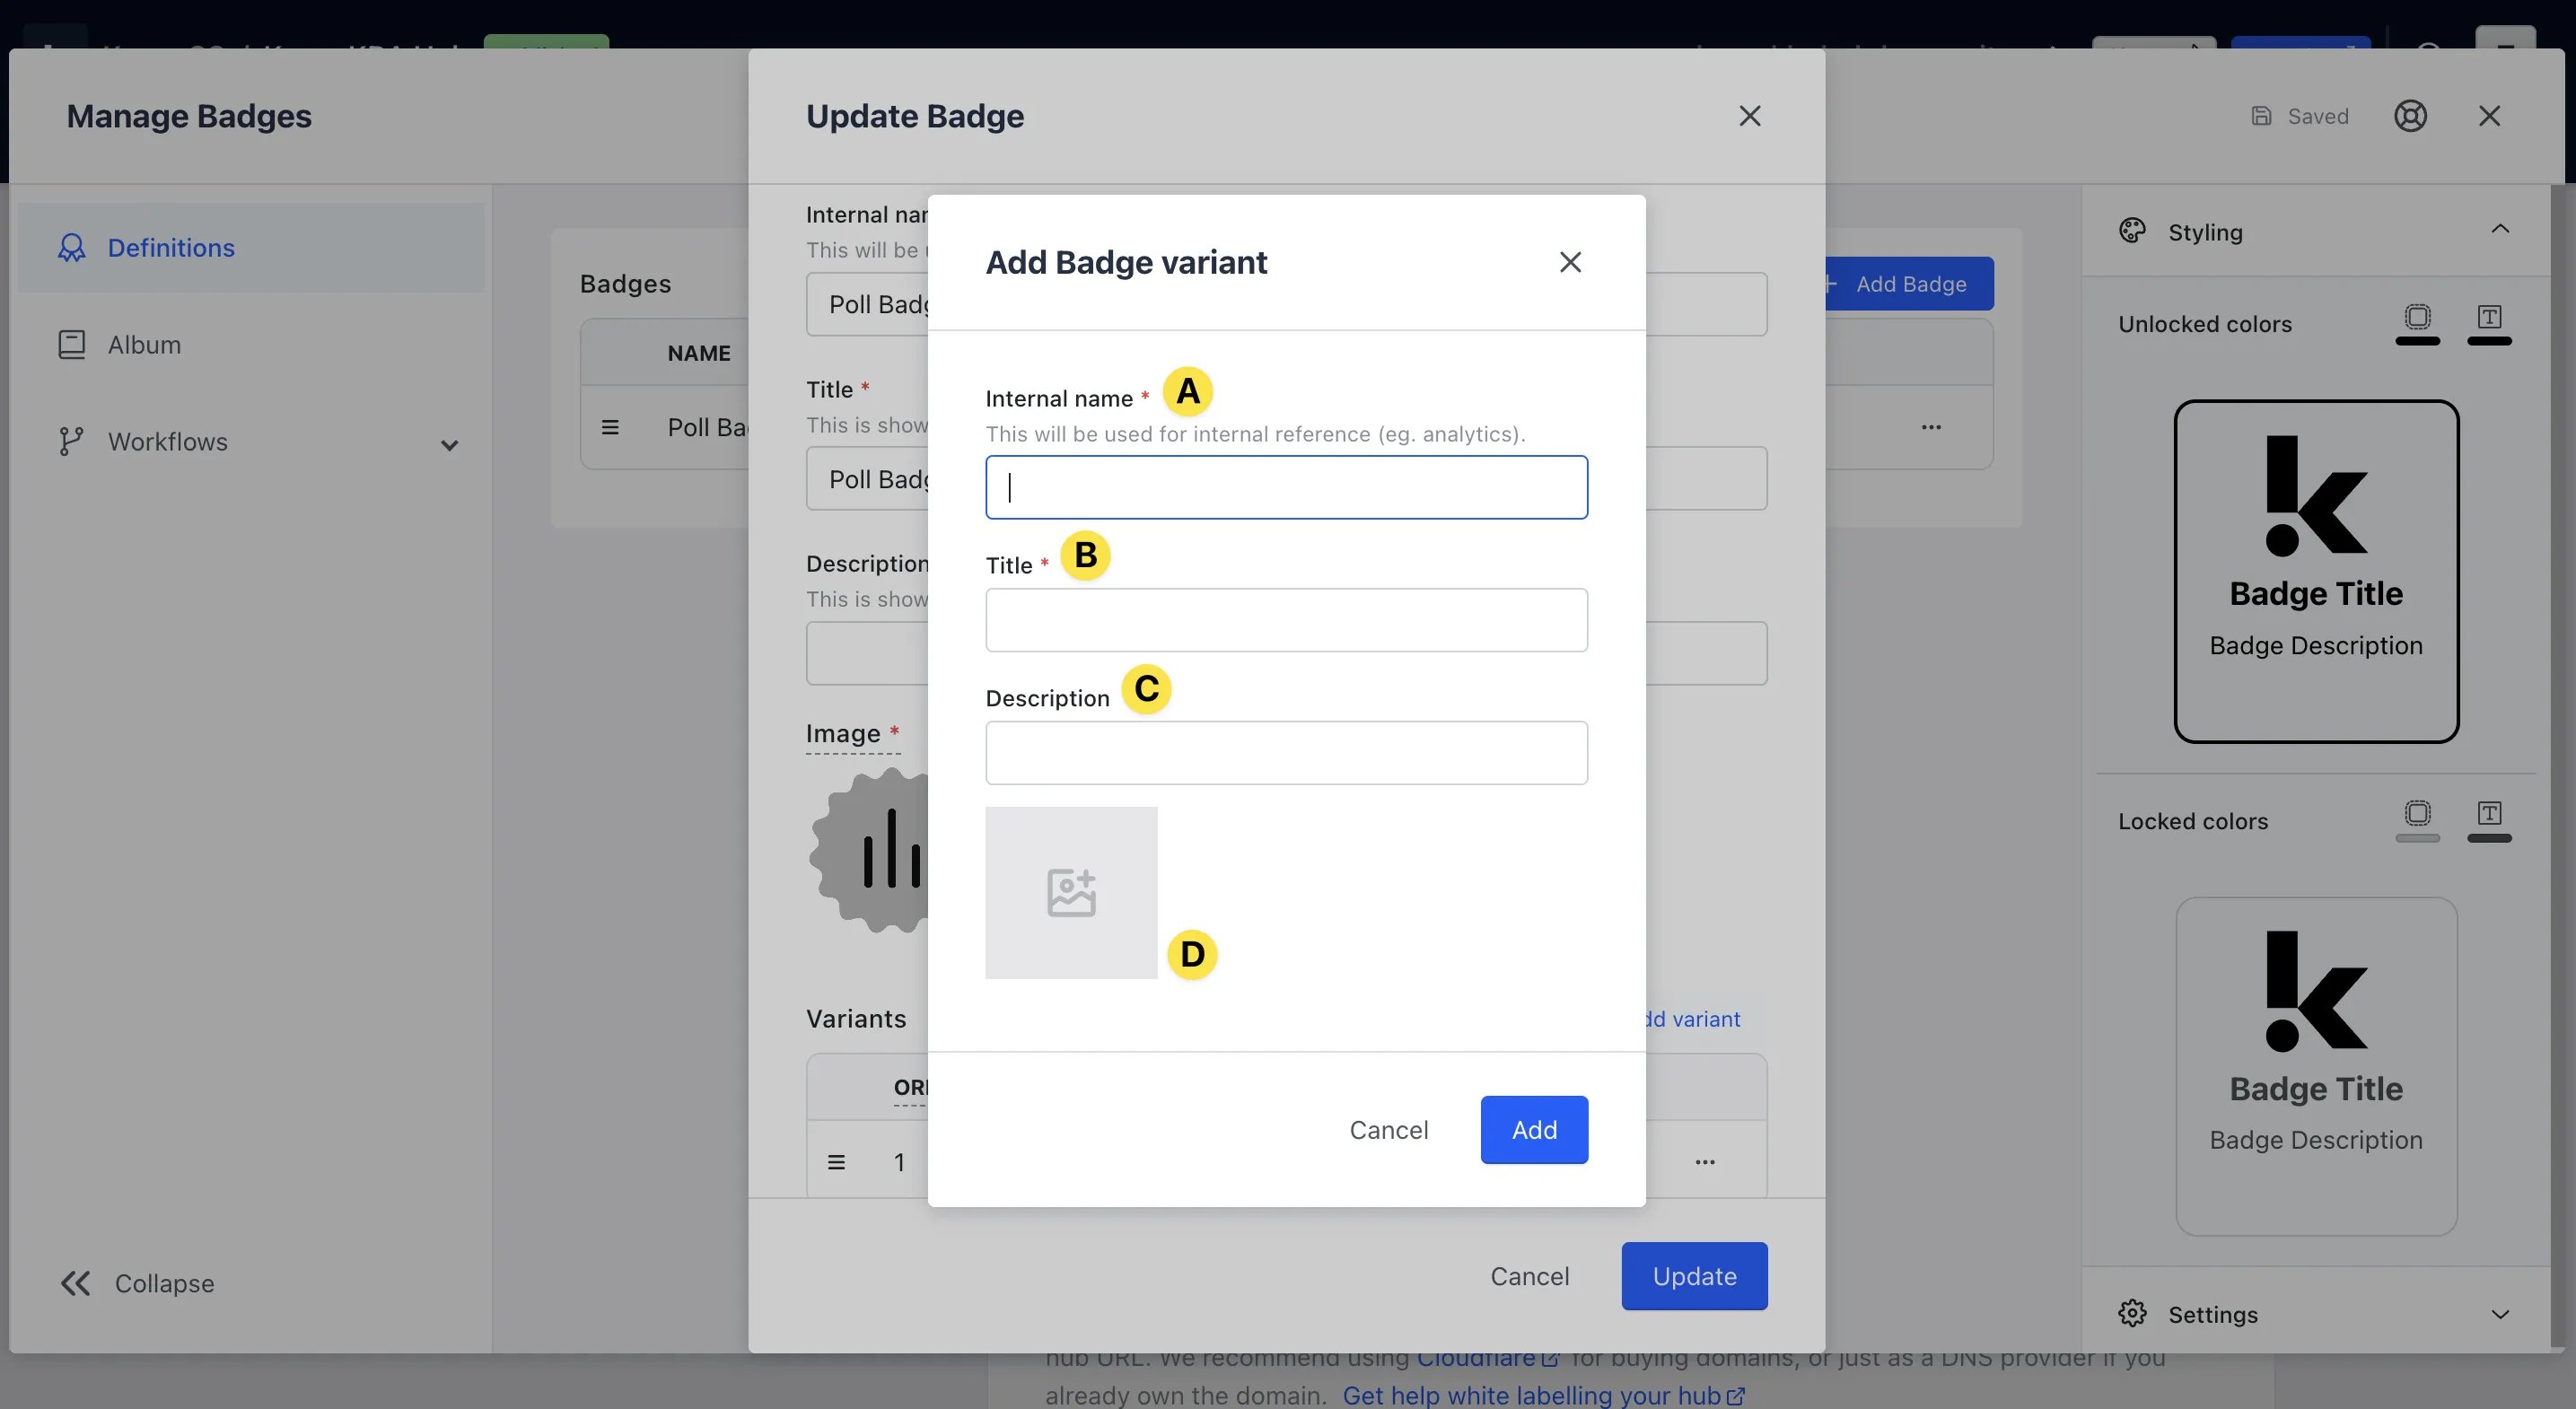 * **(A)** Enter an **Internal name** for your Variant
* **(B)** Enter a **Title** for your Variant
* **(C)** Add a **Description** for each Badge Variant Group that you create
While descriptions are optional, they are a great way to encourage your users to play again by inviting them to improve their score to unlock the next Badge level. This, in turn, drives repeat engagement!
* **(D)** Upload an **image** to represent this Variant
* **(2)** Once you have created your desired Badge Variants, use the **Drag** functionality (the three horizontal lines to the left of each Badge) to order the Badges in your desired tiering system. Then click **save**
The Badge order is ranked from 1 being the most important or highest, and less important or lower as the numbers increase.
### Step 5: Customise the Style of your Badges
* **(A)** Enter an **Internal name** for your Variant
* **(B)** Enter a **Title** for your Variant
* **(C)** Add a **Description** for each Badge Variant Group that you create
While descriptions are optional, they are a great way to encourage your users to play again by inviting them to improve their score to unlock the next Badge level. This, in turn, drives repeat engagement!
* **(D)** Upload an **image** to represent this Variant
* **(2)** Once you have created your desired Badge Variants, use the **Drag** functionality (the three horizontal lines to the left of each Badge) to order the Badges in your desired tiering system. Then click **save**
The Badge order is ranked from 1 being the most important or highest, and less important or lower as the numbers increase.
### Step 5: Customise the Style of your Badges
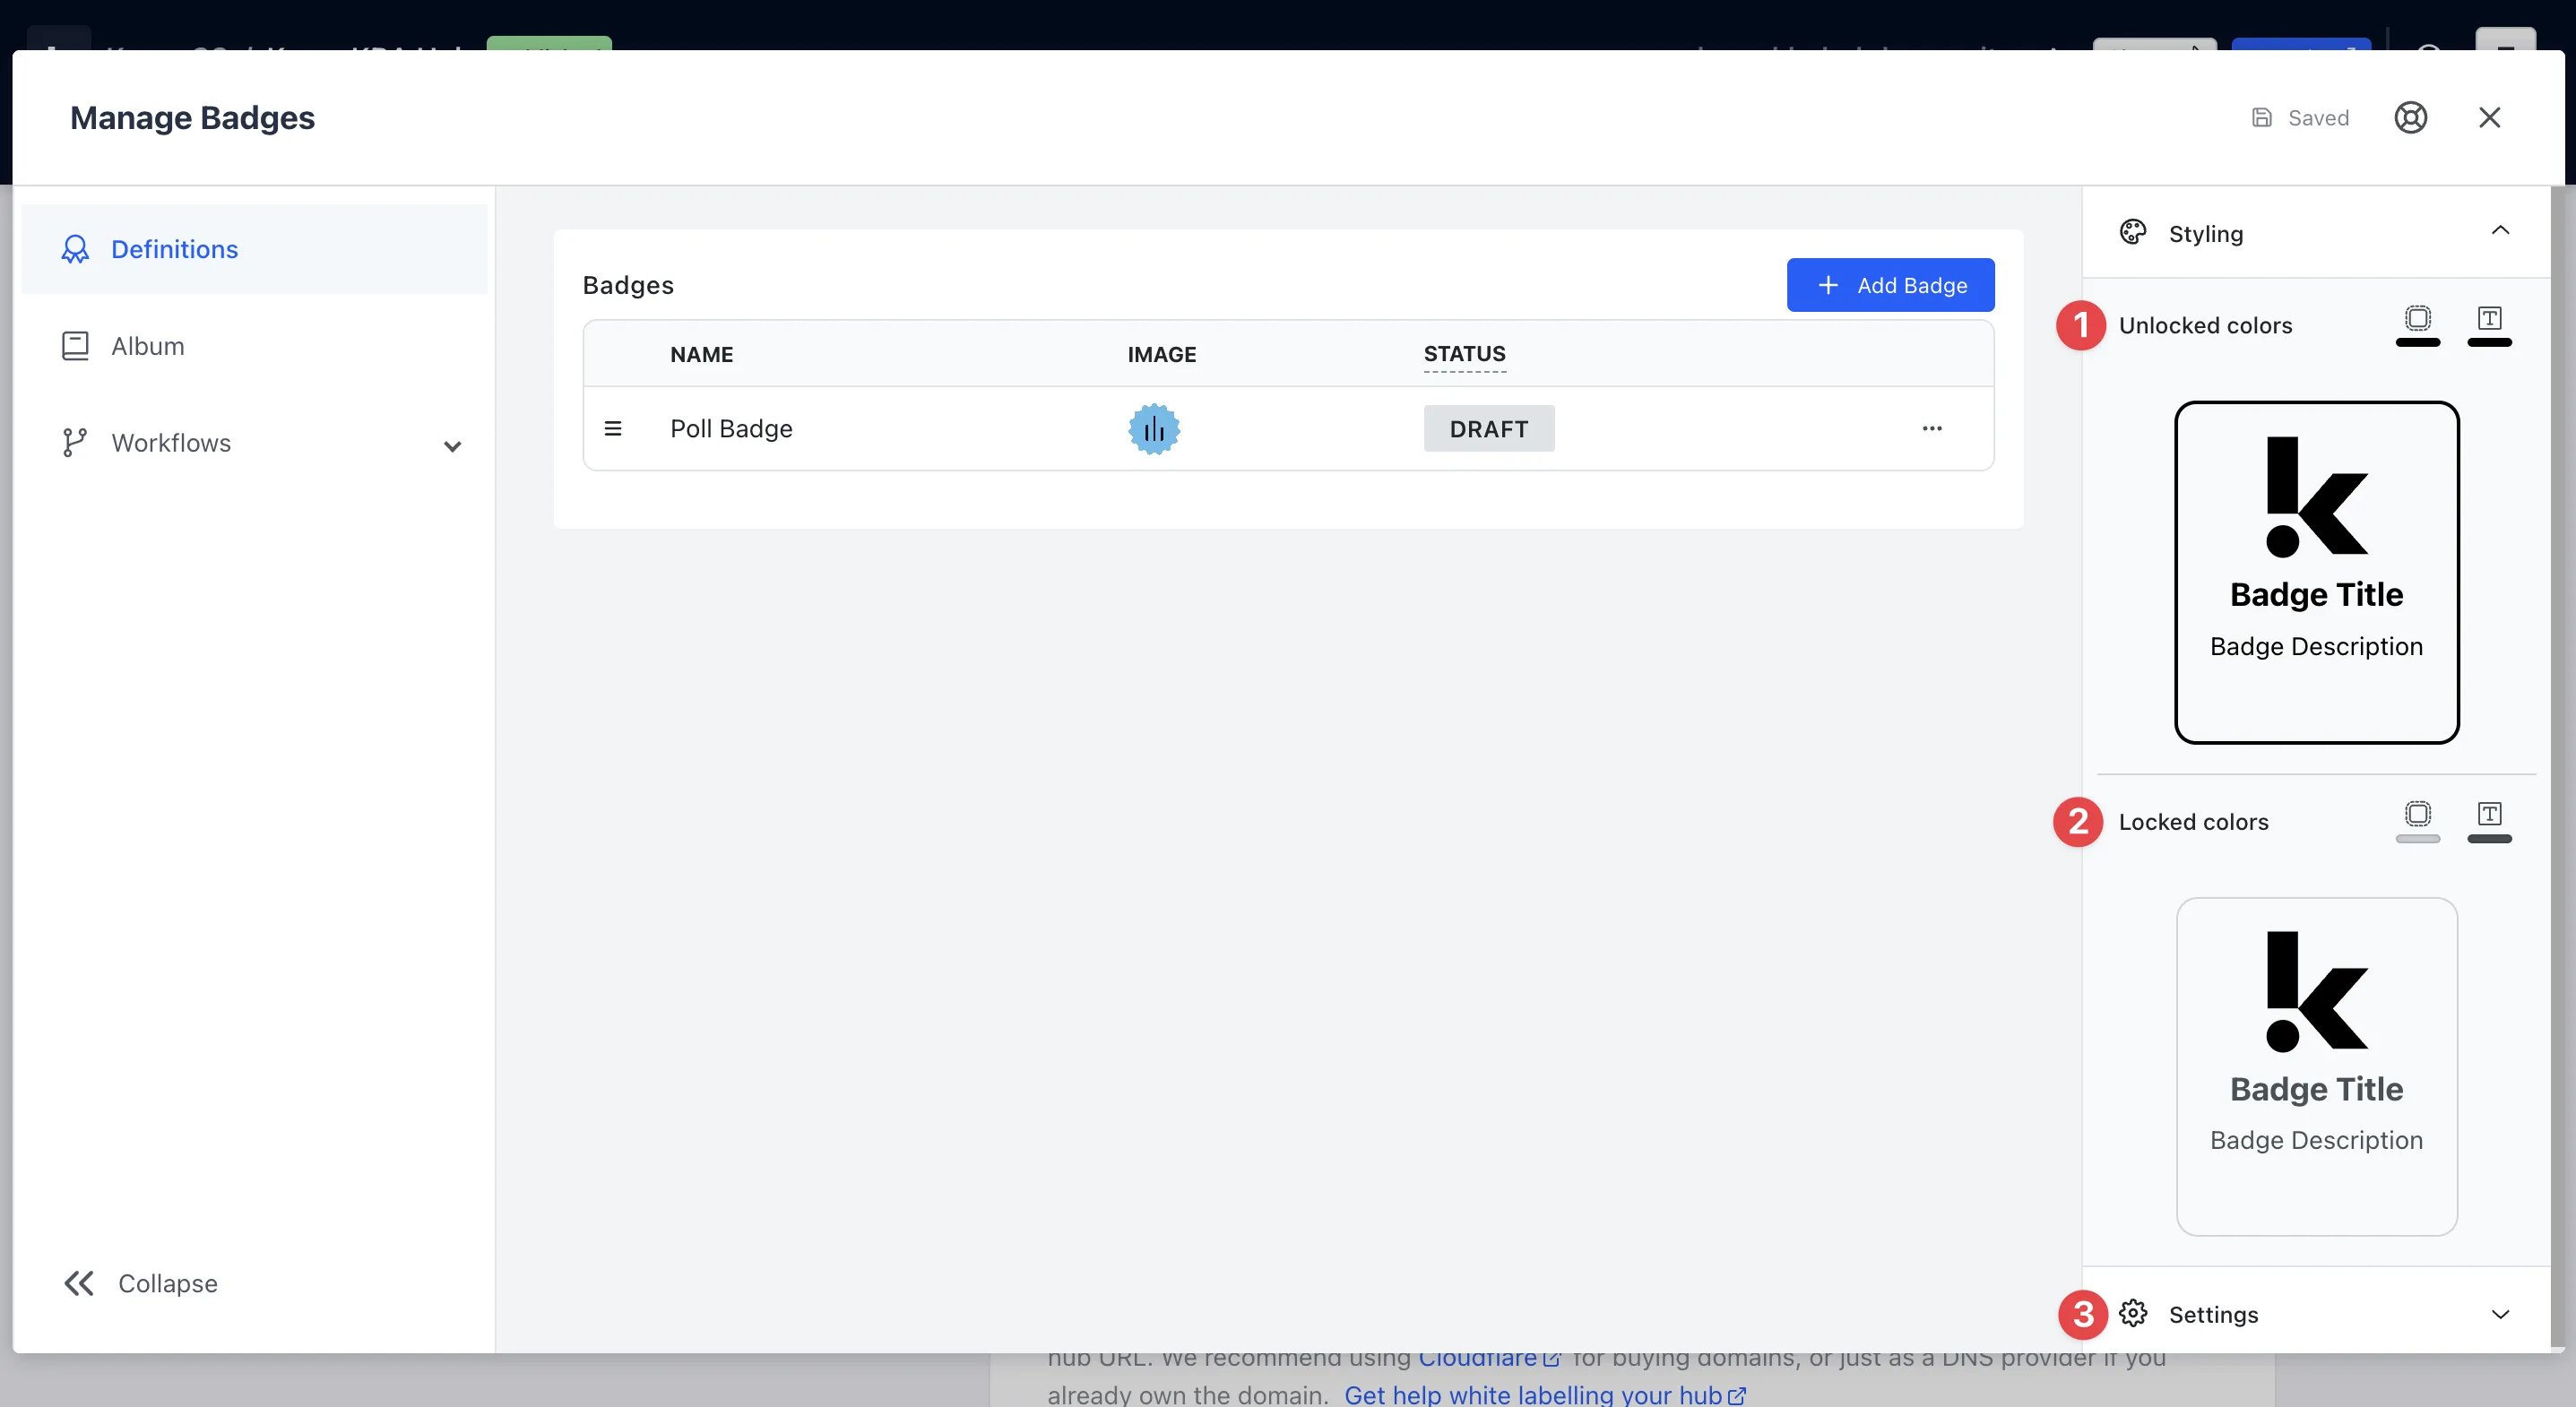 * **(1)** Use a Hex code, the eye dropper tool or the sliders to select a **border** and **text** colour for your **Unlocked Badges**
* **(2)** Use a Hex code, the eye dropper tool or the sliders to select a **border** and **text** colour for your **Locked Badges**
* **(3)** Under the **Settings** tab, you can choose to overwrite the locked Badge filter, i.e. the way the modal will automatically apply a grayscale to your locked Badges. This way, you can **upload your own locked state badge imagery**
### Step 6: Edit the Badge Album \[Optional]
* **(1)** Use a Hex code, the eye dropper tool or the sliders to select a **border** and **text** colour for your **Unlocked Badges**
* **(2)** Use a Hex code, the eye dropper tool or the sliders to select a **border** and **text** colour for your **Locked Badges**
* **(3)** Under the **Settings** tab, you can choose to overwrite the locked Badge filter, i.e. the way the modal will automatically apply a grayscale to your locked Badges. This way, you can **upload your own locked state badge imagery**
### Step 6: Edit the Badge Album \[Optional]
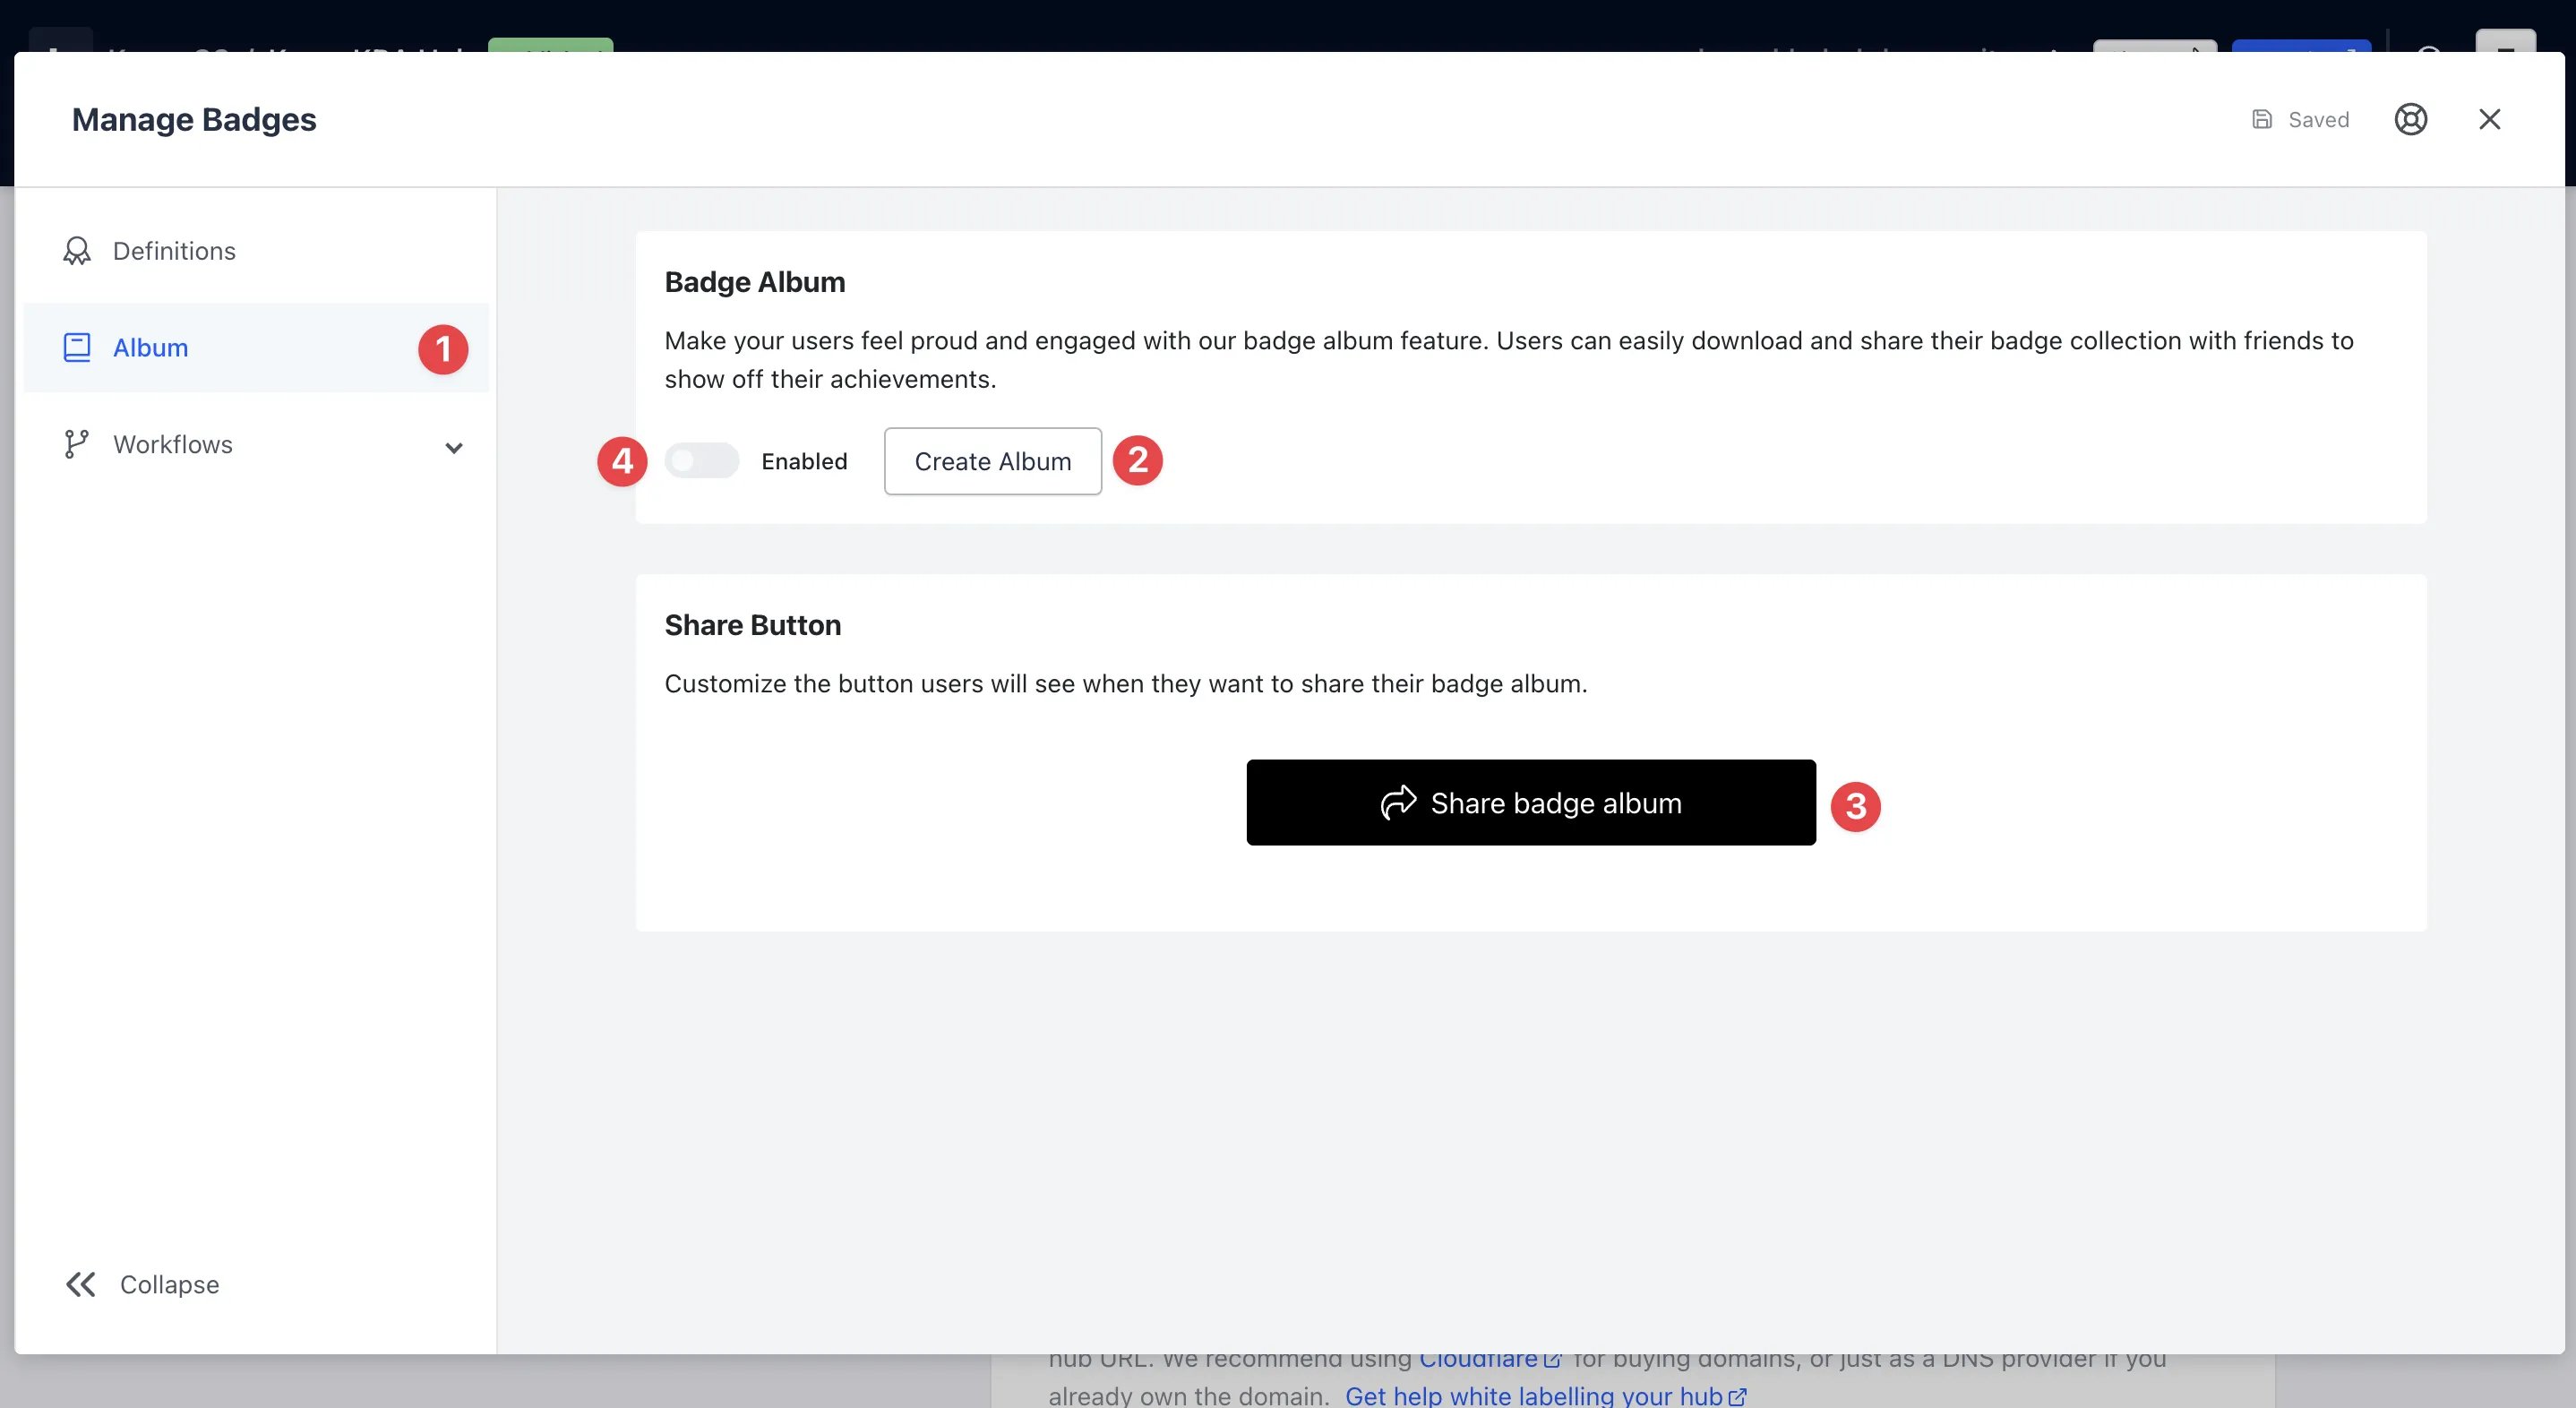 **The Badge Album** allows users to share the Badges they've earned on your Hub by downloading them as a customised image.
* **(1)** Navigate to the **Album** tab on the left sidebar
* **(2)** To edit the Badge Album, click on the **Create Album** button
**The Badge Album** allows users to share the Badges they've earned on your Hub by downloading them as a customised image.
* **(1)** Navigate to the **Album** tab on the left sidebar
* **(2)** To edit the Badge Album, click on the **Create Album** button
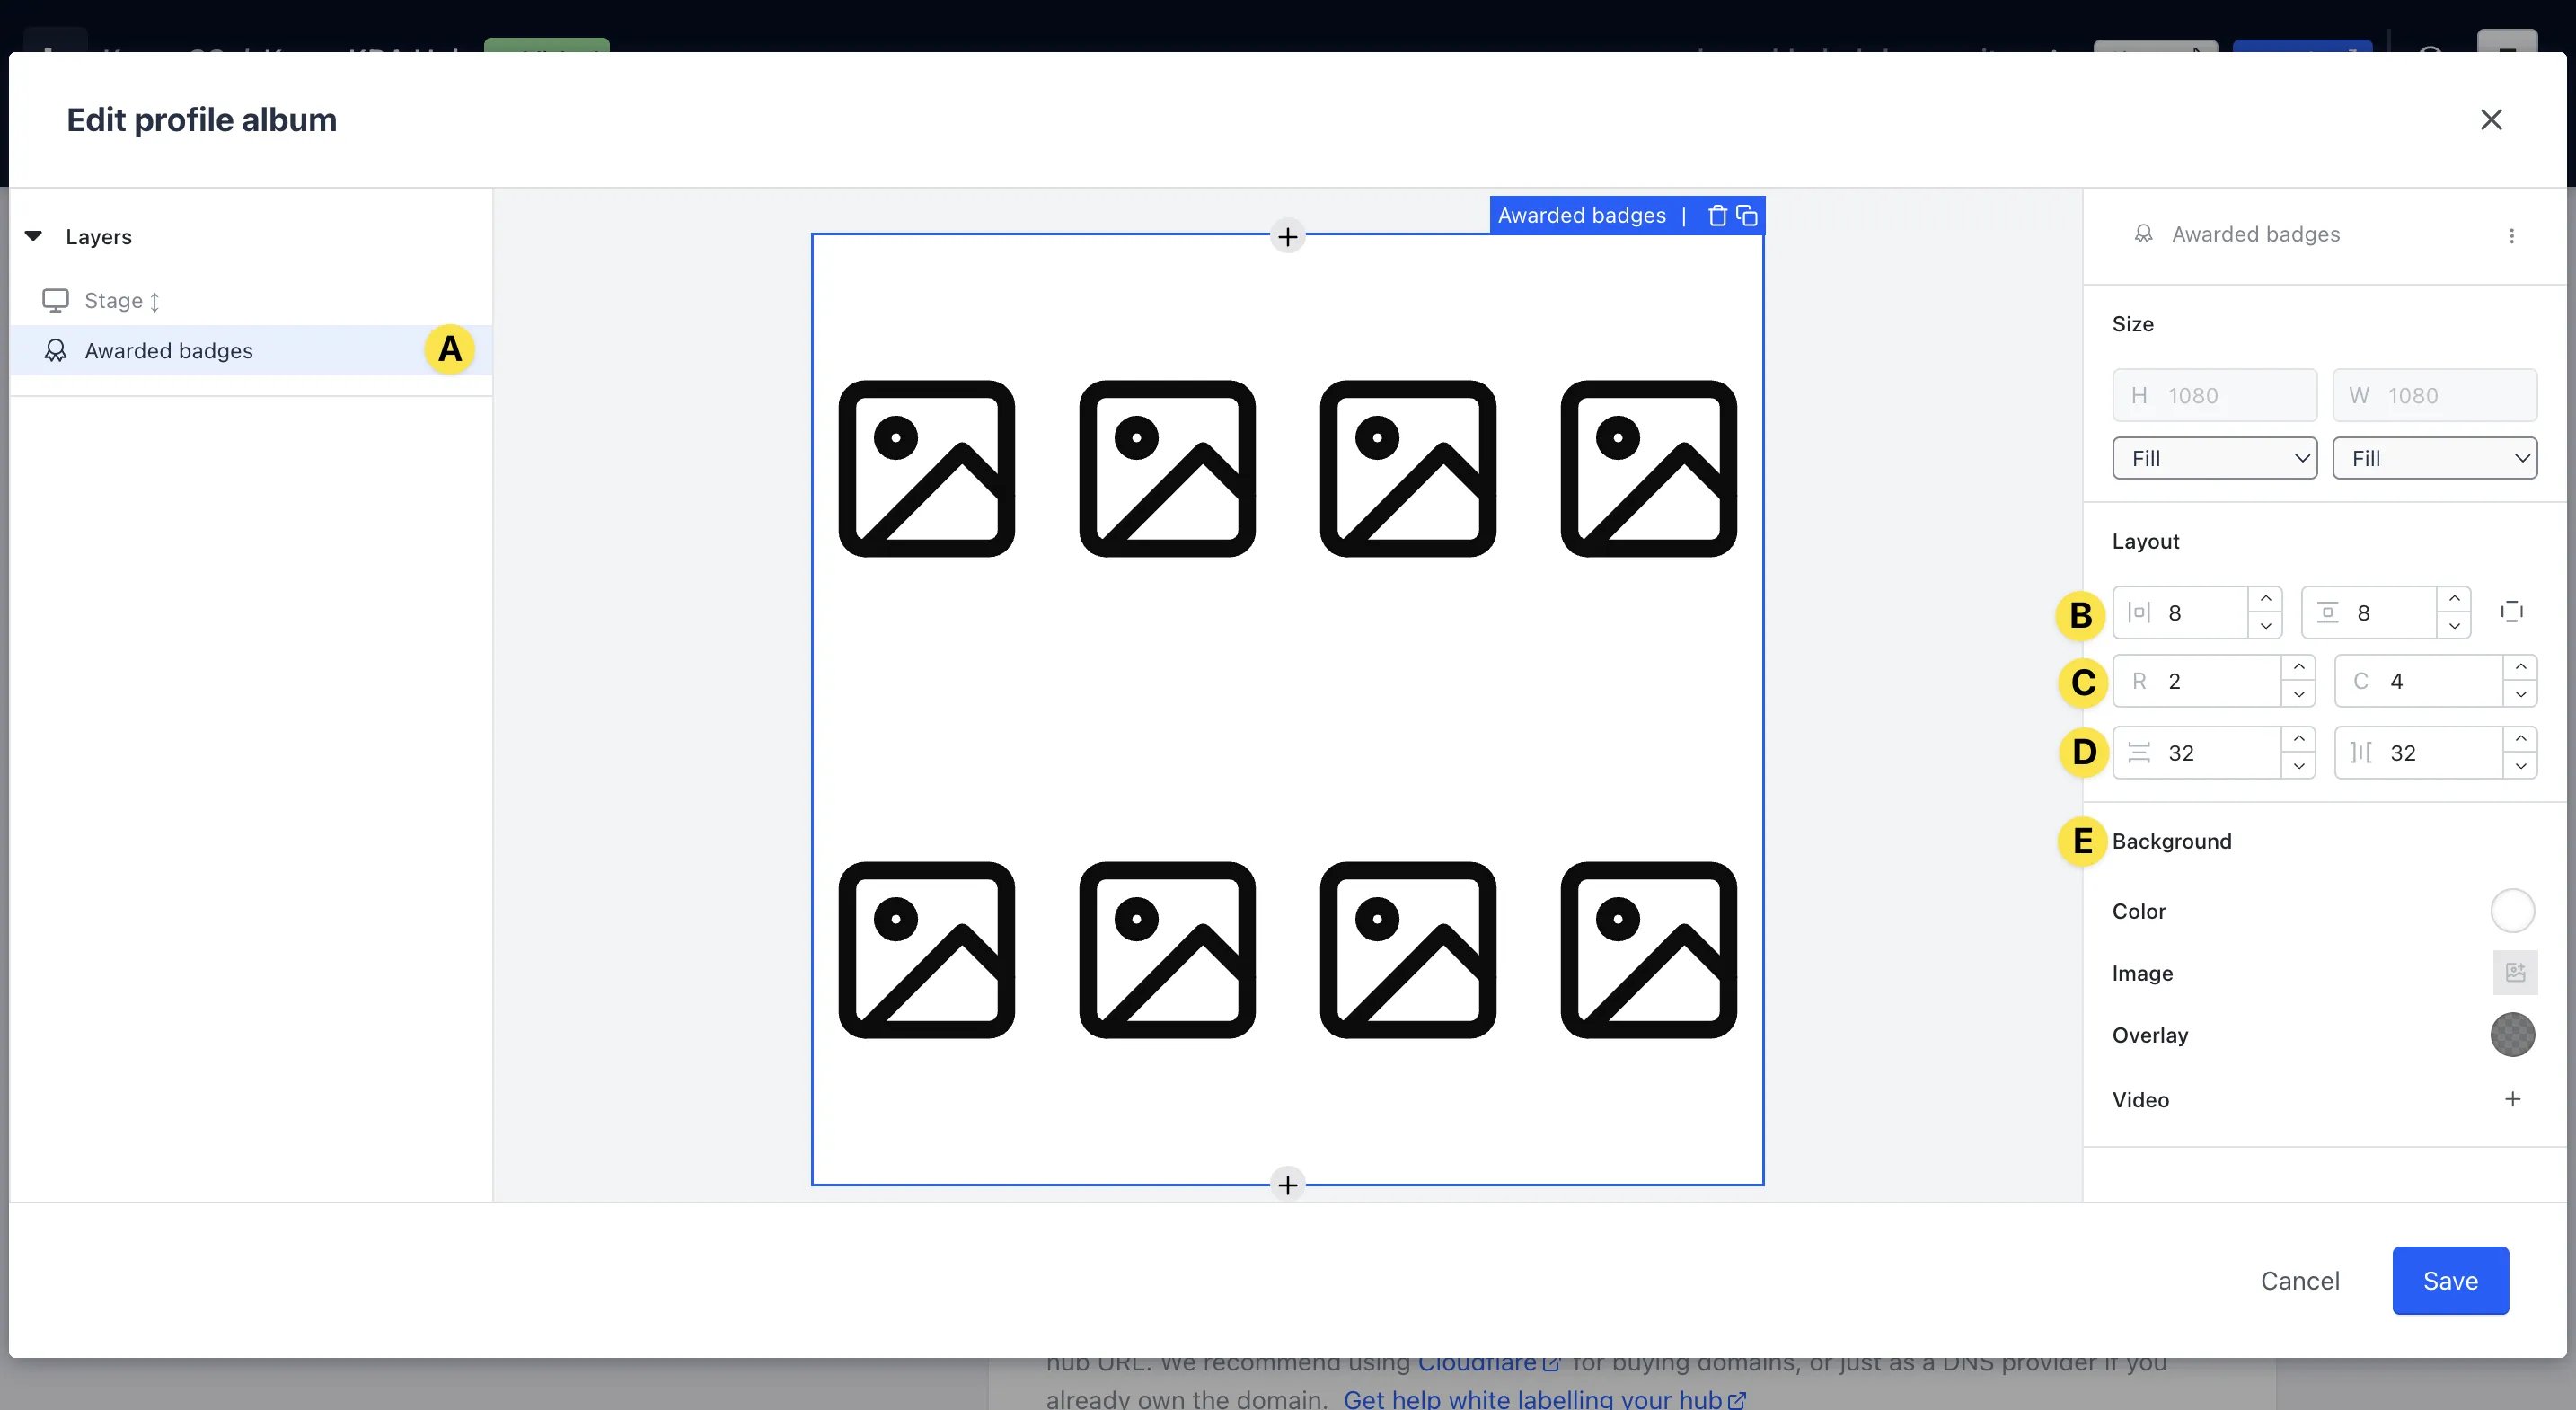 * **(A)** Click the **Awarded badges** row to edit the settings
Use the **+** icon next to the stage to add different elements to your Badge Album like Contact Properties, Awarded Badges, etc.
* **(B)** Alter the **padding** around the badges
* **(C)** Control how you want to present the badges by editing the number of **rows and columns**
* **(D)** Edit the **amount of space** between the rows and columns of each badge
* **(E)** Upload a **background** image and set a solid colour
Use the **toolbar** on the righthand side of this modal to edit spacing, layout, background, fonts and colours. Here, you can add elements of a users Profile (first name, avatar, etc.) to help them differentiate their Badge Album from those of other users. If you get stuck here, our [Live Data Feeds article](/interactive-features/features/live-data-feeds) will help!
* **(3)** Here you can also edit the **share button** that allows users to share their Badge Album
* **(4)** Once ready, you can **enable** the badge album
### Step 7: Create Workflows to Award Badges
* **(A)** Click the **Awarded badges** row to edit the settings
Use the **+** icon next to the stage to add different elements to your Badge Album like Contact Properties, Awarded Badges, etc.
* **(B)** Alter the **padding** around the badges
* **(C)** Control how you want to present the badges by editing the number of **rows and columns**
* **(D)** Edit the **amount of space** between the rows and columns of each badge
* **(E)** Upload a **background** image and set a solid colour
Use the **toolbar** on the righthand side of this modal to edit spacing, layout, background, fonts and colours. Here, you can add elements of a users Profile (first name, avatar, etc.) to help them differentiate their Badge Album from those of other users. If you get stuck here, our [Live Data Feeds article](/interactive-features/features/live-data-feeds) will help!
* **(3)** Here you can also edit the **share button** that allows users to share their Badge Album
* **(4)** Once ready, you can **enable** the badge album
### Step 7: Create Workflows to Award Badges
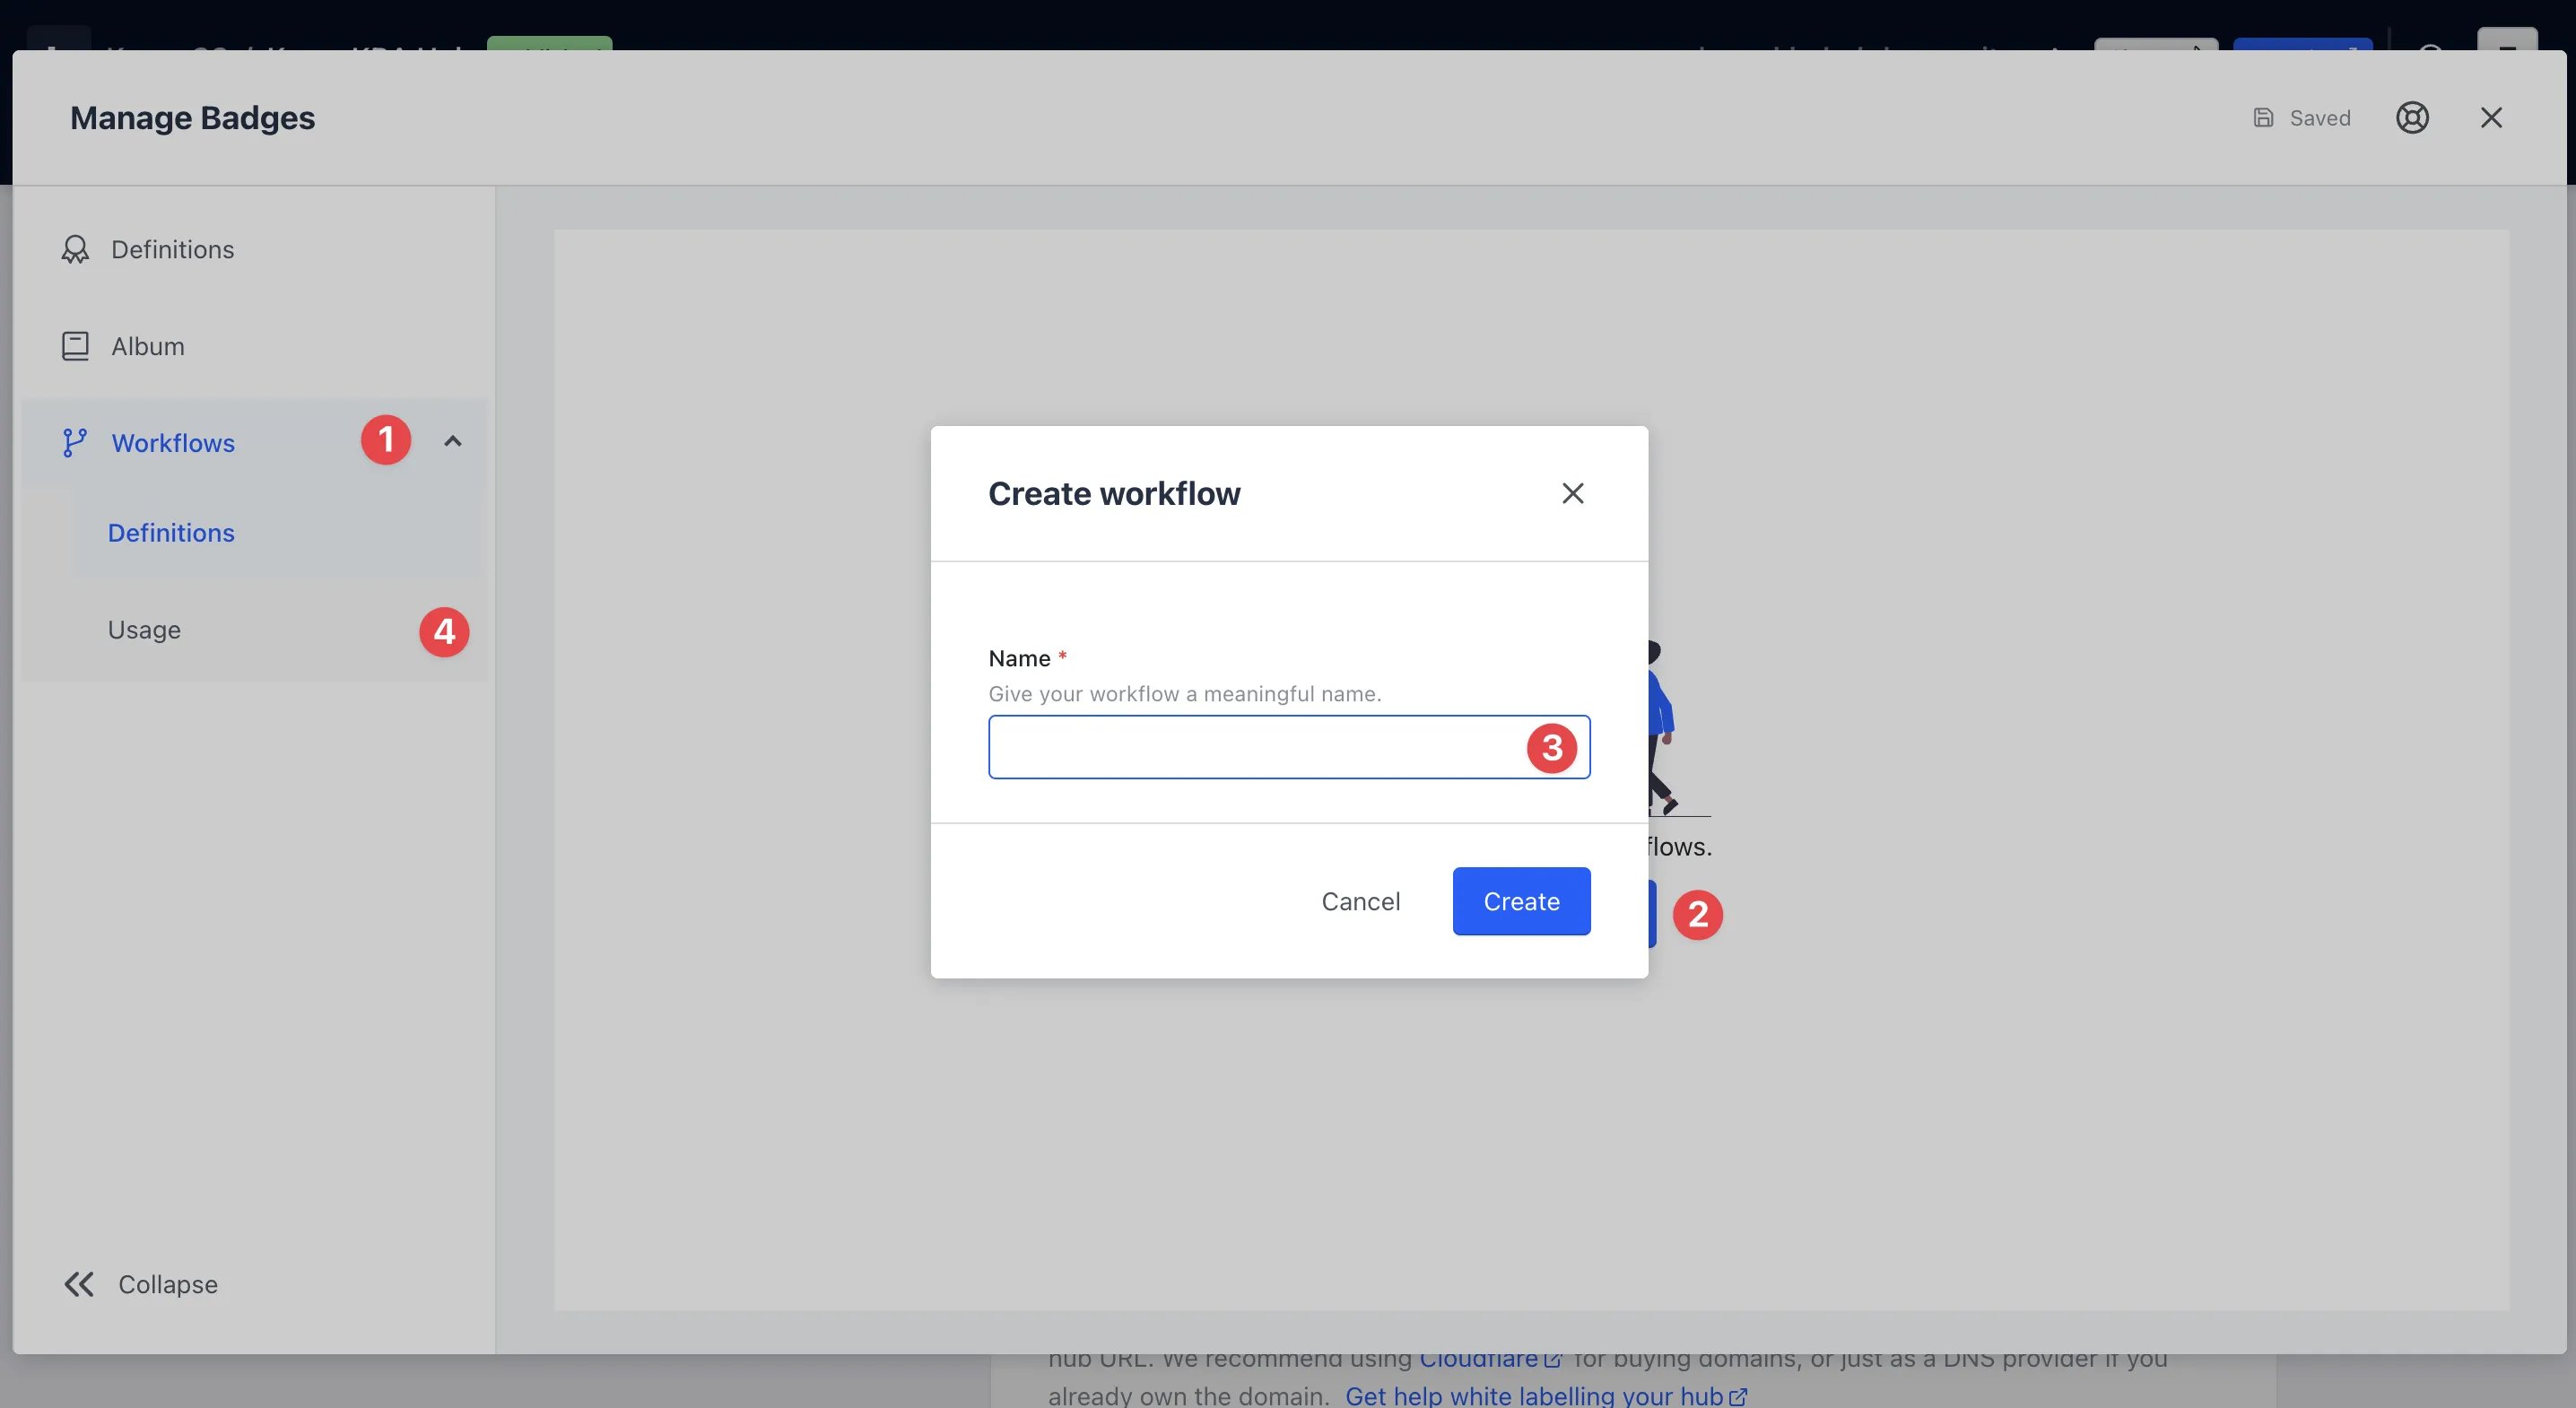 * **(1)** Navigate to the **Workflow** tab
* **(2)** Click on the **Create workflow** button
* **(3)** Enter a name for the **workflow**
* **(1)** Navigate to the **Workflow** tab
* **(2)** Click on the **Create workflow** button
* **(3)** Enter a name for the **workflow**
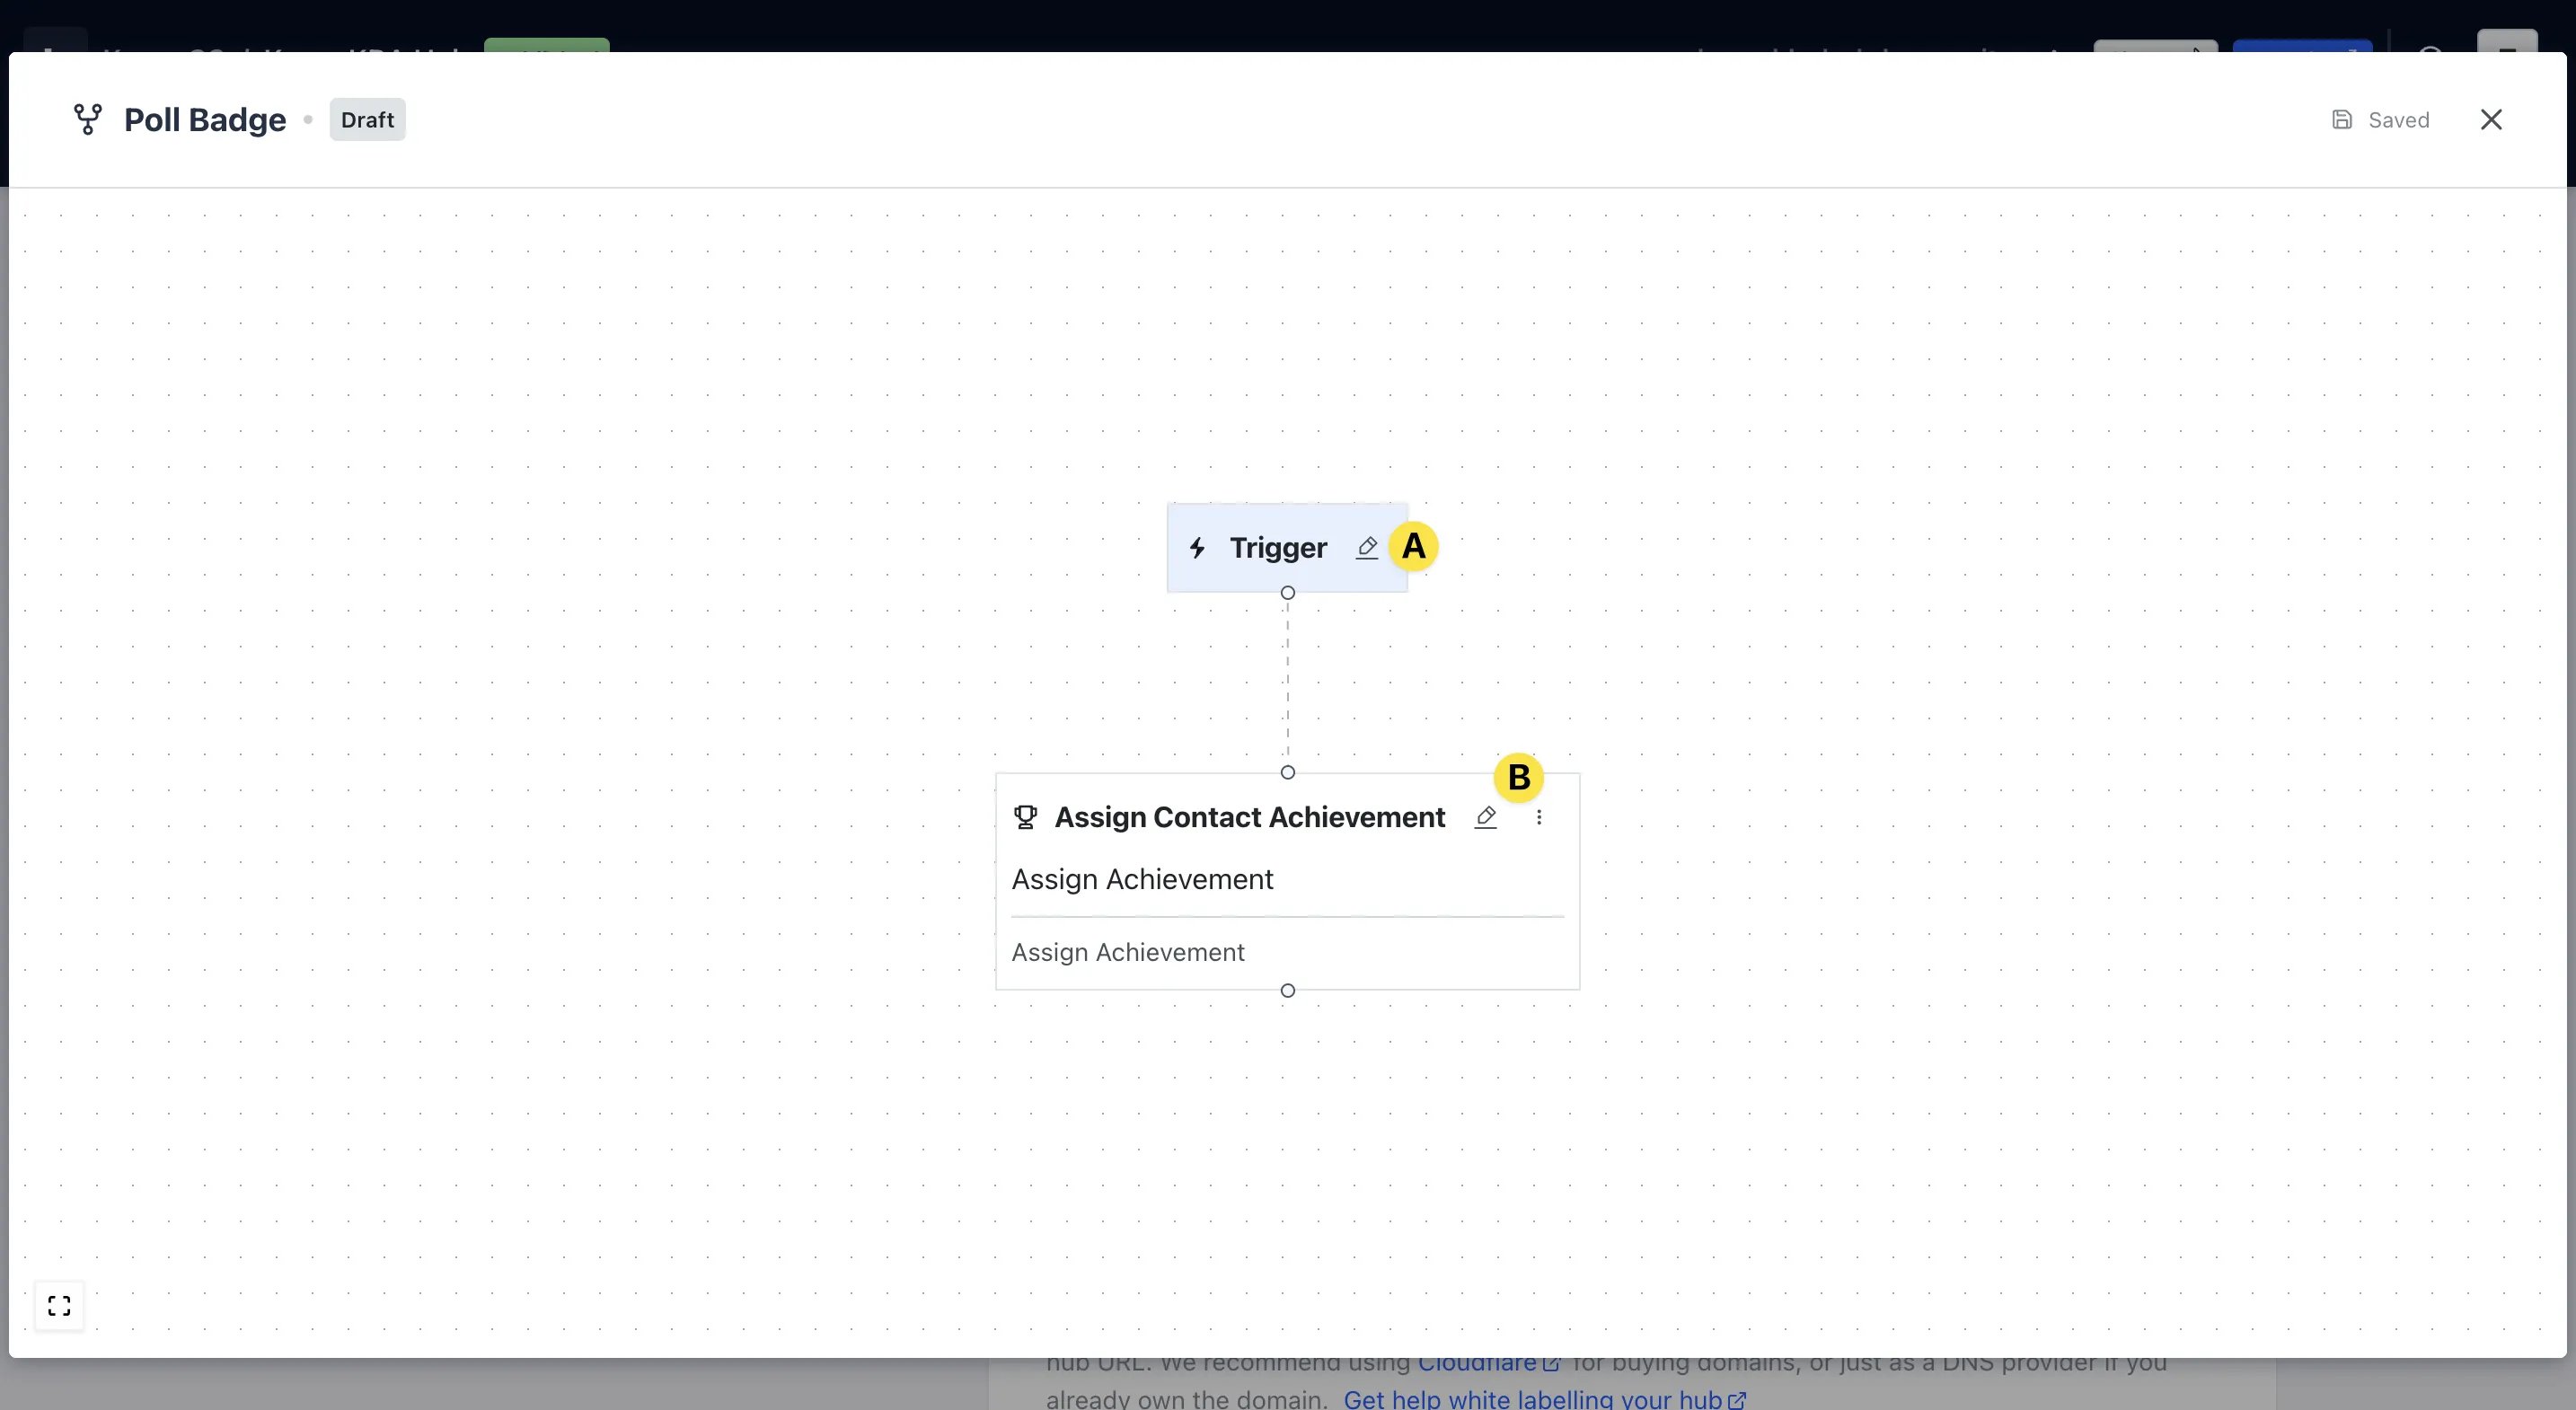 * **(A)** Click on **edit icon** to set up the trigger
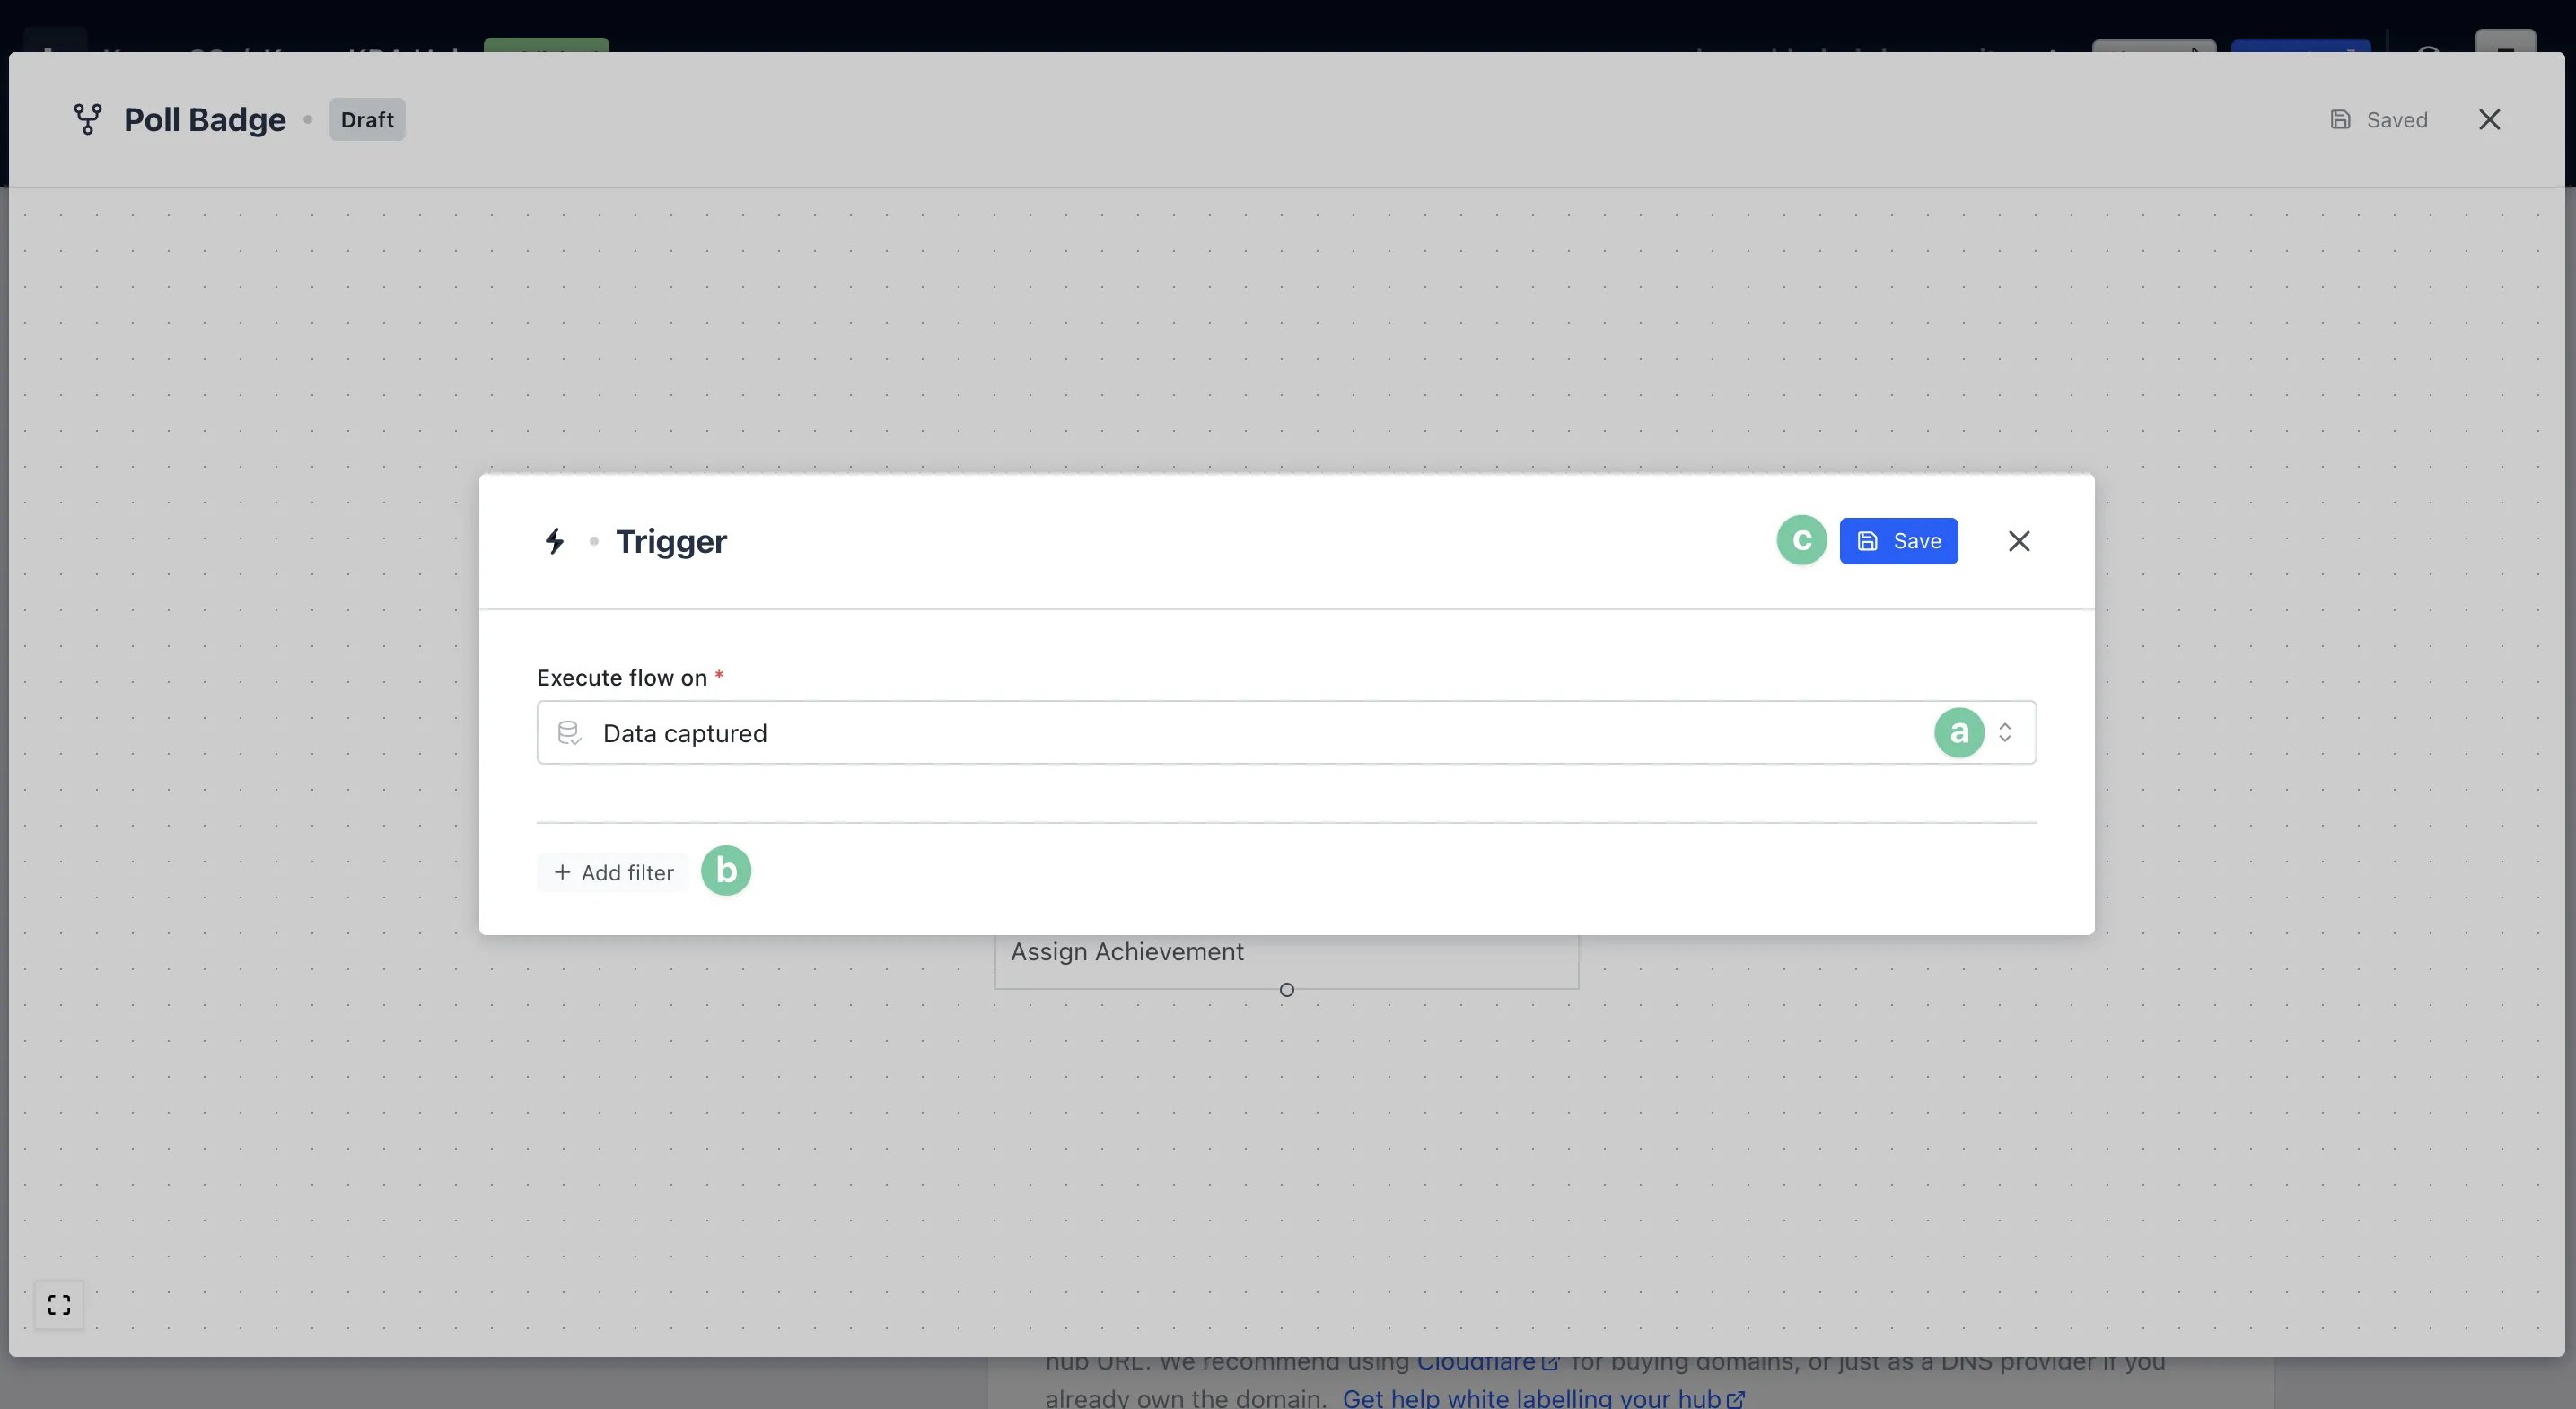 **(a)** Using the drop-down, select **when** you want to **award a badge.Trigger Definitions:**
* *Contact identified:* When a user on your Hub becomes identifiable by their first-party data
* *Contact property updated:* When details of a user are updated to a specific contact property
* *Gameplay data captured:* When a user fills out a data capture form on your Hub. Add filters to only award Badges on certain Cards
* *Gameplay action occured:* When a user completes a specific action within a game mechanic
* *Gameplay ended:* When a user completes a game on your Hub. Add filters to only award Badges for certain games, scores, etc
* *Receipt validated successfully:* When a receipt using our **auto-receipt validation tool** has been approved
**(b)** Once you've selected your trigger, you'll need to **Add a filter** to connect this to a specific card
You can link this workflow to multiple cards by adding more filters.
**(a)** Using the drop-down, select **when** you want to **award a badge.Trigger Definitions:**
* *Contact identified:* When a user on your Hub becomes identifiable by their first-party data
* *Contact property updated:* When details of a user are updated to a specific contact property
* *Gameplay data captured:* When a user fills out a data capture form on your Hub. Add filters to only award Badges on certain Cards
* *Gameplay action occured:* When a user completes a specific action within a game mechanic
* *Gameplay ended:* When a user completes a game on your Hub. Add filters to only award Badges for certain games, scores, etc
* *Receipt validated successfully:* When a receipt using our **auto-receipt validation tool** has been approved
**(b)** Once you've selected your trigger, you'll need to **Add a filter** to connect this to a specific card
You can link this workflow to multiple cards by adding more filters.
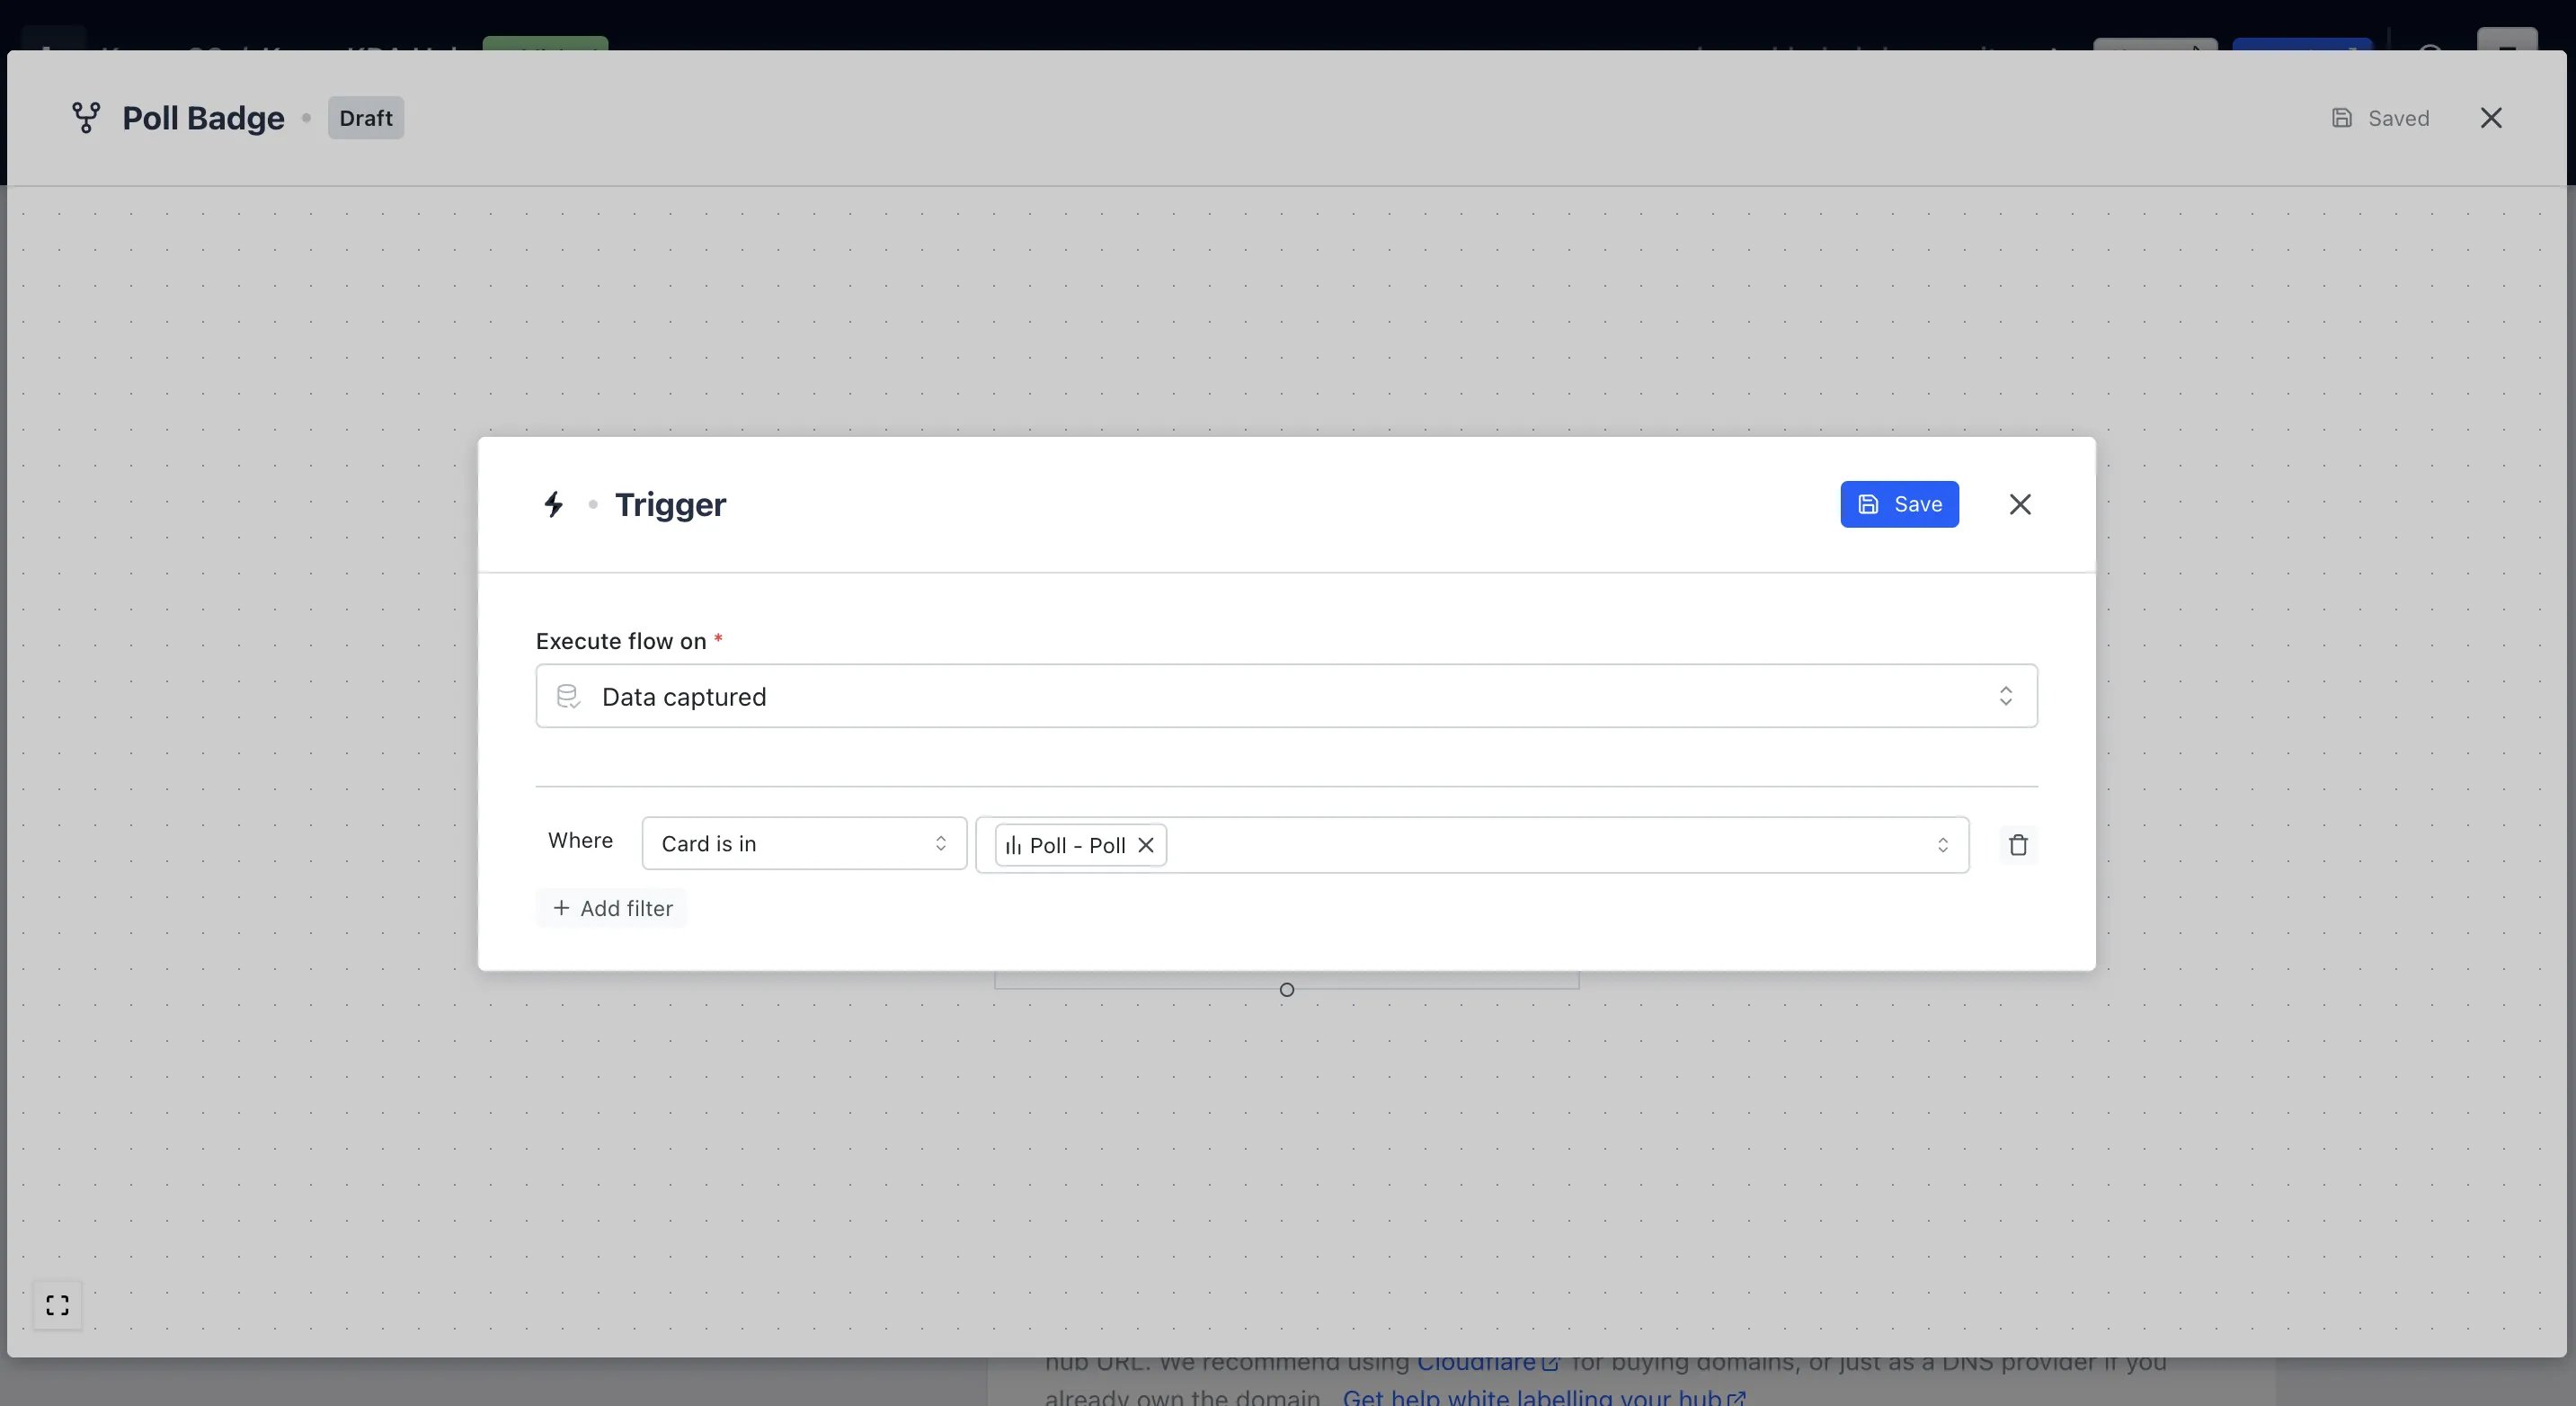 **(c)** Click on **Save** to continue
**(B)** Click on the **edit icon** to connect the badge to the workflow
**(c)** Click on **Save** to continue
**(B)** Click on the **edit icon** to connect the badge to the workflow
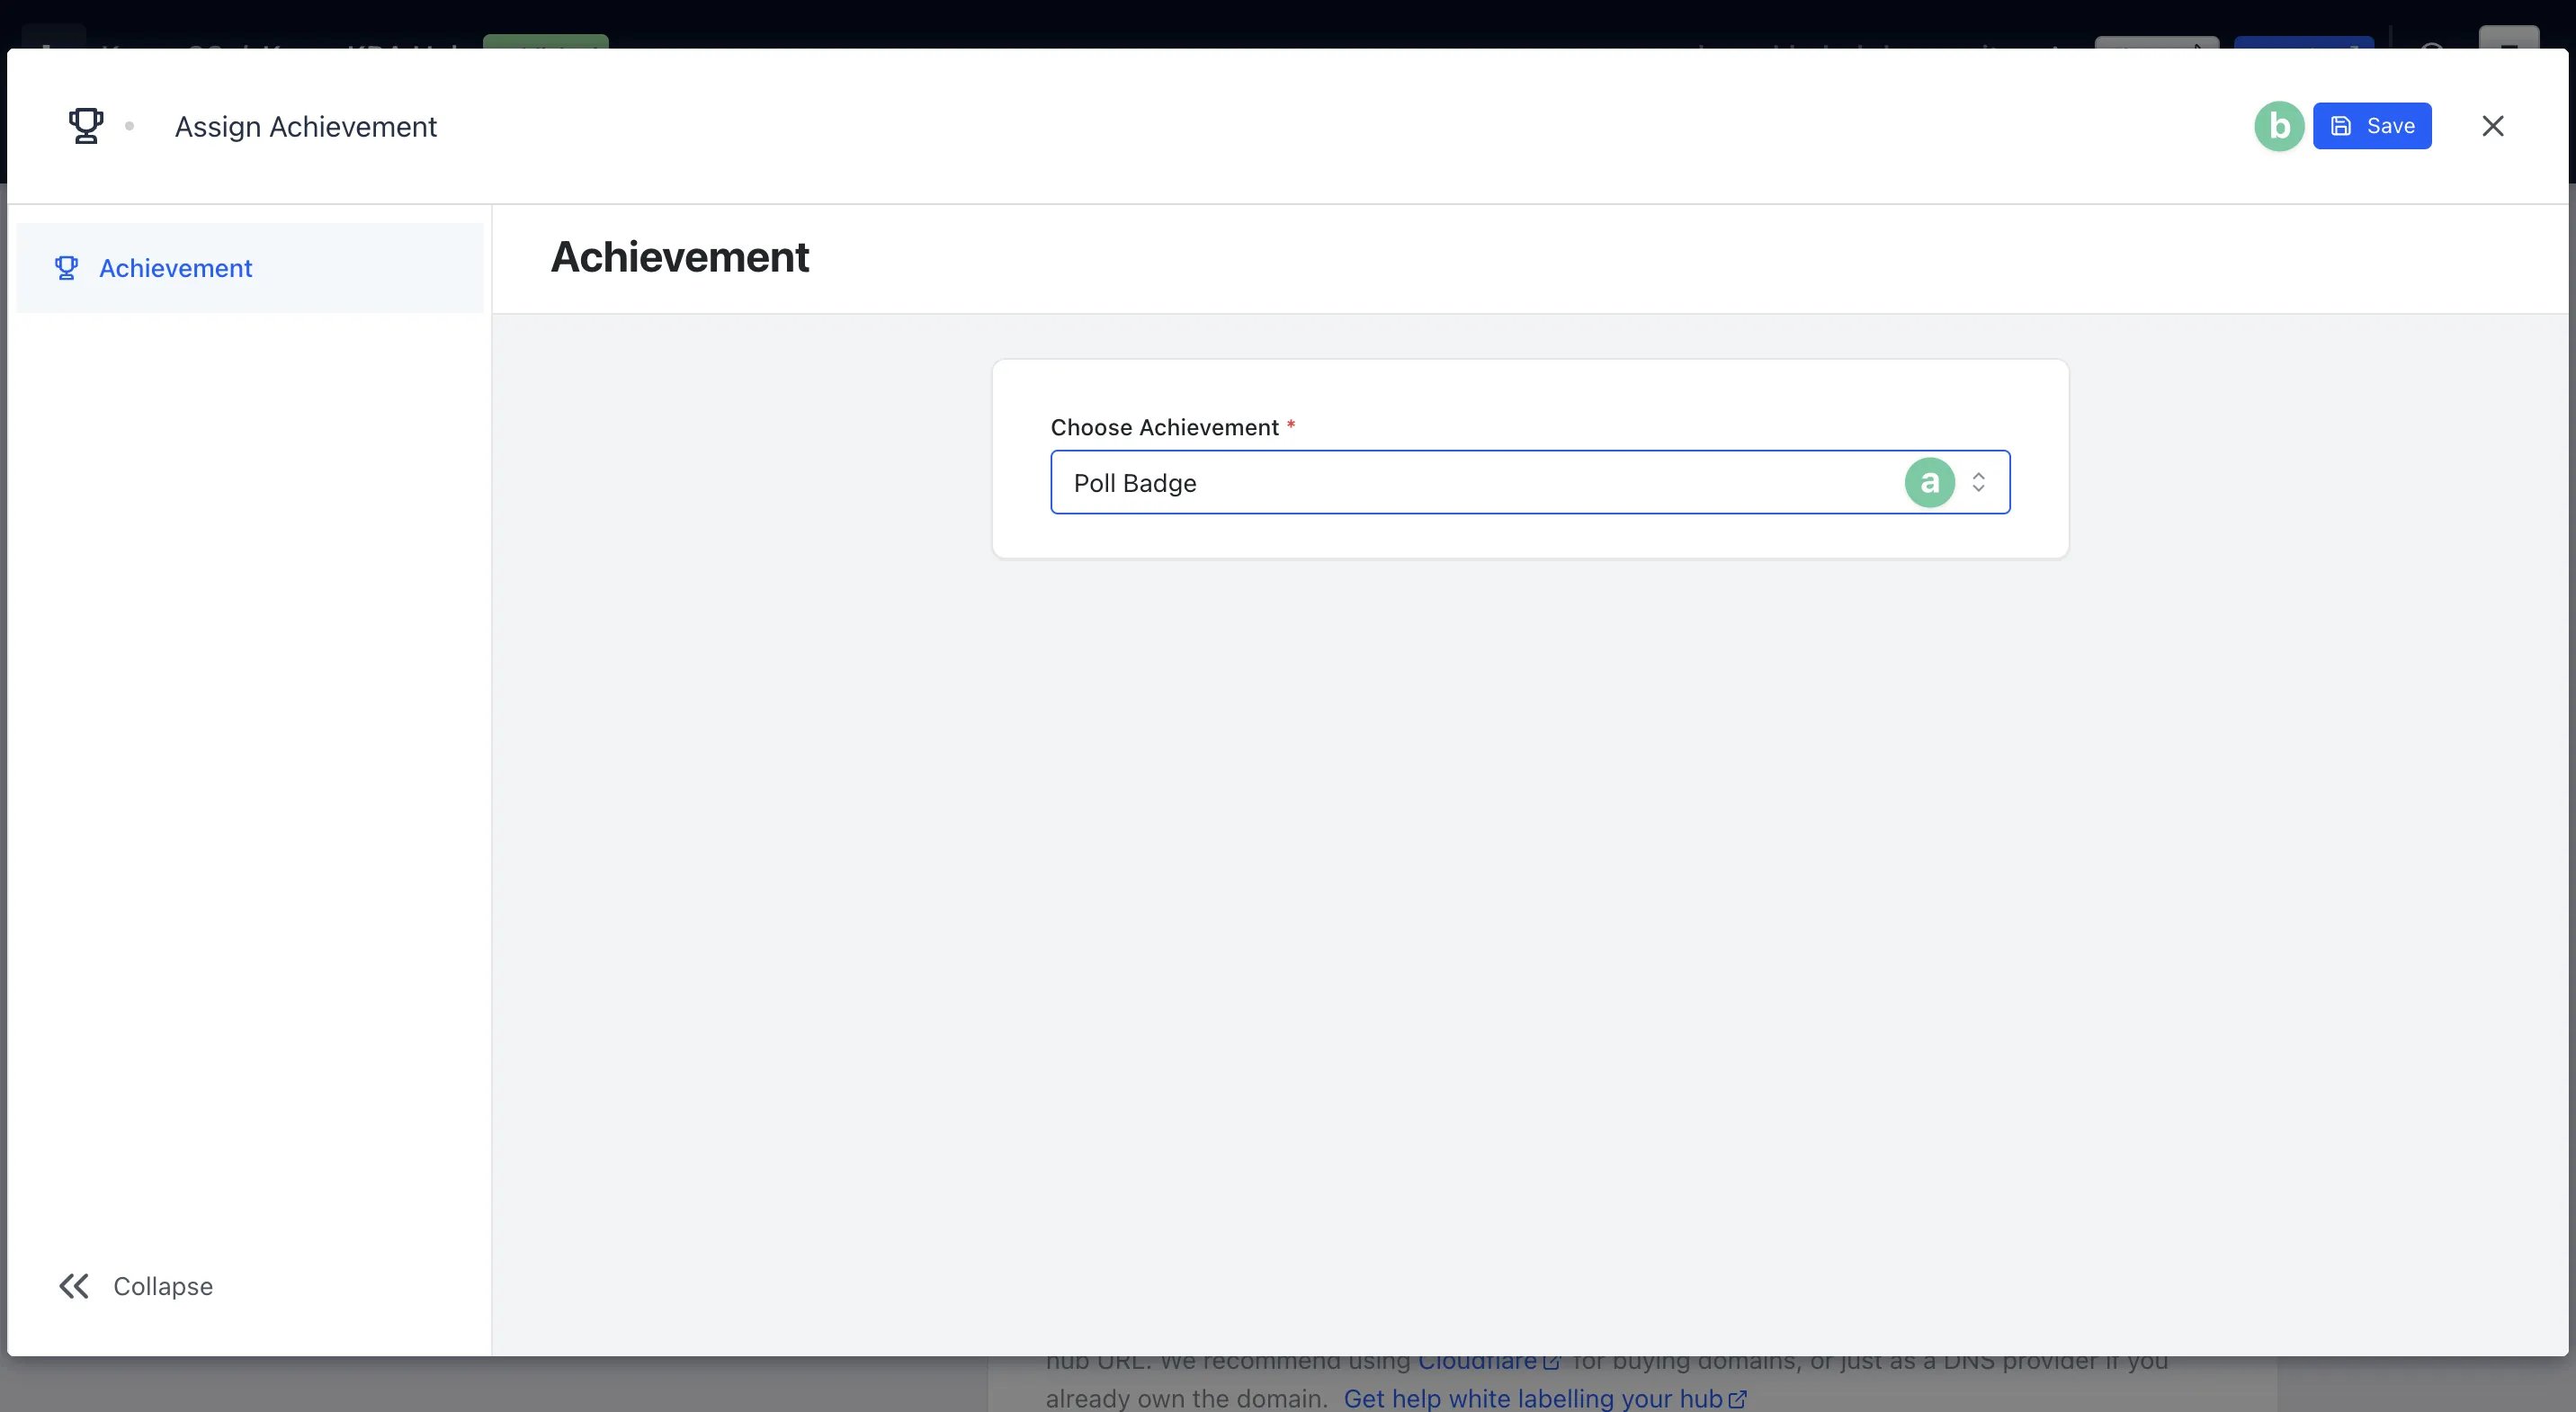 * **(a)** Using the drop-down, select the **badge** you want to connect
* **(b)** Then click on **Save** to continue
After clicking on **Save** on the workflow screen, you will see your workflow is in **draft mode**. To make this live, click on **...** next to the workflow and select **Activate**. This will make the workflow live and will award all badges based on the rules setup.
* Repeat step 7 for each Badge or Badge Variant.
* You can view each execution of an individual Workflow by navigating to the 3 dots next to a flow and selecting Edit.
To pause a particular workflow, navigate to the 3 dots next to a flow and select Pause.
**(4)** Here you can see all the **workflows** executed. You can see if the workflows were successful or if any have failed
### Step 8: Enable & Configure Profiles \[Optional]
* **(a)** Using the drop-down, select the **badge** you want to connect
* **(b)** Then click on **Save** to continue
After clicking on **Save** on the workflow screen, you will see your workflow is in **draft mode**. To make this live, click on **...** next to the workflow and select **Activate**. This will make the workflow live and will award all badges based on the rules setup.
* Repeat step 7 for each Badge or Badge Variant.
* You can view each execution of an individual Workflow by navigating to the 3 dots next to a flow and selecting Edit.
To pause a particular workflow, navigate to the 3 dots next to a flow and select Pause.
**(4)** Here you can see all the **workflows** executed. You can see if the workflows were successful or if any have failed
### Step 8: Enable & Configure Profiles \[Optional]
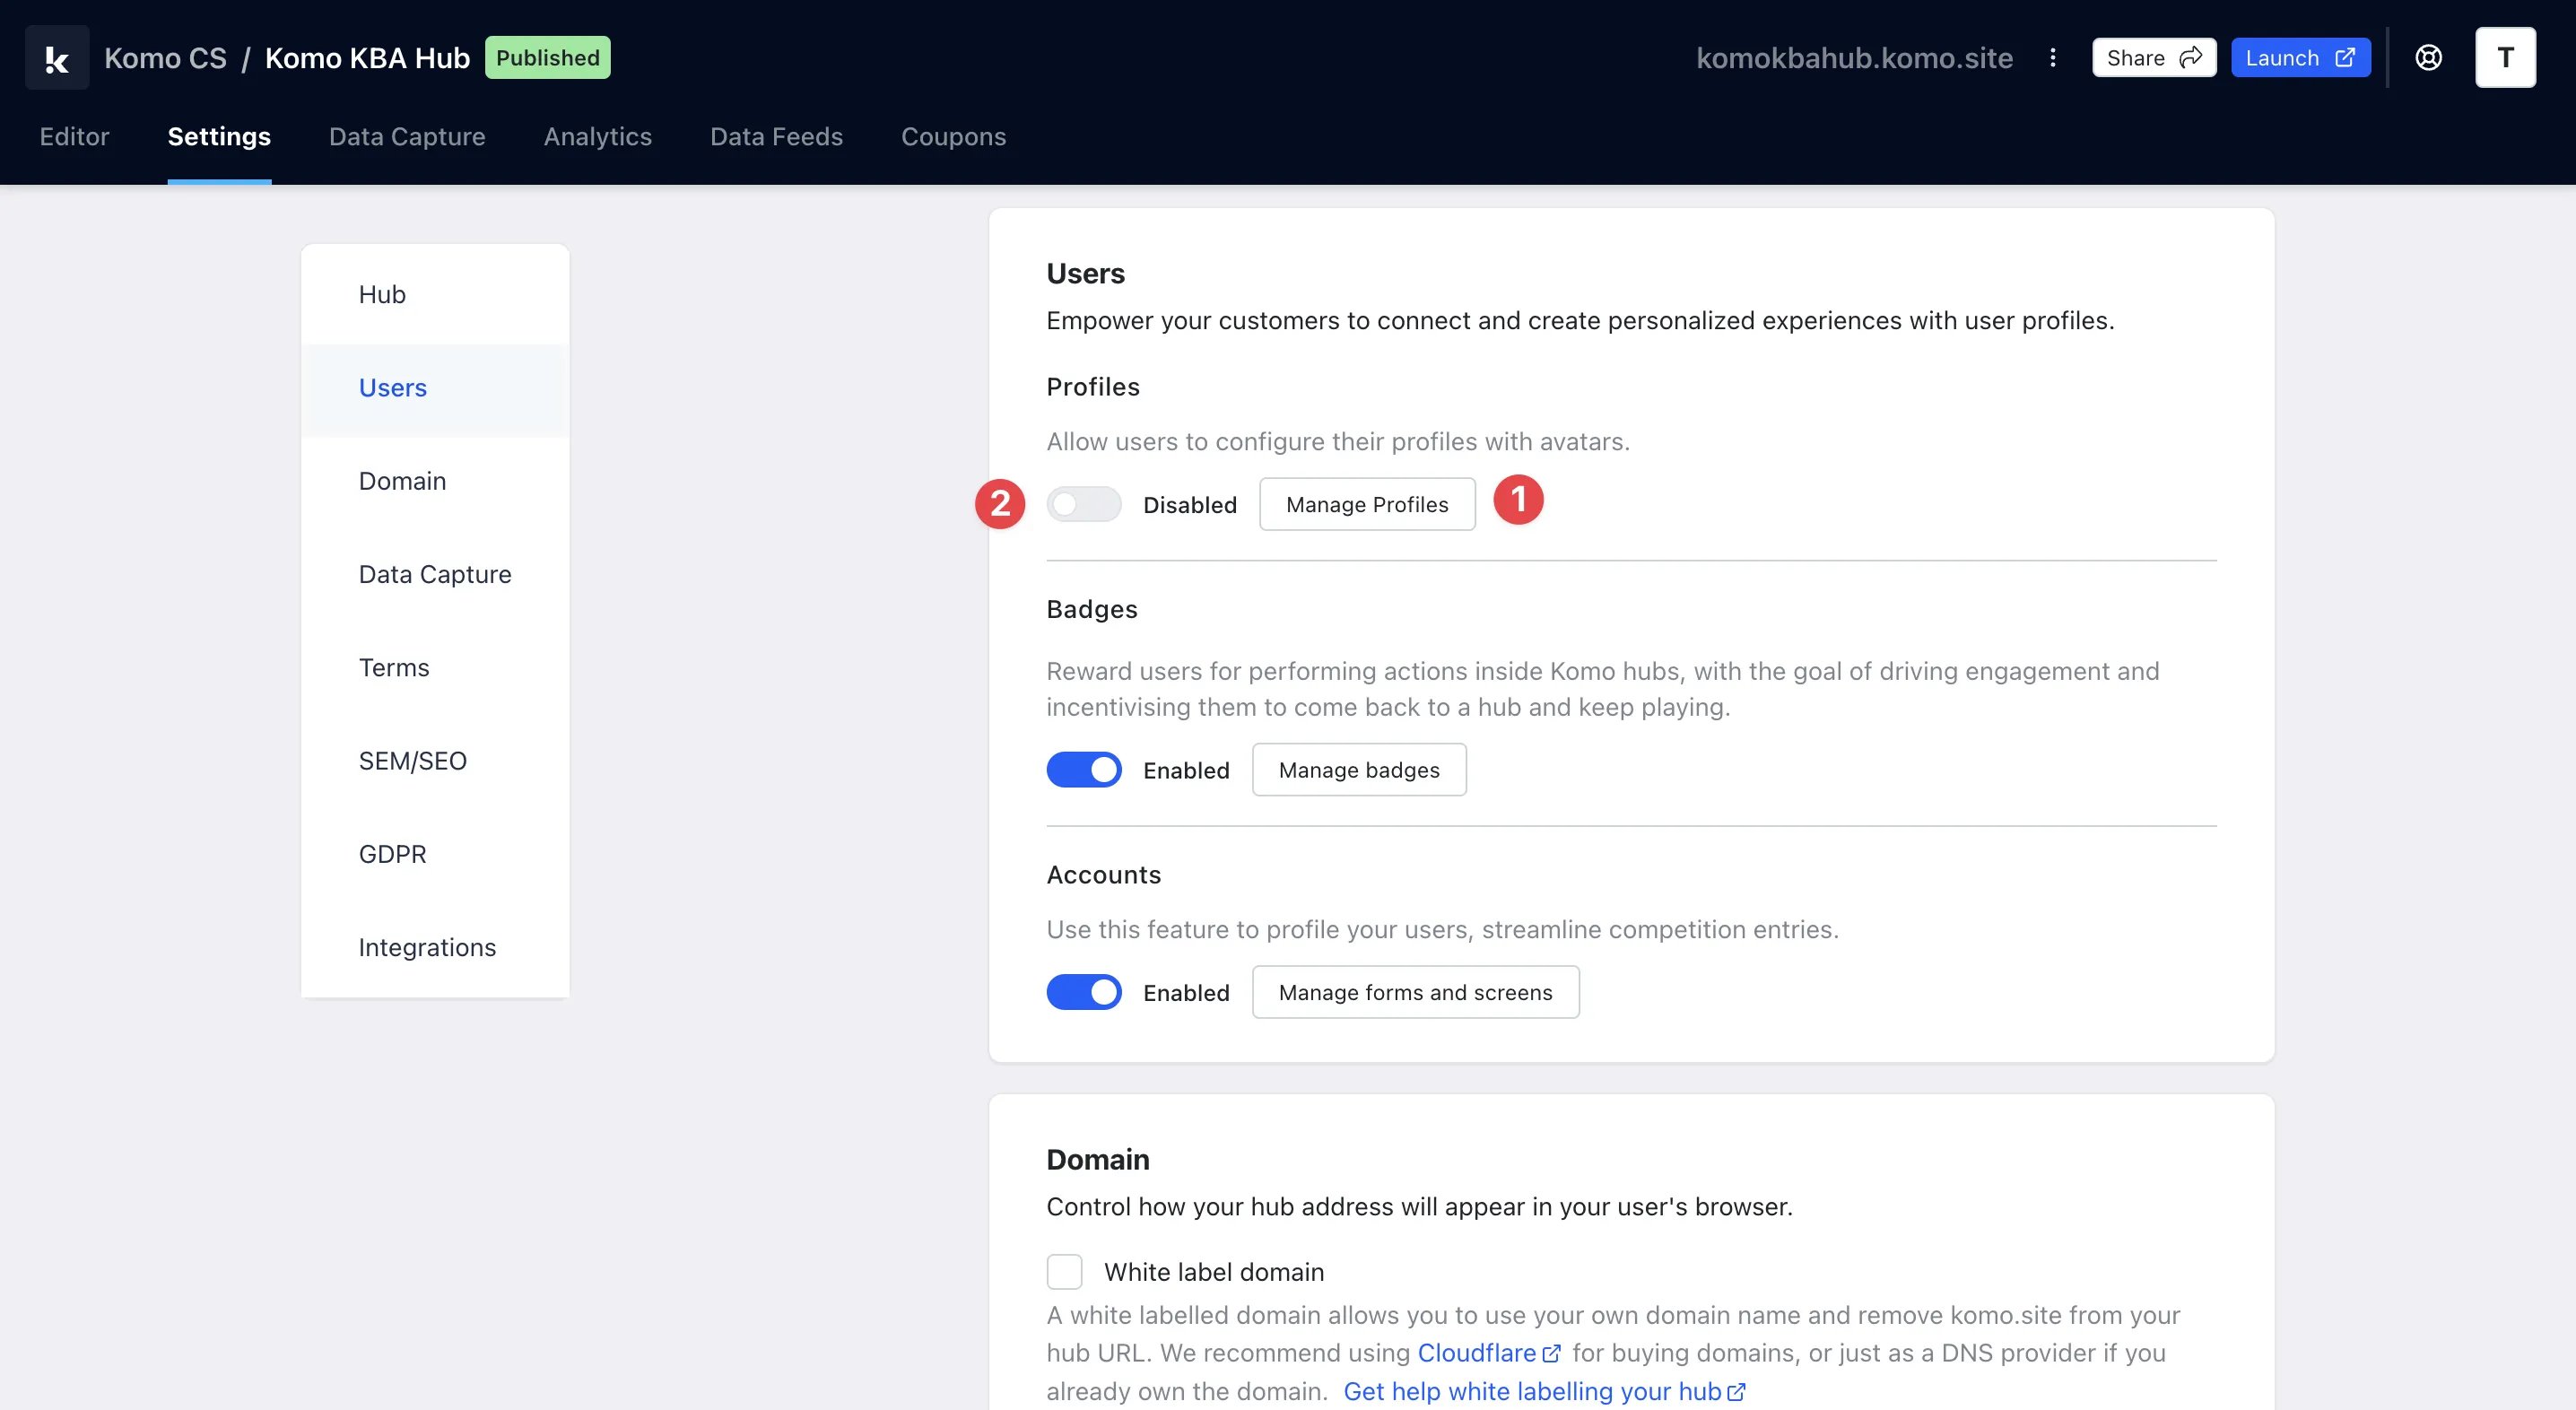 **Profiles** allow users to identify themselves with an Avatar while they play.
**(1)** To edit your Profiles, click on the **Manage Profiles** button
**Profiles** allow users to identify themselves with an Avatar while they play.
**(1)** To edit your Profiles, click on the **Manage Profiles** button
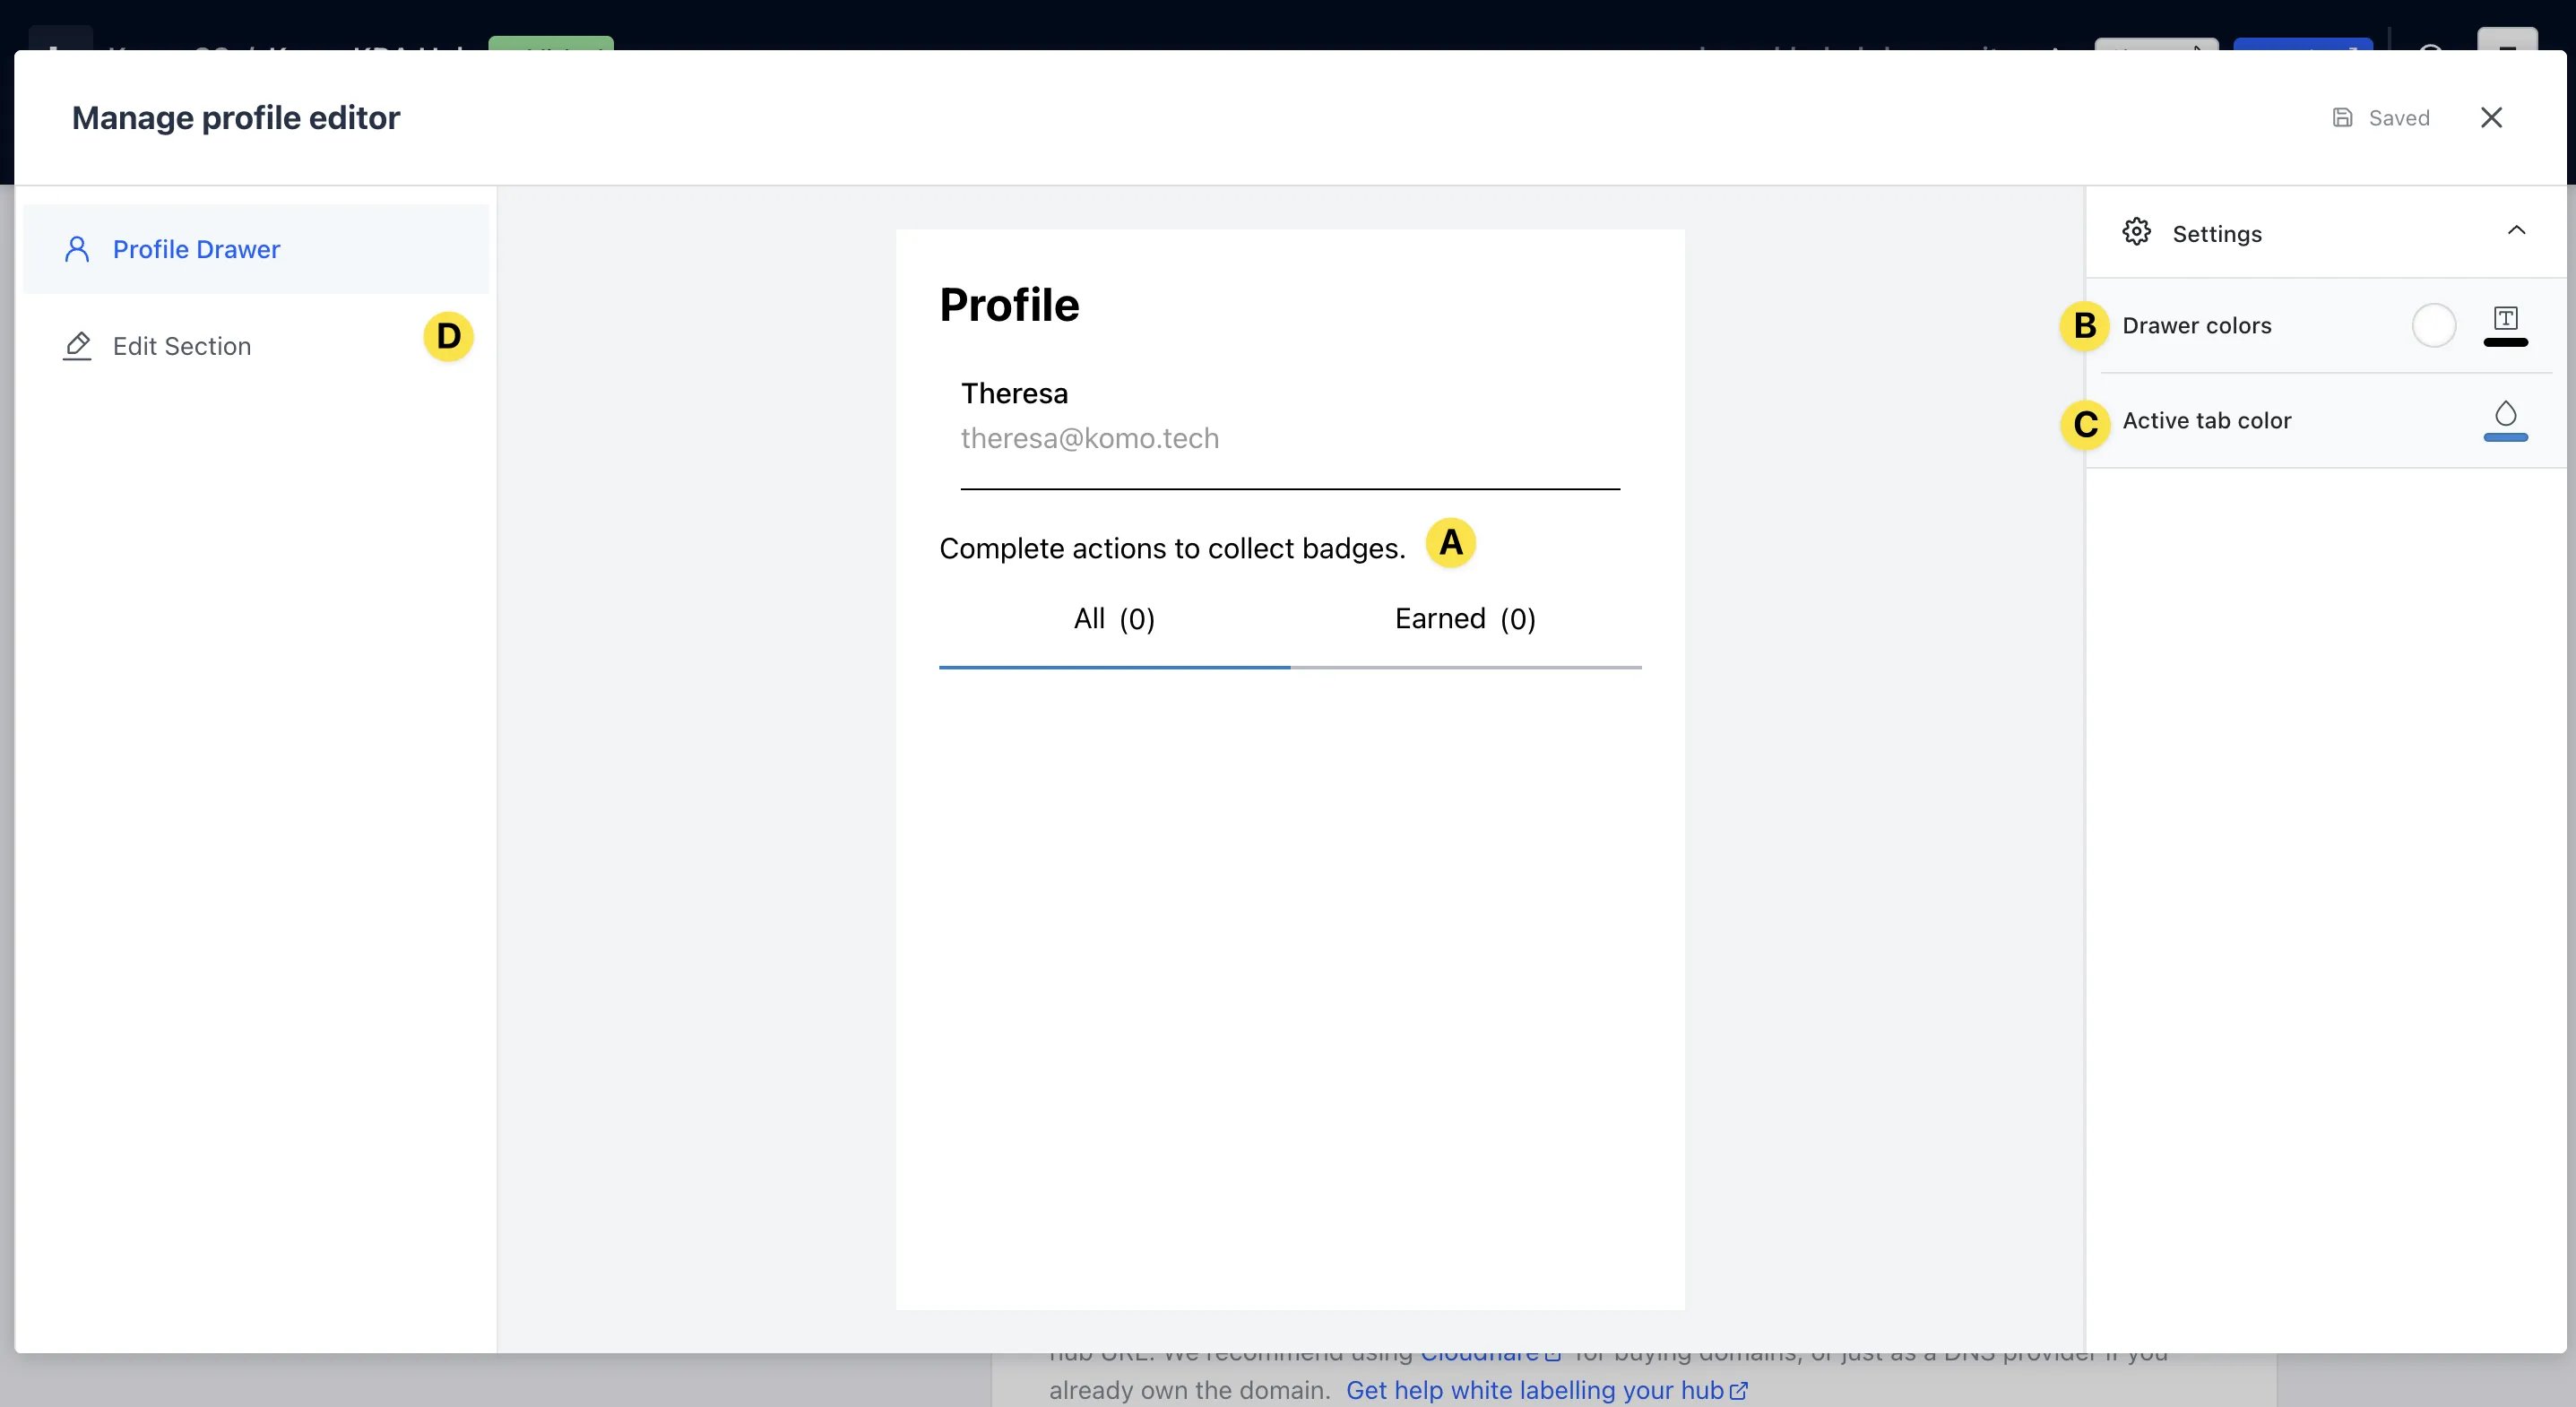 * **(A)** Here you can edit the **messaging** shown on the profile. Include instructions on what to do. For example, collect all badges to go in the running to win X!
* **(B)** You can change the **background and text colours** of the **Profile Drawer**
* **(C)** Here you can also edit the **Active tab colours**
* **(D)** Click here to edit the **profile avatars**
* **(A)** Here you can edit the **messaging** shown on the profile. Include instructions on what to do. For example, collect all badges to go in the running to win X!
* **(B)** You can change the **background and text colours** of the **Profile Drawer**
* **(C)** Here you can also edit the **Active tab colours**
* **(D)** Click here to edit the **profile avatars**
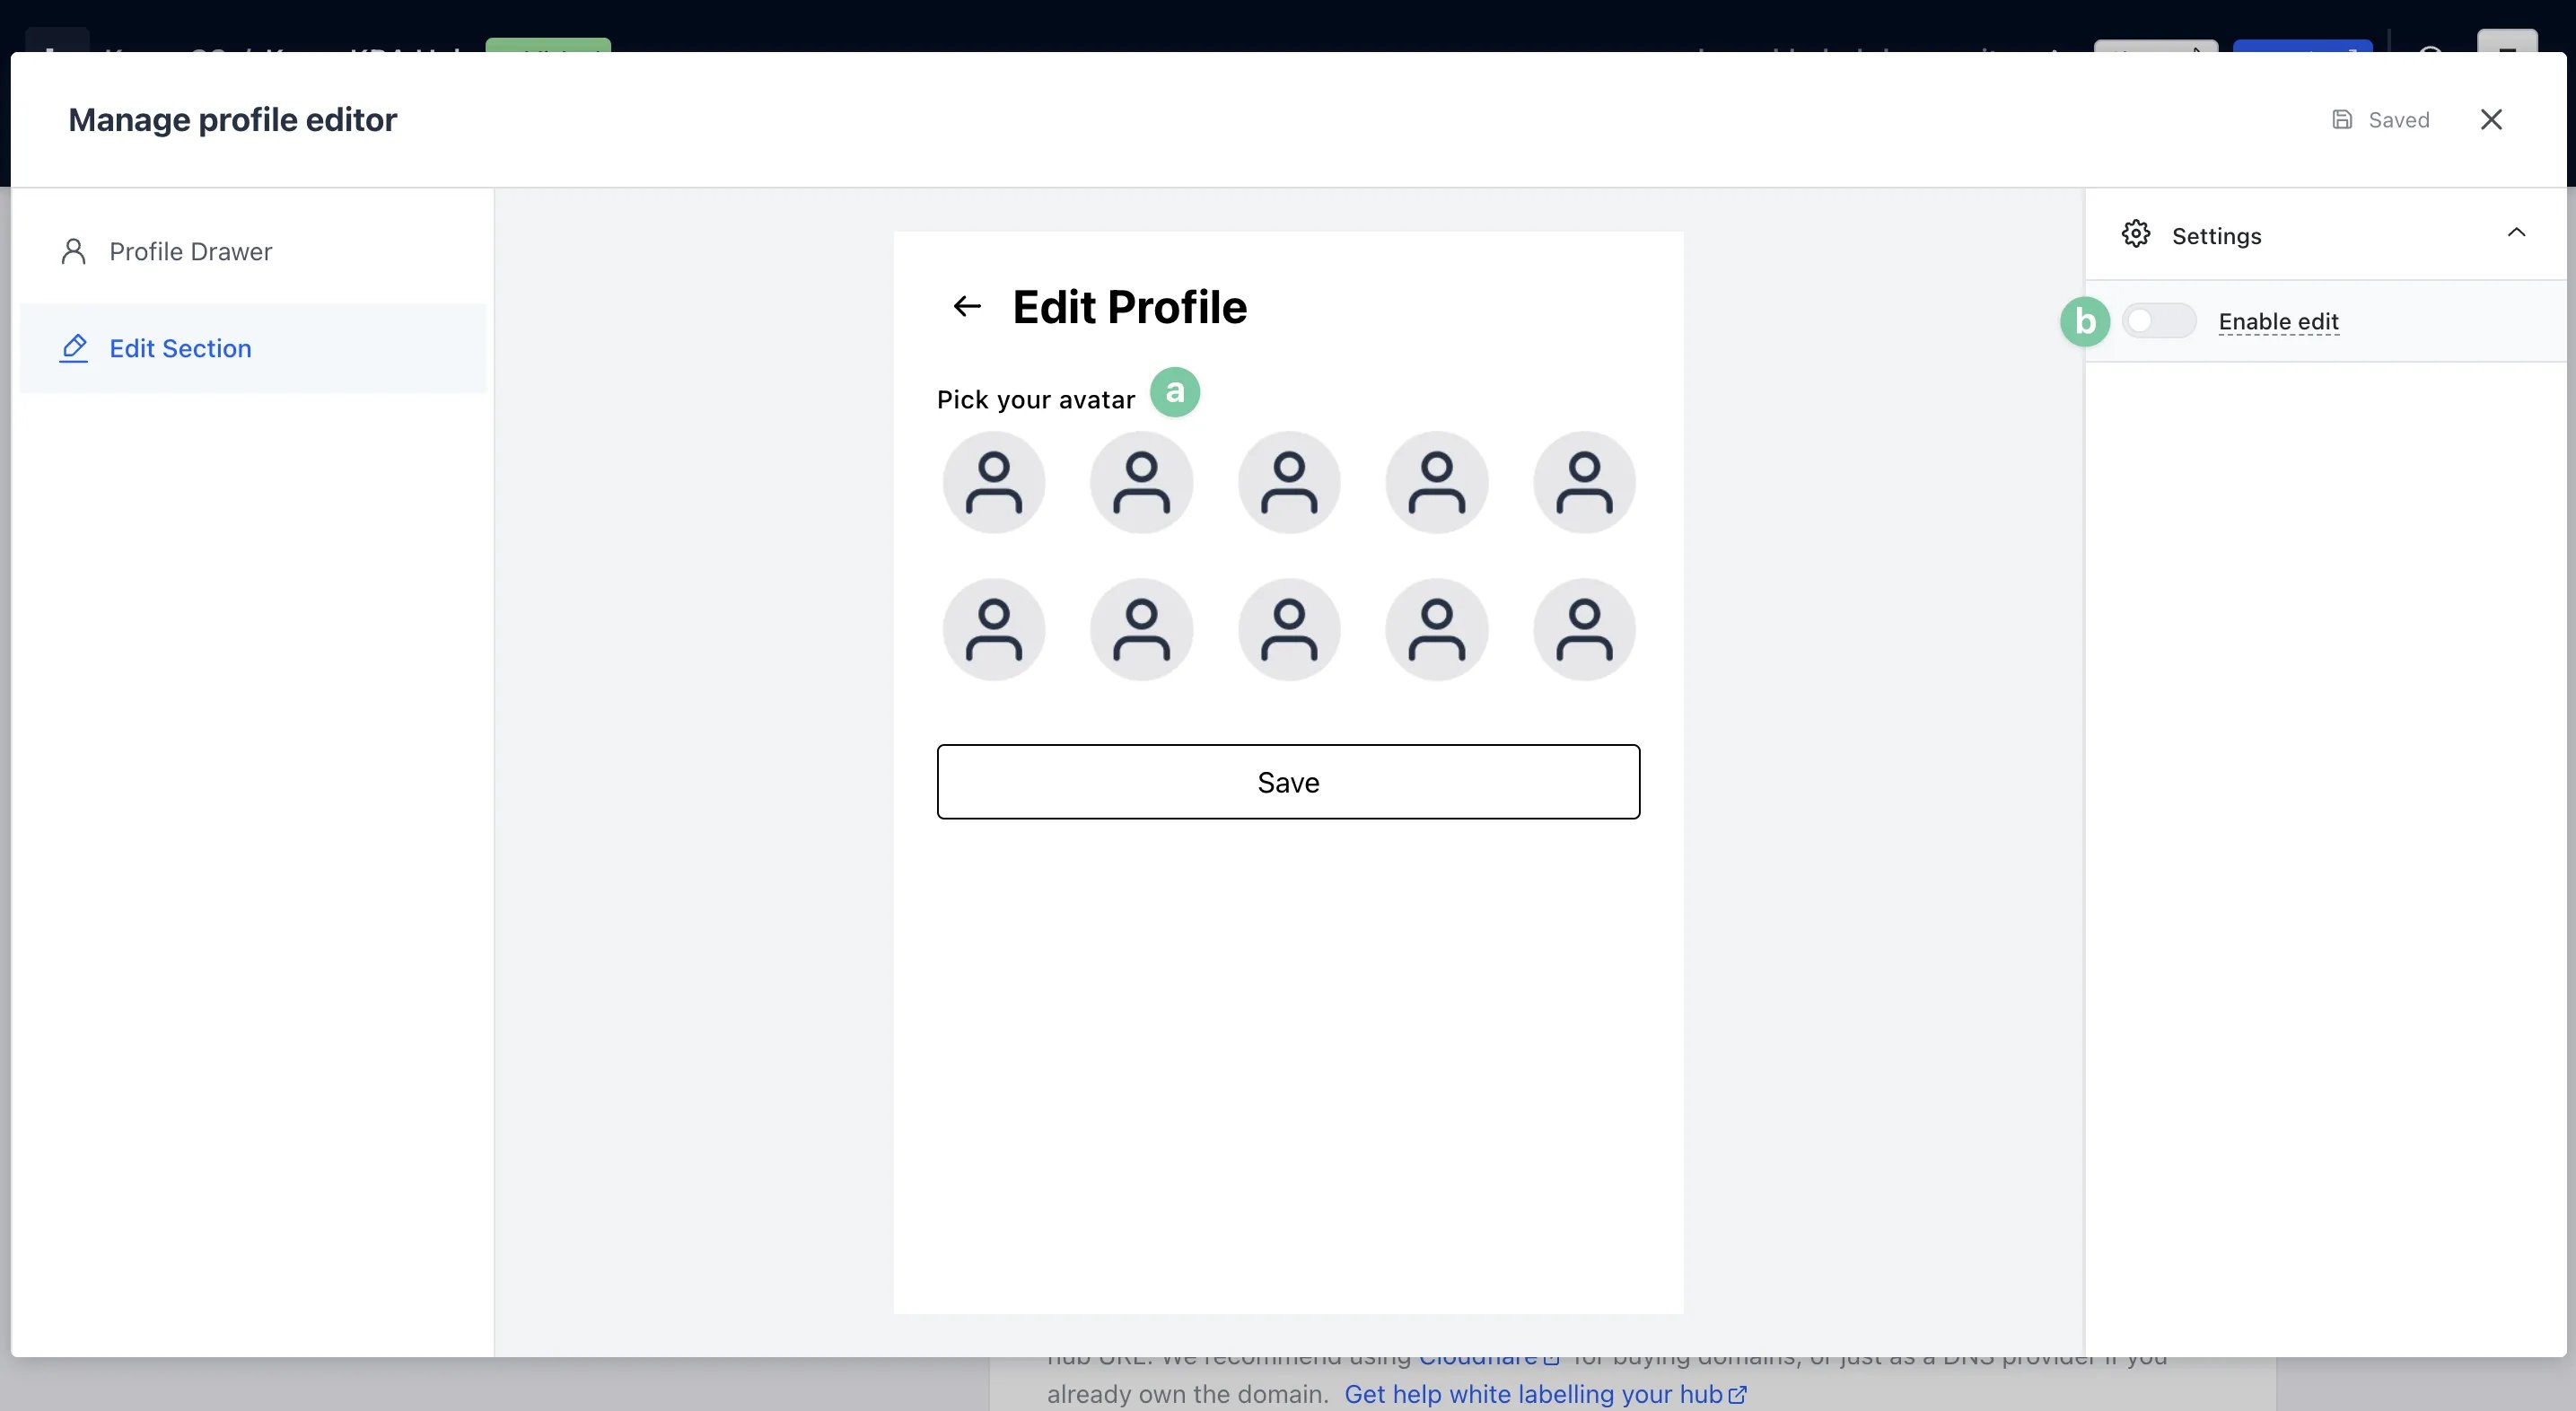 **(a)** Here you can upload images for users to select from to use as their **profile avatars**
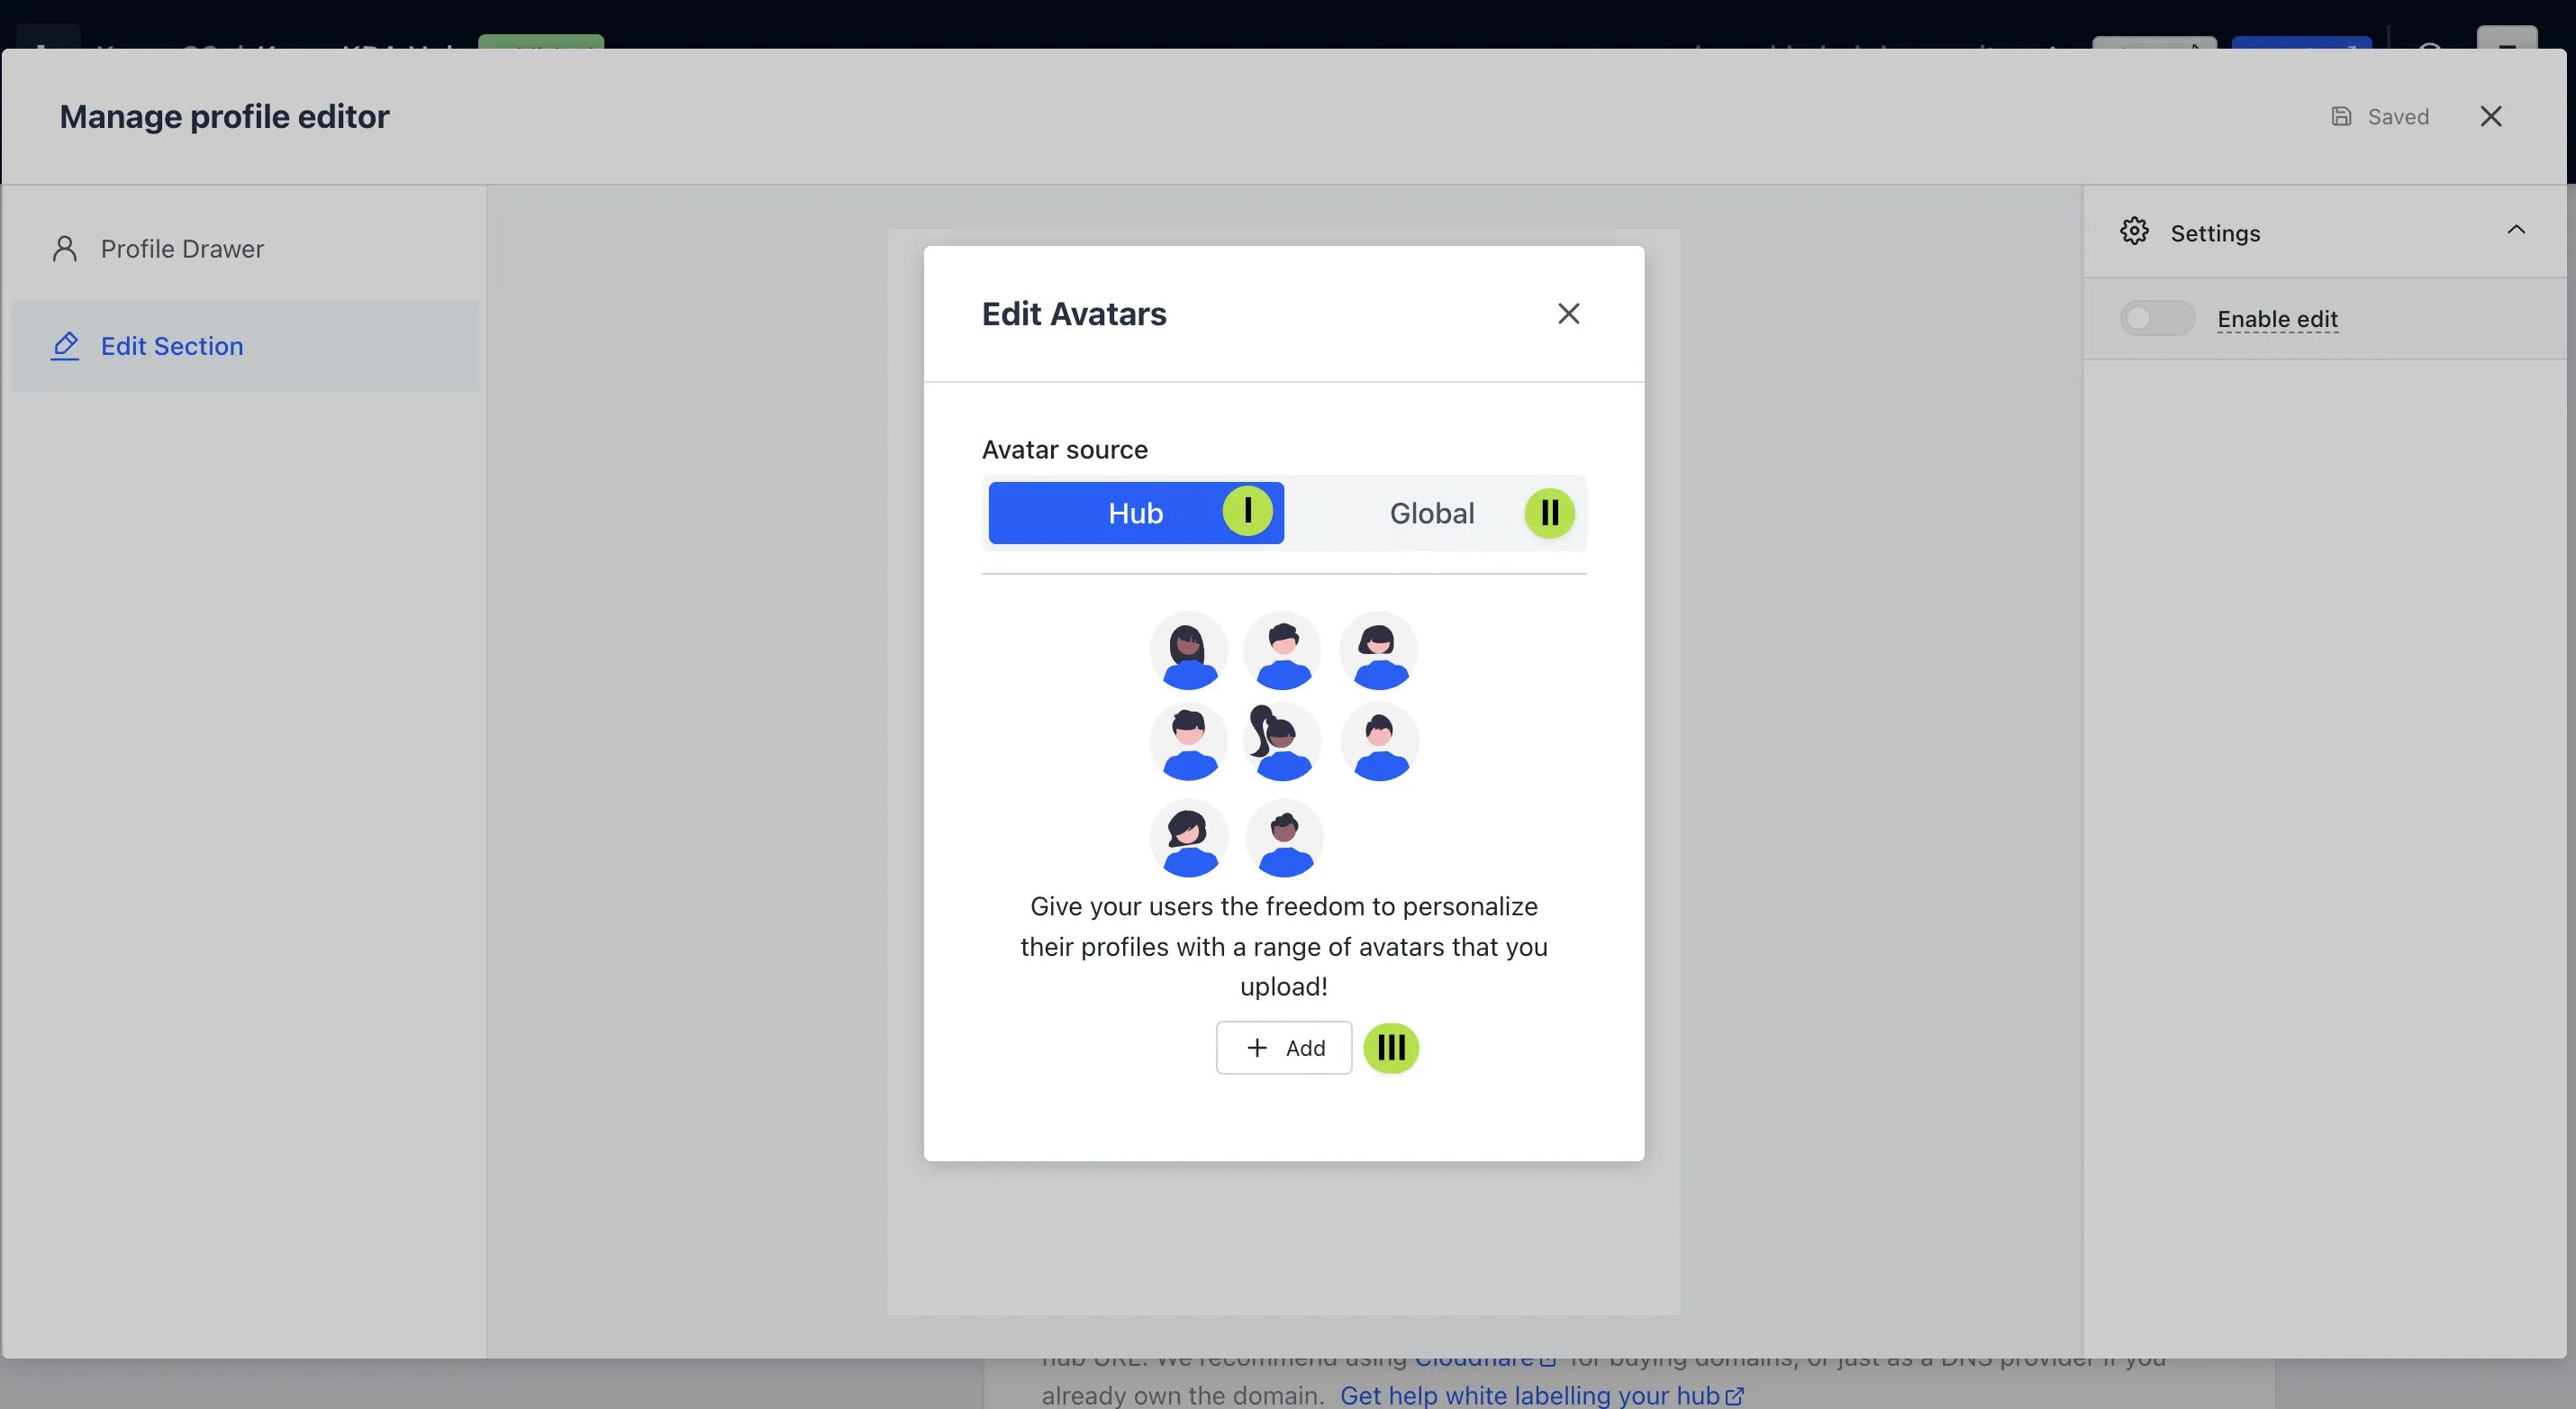 * **(I)** Have your avatars only available on **this Hub**
* **(II)** Allow uploaded avatars to be used **across all Hubs**
* **(III)** Click on **Add** to upload your avatar images
**(b)** Here you can also toggle on and off the ability for users to **edit** their Profiles
* **(I)** Have your avatars only available on **this Hub**
* **(II)** Allow uploaded avatars to be used **across all Hubs**
* **(III)** Click on **Add** to upload your avatar images
**(b)** Here you can also toggle on and off the ability for users to **edit** their Profiles
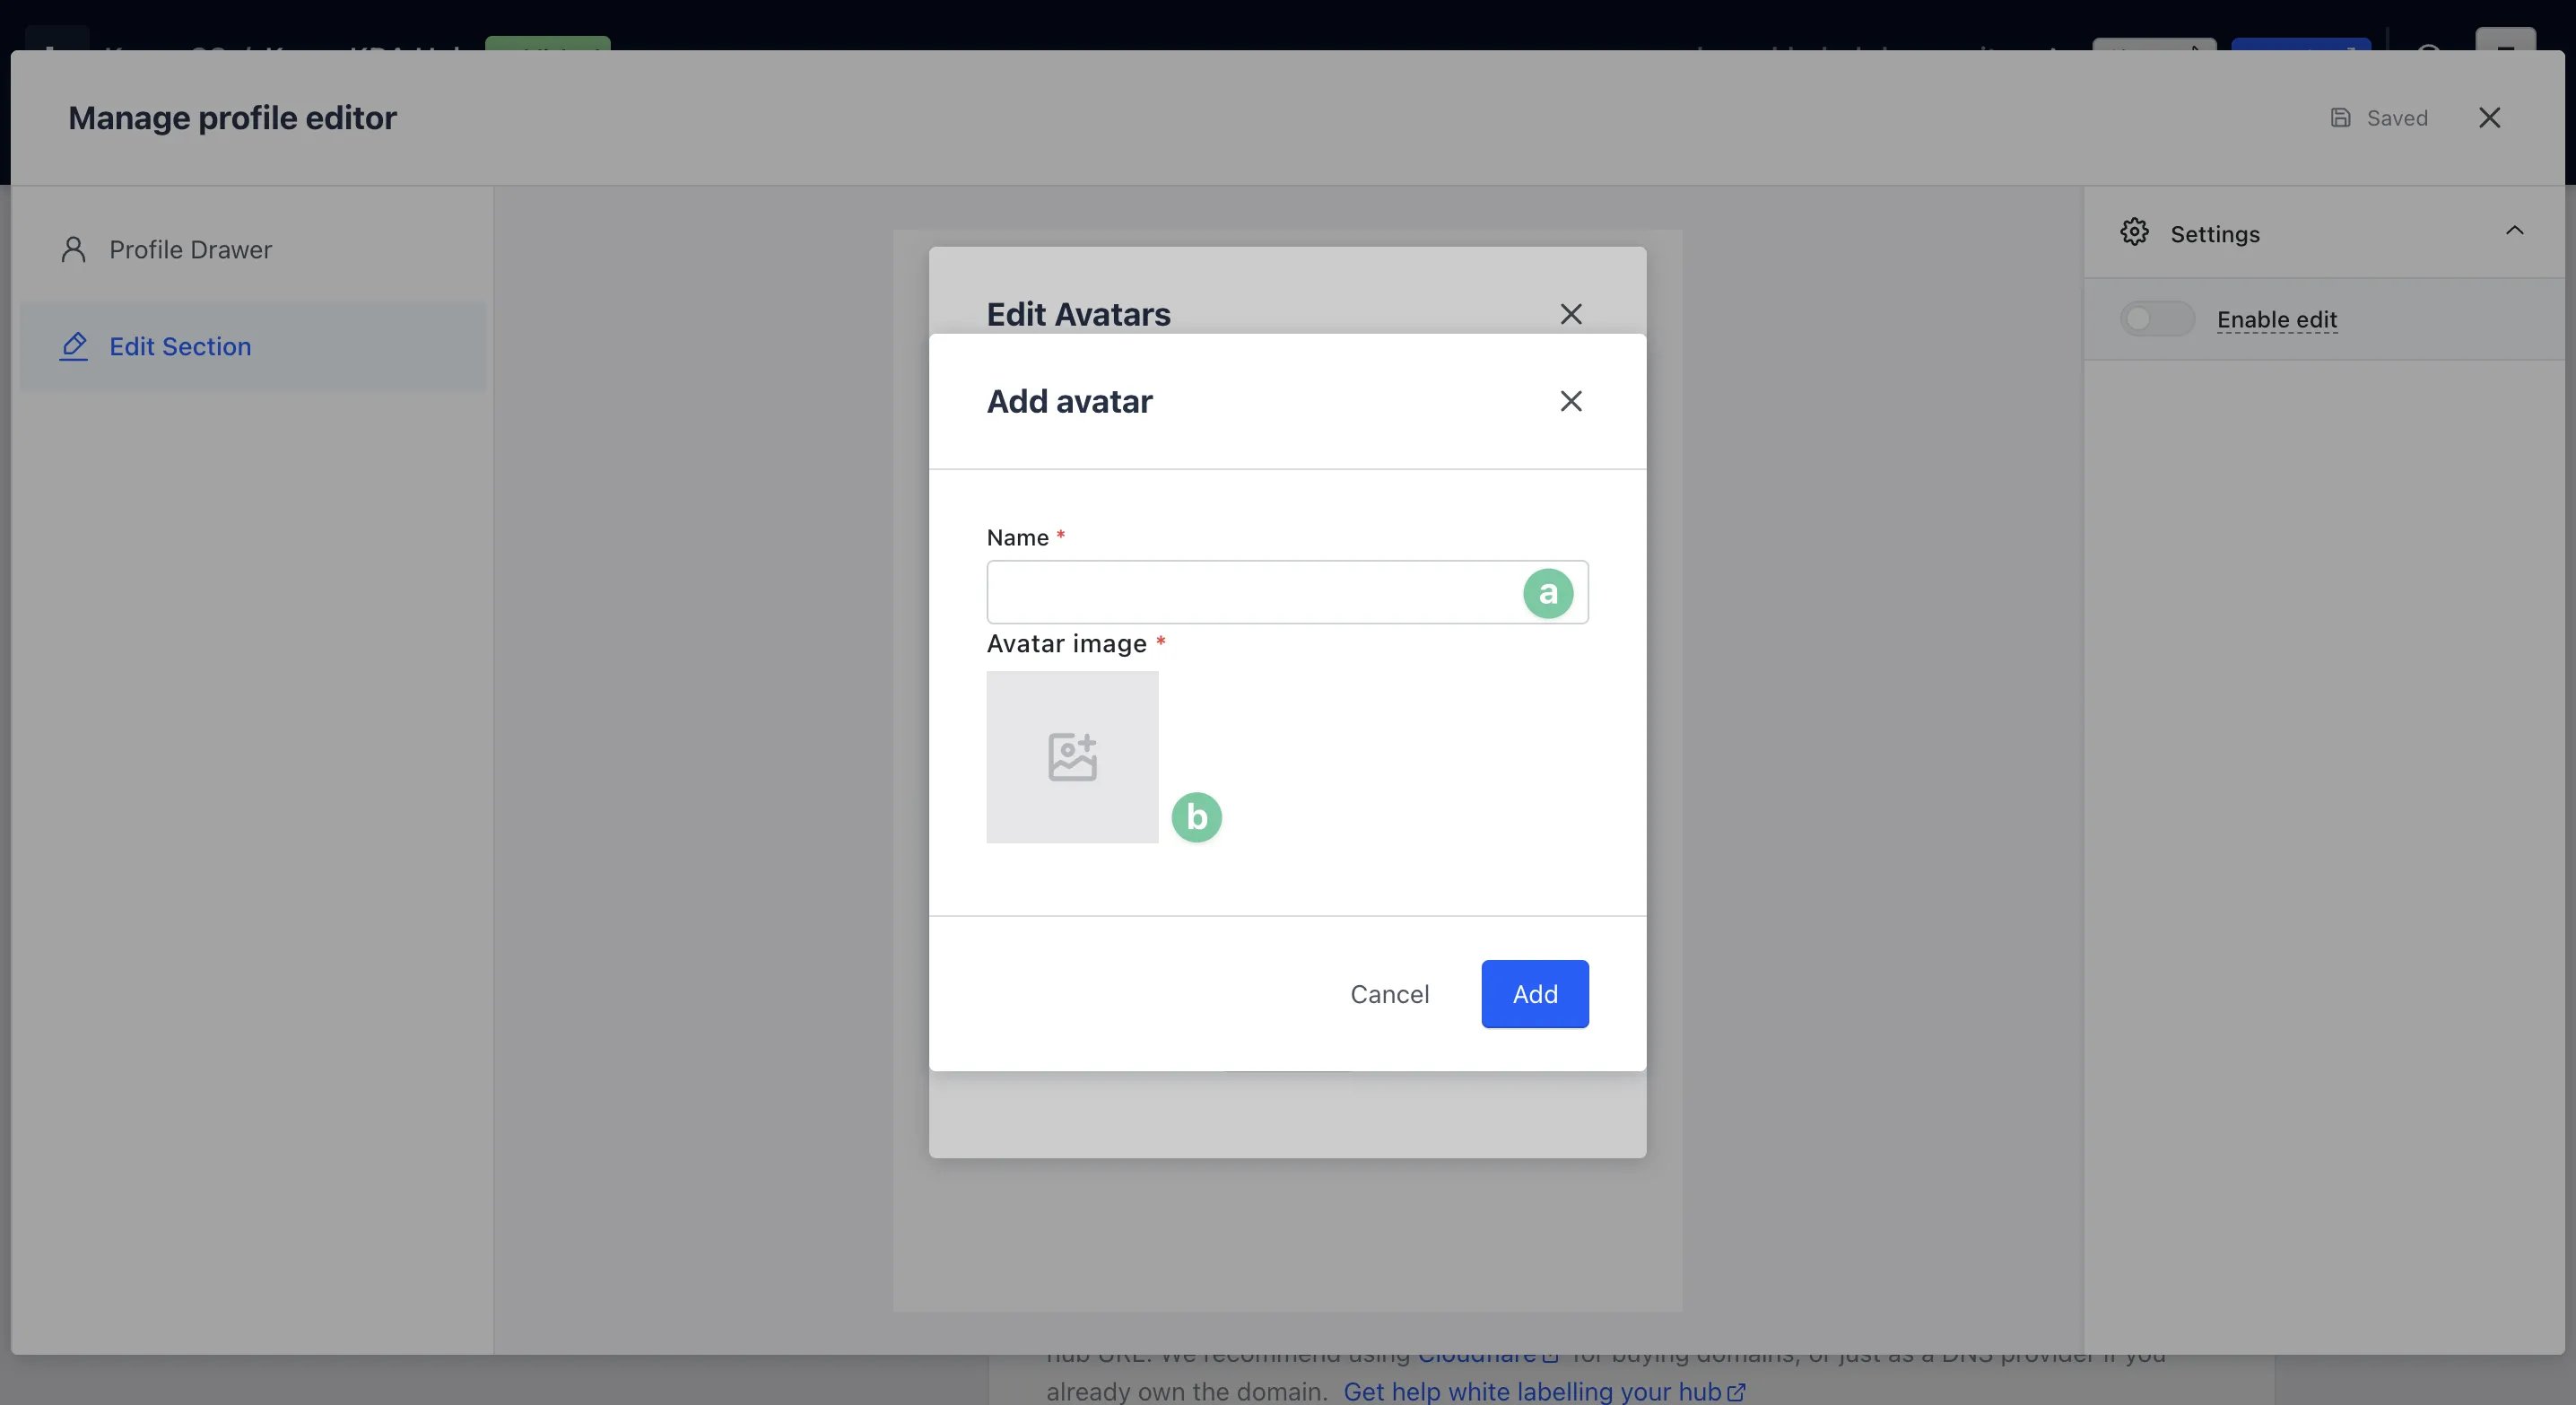 * **(a)** Enter a **name** for your avatar
* **(b)** Upload an **image** to reflect the avatar then hit Add
**(2)** Toggle the **Profiles Feature** on
## "Go Live" Checklist
Ready to go live with your Badges, Contacts & Workflows? We recommend reviewing the following list before launching and double-checking if you have:
* Ensured that all images uploaded for Badges, Badge Groups, Profile and Badge Album are the **correct dimensions**. Export image files in 2x to ensure none of the images appear pixelated. Review the design guidelines for Badges [here](#how-do-i-build-one) if needed
* Activated each workflow to award individual Badges to users. You can do this by checking that each workflow has the green **Active** badge
* Set up all communications with your contacts using the **Accounts** settings
* Edited all the styling of your Badges and various screens that appear for the end-user as a part of this feature
* You've run a test of your Badges and Workflows to ensure Badges are awarded correctly
Then you're ready to go live! Congratulations, you've built out your very own Badges feature!
## Promotion
Design badges for customers to collect
## FAQ
Is there a limit to the amount of Badges I can have on my Hub?
No, there's no limit to the amount of Badges you can create! Just remember, you have to set up a Workflow to award each individual Badge and/or Badge Variant.
Can I launch a Badges campaign to run across a certain timeline to encourage repeat engagement?
Absolutely! Through our client M\&C Saatchi, Woolworths have created a Hub in sponsorship of Netball Australia where there are different games running for each week of the Netball season, so users can return to the Hub repeatedly in order to collect all the Badges. Remember, repeat engagement is driven by how you promote your campaign! Check out some promotion ideas [here](/getting-started/promotion/promoting-your-engagement-hub).
## Top Tips
* The Badges feature provides an excellent opportunity to **drive user-generated content** (here your users promote your Hub for you!). Make sure you encourage sharing in the copy across your games, the Badge Album, etc
* While **Badge Variants** are an optional part of this feature, they do create a tiered and layered experience that encourages users to return to your Hub and play again and again in order to collect all the Badges in a given group, so definitely consider configuring these!
* **Get creative** with how you reflect your brand in the design of your Badges. This will help to **drive brand recall and recognition**, making users even more familiar with your brand
* As with any game or feature of the Komo Engagement Engine, the Badges feature is incredibly easy to configure yourself. But as there are a few steps involved, this is an important one to **test before you go live**
* **(a)** Enter a **name** for your avatar
* **(b)** Upload an **image** to reflect the avatar then hit Add
**(2)** Toggle the **Profiles Feature** on
## "Go Live" Checklist
Ready to go live with your Badges, Contacts & Workflows? We recommend reviewing the following list before launching and double-checking if you have:
* Ensured that all images uploaded for Badges, Badge Groups, Profile and Badge Album are the **correct dimensions**. Export image files in 2x to ensure none of the images appear pixelated. Review the design guidelines for Badges [here](#how-do-i-build-one) if needed
* Activated each workflow to award individual Badges to users. You can do this by checking that each workflow has the green **Active** badge
* Set up all communications with your contacts using the **Accounts** settings
* Edited all the styling of your Badges and various screens that appear for the end-user as a part of this feature
* You've run a test of your Badges and Workflows to ensure Badges are awarded correctly
Then you're ready to go live! Congratulations, you've built out your very own Badges feature!
## Promotion
Design badges for customers to collect
## FAQ
Is there a limit to the amount of Badges I can have on my Hub?
No, there's no limit to the amount of Badges you can create! Just remember, you have to set up a Workflow to award each individual Badge and/or Badge Variant.
Can I launch a Badges campaign to run across a certain timeline to encourage repeat engagement?
Absolutely! Through our client M\&C Saatchi, Woolworths have created a Hub in sponsorship of Netball Australia where there are different games running for each week of the Netball season, so users can return to the Hub repeatedly in order to collect all the Badges. Remember, repeat engagement is driven by how you promote your campaign! Check out some promotion ideas [here](/getting-started/promotion/promoting-your-engagement-hub).
## Top Tips
* The Badges feature provides an excellent opportunity to **drive user-generated content** (here your users promote your Hub for you!). Make sure you encourage sharing in the copy across your games, the Badge Album, etc
* While **Badge Variants** are an optional part of this feature, they do create a tiered and layered experience that encourages users to return to your Hub and play again and again in order to collect all the Badges in a given group, so definitely consider configuring these!
* **Get creative** with how you reflect your brand in the design of your Badges. This will help to **drive brand recall and recognition**, making users even more familiar with your brand
* As with any game or feature of the Komo Engagement Engine, the Badges feature is incredibly easy to configure yourself. But as there are a few steps involved, this is an important one to **test before you go live**