> ## Documentation Index
> Fetch the complete documentation index at: https://knowledge.komo.tech/llms.txt
> Use this file to discover all available pages before exploring further.
# Checklist
> Delve deep and learn about your community.
## What is it?
The Checklist works by users checking off various prompts that they think apply to them. The number of prompts selected then provides the user with a shareable, predetermined outcome that you can configure. This card breaks your community down into smaller segments, allowing you to target various groups with specific marketing materials.
## How do I build one?
* [Step 1: Add a Checklist to your Hub](#step-1-add-a-checklist-to-your-hub)
* [Step 2: Add your Prompts](#step-2-add-your-prompts)
* [Step 3: Set up your Results](#step-3-set-up-your-results)
* [Step 4: Add a Data capture](#step-4-add-a-data-capture-Optional)
* [Step 5: Publish your Card](#step-5-publish-your-card)
### Step 1: Add a Checklist to your Hub
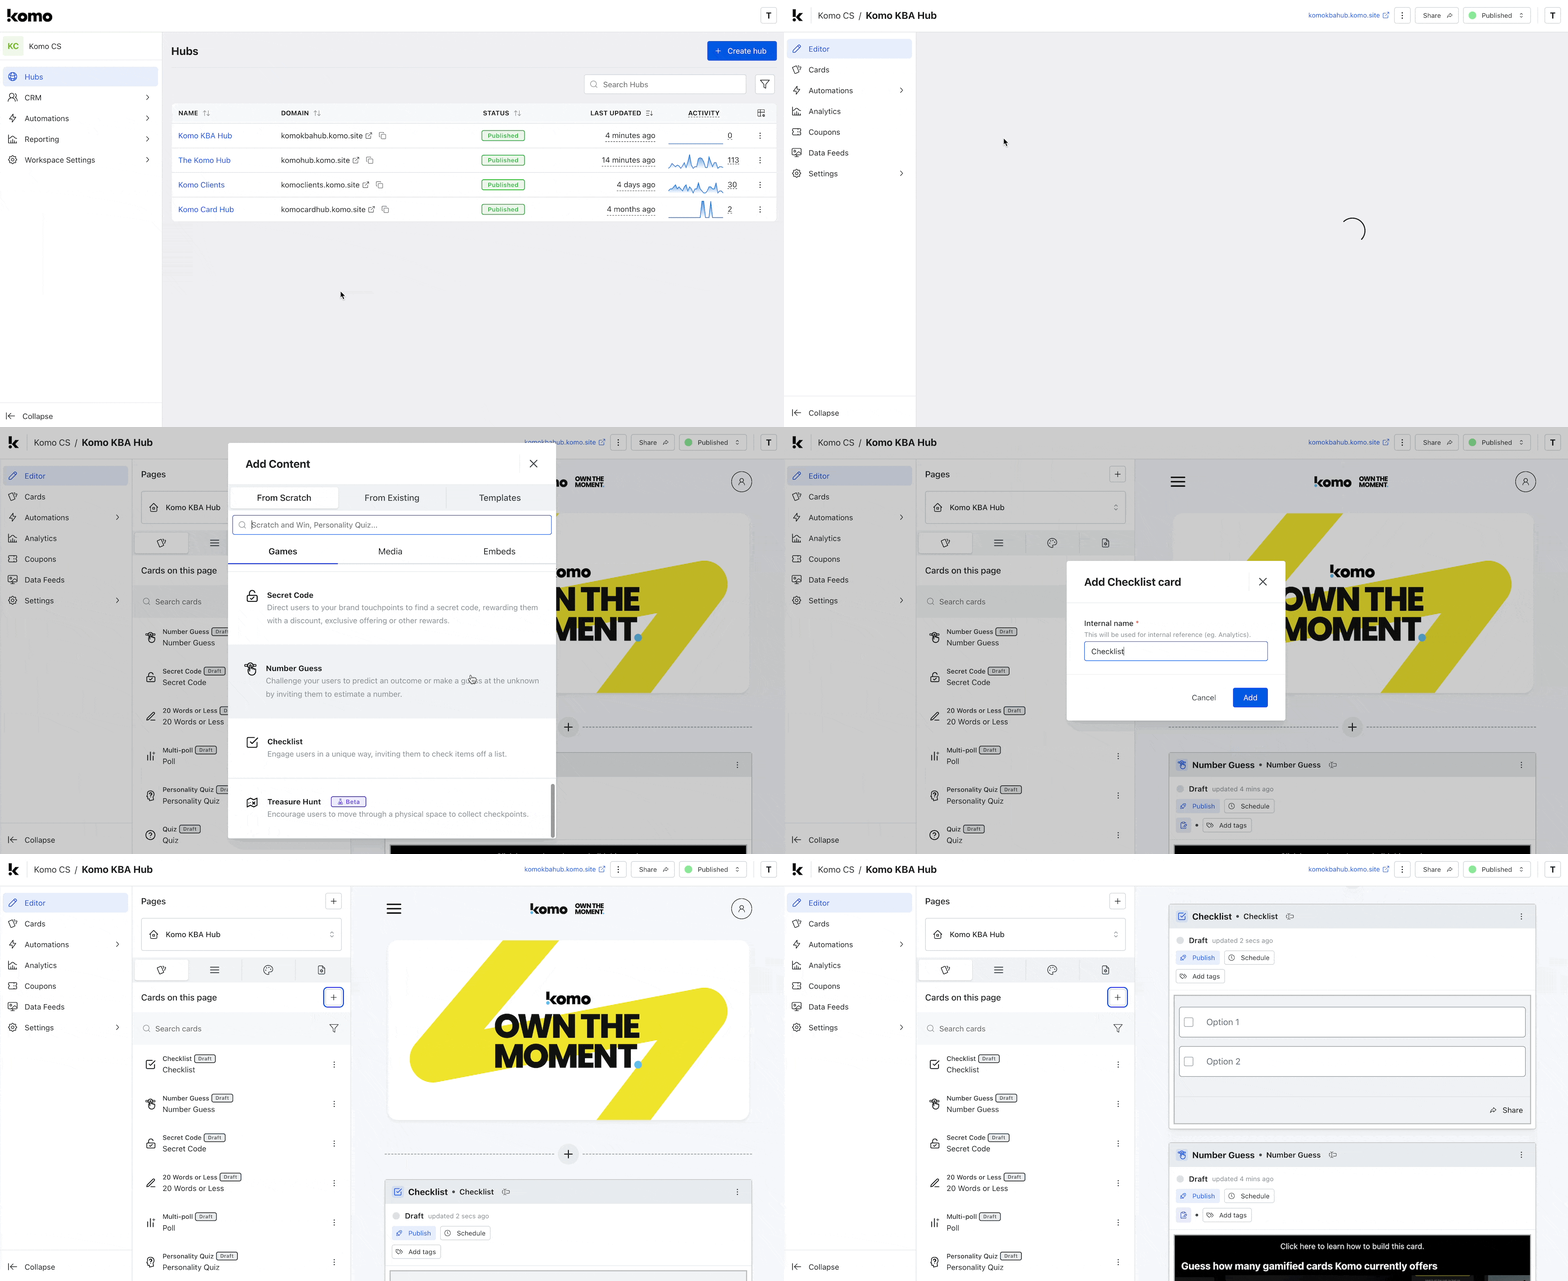 * Navigate to your **Engagement Hub**.
* Once there click the **Plus icon**, from here select **Games** and then **Checklist.**
* You will then see your new card has been added to your Hub.
### Step 2: Add your Prompts
* Navigate to your **Engagement Hub**.
* Once there click the **Plus icon**, from here select **Games** and then **Checklist.**
* You will then see your new card has been added to your Hub.
### Step 2: Add your Prompts
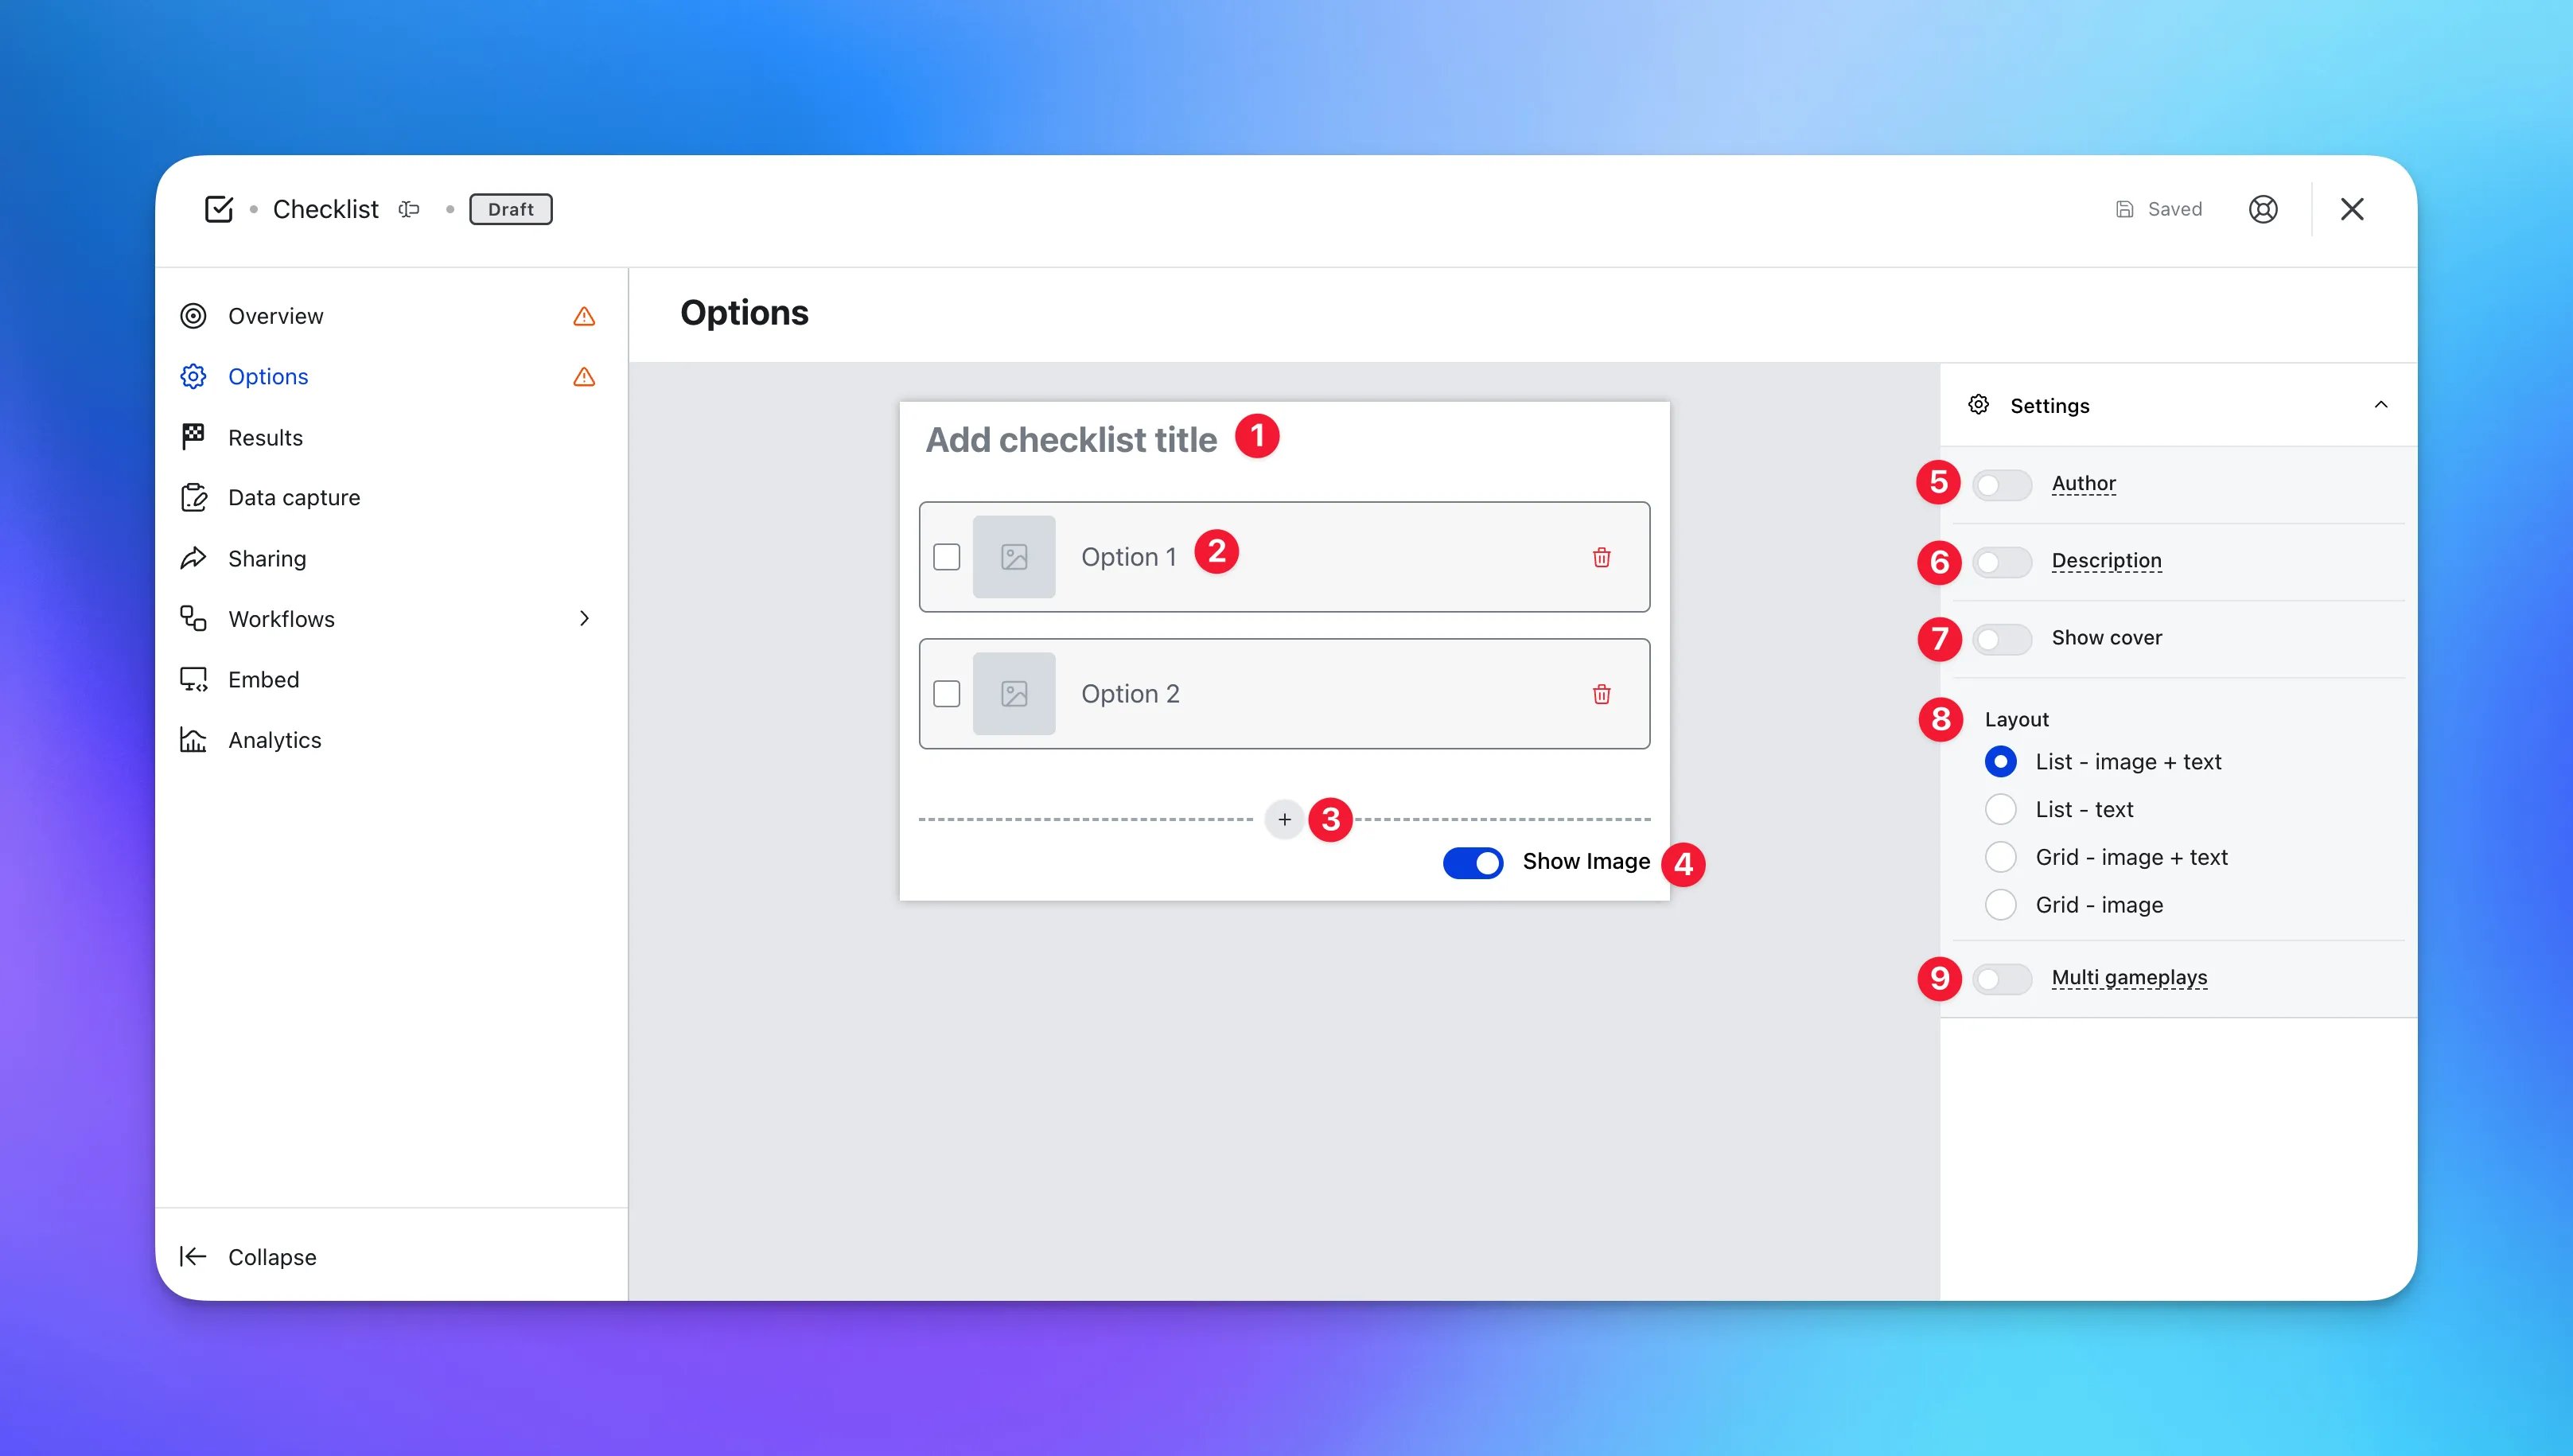 * Clicking on the **Checklist** will open the editing module.
* **(1)** Add your **title** here.
* **(2)** This is where you add each of your different **prompts.** An example of a prompt might be, "I own more than three pieces of merchandise". Additionally, you can also upload an **image** by clicking on the icon.
* **(3)** This is where you add **additional** prompts.
* **(4)** Toggling this will turn on/off the **images** associated with each prompt.
* **(5)** You can add an **author** tag by displaying the brand or person who's responsible for the card content.
* **(6)** Add a **description** to the card.
* **(7)** You have the option to add a **Cover** image.
* **(8)** You can alter the **layout** of the prompts by selecting from the options here.
* **(9)** Allow users to play **multiple** times.
### Step 3: Set up your Results
* Clicking on the **Checklist** will open the editing module.
* **(1)** Add your **title** here.
* **(2)** This is where you add each of your different **prompts.** An example of a prompt might be, "I own more than three pieces of merchandise". Additionally, you can also upload an **image** by clicking on the icon.
* **(3)** This is where you add **additional** prompts.
* **(4)** Toggling this will turn on/off the **images** associated with each prompt.
* **(5)** You can add an **author** tag by displaying the brand or person who's responsible for the card content.
* **(6)** Add a **description** to the card.
* **(7)** You have the option to add a **Cover** image.
* **(8)** You can alter the **layout** of the prompts by selecting from the options here.
* **(9)** Allow users to play **multiple** times.
### Step 3: Set up your Results
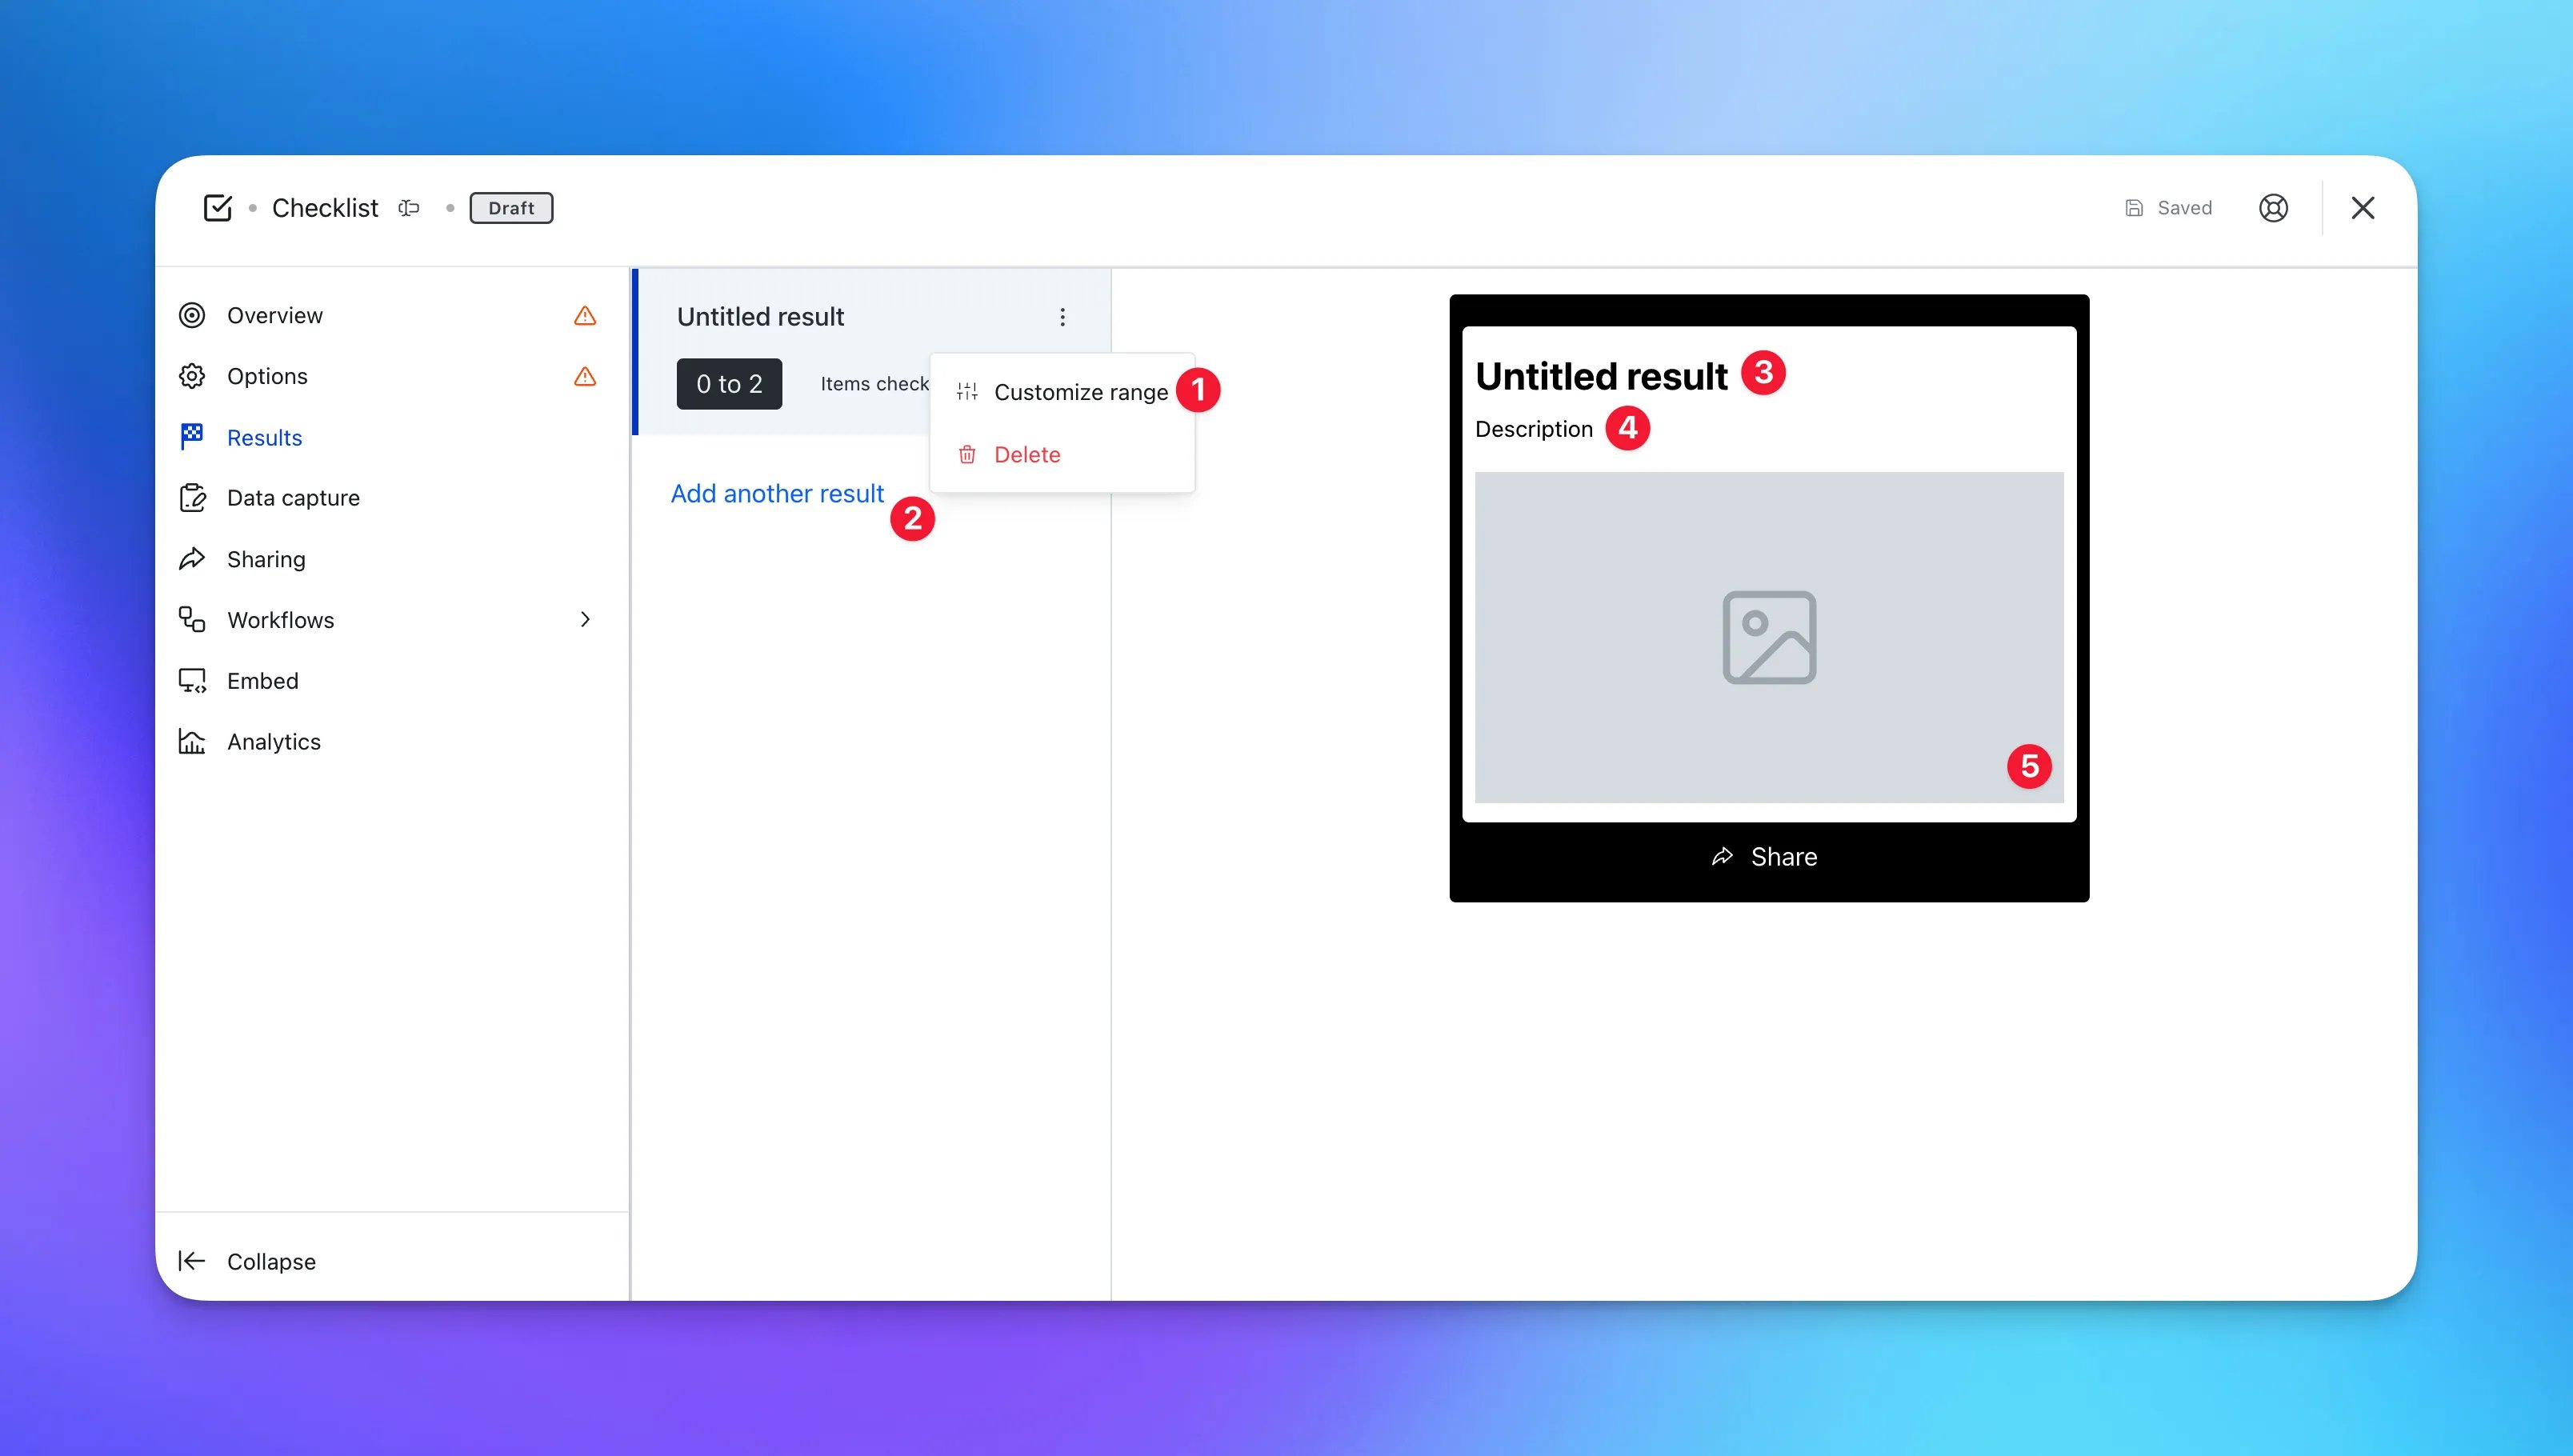 * **(1)** By clicking on the **...** you will see the options **Customize range** and **Delete.**
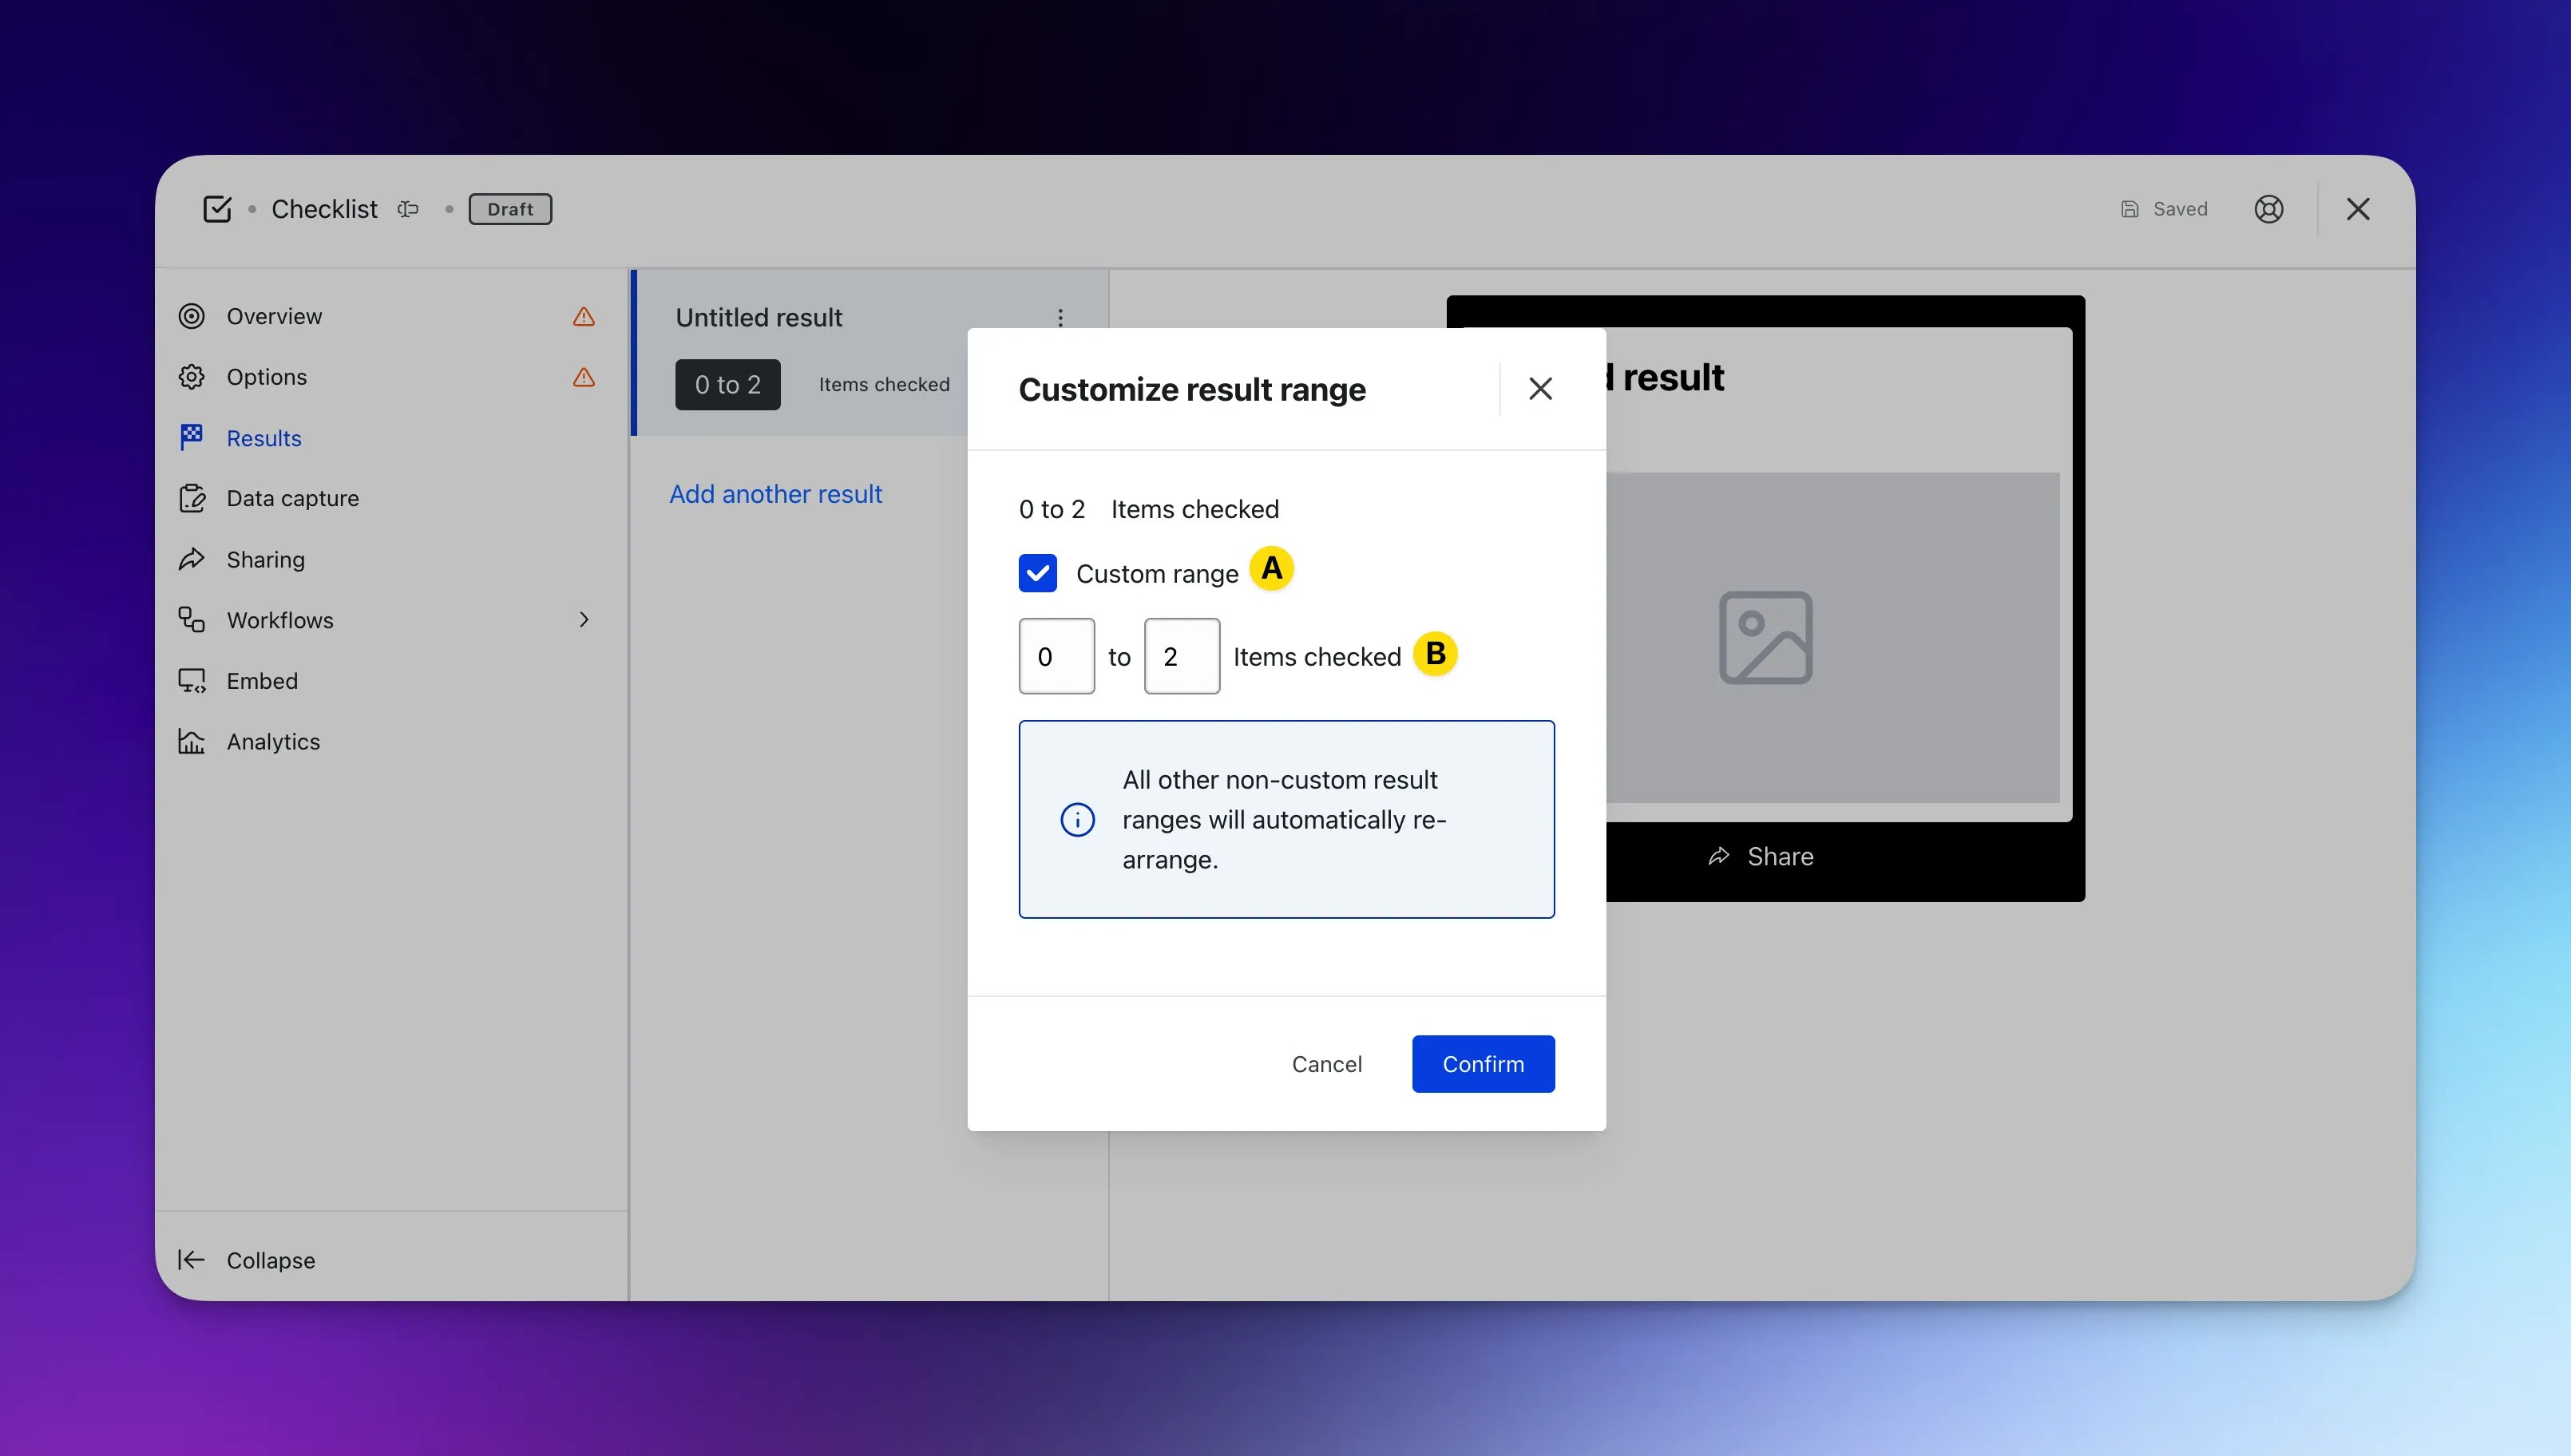 * By clicking **Customize range** you can set the number of items users need to select in order to receive this result.
* **(A)** Ticking the **Custom range** you can then set the range.
* **(B)** Here is where you enter the **range**.
* **(2)** Click here to add another **result.**
* **(3) + (4)** Here you customize your result by setting a **title** and **description**.
* **(5)** This is where you can upload an **image** associated with that result.
### Step 4: Add a Data capture (Optional)
Whilst adding a competition to your Checklist isn't mandatory if you're looking to collect user data, it is not always required and can be used purely as an engagement piece.
### Step 5: Publish your Card
* By clicking **Customize range** you can set the number of items users need to select in order to receive this result.
* **(A)** Ticking the **Custom range** you can then set the range.
* **(B)** Here is where you enter the **range**.
* **(2)** Click here to add another **result.**
* **(3) + (4)** Here you customize your result by setting a **title** and **description**.
* **(5)** This is where you can upload an **image** associated with that result.
### Step 4: Add a Data capture (Optional)
Whilst adding a competition to your Checklist isn't mandatory if you're looking to collect user data, it is not always required and can be used purely as an engagement piece.
### Step 5: Publish your Card
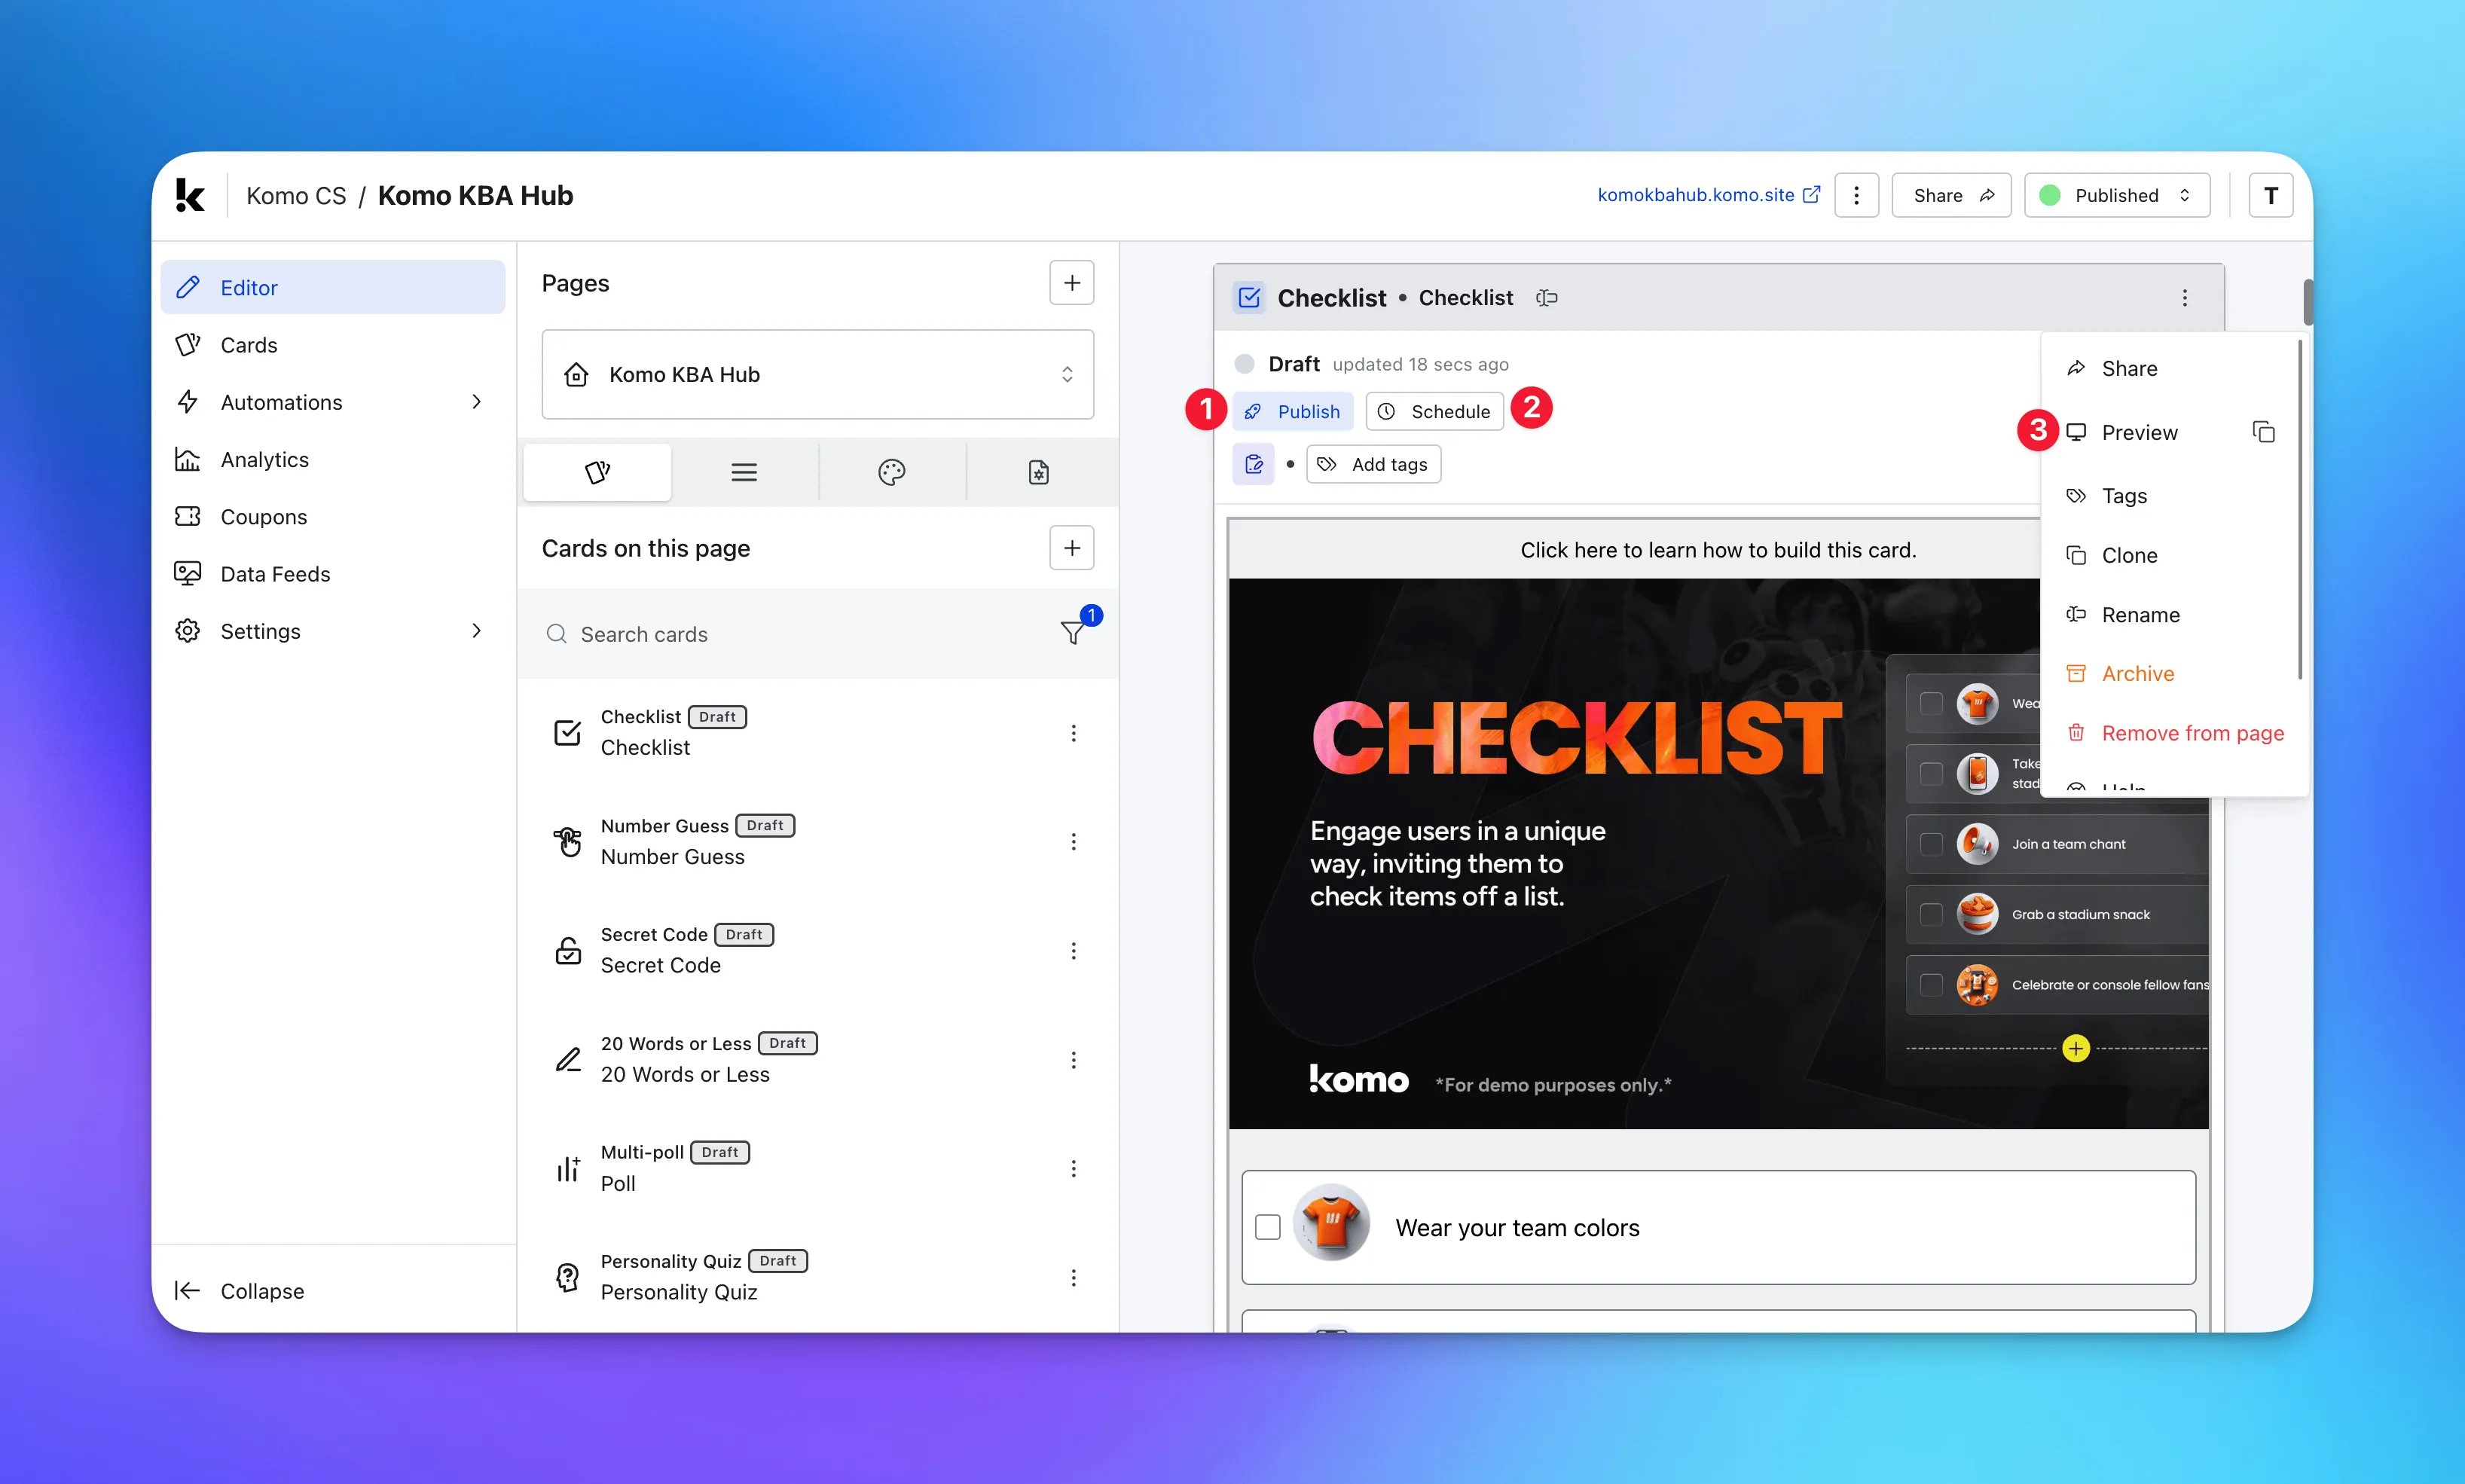 **Once you've completed all of these steps, played around with your card and are happy with all the aspects of your card, it's time to get your card live!**
* **(1) Publish** your card manually for the world to see.
* **(2) Schedule** your card to be published and unpublished at set dates and times.
* **(3)** Click on the **...** to **Preview** and interact with the card on the front end from a user's perspective before publishing it. See how to test your card [here](/getting-started/hub-setup/card-testing).
All competition entries will be recorded and will impact the card analytics.
### "Go live" checklist
Ready to go live with your Checklist? We recommend reviewing the following list before launching and double-checking if you have:
* All images uploaded are the **correct dimensions**. Export image files in 2x to ensure none of the images appear pixelated.
* Added all your **options** (including imagery where possible).
* All your [result screens](#step-3-set-up-your-results) are set up with imagery, copy and the result range.
If you have a competition and a data capture attached:
* All your **communications** (Registration, Winner's, Everybody Else) are fully set up and ready to send.
* You have hyperlinked your [T\&Cs](/getting-started/resources/terms-conditions) to the opt-in-field, which is created in the **data capture** section of the settings tab.
* Ensure your **Prizes** and the awarding rules are set up correctly.
* If you are using **coupons**, make sure the coupons created are set up correctly. Check the coupon limits are set, the copy for each screen is right and you have linked the appropriate coupons to your communications.
Then you're ready to go live!
## Promotion
## FAQ
How can the Checklist card be used to learn more about my community? Whilst you need to create content that is interesting for users to engage with, you can still include market research responses within your checklist. e.g. for sports teams; "You are a season ticket holder" This allows you to segment your users and find gaps in your product offering.
What is the recommended number of options and outcomes? For your Checklist card to display best on phone whilst providing a significant number of options we've found the sweet spot to be around 6-8 options, with an outcome generally associated with 2 options. e.g. for every 2 options, you should have 1 outcome.
## Top tips
* Add a good amount of options for users to choose from (we recommend 10 options).
* Include a cover image. A cover image brings the card to life, everyone loves images and visuals!
* Ask a question where you can learn more about your community e.g. "What type of shopper are you?"
* Create at least 2 result screens for this card. If you have 10 options, you should have at least 4 result screens as this makes each result unique to every user.
* Include market research questions to better understand your audience. E.g as an option include "I have a Komo account" here you will know who is or isn't associated with your brand directly.
**Once you've completed all of these steps, played around with your card and are happy with all the aspects of your card, it's time to get your card live!**
* **(1) Publish** your card manually for the world to see.
* **(2) Schedule** your card to be published and unpublished at set dates and times.
* **(3)** Click on the **...** to **Preview** and interact with the card on the front end from a user's perspective before publishing it. See how to test your card [here](/getting-started/hub-setup/card-testing).
All competition entries will be recorded and will impact the card analytics.
### "Go live" checklist
Ready to go live with your Checklist? We recommend reviewing the following list before launching and double-checking if you have:
* All images uploaded are the **correct dimensions**. Export image files in 2x to ensure none of the images appear pixelated.
* Added all your **options** (including imagery where possible).
* All your [result screens](#step-3-set-up-your-results) are set up with imagery, copy and the result range.
If you have a competition and a data capture attached:
* All your **communications** (Registration, Winner's, Everybody Else) are fully set up and ready to send.
* You have hyperlinked your [T\&Cs](/getting-started/resources/terms-conditions) to the opt-in-field, which is created in the **data capture** section of the settings tab.
* Ensure your **Prizes** and the awarding rules are set up correctly.
* If you are using **coupons**, make sure the coupons created are set up correctly. Check the coupon limits are set, the copy for each screen is right and you have linked the appropriate coupons to your communications.
Then you're ready to go live!
## Promotion
## FAQ
How can the Checklist card be used to learn more about my community? Whilst you need to create content that is interesting for users to engage with, you can still include market research responses within your checklist. e.g. for sports teams; "You are a season ticket holder" This allows you to segment your users and find gaps in your product offering.
What is the recommended number of options and outcomes? For your Checklist card to display best on phone whilst providing a significant number of options we've found the sweet spot to be around 6-8 options, with an outcome generally associated with 2 options. e.g. for every 2 options, you should have 1 outcome.
## Top tips
* Add a good amount of options for users to choose from (we recommend 10 options).
* Include a cover image. A cover image brings the card to life, everyone loves images and visuals!
* Ask a question where you can learn more about your community e.g. "What type of shopper are you?"
* Create at least 2 result screens for this card. If you have 10 options, you should have at least 4 result screens as this makes each result unique to every user.
* Include market research questions to better understand your audience. E.g as an option include "I have a Komo account" here you will know who is or isn't associated with your brand directly.