> ## Documentation Index
> Fetch the complete documentation index at: https://knowledge.komo.tech/llms.txt
> Use this file to discover all available pages before exploring further.
# Meme Generator
> Allow users to create, download, and share branded memes in your Engagement Hub.
## What is it?
The **Meme Generator** card lets users create and share unique memes within your **Engagement Hub**. You define the template, control which elements users can edit, and optionally require **Data Capture** before users download or share their creation.
## How do I build one?
* [Step 1: Add a Meme Generator to your Hub](#step-1-add-a-meme-generator-to-your-hub)
* [Step 2: Create your template](#step-2-create-your-template)
* [Step 3: Set up your user options](#step-3-set-up-your-user-options)
* [Step 4: Set up your result screen](#step-4-set-up-your-result-screen)
* [Step 5: Set up your Data Capture *(Optional)*](#step-5-set-up-your-data-capture-optional)
* [Step 6: Publish your card](#step-6-publish-your-card)
### Step 1: Add a Meme Generator to your Hub
 1. Navigate to your **Engagement Hub**.
2. Click **+ Add card**, select **Games**, then **Meme Generator**.
3. Provide an **internal name** for the card and click **Add**.
Your new card appears in the Hub editor.
### Step 2: Create your template
1. Navigate to your **Engagement Hub**.
2. Click **+ Add card**, select **Games**, then **Meme Generator**.
3. Provide an **internal name** for the card and click **Add**.
Your new card appears in the Hub editor.
### Step 2: Create your template
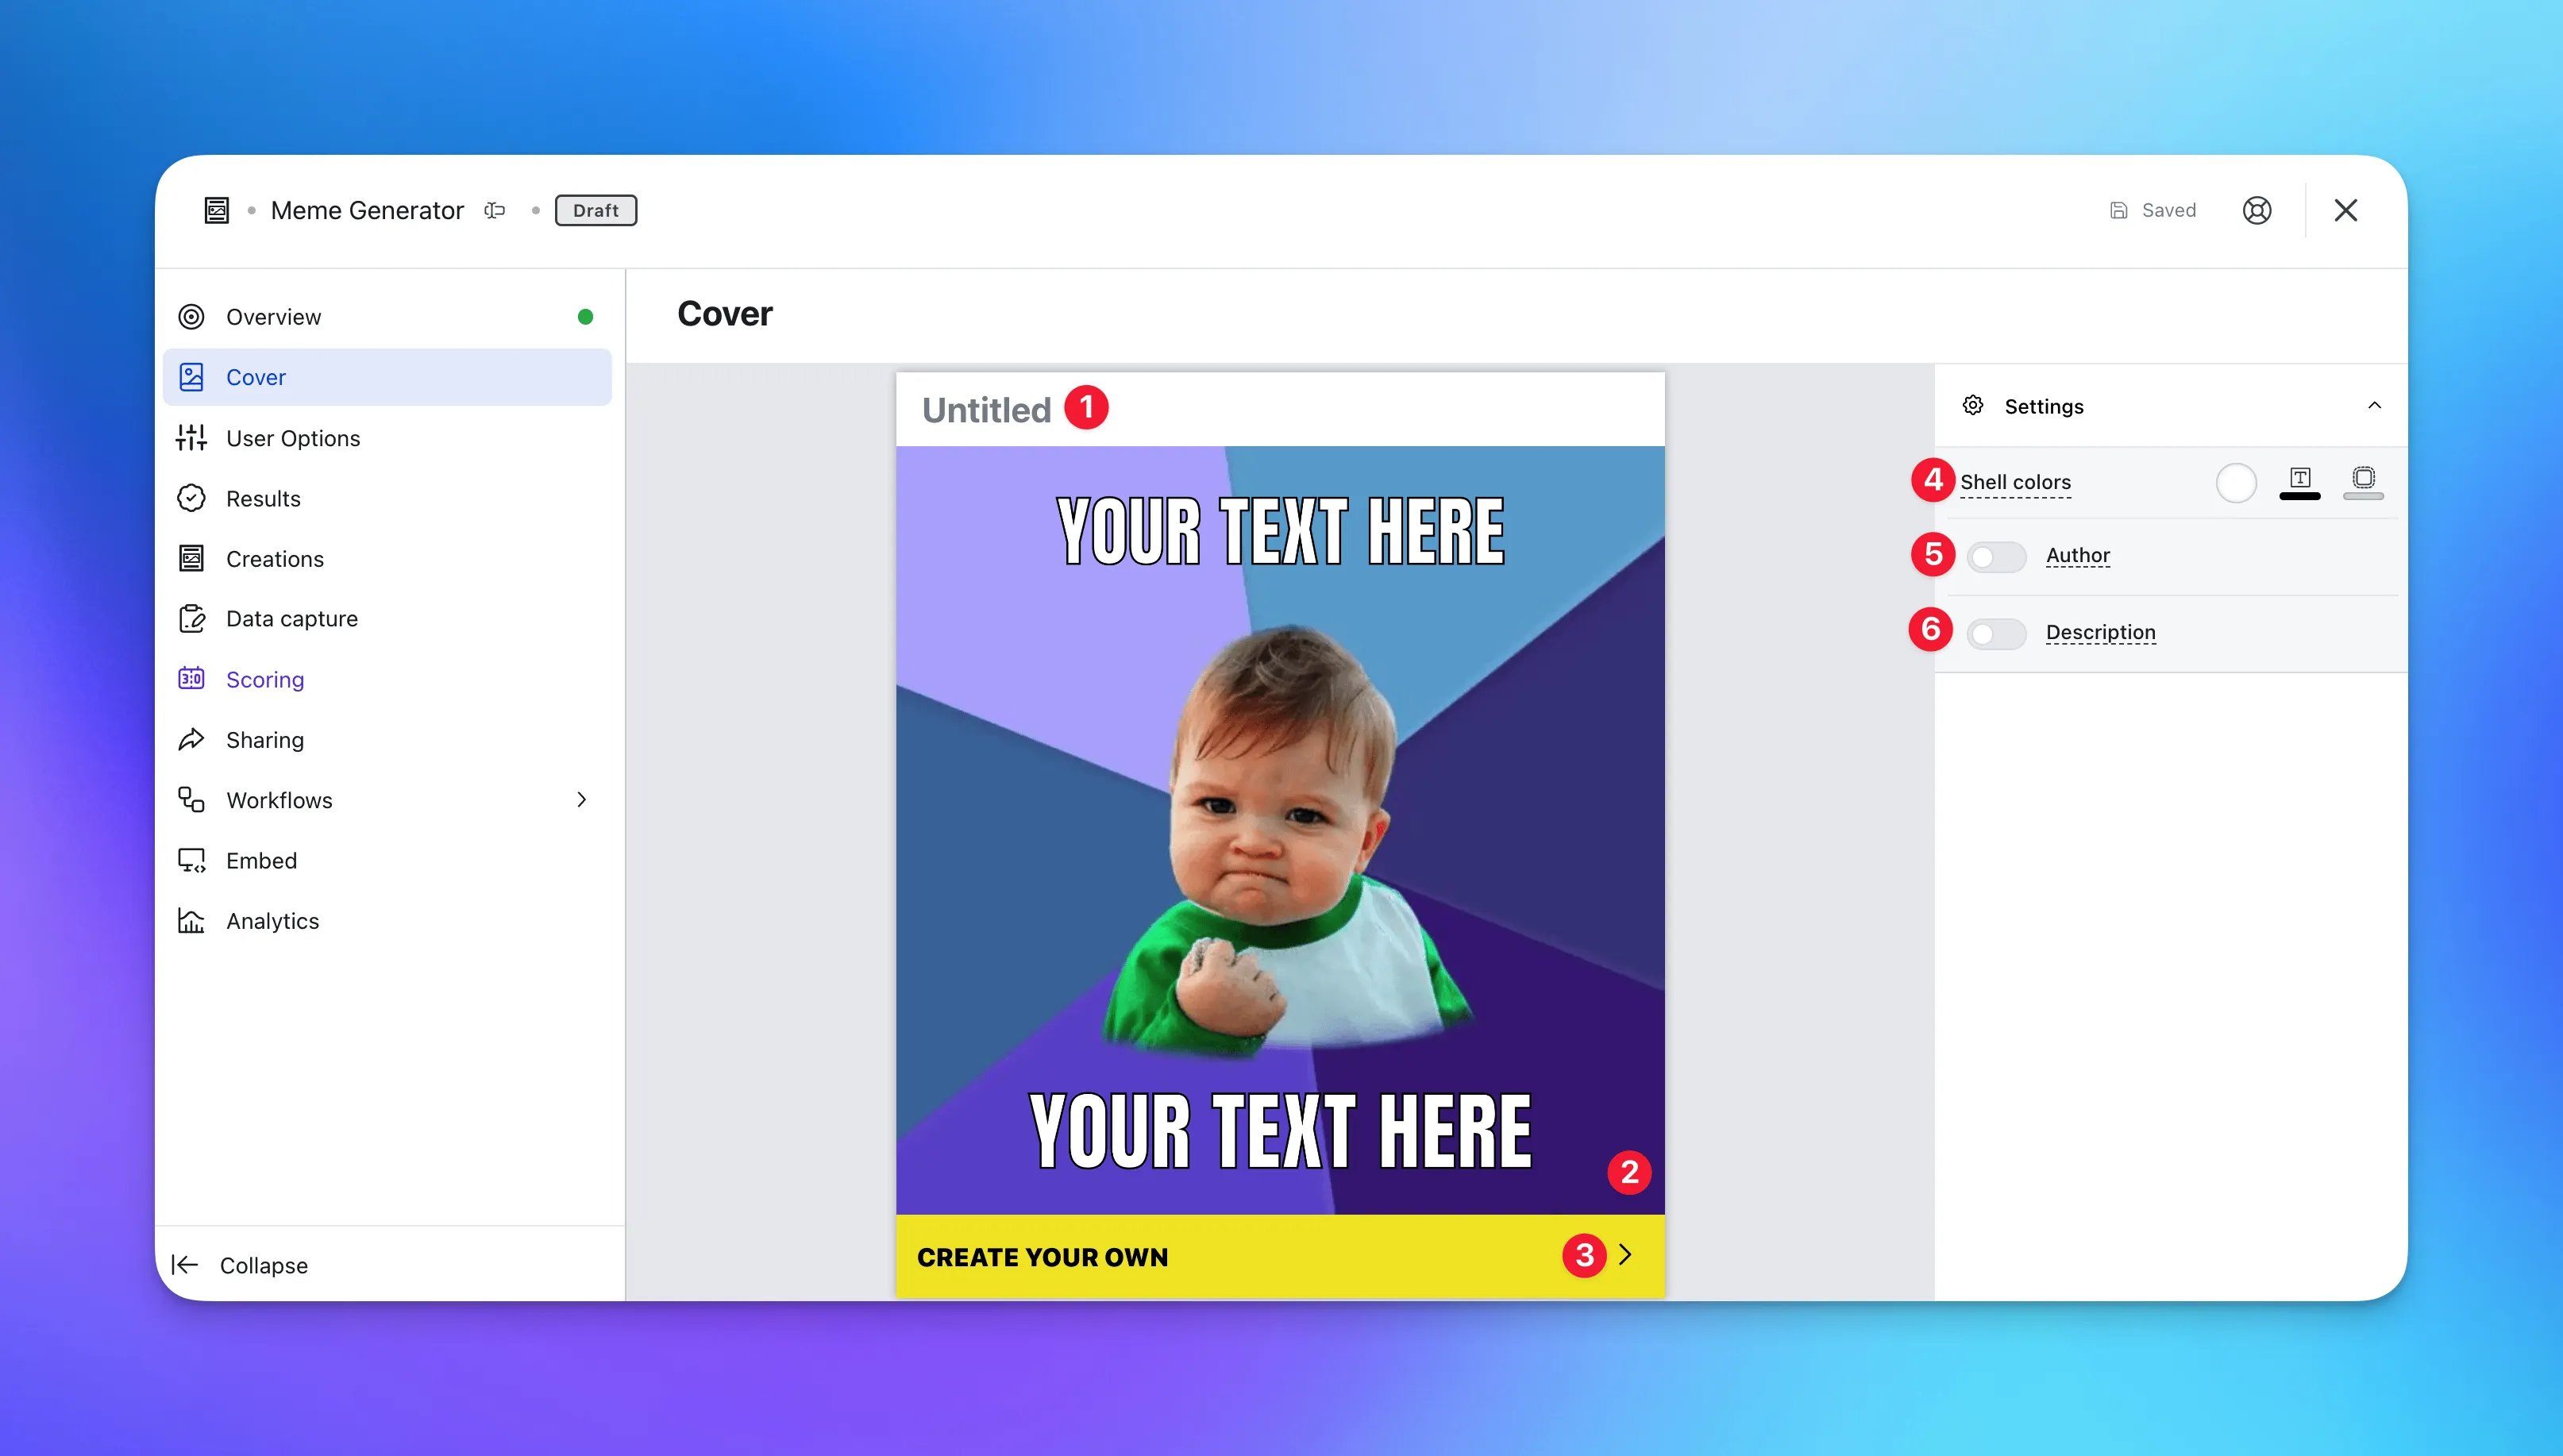 Click the **Meme Generator** card to open the editor. In this step you create the default meme template, which also acts as the cover image for the card.
* **(1)** Set the card **title**.
* **(2)** Configure your **Meme Canvas**.
Click the **Meme Generator** card to open the editor. In this step you create the default meme template, which also acts as the cover image for the card.
* **(1)** Set the card **title**.
* **(2)** Configure your **Meme Canvas**.
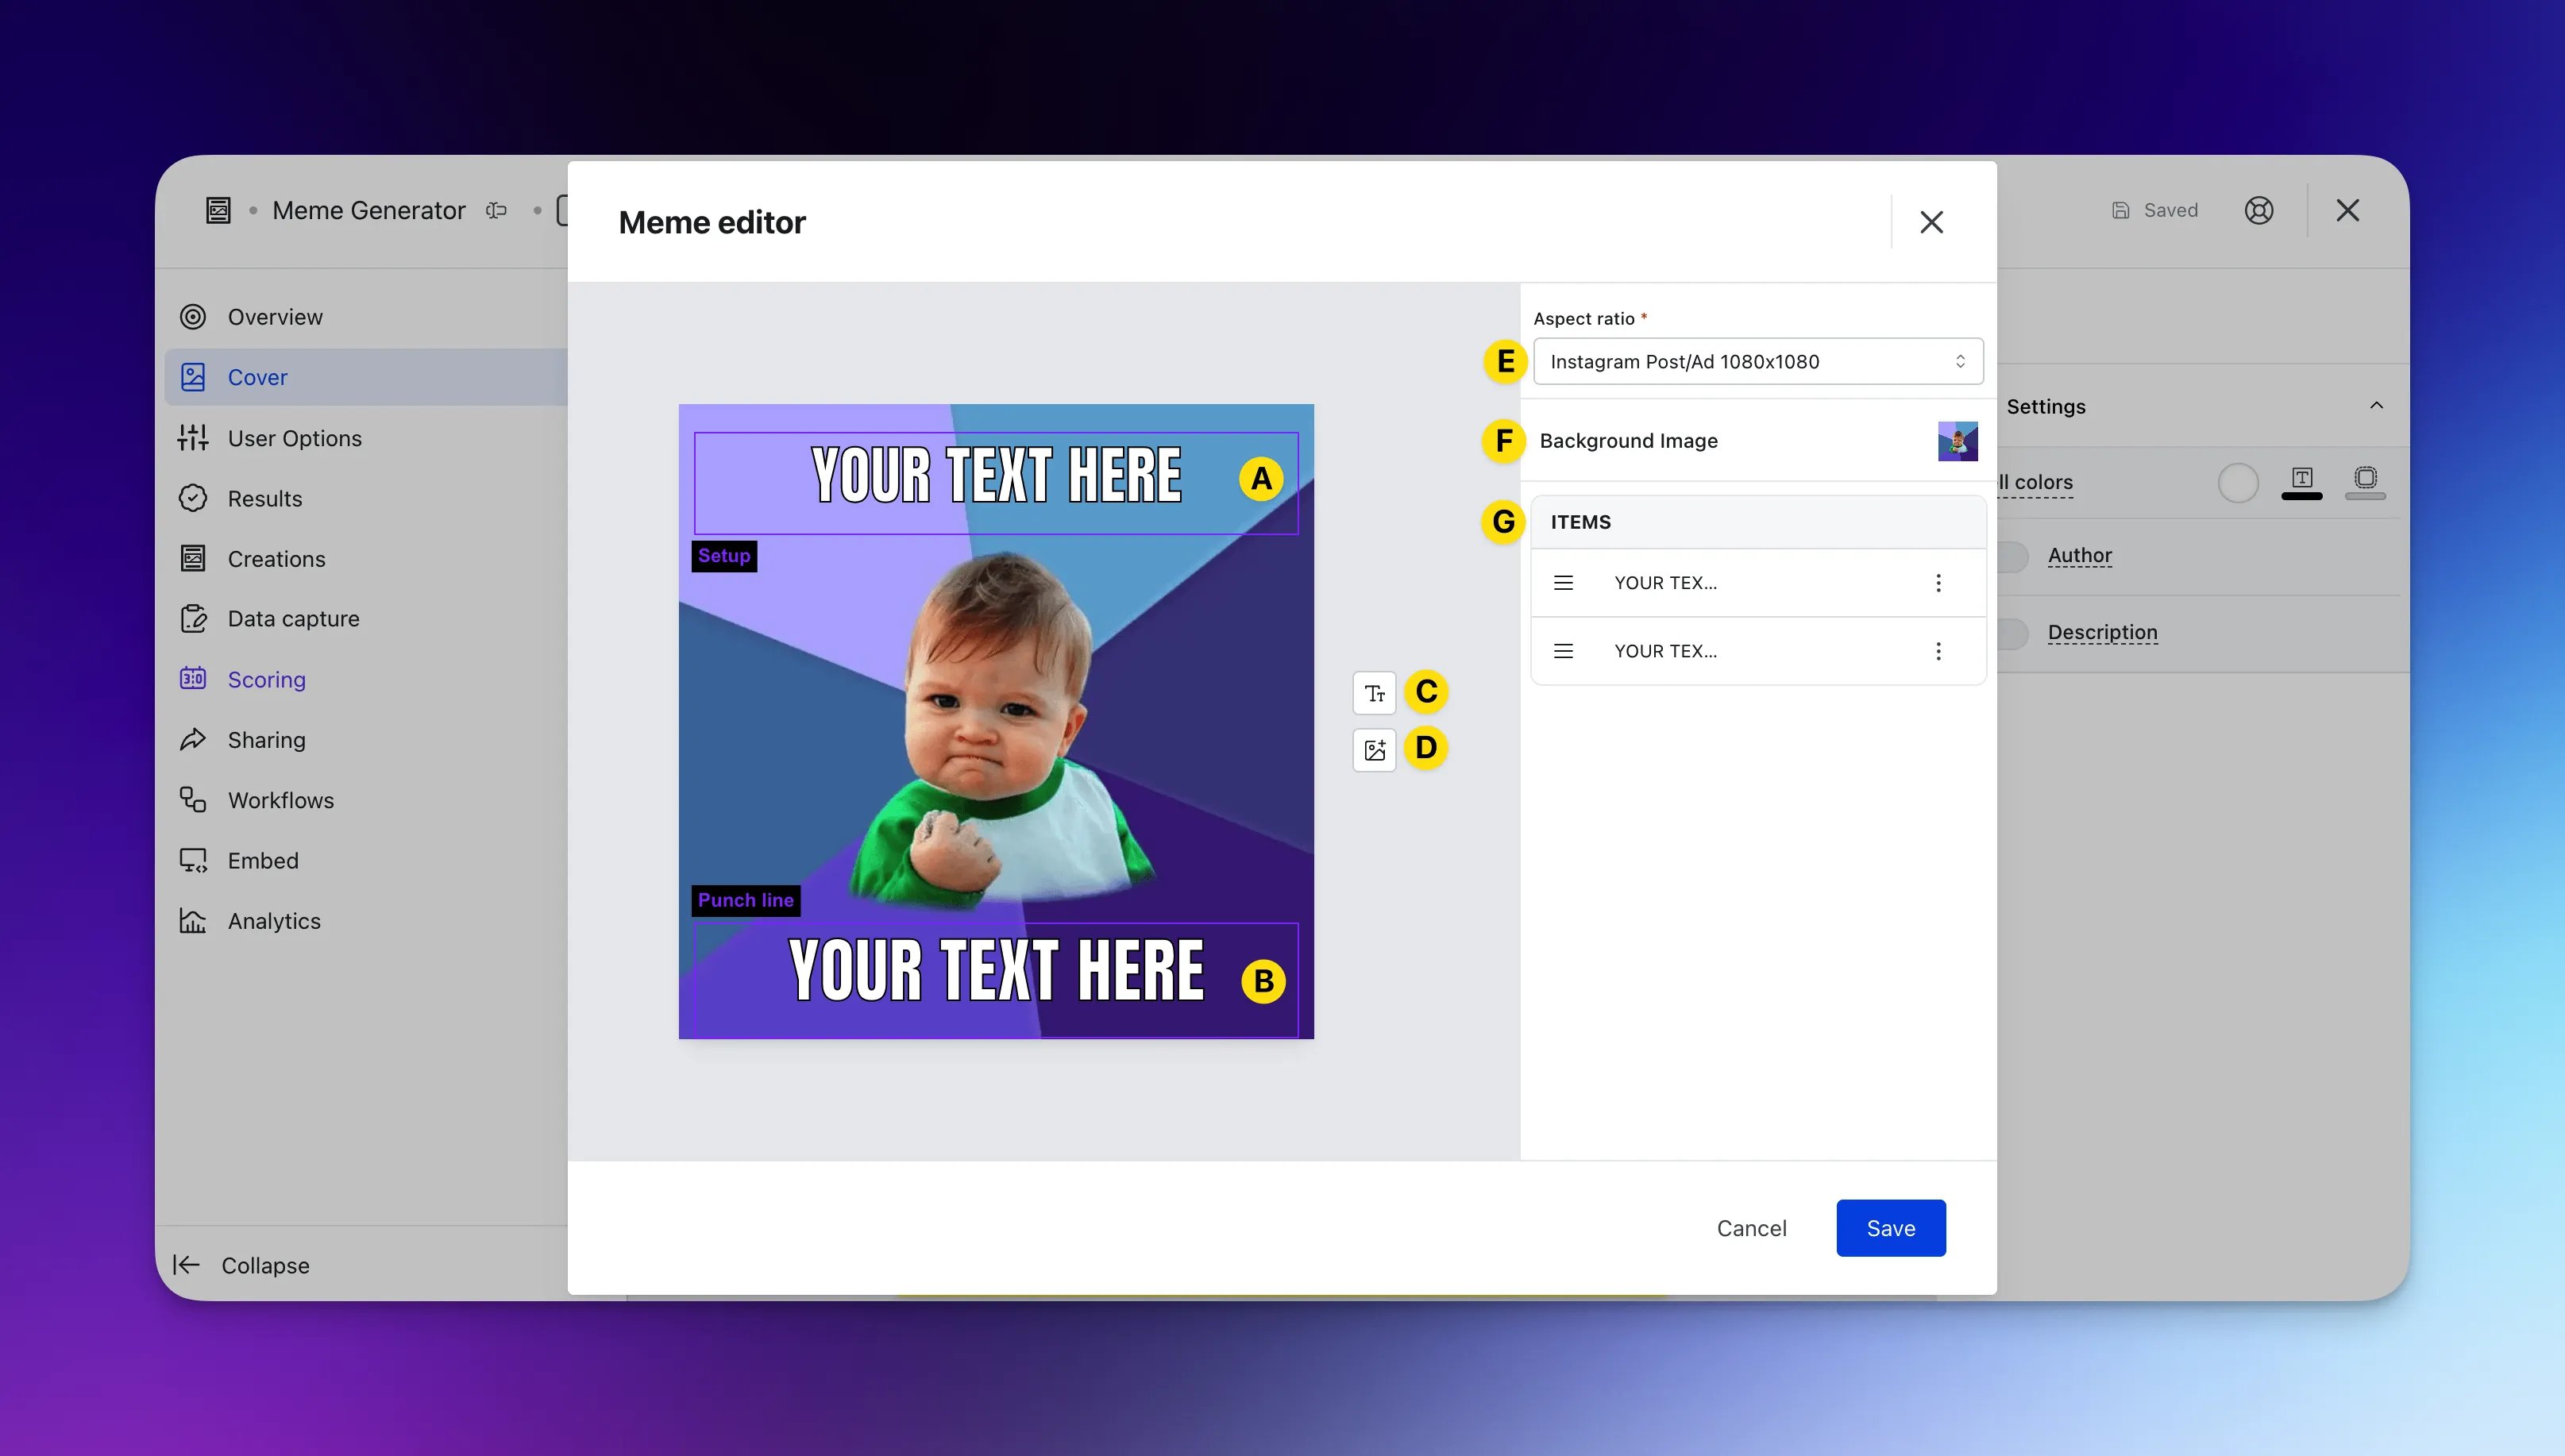 * **(A)+(B)** Click here to edit **text** on the canvas.
* **(a)** Select a text box and choose whether users can edit it (**Input**) or not (**Read-Only**).
* **(b)** Set the **label** for the text box.
* **(c)** Change the **font size**.
* **(d)** Change the **font type**.
* **(e)** Change the **text alignment**.
* **(f)** Scroll down to change the **text colour**.
* **(g)** Add a **text outline**.
* **(h)** **Clone** the text item.
* **(i)** **Delete** the text item.
* **(C)+(D)** Add **text** and **images** to your canvas.
* **(E)** Select the **aspect ratio** users will create memes in.
* **(F)** Set the **default background image** (also used as the card cover image).
* **(G)** **Rearrange** canvas items as you add content.
Text elements remain in place regardless of which background image is selected.
* **(3)** Edit the colour and copy of the **call-to-action bar**.
* **(4)** Set the **outer card shell colours** (description and share bar).
* **(5)** Add an **author** tag to show who created the card content.
* **(6)** Add a **description** for the card.
### Step 3: Set up your user options
* **(A)+(B)** Click here to edit **text** on the canvas.
* **(a)** Select a text box and choose whether users can edit it (**Input**) or not (**Read-Only**).
* **(b)** Set the **label** for the text box.
* **(c)** Change the **font size**.
* **(d)** Change the **font type**.
* **(e)** Change the **text alignment**.
* **(f)** Scroll down to change the **text colour**.
* **(g)** Add a **text outline**.
* **(h)** **Clone** the text item.
* **(i)** **Delete** the text item.
* **(C)+(D)** Add **text** and **images** to your canvas.
* **(E)** Select the **aspect ratio** users will create memes in.
* **(F)** Set the **default background image** (also used as the card cover image).
* **(G)** **Rearrange** canvas items as you add content.
Text elements remain in place regardless of which background image is selected.
* **(3)** Edit the colour and copy of the **call-to-action bar**.
* **(4)** Set the **outer card shell colours** (description and share bar).
* **(5)** Add an **author** tag to show who created the card content.
* **(6)** Add a **description** for the card.
### Step 3: Set up your user options
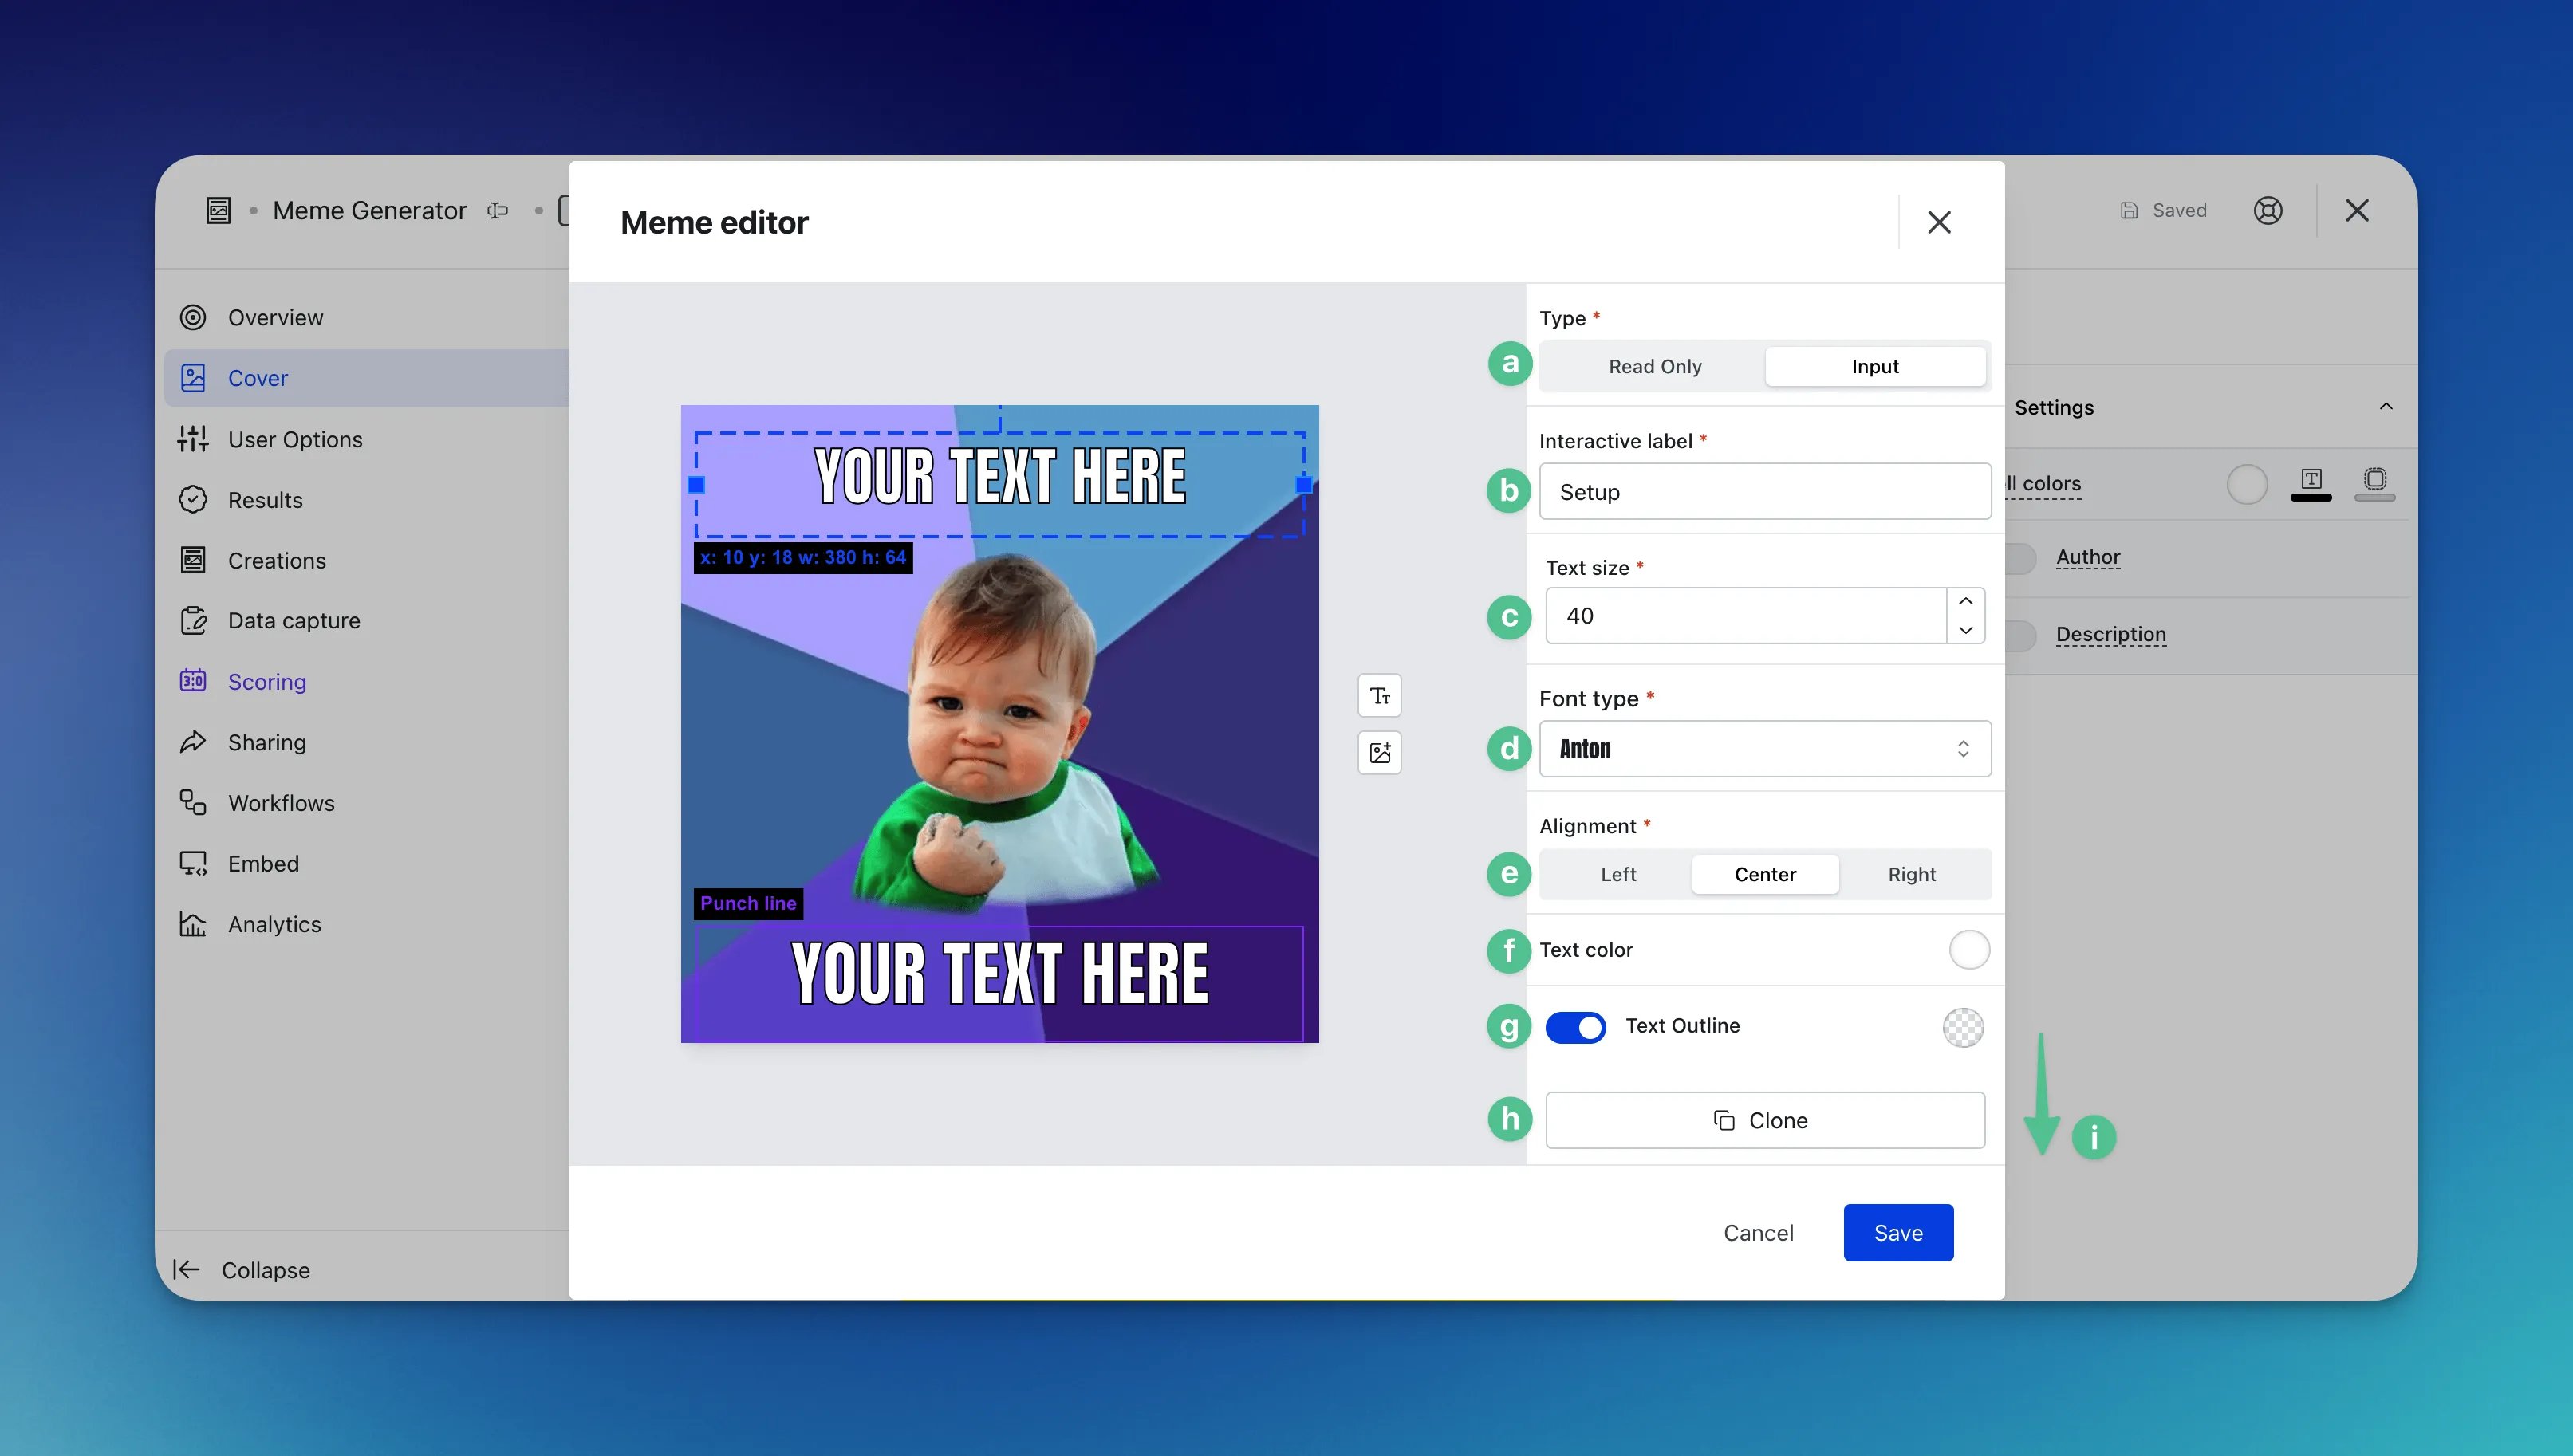 Open the **Gameplay** tab to configure what users can change when creating a meme.
* **(1)** Set the **title** shown during meme creation.
* **(2)** Enter a **description** for the meme experience.
* **(3)+(4)** Scroll down to **customise labels** for interactive elements.
* **(5)** Edit the colour and copy of the **submit button**.
* **(6)** Toggle on **additional background imagery** to let users choose from extra backgrounds.
Open the **Gameplay** tab to configure what users can change when creating a meme.
* **(1)** Set the **title** shown during meme creation.
* **(2)** Enter a **description** for the meme experience.
* **(3)+(4)** Scroll down to **customise labels** for interactive elements.
* **(5)** Edit the colour and copy of the **submit button**.
* **(6)** Toggle on **additional background imagery** to let users choose from extra backgrounds.
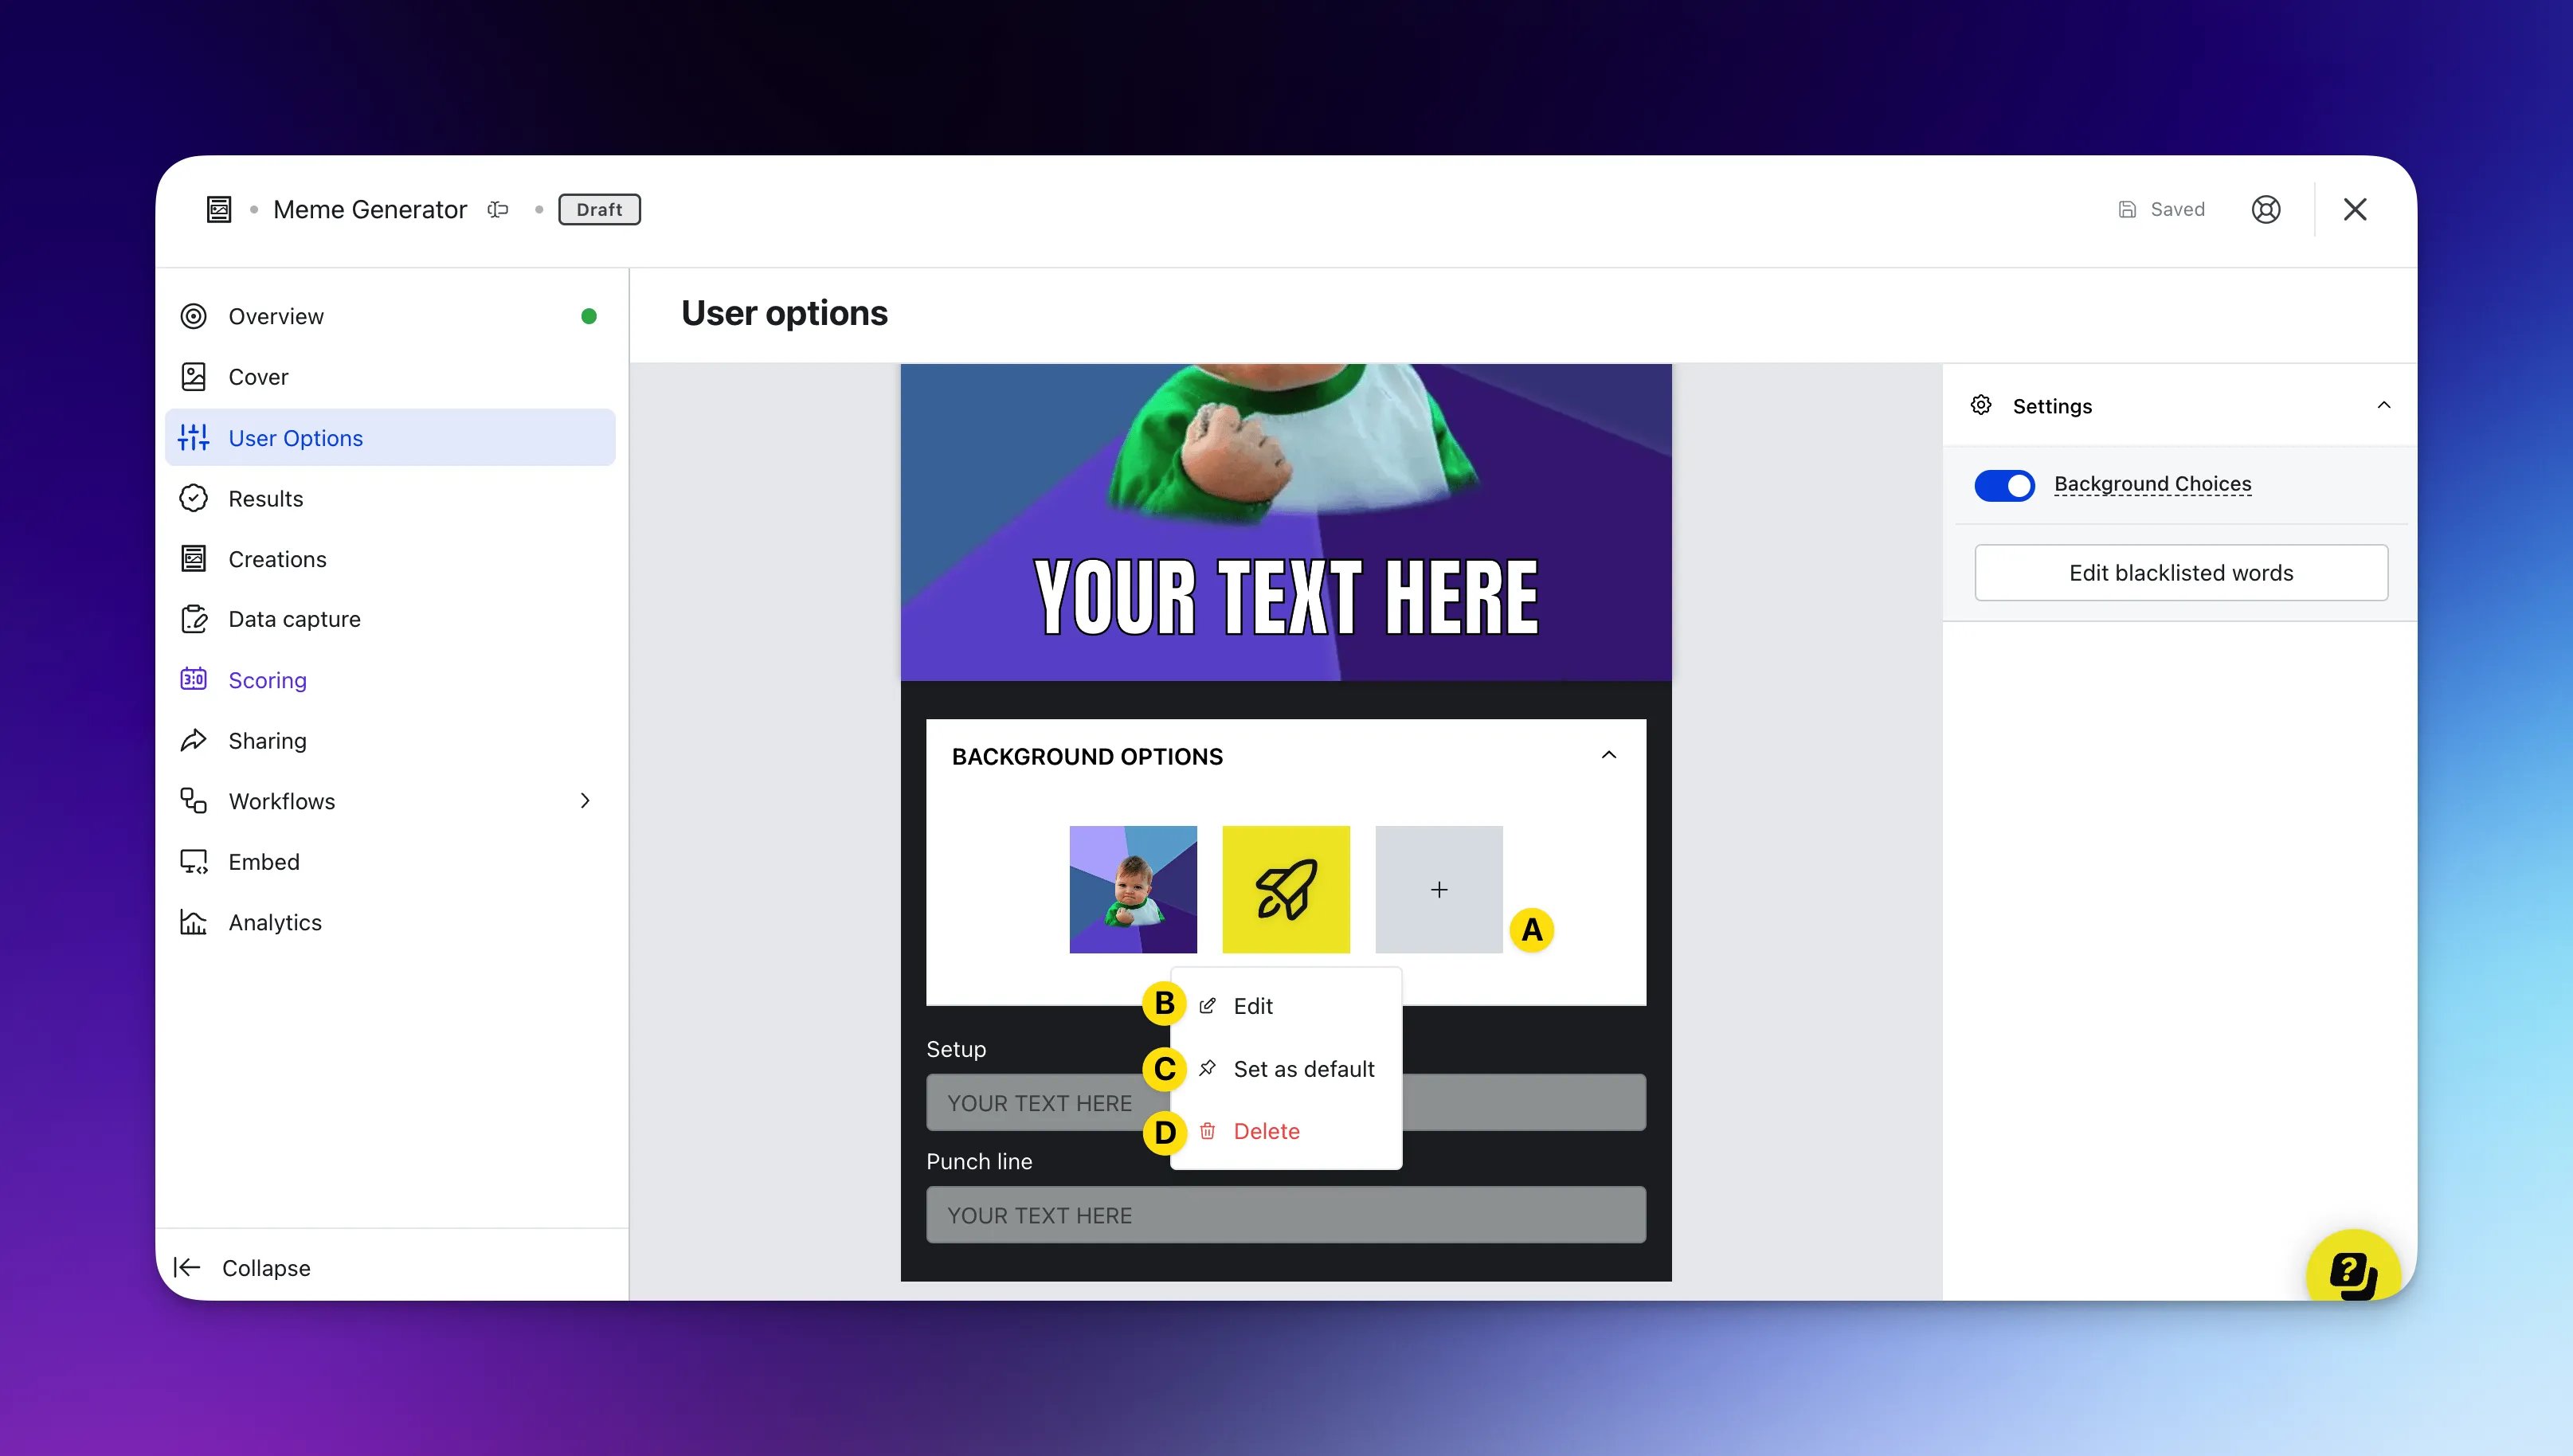 When enabled, a new section appears where you can manage background options:
* **(A)** Add image or colour **backgrounds** for users to choose from. Keep backgrounds similar in composition so text placement stays readable.
* **(B)** Select an image to **edit** it.
* **(C)** Mark an upload as the **default background**.
* **(D)** **Delete** a background option.
* **(7)** Optionally add **banned words** to block inappropriate user input.
Blacklisted words are replaced with `***` when users submit text.
* **(8)** View all **memes created** on this card, along with associated user details, under **Meme Creations**.
### Step 4: Set up your result screen
Configure the screen shown after a user creates a meme.
* **(1)** Edit the colour and copy of the **share button**, or use **(4)** to turn it off.
* **(2)** Edit the colour and copy of the **download button**, or use **(5)** to turn it off.
* **(3)** Edit the colour and copy of the **make another button**, or use **(6)** to turn it off.
### Step 5: Set up your Data Capture *(Optional)*
Adding **Data Capture** requires users to enter their details before they can download their creation.
### Step 6: Publish your card
Once you are happy with your card, publish it to make it available on your **Engagement Hub**.
1. **Publish** the card manually, or **Schedule** publish and unpublish dates and times.
2. Click **...** and select **Preview** to test the user journey before going live. See [card testing](/getting-started/hub-setup/card-testing) for more detail.
3. Add the card to a page and confirm it is **Visible** if you want it shown on your Hub.
If **Data Capture** is attached, competition entries are recorded and count toward card analytics.
## "Go live" checklist
Ready to go live with your **Meme Generator**? Review the following before launch:
* All uploaded images use the **correct dimensions**. Export image files at 2x resolution to avoid pixelation.
* You have added an example **setup and punchline** on the card, with those text fields set to **Input** so users can edit the copy.
* You have uploaded a list of **banned words** if users can enter custom text.
If you are running a competition with **Data Capture** attached:
* All **communications** (Registration, Winner/s, Everybody Else) are set up and ready to send.
* You have linked your [**T\&Cs**](/getting-started/resources/terms-conditions) to the opt-in field in **Data Capture**.
* **Prizes** and awarding rules are configured correctly.
* If you are using **Digital Coupons**, confirm coupon limits, screen copy, and communication links are correct.
Then you are ready to go live.
## Promotion
## FAQ
**How many background options can I upload?** You can add as many background options as you need.
**When a meme is created, where is it stored?** Open the **Meme Creations** tab on the card to review, download, and view user details for each submission.
**Is there a way to see the number of creations made?** Open the card **Settings** tab and select **Analytics** for card stats. You can also check the total at the bottom of the **Meme Creations** tab.
**Can users take photos or selfies in the Meme Generator?** No. If you want users to take photos within a card, use the [Photo Frame](/interactive-features/features/photo-frame) card instead.
## Top tips
* Let users edit text where possible. Personalised memes drive stronger engagement than read-only templates.
* Test longer text inputs before launch and resize text boxes so copy remains readable.
* Run competitions with the **Meme Generator** card—feature winning memes on social channels, or display finalists in a [Carousel](/interactive-features/features/carousel-card) or [Vote](/interactive-features/features/vote-card) card to extend engagement.
* Place text boxes near the edges of the canvas so user-uploaded backgrounds stay visible.
* Choose an **aspect ratio** that matches where users are most likely to share their memes (for example, square for Instagram or landscape for Facebook).
When enabled, a new section appears where you can manage background options:
* **(A)** Add image or colour **backgrounds** for users to choose from. Keep backgrounds similar in composition so text placement stays readable.
* **(B)** Select an image to **edit** it.
* **(C)** Mark an upload as the **default background**.
* **(D)** **Delete** a background option.
* **(7)** Optionally add **banned words** to block inappropriate user input.
Blacklisted words are replaced with `***` when users submit text.
* **(8)** View all **memes created** on this card, along with associated user details, under **Meme Creations**.
### Step 4: Set up your result screen
Configure the screen shown after a user creates a meme.
* **(1)** Edit the colour and copy of the **share button**, or use **(4)** to turn it off.
* **(2)** Edit the colour and copy of the **download button**, or use **(5)** to turn it off.
* **(3)** Edit the colour and copy of the **make another button**, or use **(6)** to turn it off.
### Step 5: Set up your Data Capture *(Optional)*
Adding **Data Capture** requires users to enter their details before they can download their creation.
### Step 6: Publish your card
Once you are happy with your card, publish it to make it available on your **Engagement Hub**.
1. **Publish** the card manually, or **Schedule** publish and unpublish dates and times.
2. Click **...** and select **Preview** to test the user journey before going live. See [card testing](/getting-started/hub-setup/card-testing) for more detail.
3. Add the card to a page and confirm it is **Visible** if you want it shown on your Hub.
If **Data Capture** is attached, competition entries are recorded and count toward card analytics.
## "Go live" checklist
Ready to go live with your **Meme Generator**? Review the following before launch:
* All uploaded images use the **correct dimensions**. Export image files at 2x resolution to avoid pixelation.
* You have added an example **setup and punchline** on the card, with those text fields set to **Input** so users can edit the copy.
* You have uploaded a list of **banned words** if users can enter custom text.
If you are running a competition with **Data Capture** attached:
* All **communications** (Registration, Winner/s, Everybody Else) are set up and ready to send.
* You have linked your [**T\&Cs**](/getting-started/resources/terms-conditions) to the opt-in field in **Data Capture**.
* **Prizes** and awarding rules are configured correctly.
* If you are using **Digital Coupons**, confirm coupon limits, screen copy, and communication links are correct.
Then you are ready to go live.
## Promotion
## FAQ
**How many background options can I upload?** You can add as many background options as you need.
**When a meme is created, where is it stored?** Open the **Meme Creations** tab on the card to review, download, and view user details for each submission.
**Is there a way to see the number of creations made?** Open the card **Settings** tab and select **Analytics** for card stats. You can also check the total at the bottom of the **Meme Creations** tab.
**Can users take photos or selfies in the Meme Generator?** No. If you want users to take photos within a card, use the [Photo Frame](/interactive-features/features/photo-frame) card instead.
## Top tips
* Let users edit text where possible. Personalised memes drive stronger engagement than read-only templates.
* Test longer text inputs before launch and resize text boxes so copy remains readable.
* Run competitions with the **Meme Generator** card—feature winning memes on social channels, or display finalists in a [Carousel](/interactive-features/features/carousel-card) or [Vote](/interactive-features/features/vote-card) card to extend engagement.
* Place text boxes near the edges of the canvas so user-uploaded backgrounds stay visible.
* Choose an **aspect ratio** that matches where users are most likely to share their memes (for example, square for Instagram or landscape for Facebook).