> ## Documentation Index
> Fetch the complete documentation index at: https://knowledge.komo.tech/llms.txt
> Use this file to discover all available pages before exploring further.
# Multi-page Hubs
> Effortlessly build and deploy multiple content pages within a single Hub using Multi-page Hubs.
## What is it?
Whether you need navigable pages for FAQs and T\&Cs, or independent campaign and sub-brand sites, Multi-page Hubs empowers you to scale Hubs to suit your specific requirements, with the ability to fully customize each page as needed.
## How do I build one?
### Step 1: Create your Hub
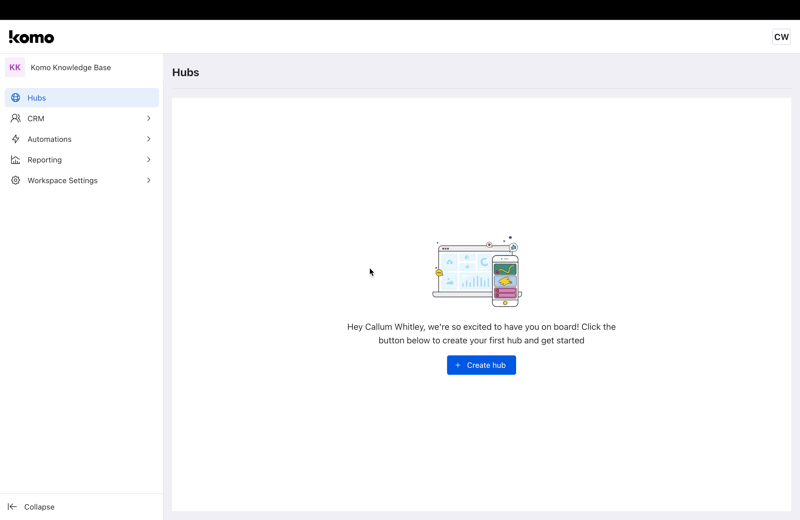 * Navigate to **Hubs**.
* Once there, click **+ Create hub**.
* Input an **Internal name** for the hub and click **Create**.
* You will then see that your new hub has been created.
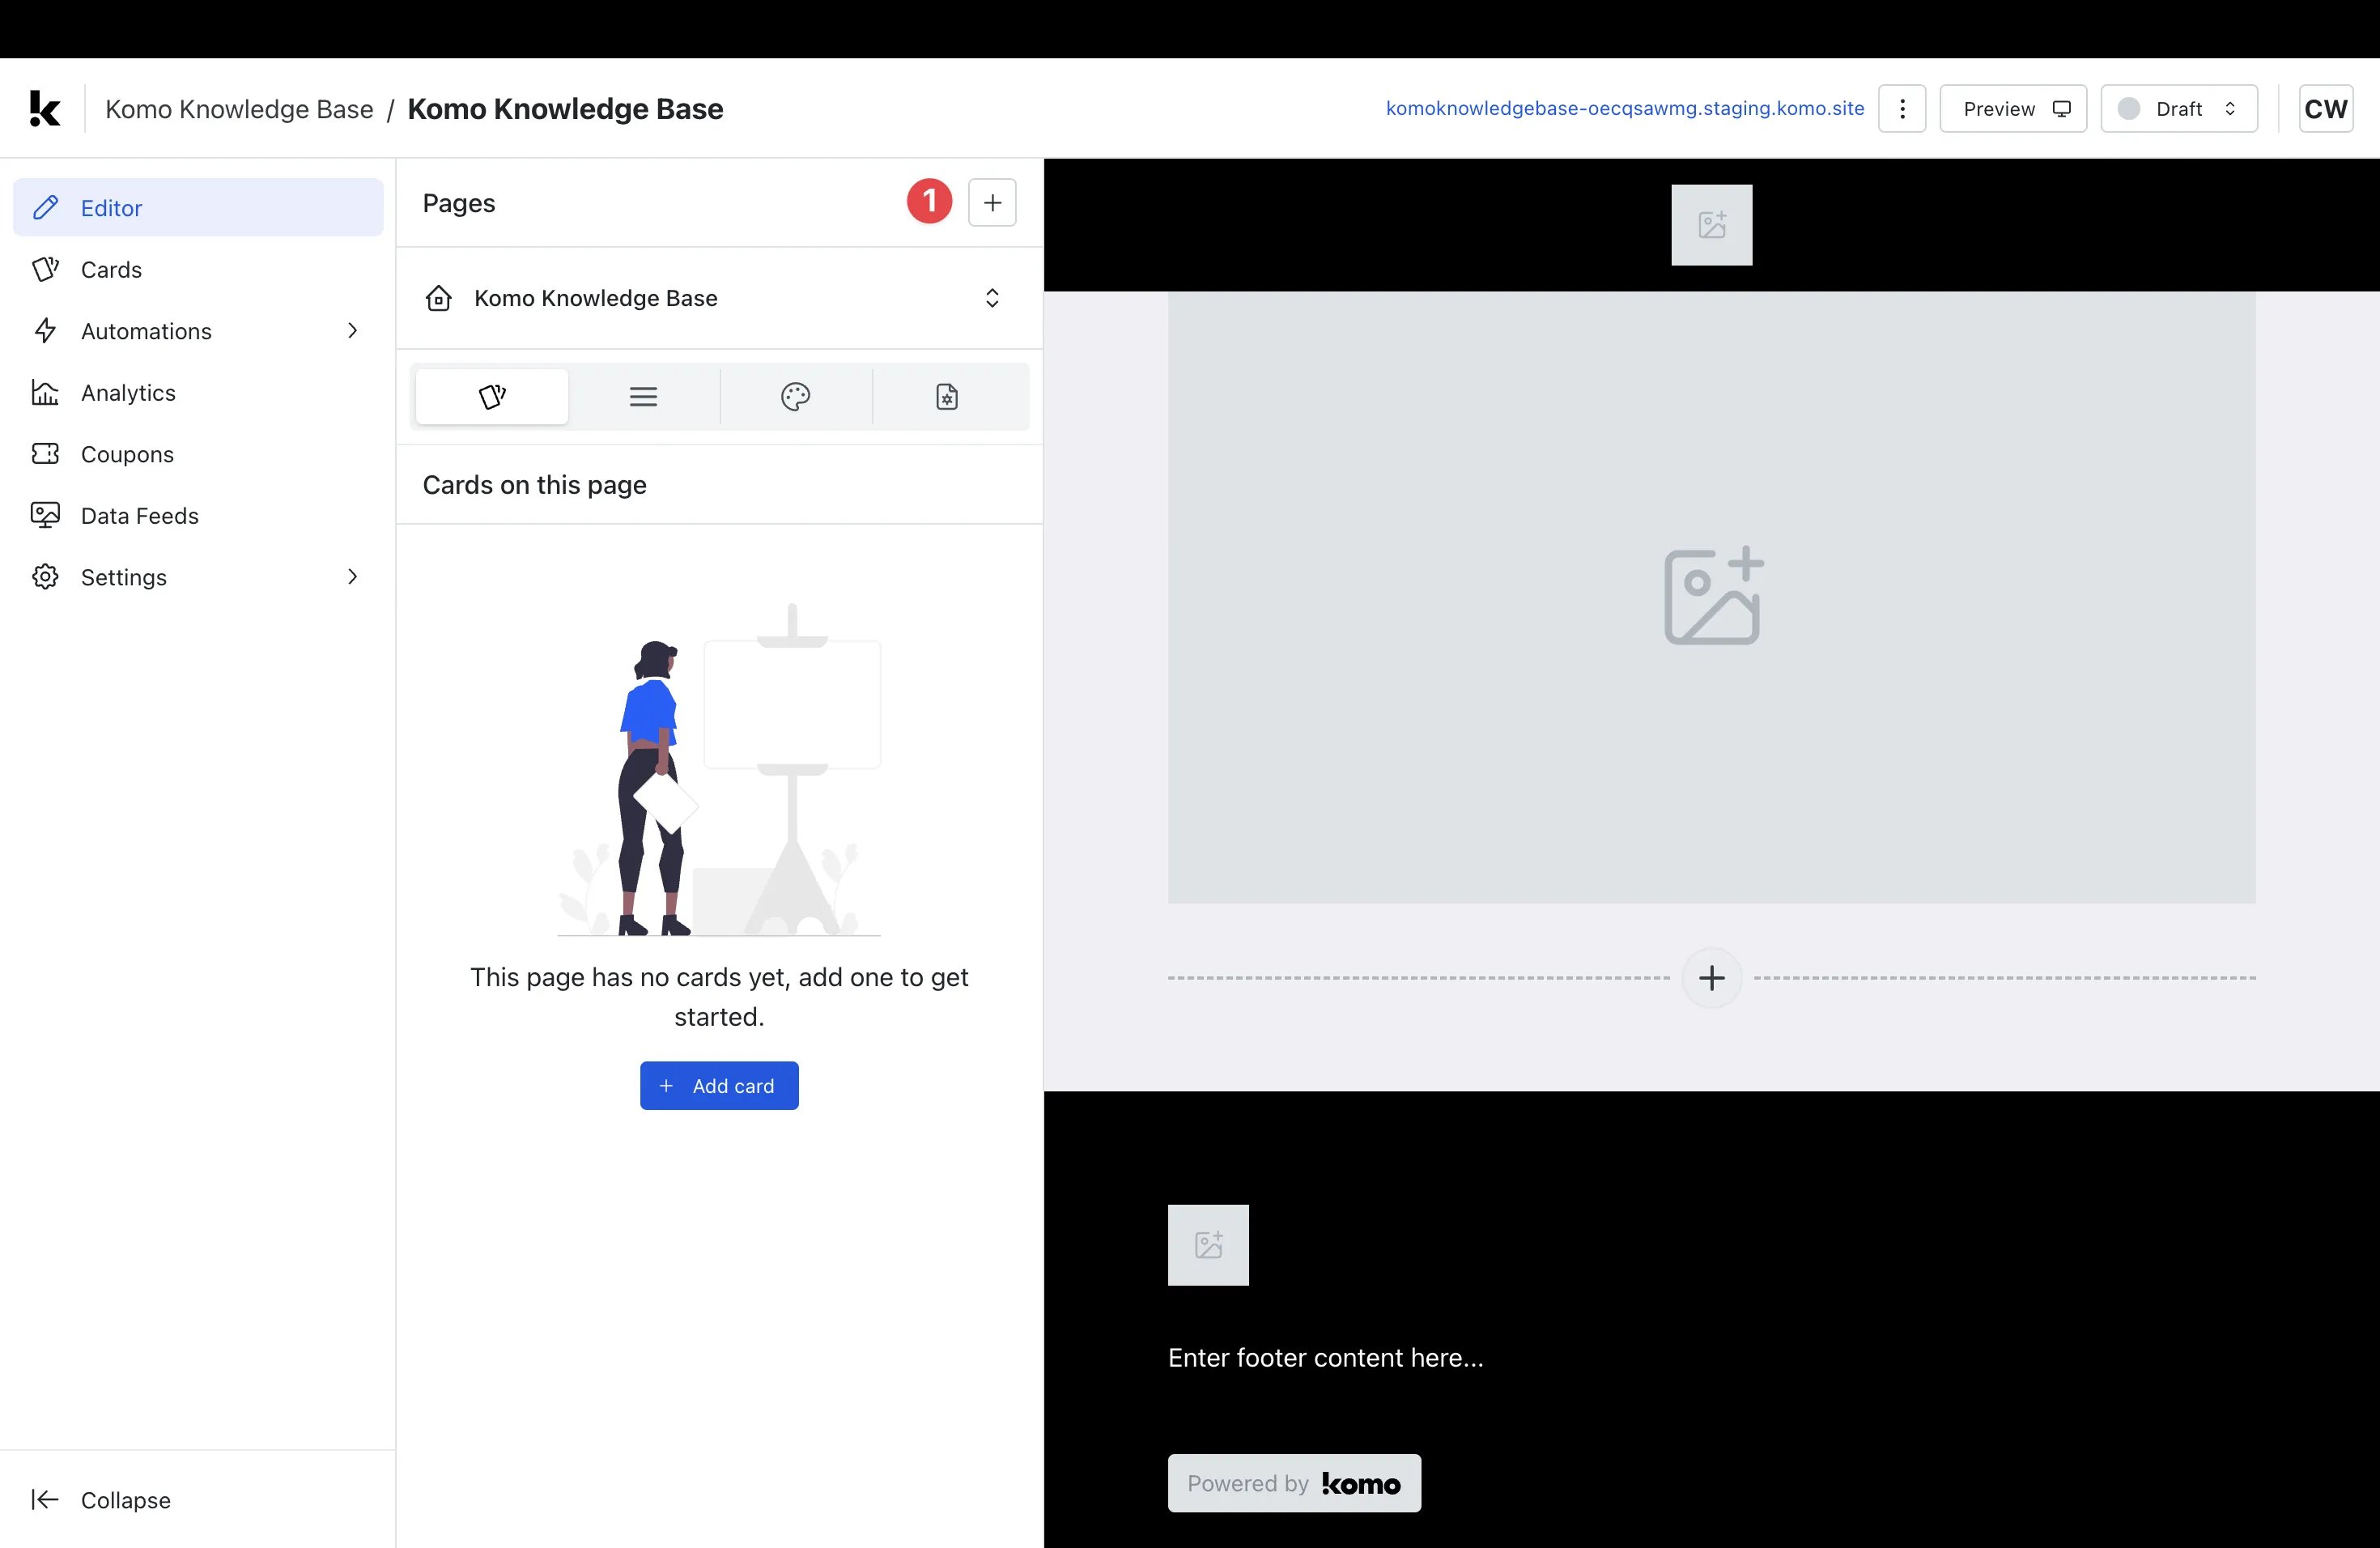
### Step 2: Add additional pages
* Navigate to **Hubs**.
* Once there, click **+ Create hub**.
* Input an **Internal name** for the hub and click **Create**.
* You will then see that your new hub has been created.
### Step 2: Add additional pages
 * **(1)** Click **+ (Create page)**.
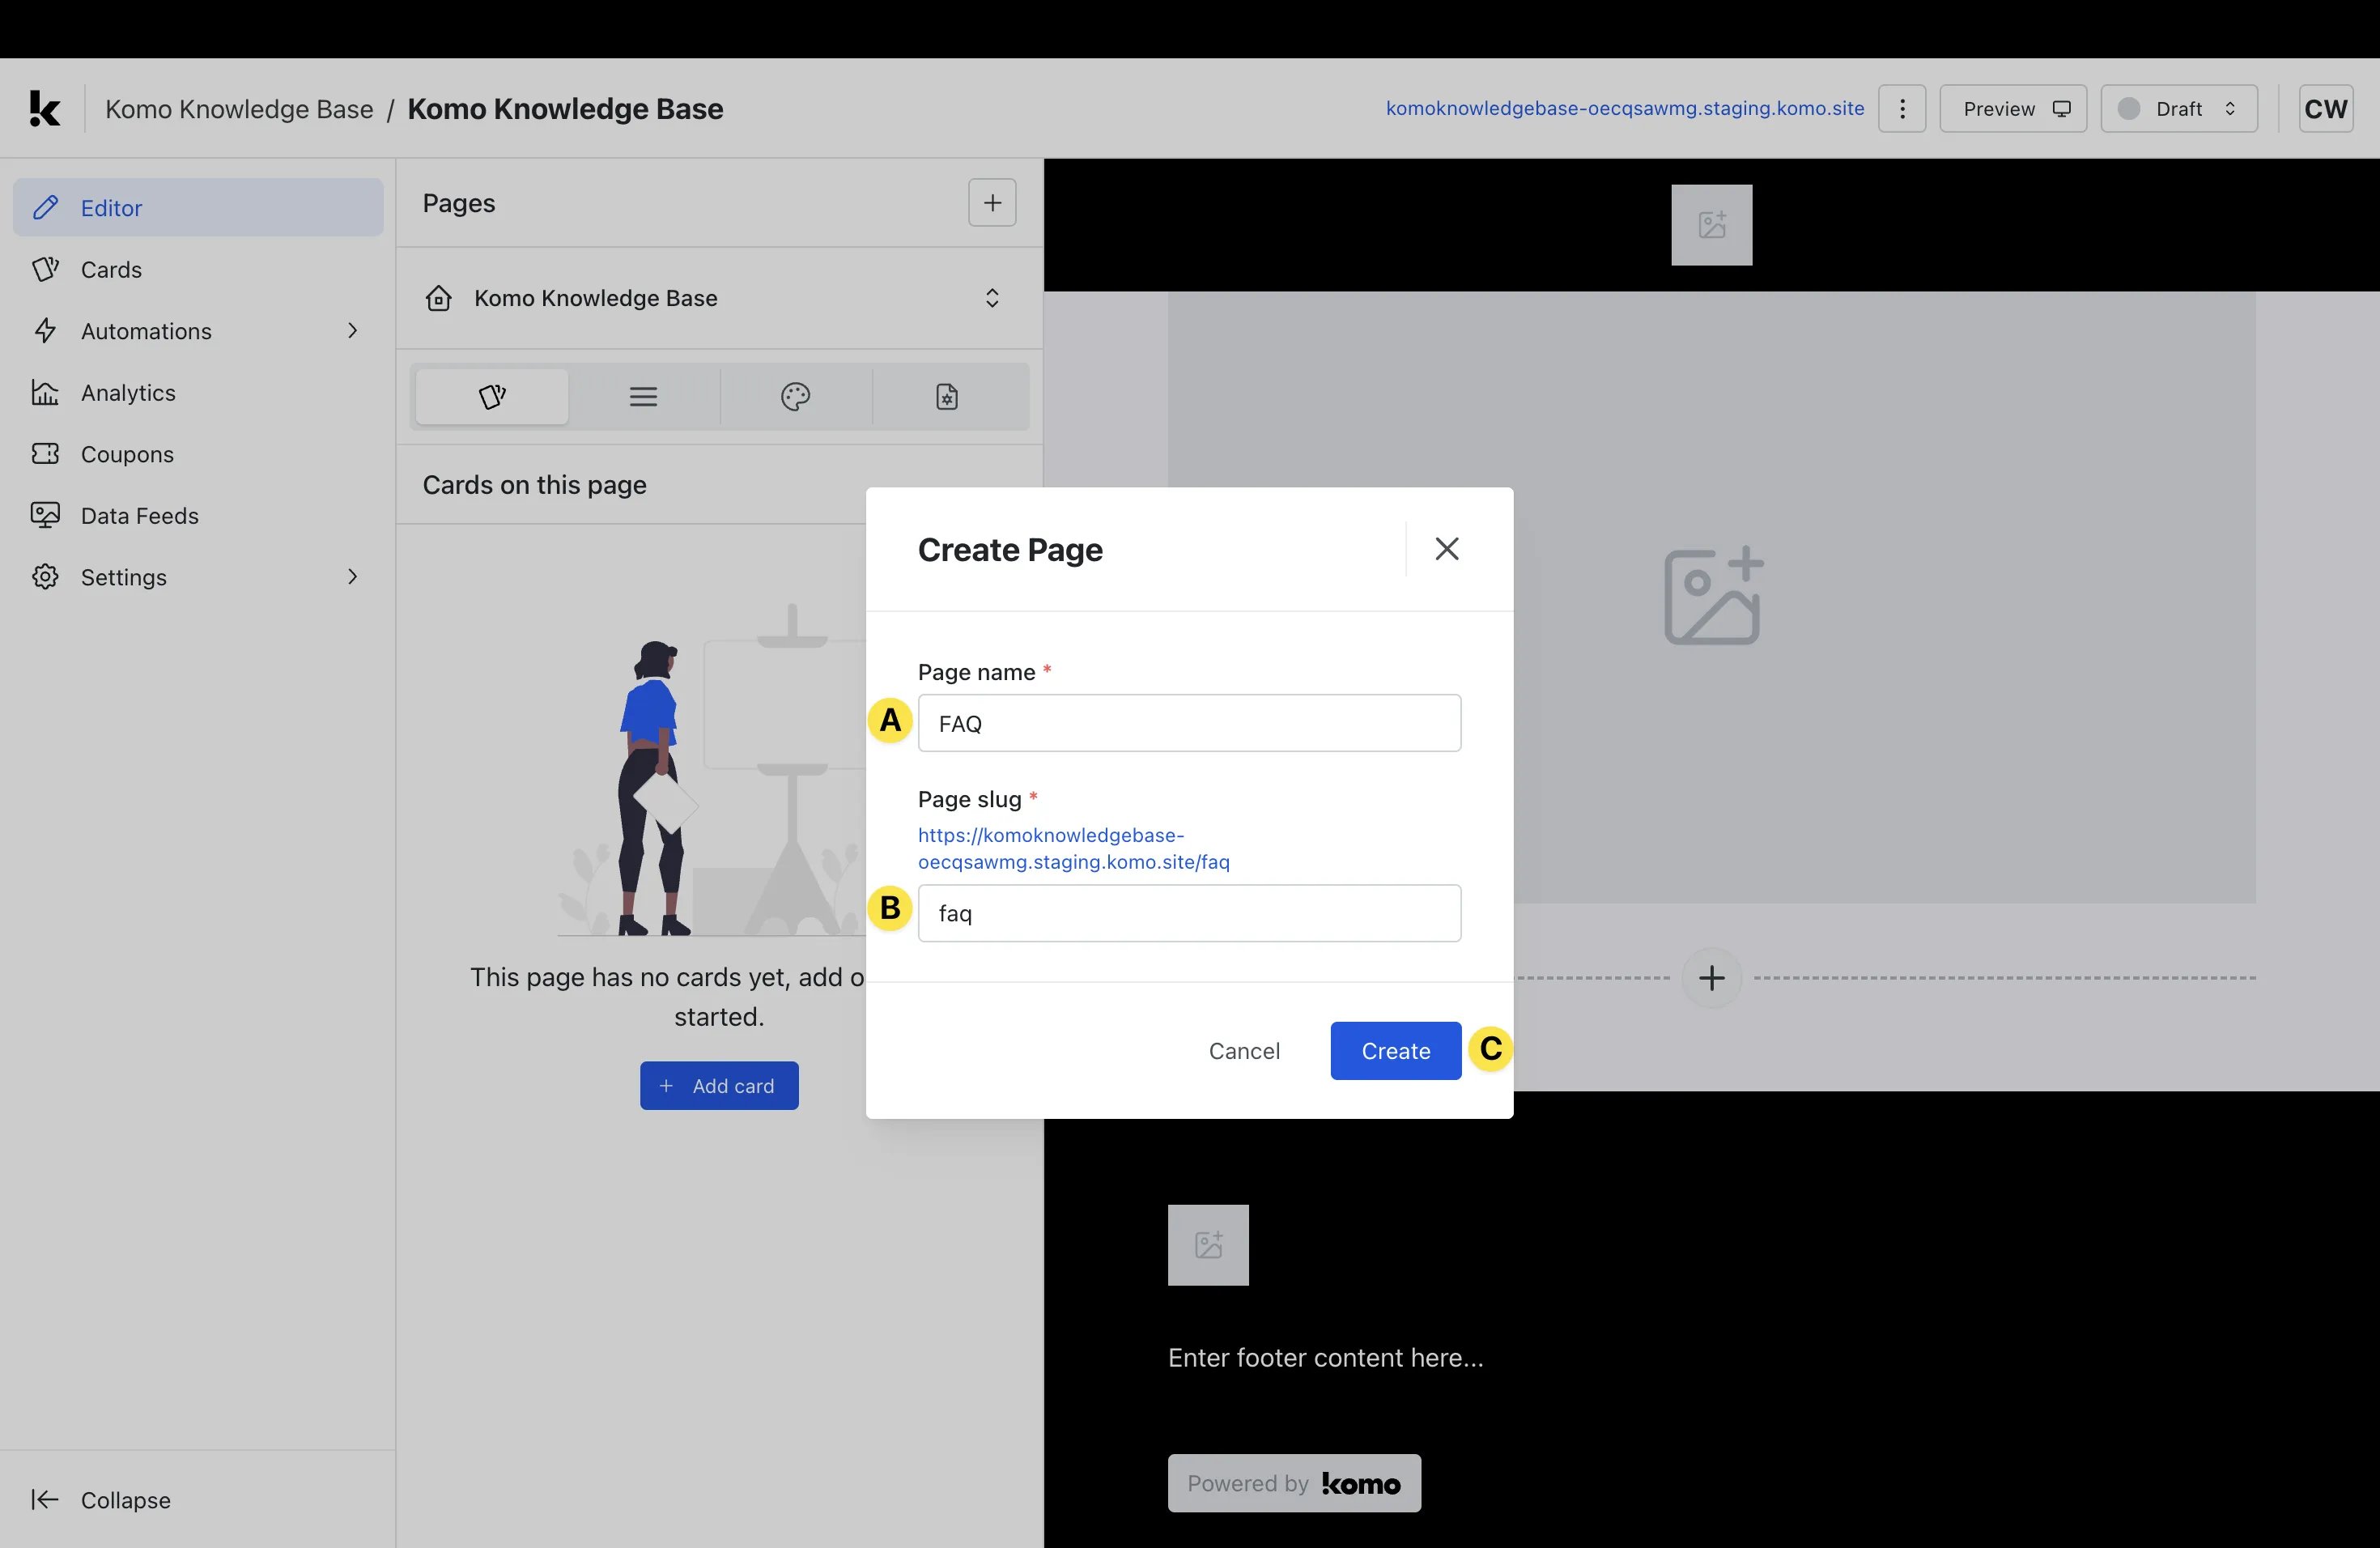 * **(A)** Give your page an appropriate **Page name**.
* **(B)** Give your page an appropriate **Page slug**.
* **(C)** Click **Create**.
* You will then see that your additional page has been created.
**Notes:** Please remember that your **Page name** and **Page slug** will be publicly visible, so be sure to use a suitable name.
### Step 3: Edit page settings
* **(A)** Give your page an appropriate **Page name**.
* **(B)** Give your page an appropriate **Page slug**.
* **(C)** Click **Create**.
* You will then see that your additional page has been created.
**Notes:** Please remember that your **Page name** and **Page slug** will be publicly visible, so be sure to use a suitable name.
### Step 3: Edit page settings
 * Navigate to the **Page settings** tab.
* **(1)** This is where you can edit your **Page Name** if desired.
* **(2)** This is where you can edit your **Page slug** if desired.
* **(3)** This allows you to set the page you are currently editing as the **Homepage** if desired.
* Navigate to the **Page settings** tab.
* **(1)** This is where you can edit your **Page Name** if desired.
* **(2)** This is where you can edit your **Page slug** if desired.
* **(3)** This allows you to set the page you are currently editing as the **Homepage** if desired.
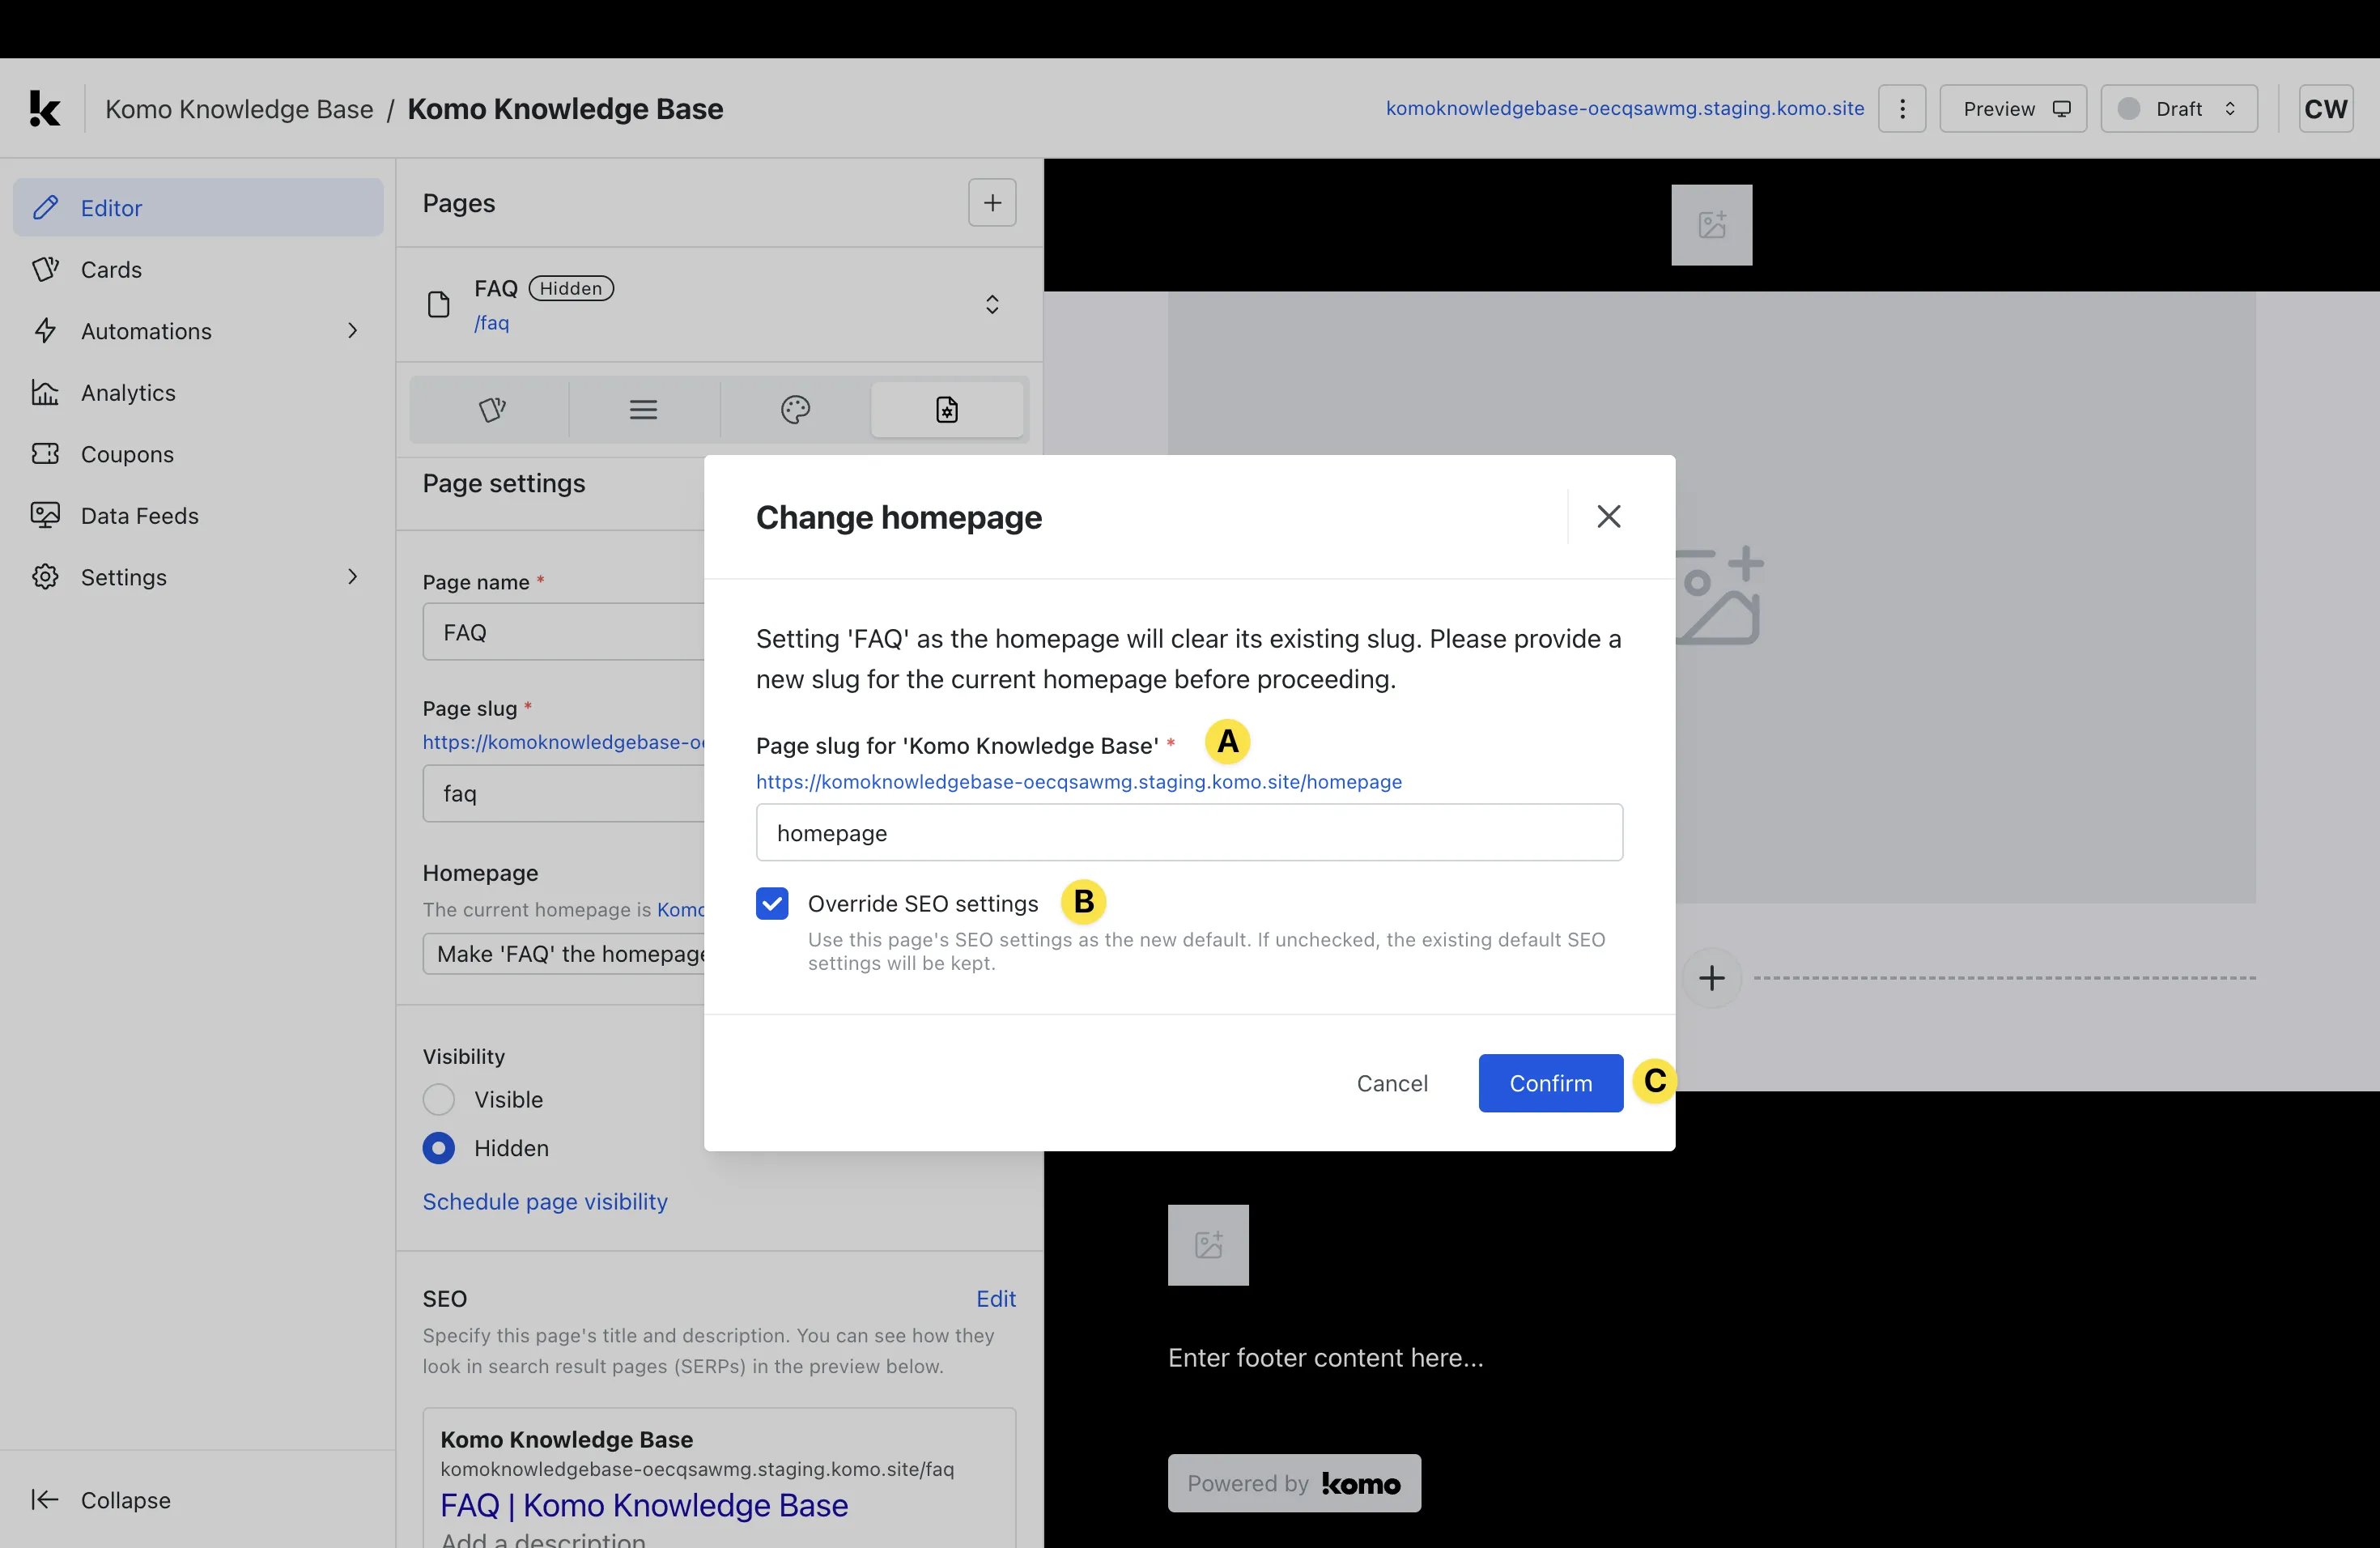 * **(A)** This is where you can set a new **Page slug** for the new homepage.
* **(B)** Select this box if you would like to use this page's SEO settings as the default SEO settings across all pages.
* **(C)** Click **Confirm** to implement the homepage change.
**Notes:** You should only undertake these steps if you are looking to change which page displays as the homepage.
* **(4)** Here you can select whether your page is **Visible** (accessible by URL) or **Hidden** (only with password).
* **(5)** Here you can preview the SEO settings for that specific page. Click **Edit** to change these.
* **(A)** This is where you can set a new **Page slug** for the new homepage.
* **(B)** Select this box if you would like to use this page's SEO settings as the default SEO settings across all pages.
* **(C)** Click **Confirm** to implement the homepage change.
**Notes:** You should only undertake these steps if you are looking to change which page displays as the homepage.
* **(4)** Here you can select whether your page is **Visible** (accessible by URL) or **Hidden** (only with password).
* **(5)** Here you can preview the SEO settings for that specific page. Click **Edit** to change these.
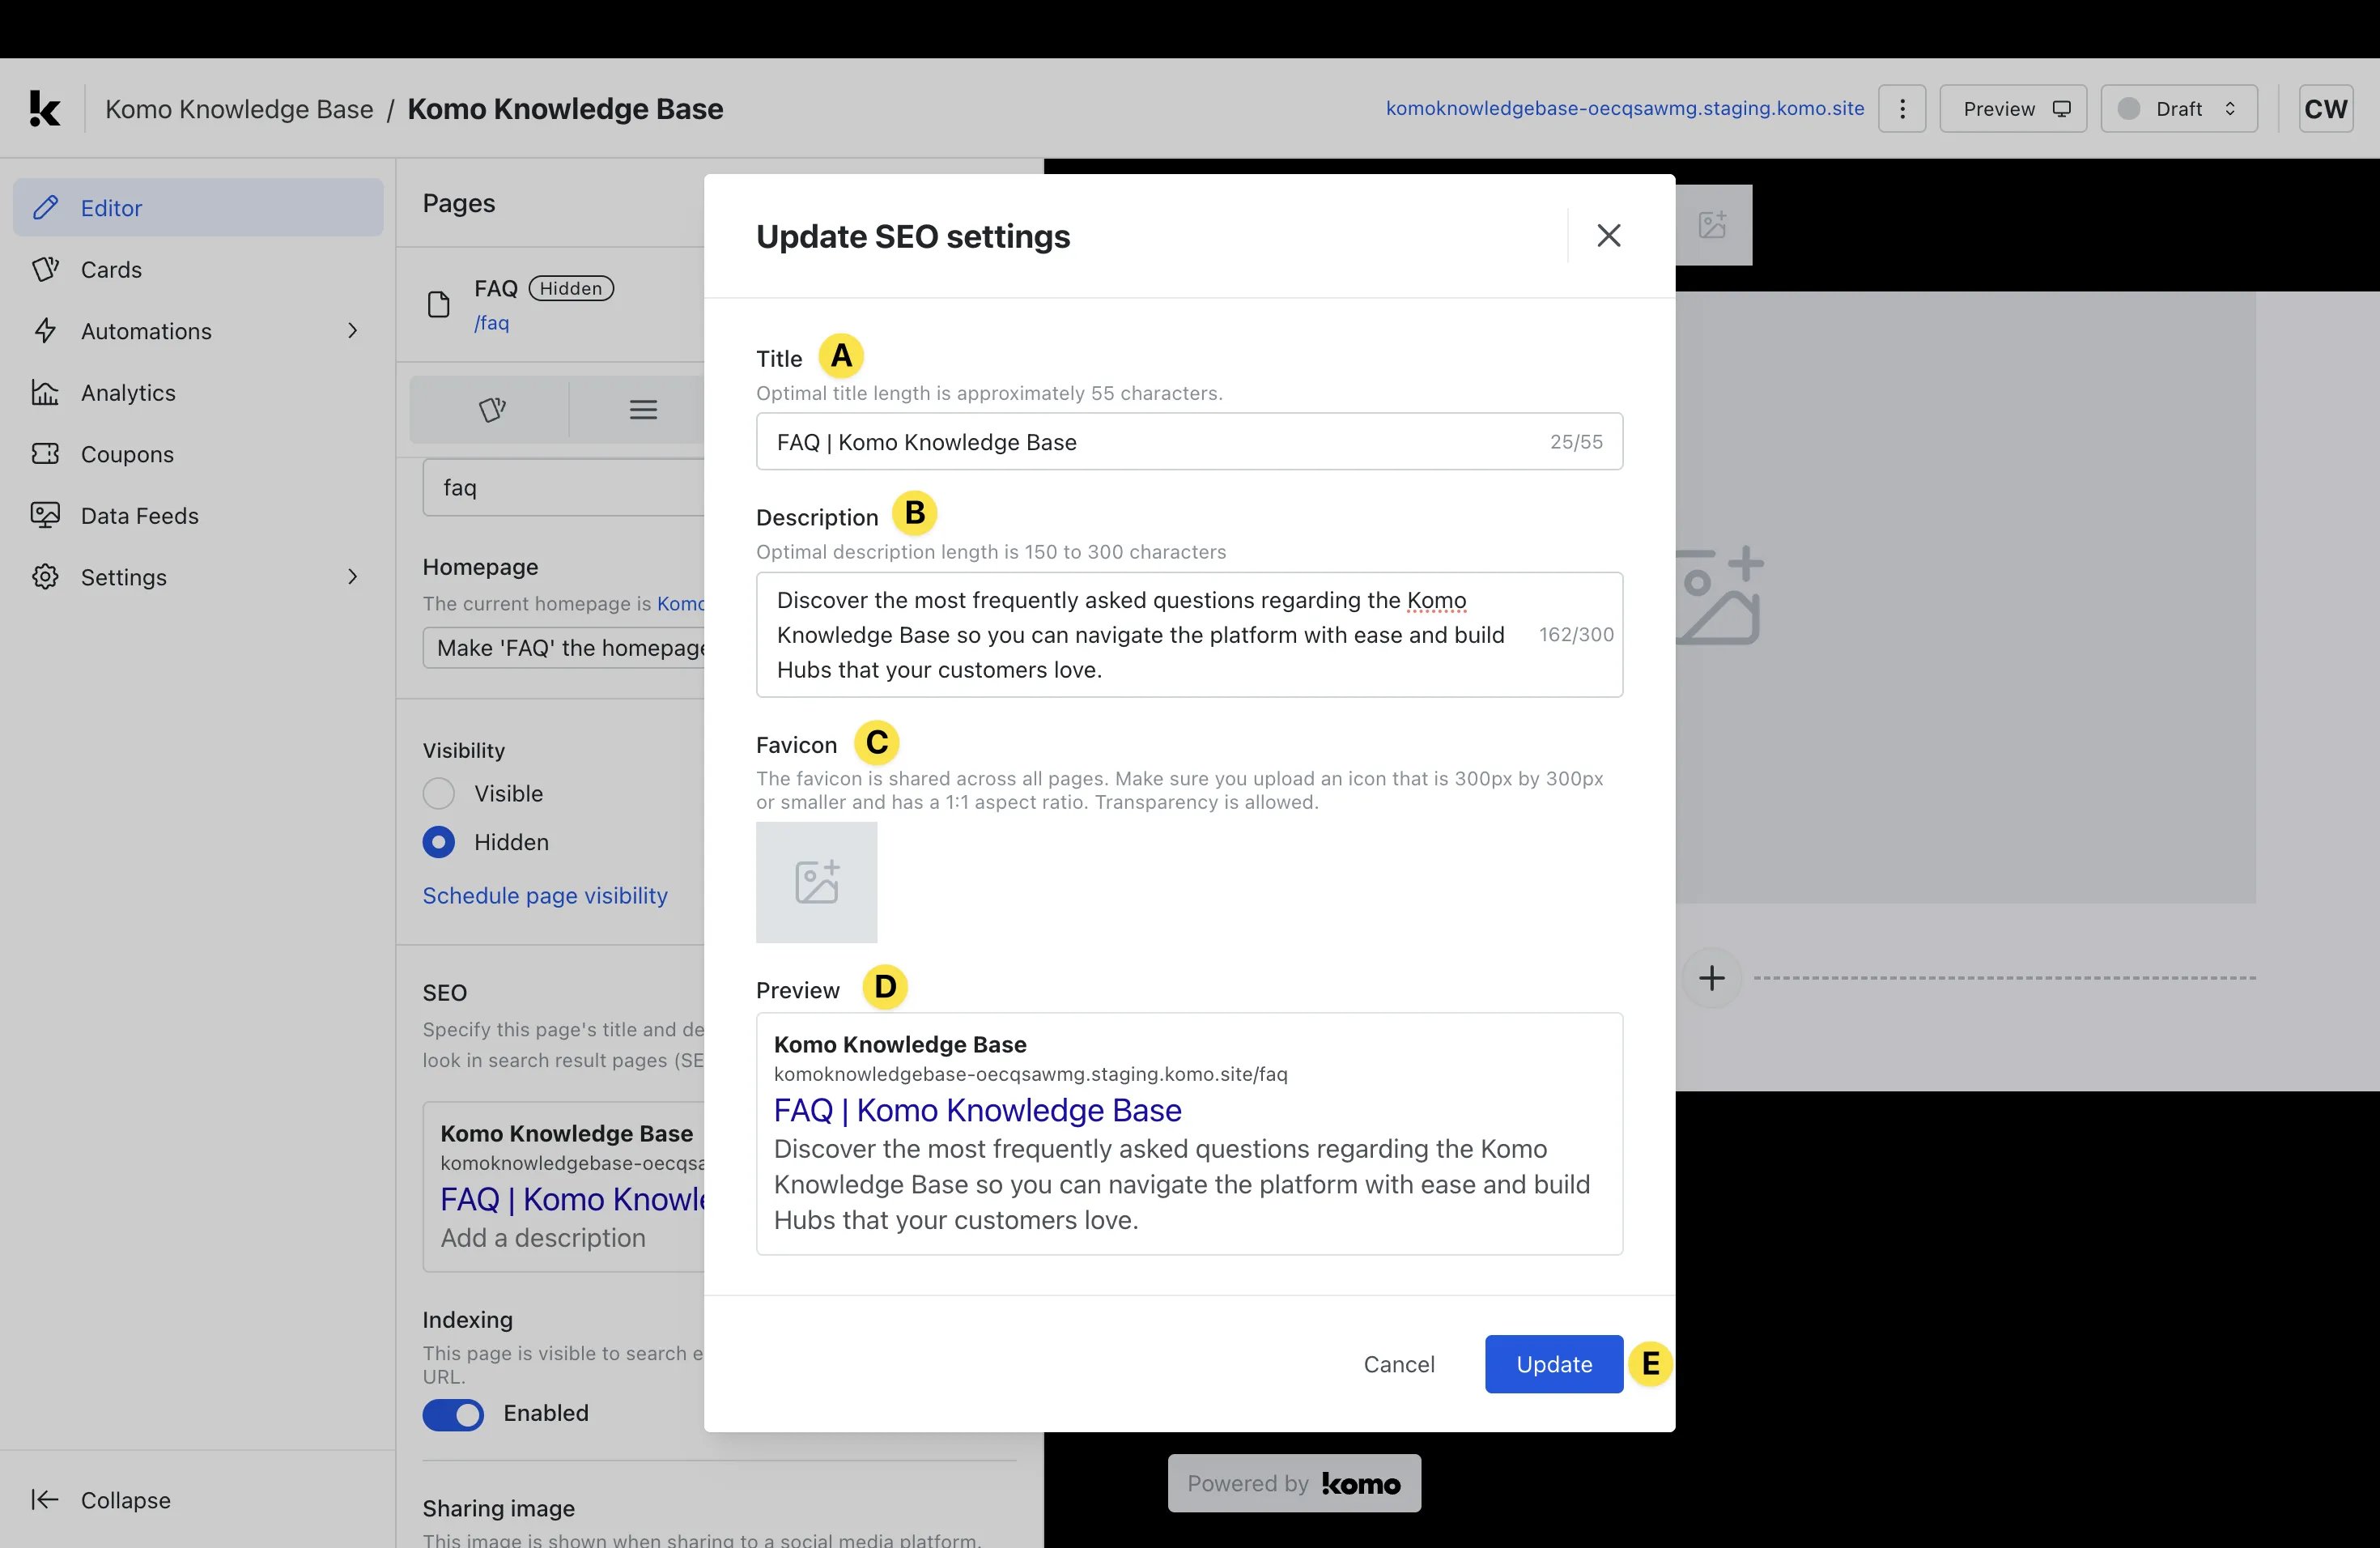 * **(A)** Here you can edit your **Title** so that it is an optimal length for SEO purposes.
* **(B)** Edit the page **Description** to provide a brief outline of the page for viewing in search engines.
* **(C)** Upload a **Favicon** that will be displayed alongside the page listing in search engines. This is usually your brand logo or icon.
* **(D)** Be sure to **Preview** your SEO settings to ensure you're satisfied with how they will appear publically.
* **(E)** Click **Update** to confirm the settings.
* **(6)** Scrolling down you can select whether you would like **Indexing** enabled or not. Indexing determines whether the page is visible within search engines.
* **(7)** Scrolling down you can upload a **Sharing Image** which is the image that will be displayed when sharing the page on social media platforms.
### Step 4: Add a Menu
* **(A)** Here you can edit your **Title** so that it is an optimal length for SEO purposes.
* **(B)** Edit the page **Description** to provide a brief outline of the page for viewing in search engines.
* **(C)** Upload a **Favicon** that will be displayed alongside the page listing in search engines. This is usually your brand logo or icon.
* **(D)** Be sure to **Preview** your SEO settings to ensure you're satisfied with how they will appear publically.
* **(E)** Click **Update** to confirm the settings.
* **(6)** Scrolling down you can select whether you would like **Indexing** enabled or not. Indexing determines whether the page is visible within search engines.
* **(7)** Scrolling down you can upload a **Sharing Image** which is the image that will be displayed when sharing the page on social media platforms.
### Step 4: Add a Menu
 * **(1)** Click on the **Menu** tab.
* **(2)** Click the **+ Add menu** button.
* **(3)** Give your menu an appropriate **Name**.
* **(4)** Click **Create**.
* You will now be shown a modal that gives you the ability to add clickable links to your menu.
* **(1)** Click on the **Menu** tab.
* **(2)** Click the **+ Add menu** button.
* **(3)** Give your menu an appropriate **Name**.
* **(4)** Click **Create**.
* You will now be shown a modal that gives you the ability to add clickable links to your menu.
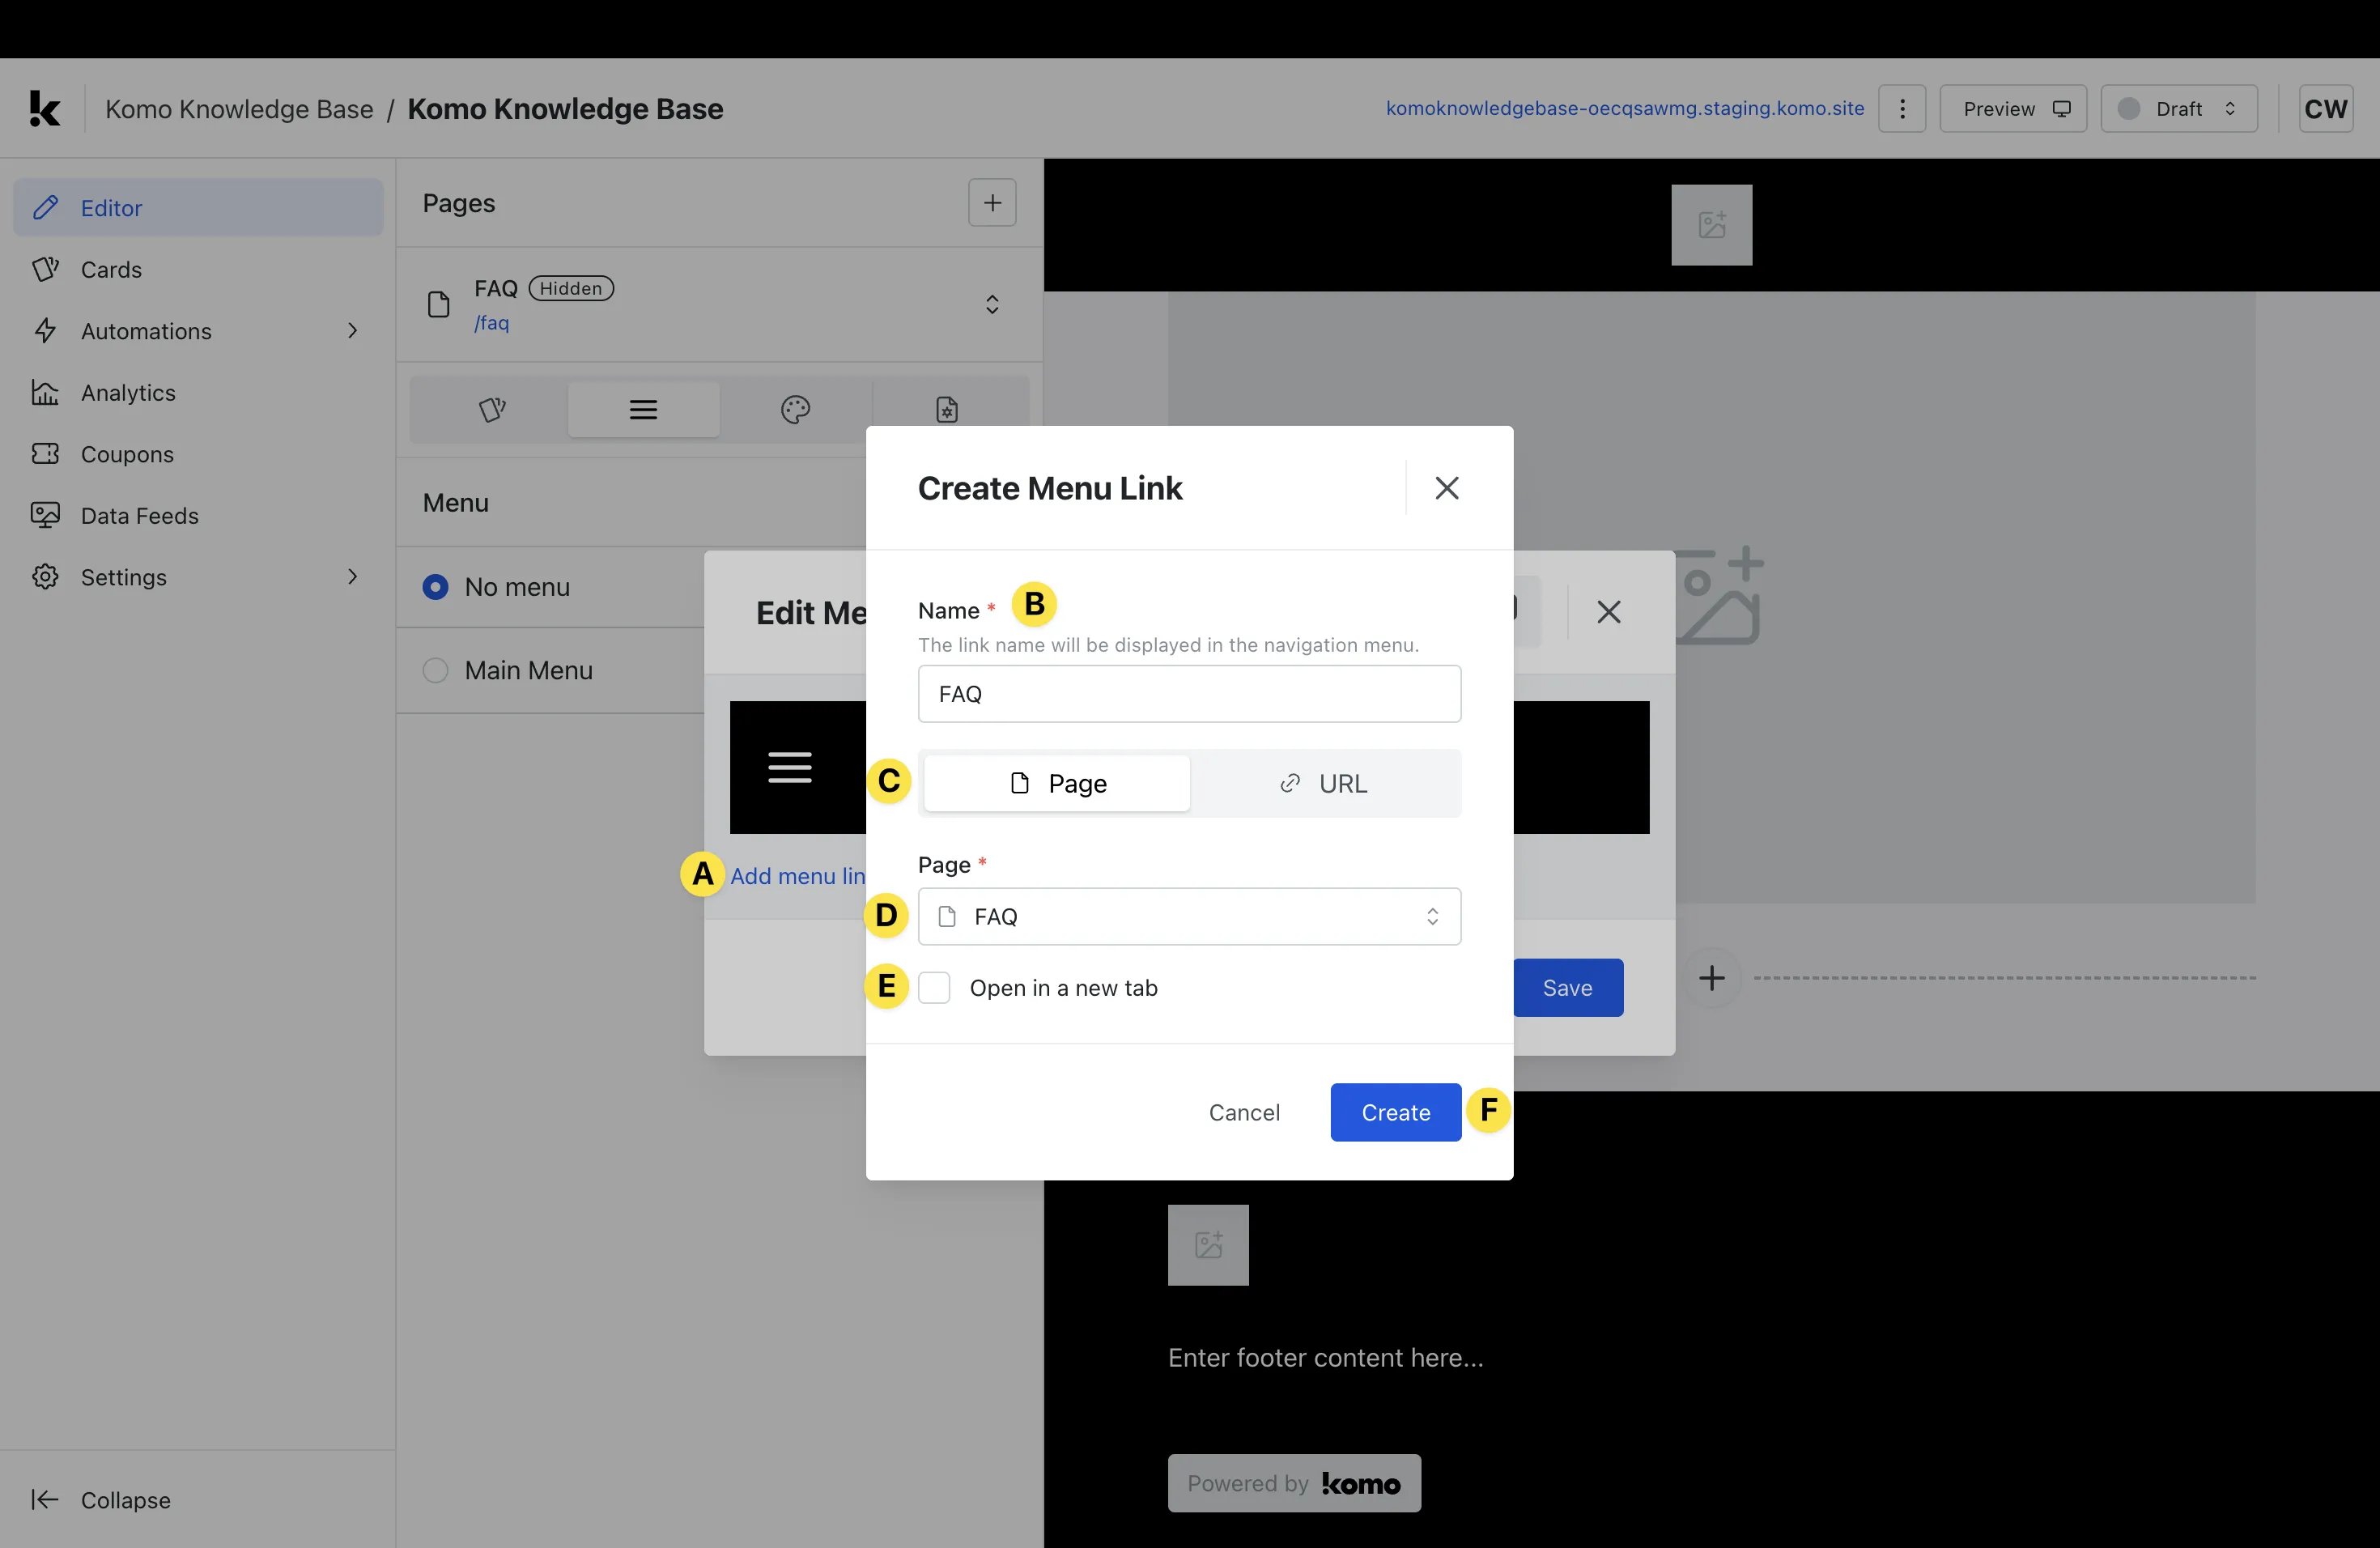 * **(A)** Click **Add menu link**.
* **(B)** Give your link an appropriate **Name** (this will be visible to the public within the menu).
* **(C)** Here you can select whether you want to link to an internal **Page** or external **URL**.
* **(D)** Select your internal **page** to link to or paste in an external **URL**.
* **(E)** Check this box if you would like the link to **Open in a new tab**.
* **(F)** Once you have completed all steps, click **Create**.
* **(A)** Click **Add menu link**.
* **(B)** Give your link an appropriate **Name** (this will be visible to the public within the menu).
* **(C)** Here you can select whether you want to link to an internal **Page** or external **URL**.
* **(D)** Select your internal **page** to link to or paste in an external **URL**.
* **(E)** Check this box if you would like the link to **Open in a new tab**.
* **(F)** Once you have completed all steps, click **Create**.
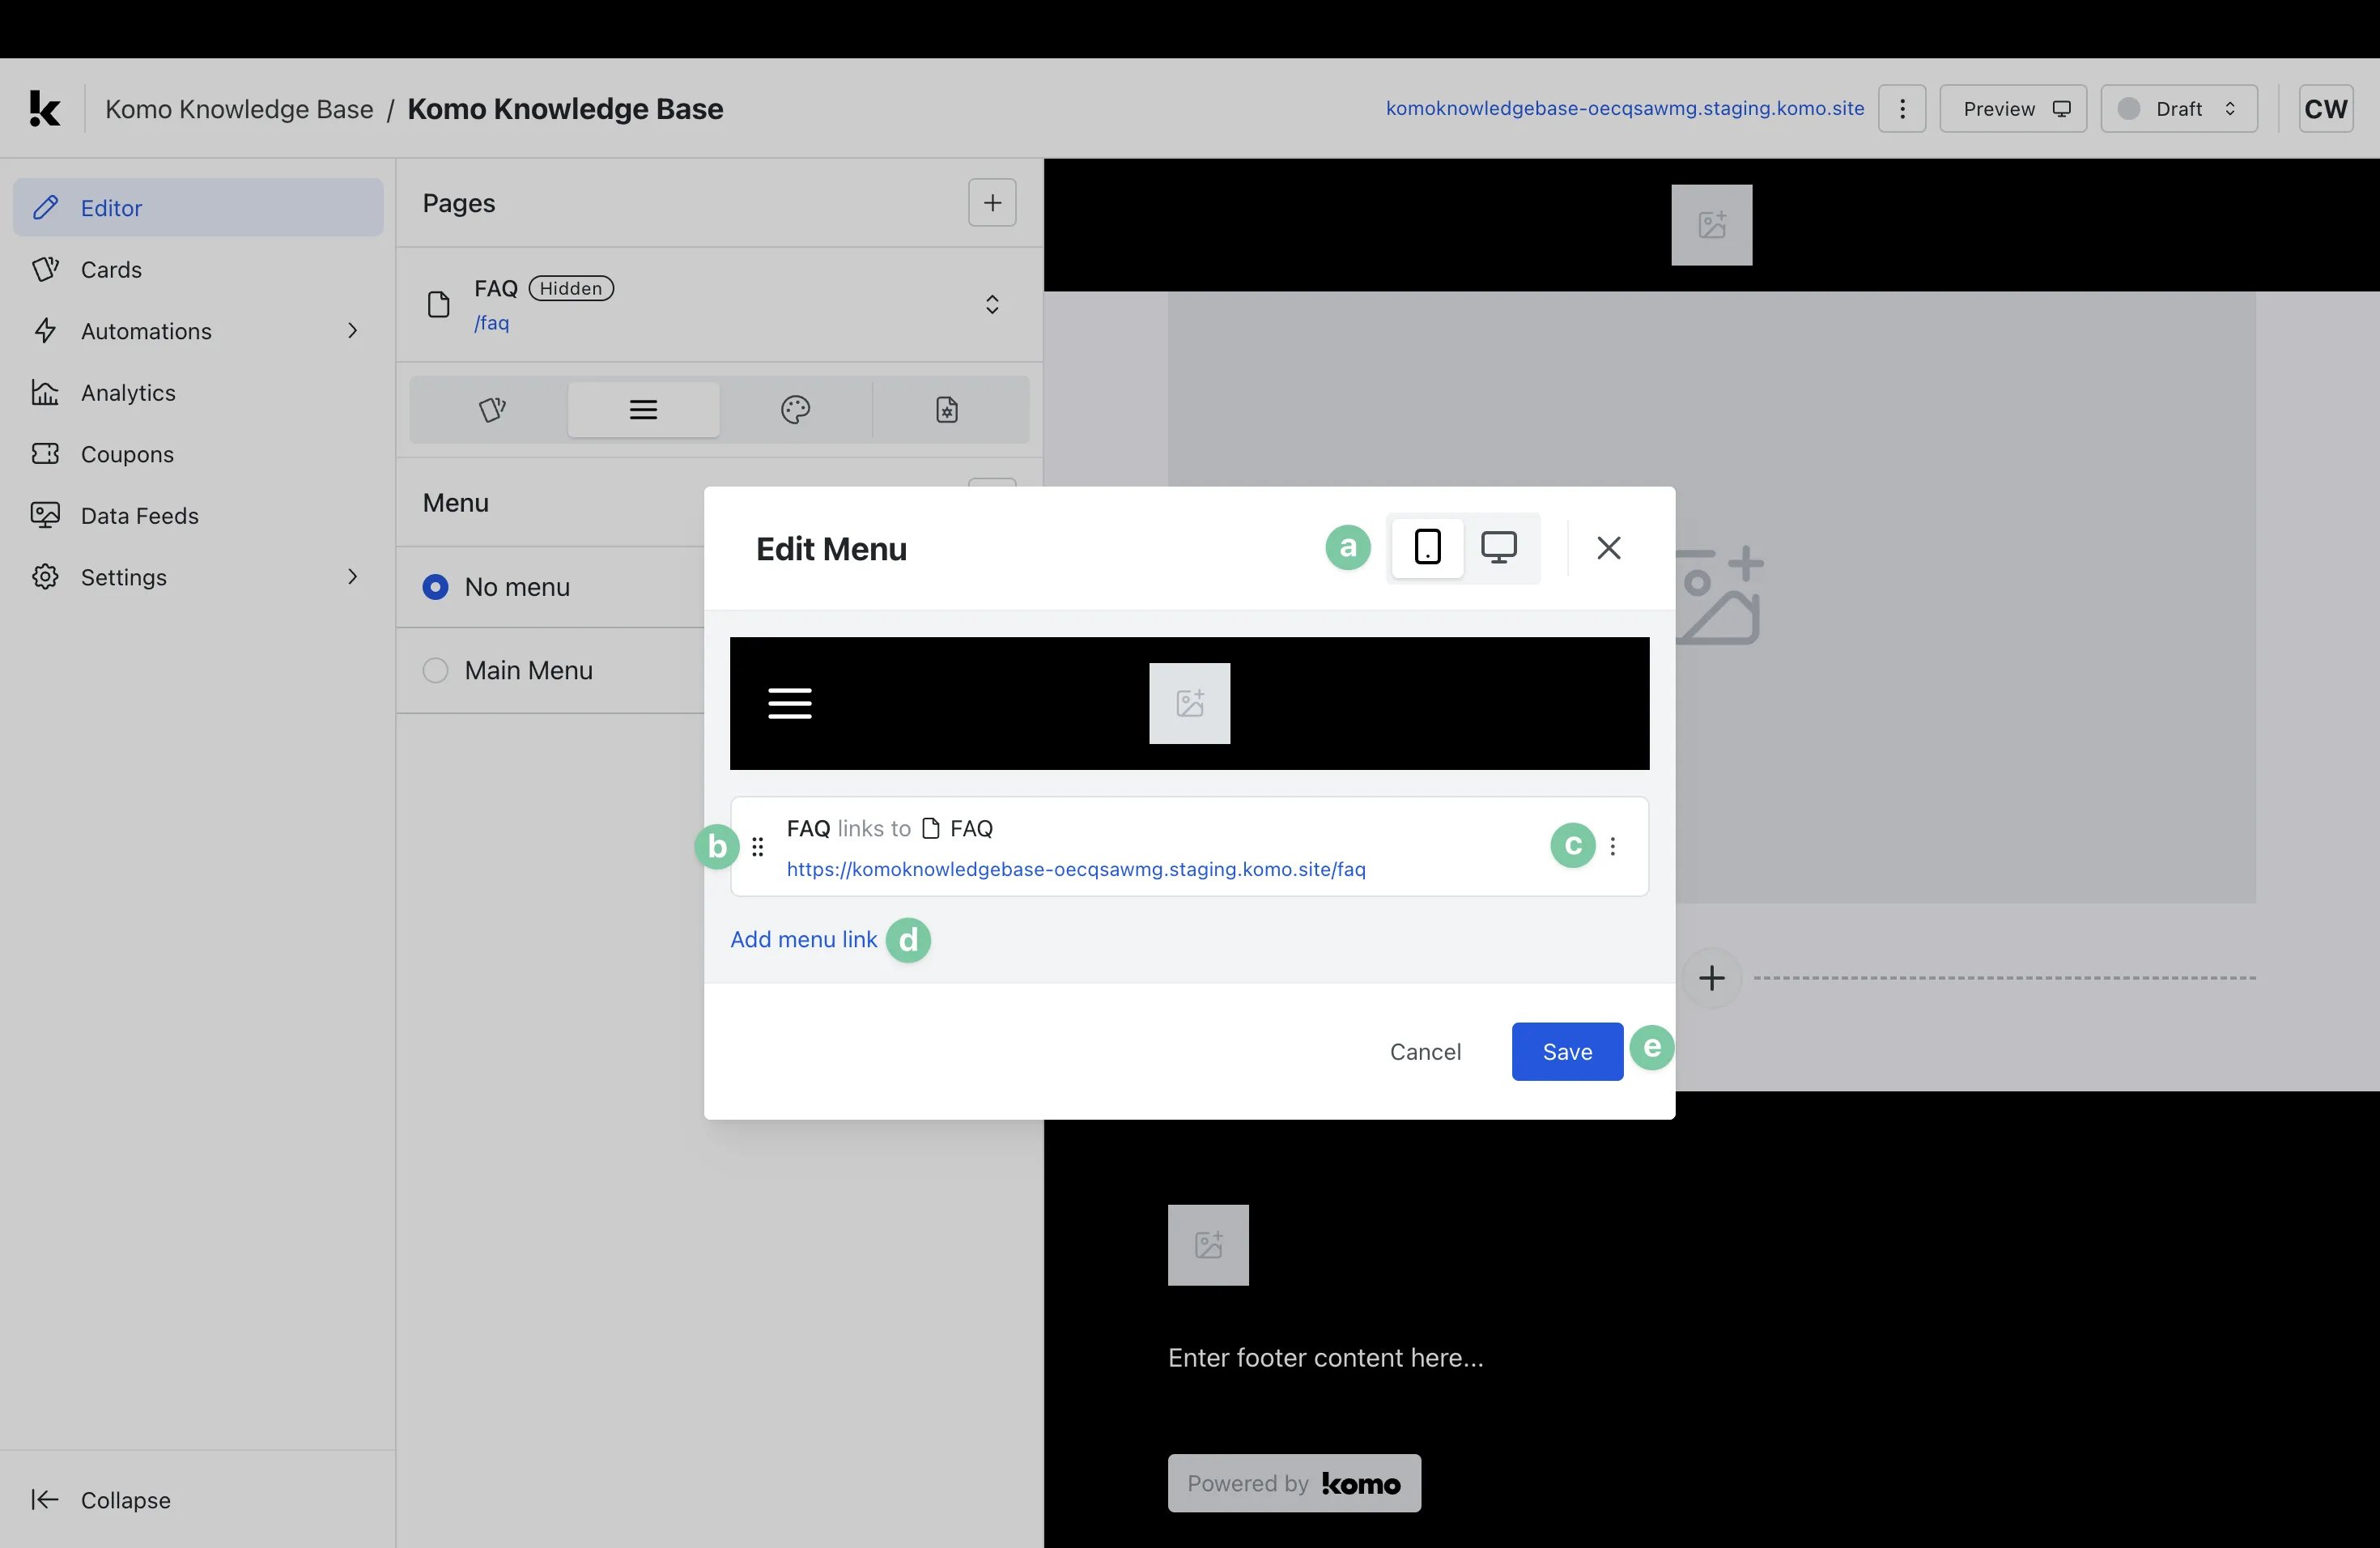 * **(a)** Here you can preview how your menu will appear on **Mobile** and **Desktop** screens.
* **(b)** Click and drag the **6 dots** on the left to **reorder** the links in your menu.
* **(c)** Click the **3 dots** on the right to **Edit, Clone,** or **Delete** your link.
* **(d)** Click **Add menu link** to add additional links.
* **(e)** Select **Save** to finalize your changes.
### Step 5: Apply Menu to page
* **(a)** Here you can preview how your menu will appear on **Mobile** and **Desktop** screens.
* **(b)** Click and drag the **6 dots** on the left to **reorder** the links in your menu.
* **(c)** Click the **3 dots** on the right to **Edit, Clone,** or **Delete** your link.
* **(d)** Click **Add menu link** to add additional links.
* **(e)** Select **Save** to finalize your changes.
### Step 5: Apply Menu to page
 Once you have created your menu(s) you will need to select which menu to apply to the page being edited.
* **(1)** Select which **menu** you would like to be applied to the page.
Once you have created your menu(s) you will need to select which menu to apply to the page being edited.
* **(1)** Select which **menu** you would like to be applied to the page.
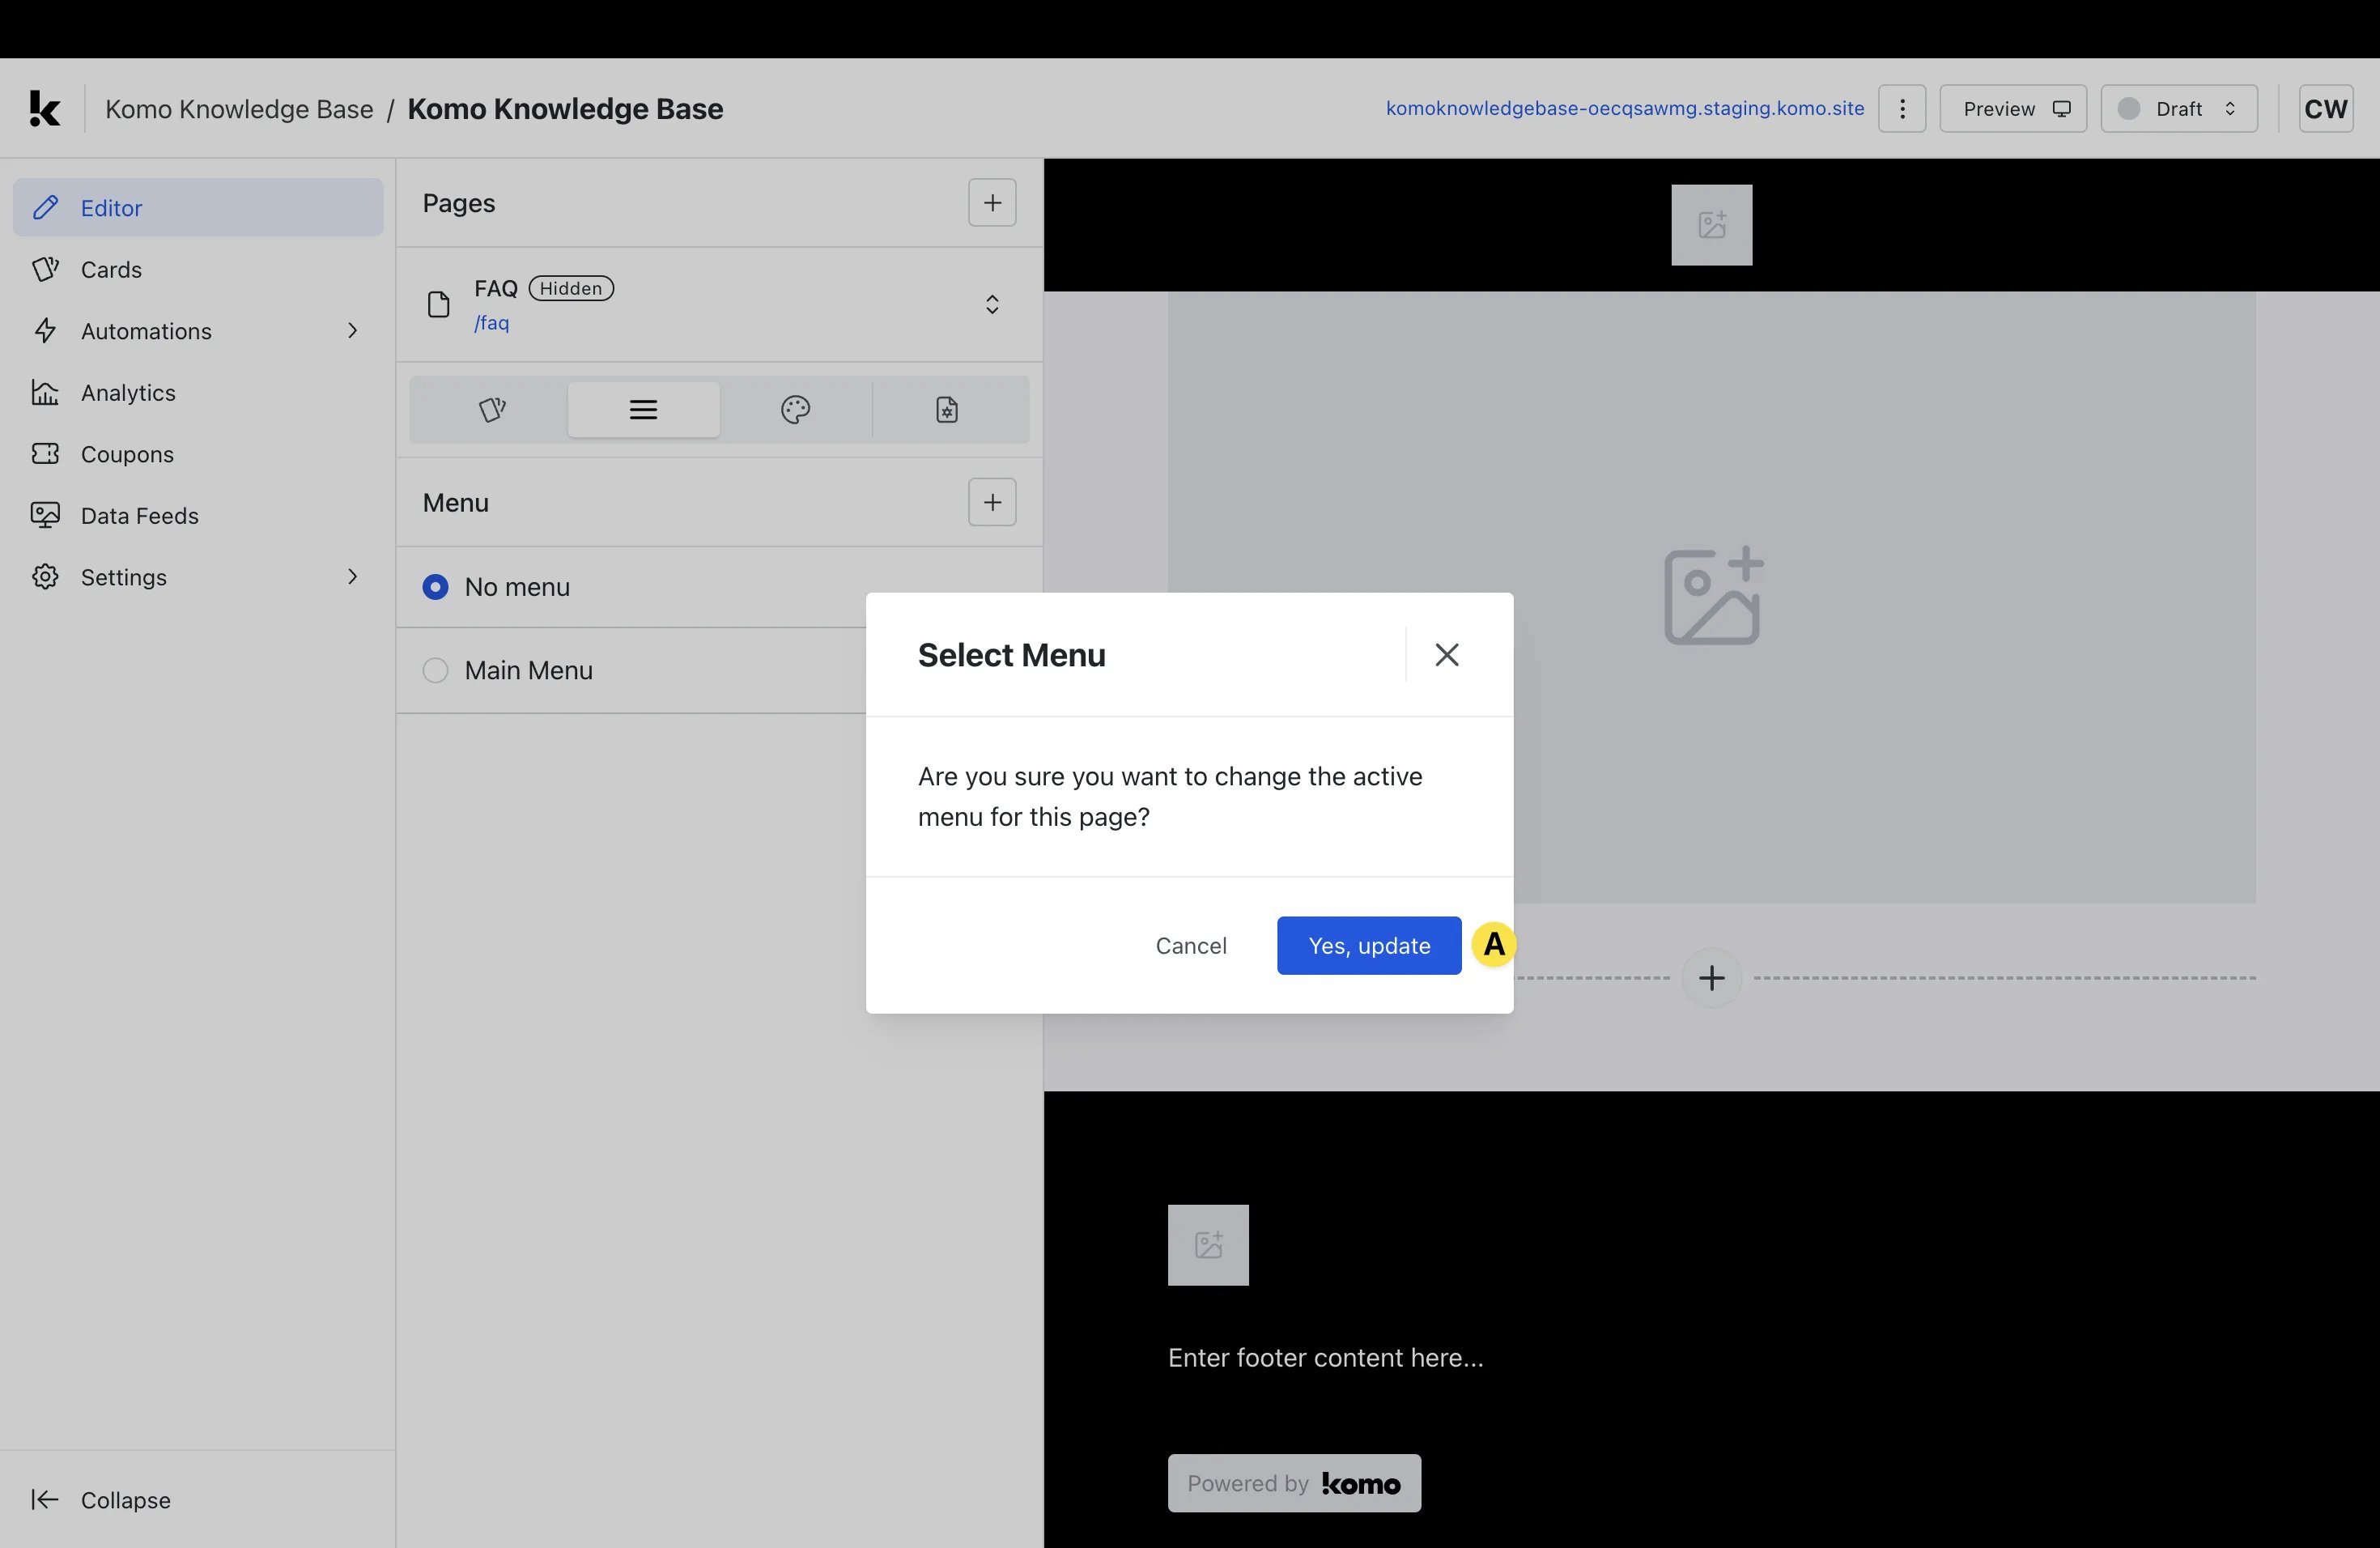 * **(A)** Select **Yes, update**.
* **(2)** Click the **3 dots** to **Edit, Rename, Clone, or Delete** the menu (if required).
> **Note:** If you would like a page to have no menu, you can select **No menu**.
### Step 6: Set active and inactive text colors
* **(A)** Select **Yes, update**.
* **(2)** Click the **3 dots** to **Edit, Rename, Clone, or Delete** the menu (if required).
> **Note:** If you would like a page to have no menu, you can select **No menu**.
### Step 6: Set active and inactive text colors
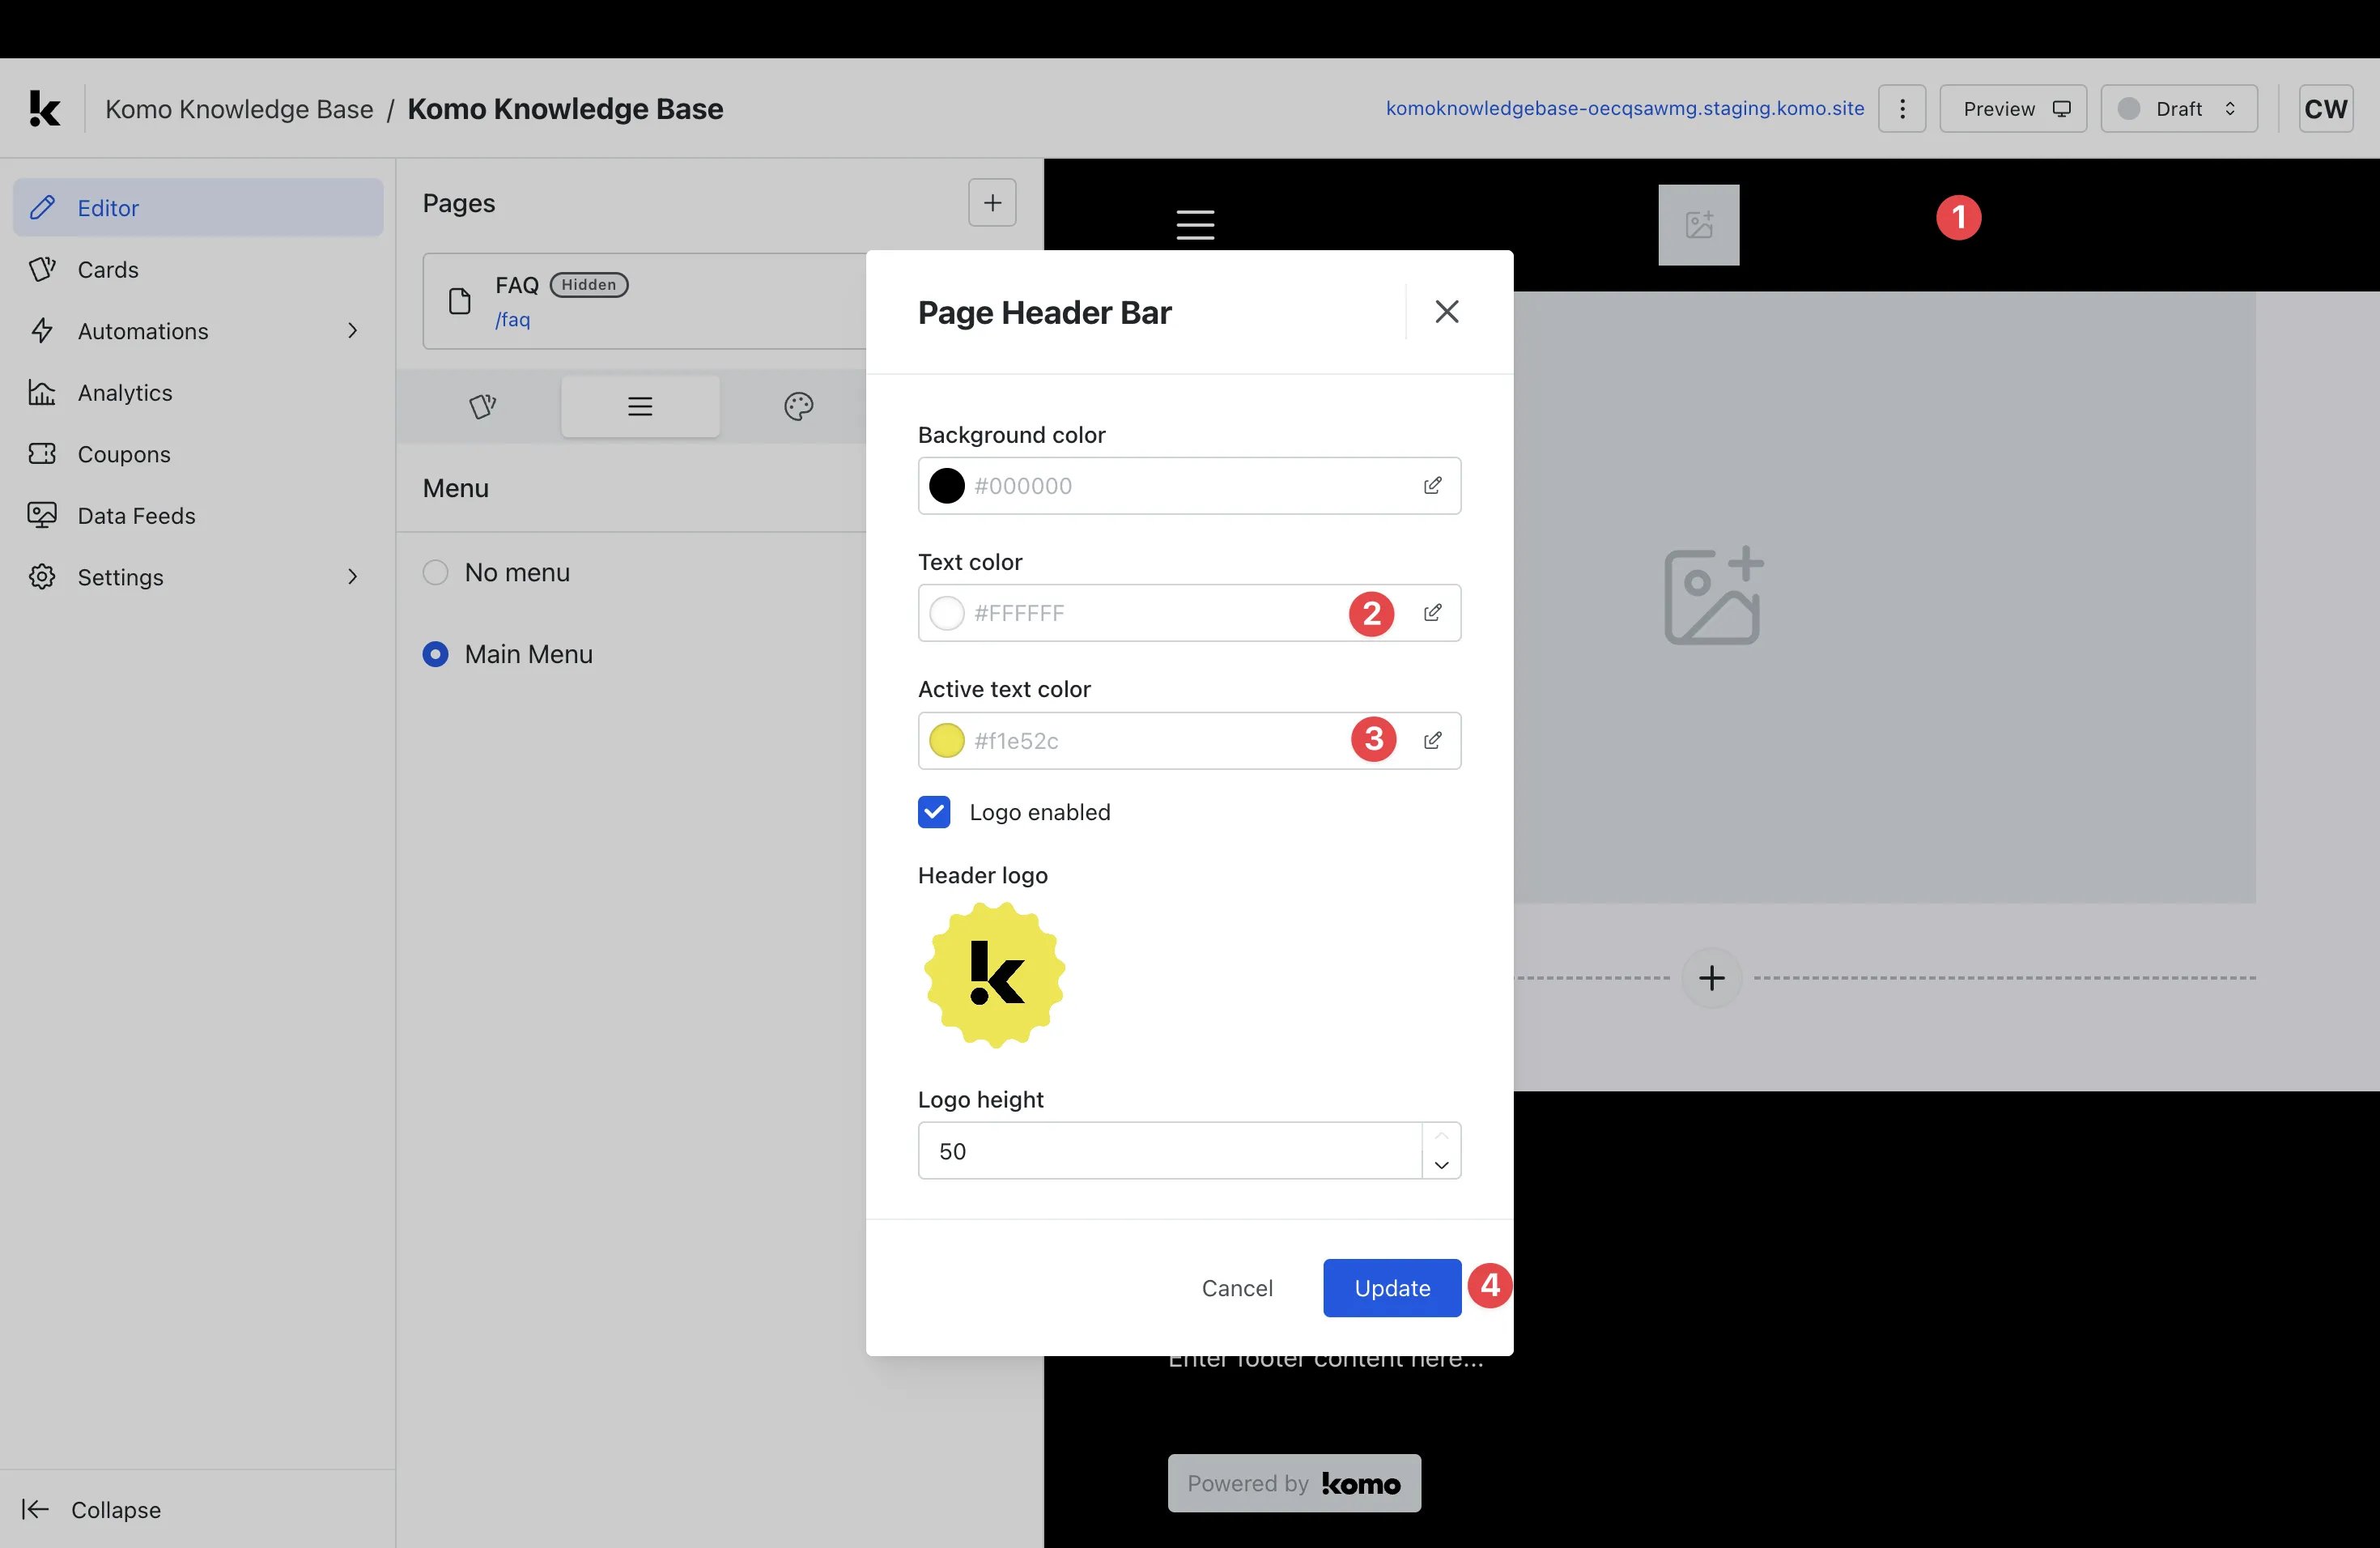 * Once your menu has been applied to the page, you will need to set the **active** and **inactive** text colors.
* **(1)** Click on the **header bar** located at the top of the page.
* **(2)** Within the modal, set the **text color** you would like to apply to **inactive menu text**.
* **(3)** Here you can set the **text color** you would like to apply to **active menu text**.
* **(4)** Click **Update** to save your settings.
### Step 7: Edit page design
* Once you're ready to edit page design, [access this article](/getting-started/hub-setup/data-capture) for detailed instructions on editing page design.
### Step 8: Navigate between pages
* Once your menu has been applied to the page, you will need to set the **active** and **inactive** text colors.
* **(1)** Click on the **header bar** located at the top of the page.
* **(2)** Within the modal, set the **text color** you would like to apply to **inactive menu text**.
* **(3)** Here you can set the **text color** you would like to apply to **active menu text**.
* **(4)** Click **Update** to save your settings.
### Step 7: Edit page design
* Once you're ready to edit page design, [access this article](/getting-started/hub-setup/data-capture) for detailed instructions on editing page design.
### Step 8: Navigate between pages
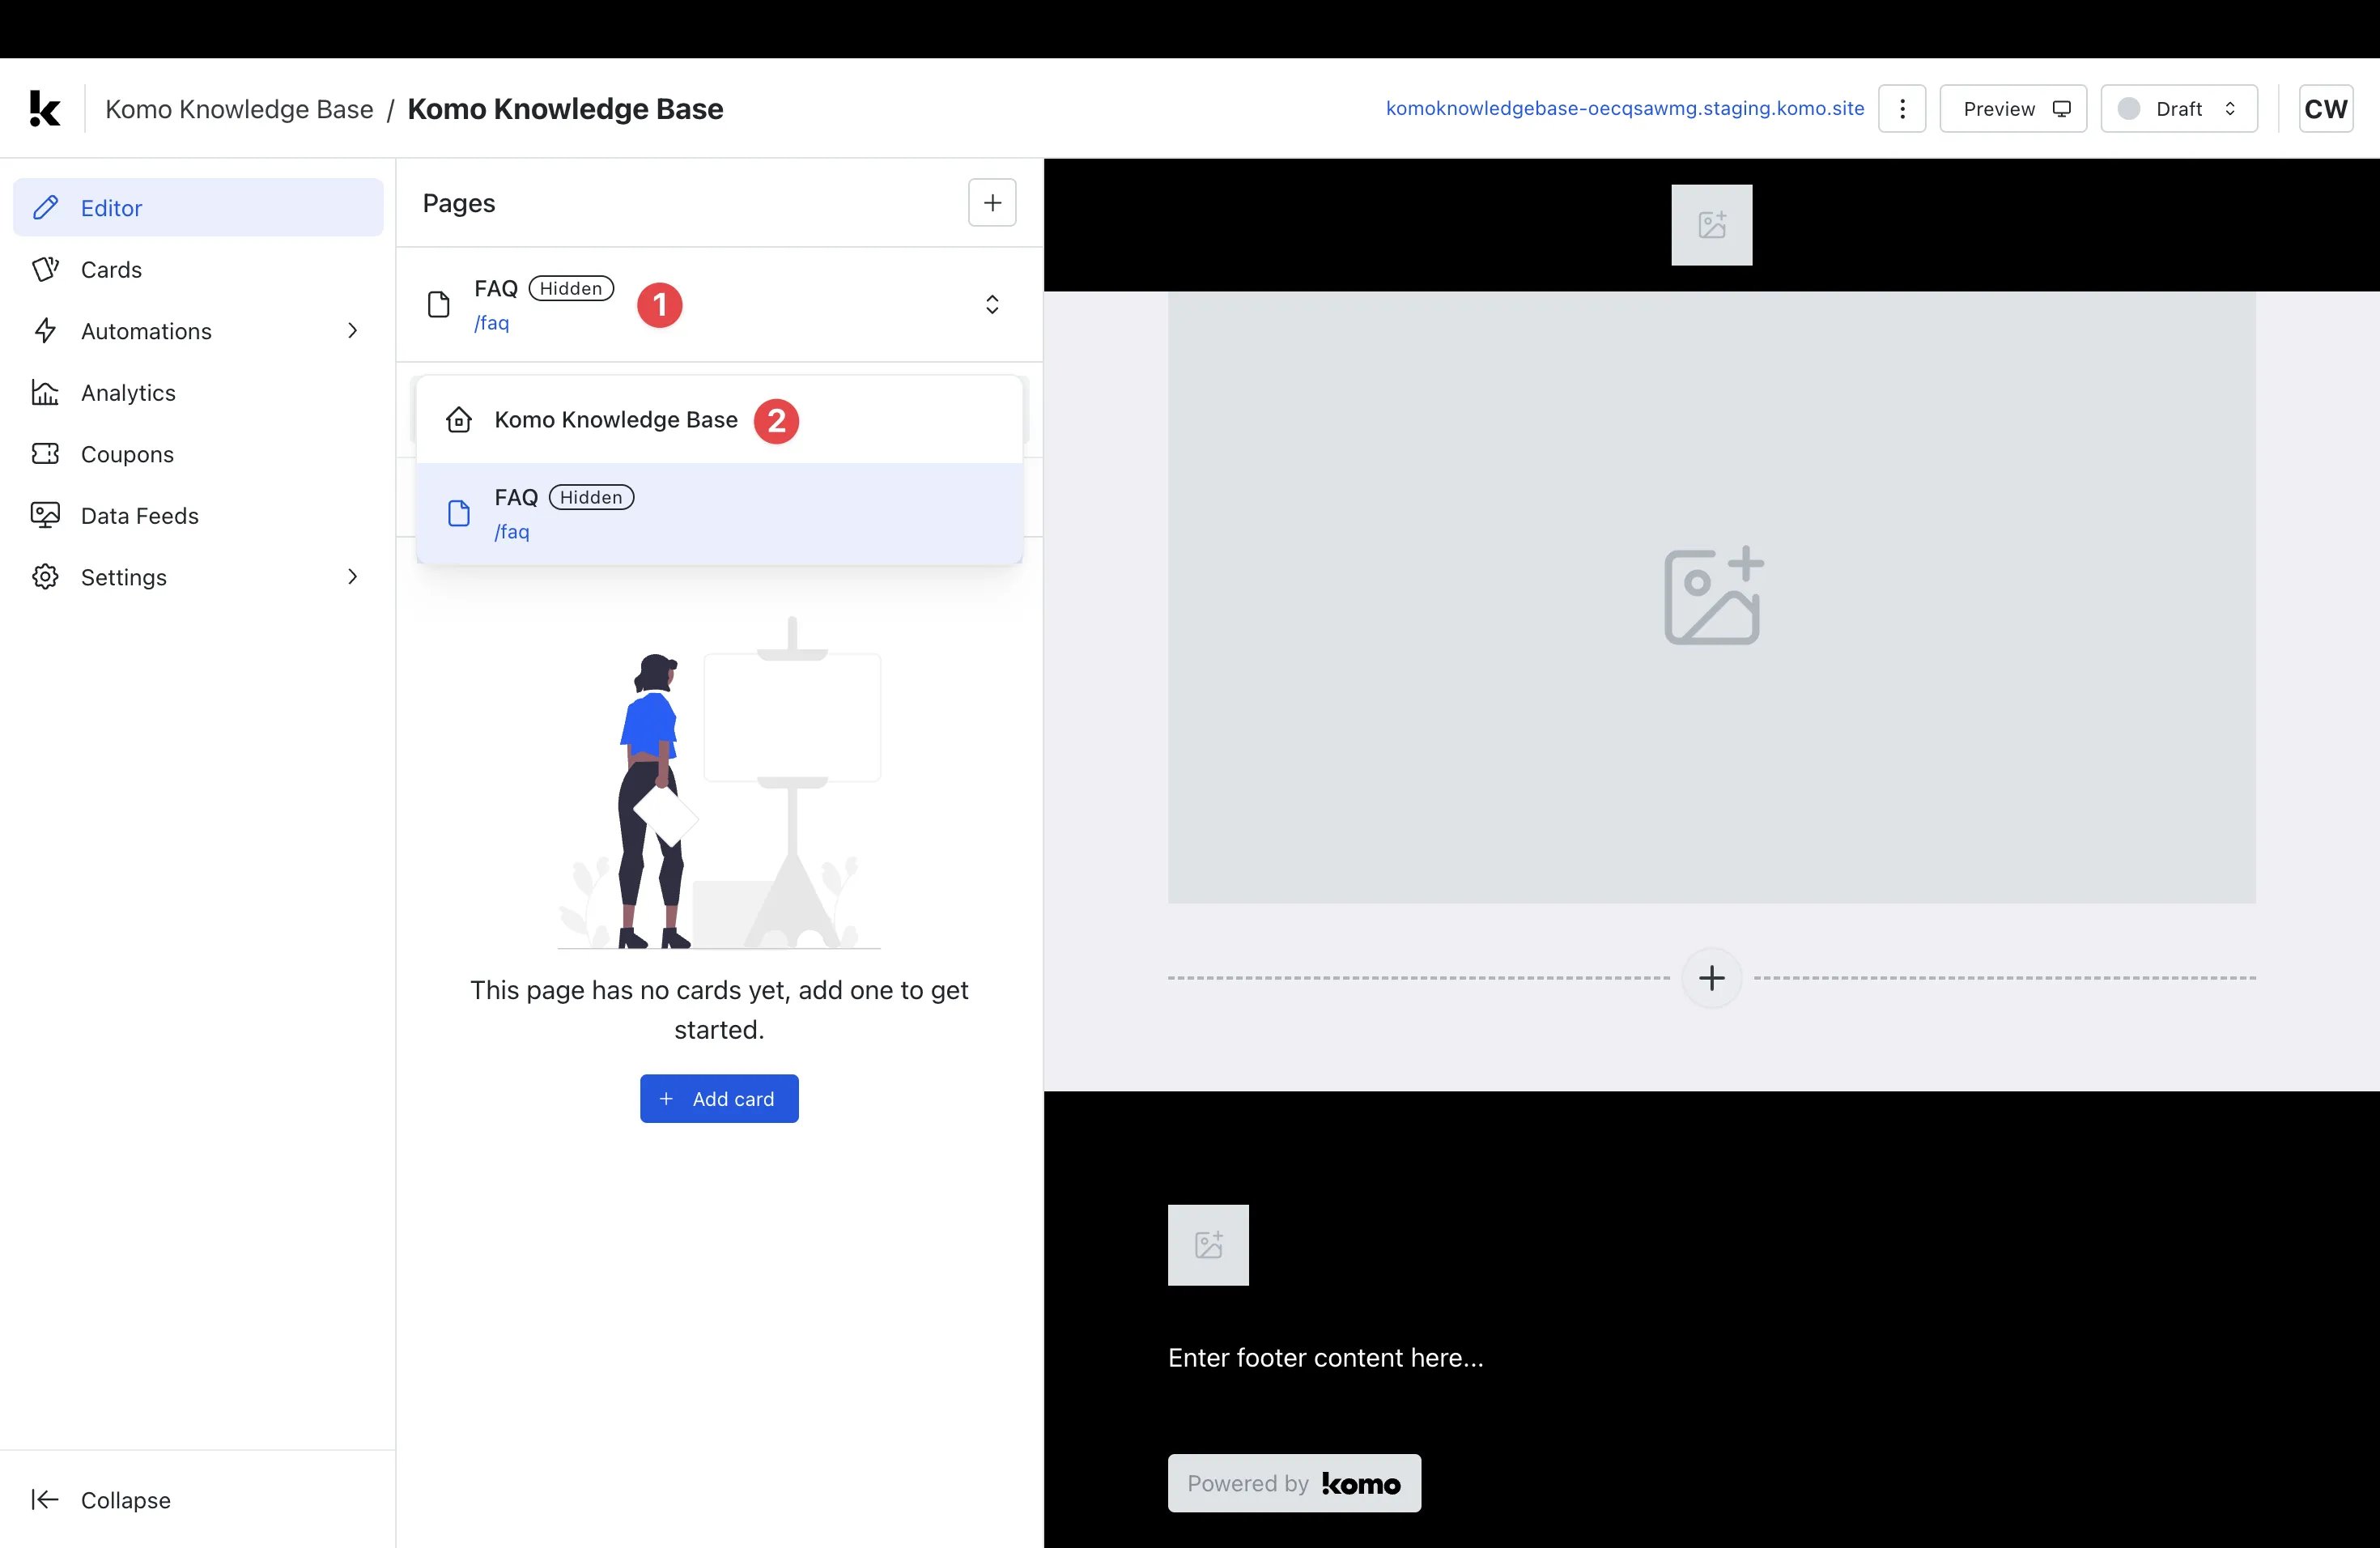 * **(1)** Click the dropdown next to your page **name**.
* **(2)** Select the name of the page you would like to navigate to.
* You will now be redirected to the selected page.
## FAQ
**Why would I use multiple pages?**
Multi-page Hubs are a valuable tool for those who don't want to confine their promotional activities to a single page. Whether you want to create pages for additional context, such as T\&Cs or FAQs, or would like to create dedicated sub-brand pages that sit under the one parent brand, Multi-page Hubs allows you to do so.
**How many pages am I able to create?**
With Multi-page Hubs, you can create as many additional pages as you like — there is no limit.
**What is the difference between pages that are 'Visible' and 'Hidden'?**
A page that is 'Visible' can be accessed by anyone via a URL. A 'Hidden' page is only viewable for those with a password (think of these like 'draft' pages).
**Do I have to create a menu for a page?**
Menus are an optional addition to pages. If you would prefer pages to only be navigable through URLs rather than a menu, you can opt not to create a menu.
**What is the purpose of having the option to create multiple menus?**
Menus are applied at the page level (not the Hub level), so you will need to designate an appropriate menu for each page you create. Having the option to create multiple menus gives you the flexibility to add variations to menus on each of the pages you create. This is particularly useful for parent brands who are looking to create sub-brand pages with unique menus on each page.
* **(1)** Click the dropdown next to your page **name**.
* **(2)** Select the name of the page you would like to navigate to.
* You will now be redirected to the selected page.
## FAQ
**Why would I use multiple pages?**
Multi-page Hubs are a valuable tool for those who don't want to confine their promotional activities to a single page. Whether you want to create pages for additional context, such as T\&Cs or FAQs, or would like to create dedicated sub-brand pages that sit under the one parent brand, Multi-page Hubs allows you to do so.
**How many pages am I able to create?**
With Multi-page Hubs, you can create as many additional pages as you like — there is no limit.
**What is the difference between pages that are 'Visible' and 'Hidden'?**
A page that is 'Visible' can be accessed by anyone via a URL. A 'Hidden' page is only viewable for those with a password (think of these like 'draft' pages).
**Do I have to create a menu for a page?**
Menus are an optional addition to pages. If you would prefer pages to only be navigable through URLs rather than a menu, you can opt not to create a menu.
**What is the purpose of having the option to create multiple menus?**
Menus are applied at the page level (not the Hub level), so you will need to designate an appropriate menu for each page you create. Having the option to create multiple menus gives you the flexibility to add variations to menus on each of the pages you create. This is particularly useful for parent brands who are looking to create sub-brand pages with unique menus on each page.