> ## Documentation Index
> Fetch the complete documentation index at: https://knowledge.komo.tech/llms.txt
> Use this file to discover all available pages before exploring further.
# Photo Frame
> Allows users to photograph themselves and apply a branded frame to their image.
## What is it?
The Photo Frame card allows users to photograph themselves within a branded frame and share across their socials.
## How do I build one?
* [Step 1: Add a Photo Frame card to your Hub](#step-1-add-a-photo-frame-card-to-your-hub)
* [Step 2: Build out your card](#step-2-build-out-your-card)
* [Step 3: Set up your Gameplay Options](#step-3-set-up-your-gameplay-options)
* [Step 4: Set up your Data capture](#step-4-set-up-your-data-capture)
* [Step 5: Publish your card](#step-5-publish-your-card)
### Step 1: Add a Photo Frame card to your Hub
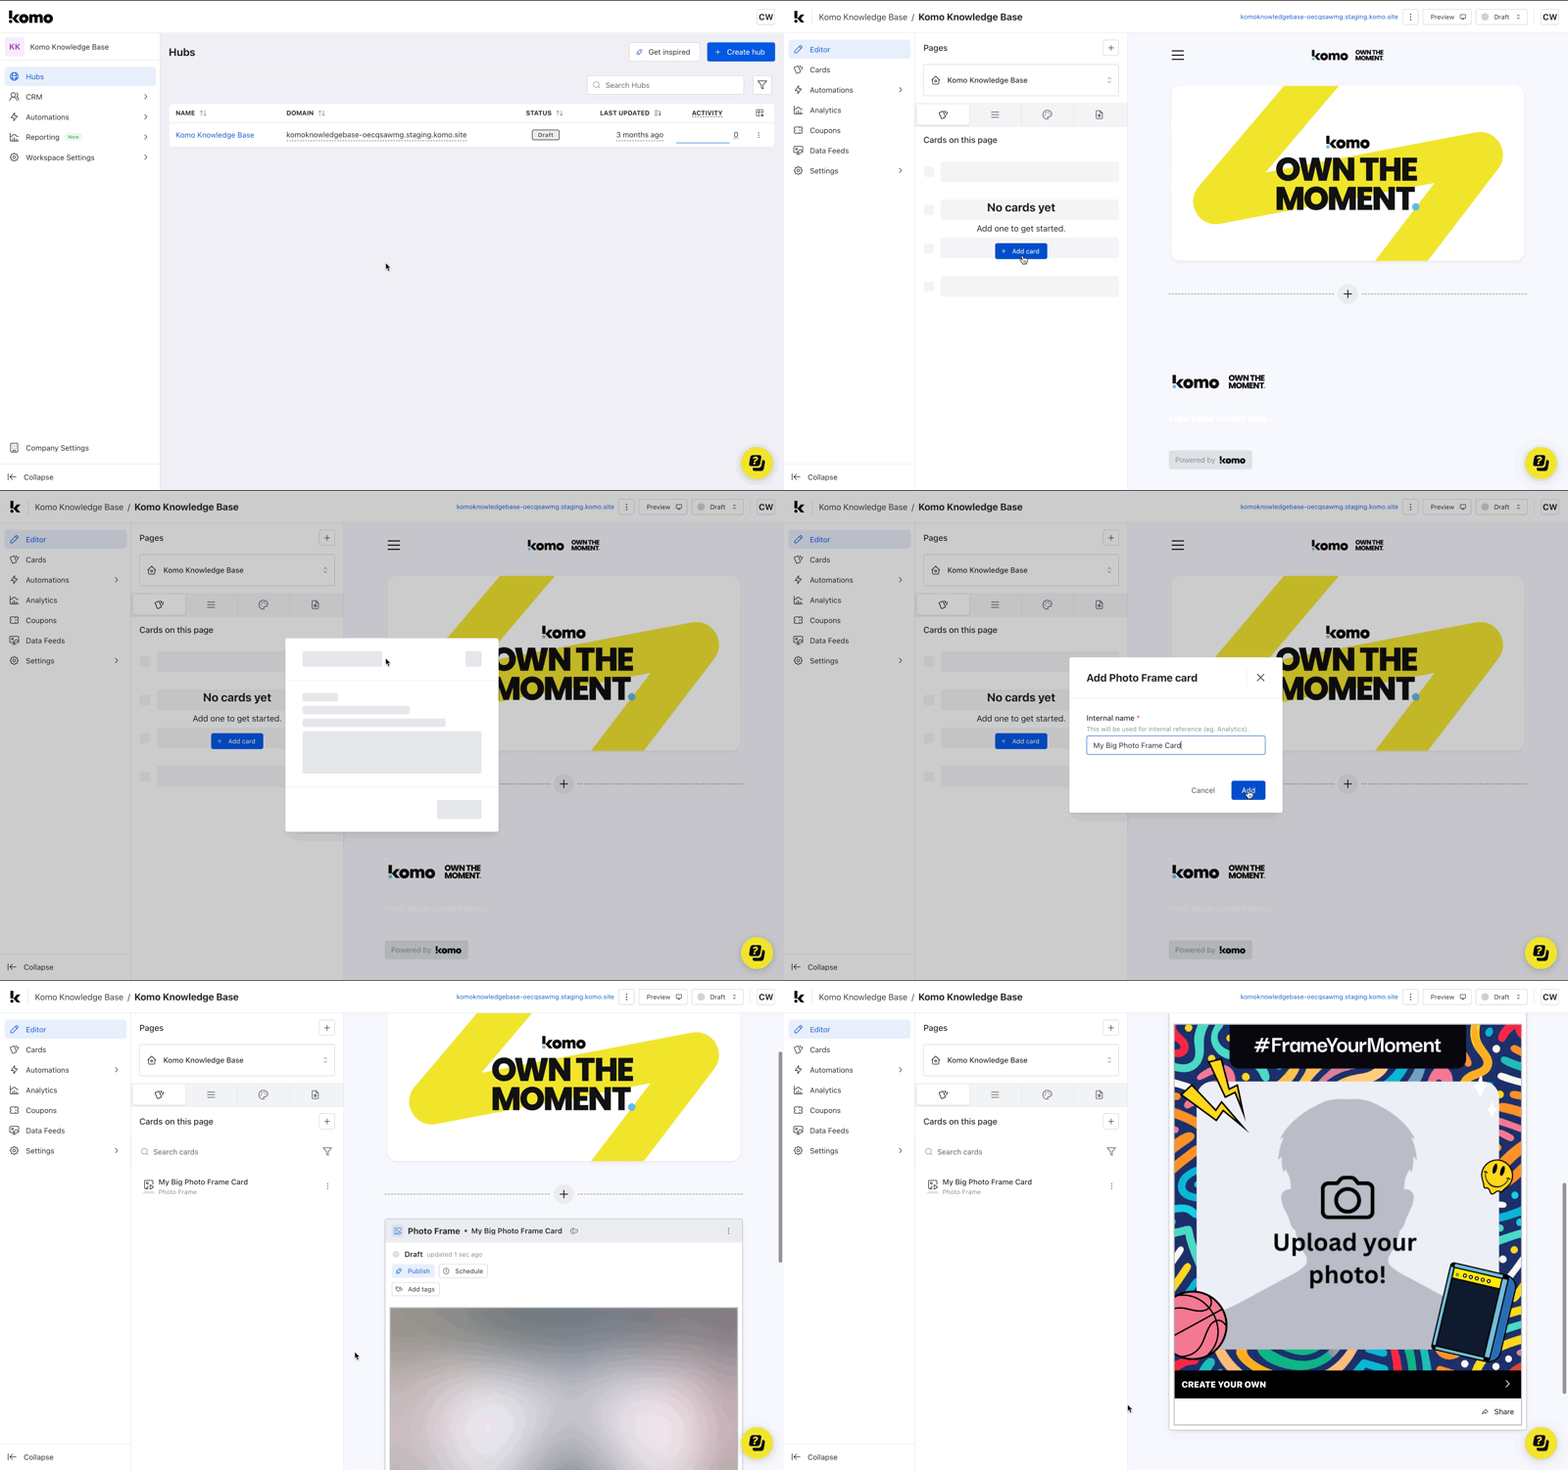 * Navigate to your **Engagement Hub**.
* Once there click **+** **Add card,** from there select **Media** and then **Photo Frame.**
* Provide an **internal name** for the card and click **Add.**
* You will then see your new card has been added to your Hub.
### Step 2: Build out your card
* Navigate to your **Engagement Hub**.
* Once there click **+** **Add card,** from there select **Media** and then **Photo Frame.**
* Provide an **internal name** for the card and click **Add.**
* You will then see your new card has been added to your Hub.
### Step 2: Build out your card
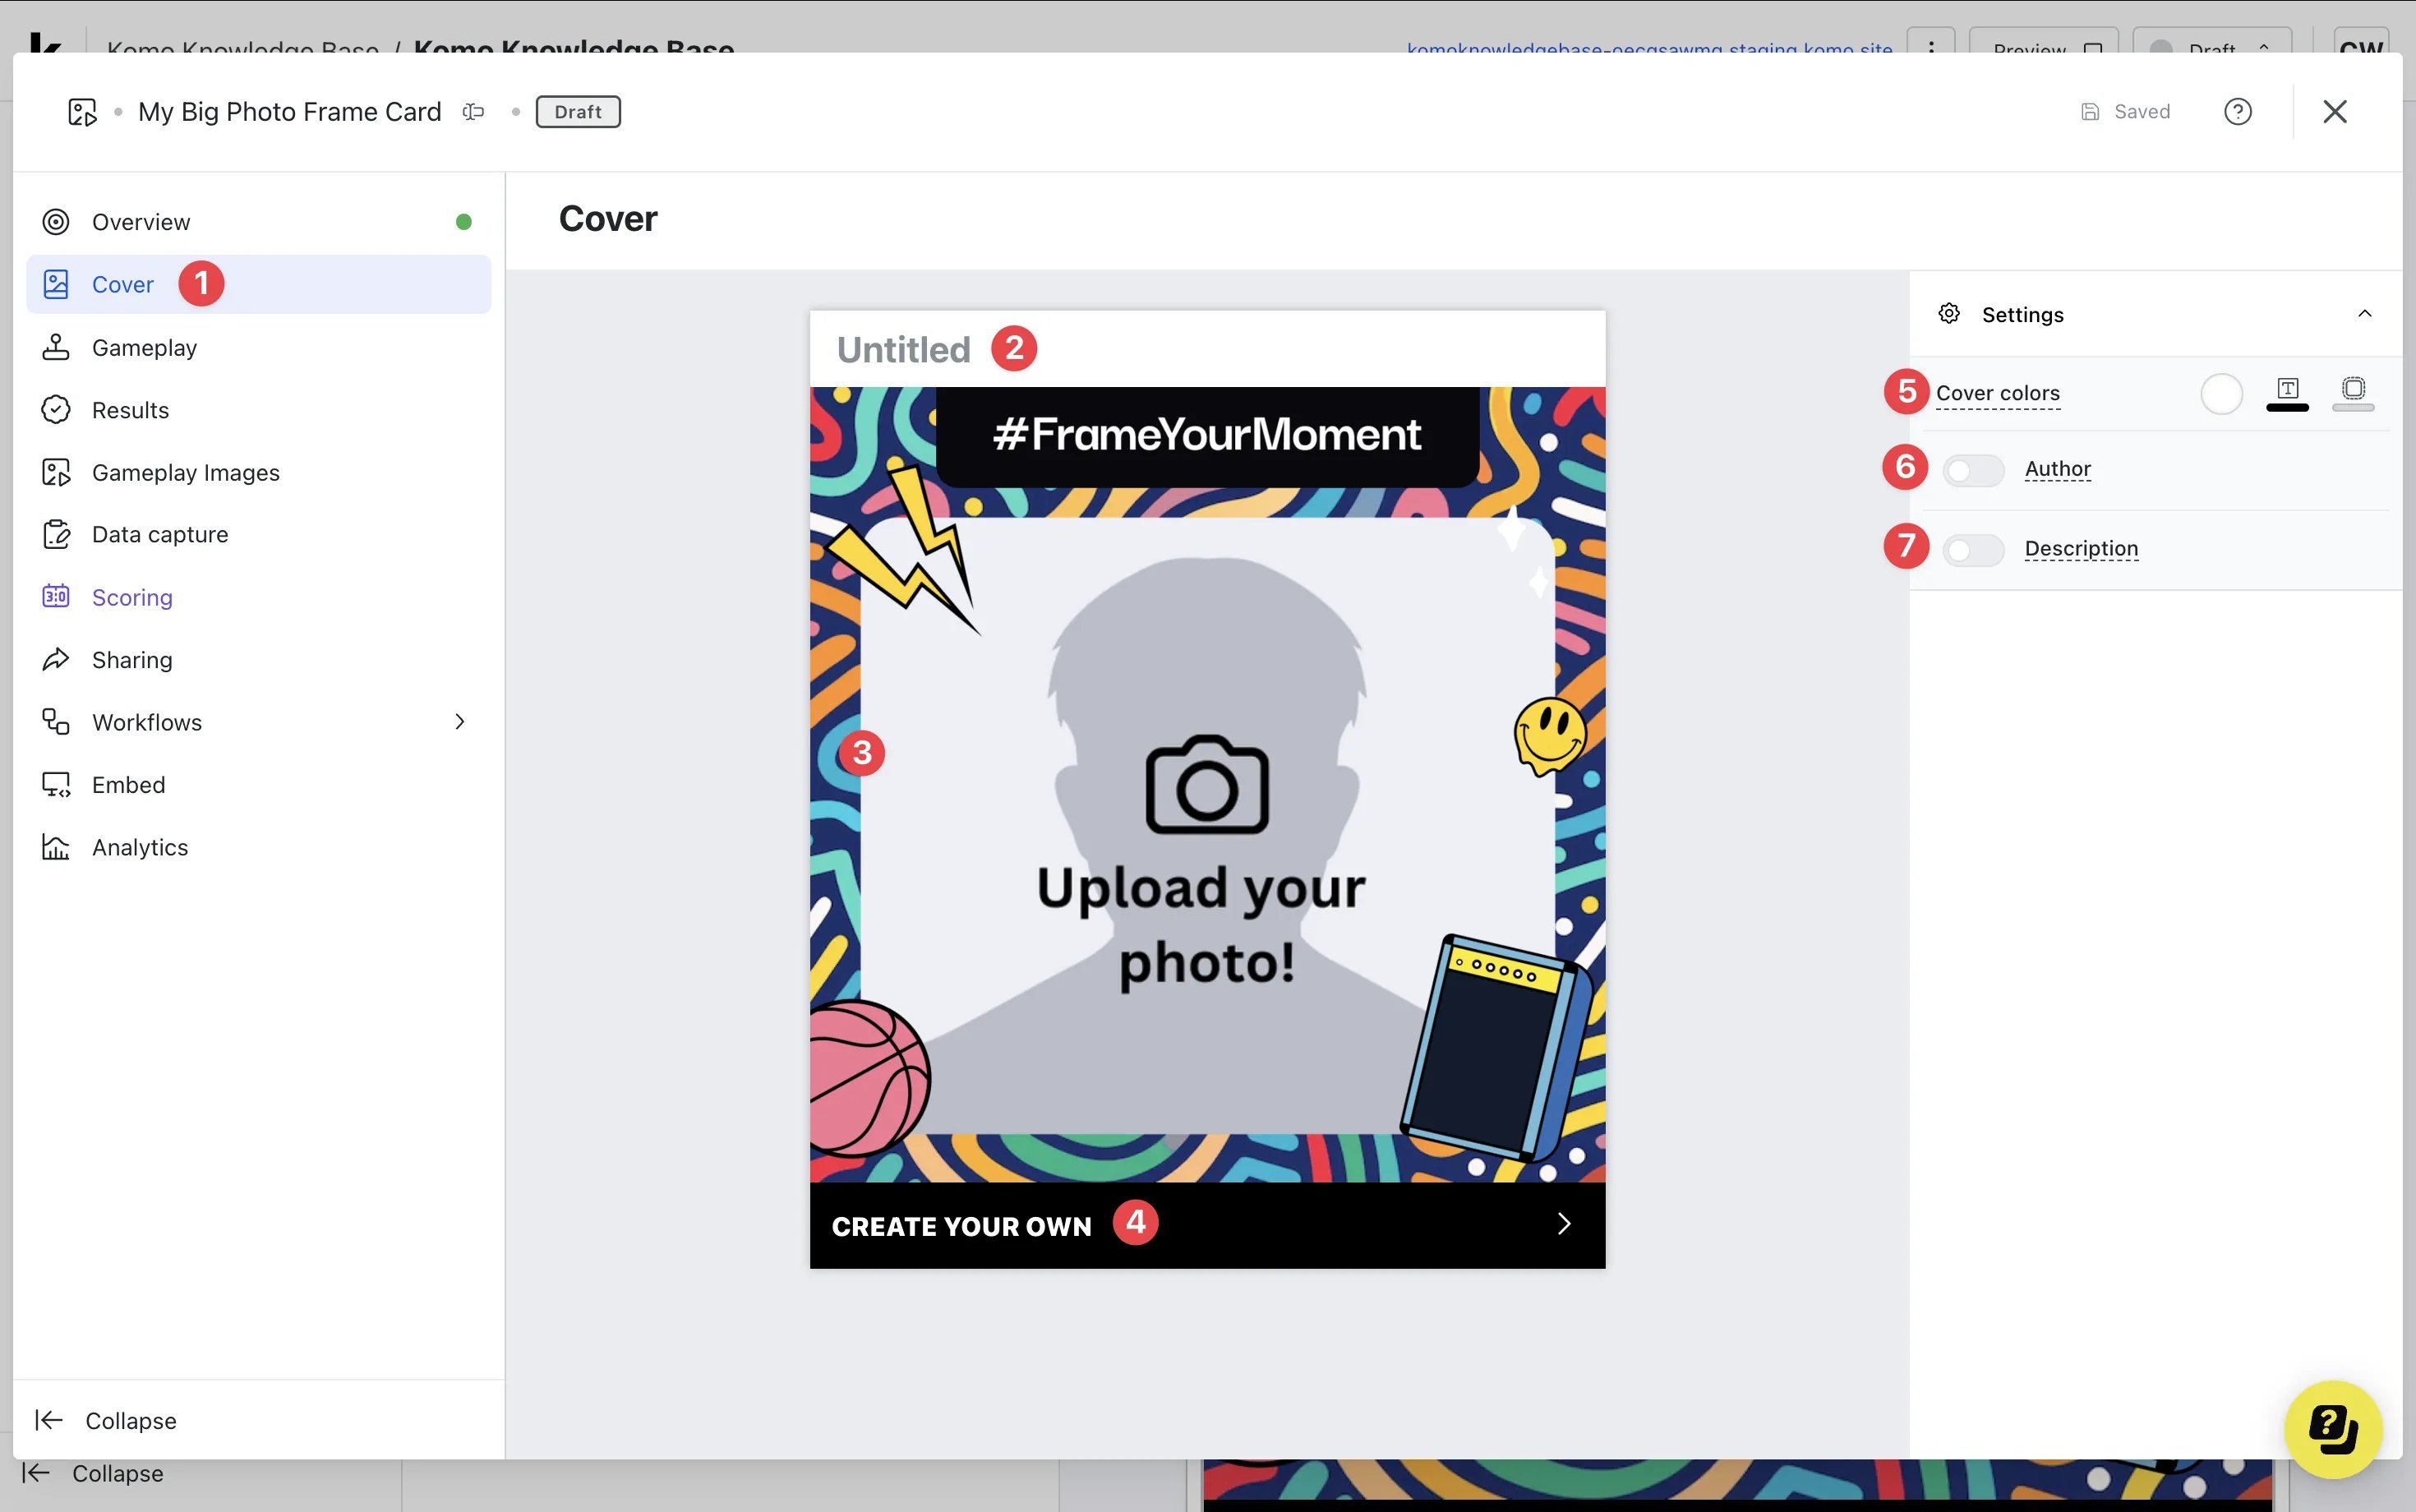 * Clicking on the **Photo Frame** card within your Hub will allow you to edit the card and start building.
* **(1)** Click on **Cover** to begin editing the initial 'Frame' which will also act as the Cover image for your card.
* **(2)** Clicking here will allow you to set a **title**.
* **(3)** Clicking here will give you access to the **Photo** **Frame Editor** where you can add and set up your selection of photo frames.
* Clicking on the **Photo Frame** card within your Hub will allow you to edit the card and start building.
* **(1)** Click on **Cover** to begin editing the initial 'Frame' which will also act as the Cover image for your card.
* **(2)** Clicking here will allow you to set a **title**.
* **(3)** Clicking here will give you access to the **Photo** **Frame Editor** where you can add and set up your selection of photo frames.
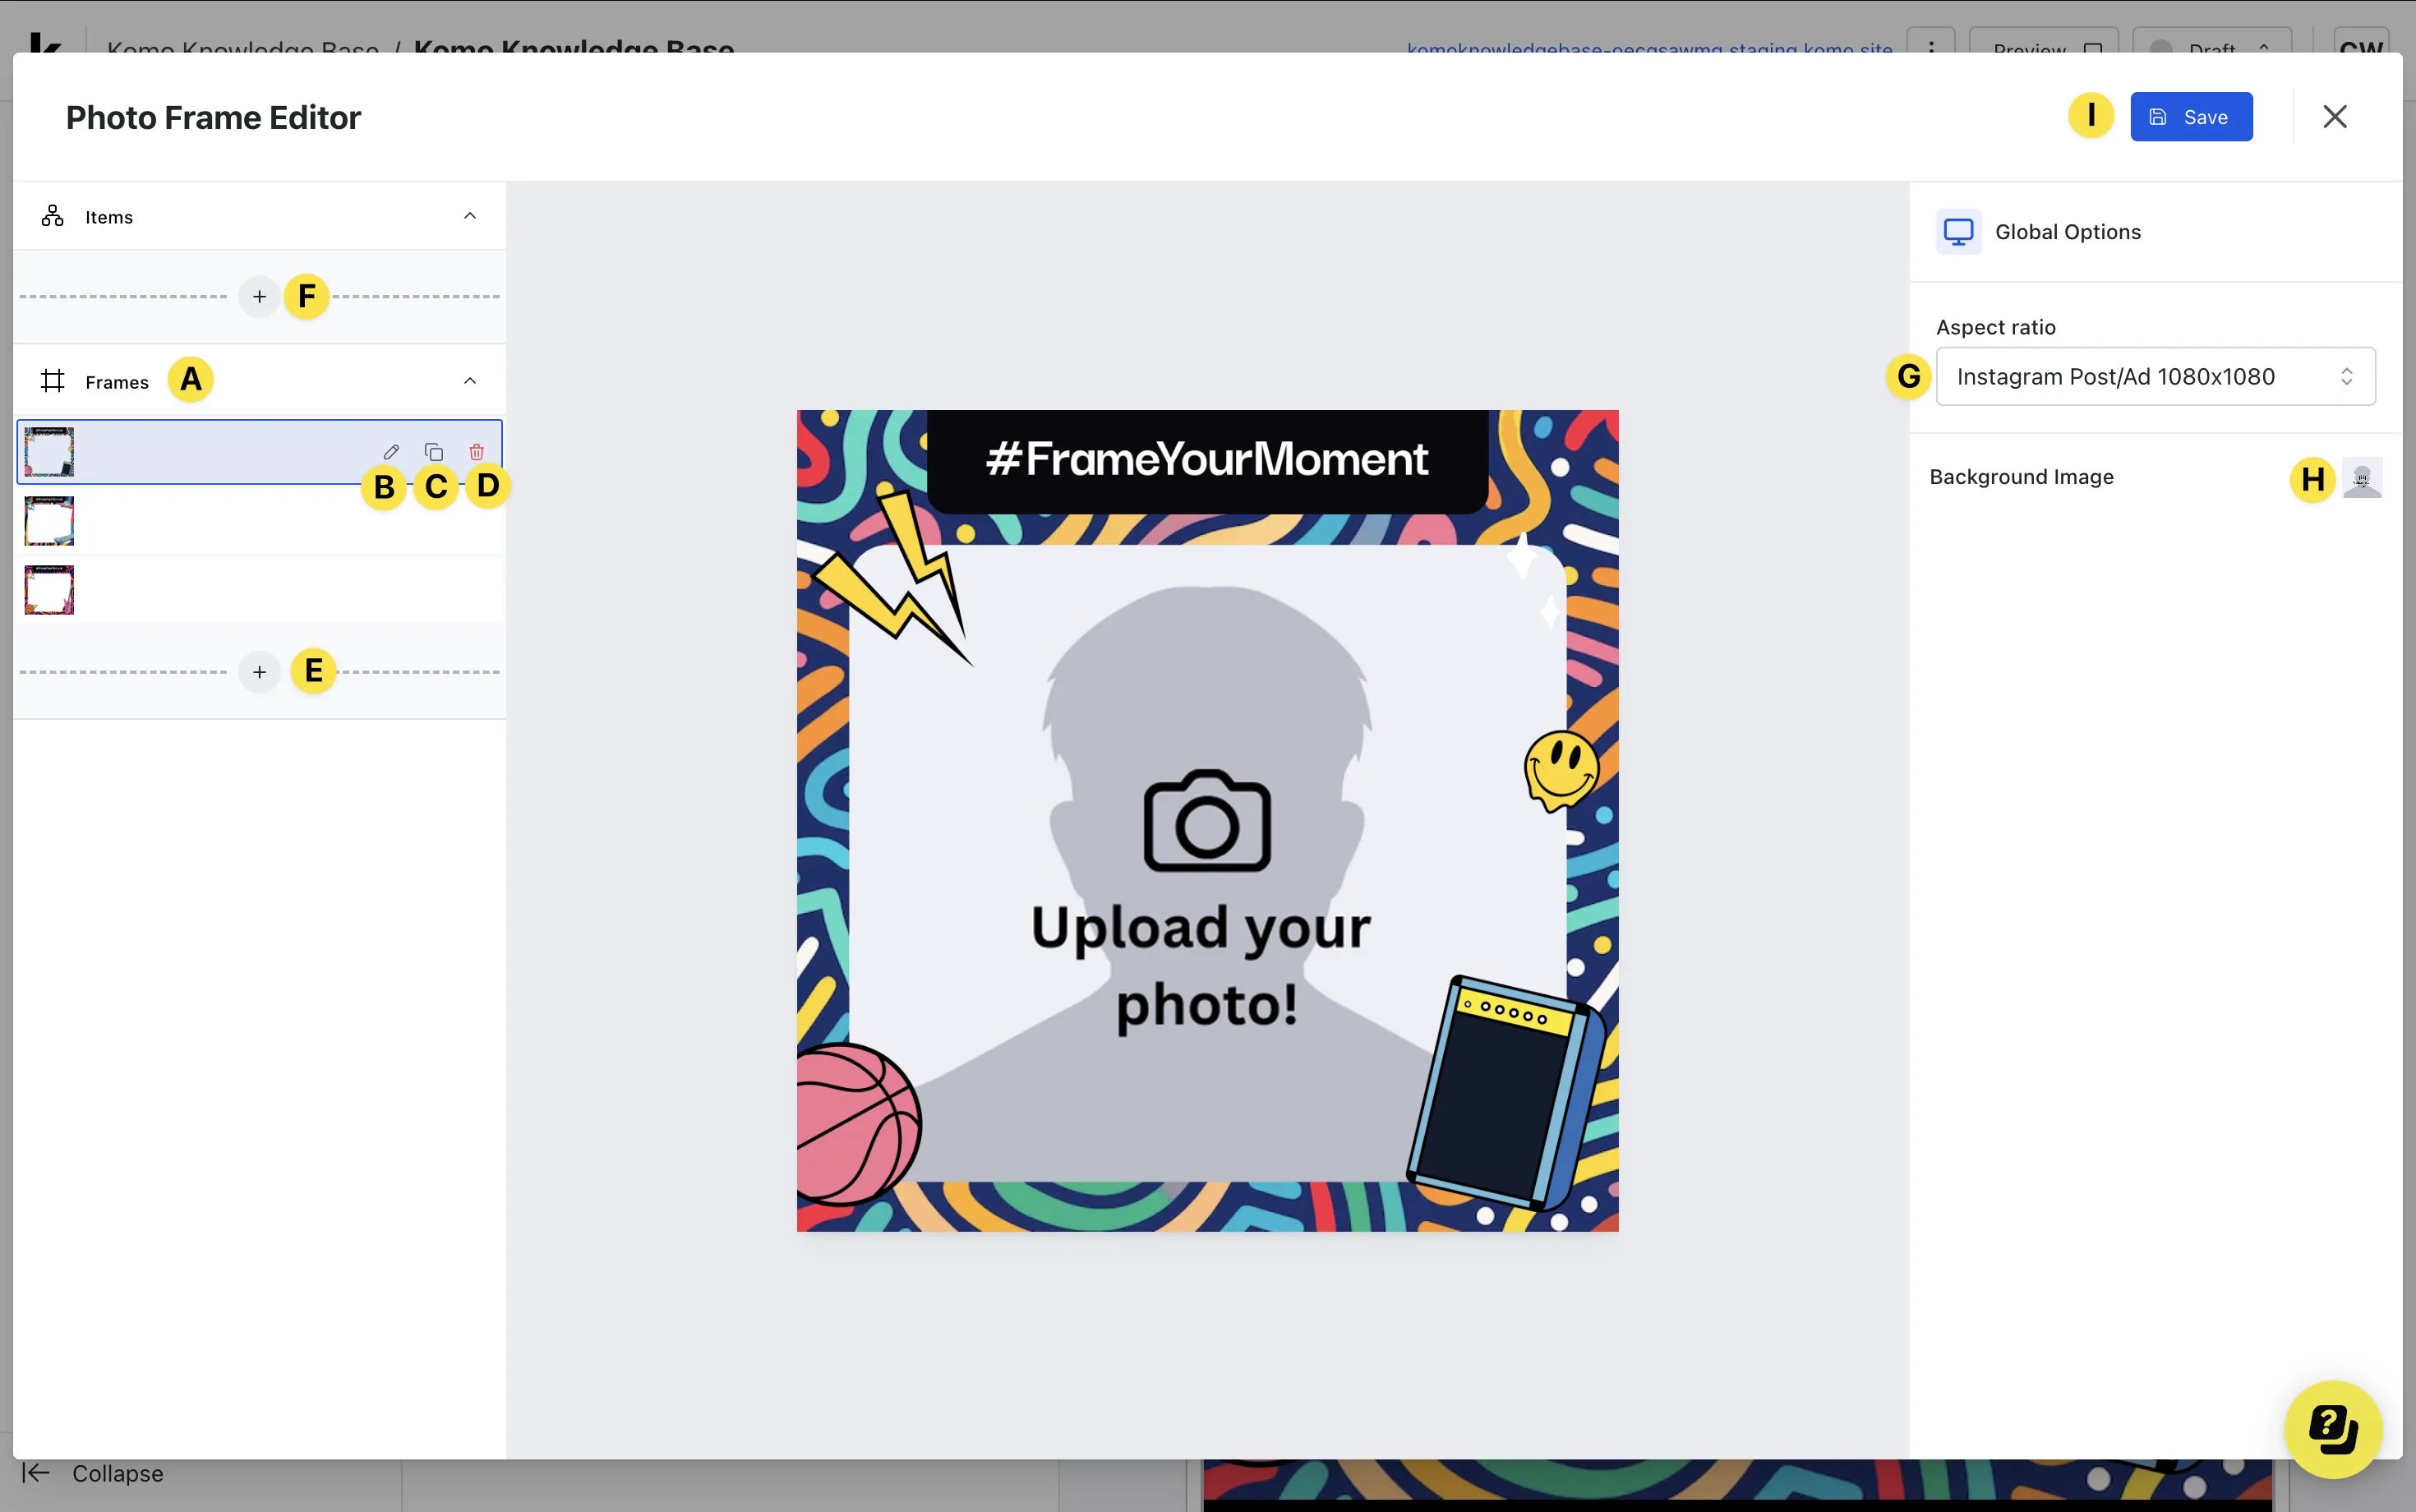 * **(A)** Here you can see all the uploaded **Frames** (there will always be 3 default frames). Clicking on a frame will set that frame as the default frame that is shown when a user interacts with the card.
* **(B)** By clicking on the **Pencil** icon next to the frame, you can **Edit** and replace with a new image.
* **(C)** Clicking here will allow you to **Clone** a frame.
* **(D)** Clicking here will allow you to **Delete** a frame.
* **(E)** Click the **+** icon to **Add** a new frame
* **(A)** Here you can see all the uploaded **Frames** (there will always be 3 default frames). Clicking on a frame will set that frame as the default frame that is shown when a user interacts with the card.
* **(B)** By clicking on the **Pencil** icon next to the frame, you can **Edit** and replace with a new image.
* **(C)** Clicking here will allow you to **Clone** a frame.
* **(D)** Clicking here will allow you to **Delete** a frame.
* **(E)** Click the **+** icon to **Add** a new frame 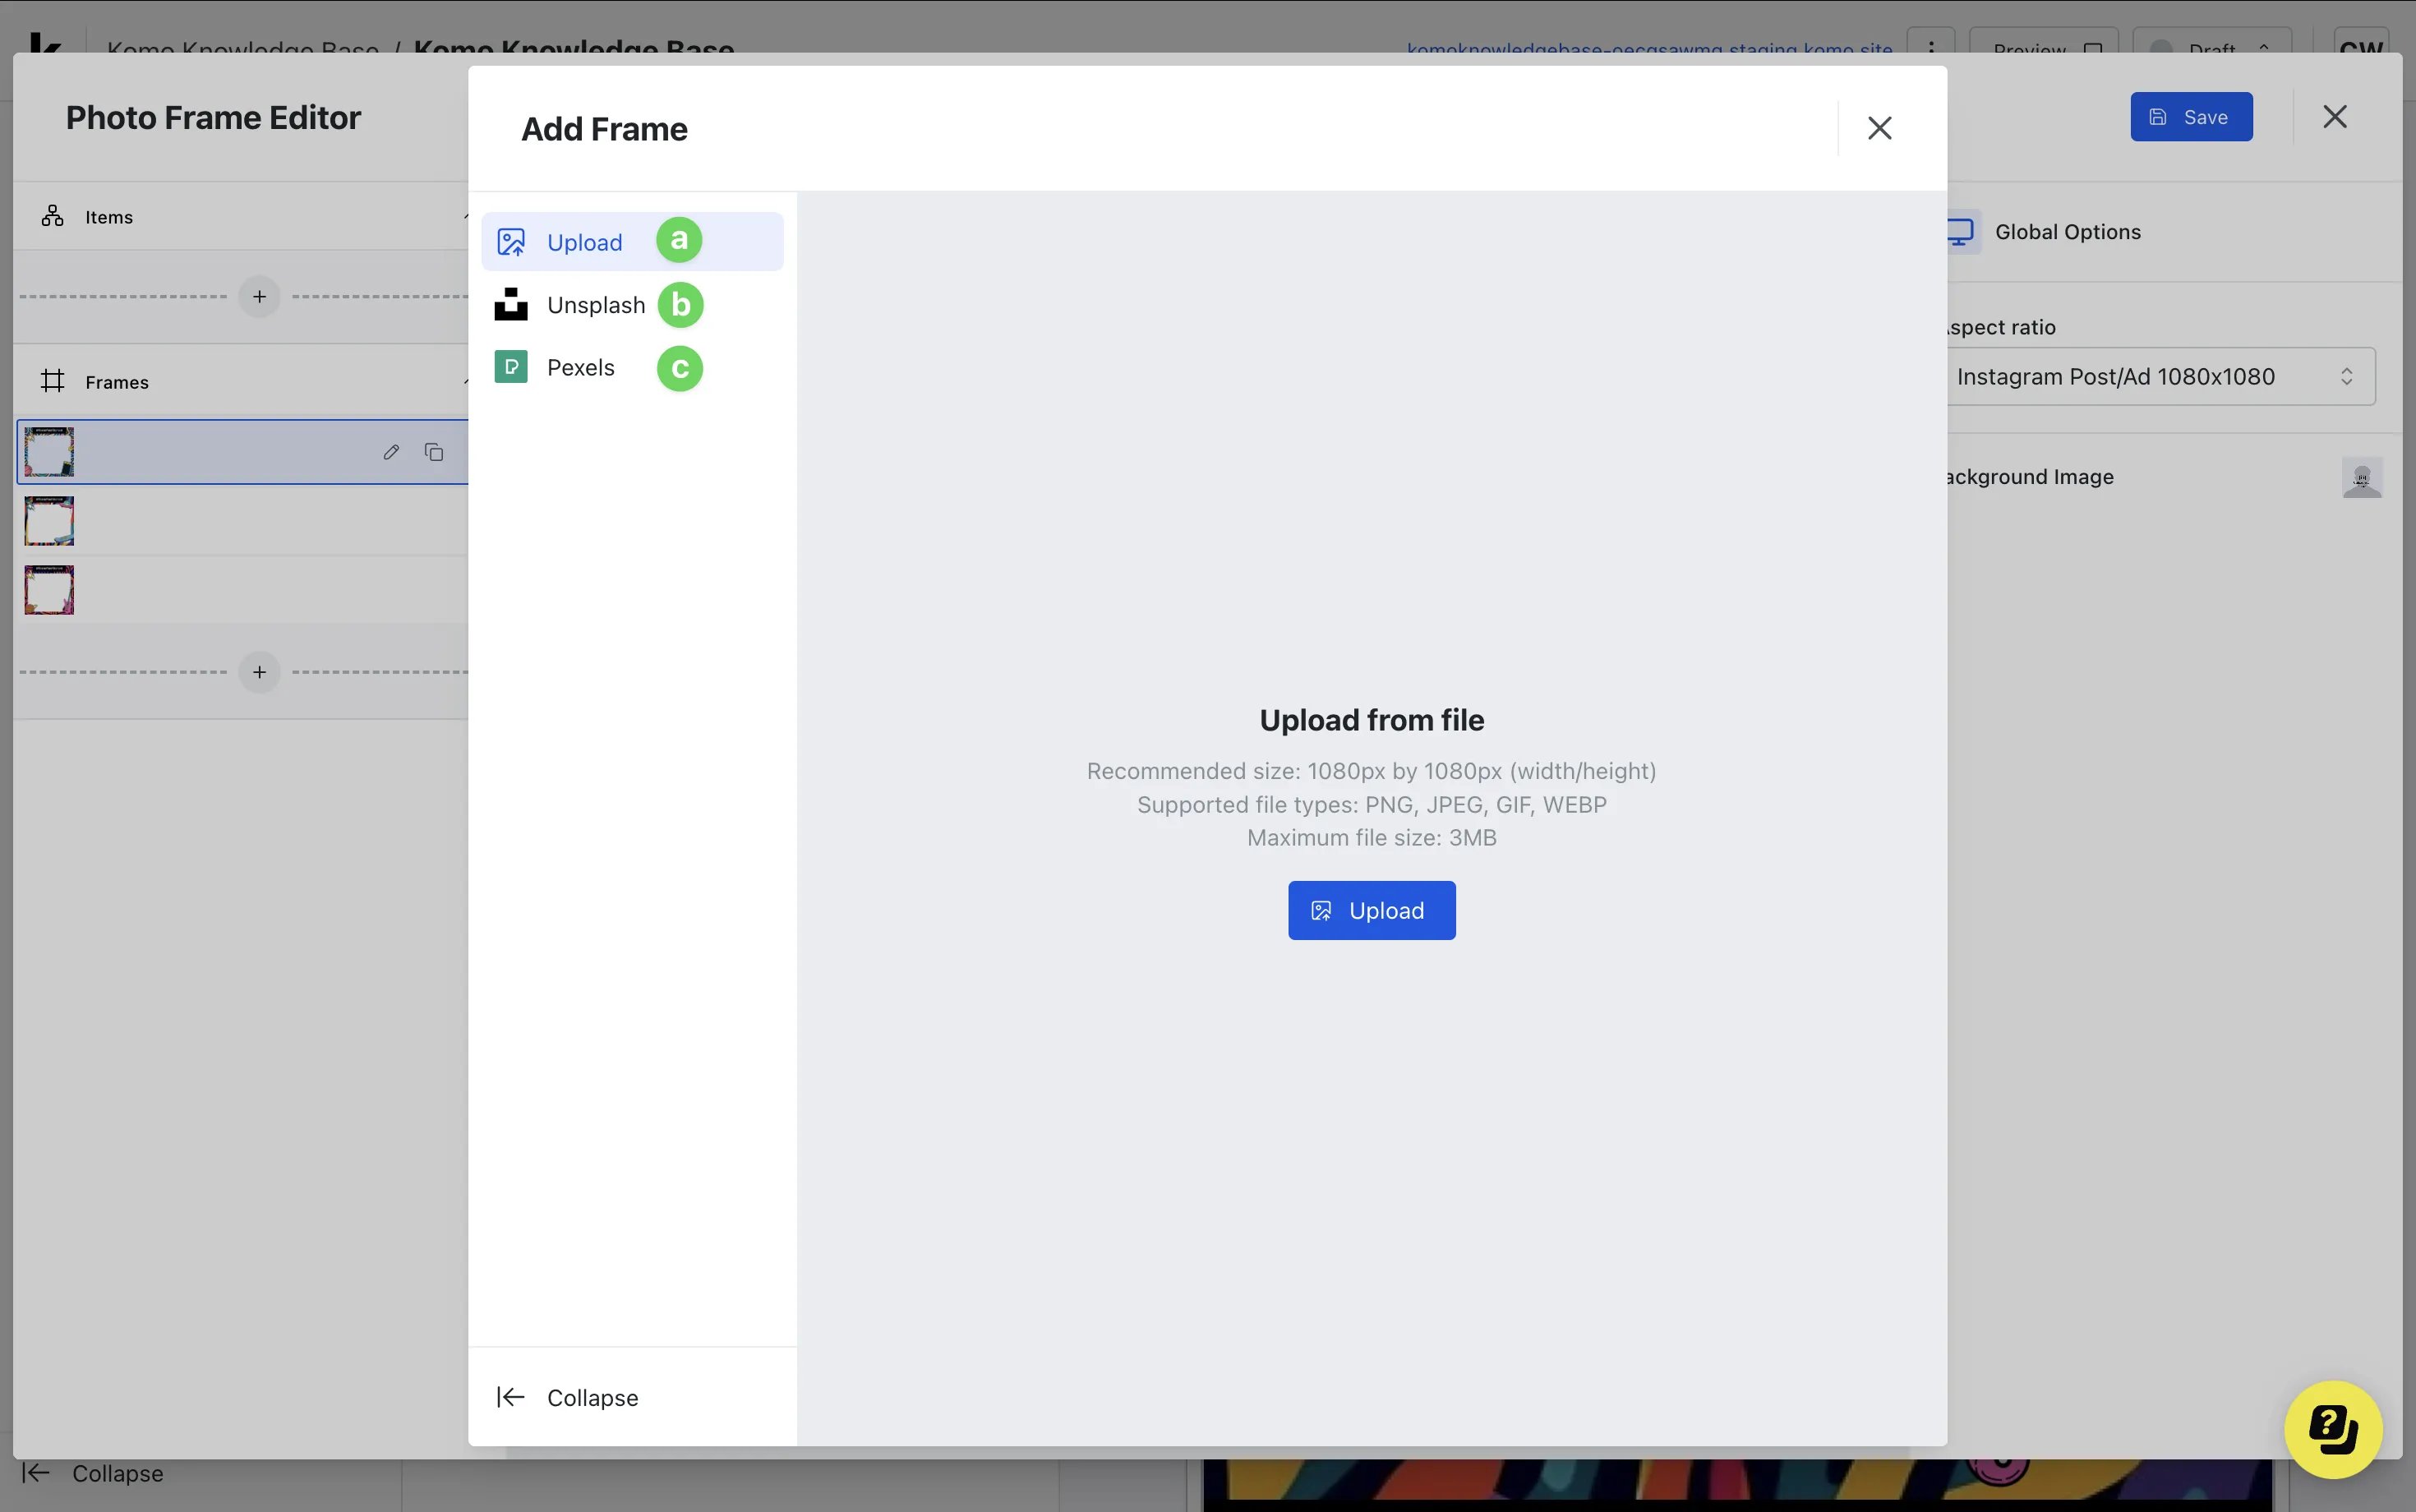 * **(a)** Here you can **Upload** a frame/image from your local drive.
* **(b)** Here you can search **Unsplash's** free image database for a suitable frame.
* **(c)** Here you can search **Pexels'** free image database for a suitable frame.
* **(F)** Click the **+** icon here to **Add items** that are overlaid on your frame. When adding an image item you will have the ability to resize and reposition the image as required. A full breakdown of customization when adding a text item can be seen below.
These items can be text or images and will remain regardless of what Frame is selected.
* **(a)** Here you can **Upload** a frame/image from your local drive.
* **(b)** Here you can search **Unsplash's** free image database for a suitable frame.
* **(c)** Here you can search **Pexels'** free image database for a suitable frame.
* **(F)** Click the **+** icon here to **Add items** that are overlaid on your frame. When adding an image item you will have the ability to resize and reposition the image as required. A full breakdown of customization when adding a text item can be seen below.
These items can be text or images and will remain regardless of what Frame is selected.
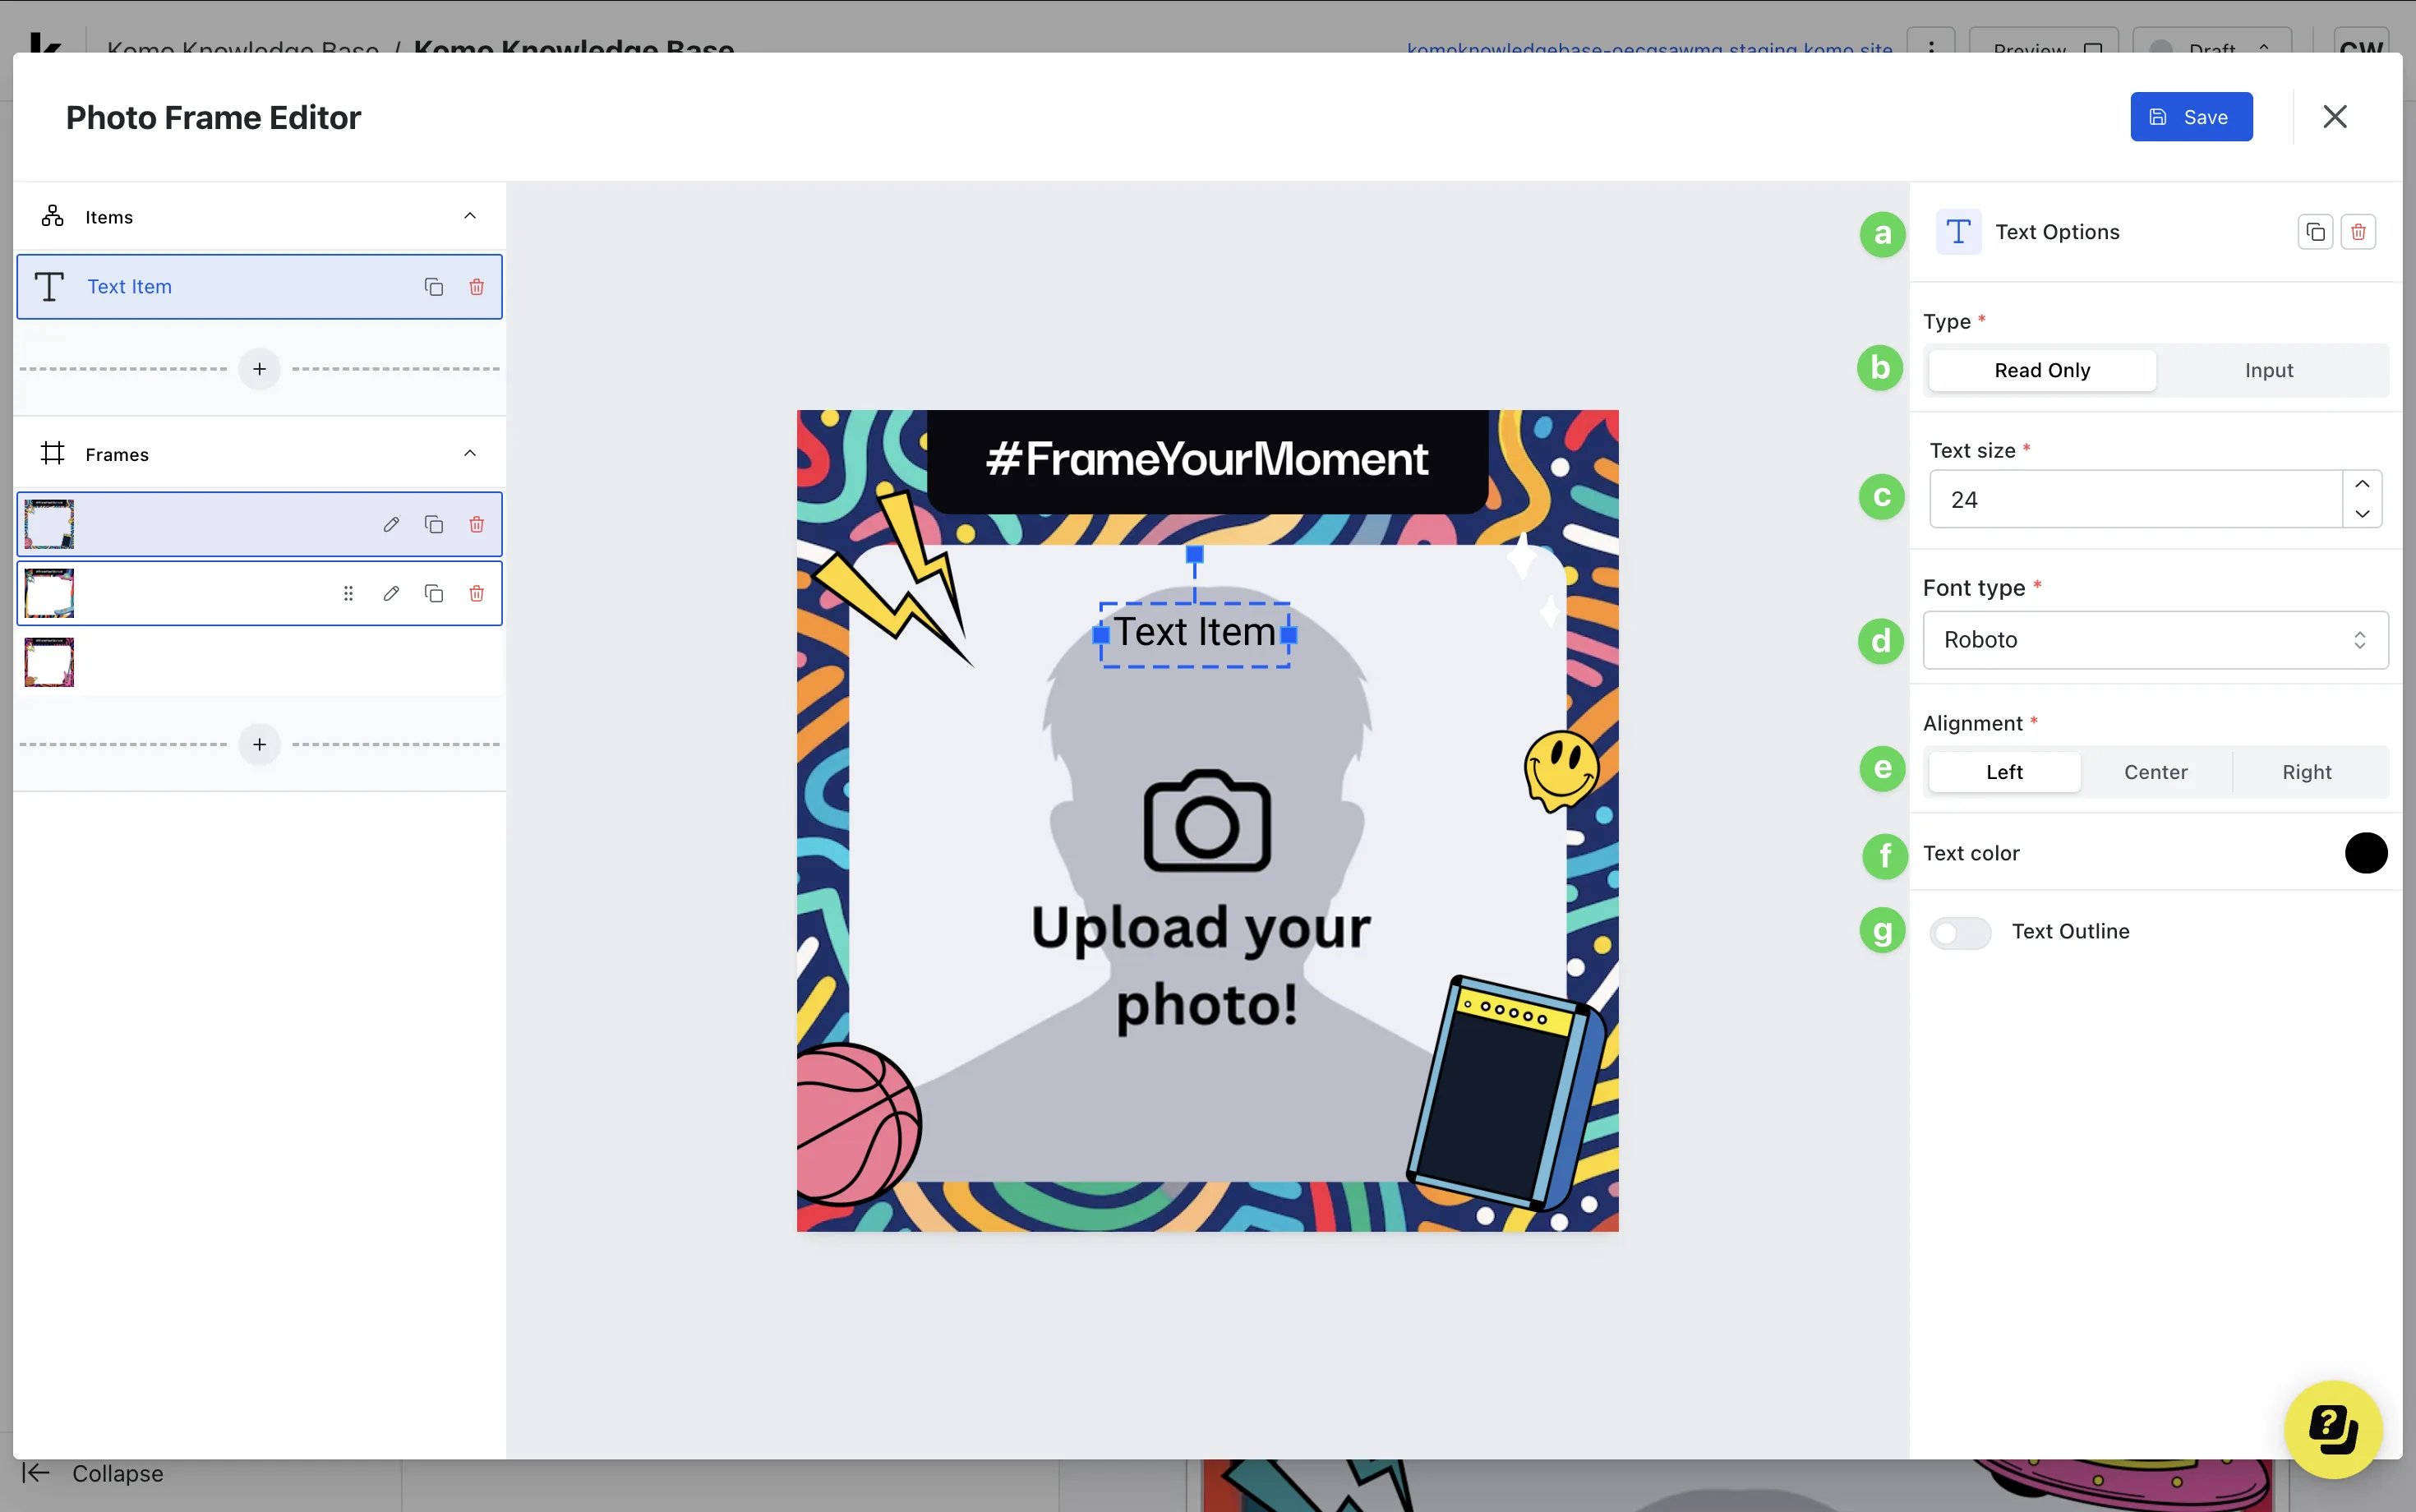 * **(a)** Here you can either **Clone** or **Delete** the text item.
* **(b)** Here we can set whether the text can be editable by your end-users **(Input)** or not **(Read Only)**. When **Input** is selected, you will need to set an interactive label which acts as a prompt for users to edit the text when uploading a photo. This interactive label will not be displayed on the user's final image (only in the creation phase).
* **(c)** Here you can change the **Text size.**
* **(d)** Here you can select your desired **Font type.**
* **(e)** You can **align** the text according to your requirements.
* **(f)** Here you can change the **Text Color.**
* **(g)** You also have the ability to add a colored **Text Outline.**
* **(G)** Select the **Aspect ratio** you would like users to upload their photos in.
We recommend sticking to the default **1080 x 1080** Aspect Ratio for compatibility across devices.
* **(H)** Clicking here will allow you to upload and replace the default **Background Image**. This image is a placeholder only and will be replaced by the user's uploaded photo when creating their submission.
We recommend placing the text "Upload your photo" on the background image to encourage users to take their own photos.
* **(I)** Once you are satisfied with all settings, click **Save** to confirm your changes.
### Step 3: Set up your Gameplay options
* **(a)** Here you can either **Clone** or **Delete** the text item.
* **(b)** Here we can set whether the text can be editable by your end-users **(Input)** or not **(Read Only)**. When **Input** is selected, you will need to set an interactive label which acts as a prompt for users to edit the text when uploading a photo. This interactive label will not be displayed on the user's final image (only in the creation phase).
* **(c)** Here you can change the **Text size.**
* **(d)** Here you can select your desired **Font type.**
* **(e)** You can **align** the text according to your requirements.
* **(f)** Here you can change the **Text Color.**
* **(g)** You also have the ability to add a colored **Text Outline.**
* **(G)** Select the **Aspect ratio** you would like users to upload their photos in.
We recommend sticking to the default **1080 x 1080** Aspect Ratio for compatibility across devices.
* **(H)** Clicking here will allow you to upload and replace the default **Background Image**. This image is a placeholder only and will be replaced by the user's uploaded photo when creating their submission.
We recommend placing the text "Upload your photo" on the background image to encourage users to take their own photos.
* **(I)** Once you are satisfied with all settings, click **Save** to confirm your changes.
### Step 3: Set up your Gameplay options
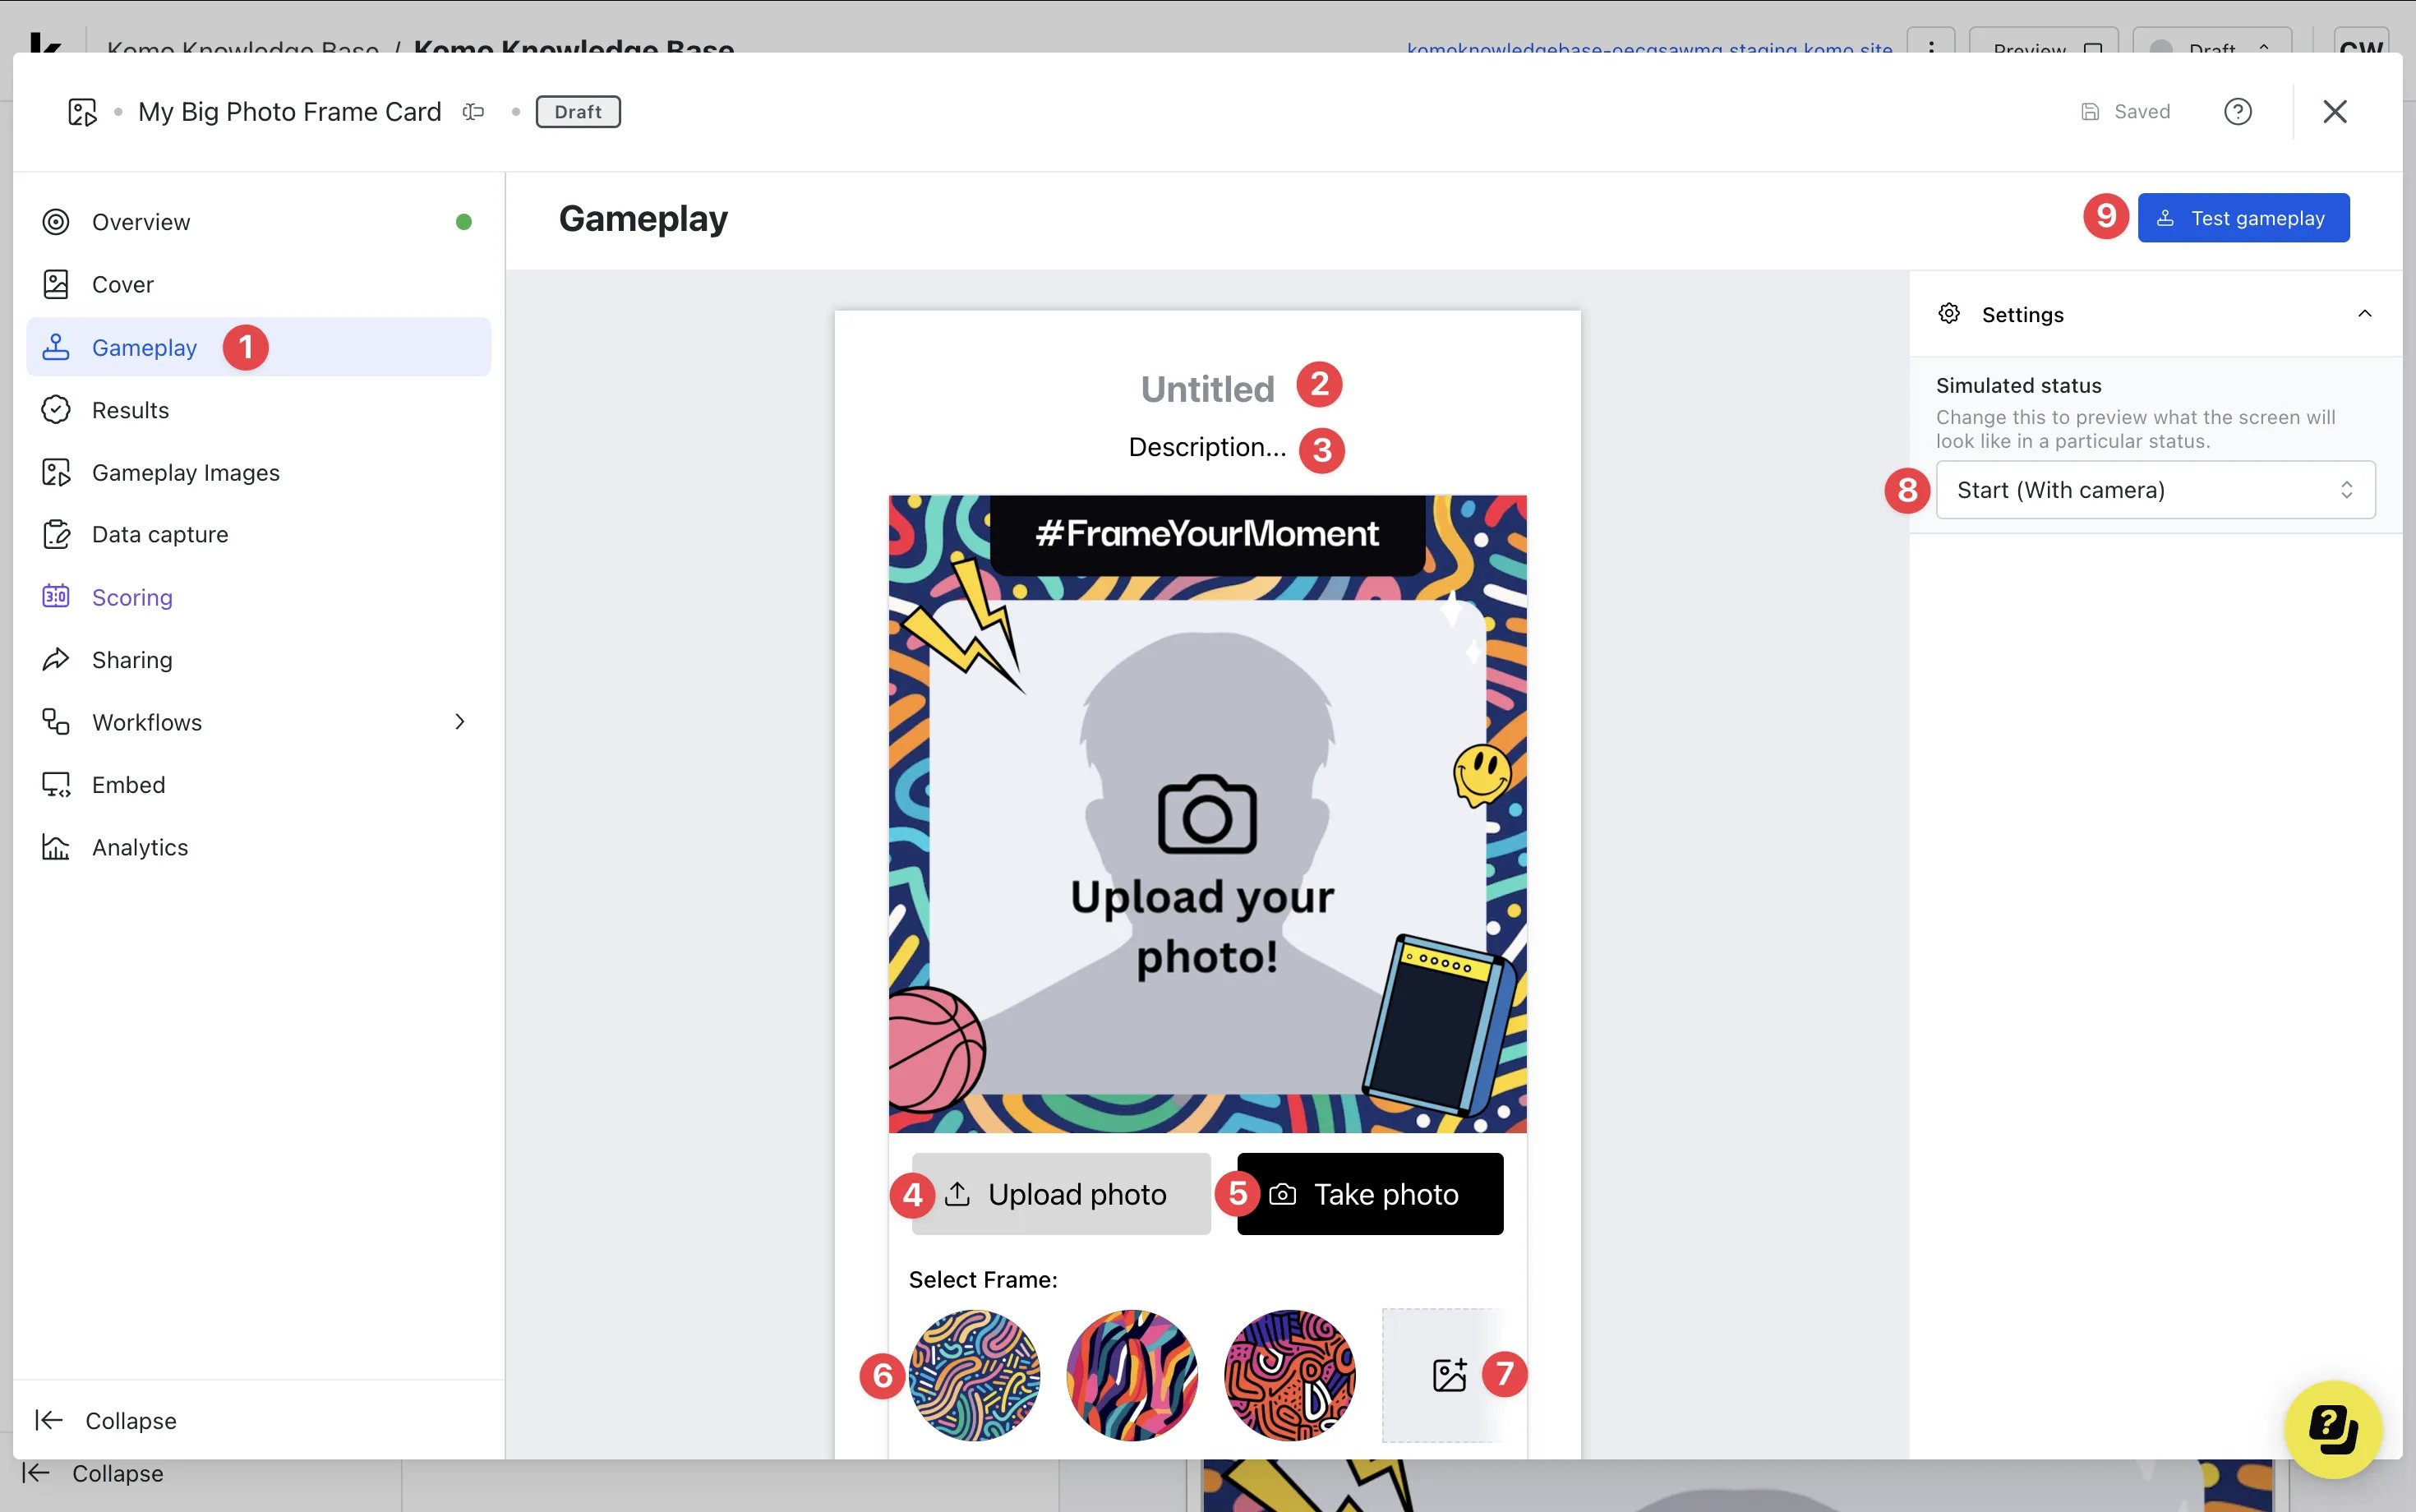 * **(1)** Click **Gameplay** to access the Gameplay editor.
* **(2)** Here you are setting the **Title** for your photo frame.
* **(3)** Enter a **Description**.
* **(4)** By clicking on the **Upload photo button** you can edit the **Text Color** and **Background Color** of the button.
* **(5)** By clicking on the **Take photo button** you can edit the **Text Color** and **Background Color** of the button.
* **(6)** By clicking on the **Frame Thumbnails,** you can **Update the Frame, Update the Thumbnail, Set a Frame as default, or Delete a Frame.**
Frame thumbnails are auto-generated when you upload a Frame but you have the ability to customize these by updating the Thumbnail. The recommended size for frame thumbnails is **400 x 400.**
* **(7)** Click here to **Add a new Frame.**
* **(8)** By clicking on **Simulated Status** you can preview what the screen will look like for the end user depending on whether they have **Started (With Camera), Started (No Camera)** or **Finished (Photo Taken).** You will also have the ability to edit the **Text Color** and **Background Color** for each button that is displayed with each status.
The buttons shown across each of the Simulated Status screens will carry the same colors initially set when editing the Gameplay settings. Editing colors on these screens will edit all button colors across gameplay.
* **(9)** Clicking **Test Gameplay** will enable you to simulate how users will interact with the card.
### Step 4: Add a Data capture *(Optional)*
Adding a Data capture to your card will require users to enter their details in order to download their creation.
### Step 5: Publish your card
* **(1)** Click **Gameplay** to access the Gameplay editor.
* **(2)** Here you are setting the **Title** for your photo frame.
* **(3)** Enter a **Description**.
* **(4)** By clicking on the **Upload photo button** you can edit the **Text Color** and **Background Color** of the button.
* **(5)** By clicking on the **Take photo button** you can edit the **Text Color** and **Background Color** of the button.
* **(6)** By clicking on the **Frame Thumbnails,** you can **Update the Frame, Update the Thumbnail, Set a Frame as default, or Delete a Frame.**
Frame thumbnails are auto-generated when you upload a Frame but you have the ability to customize these by updating the Thumbnail. The recommended size for frame thumbnails is **400 x 400.**
* **(7)** Click here to **Add a new Frame.**
* **(8)** By clicking on **Simulated Status** you can preview what the screen will look like for the end user depending on whether they have **Started (With Camera), Started (No Camera)** or **Finished (Photo Taken).** You will also have the ability to edit the **Text Color** and **Background Color** for each button that is displayed with each status.
The buttons shown across each of the Simulated Status screens will carry the same colors initially set when editing the Gameplay settings. Editing colors on these screens will edit all button colors across gameplay.
* **(9)** Clicking **Test Gameplay** will enable you to simulate how users will interact with the card.
### Step 4: Add a Data capture *(Optional)*
Adding a Data capture to your card will require users to enter their details in order to download their creation.
### Step 5: Publish your card
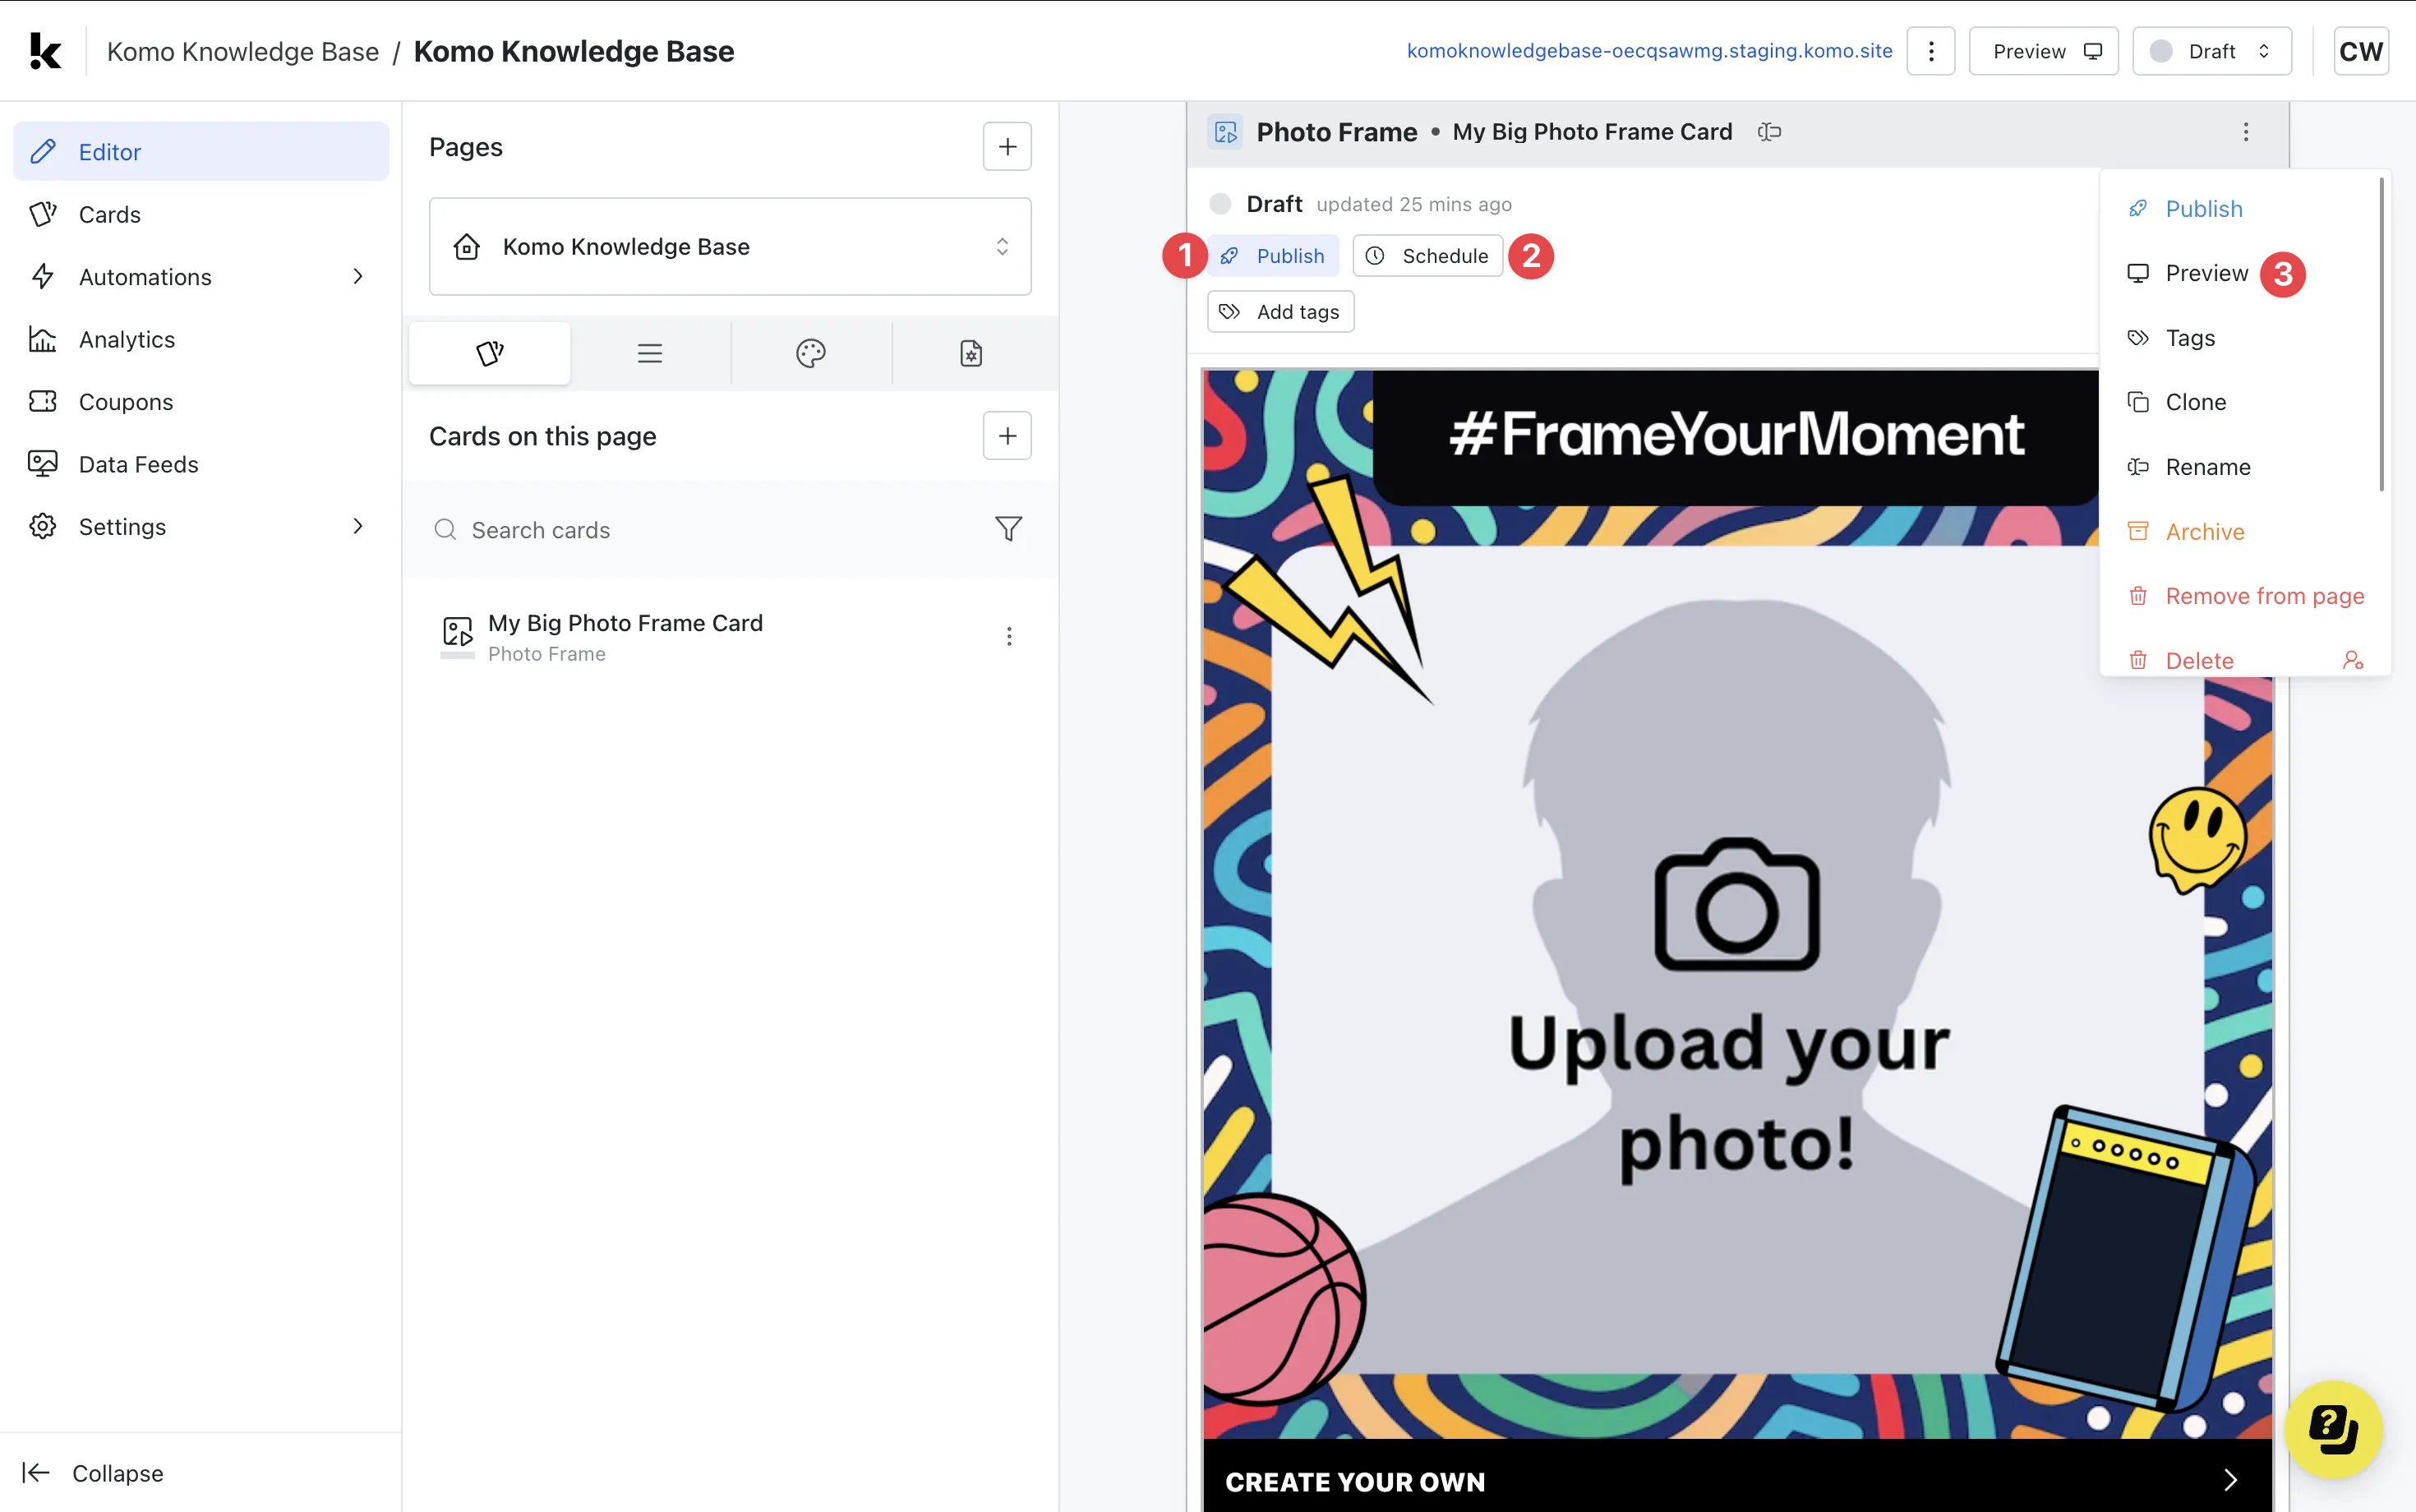 **Once you've completed all of these steps, played around with your card and are happy with all the aspects of your card, it's time to get your card live!**
* **(1) Publish** your card manually and instantly for the world to see.
* **(2) Schedule** your card to be published and unpublished at set dates and times.
* **(3)** Click on **...** to **Preview** and interact with the card on the front end from a user's perspective before publishing it. See how to test your card [here](/getting-started/hub-setup/card-testing).
All competition entries will be recorded and will impact the card analytics.
## "Go live" checklist
Ready to go live with your Photo Frame? We recommend reviewing the following list before launching and double-checking if you have:
* All images uploaded are the **correct dimensions**. Export image files in 2x to ensure none of the images appear pixelated.
* Added all your desired **frames** and **thumbnails.**
* Added a **placeholder background image**
Then you're ready to go live!
## Promotion
## **FAQ**
**When a photograph is taken where is it stored?**
If you go under the **Gameplay Images** tab you will be able to review and download all images that have been created on your card, within this card you will also be able to review the details of the user that has uploaded their photo.
**Is there a way to see the number of creations made?**
If you click on the **Analytics** tab, you can see a breakdown of stats relating to the card. Alternatively, you can check the number of creations made by clicking on the **Gameplay Images** tab and scrolling down to the bottom.
**What's the purpose of uploading multiple frames?**
Uploading multiple frames gives your end user more flexibility to choose the frame that best aligns with their taste. When uploading a photo or taking a selfie, the end user will be able to apply any of the frames that you have uploaded to the card.
**Can users take photos/selfies in the Photo Frame?**
Yes, they can! Users can take photos from their mobile, laptop, or computer.
## Top Tips
* Use a team guernsey and get users to upload a photo of themselves in support of their favorite team!
* Make a 'frame' for your meme canvas. A frame will be a border you put around an image and here you can include your logo/imagery. This frame will be permanent, so when users upload a photo, the frame will be visible each time. A frame is great to include as when users share their creations, it will include your logo/imagery and help promote your brand.
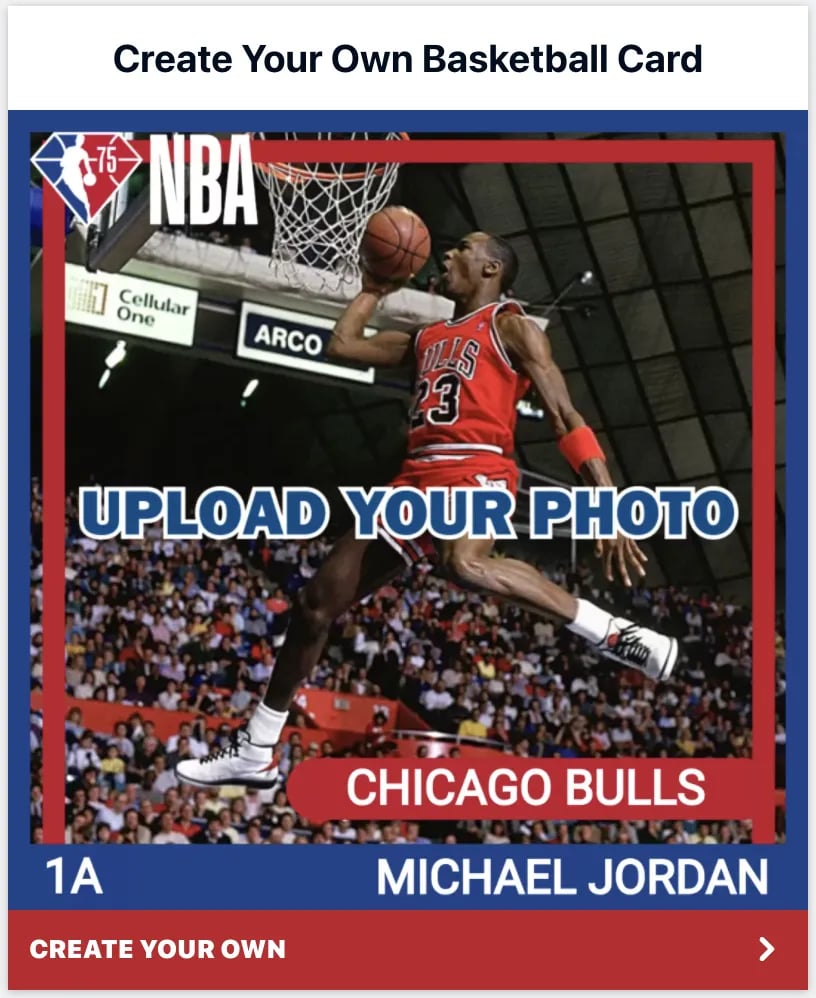
The frame will look like below:
**Once you've completed all of these steps, played around with your card and are happy with all the aspects of your card, it's time to get your card live!**
* **(1) Publish** your card manually and instantly for the world to see.
* **(2) Schedule** your card to be published and unpublished at set dates and times.
* **(3)** Click on **...** to **Preview** and interact with the card on the front end from a user's perspective before publishing it. See how to test your card [here](/getting-started/hub-setup/card-testing).
All competition entries will be recorded and will impact the card analytics.
## "Go live" checklist
Ready to go live with your Photo Frame? We recommend reviewing the following list before launching and double-checking if you have:
* All images uploaded are the **correct dimensions**. Export image files in 2x to ensure none of the images appear pixelated.
* Added all your desired **frames** and **thumbnails.**
* Added a **placeholder background image**
Then you're ready to go live!
## Promotion
## **FAQ**
**When a photograph is taken where is it stored?**
If you go under the **Gameplay Images** tab you will be able to review and download all images that have been created on your card, within this card you will also be able to review the details of the user that has uploaded their photo.
**Is there a way to see the number of creations made?**
If you click on the **Analytics** tab, you can see a breakdown of stats relating to the card. Alternatively, you can check the number of creations made by clicking on the **Gameplay Images** tab and scrolling down to the bottom.
**What's the purpose of uploading multiple frames?**
Uploading multiple frames gives your end user more flexibility to choose the frame that best aligns with their taste. When uploading a photo or taking a selfie, the end user will be able to apply any of the frames that you have uploaded to the card.
**Can users take photos/selfies in the Photo Frame?**
Yes, they can! Users can take photos from their mobile, laptop, or computer.
## Top Tips
* Use a team guernsey and get users to upload a photo of themselves in support of their favorite team!
* Make a 'frame' for your meme canvas. A frame will be a border you put around an image and here you can include your logo/imagery. This frame will be permanent, so when users upload a photo, the frame will be visible each time. A frame is great to include as when users share their creations, it will include your logo/imagery and help promote your brand.
The frame will look like below:
 The cover of the card will update as below: