> ## Documentation Index
> Fetch the complete documentation index at: https://knowledge.komo.tech/llms.txt
> Use this file to discover all available pages before exploring further.
# Receipt Uploader Card
> Reward users when they upload proof of purchase.
## What is it?
The Receipt Uploader card is an easy tool for customers to upload proof of purchase. This is commonly used in conjunction with campaigns where digital coupons or prizes are awarded for shopping, e.g., spend \$10 in-store and receive a free coffee.
## Watch it come to life
## How do I build one?
* [Step 1: Add a Receipt Uploader card to your Hub](#step-1-add-a-receipt-uploader-card-to-your-hub)
* [Step 2: Add a Cover image](#step-2-add-a-cover-image)
* [Step 3: Set up your Data capture](#step-3-set-up-your-data-capture)
* [Step 4: Publish your card](#step-4-publish-your-card)
### Step 1: Add a Receipt Uploader card to your Hub
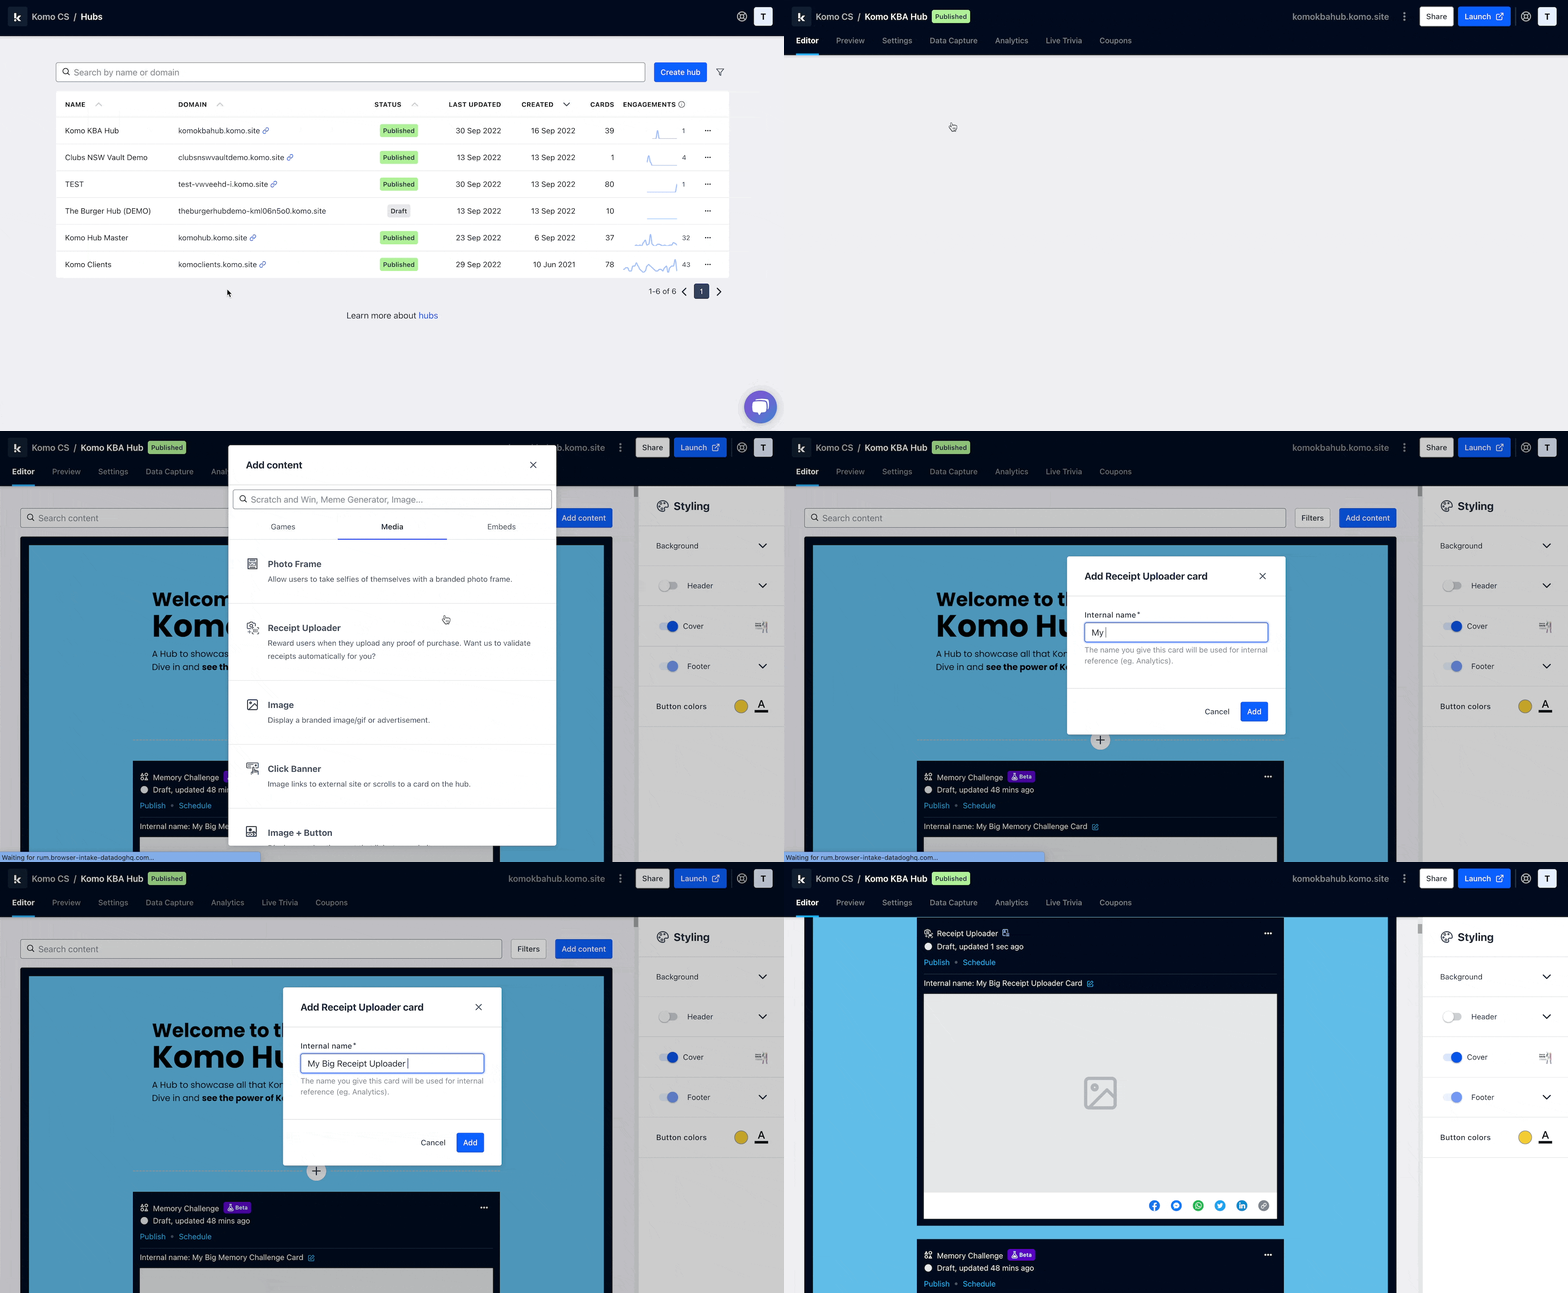 * Navigate to your **Engagement Hub**.
* Once there click **Add Content**, from here select **Media** and then **Receipt Uploader.**
* You will then see your new card has been added to your Hub.
### Step 2: Add a Cover image
* Navigate to your **Engagement Hub**.
* Once there click **Add Content**, from here select **Media** and then **Receipt Uploader.**
* You will then see your new card has been added to your Hub.
### Step 2: Add a Cover image
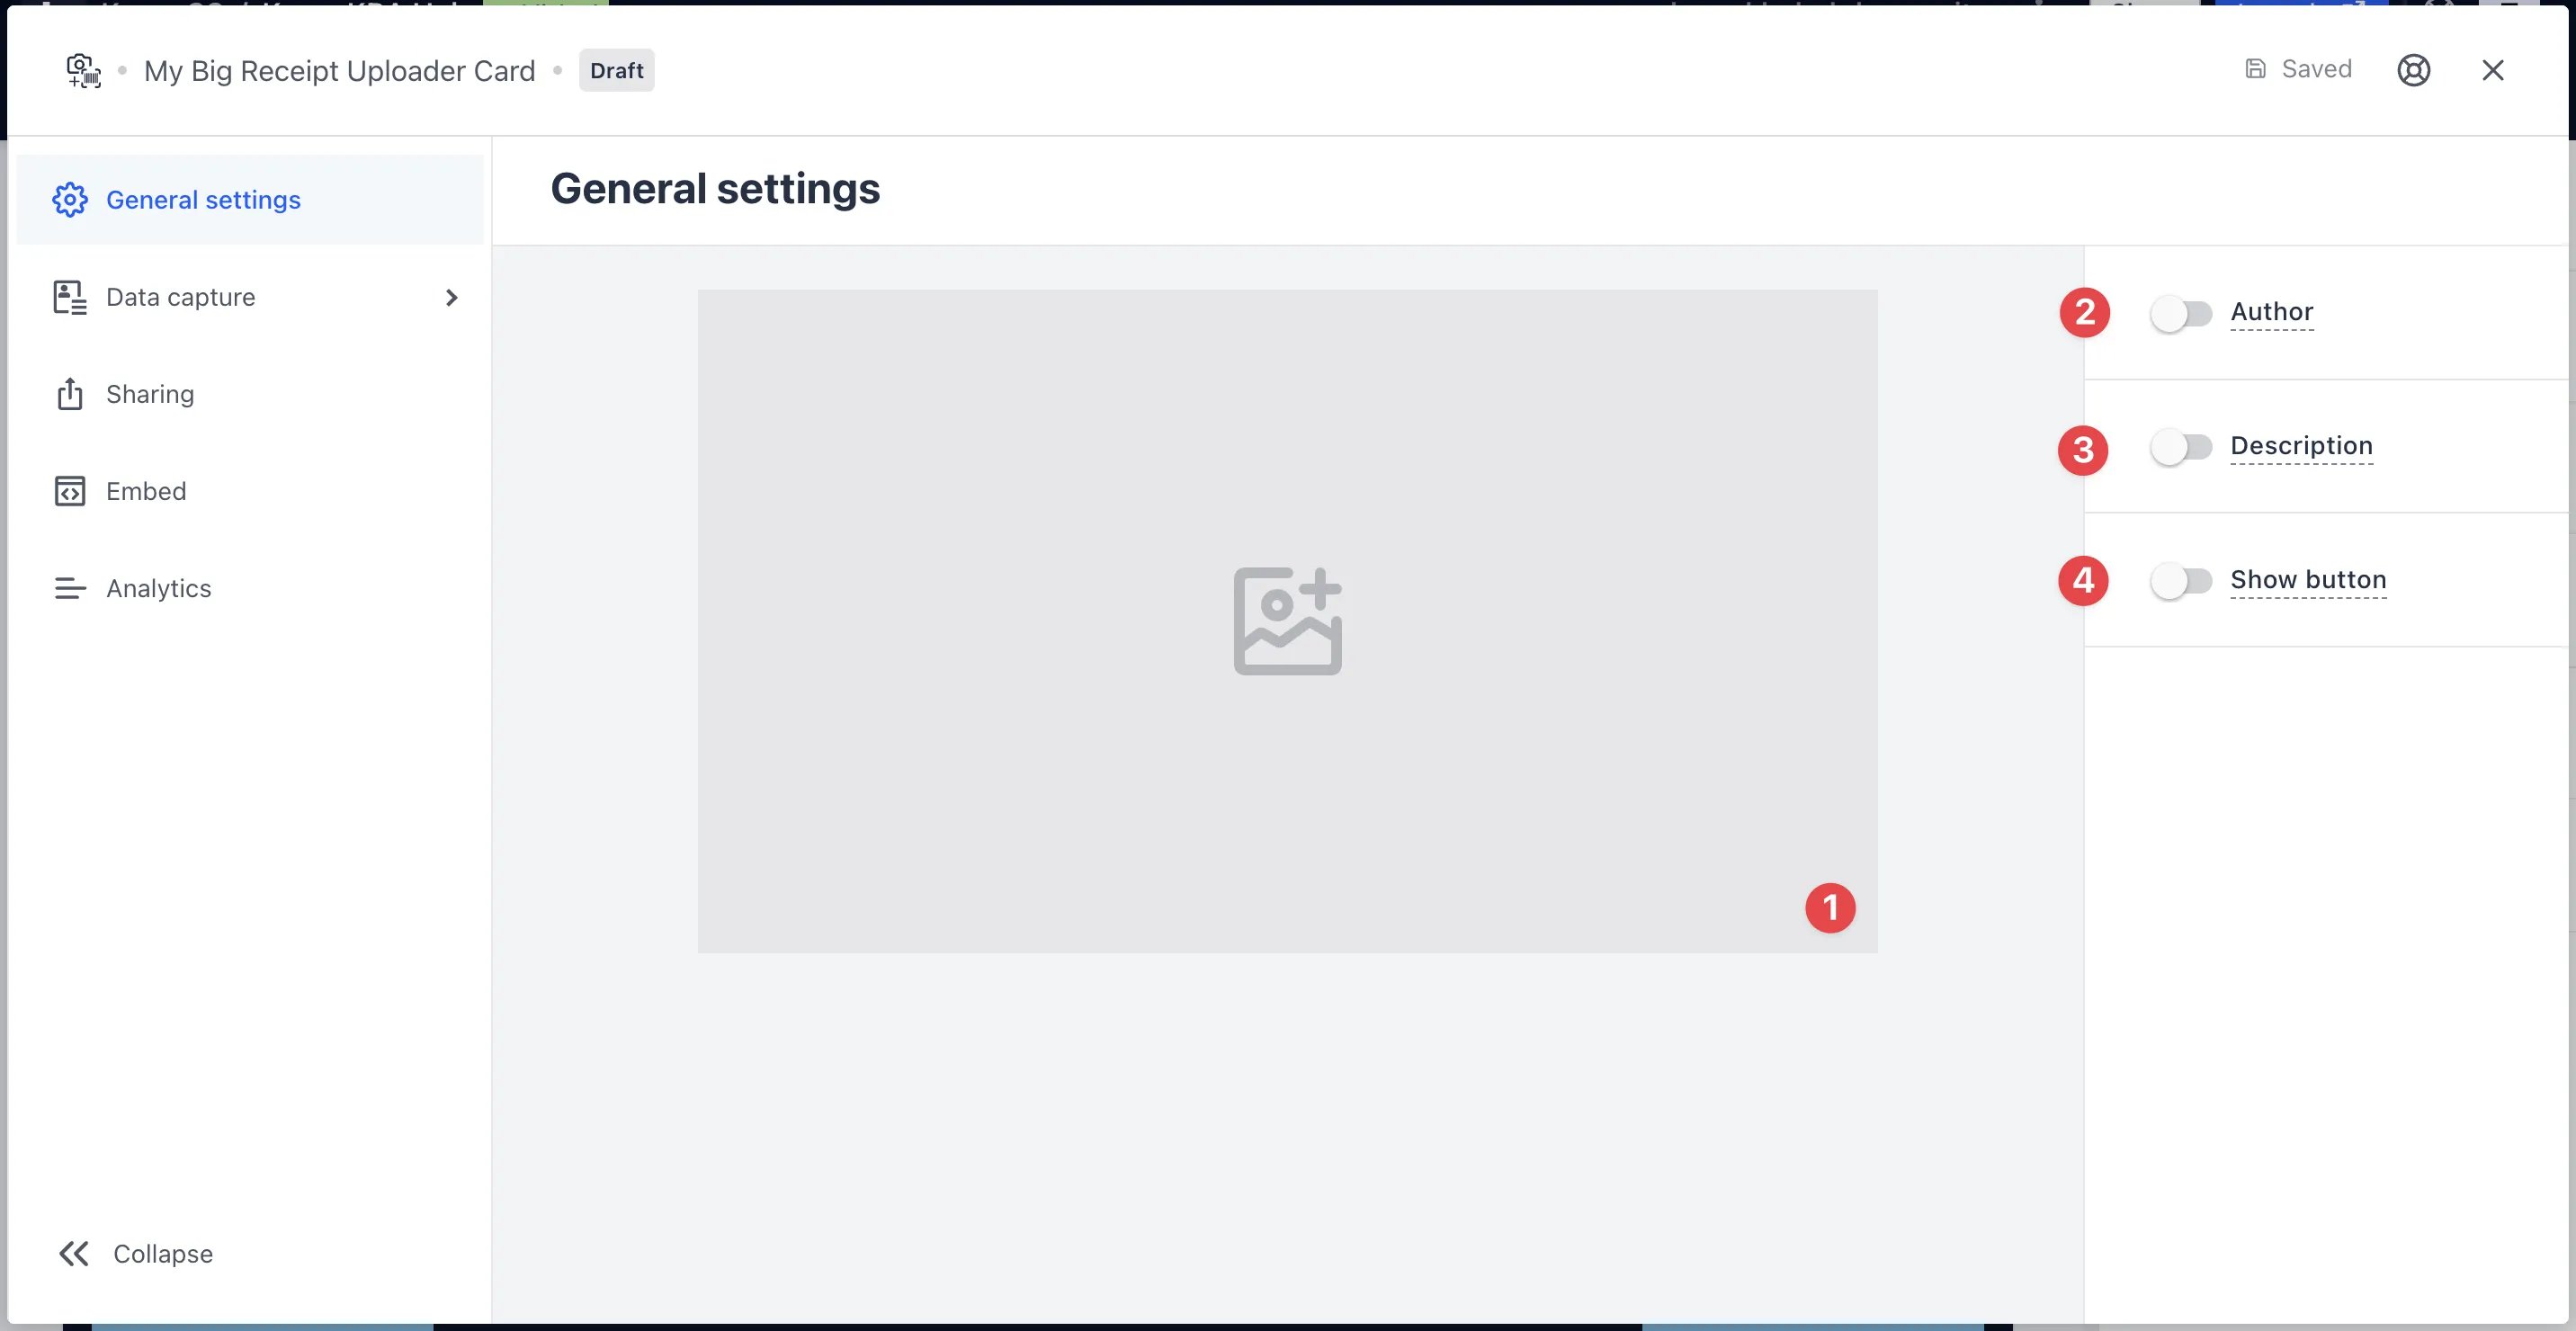 * **(1)** Here is where you'll add your **Cover** image.
* **(2)** You can add an **author** tag by displaying the brand or person who's responsible for the card content.
* **(3)** Add a **description** to the card.
* **(4)** Here you can add a **call-to-action** button below the card.
If you have this disabled, make sure you add a CTA in the cover image.
* **(1)** Here is where you'll add your **Cover** image.
* **(2)** You can add an **author** tag by displaying the brand or person who's responsible for the card content.
* **(3)** Add a **description** to the card.
* **(4)** Here you can add a **call-to-action** button below the card.
If you have this disabled, make sure you add a CTA in the cover image.
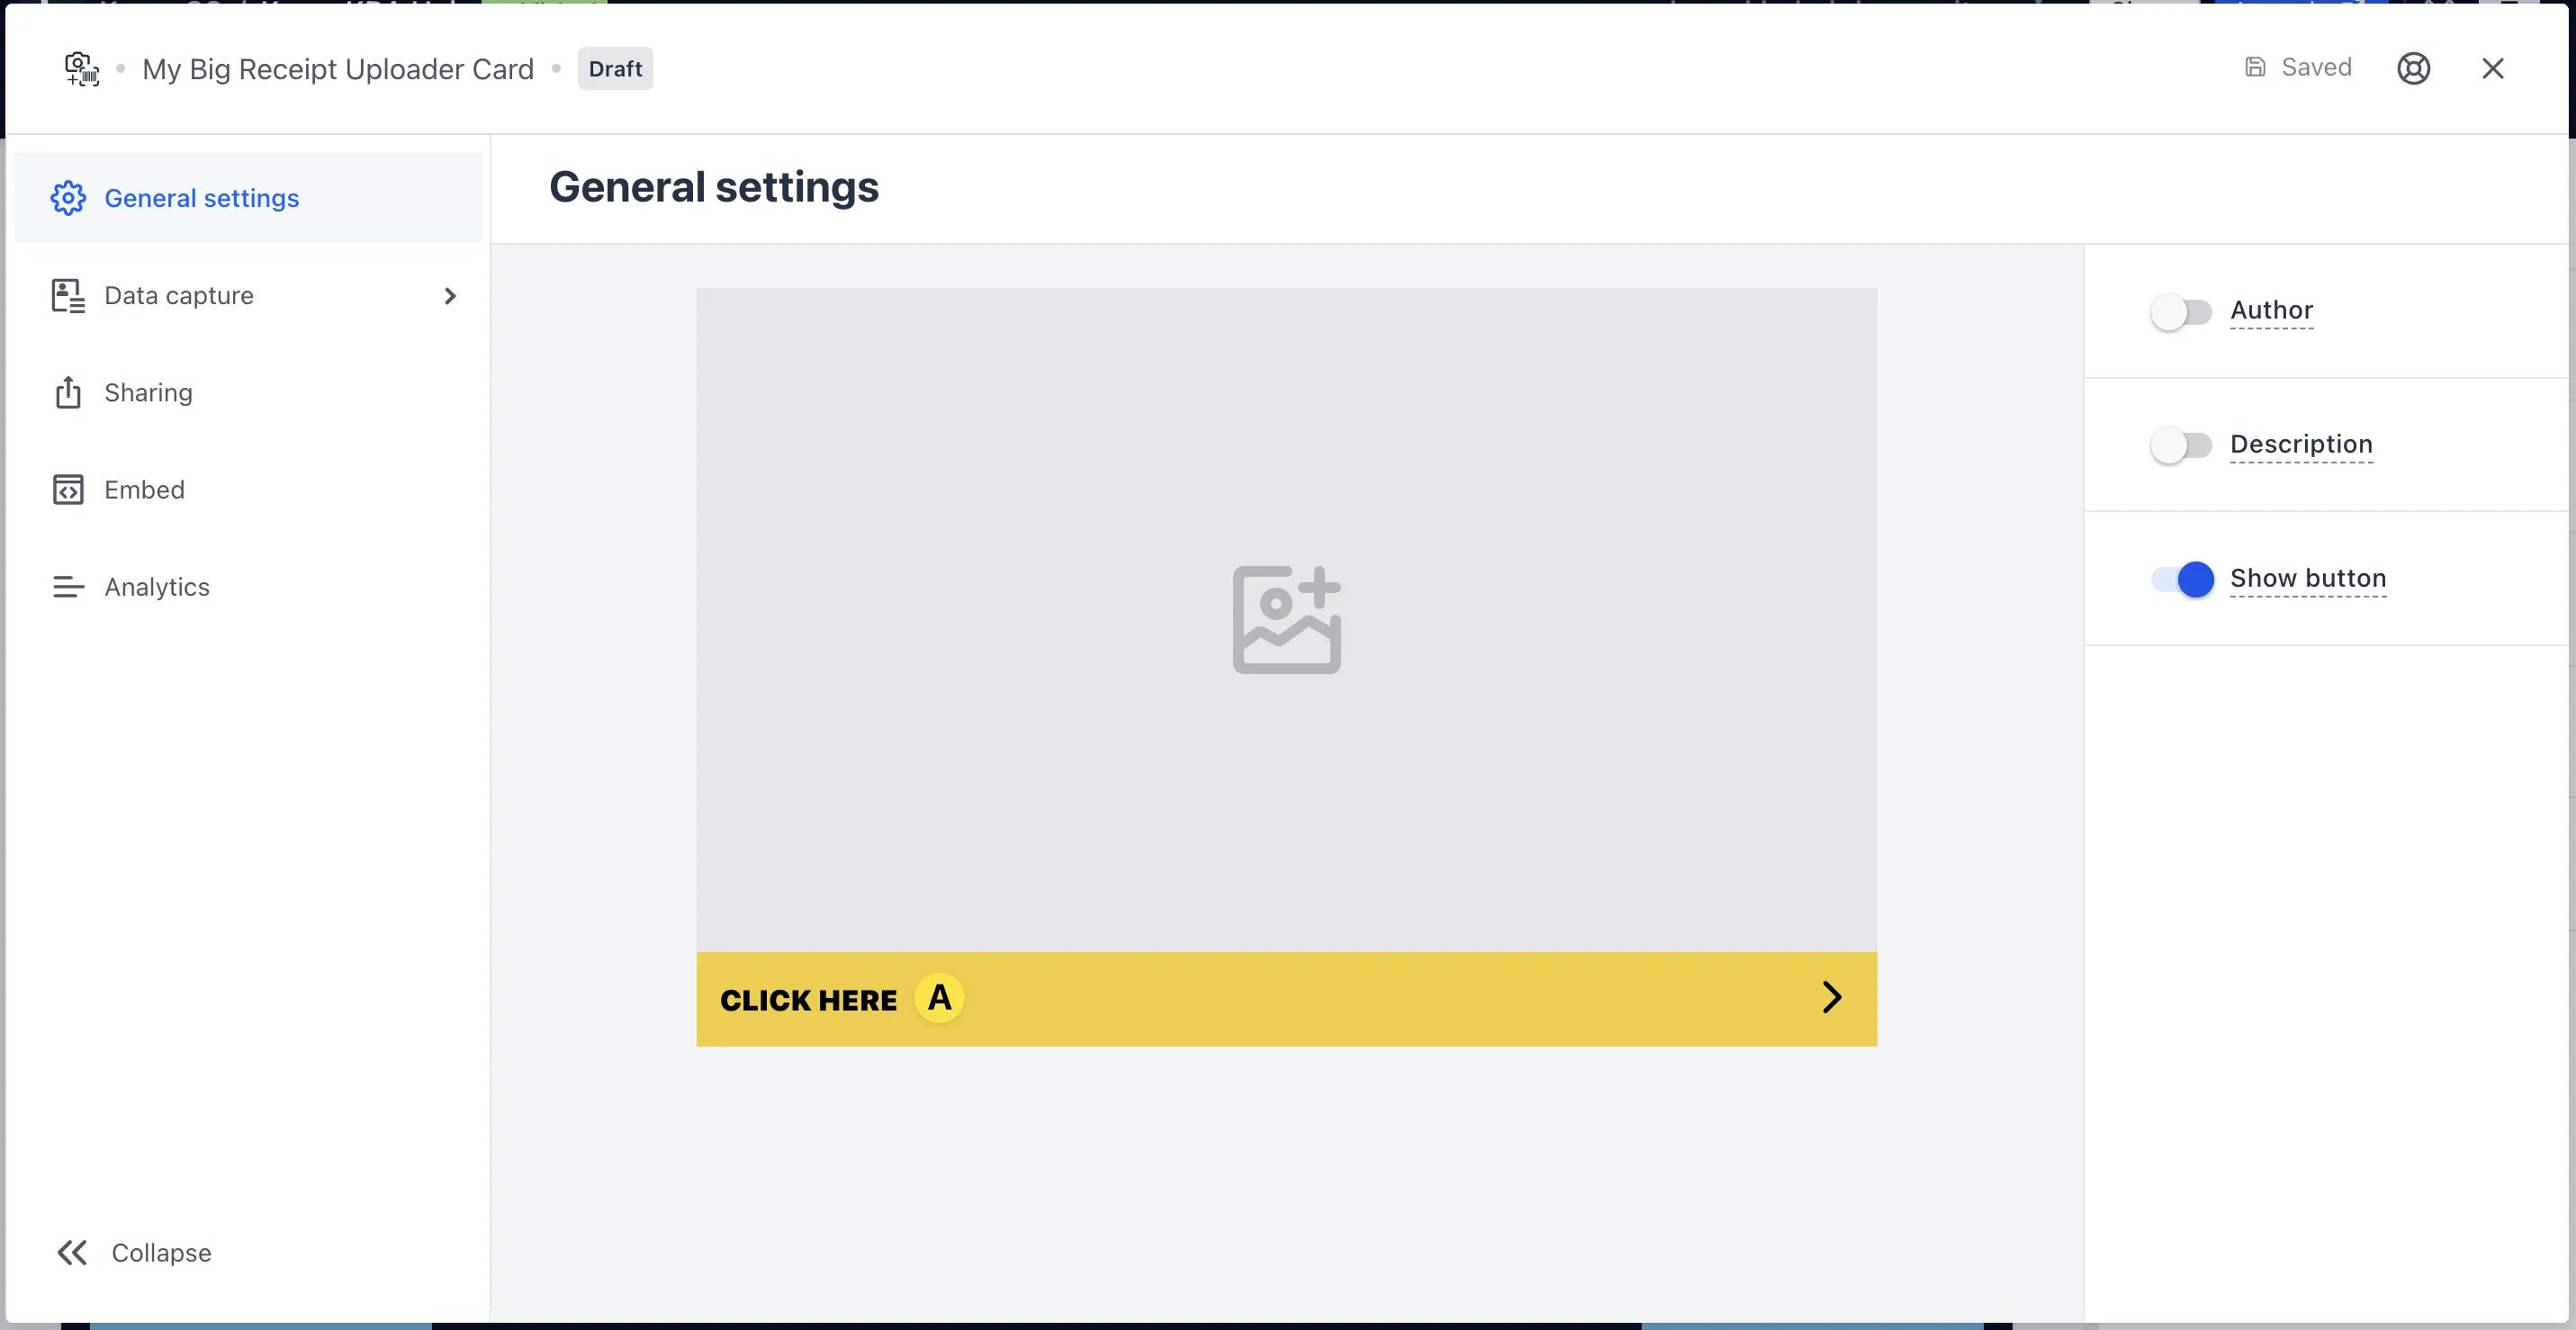 * **(A)** Once you have enabled the button, click on the bar to alter the **colour and copy** of the call-to-action.
### Step 3: Add a Data capture *(Optional)*
The data capture is a requirement for this card type.
By default, the Secret Code card has a data capture already added. For details on how to set this up click on the banner below.
### **Step 4: Publish your card**
* **(A)** Once you have enabled the button, click on the bar to alter the **colour and copy** of the call-to-action.
### Step 3: Add a Data capture *(Optional)*
The data capture is a requirement for this card type.
By default, the Secret Code card has a data capture already added. For details on how to set this up click on the banner below.
### **Step 4: Publish your card**
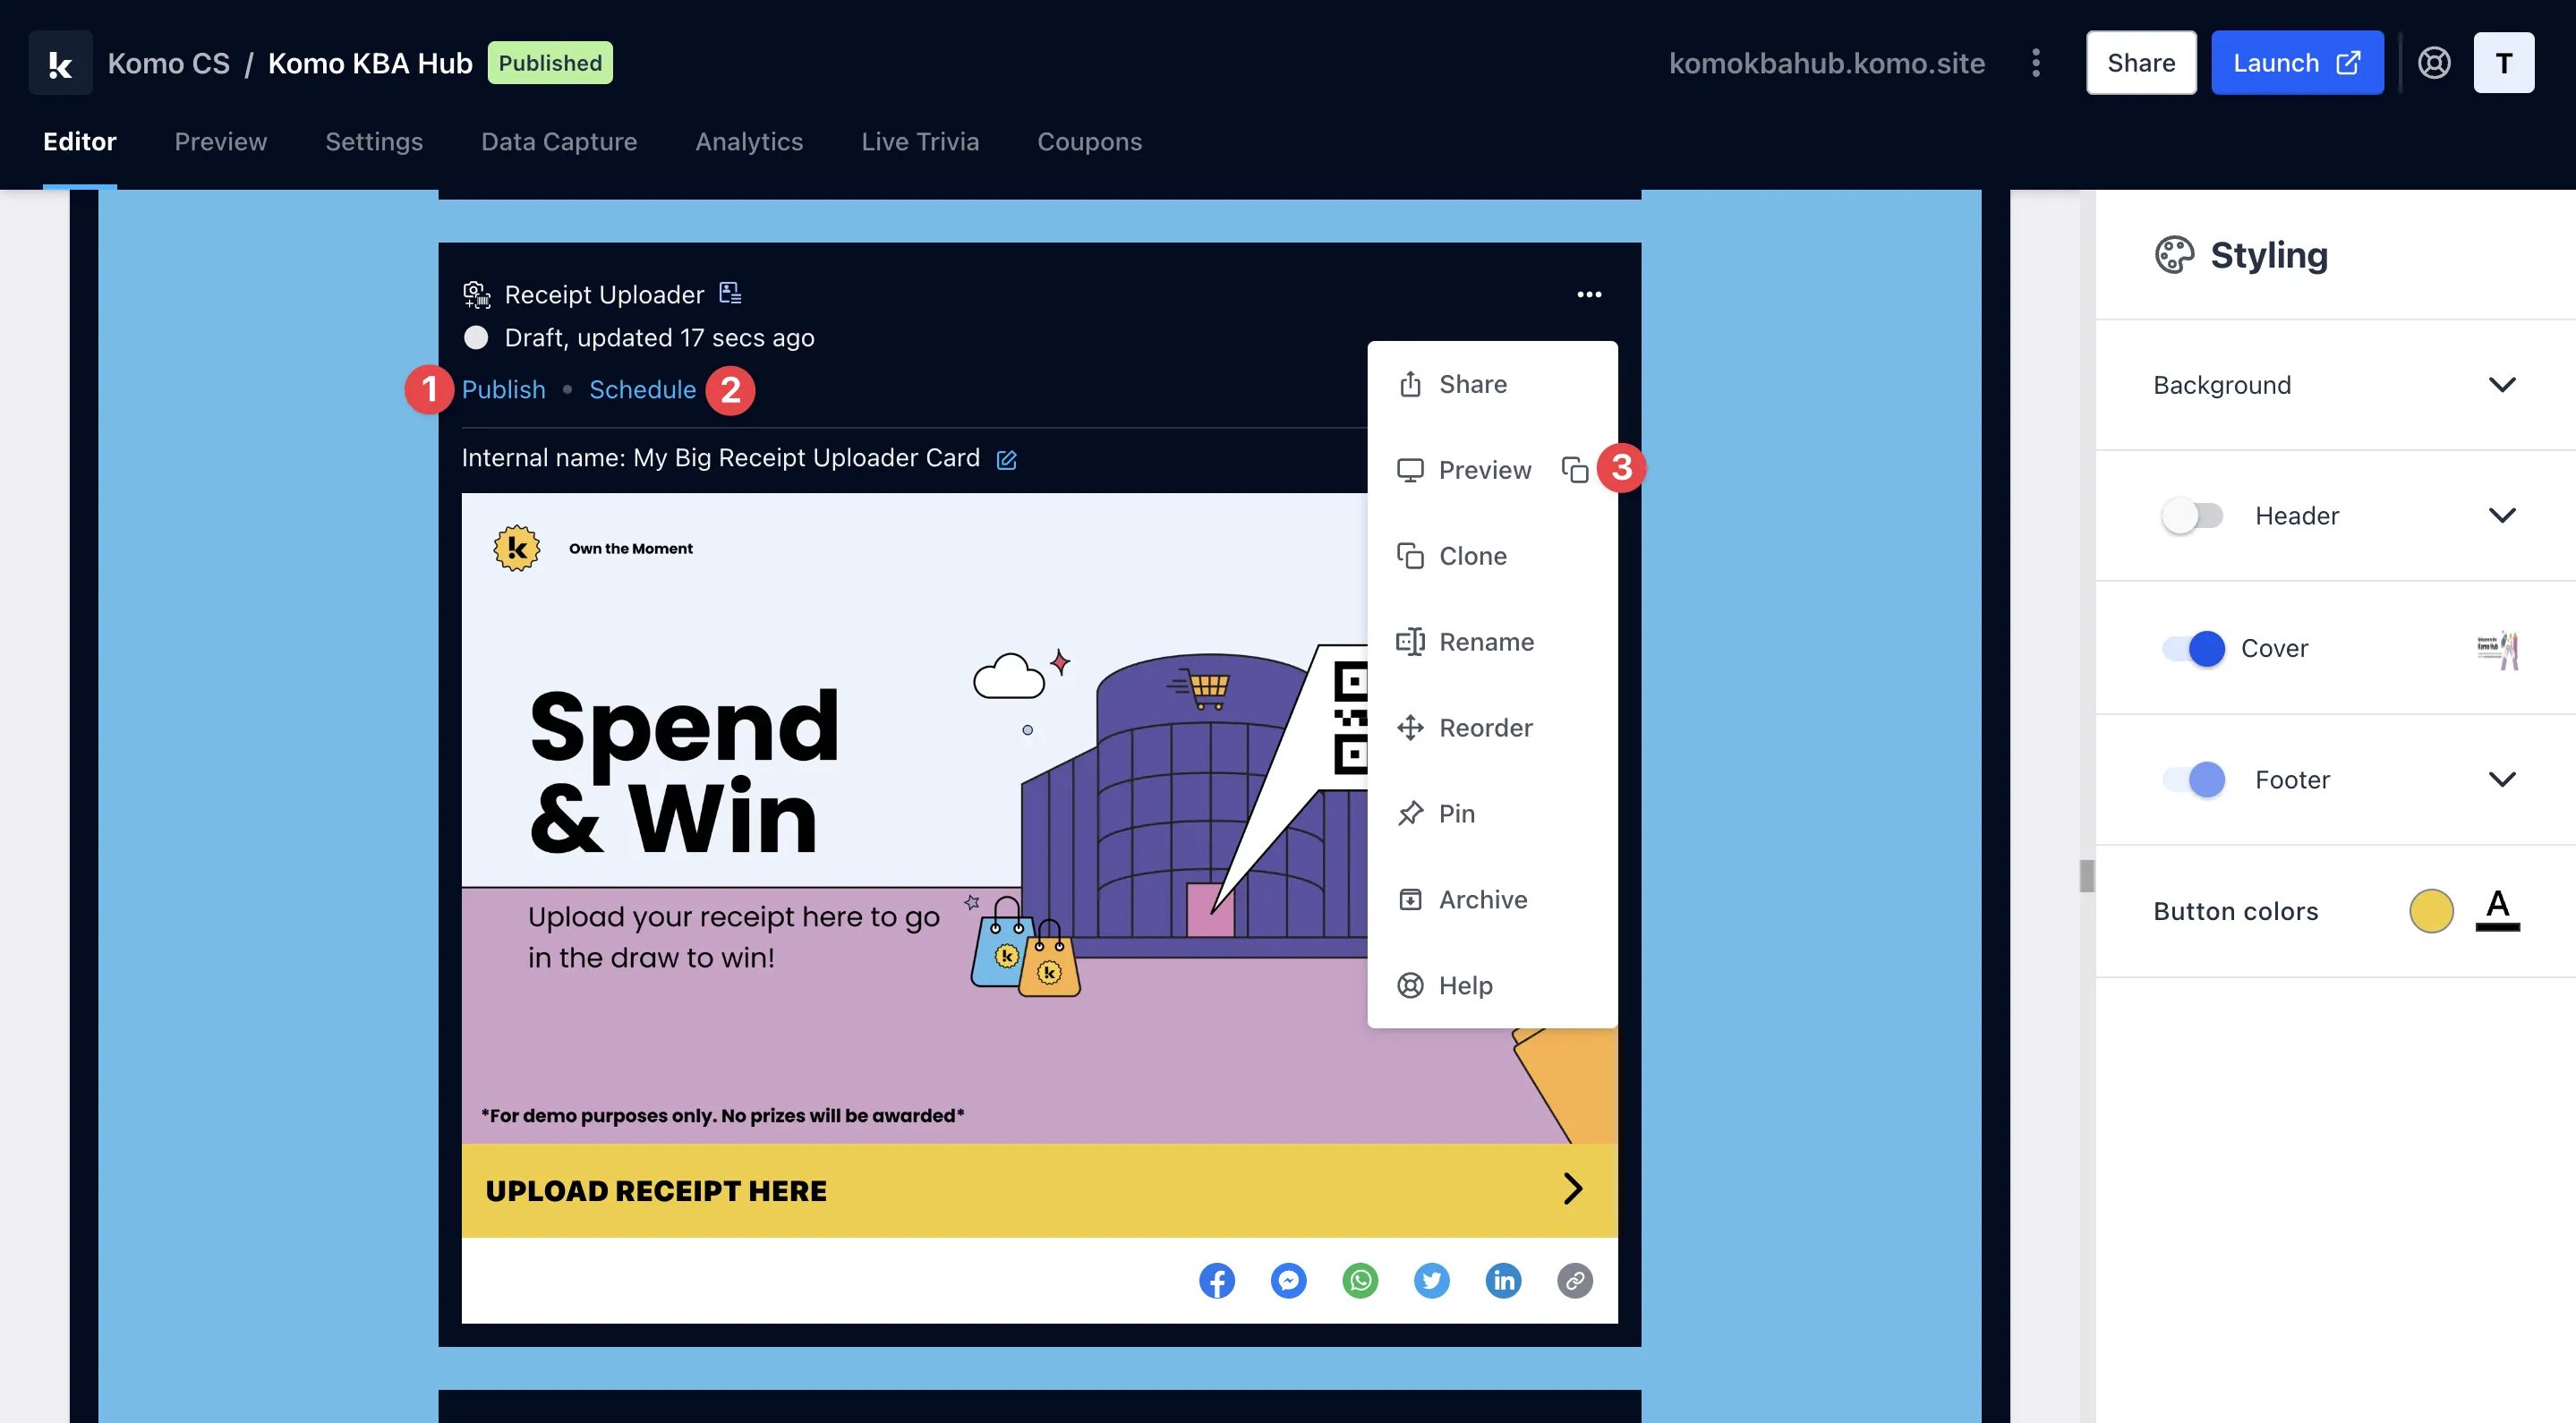 **Once you've completed all of these steps, played around with your card and are happy with all the aspects of your card, it's time to get your card live!**
* **(1) Publish** your card manually and instantly for the world to see.
* **(2) Schedule** your card to be published and unpublished at set dates and times.
* **(3)** Click on **...** to **Preview** and interact with the card on the front end from a user's perspective before publishing it. See how to test your card [here](/getting-started/hub-setup/card-testing).
All competition entries will be recorded and will impact the card analytics.
## Promotion
## How do I validate receipts?
### Automatic and Live Validation
You set the parameters around the campaign including but not limited to: spend, products, date of purchase, retailer of purchase etc. and our system will auto validate the receipt that has been uploaded by the customer.
If the receipt is within the parameters, we auto issue the communications with the prize/digital coupon.
If the uploaded receipt is not within the parameters, we issue communications back to the customer letting them know what the issue may have been.
There are set up costs and weekly management costs for this type of campaign. These are priced on a case by case basis depending on scale, the number of retailers and a few other factors.
For more information, email us at [**support@komo.tech**](mailto:support@komo.tech)
### **Manual Validation**
Customers can easily upload their receipts when filling in the entry form. When the campaign is complete, we draw the winners and then manually check the receipt which is stored with their entry. If the receipt is valid then the customer wins. If the receipt is not valid then you simply draw again. There are no additional costs associated with this mechanic.
You can set up a [Scratch and Win](/interactive-features/features/scratch-and-win/index) competition and every winner will need to upload a receipt in the Extra data form in order to receive the prize. This option reduces the time needed to validate receipts.
## FAQ
**How do I view the uploaded images/receipts?**
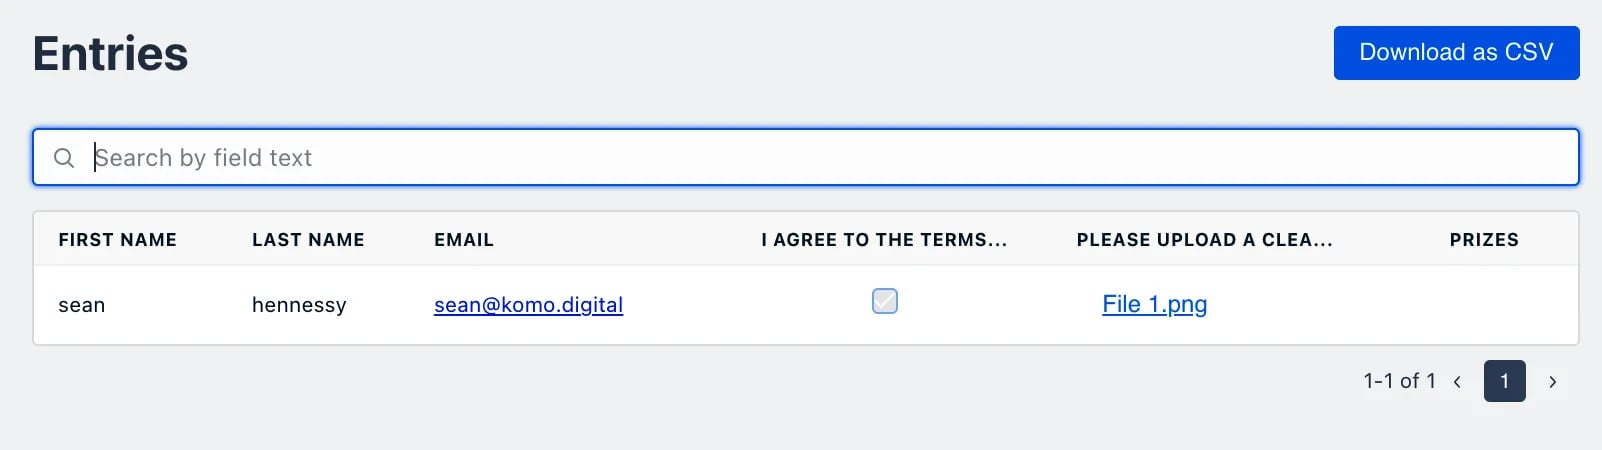
Once people have started uploading receipts to the card you can access the uploaded images through the entries tab.
**Once you've completed all of these steps, played around with your card and are happy with all the aspects of your card, it's time to get your card live!**
* **(1) Publish** your card manually and instantly for the world to see.
* **(2) Schedule** your card to be published and unpublished at set dates and times.
* **(3)** Click on **...** to **Preview** and interact with the card on the front end from a user's perspective before publishing it. See how to test your card [here](/getting-started/hub-setup/card-testing).
All competition entries will be recorded and will impact the card analytics.
## Promotion
## How do I validate receipts?
### Automatic and Live Validation
You set the parameters around the campaign including but not limited to: spend, products, date of purchase, retailer of purchase etc. and our system will auto validate the receipt that has been uploaded by the customer.
If the receipt is within the parameters, we auto issue the communications with the prize/digital coupon.
If the uploaded receipt is not within the parameters, we issue communications back to the customer letting them know what the issue may have been.
There are set up costs and weekly management costs for this type of campaign. These are priced on a case by case basis depending on scale, the number of retailers and a few other factors.
For more information, email us at [**support@komo.tech**](mailto:support@komo.tech)
### **Manual Validation**
Customers can easily upload their receipts when filling in the entry form. When the campaign is complete, we draw the winners and then manually check the receipt which is stored with their entry. If the receipt is valid then the customer wins. If the receipt is not valid then you simply draw again. There are no additional costs associated with this mechanic.
You can set up a [Scratch and Win](/interactive-features/features/scratch-and-win/index) competition and every winner will need to upload a receipt in the Extra data form in order to receive the prize. This option reduces the time needed to validate receipts.
## FAQ
**How do I view the uploaded images/receipts?**
Once people have started uploading receipts to the card you can access the uploaded images through the entries tab.