> ## Documentation Index
> Fetch the complete documentation index at: https://knowledge.komo.tech/llms.txt
> Use this file to discover all available pages before exploring further.
# Spin to Win
> The Spin to Win turns an age-old favorite into completely customizable gamified content - the ultimate way to engage & reward your audience.
## What is it?
The Spin to Win is a way to instantly reward users through a virtual spin-the-wheel experience.
## How do I build one?
### Step 1: Add a Spin to Win to your Hub
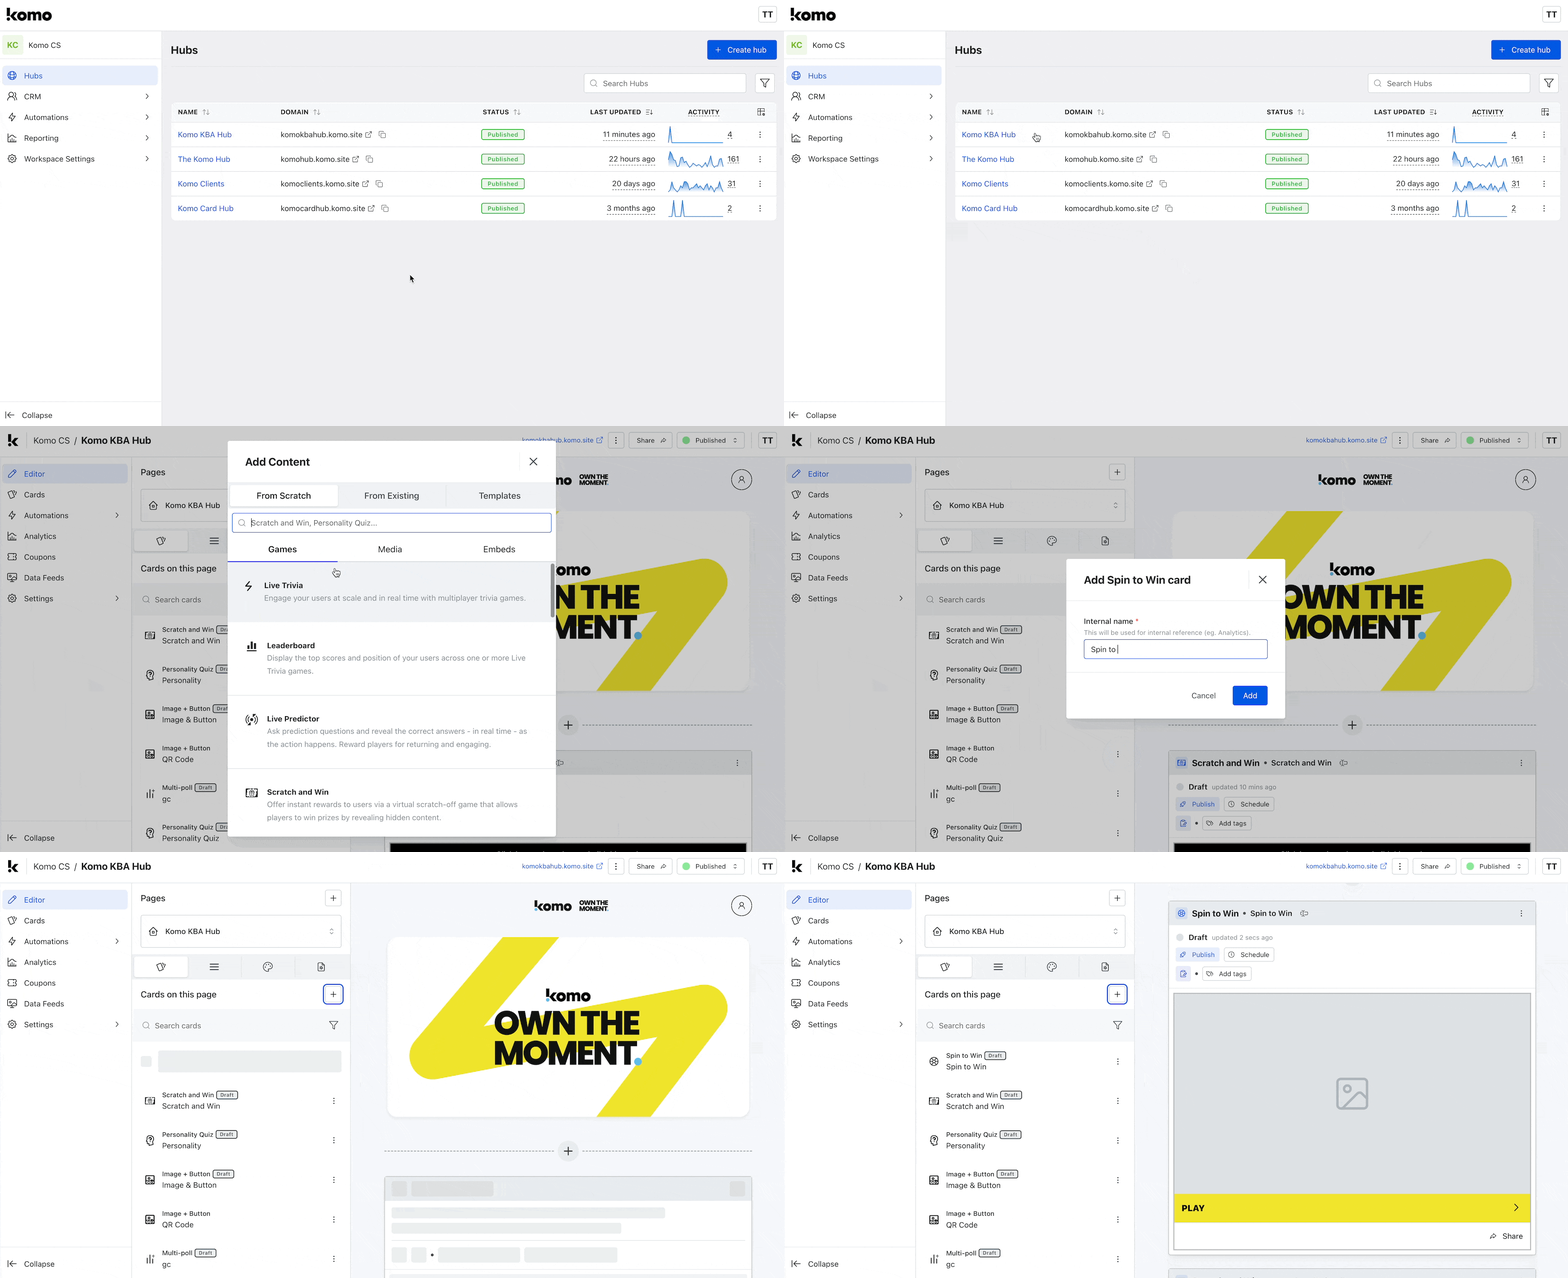 * Navigate to your **Engagement Hub**.
* Once there, click the **Plus icon,** select **Games** and then **Spin to Win.** - Input an **internal name** for the card and click **Add.** - You will then see your new card has been added to your Hub.
### Step 2: Add a Cover image
* Navigate to your **Engagement Hub**.
* Once there, click the **Plus icon,** select **Games** and then **Spin to Win.** - Input an **internal name** for the card and click **Add.** - You will then see your new card has been added to your Hub.
### Step 2: Add a Cover image
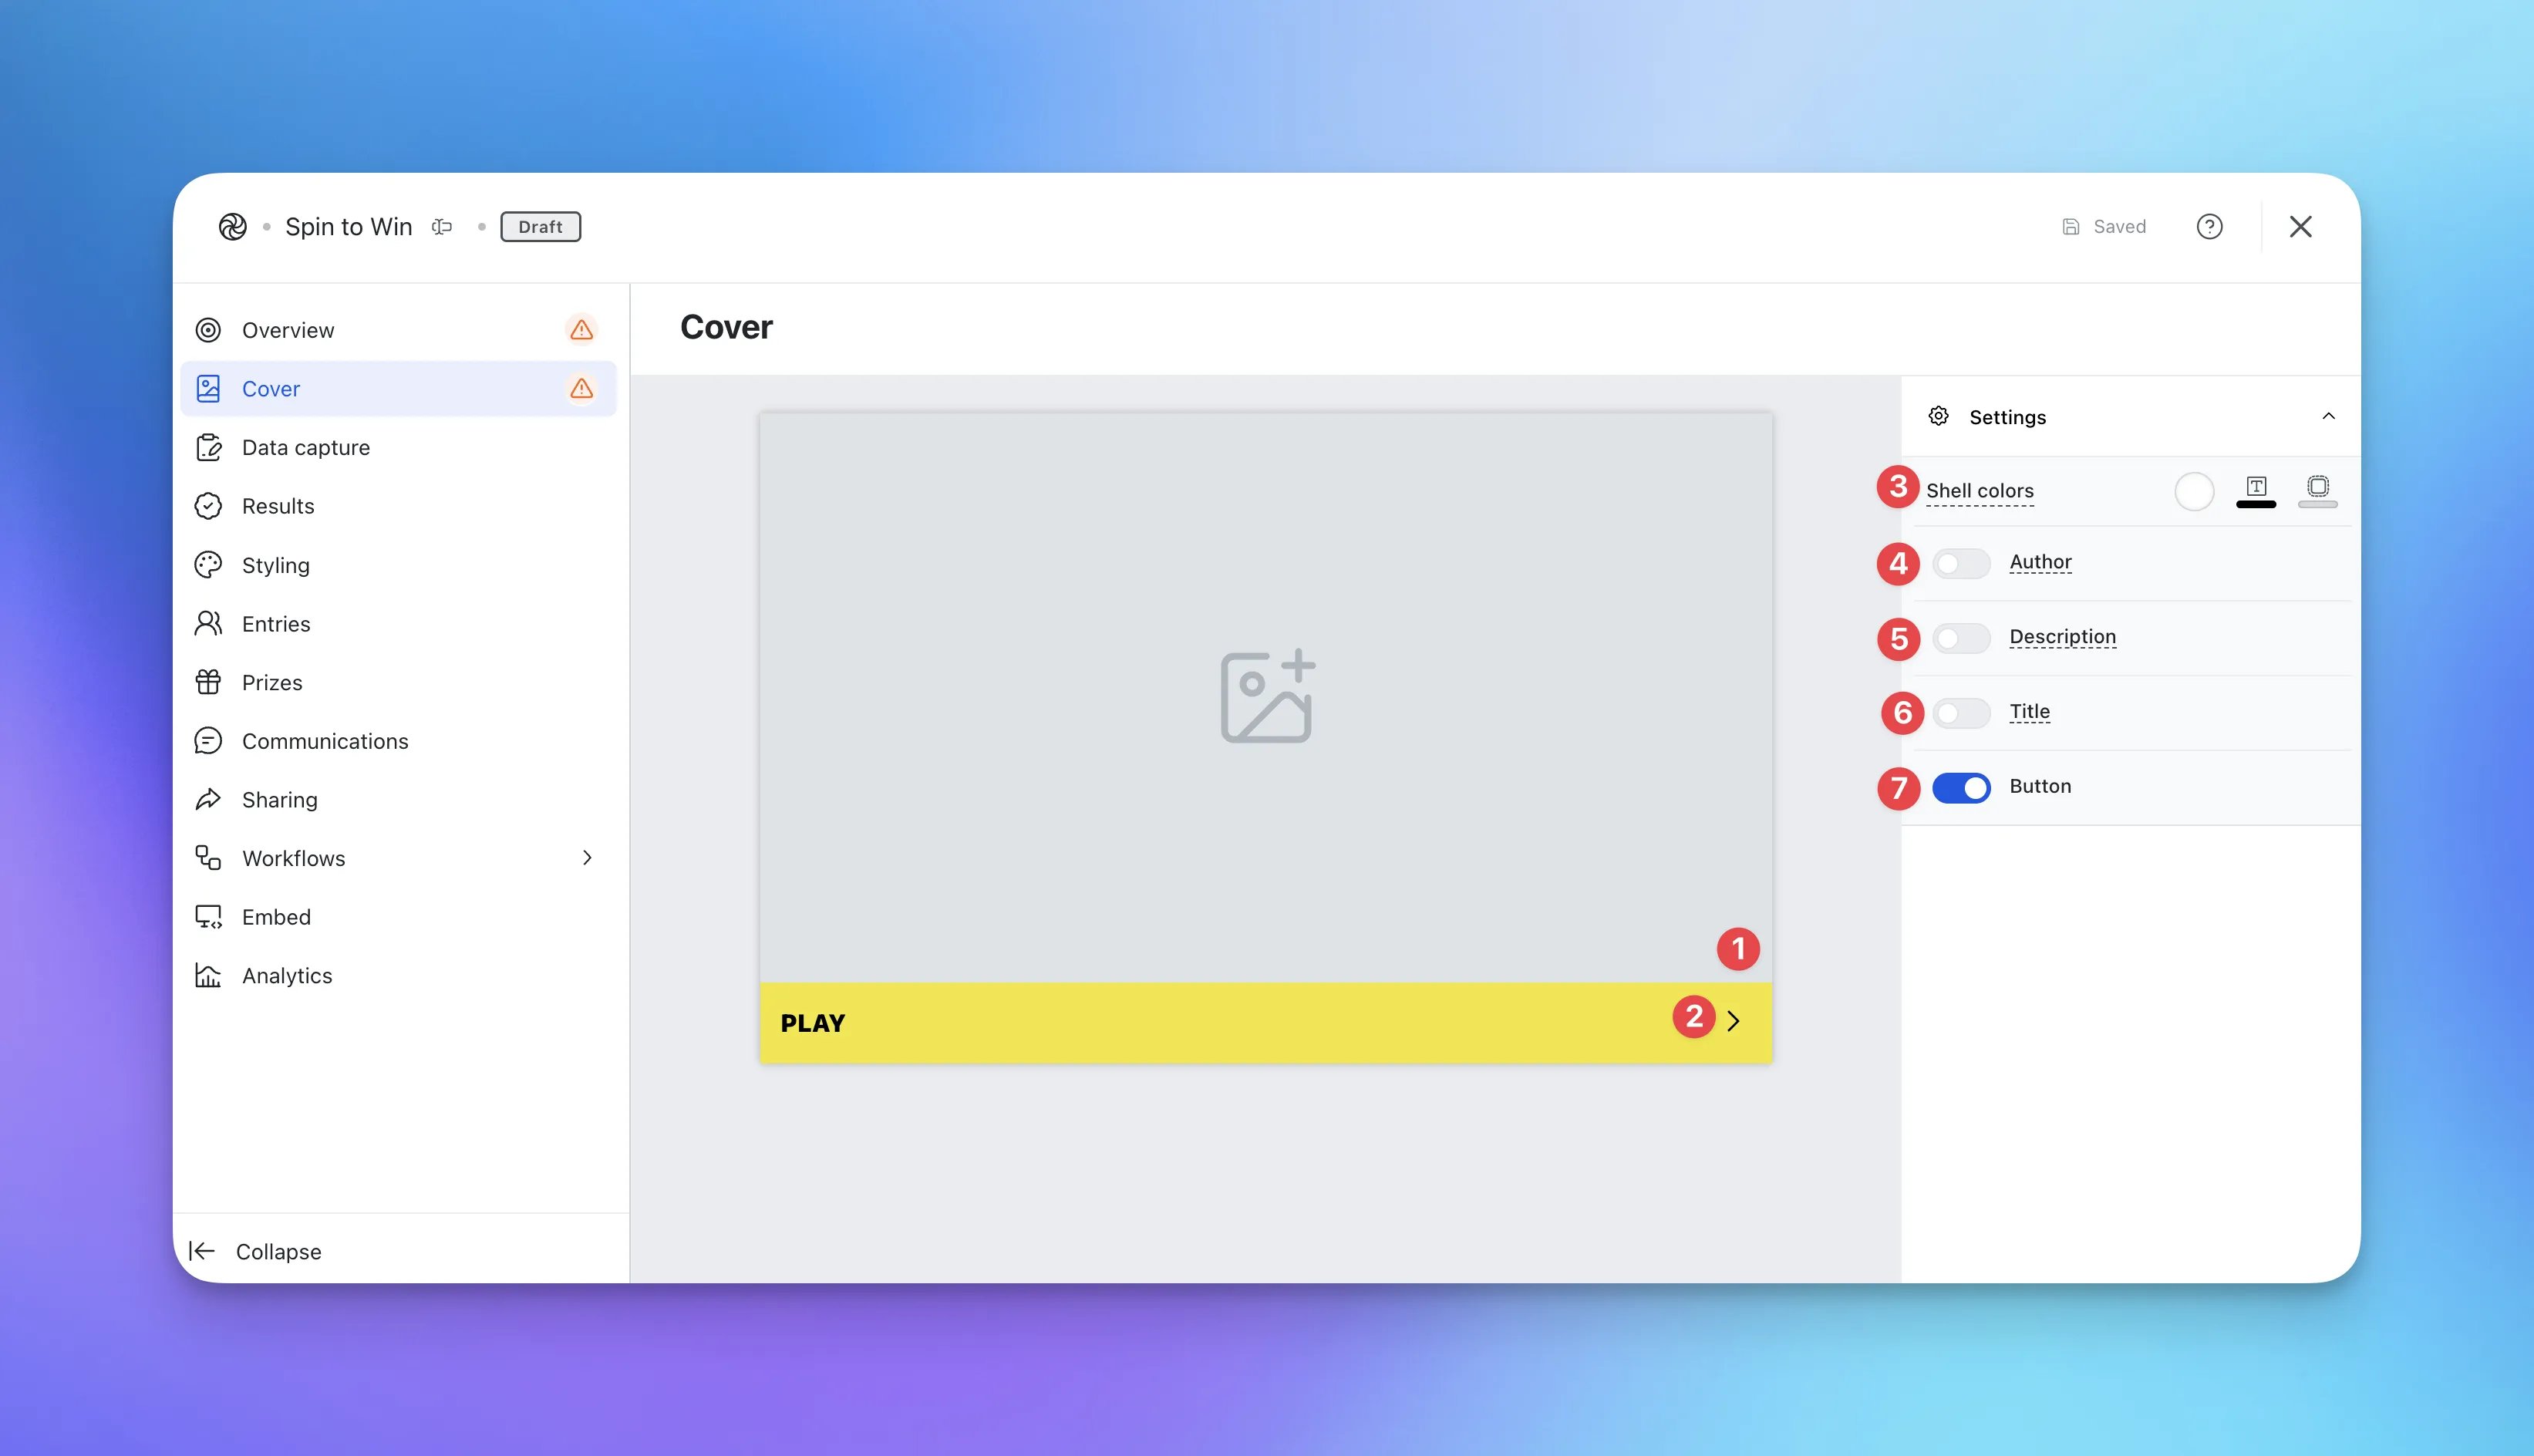 * **(1)** This is where you can upload a **cover image.**
* **(2)** Clicking on the **call-to-action button** will allow you to edit the copy and colours of this section, **(7)** or you can **disable** this here.
* **(3)** Set the **outer card shell colours** (description and share bar).
* **(4)** You can add an **author** tag by displaying the brand or person who's responsible for the card content.
* **(5)** Add an optional **description** to the card by toggling this on in the righthand toolbar.
* **(6) Here you can enable a title.**
### Step 3: Add a Data capture form
* **(1)** Data capture is **required** for this card. This will be on by default but will require you to configure additional settings.
Within this card, you can alter the communications within the data capture and when setting up the prize screens.
### Step 4: Set up your Gameplay screens
* **(1)** This is where you can upload a **cover image.**
* **(2)** Clicking on the **call-to-action button** will allow you to edit the copy and colours of this section, **(7)** or you can **disable** this here.
* **(3)** Set the **outer card shell colours** (description and share bar).
* **(4)** You can add an **author** tag by displaying the brand or person who's responsible for the card content.
* **(5)** Add an optional **description** to the card by toggling this on in the righthand toolbar.
* **(6) Here you can enable a title.**
### Step 3: Add a Data capture form
* **(1)** Data capture is **required** for this card. This will be on by default but will require you to configure additional settings.
Within this card, you can alter the communications within the data capture and when setting up the prize screens.
### Step 4: Set up your Gameplay screens
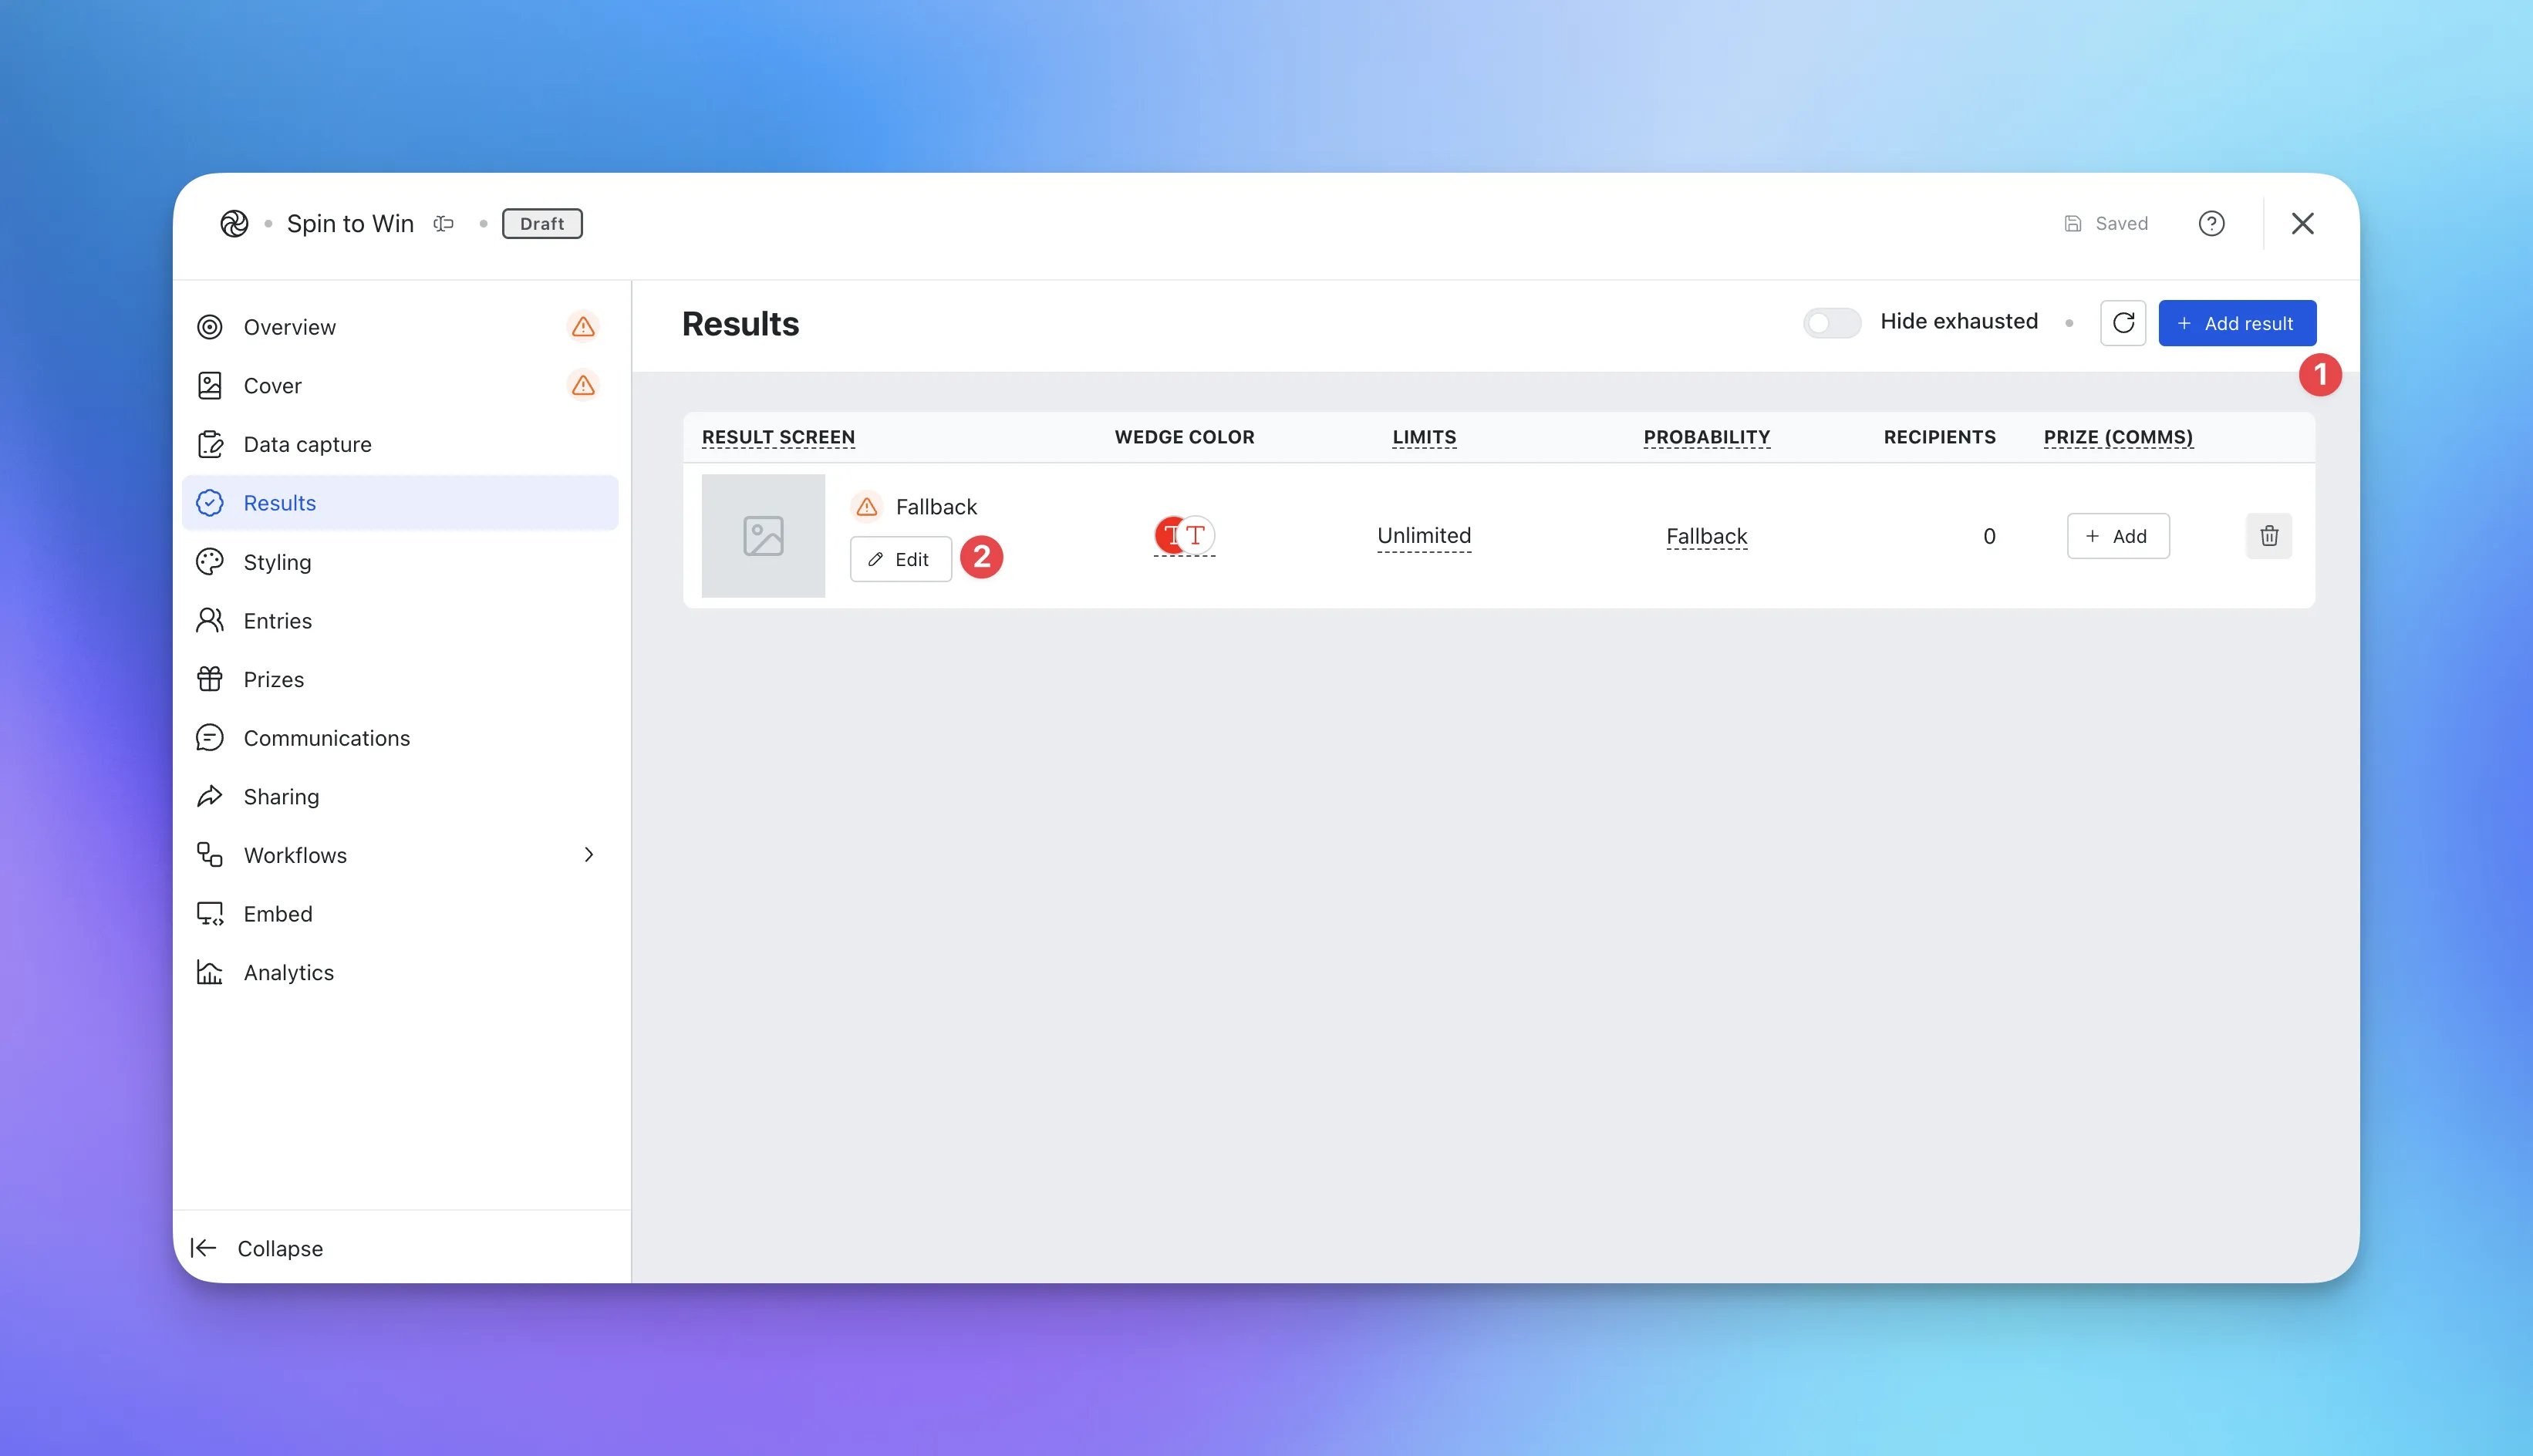 * Here is where you will set up all the screens which will be seen by your users.
* **(1)** To create a new spin wheel wedge, click on **Add Result**. This will open the wedge and result screen editing modal.
* Here is where you will set up all the screens which will be seen by your users.
* **(1)** To create a new spin wheel wedge, click on **Add Result**. This will open the wedge and result screen editing modal.
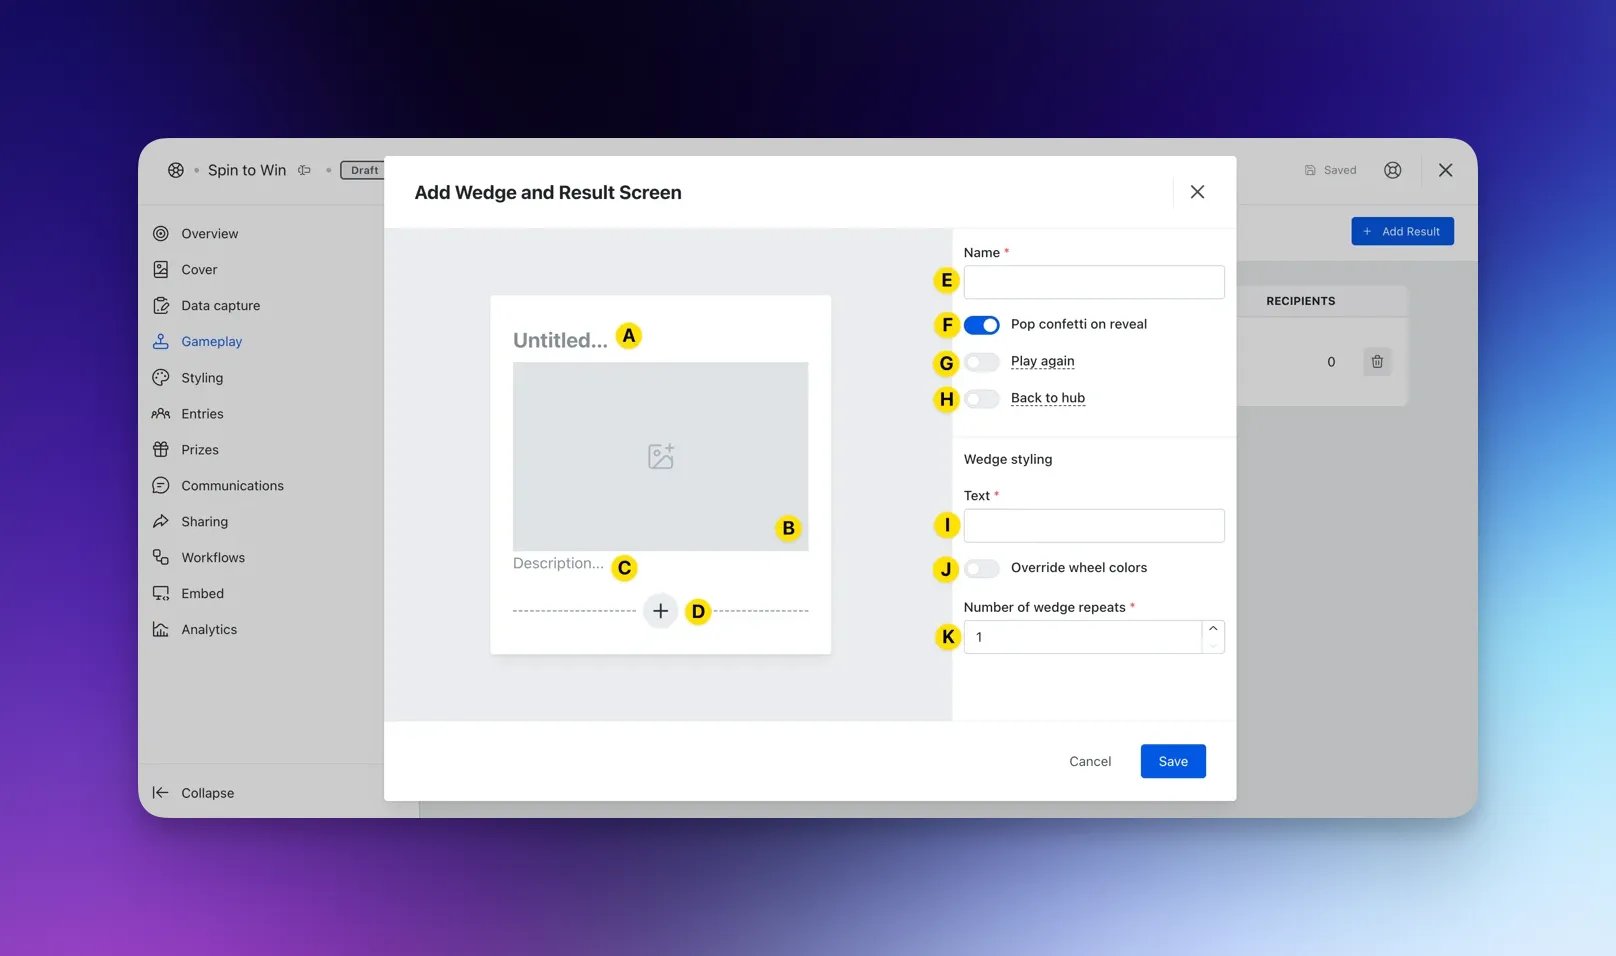 * **(A)** Using the result screen editor, **title** your result (in most cases, this result would be how you reveal a prize or reward to your user).
* **(B)** Upload an **image** to reflect your result.
* **(C)** Add an optional **description** that explains the prize or next steps.
* **(D)** Here you can add a **call-to-action button** to your result screen with an external URL.
* **(E)** Navigate to the righthand toolbar and give the result an **internal name**.
* **(F)** Here you can also enable a pop of **confetti** on the reveal.
* **(G)** Enable users to **play again.** - **(H)** Add a **Back to Hub** button.
* **(I)** To style your wedge, input the **text** that will display on the spin wheel, edit the **wedge and text colour** and enter the number of times you'd like to wedge to be **repeated** on the spin wheel.
* **(J)** In the next step, we'll show you how to configure your wedge colour palette so that your wedges will automatically shift through a pre-selected list of brand colours. However, you can also choose to **override the wedge colour** for a particular result by **toggling this on in your Wedge Styling settings** and configuring the wedge and text colour as you wish.
* **(K)** Input the number of times you want this particular wedge to **repeat** on the spin wheel. You can leave this as 1.
* Repeat this step for every Wedge you create.
* **(2)** Repeat the steps above to set up the **Failure screen.**
### Step 5: Configure prizes, limits & probabilities
* **(A)** Using the result screen editor, **title** your result (in most cases, this result would be how you reveal a prize or reward to your user).
* **(B)** Upload an **image** to reflect your result.
* **(C)** Add an optional **description** that explains the prize or next steps.
* **(D)** Here you can add a **call-to-action button** to your result screen with an external URL.
* **(E)** Navigate to the righthand toolbar and give the result an **internal name**.
* **(F)** Here you can also enable a pop of **confetti** on the reveal.
* **(G)** Enable users to **play again.** - **(H)** Add a **Back to Hub** button.
* **(I)** To style your wedge, input the **text** that will display on the spin wheel, edit the **wedge and text colour** and enter the number of times you'd like to wedge to be **repeated** on the spin wheel.
* **(J)** In the next step, we'll show you how to configure your wedge colour palette so that your wedges will automatically shift through a pre-selected list of brand colours. However, you can also choose to **override the wedge colour** for a particular result by **toggling this on in your Wedge Styling settings** and configuring the wedge and text colour as you wish.
* **(K)** Input the number of times you want this particular wedge to **repeat** on the spin wheel. You can leave this as 1.
* Repeat this step for every Wedge you create.
* **(2)** Repeat the steps above to set up the **Failure screen.**
### Step 5: Configure prizes, limits & probabilities
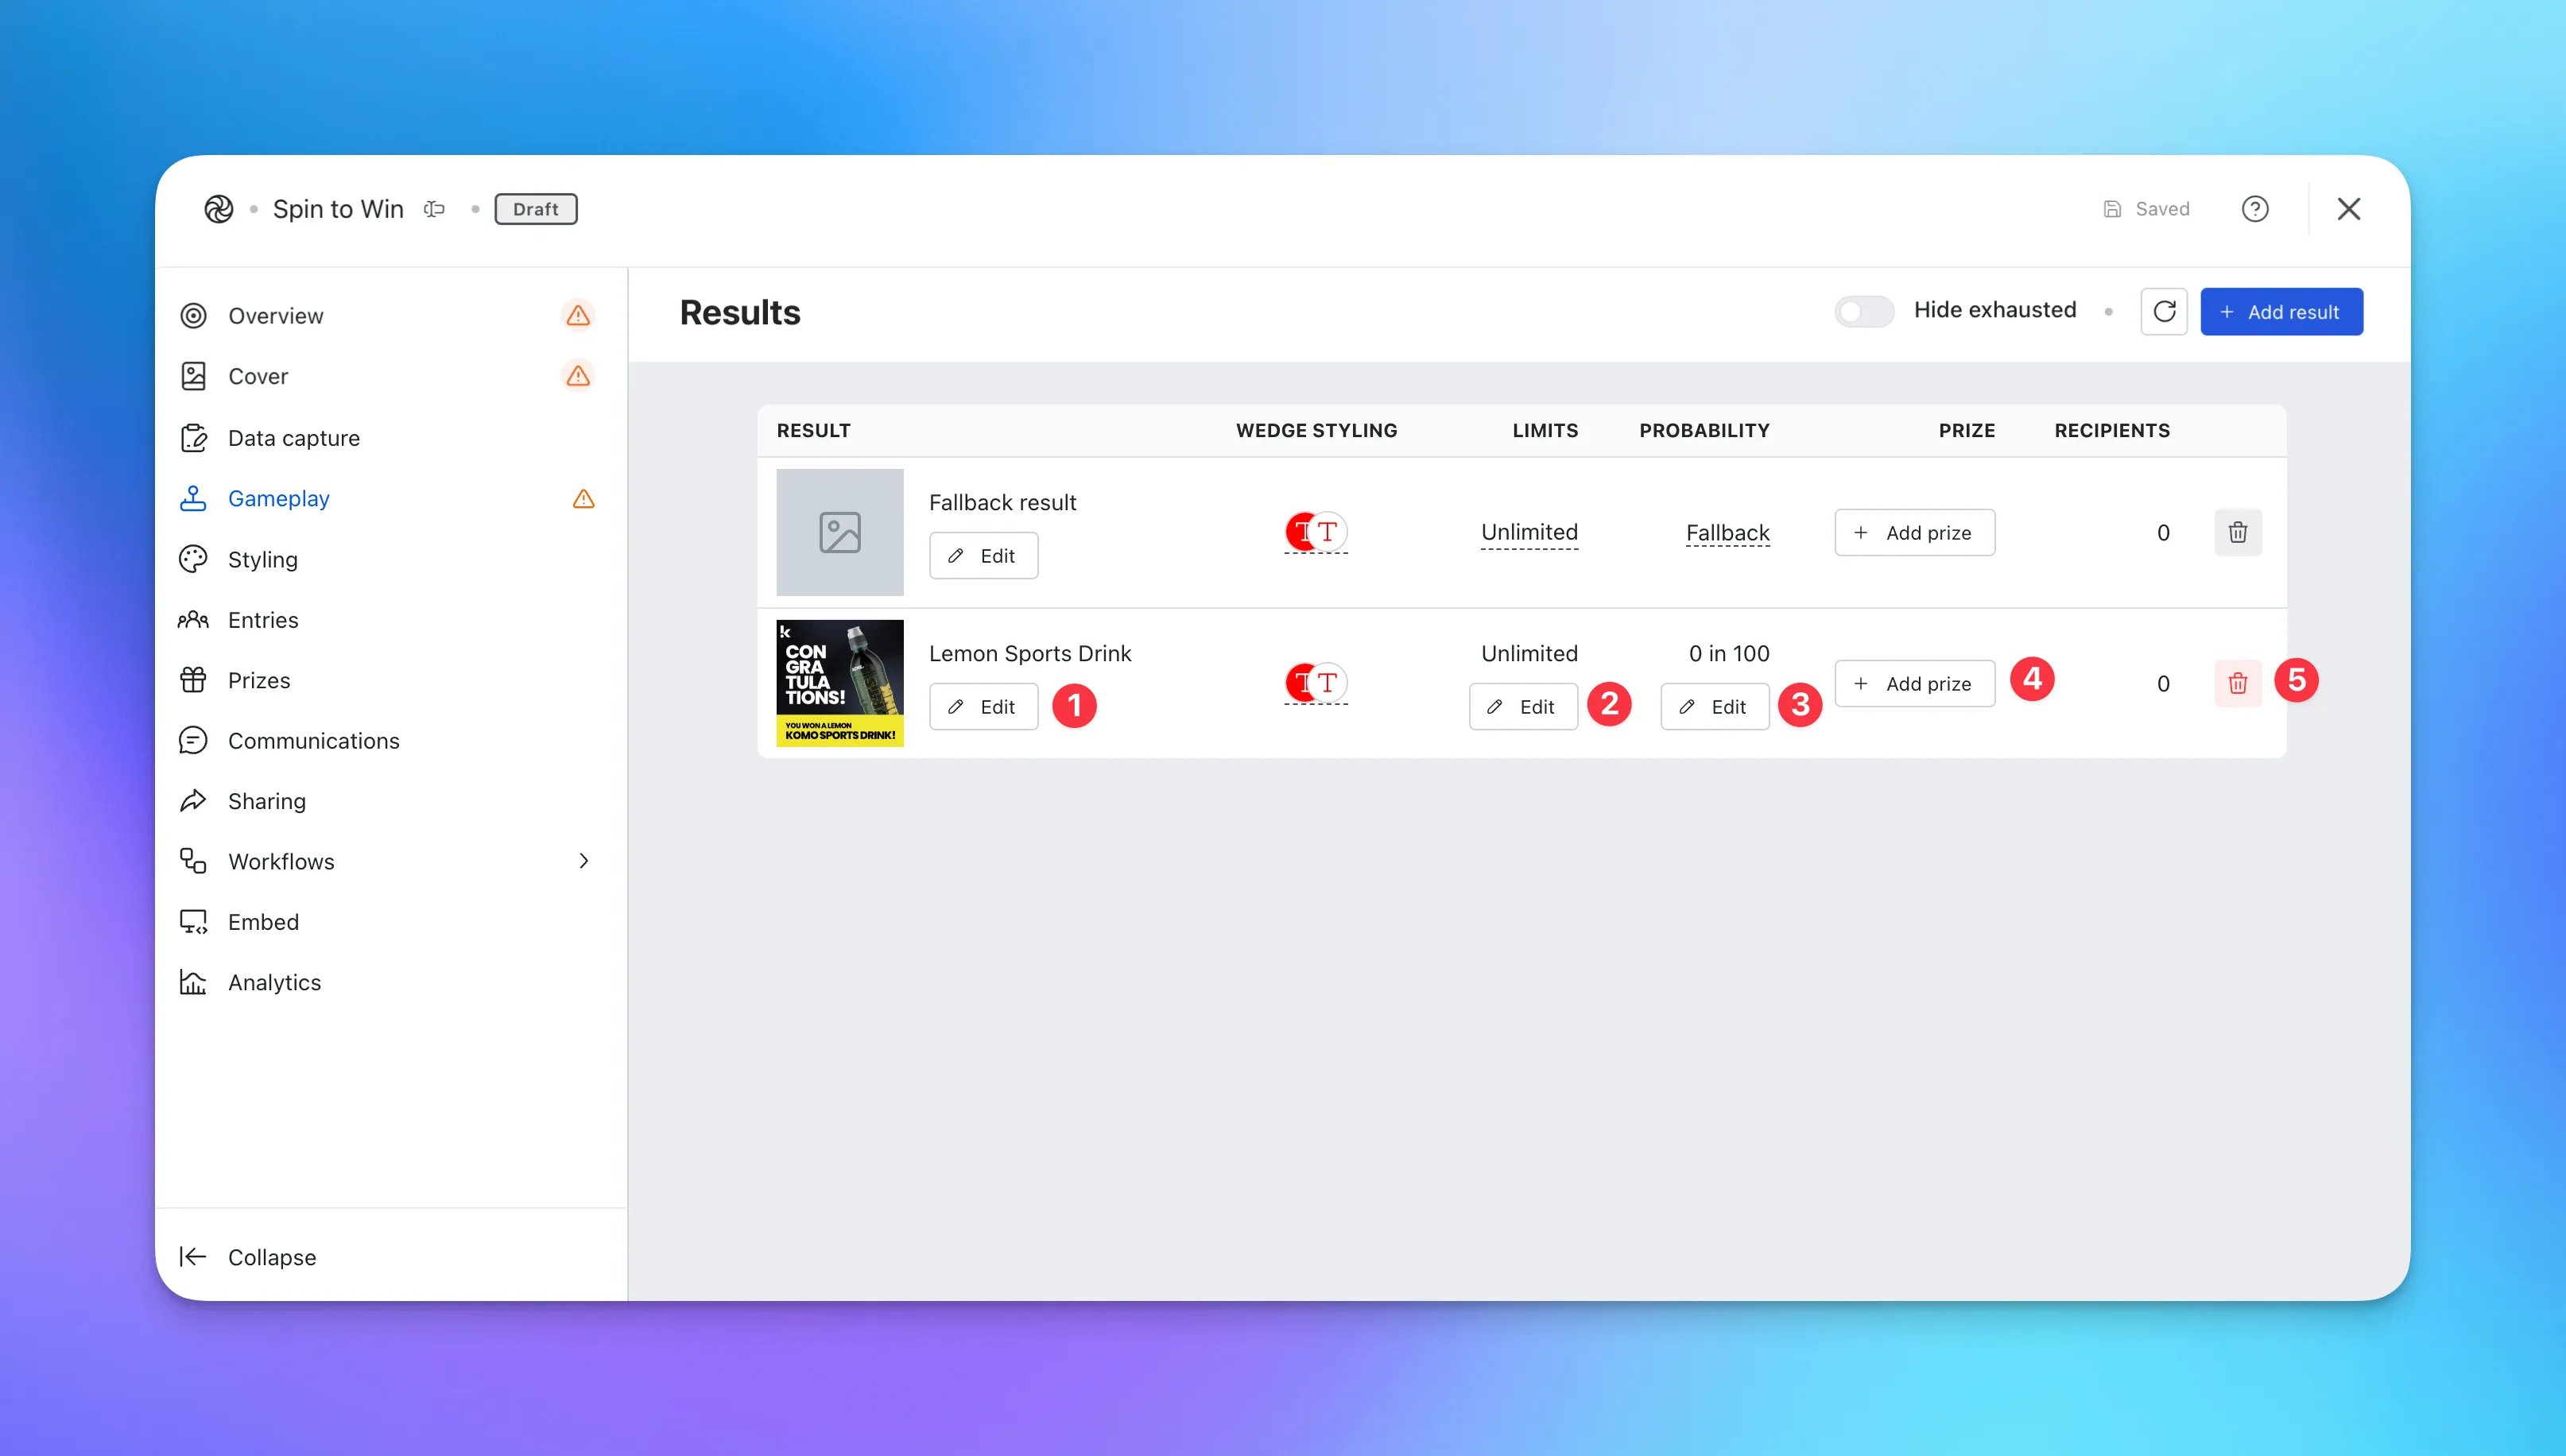 * **(1)** You can return to **edit** the prize screen and communications here.
* **(2)** You can set the **maximum number** of times this prize can be won here. \
**Note:** Once the allocation for this prize has been used up all probability associated with this will be reverted to the **failure screen**.
* **(3)** Here you will set the **percentage probability** that a user will see this. **Note:** This probability is shared across all the prizes you set up. e.g. you cannot have two prizes with a probability of over 50.
* **(4)** To add a prize and communications to a particular wedge, click **Add Prize**.
* **(1)** You can return to **edit** the prize screen and communications here.
* **(2)** You can set the **maximum number** of times this prize can be won here. \
**Note:** Once the allocation for this prize has been used up all probability associated with this will be reverted to the **failure screen**.
* **(3)** Here you will set the **percentage probability** that a user will see this. **Note:** This probability is shared across all the prizes you set up. e.g. you cannot have two prizes with a probability of over 50.
* **(4)** To add a prize and communications to a particular wedge, click **Add Prize**.
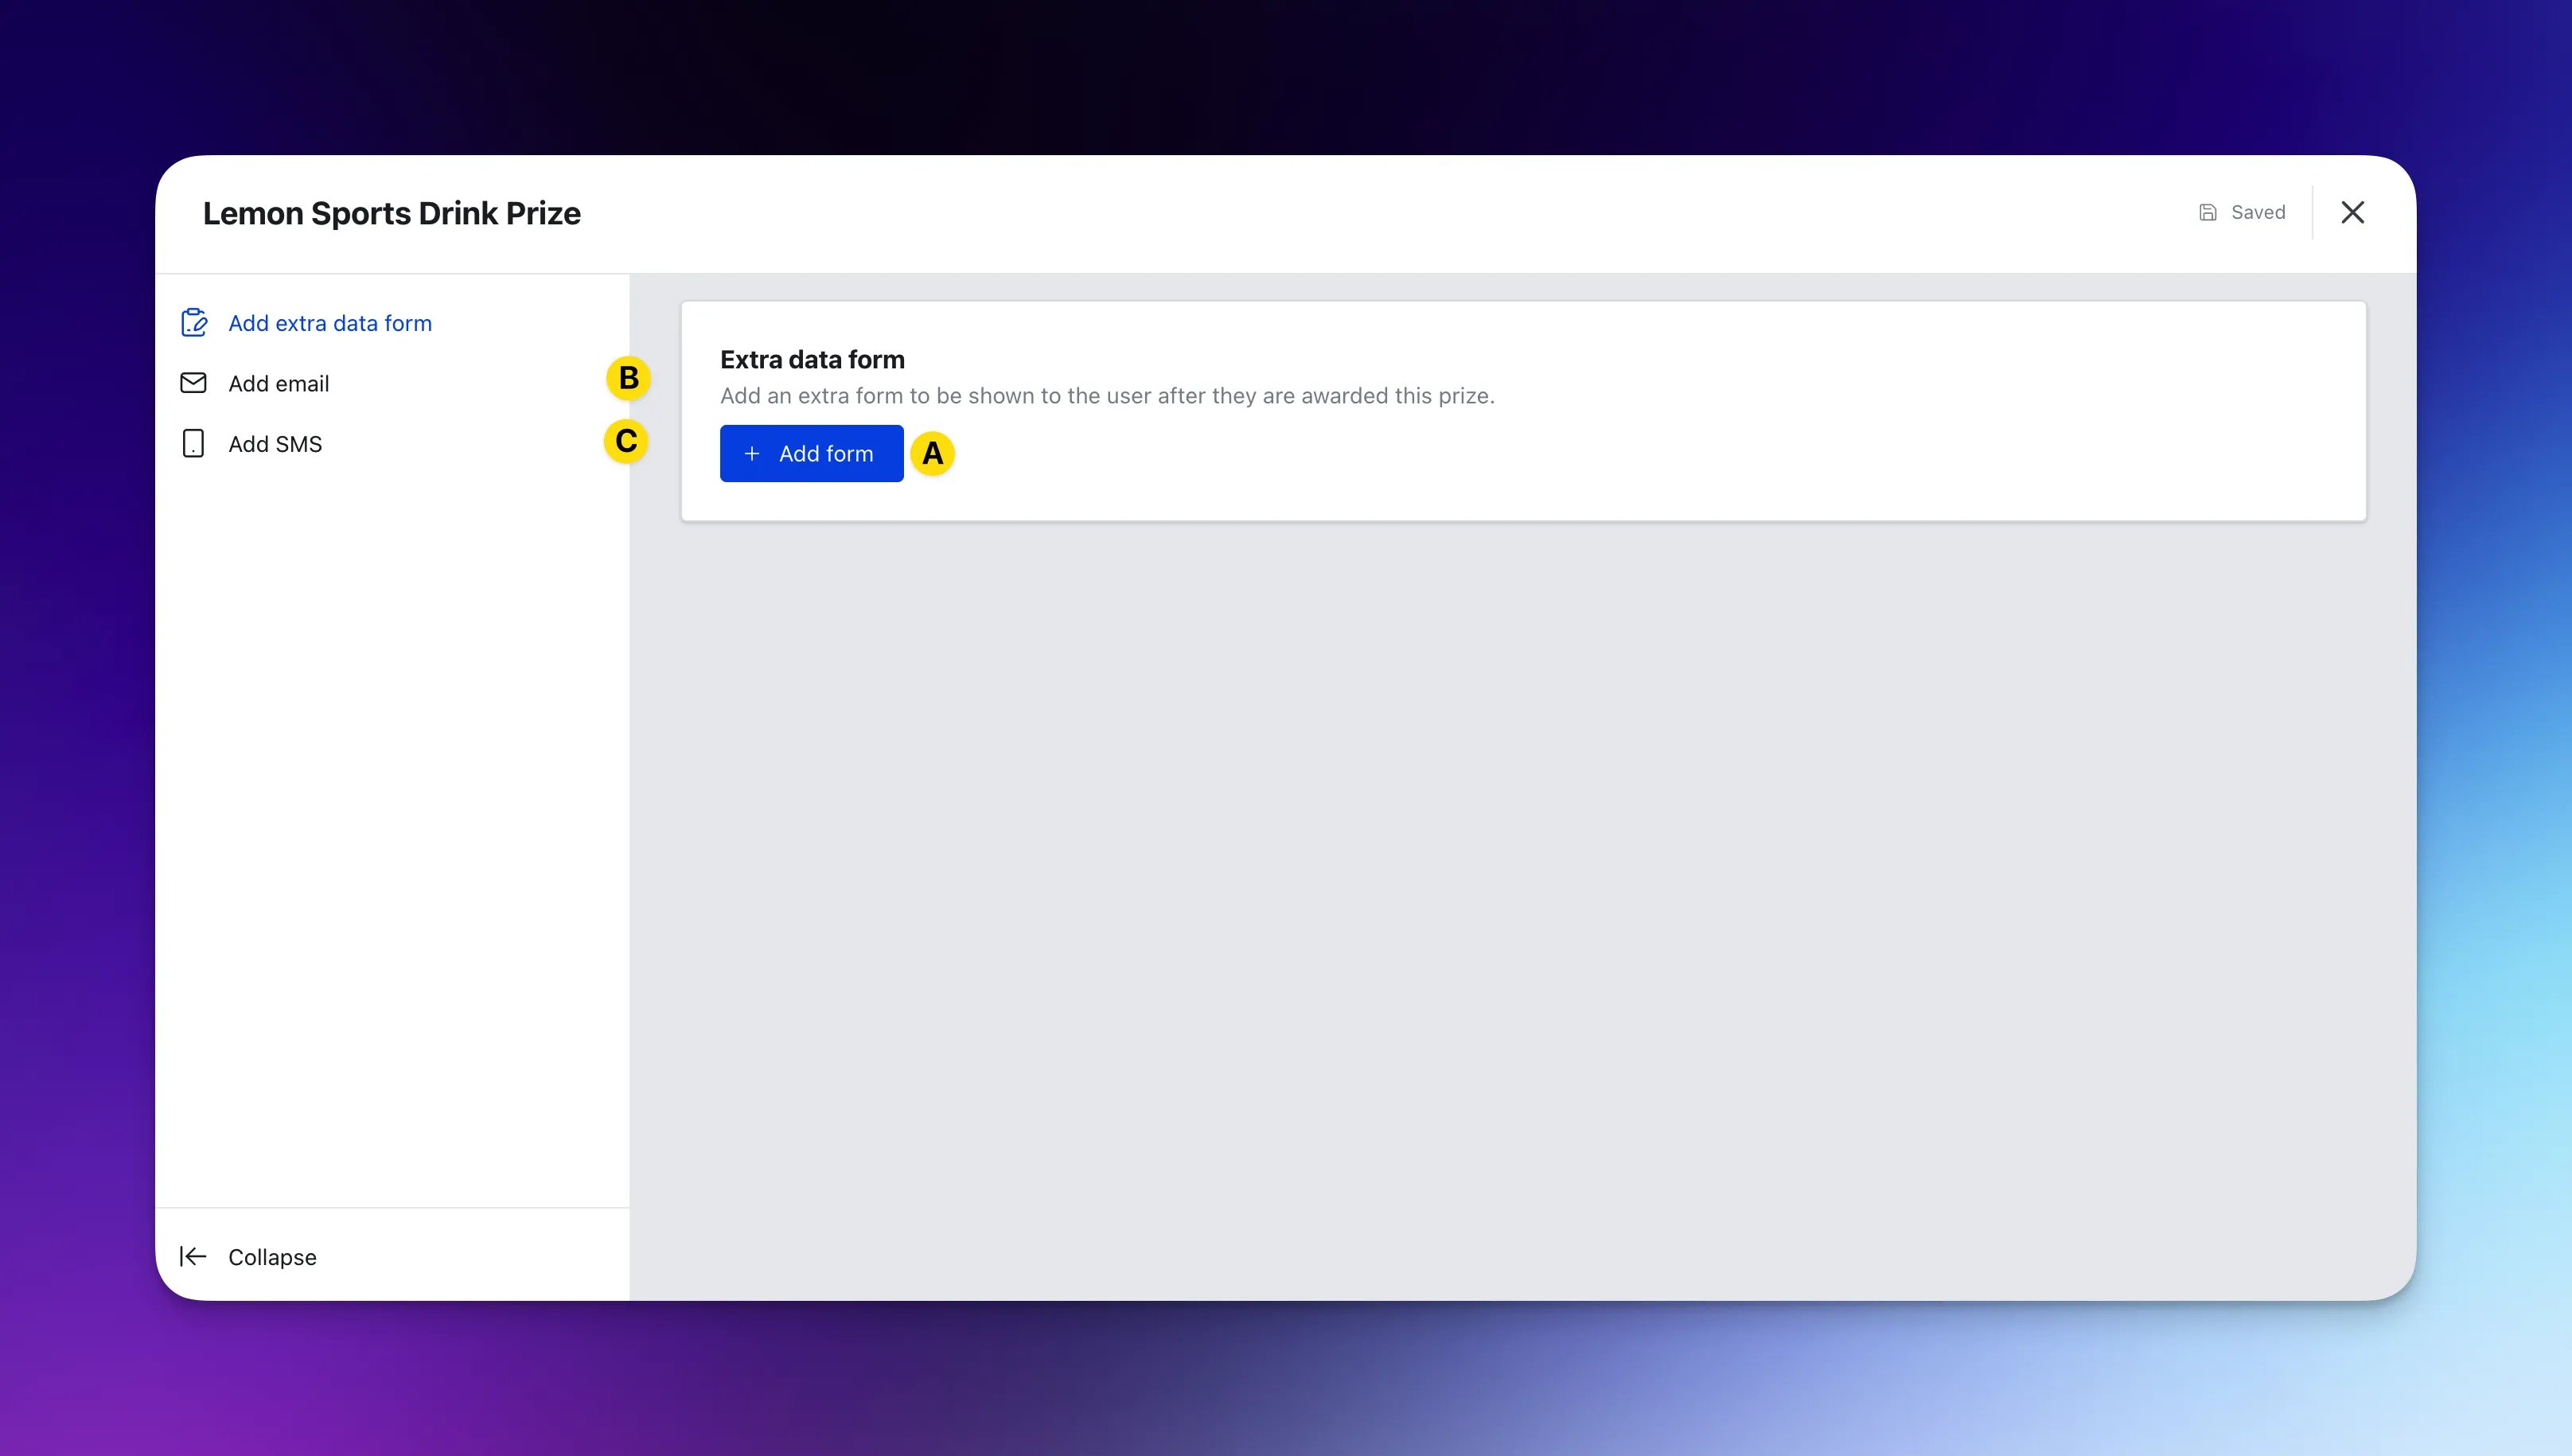 * **(A)** Here, you can **add an extra data form** to a particular prize wedge. \
**Note:** This extra data capture form is perfect for getting that extra piece of information that you don't necessarily need unless a user lands on a prize wedge, i.e. their postal address to send them their prize. If you need guidance on setting up a Data Capture form, check out [**this article**](/getting-started/hub-setup/data-capture).
* **(B) + (C)** Add **email communications** and/or **SMS communications** to each prize. Here you can attach coupons, link them to an external reward or provide the next steps. If you need guidance on setting up prizes and communications, head to [**this article**](/competitions-promotions/setup-management/prizes-and-comms).
### Step 6: Style your Spin to Win
* **(A)** Here, you can **add an extra data form** to a particular prize wedge. \
**Note:** This extra data capture form is perfect for getting that extra piece of information that you don't necessarily need unless a user lands on a prize wedge, i.e. their postal address to send them their prize. If you need guidance on setting up a Data Capture form, check out [**this article**](/getting-started/hub-setup/data-capture).
* **(B) + (C)** Add **email communications** and/or **SMS communications** to each prize. Here you can attach coupons, link them to an external reward or provide the next steps. If you need guidance on setting up prizes and communications, head to [**this article**](/competitions-promotions/setup-management/prizes-and-comms).
### Step 6: Style your Spin to Win
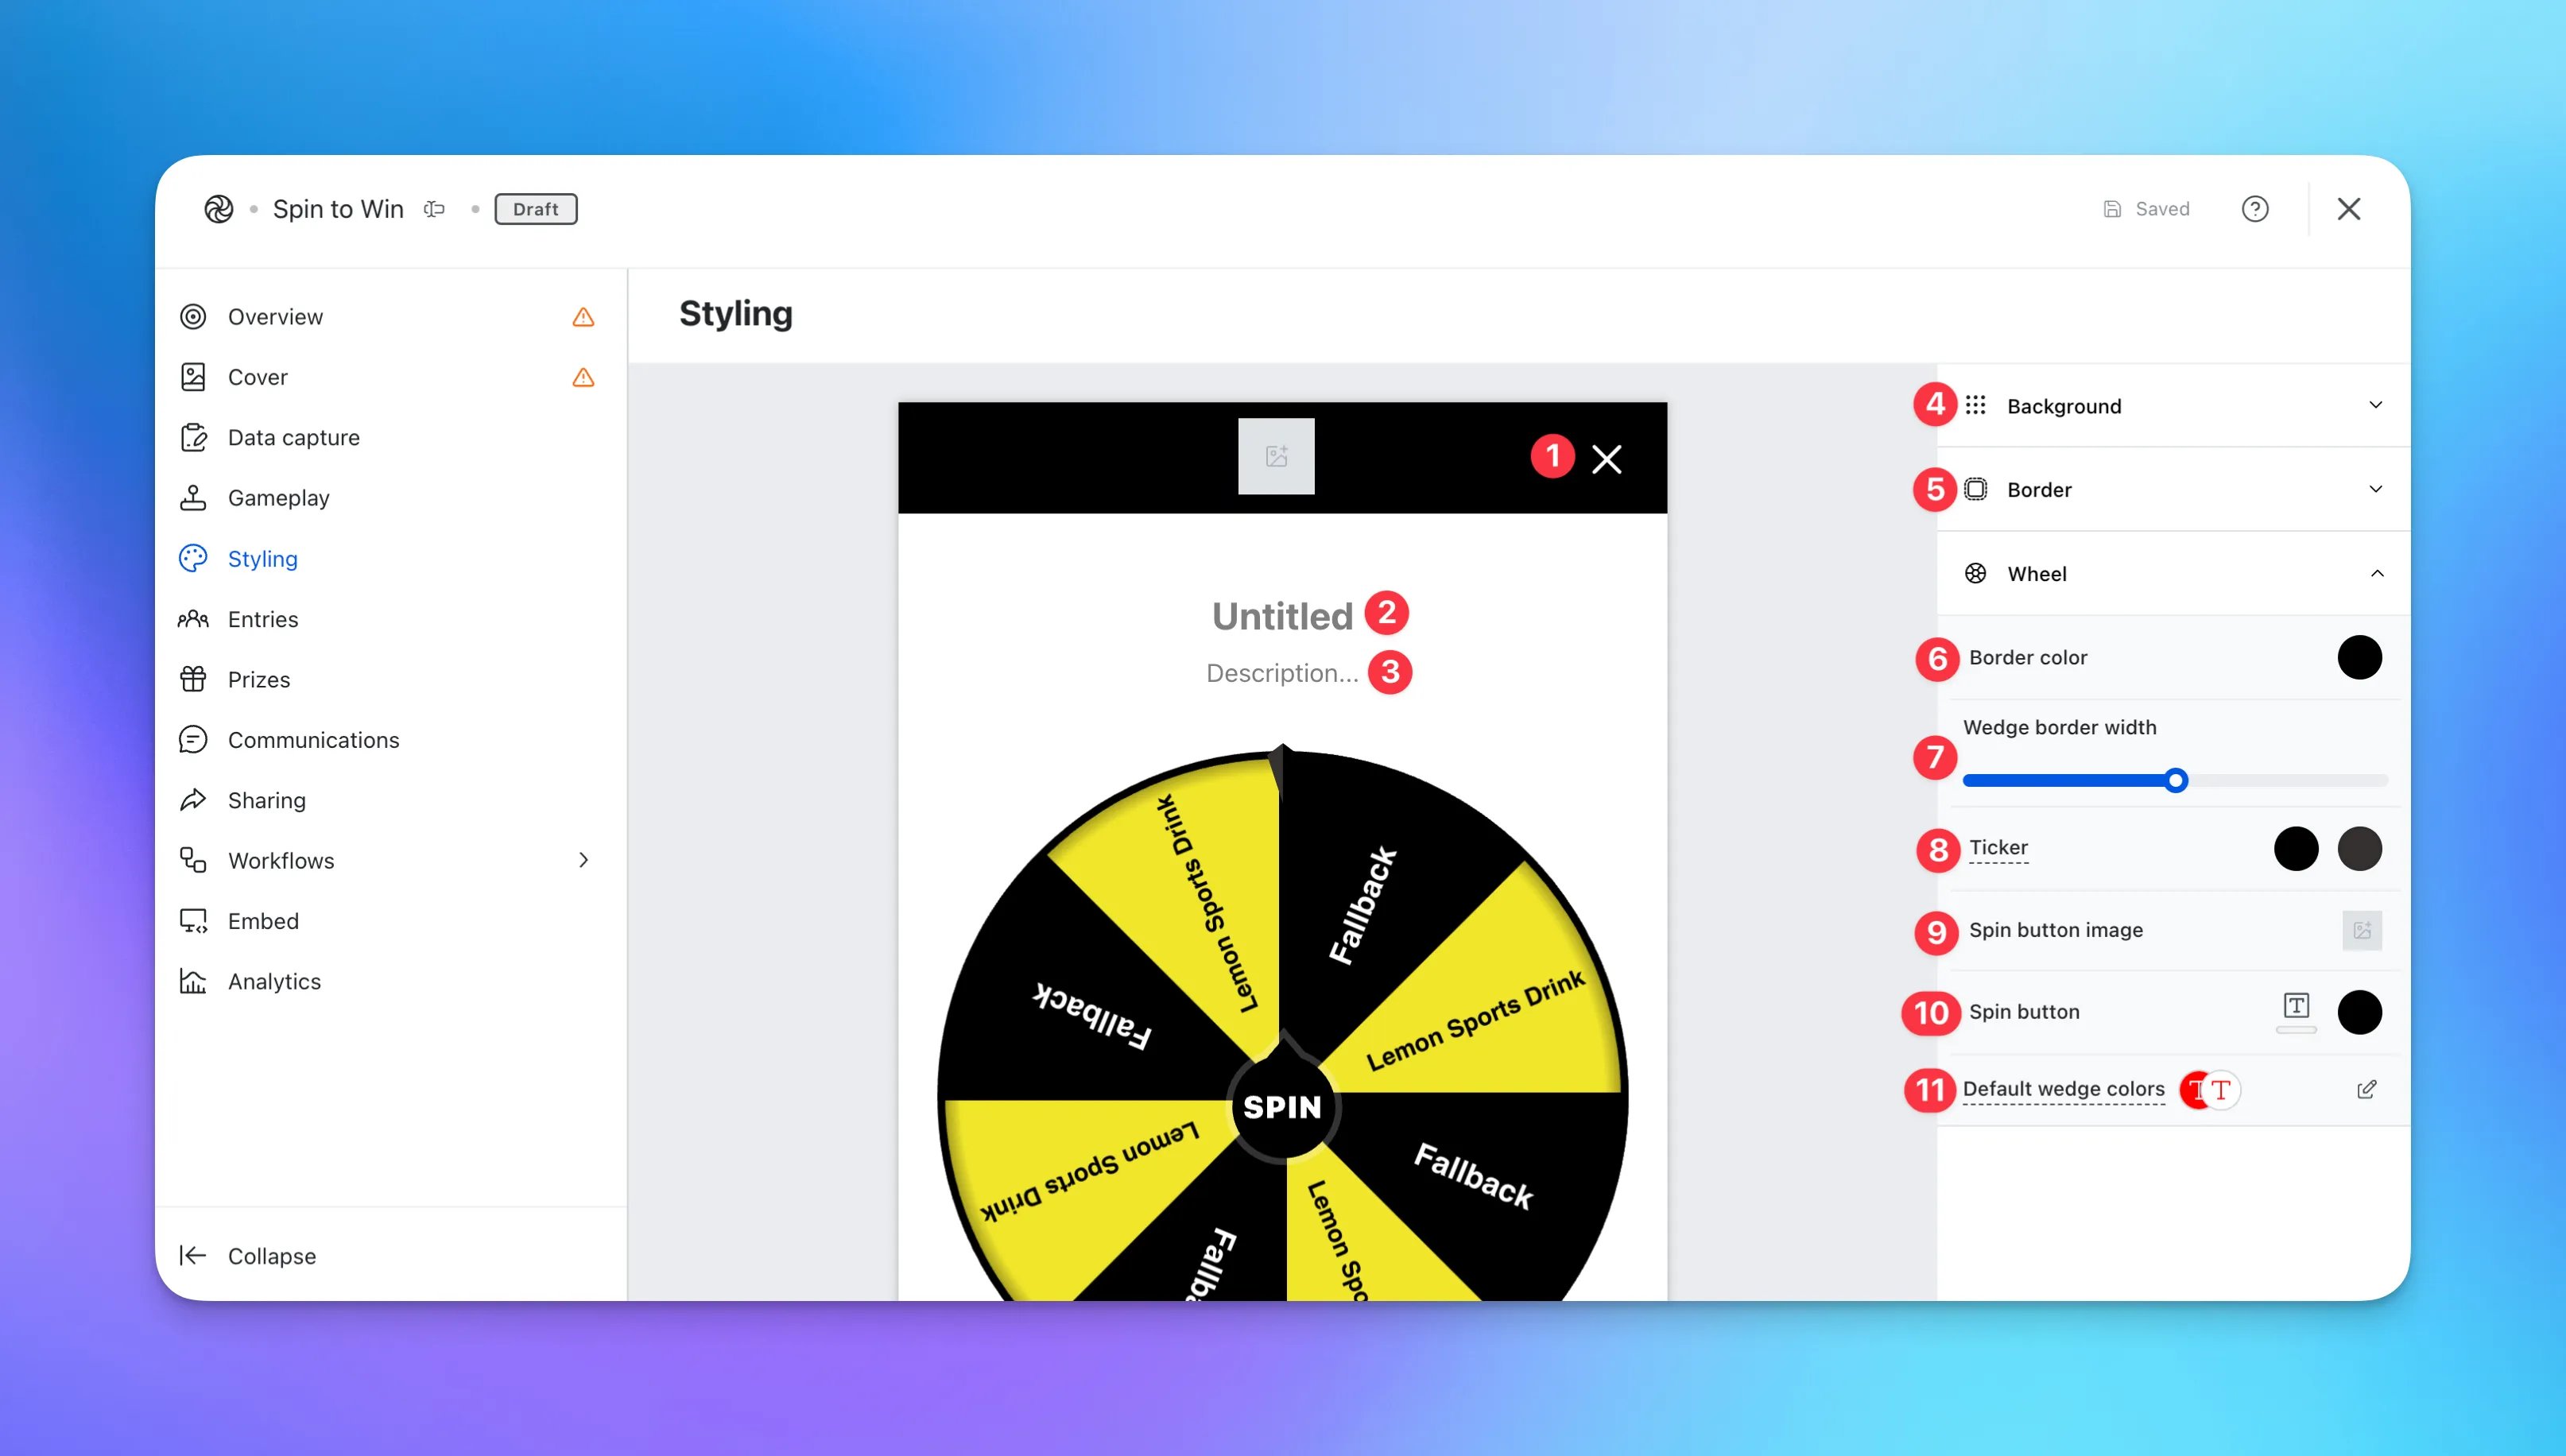 * **(1)** To edit the **Header Bar** of your game, click on the header. Here you can change the header background color, close button color and add your logo to the top of your Spin to Win.
* **(2)** Add a **title** to your game by inputting text above the spin wheel.
* **(3)** Add an optional **description** to your game by inputting text here.
* **(4)** Navigate to the righthand toolbar to the **Background** dropdown menu.
* **(1)** To edit the **Header Bar** of your game, click on the header. Here you can change the header background color, close button color and add your logo to the top of your Spin to Win.
* **(2)** Add a **title** to your game by inputting text above the spin wheel.
* **(3)** Add an optional **description** to your game by inputting text here.
* **(4)** Navigate to the righthand toolbar to the **Background** dropdown menu.
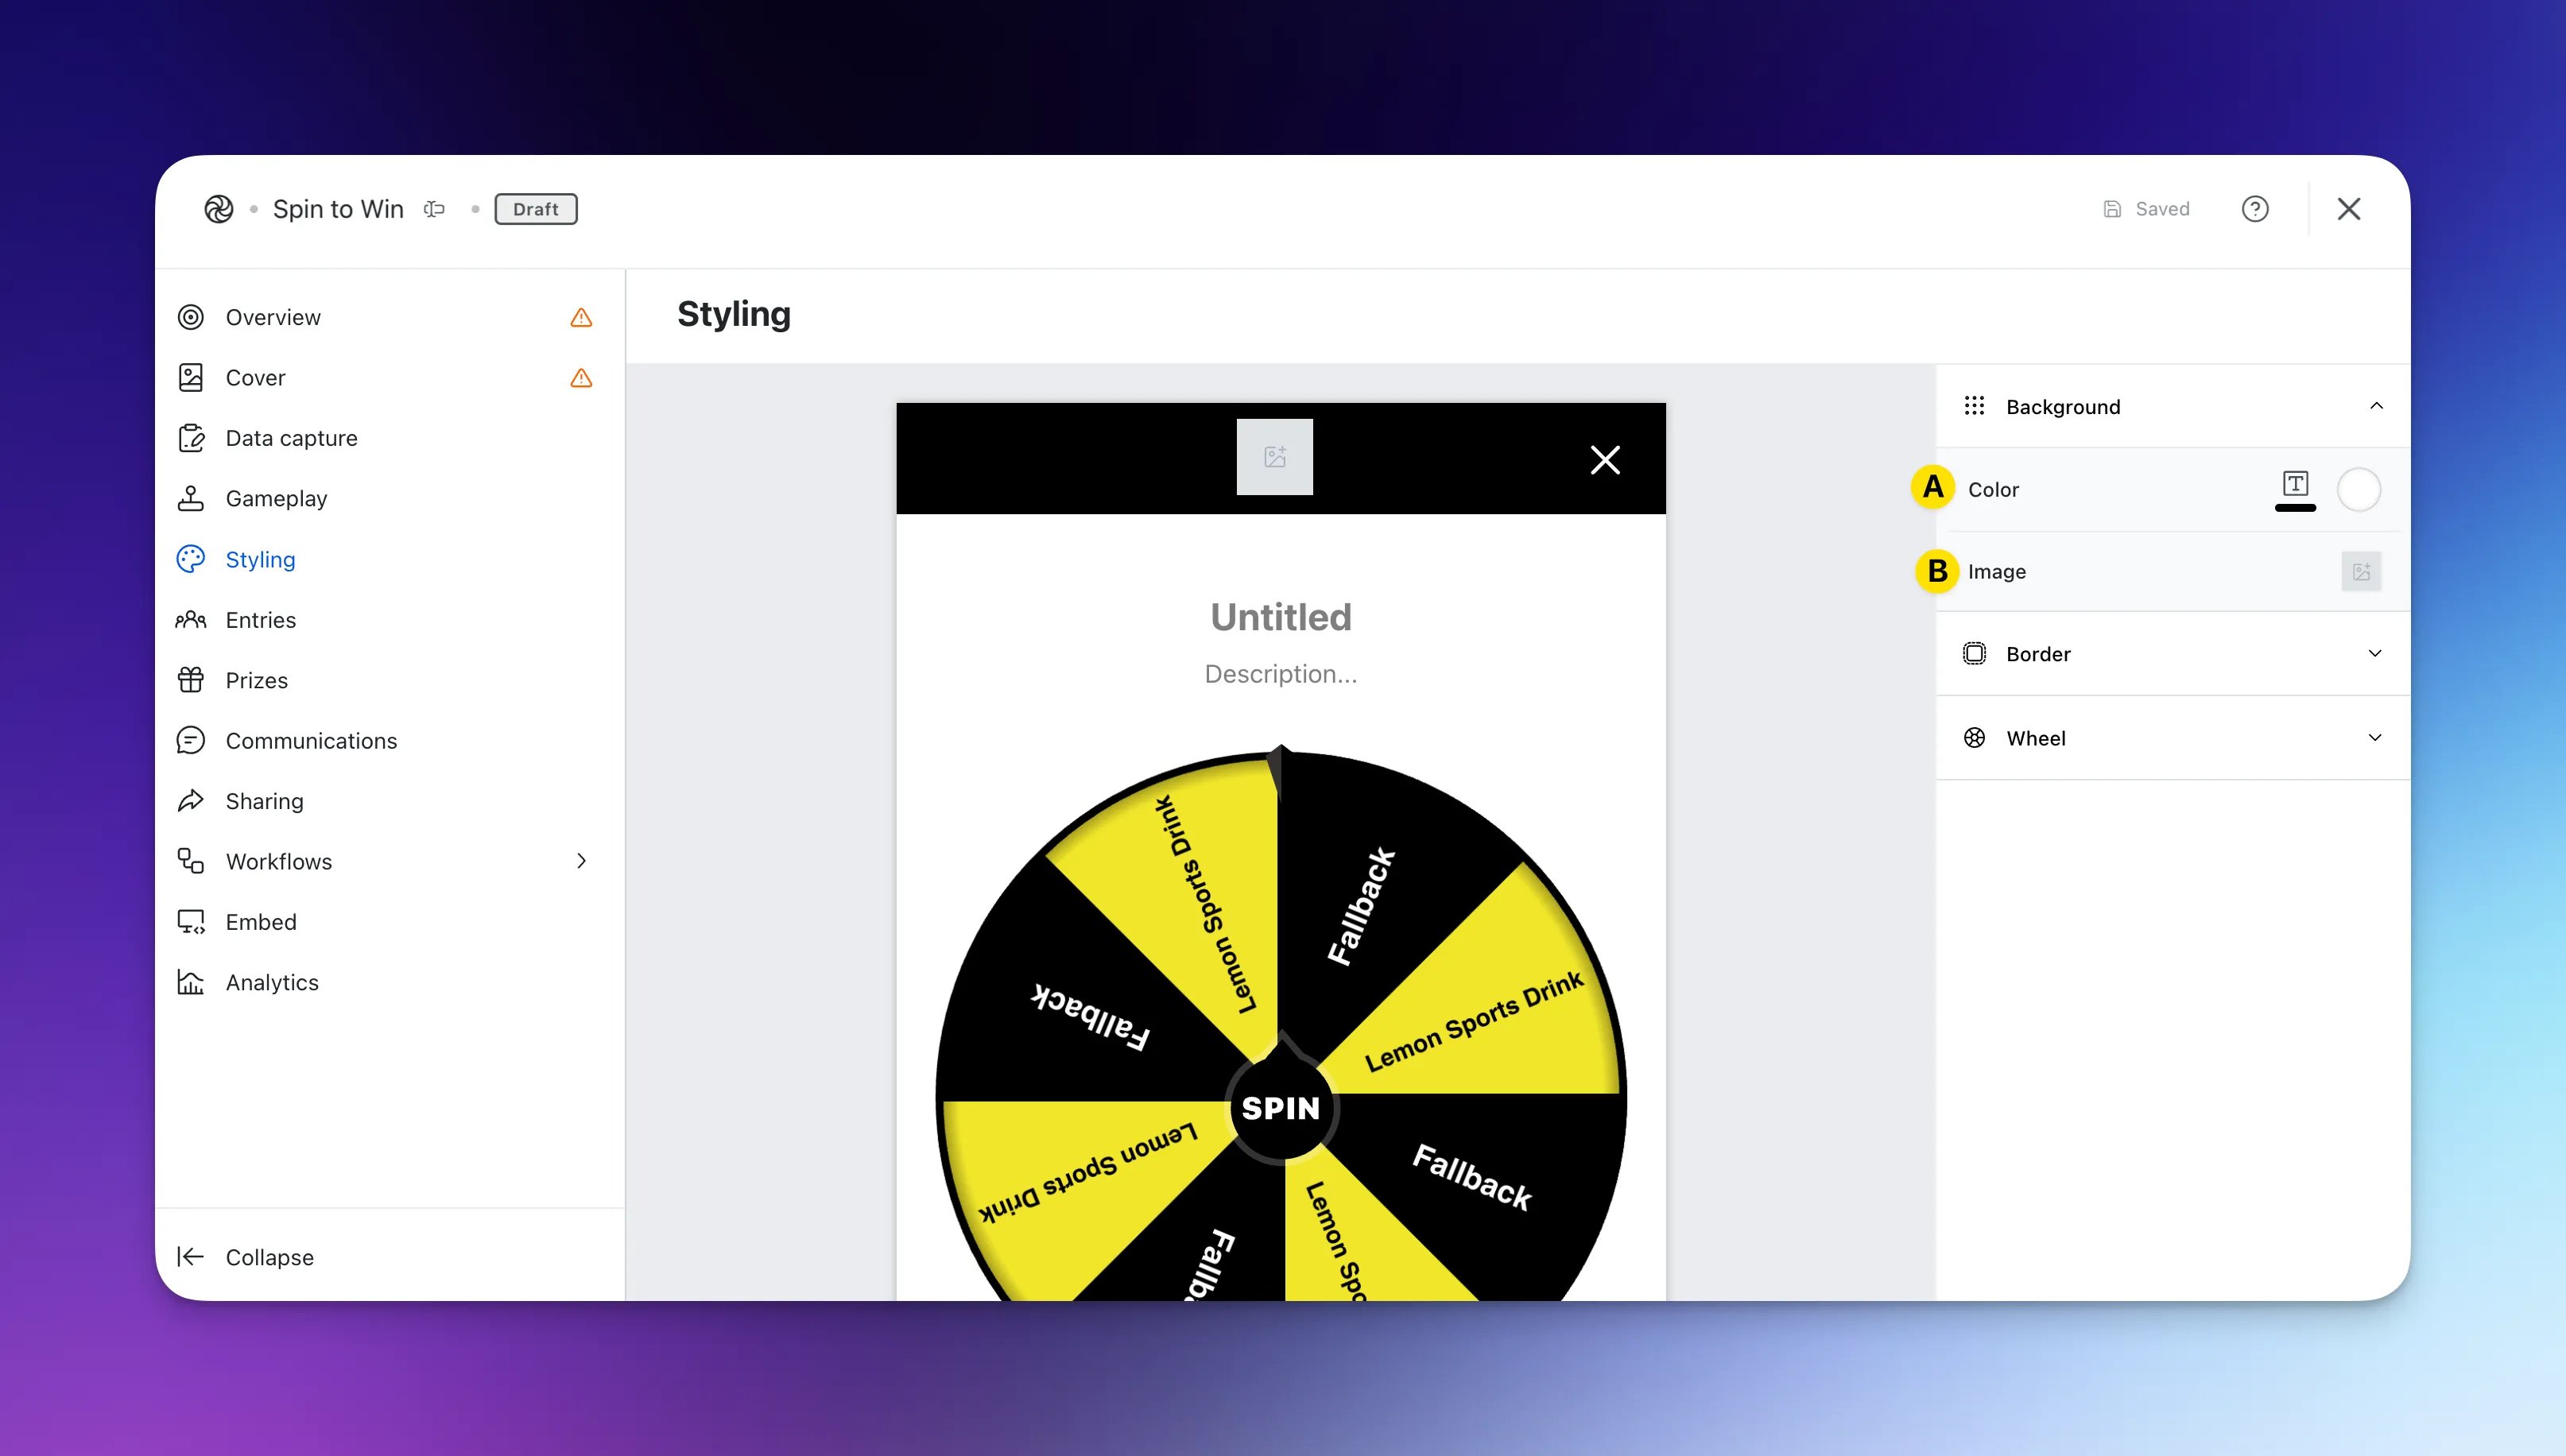 * **(A)** Here you can edit the **background and text color** of your title and description.
* **(B)** Alternatively, upload a **background image**.
* **(5)** Navigate to the **Border** dropdown menu.
* **(A)** Here you can edit the **background and text color** of your title and description.
* **(B)** Alternatively, upload a **background image**.
* **(5)** Navigate to the **Border** dropdown menu.
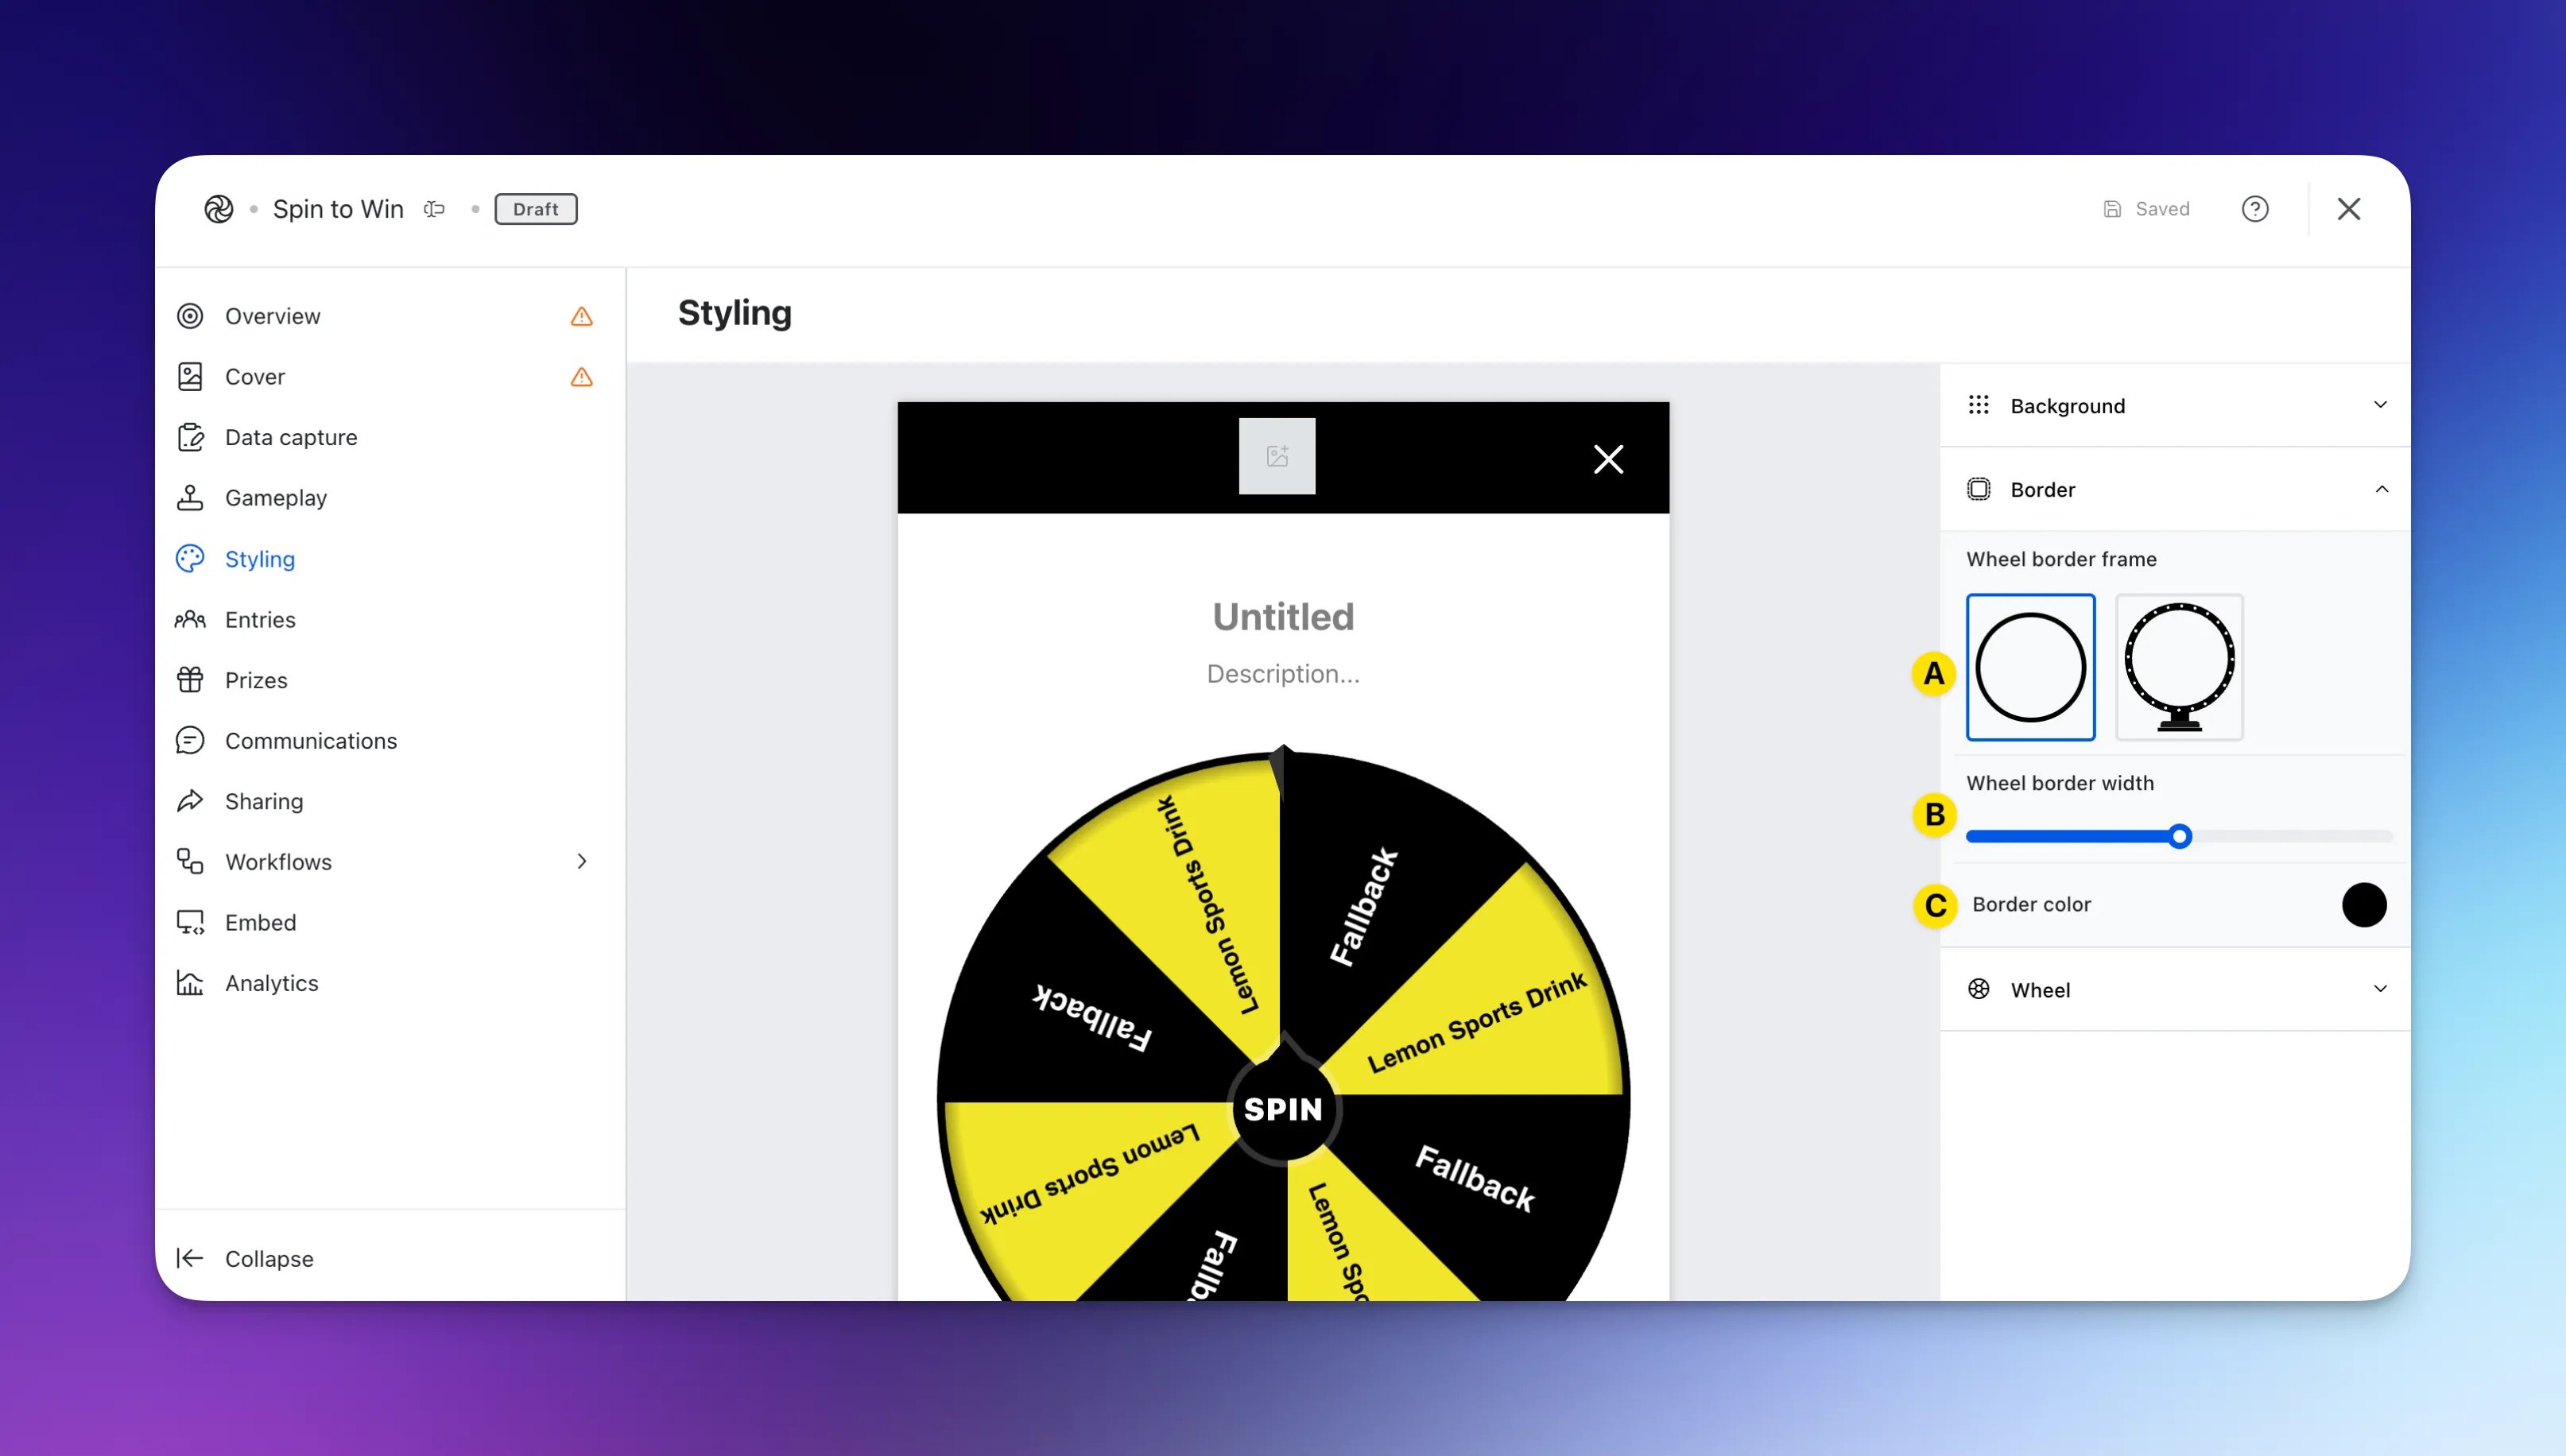 * **(A)** Here you can choose a solid-colored **border** or our classic spin wheel style.
* **(B)** Alter the **border width** here.
* **(C) Here you can configure the color** of your border.
* **(6)** Here you can change the **border color** of the wheel.
* **(7)** Alter the **width** of the wedge borders inside the spin wheel.
* **(8)** Edit the colors of the **ticker** located at the top of the wheel.
* **(9)** add an **image** to replace the spin button or **(10)** change the colors of the **spin button**.
* **(11)** Here is where you can set the **default colors for your wedges.** This will mean that your wedges will be pre-filled with your branding colors and the wedges will switch between these automatically as opposed to manually selecting a color for each wedge.
This is not required if you have overridden the colors of your wedges in Step 4.
* **(A)** Here you can choose a solid-colored **border** or our classic spin wheel style.
* **(B)** Alter the **border width** here.
* **(C) Here you can configure the color** of your border.
* **(6)** Here you can change the **border color** of the wheel.
* **(7)** Alter the **width** of the wedge borders inside the spin wheel.
* **(8)** Edit the colors of the **ticker** located at the top of the wheel.
* **(9)** add an **image** to replace the spin button or **(10)** change the colors of the **spin button**.
* **(11)** Here is where you can set the **default colors for your wedges.** This will mean that your wedges will be pre-filled with your branding colors and the wedges will switch between these automatically as opposed to manually selecting a color for each wedge.
This is not required if you have overridden the colors of your wedges in Step 4.
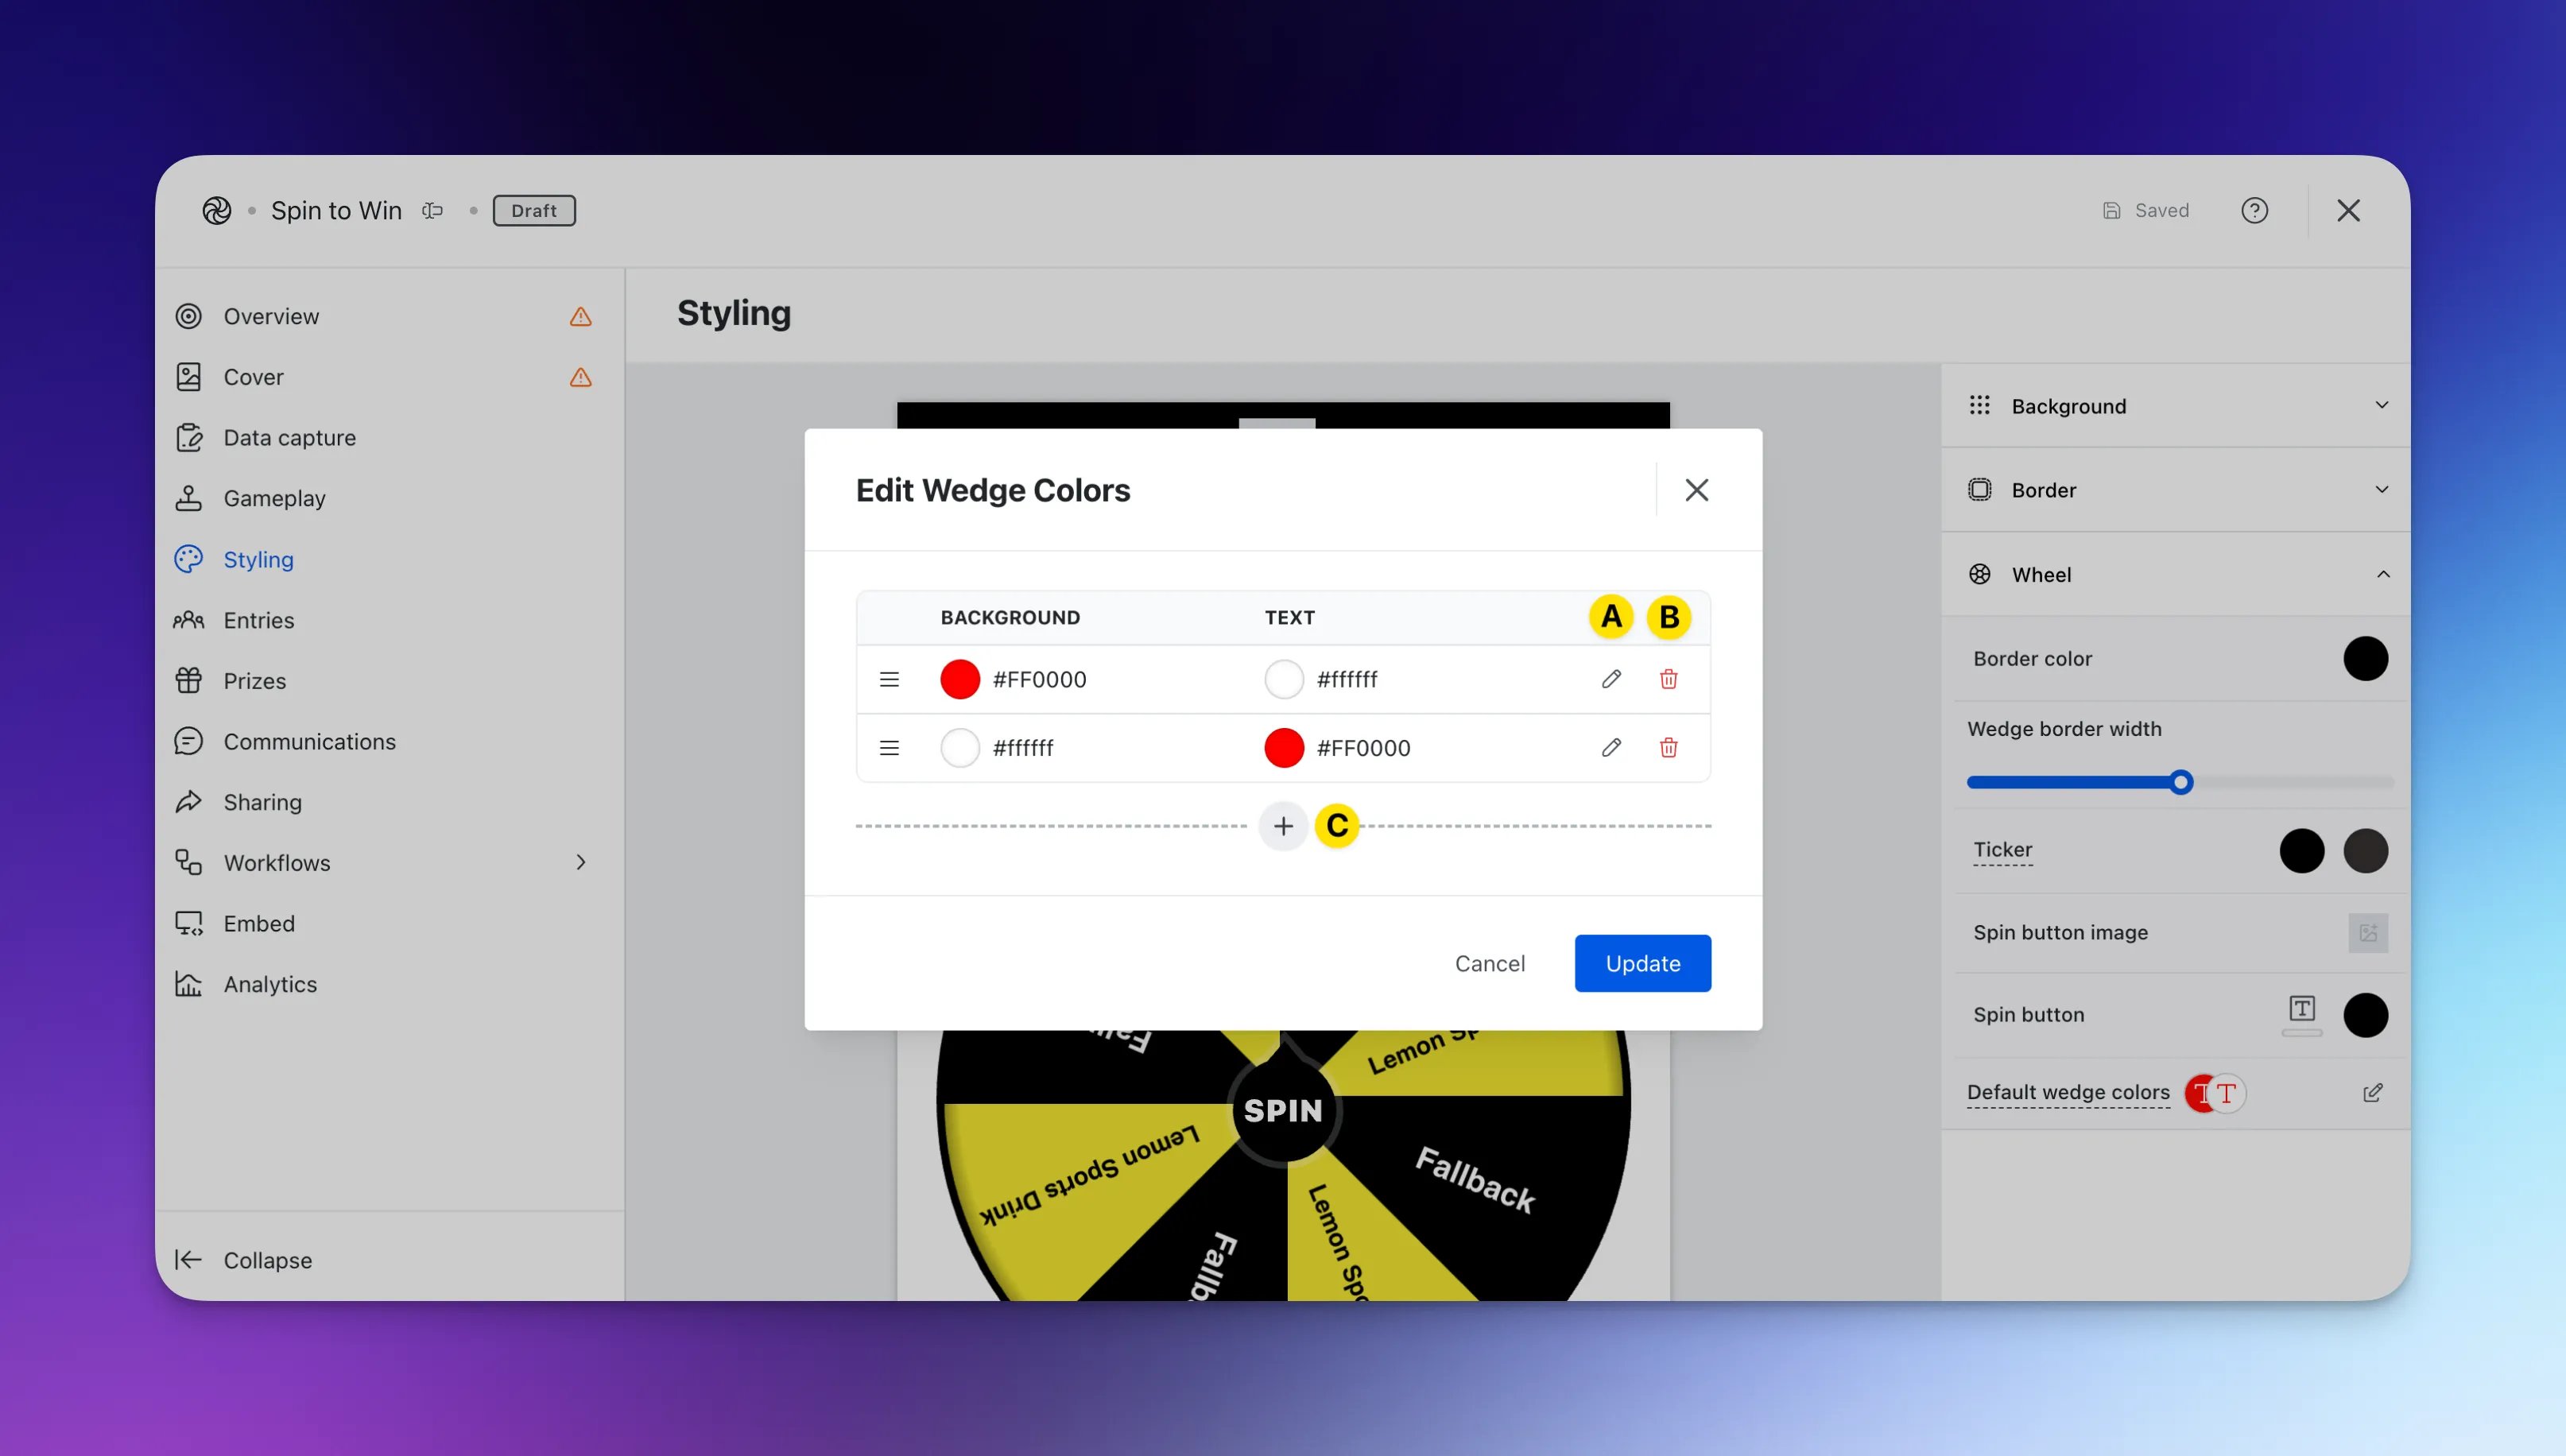 * **(A)** **By clicking on the edit icon**, you can change the **background and text color** of your wedges.
* **(B)** Clicking here will **delete** your selected wedge color.
* **(C)** Clicking here will **add a new wedge color**.
### Step 7: Publish your Card
* **(A)** **By clicking on the edit icon**, you can change the **background and text color** of your wedges.
* **(B)** Clicking here will **delete** your selected wedge color.
* **(C)** Clicking here will **add a new wedge color**.
### Step 7: Publish your Card
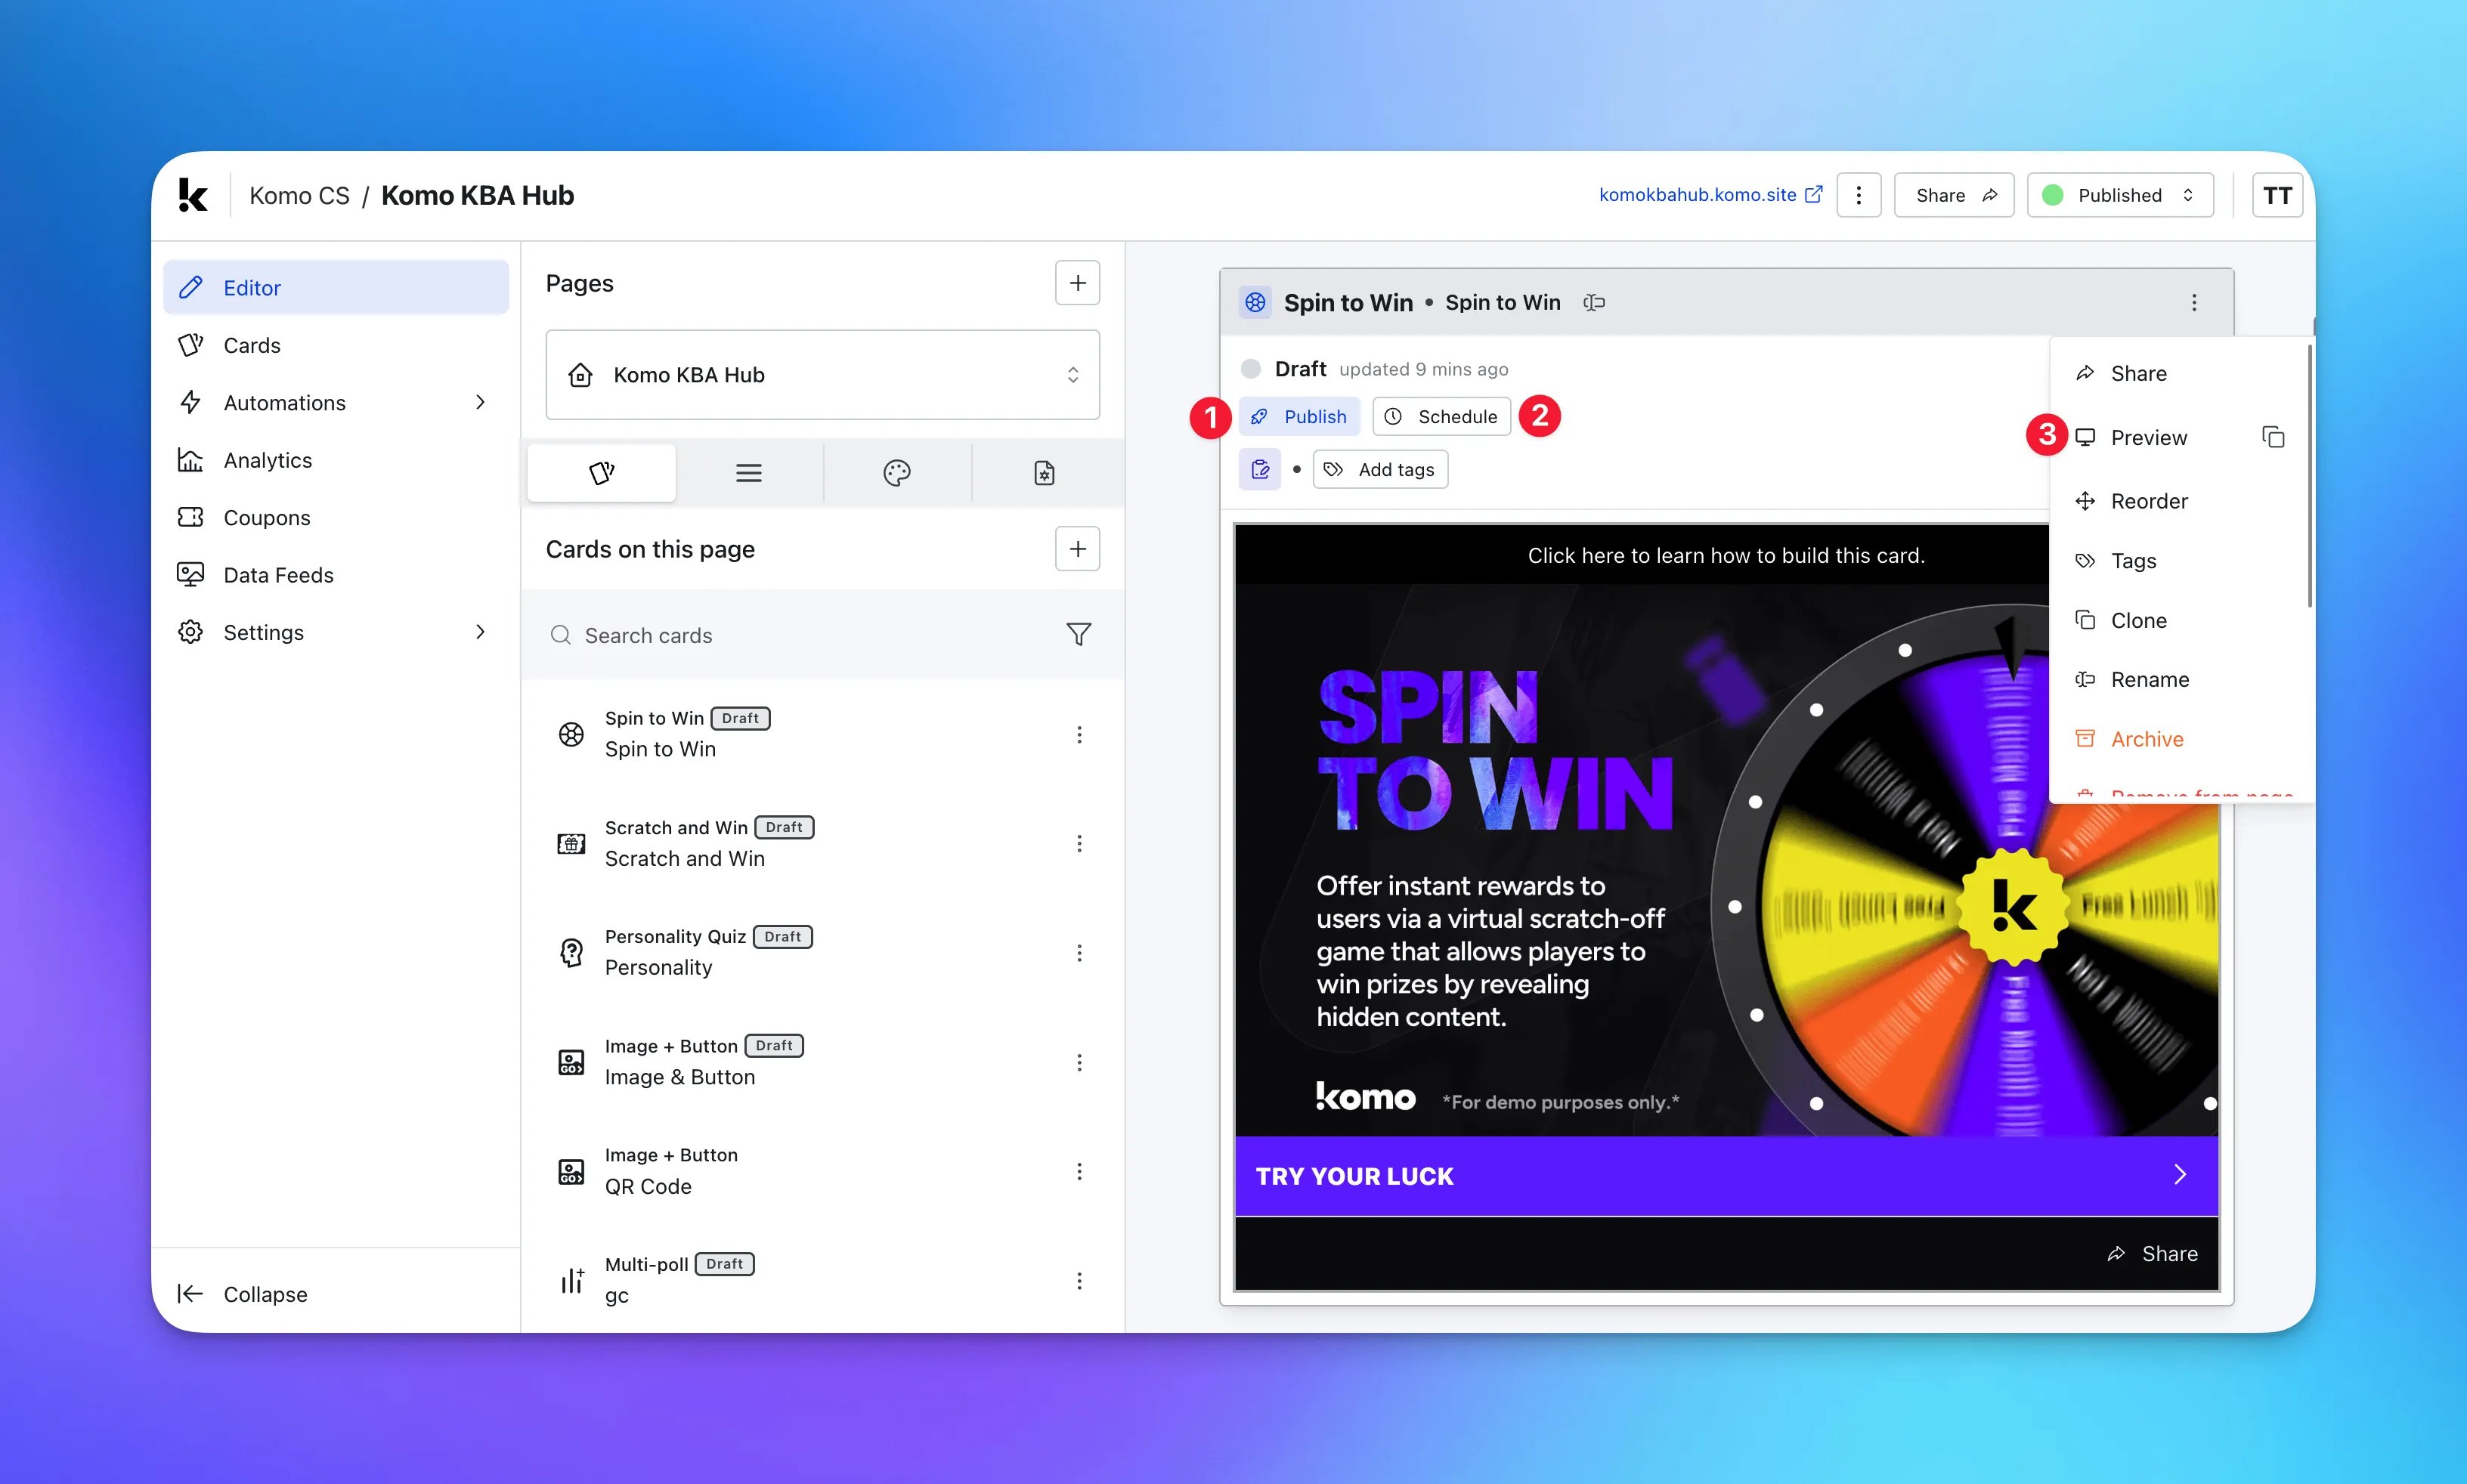 **Once you've completed all of these steps, played around with your card and are happy with all the aspects of your card, it's time to get your card live!**
* **(1) Publish** your card manually and instantly for the world to see.
* **(2) Schedule** your card to be published and unpublished at set dates and times.
* **(3)** Click on **...** to **Preview** and interact with the card on the front end from a user's perspective before publishing it. See how to test your card [here](/getting-started/hub-setup/card-testing).
All competition entries will be recorded and will impact the card analytics.
## "Go Live" Checklist
Ready to go live with your Spin to Win? We recommend reviewing the following list before launching and double-checking that you have:- All images uploaded to each screen are the **correct dimensions**. Export image files in 2x to ensure none of the images appear pixelated.
* Hyperlinked your [T\&C's](/getting-started/resources/terms-conditions) to the opt-in-field, which is created in the **data capture** section of the settings tab.
* All your **communications** (Prize screen/s and Fallback screen/s) fully set up and ready to send.
* Made sure the coupons you've used (if any) are set up correctly. Check the coupon limits are set, the copy for each screen is right and you have linked the appropriate coupons to your communications.
* Ensured you have set the **probability** for each result screen.
* Ensured you have set the **limits** for each result. - Edited the **Styling** of the Spin to Win to your branding. - Checked that your spin wheel is configured to your desired order of wedges by viewing it in the Styling tab.
* Ensured that if you have multiple result screens, each have an **internal name** to help you distinguish between the prizes in the analytics.Then you're ready to go live!
## Promotion
## FAQ
**Is there a limit to the number of wedges I can have on the spin wheel?**
You can have as many wedges as you'd like. Just keep in mind that the more you add, depending on your text input, the more the spacing and sizing will be limited.
**How many prizes can I have?**
You can have as many prizes as you like. The only exception is that the probability of winning all prizes combined must not be greater than 100.
## Top tips
* Include a bit of information in your cover image. Mention what prize/s can be won. This will get users to engage more as they know the prize/s. You can add this information on the top of the card instead by using the **Options** button located at the bottom of the card and selecting **Description**.
* Set up communications for prize winners in the Result screen section. After designing the Prize Result screen, on the left, you can set up SMS or Email communications. These communications will be sent out instantly when a user has won.- The communications tab in the Data capture section is an overview of all communications set up for the game.- Direct users back to the Hub in the Failure screen to compete in more competitions and games. Drive more traffic and engagement to your Hub.
* Set the probability of seeing a result screen accordingly. If you have a couple of prizes to give away, set the probability lower so you don't reach your prize limit too soon and can drive more traffic to your Hub. If your game is active for a certain period of time, set the probability a bit higher to reach your prize limit.
**Once you've completed all of these steps, played around with your card and are happy with all the aspects of your card, it's time to get your card live!**
* **(1) Publish** your card manually and instantly for the world to see.
* **(2) Schedule** your card to be published and unpublished at set dates and times.
* **(3)** Click on **...** to **Preview** and interact with the card on the front end from a user's perspective before publishing it. See how to test your card [here](/getting-started/hub-setup/card-testing).
All competition entries will be recorded and will impact the card analytics.
## "Go Live" Checklist
Ready to go live with your Spin to Win? We recommend reviewing the following list before launching and double-checking that you have:- All images uploaded to each screen are the **correct dimensions**. Export image files in 2x to ensure none of the images appear pixelated.
* Hyperlinked your [T\&C's](/getting-started/resources/terms-conditions) to the opt-in-field, which is created in the **data capture** section of the settings tab.
* All your **communications** (Prize screen/s and Fallback screen/s) fully set up and ready to send.
* Made sure the coupons you've used (if any) are set up correctly. Check the coupon limits are set, the copy for each screen is right and you have linked the appropriate coupons to your communications.
* Ensured you have set the **probability** for each result screen.
* Ensured you have set the **limits** for each result. - Edited the **Styling** of the Spin to Win to your branding. - Checked that your spin wheel is configured to your desired order of wedges by viewing it in the Styling tab.
* Ensured that if you have multiple result screens, each have an **internal name** to help you distinguish between the prizes in the analytics.Then you're ready to go live!
## Promotion
## FAQ
**Is there a limit to the number of wedges I can have on the spin wheel?**
You can have as many wedges as you'd like. Just keep in mind that the more you add, depending on your text input, the more the spacing and sizing will be limited.
**How many prizes can I have?**
You can have as many prizes as you like. The only exception is that the probability of winning all prizes combined must not be greater than 100.
## Top tips
* Include a bit of information in your cover image. Mention what prize/s can be won. This will get users to engage more as they know the prize/s. You can add this information on the top of the card instead by using the **Options** button located at the bottom of the card and selecting **Description**.
* Set up communications for prize winners in the Result screen section. After designing the Prize Result screen, on the left, you can set up SMS or Email communications. These communications will be sent out instantly when a user has won.- The communications tab in the Data capture section is an overview of all communications set up for the game.- Direct users back to the Hub in the Failure screen to compete in more competitions and games. Drive more traffic and engagement to your Hub.
* Set the probability of seeing a result screen accordingly. If you have a couple of prizes to give away, set the probability lower so you don't reach your prize limit too soon and can drive more traffic to your Hub. If your game is active for a certain period of time, set the probability a bit higher to reach your prize limit.