> ## Documentation Index
> Fetch the complete documentation index at: https://knowledge.komo.tech/llms.txt
> Use this file to discover all available pages before exploring further.
# Treasure Hunt
> Direct your audience to different touchpoints in a physical or digital space.
## What is it?
The Treasure Hunt allows you to create a digital scavenger hunt for your audience by providing clues or riddles to direct users to different touchpoints either in a physical space (e.g. a shopping center) or digitally (e.g. Facebook and Instagram pages).
Users will need to go to these touchpoints and to confirm they were there, they will need to enter a secret code or scan a QR code to mark the checkpoint as completed.
## How do I build one?
### Step 1: **Add a Treasure Hunt to your Hub**
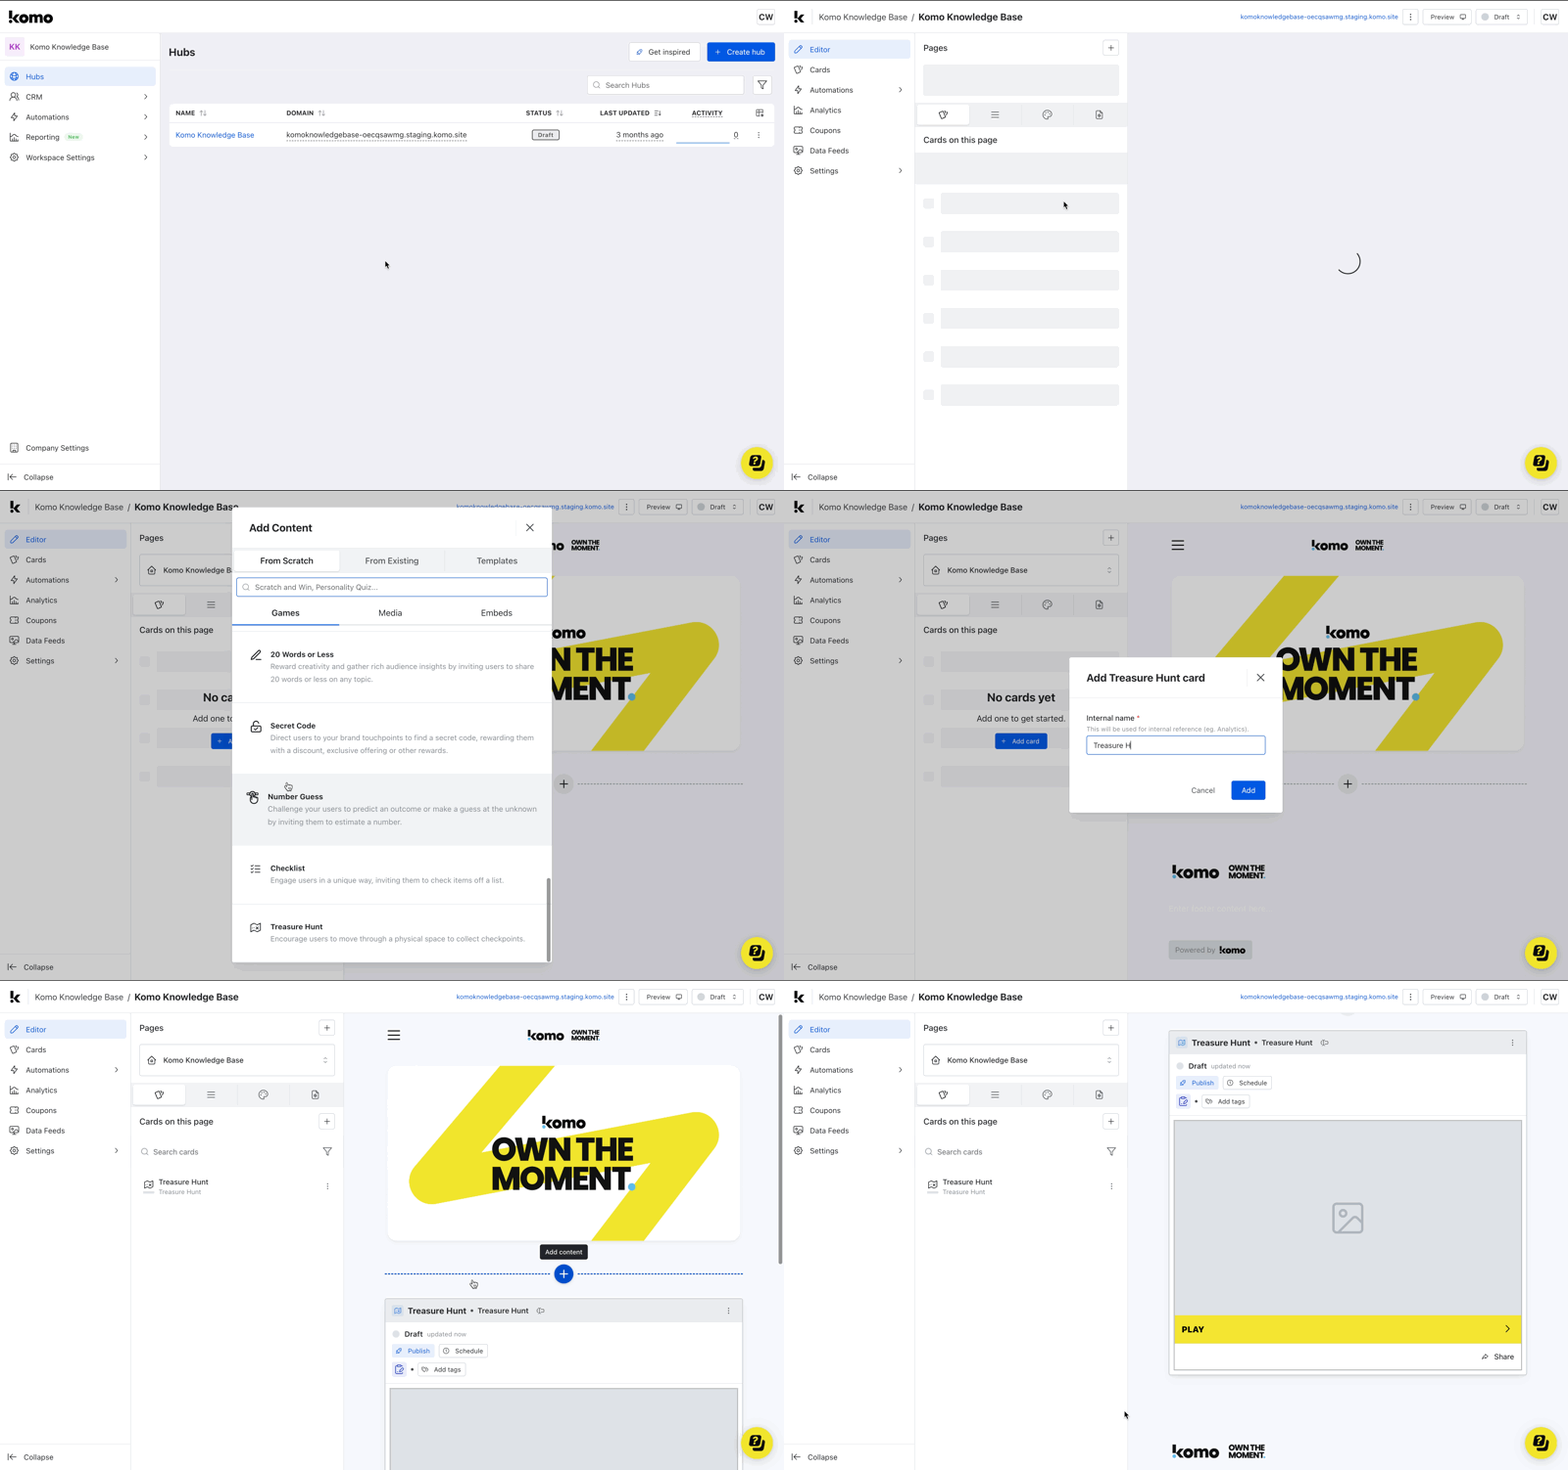 * Navigate to your **Engagement Hub**.
* Once there click the **Plus icon,** from here select **Games** and then **Treasure Hunt.**
* Give the card an **Internal Name** and then click **Add.**
* You will then see your new card has been added to your Hub.
### Step 2: **Add a Cover image**
* Navigate to your **Engagement Hub**.
* Once there click the **Plus icon,** from here select **Games** and then **Treasure Hunt.**
* Give the card an **Internal Name** and then click **Add.**
* You will then see your new card has been added to your Hub.
### Step 2: **Add a Cover image**
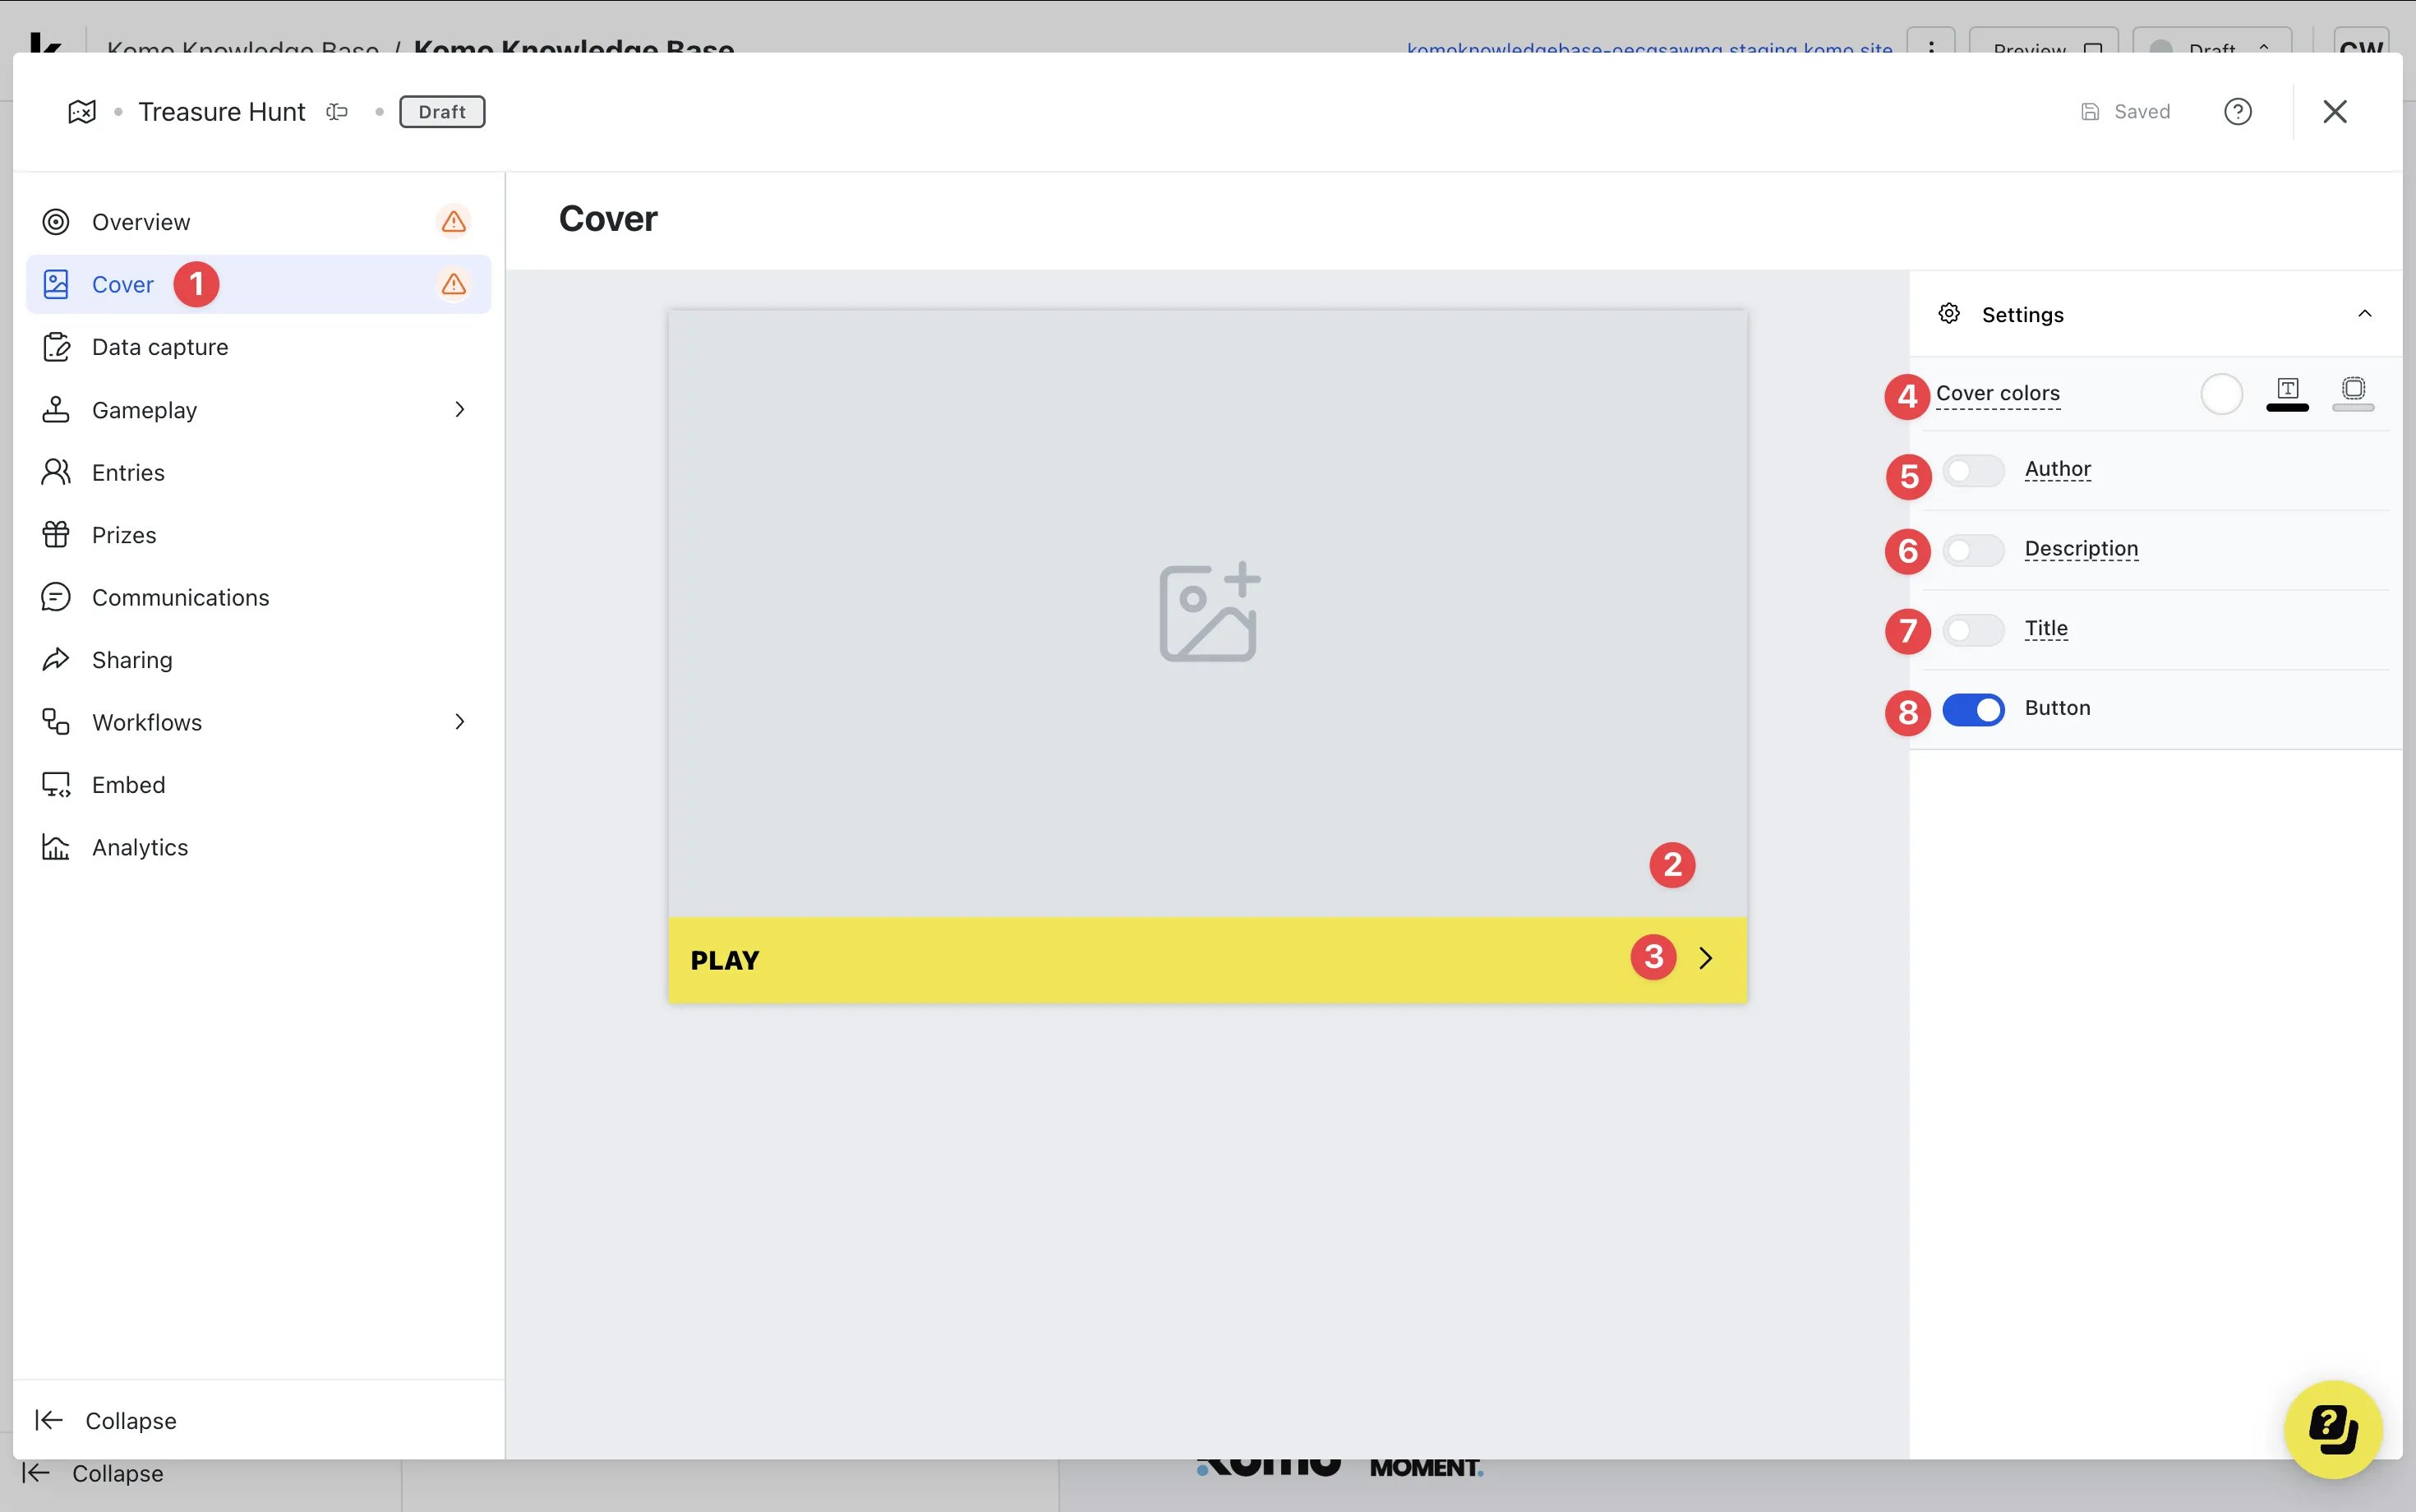 * Clicking on the **Treasure Hunt** will open the editing module.
* **(1)** Click **cover** to open the Cover editor.
* **(2)** This is where you can upload a **cover image**.
* **(3)** Here you can edit the color and copy of the **call-to-action bar** or **(7)** you can disable the bar here.
* **(4)** Set the **outer cover colors** (description and share bar).
* **(5)** You can add an **author** tag by displaying the brand sponsoring the competition.
* **(6)** Add a **description** to the card.
* **(7)** By clicking here you can add a **title** to your Treasure Hunt card.
* **(8)** Here you can choose to toggle on or off the **CTA button.**
### Step 3: Set up your Data capture
**Data capture** is required for this card, this will be on by default but will require you to set up additional settings.
### Step 4: **Set up your Rules screen**
* Clicking on the **Treasure Hunt** will open the editing module.
* **(1)** Click **cover** to open the Cover editor.
* **(2)** This is where you can upload a **cover image**.
* **(3)** Here you can edit the color and copy of the **call-to-action bar** or **(7)** you can disable the bar here.
* **(4)** Set the **outer cover colors** (description and share bar).
* **(5)** You can add an **author** tag by displaying the brand sponsoring the competition.
* **(6)** Add a **description** to the card.
* **(7)** By clicking here you can add a **title** to your Treasure Hunt card.
* **(8)** Here you can choose to toggle on or off the **CTA button.**
### Step 3: Set up your Data capture
**Data capture** is required for this card, this will be on by default but will require you to set up additional settings.
### Step 4: **Set up your Rules screen**
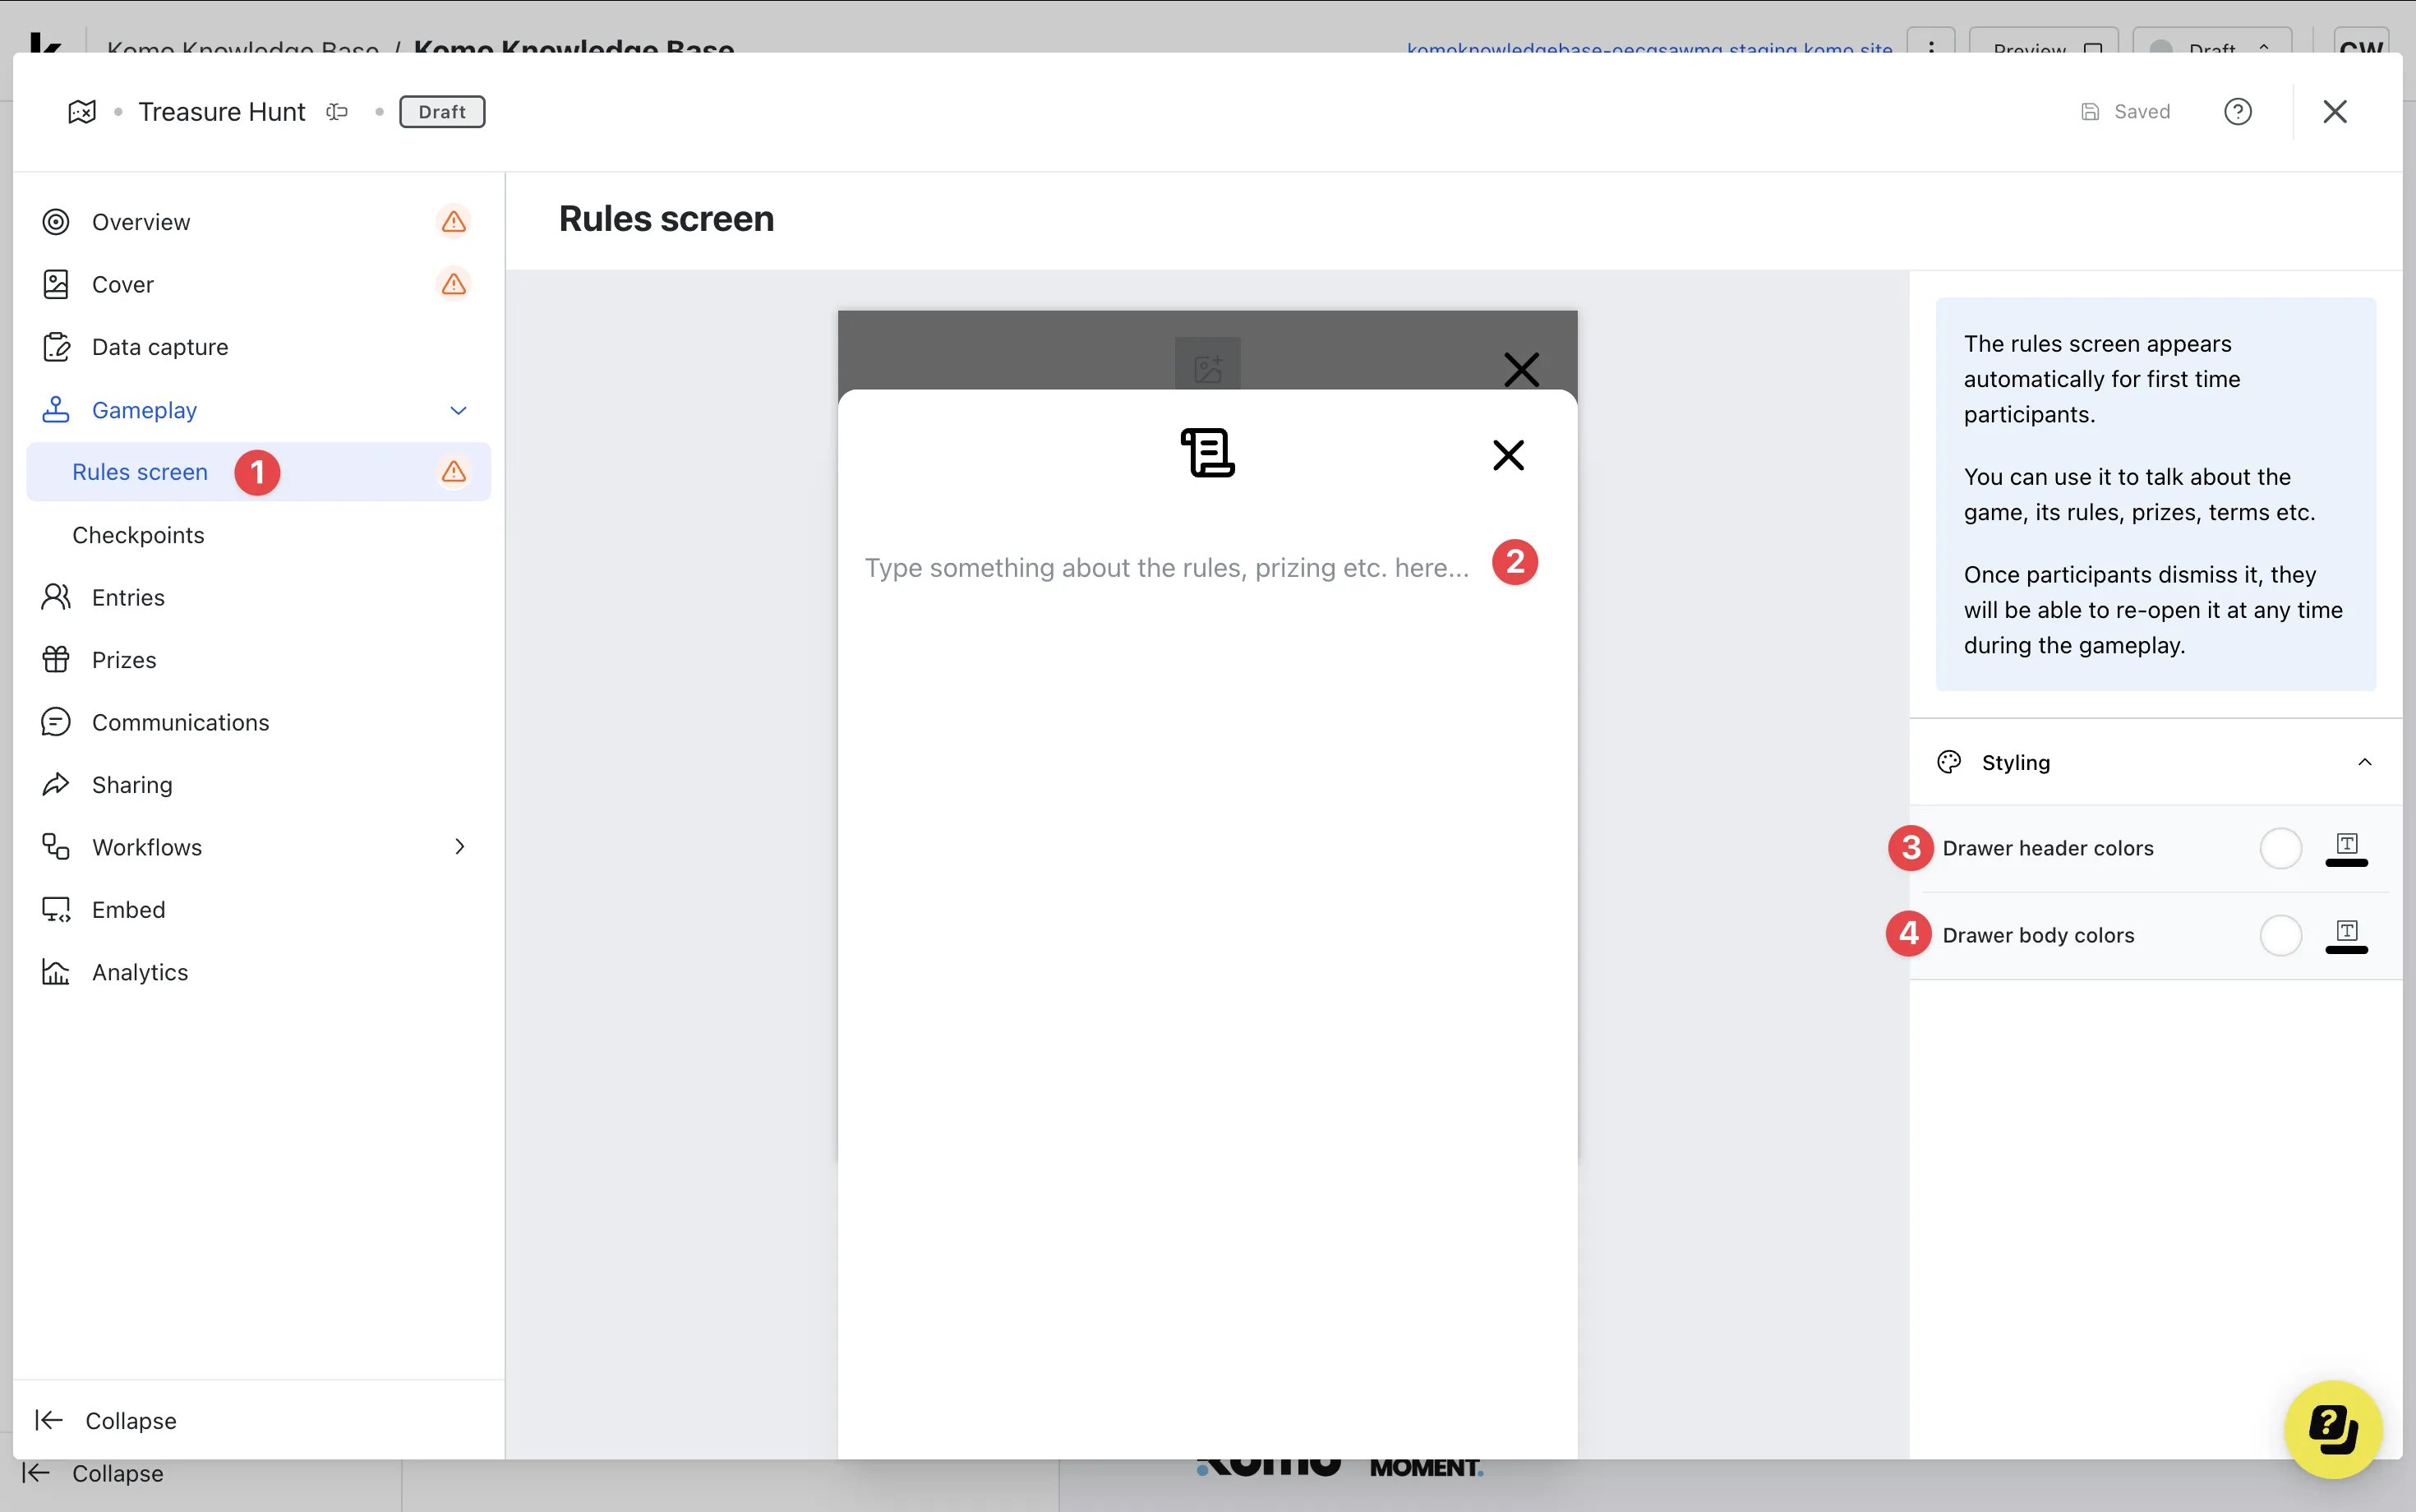 * **(1)** Click on the **Rules screen** tab.
* **(2)** Input the **rules** for the game here.
Share details on how to play and win prizes (if applicable) e.g. Find all the checkpoints for your chance to win X
* **(3)** Edit the **rules header colors** here.
* **(4)** Edit the **rules body colors** here.
### Step 5: **Create your QR code Checkpoints**
* **(1)** Click on the **Rules screen** tab.
* **(2)** Input the **rules** for the game here.
Share details on how to play and win prizes (if applicable) e.g. Find all the checkpoints for your chance to win X
* **(3)** Edit the **rules header colors** here.
* **(4)** Edit the **rules body colors** here.
### Step 5: **Create your QR code Checkpoints**
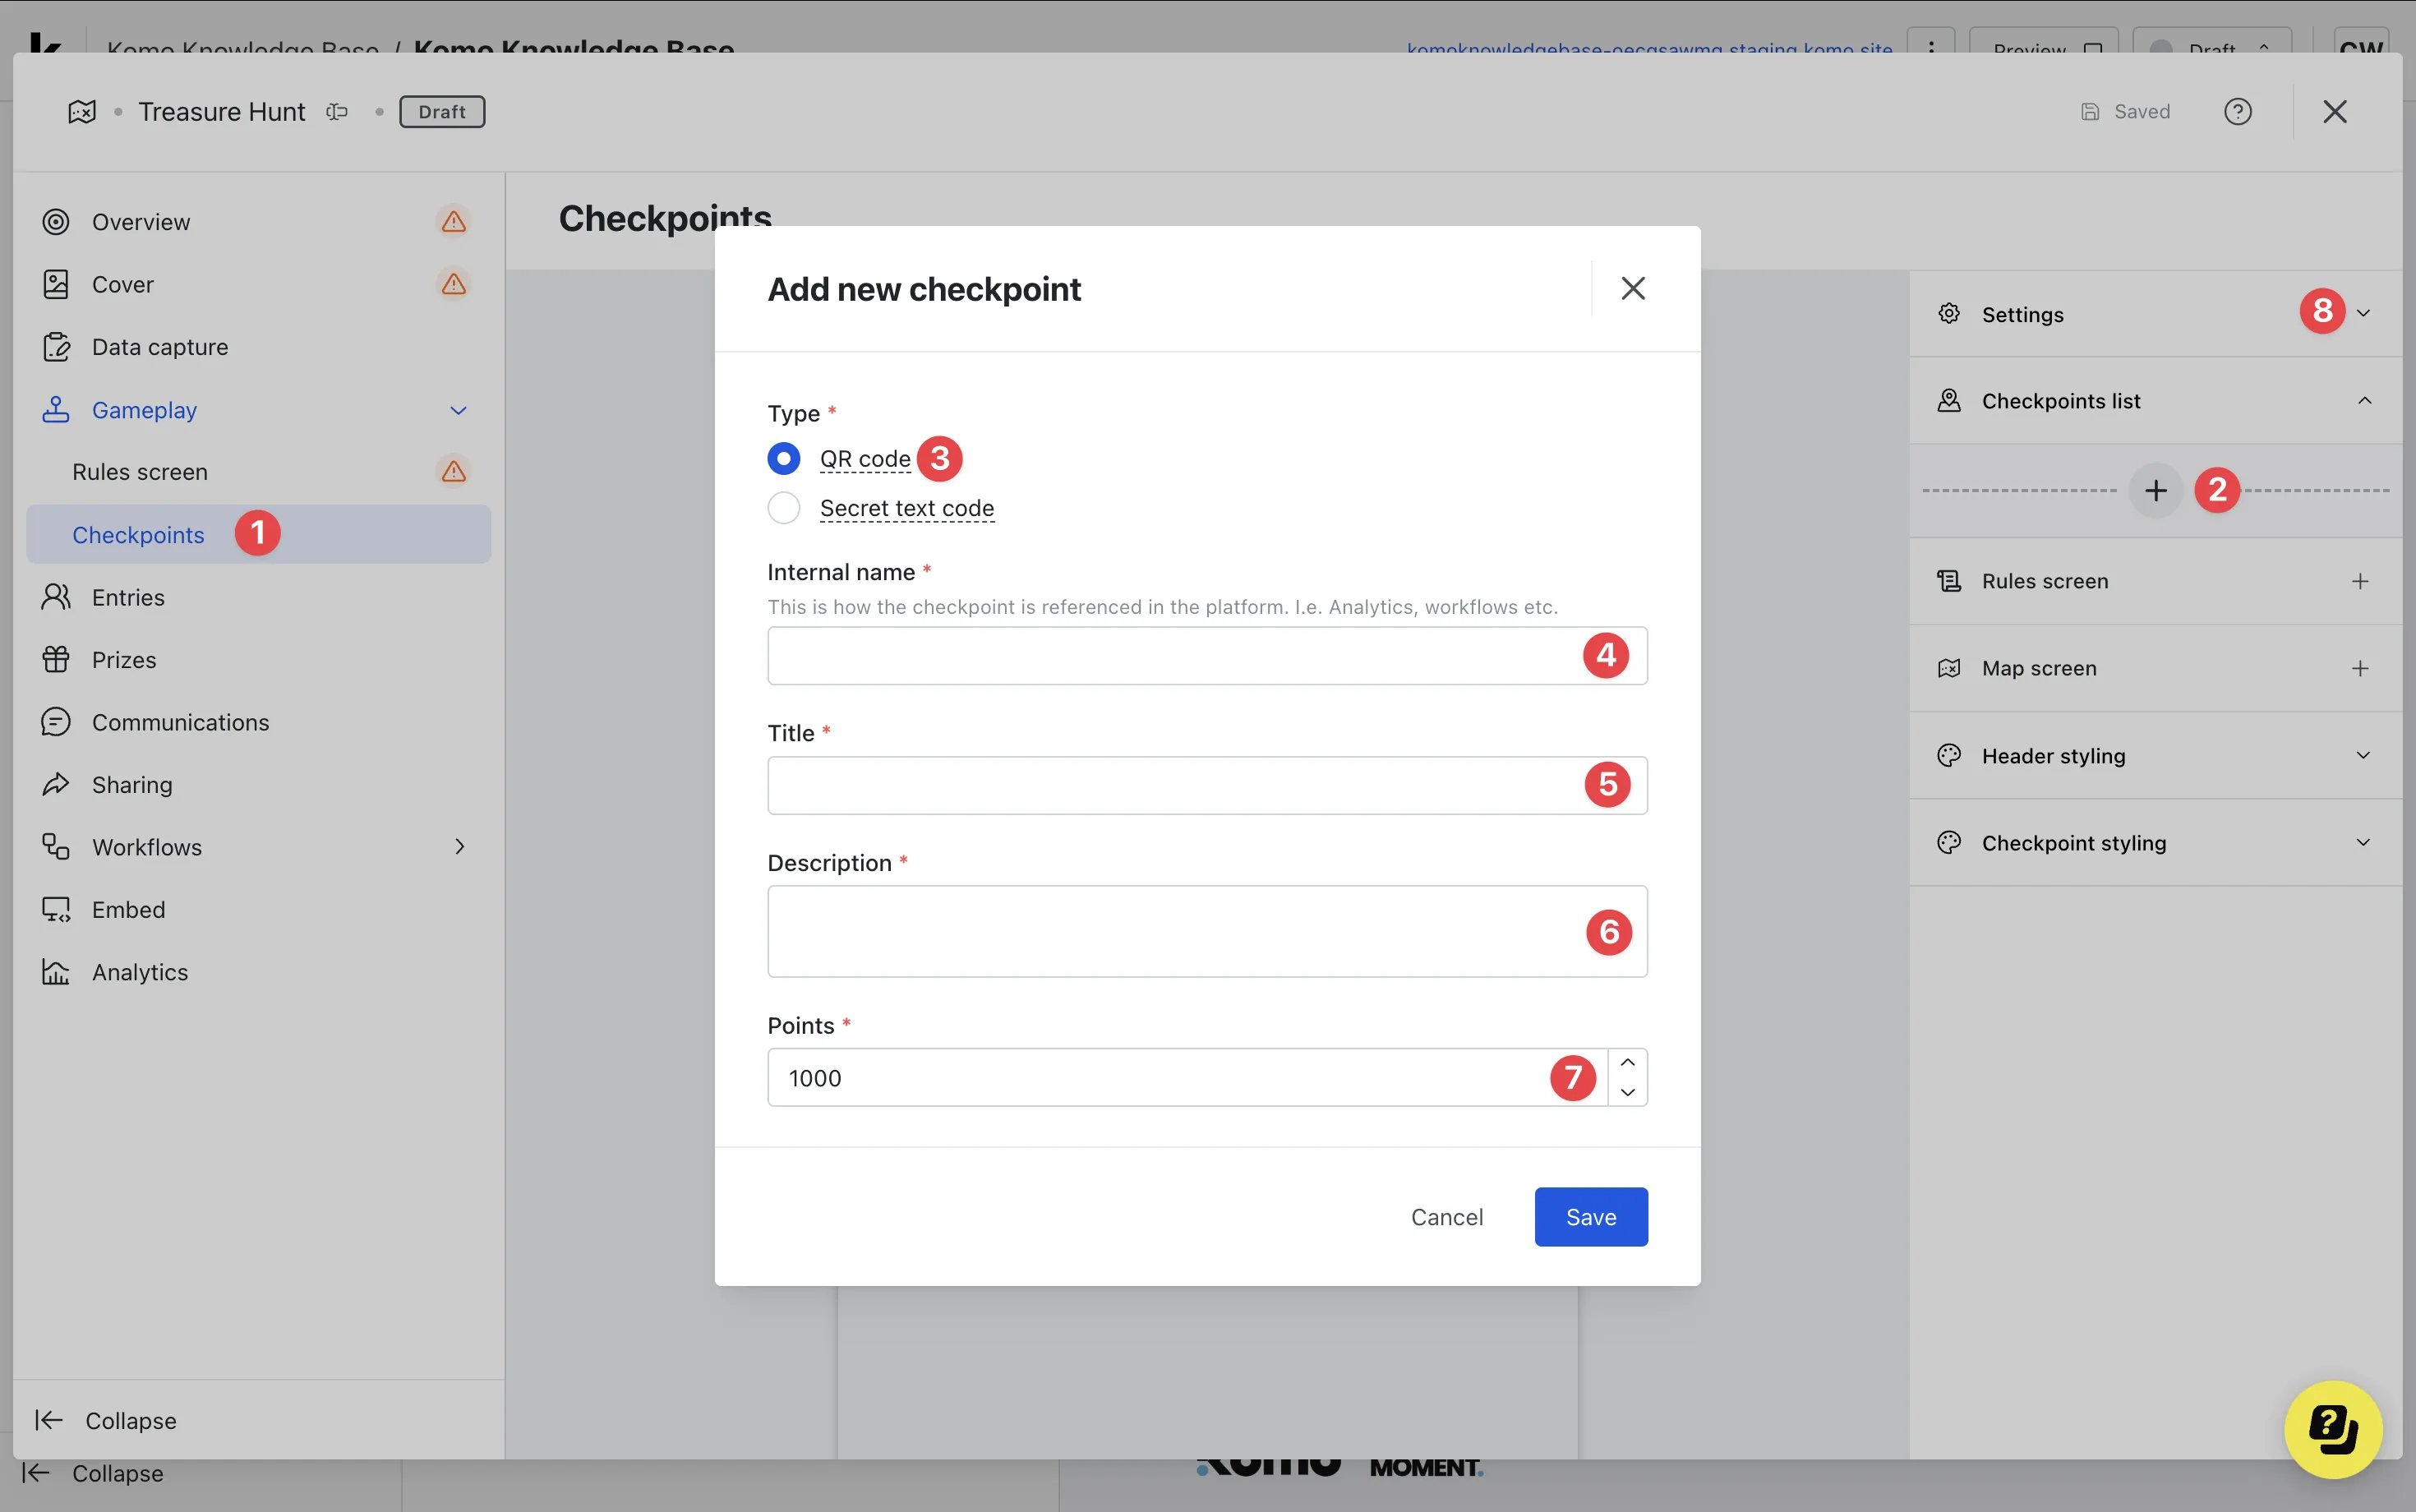 * **(1)** Click on the **Checkpoints** tab.
* **(2)** Click on the **Checkpoints list** tab and then the **+ icon** to add a checkpoint.
* **(3)** Select the **QR code** type.
* **(4)** Give the checkpoint an **internal name.**
* **(5)** Add a **title** for the checkpoint.
* **(6)** Include instructions/directions to find the checkpoint in the **description.**
* **(7)** If you have points enabled, alter the number of **points** the checkpoint is worth or **(8)** you can disable the points in the **settings.**
* **(1)** Click on the **Checkpoints** tab.
* **(2)** Click on the **Checkpoints list** tab and then the **+ icon** to add a checkpoint.
* **(3)** Select the **QR code** type.
* **(4)** Give the checkpoint an **internal name.**
* **(5)** Add a **title** for the checkpoint.
* **(6)** Include instructions/directions to find the checkpoint in the **description.**
* **(7)** If you have points enabled, alter the number of **points** the checkpoint is worth or **(8)** you can disable the points in the **settings.**
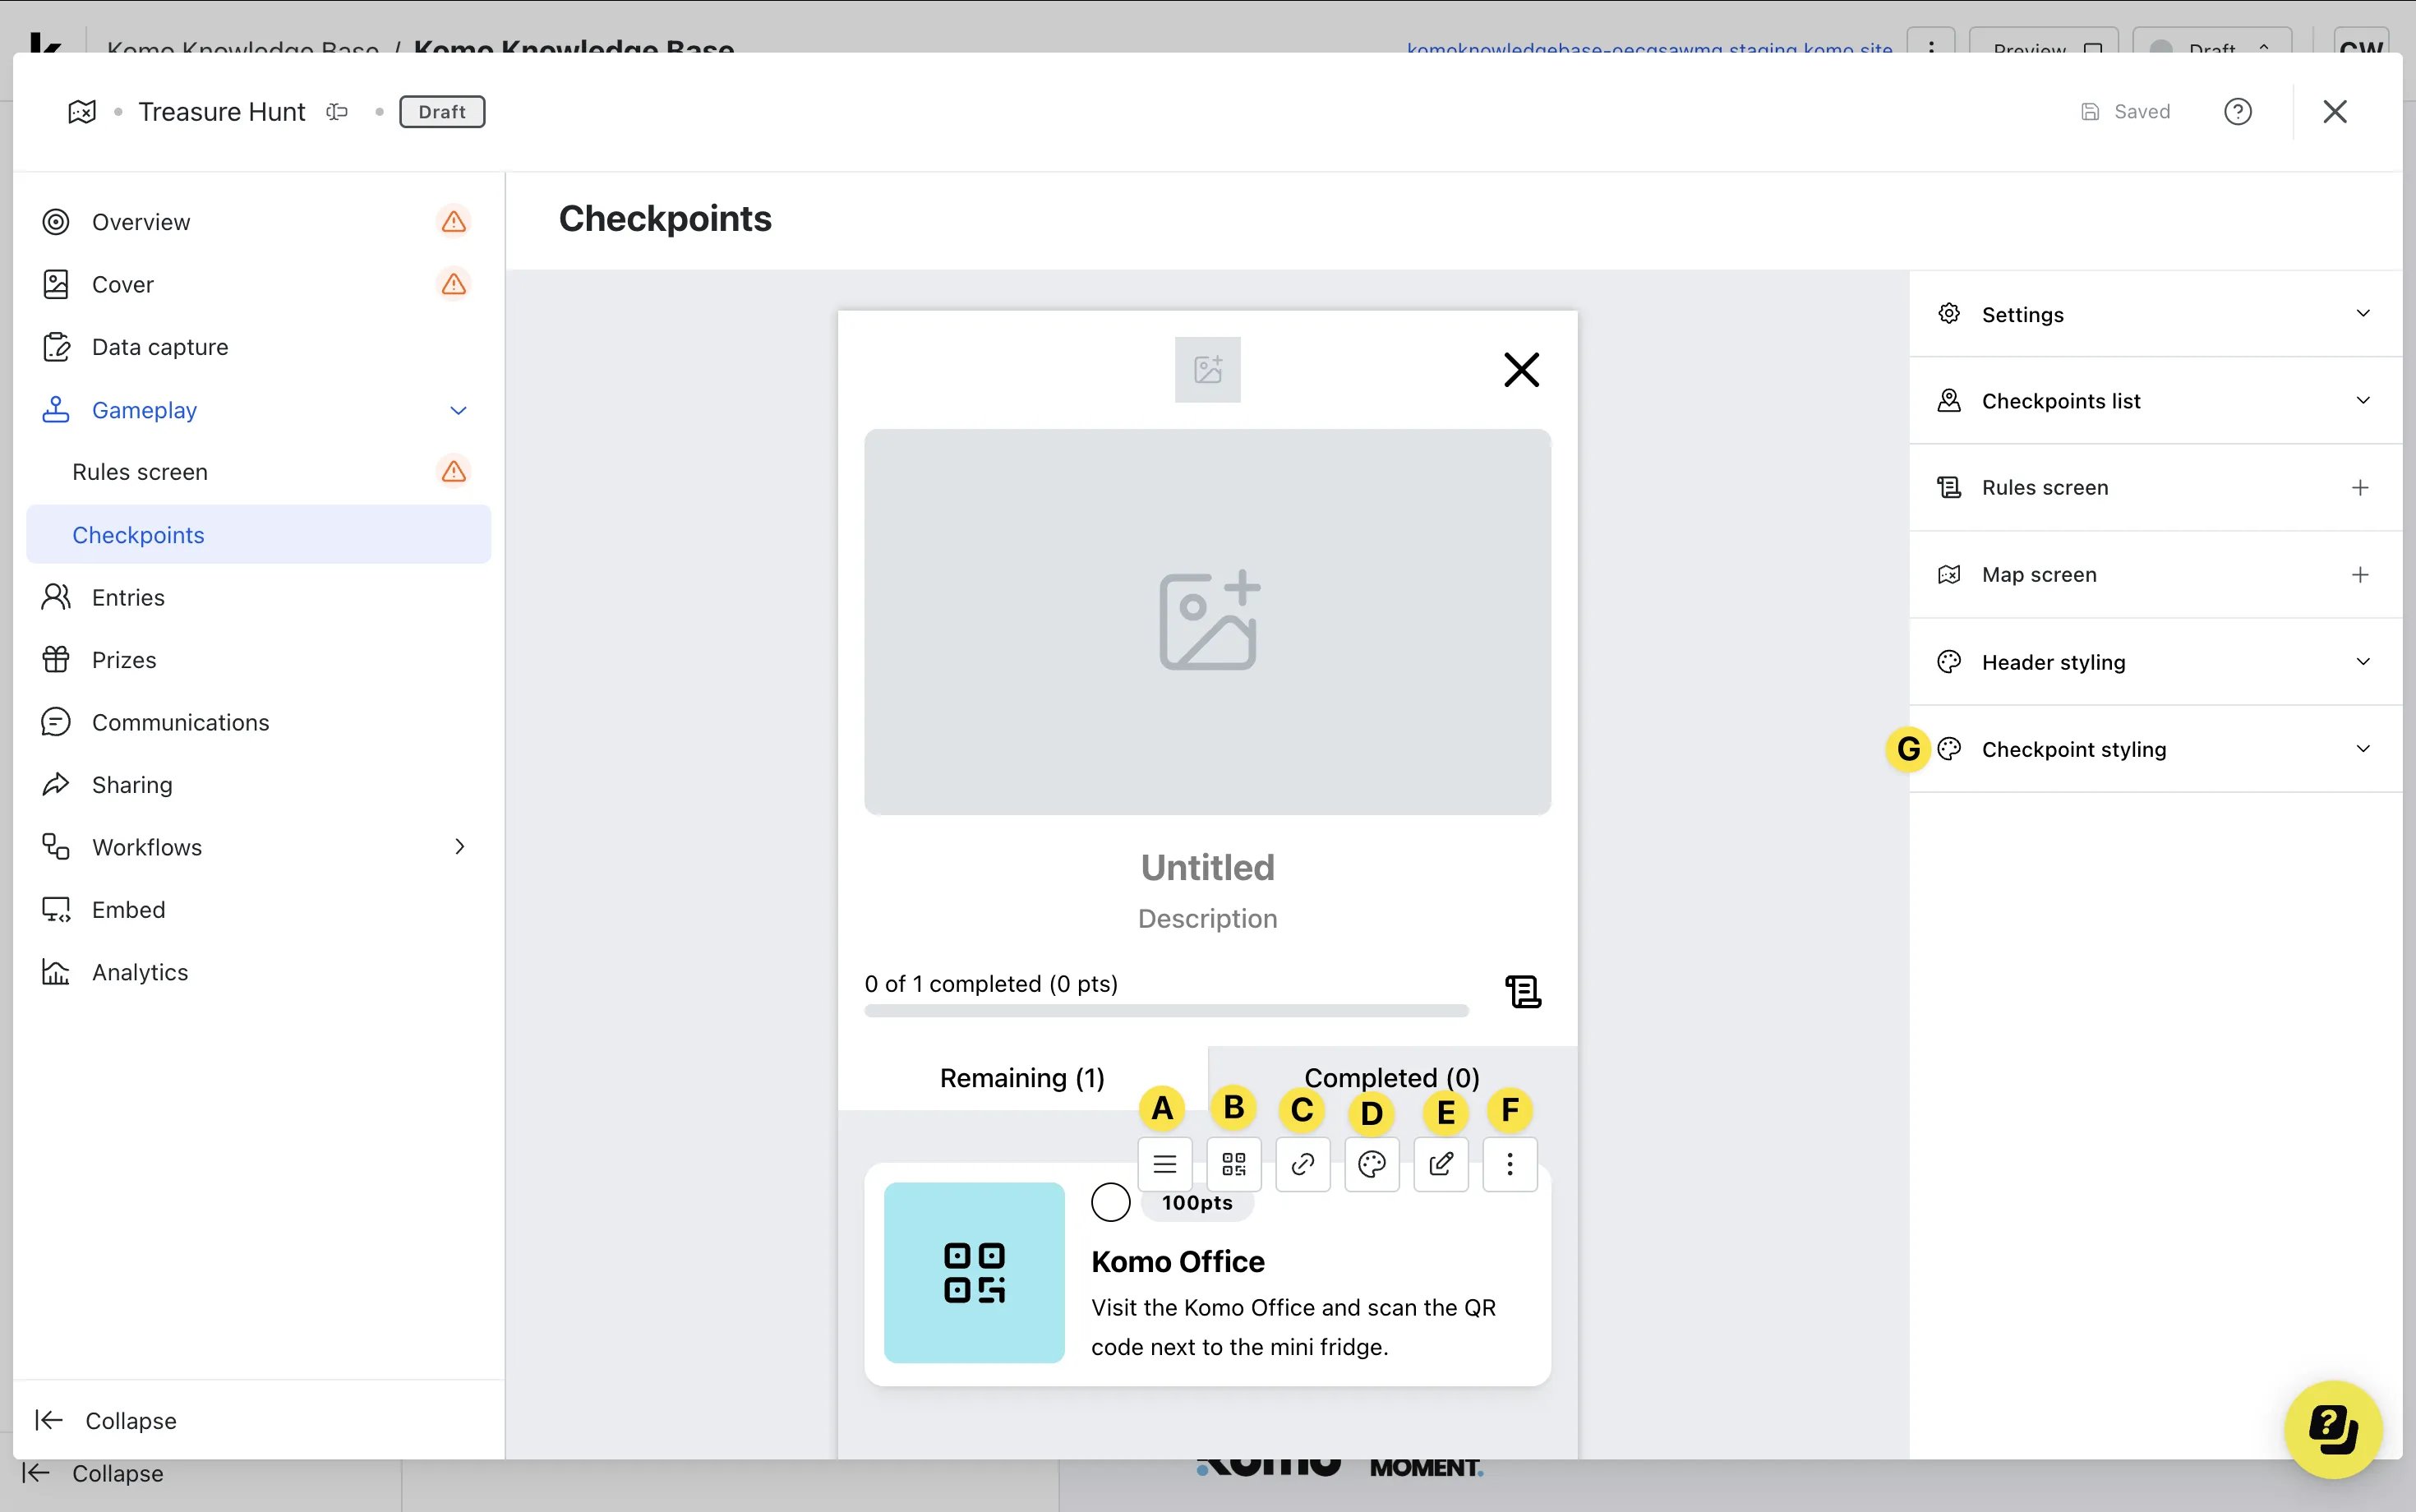 * After clicking save, you will see additional checkpoint settings.
* **(A)** Using the hamburger menu, drag the checkpoint to **reorder.**
* **(b)** Click on the QR code icon to **download the QR code.**
* **(C)** Copy the **checkpoint URL.**
* **(D)** Edit the colors for the specific checkpoint or alternatively,
* **(G)** set **default colors** here to apply to all checkpoints created.
* **(E)** Here you can **edit** the checkpoint.
* After clicking save, you will see additional checkpoint settings.
* **(A)** Using the hamburger menu, drag the checkpoint to **reorder.**
* **(b)** Click on the QR code icon to **download the QR code.**
* **(C)** Copy the **checkpoint URL.**
* **(D)** Edit the colors for the specific checkpoint or alternatively,
* **(G)** set **default colors** here to apply to all checkpoints created.
* **(E)** Here you can **edit** the checkpoint. 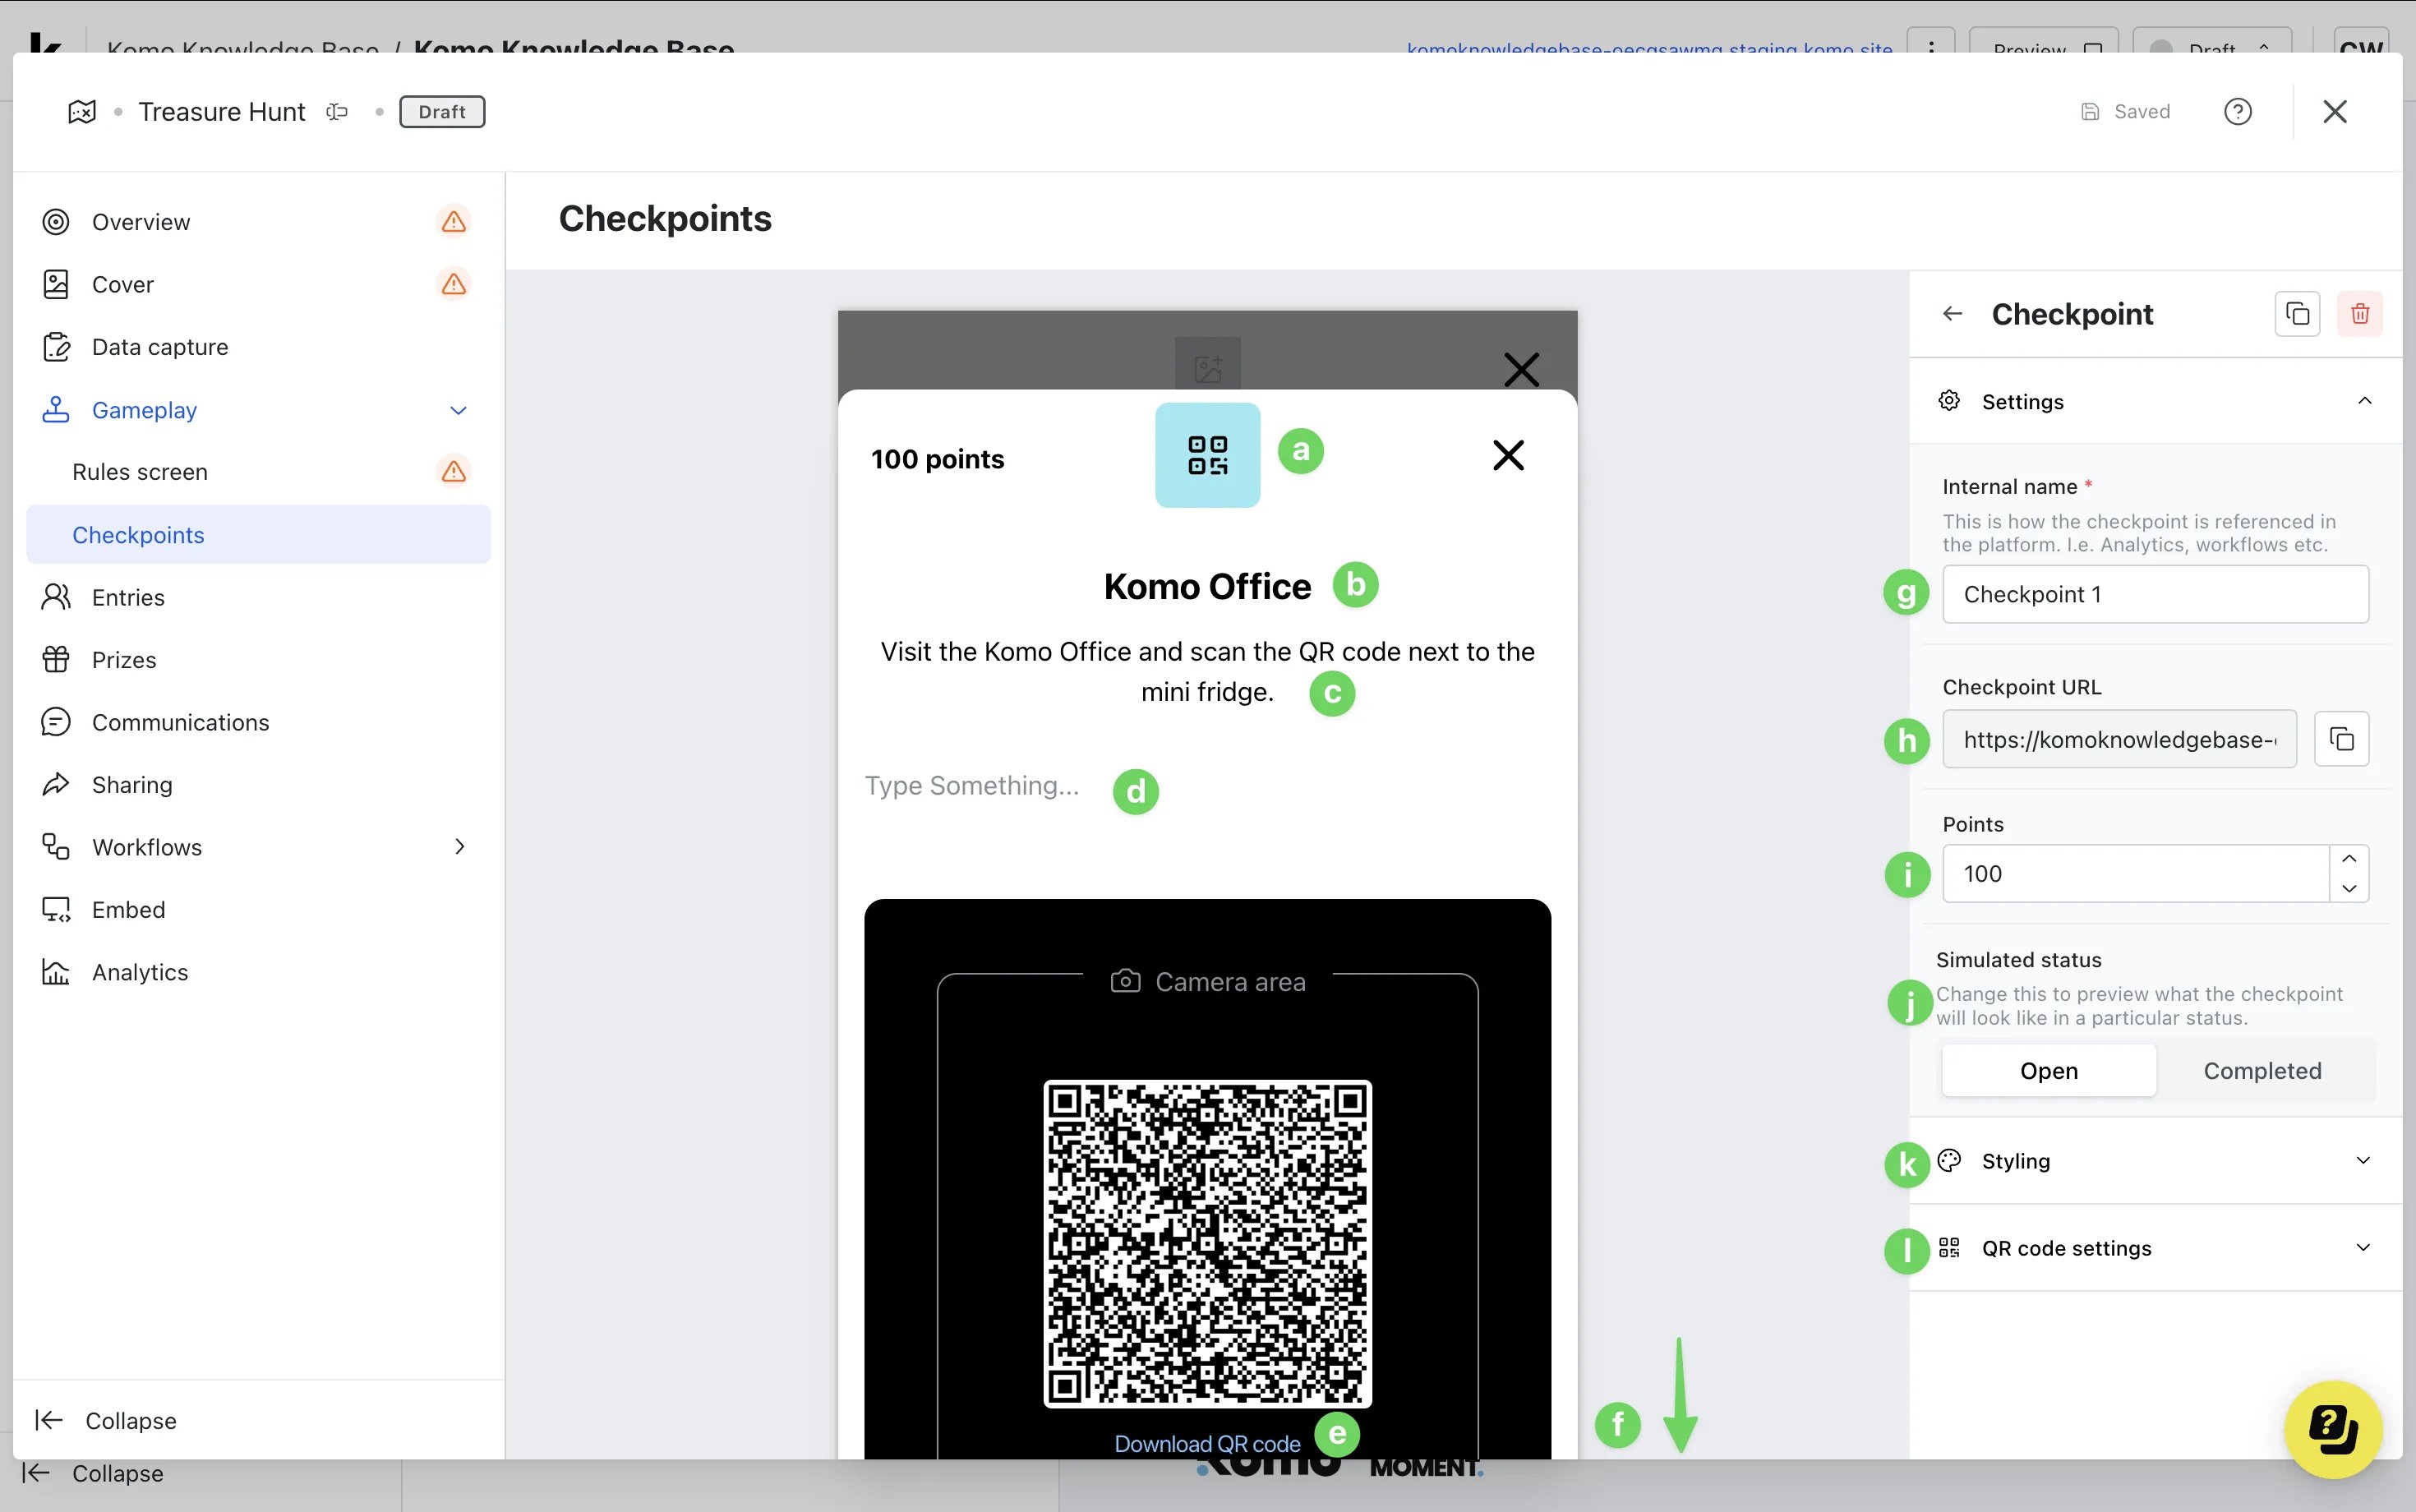 * **(a)** Upload an **image** for the checkpoint.
* **(b)** Update the **title** of the checkpoint.
* **(c)** Update the **description** of the checkpoint.
* **(d)** Here you can include **additional information** about the checkpoint.
* **(e)** Here you can **download the QR code.**
* **(f)** Scrolling down, you can include **additional information** on the footer.
* **(g)** Edit the **internal name** of the checkpoint.
* **(h)** Here you can **copy the link** to the checkpoint.
* **(i)** Edit the number of **points** for the checkpoint.
* **(j)** Preview the different **statuses** for the checkpoint.
* **(k)** Here you can update the the **drawer header and body colors.**
* **(l)** Customise and add UTM parameters **to the QR code.**
* **(F)** You can **delete and clone** the checkpoint here.
* **(8)** Click **Save.**
### Step 6: **Create your Secret Code Checkpoints**
* **(a)** Upload an **image** for the checkpoint.
* **(b)** Update the **title** of the checkpoint.
* **(c)** Update the **description** of the checkpoint.
* **(d)** Here you can include **additional information** about the checkpoint.
* **(e)** Here you can **download the QR code.**
* **(f)** Scrolling down, you can include **additional information** on the footer.
* **(g)** Edit the **internal name** of the checkpoint.
* **(h)** Here you can **copy the link** to the checkpoint.
* **(i)** Edit the number of **points** for the checkpoint.
* **(j)** Preview the different **statuses** for the checkpoint.
* **(k)** Here you can update the the **drawer header and body colors.**
* **(l)** Customise and add UTM parameters **to the QR code.**
* **(F)** You can **delete and clone** the checkpoint here.
* **(8)** Click **Save.**
### Step 6: **Create your Secret Code Checkpoints**
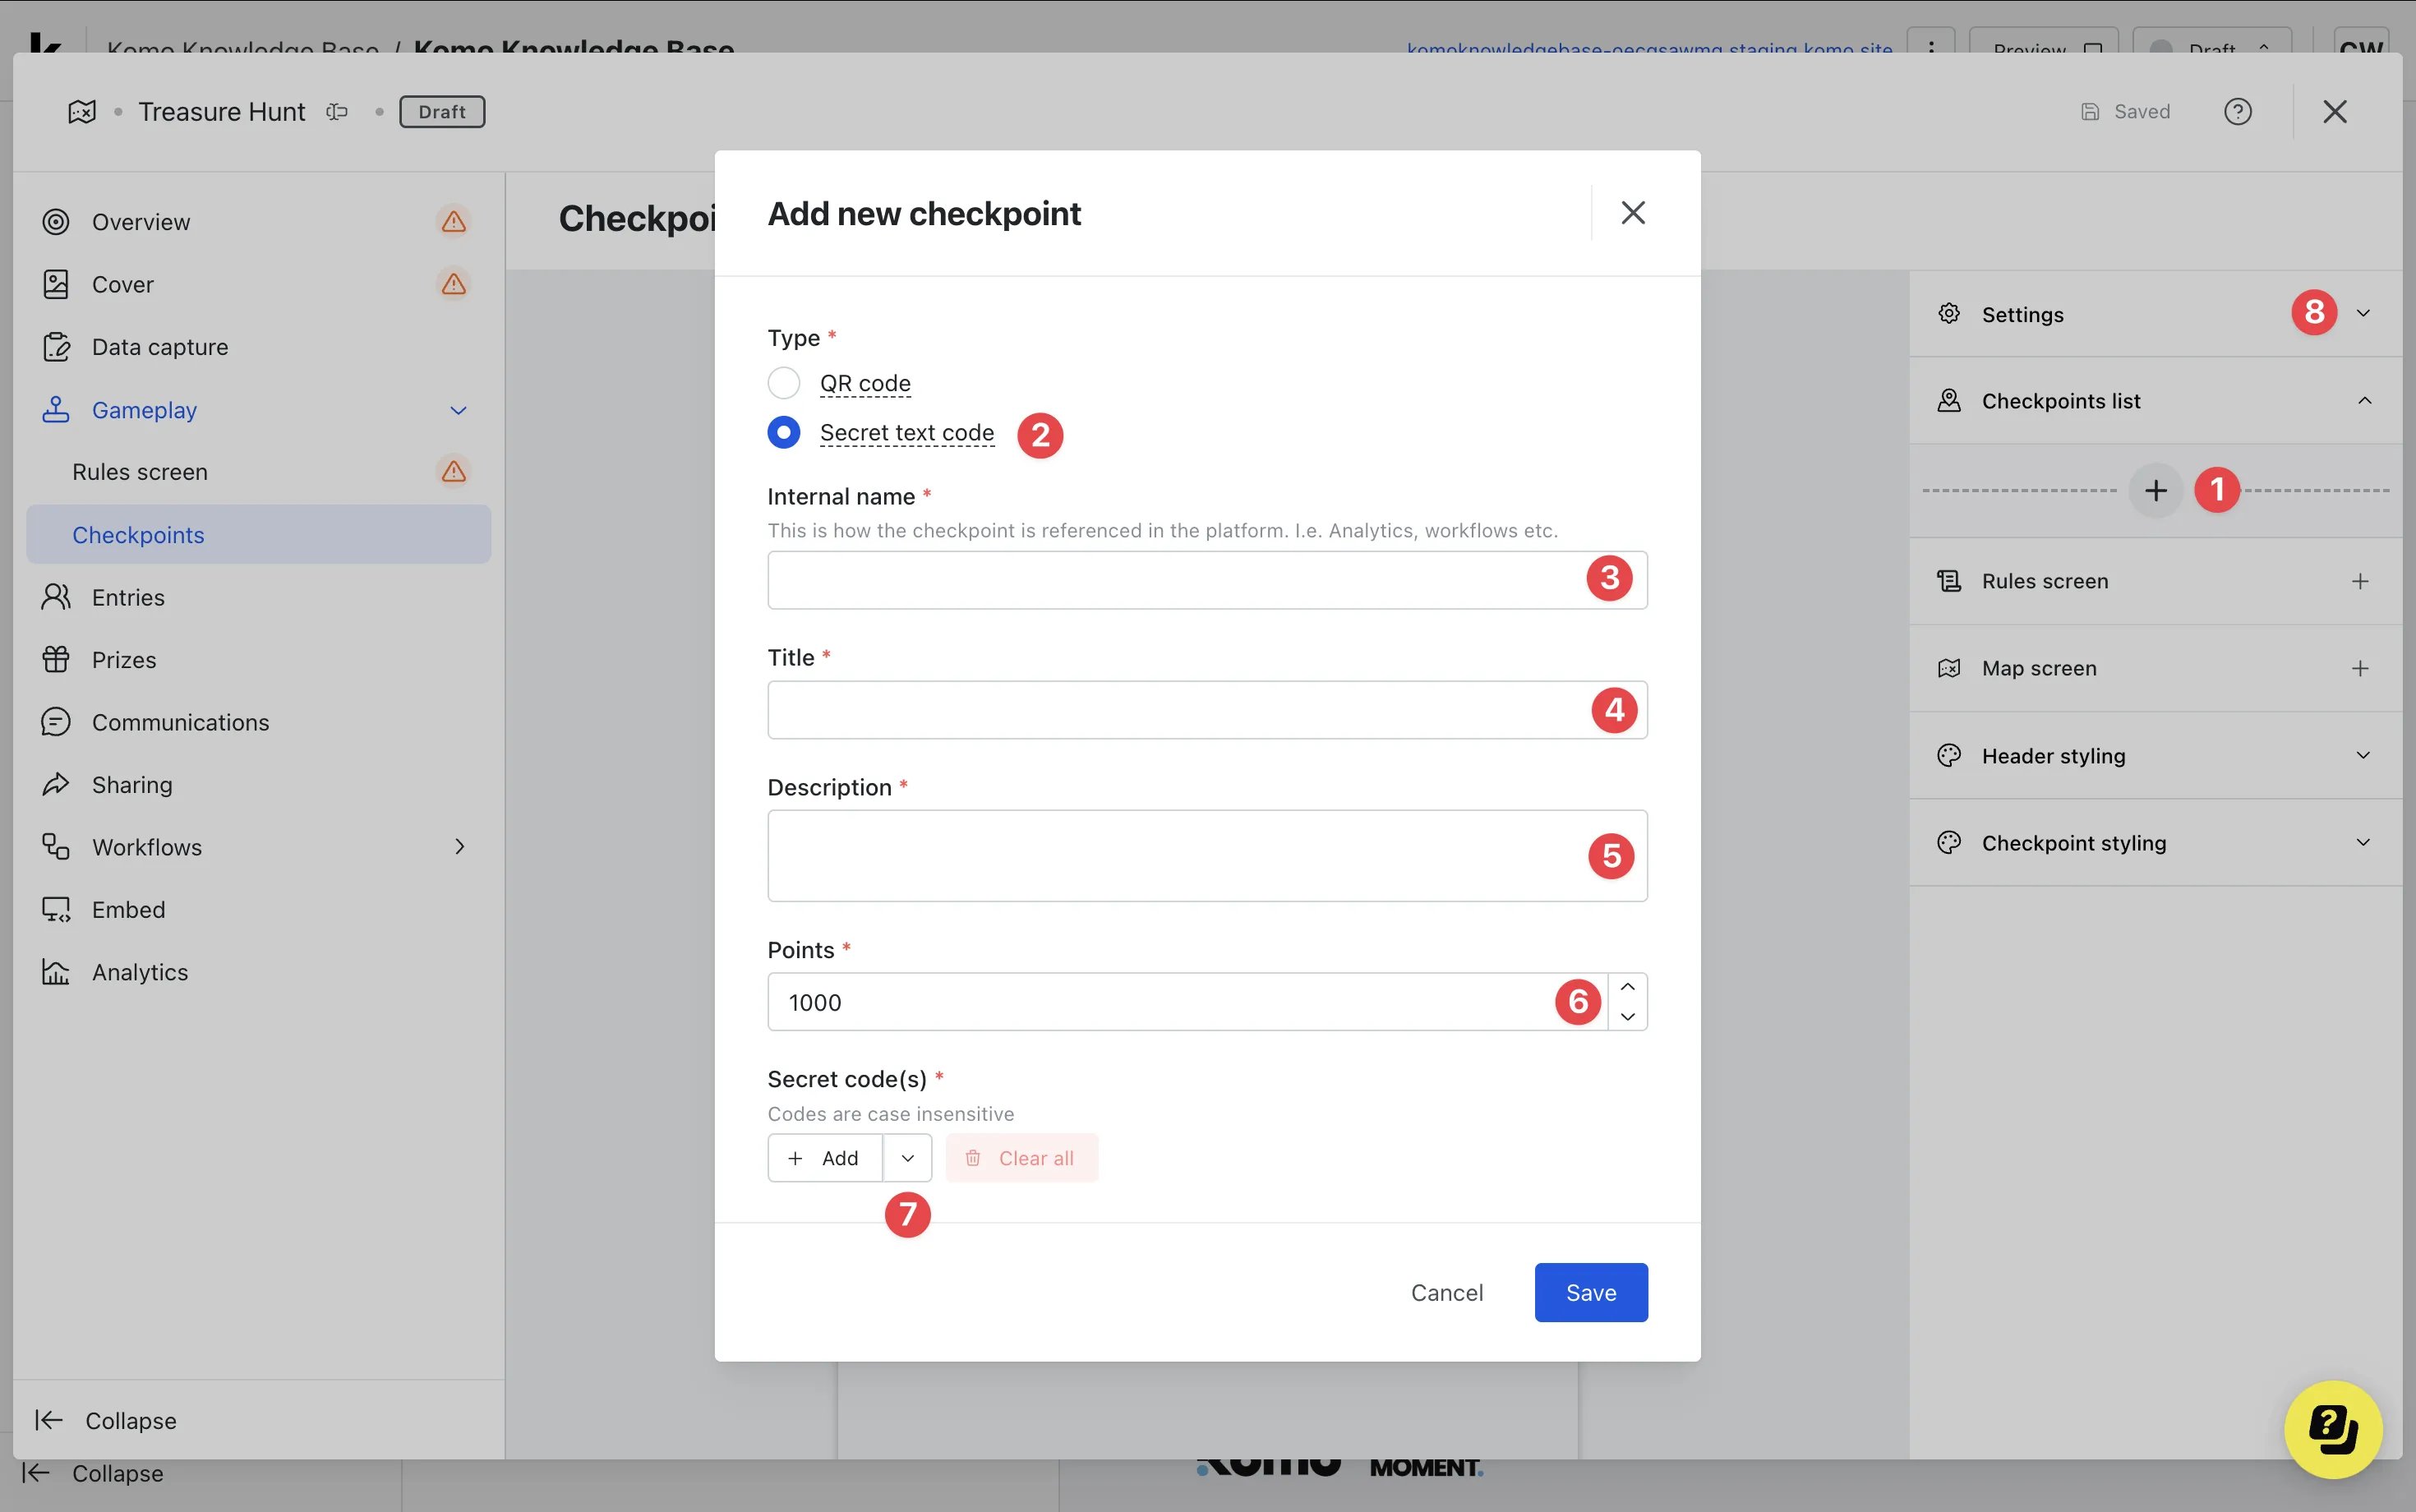 * **(1)** Click on the **checkpoints list** tab and then the **+ icon** to add a checkpoint.
* **(2)** Select the **Secret text code** type.
* **(3)** Give the checkpoint an **internal name.**
* **(4)** Add a **title** for the checkpoint.
* **(5)** Include instructions/directions to find the checkpoint in the **description.**
* **(6)** If you have points enabled, alter the number of **points** the checkpoint is worth or **(8)** you can disable the points in the **settings.**
* **(7)** Click on **+ Add** to add any **individual codes** or use the **drown-down arrow** to **add multiple codes.**
* **(1)** Click on the **checkpoints list** tab and then the **+ icon** to add a checkpoint.
* **(2)** Select the **Secret text code** type.
* **(3)** Give the checkpoint an **internal name.**
* **(4)** Add a **title** for the checkpoint.
* **(5)** Include instructions/directions to find the checkpoint in the **description.**
* **(6)** If you have points enabled, alter the number of **points** the checkpoint is worth or **(8)** you can disable the points in the **settings.**
* **(7)** Click on **+ Add** to add any **individual codes** or use the **drown-down arrow** to **add multiple codes.**
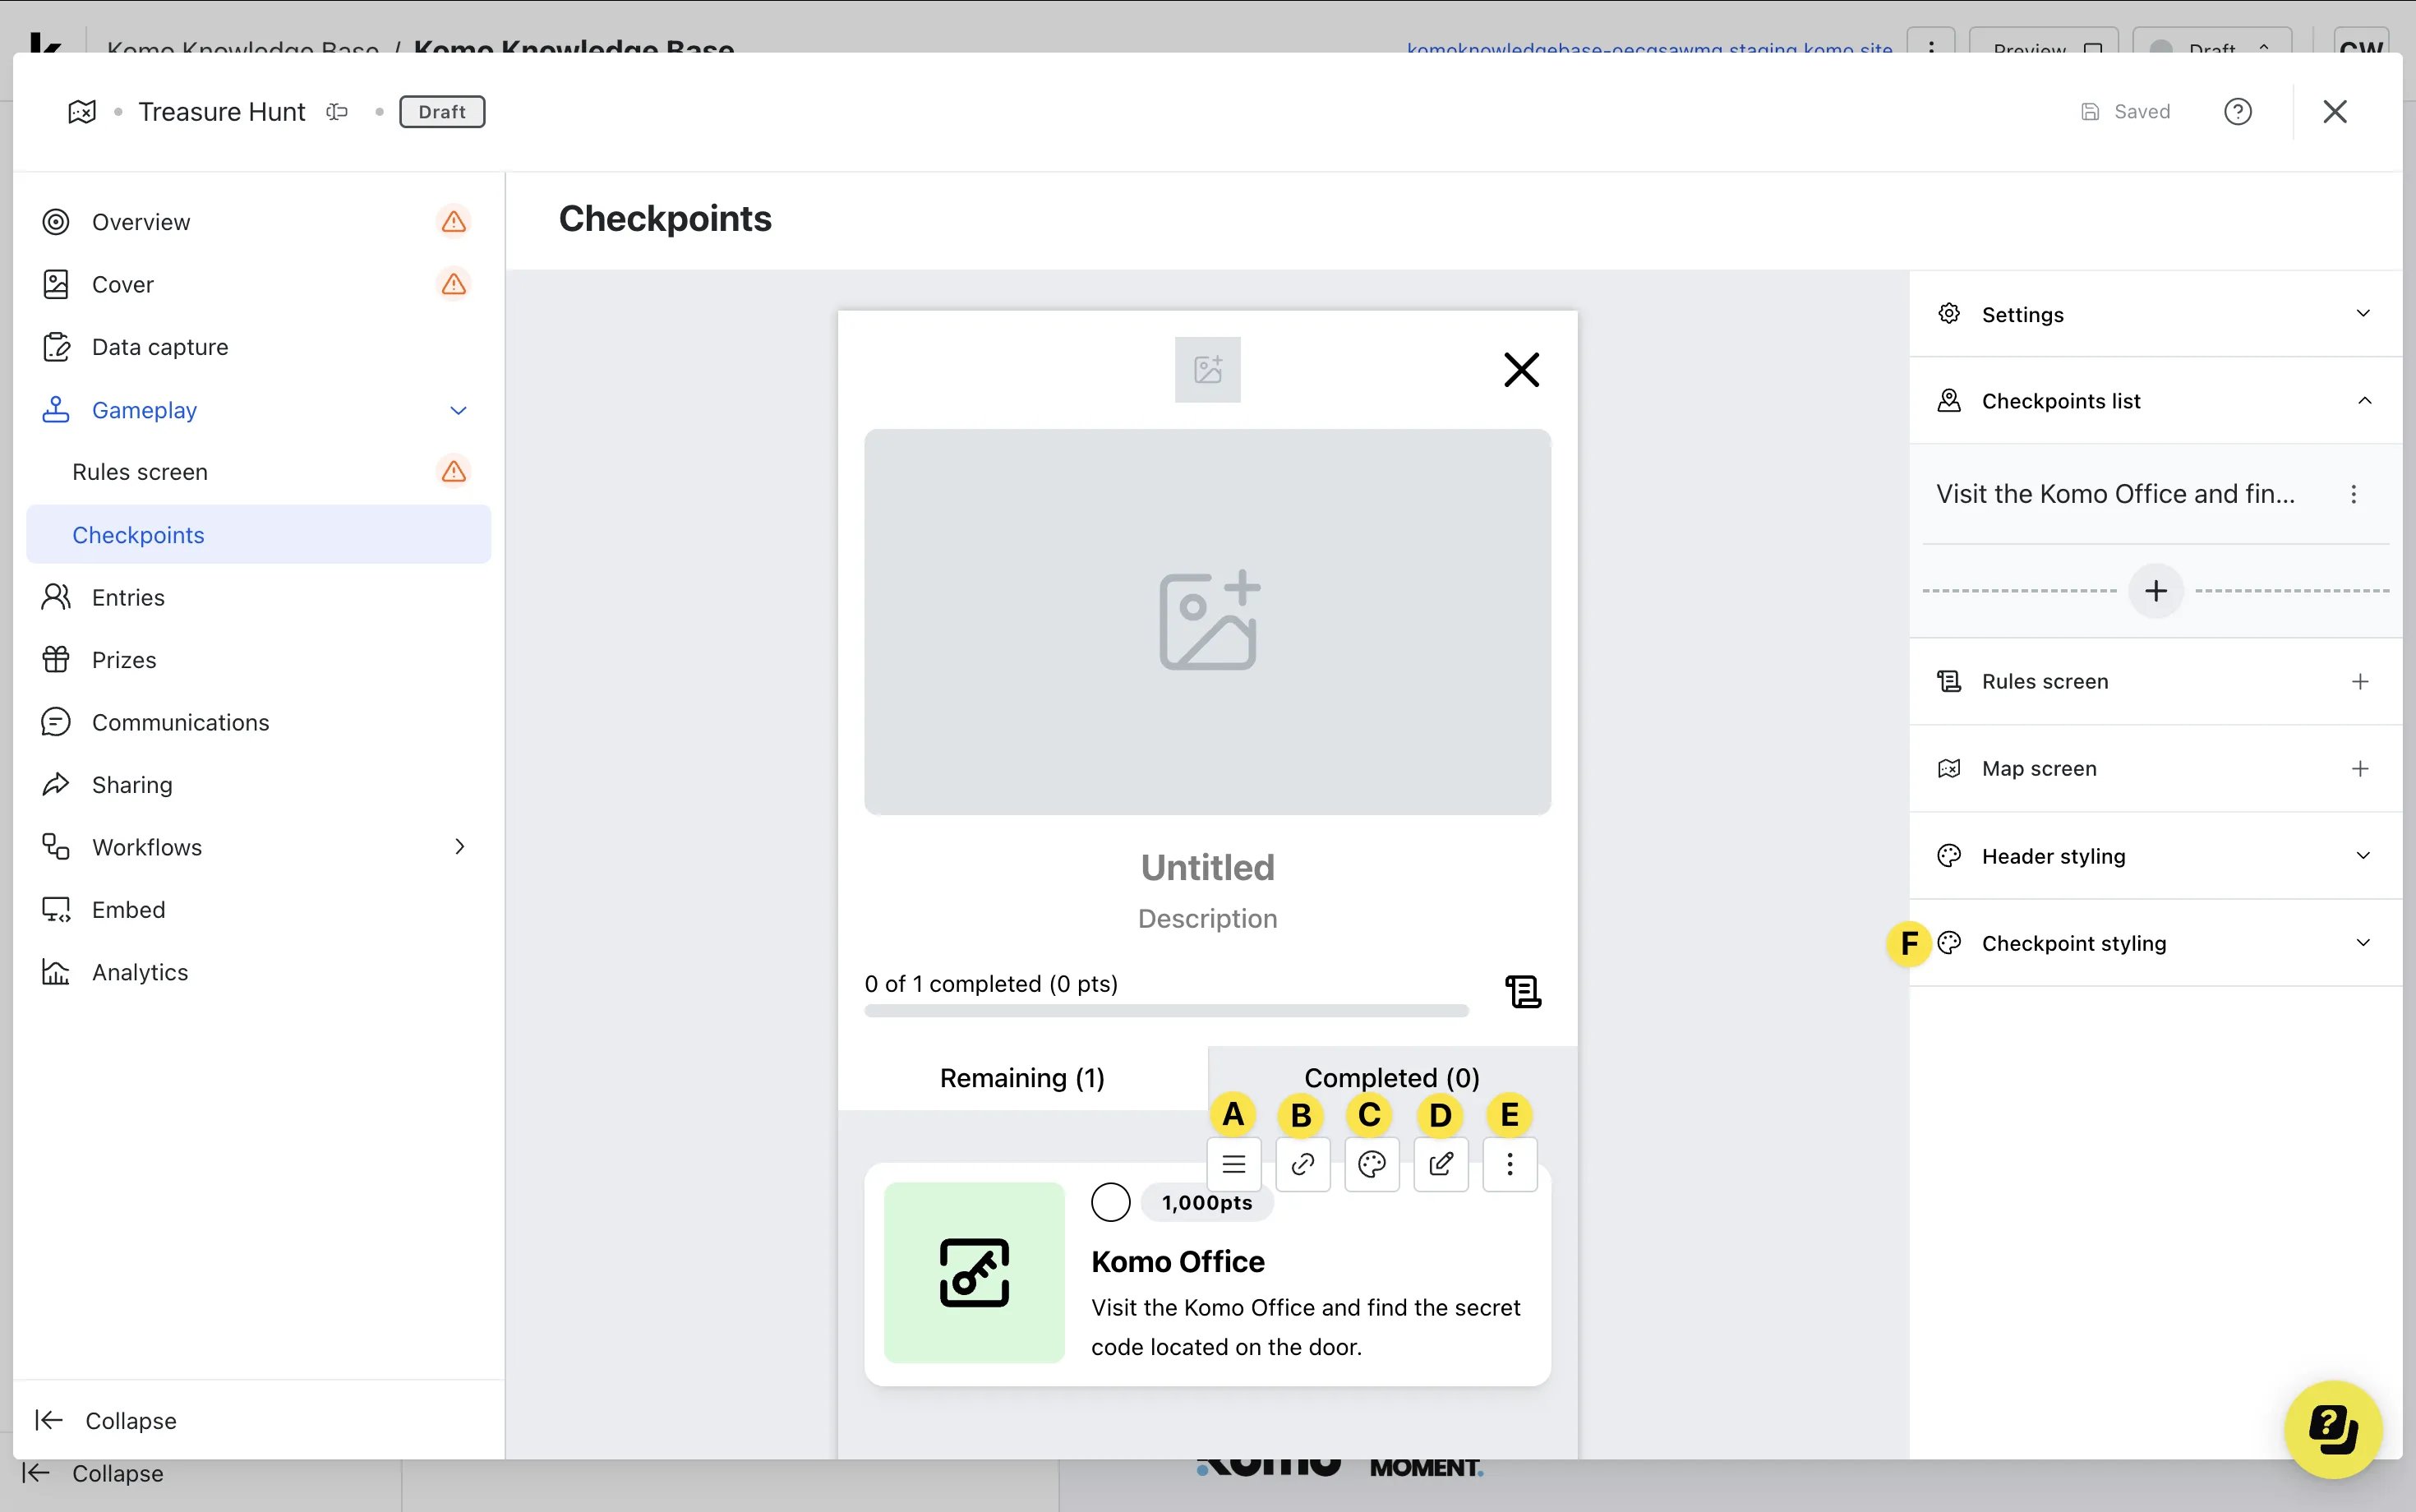 * After clicking save, you will see additional checkpoint settings.
* **(A)** Using the hamburger menu, drag the checkpoint to **reorder.**
* **(b)** Copy the **checkpoint URL.**
* **(C)** Edit the colors for the specific checkpoint or **(F)** you can set **default colors** here to apply to all checkpoints created.
* **(D)** Here you can **edit** the checkpoint.
* After clicking save, you will see additional checkpoint settings.
* **(A)** Using the hamburger menu, drag the checkpoint to **reorder.**
* **(b)** Copy the **checkpoint URL.**
* **(C)** Edit the colors for the specific checkpoint or **(F)** you can set **default colors** here to apply to all checkpoints created.
* **(D)** Here you can **edit** the checkpoint. 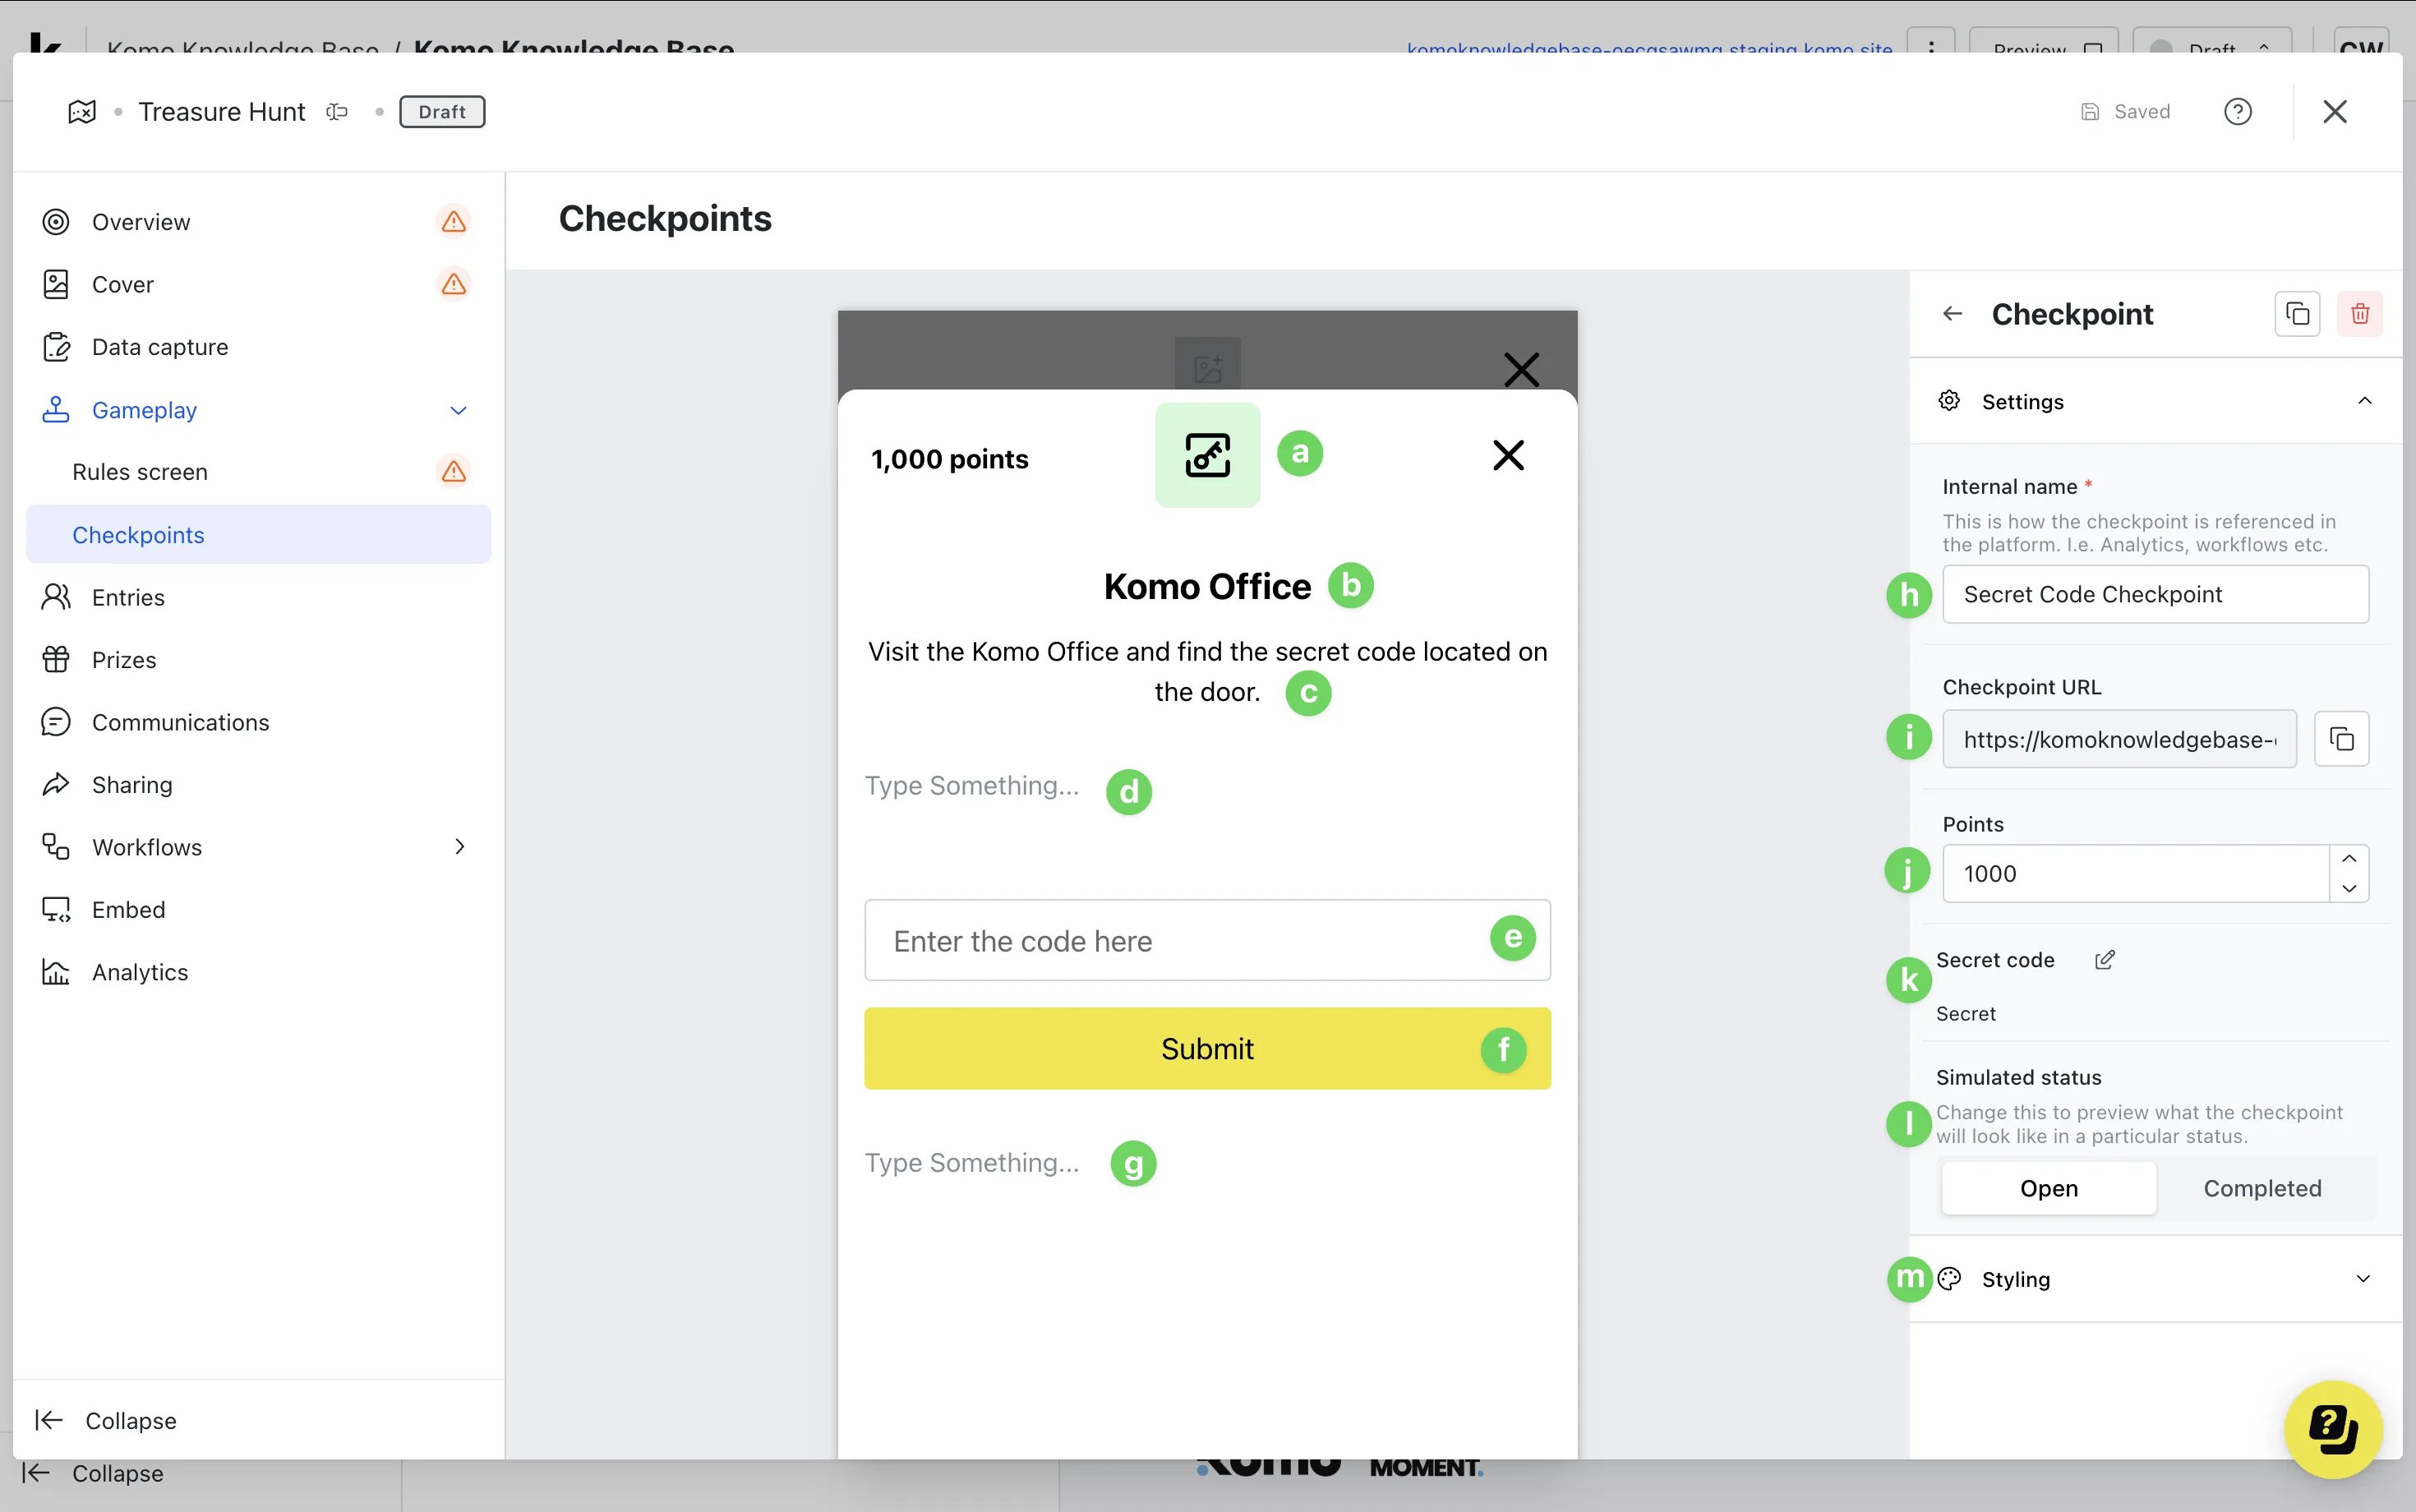 * **(a)** Upload an **image** for the checkpoint.
* **(b)** Update the **title** of the checkpoint.
* **(c)** Update the **description** of the checkpoint.
* **(d)** Here you can include **additional information** about the checkpoint.
* **(e)** Click here to edit and update the **secret codes.**
* **(f)** Edit the color and copy of the **call-to-action.**
* **(g)** You can include **additional information** on the footer.
* **(h)** Edit the **internal name** of the checkpoint.
* **(i)** Here you can **copy the link** to the checkpoint.
* **(j)** Edit the number of **points** for the checkpoint.
* **(k)** Here you can edit the **secret code** for the checkpoint.
* **(l)** Preview the different **statuses** for the checkpoint.
* **(m)** Here you can update the the **drawer header and body colors.**
* **(E)** You can **delete and clone** the checkpoint here.
### Step 7: **Style the Gameplay**
* **(a)** Upload an **image** for the checkpoint.
* **(b)** Update the **title** of the checkpoint.
* **(c)** Update the **description** of the checkpoint.
* **(d)** Here you can include **additional information** about the checkpoint.
* **(e)** Click here to edit and update the **secret codes.**
* **(f)** Edit the color and copy of the **call-to-action.**
* **(g)** You can include **additional information** on the footer.
* **(h)** Edit the **internal name** of the checkpoint.
* **(i)** Here you can **copy the link** to the checkpoint.
* **(j)** Edit the number of **points** for the checkpoint.
* **(k)** Here you can edit the **secret code** for the checkpoint.
* **(l)** Preview the different **statuses** for the checkpoint.
* **(m)** Here you can update the the **drawer header and body colors.**
* **(E)** You can **delete and clone** the checkpoint here.
### Step 7: **Style the Gameplay**
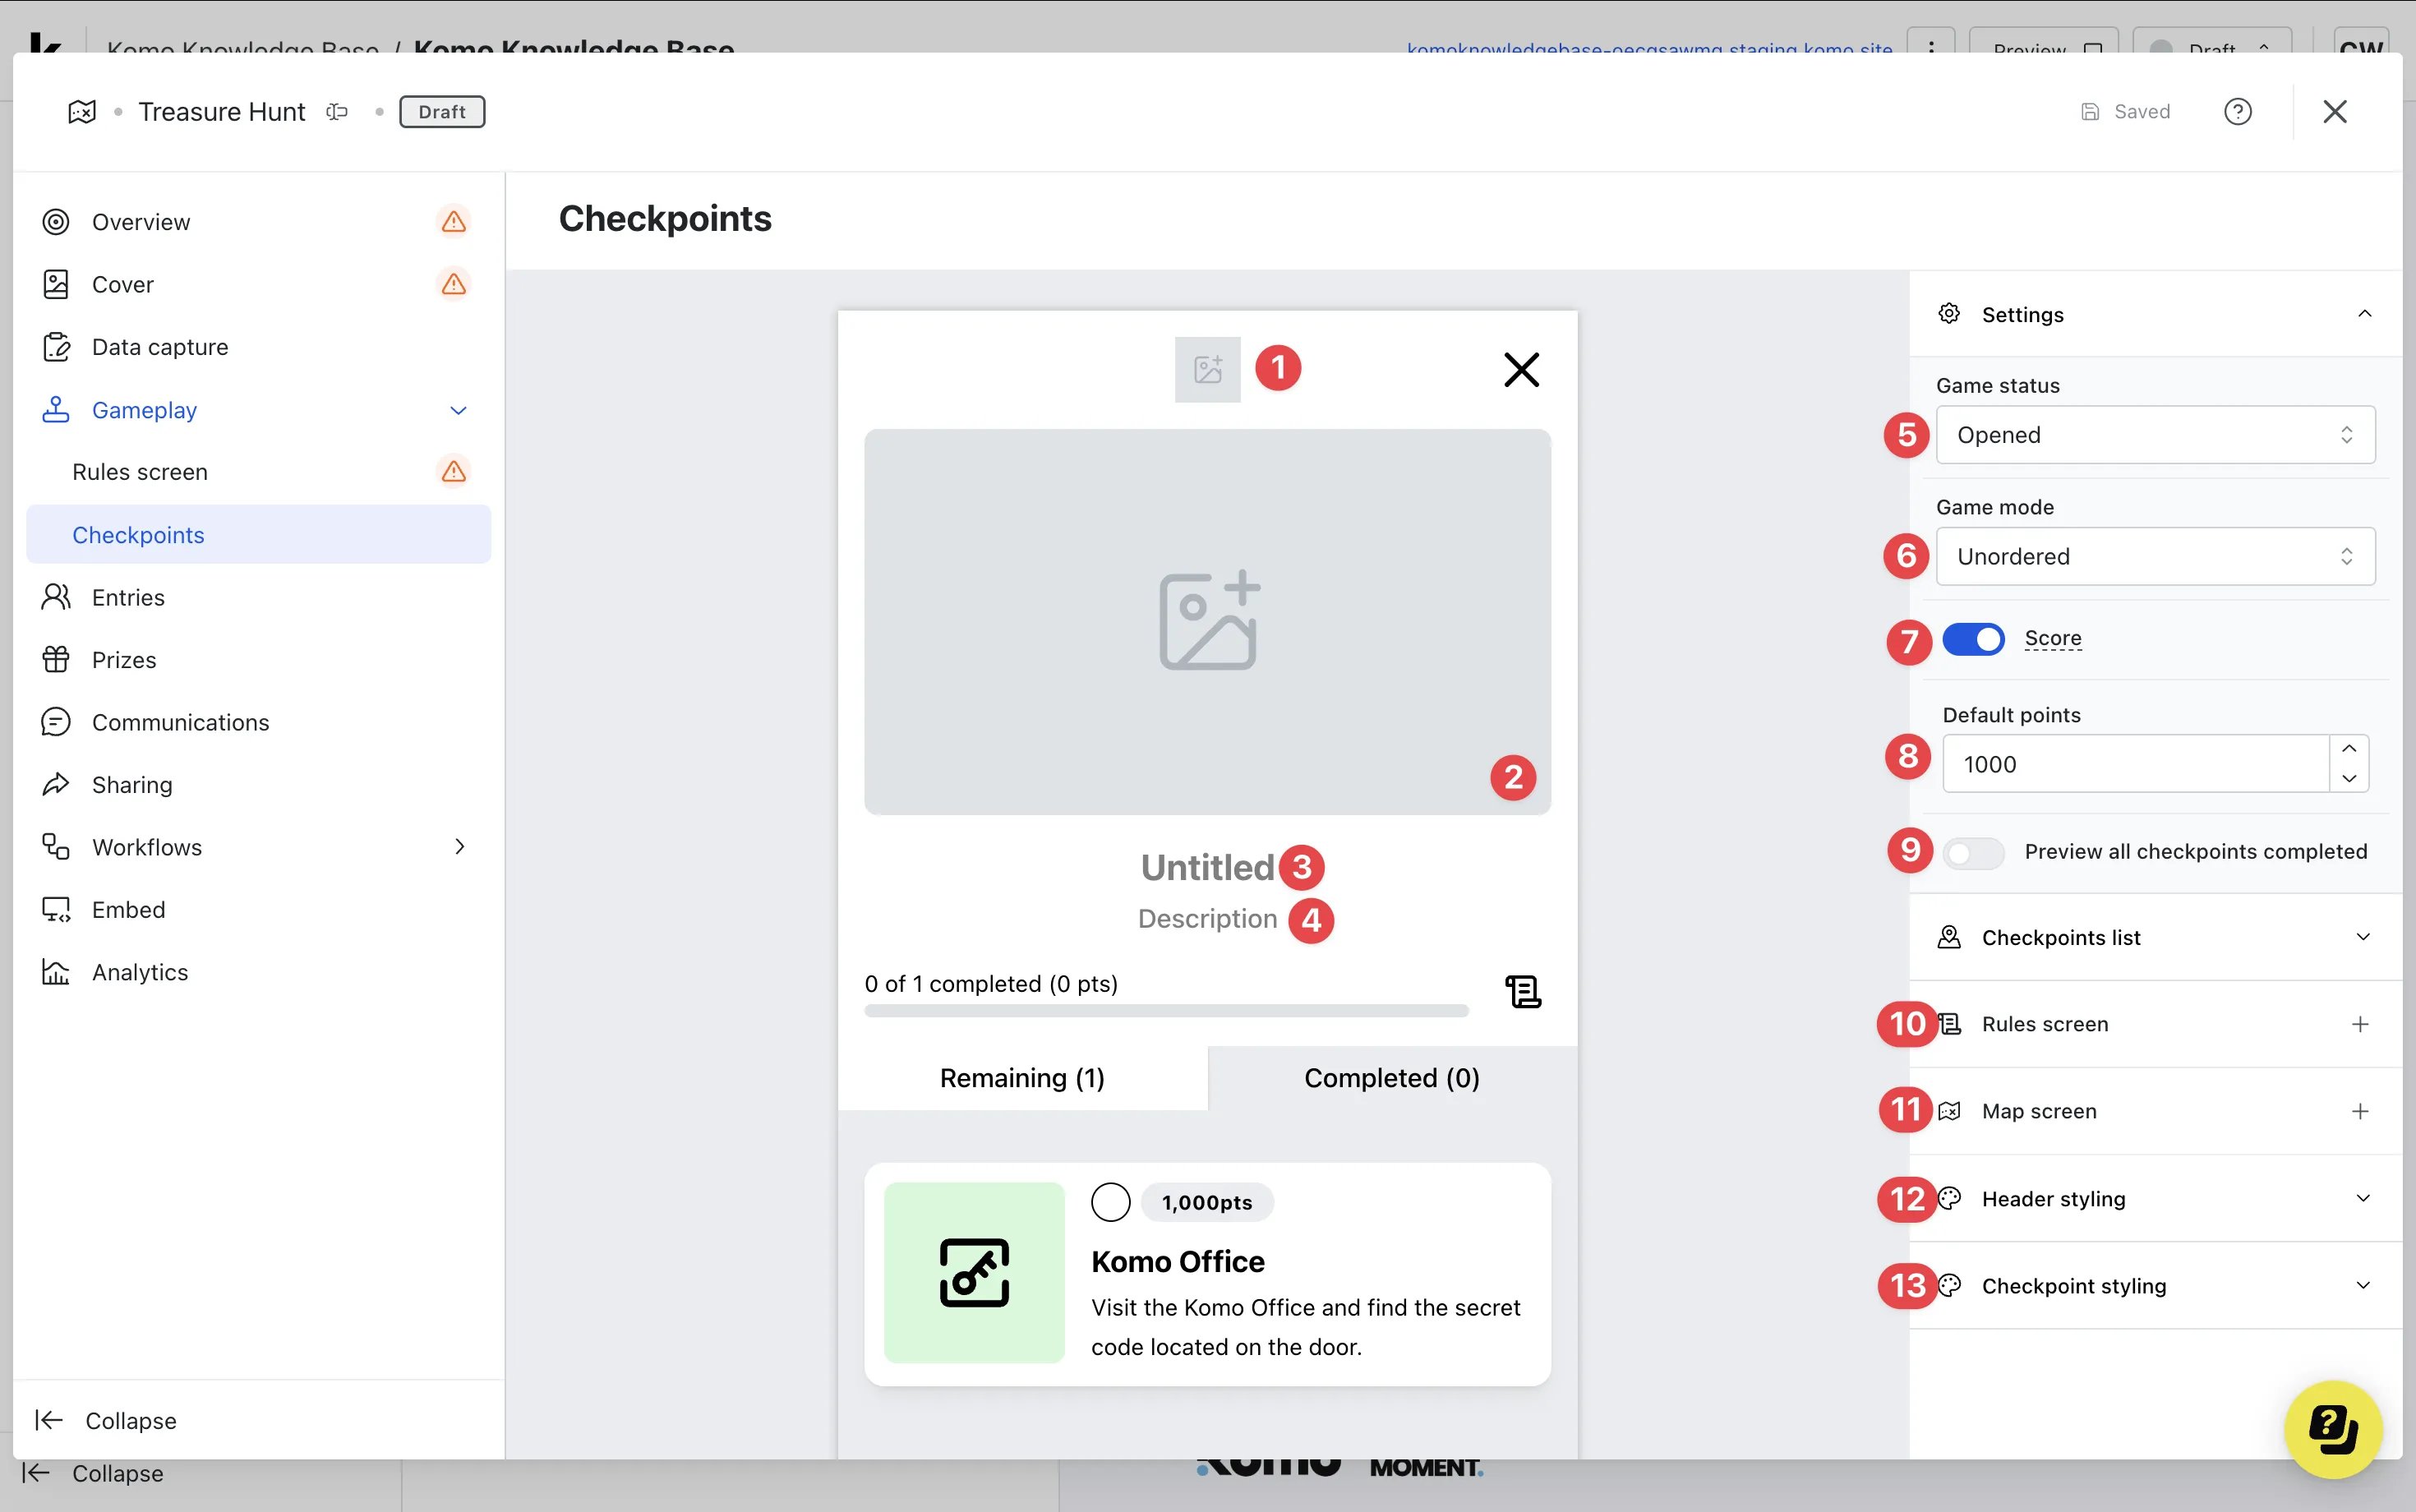 * **(1)** Upload a **logo** to the header.
* **(2)** Upload a **cover image** for the checkpoints.
* **(3)** You have the option to add a **title.**
* **(4)** Here you can include a **description.**
* **(5)** The **game status** allows you to open or close the game.
You can build the checkpoints and have the game closed but publish the card to get the audience to register to play earlier.
* **(6)** The **game mode** allows you to alter whether the checkpoints need to be completed in any order or in a sequence (ordered).
* **(7)** Here you can disable the **points** functionality.
* **(8)** If you have points enabled, edit the **default number of points** awarded per checkpoint.
* **(9)** Here you can preview the experience for when a user **completes all checkpoints** and add a **completion banner** or **message**.
* **(1)** Upload a **logo** to the header.
* **(2)** Upload a **cover image** for the checkpoints.
* **(3)** You have the option to add a **title.**
* **(4)** Here you can include a **description.**
* **(5)** The **game status** allows you to open or close the game.
You can build the checkpoints and have the game closed but publish the card to get the audience to register to play earlier.
* **(6)** The **game mode** allows you to alter whether the checkpoints need to be completed in any order or in a sequence (ordered).
* **(7)** Here you can disable the **points** functionality.
* **(8)** If you have points enabled, edit the **default number of points** awarded per checkpoint.
* **(9)** Here you can preview the experience for when a user **completes all checkpoints** and add a **completion banner** or **message**.
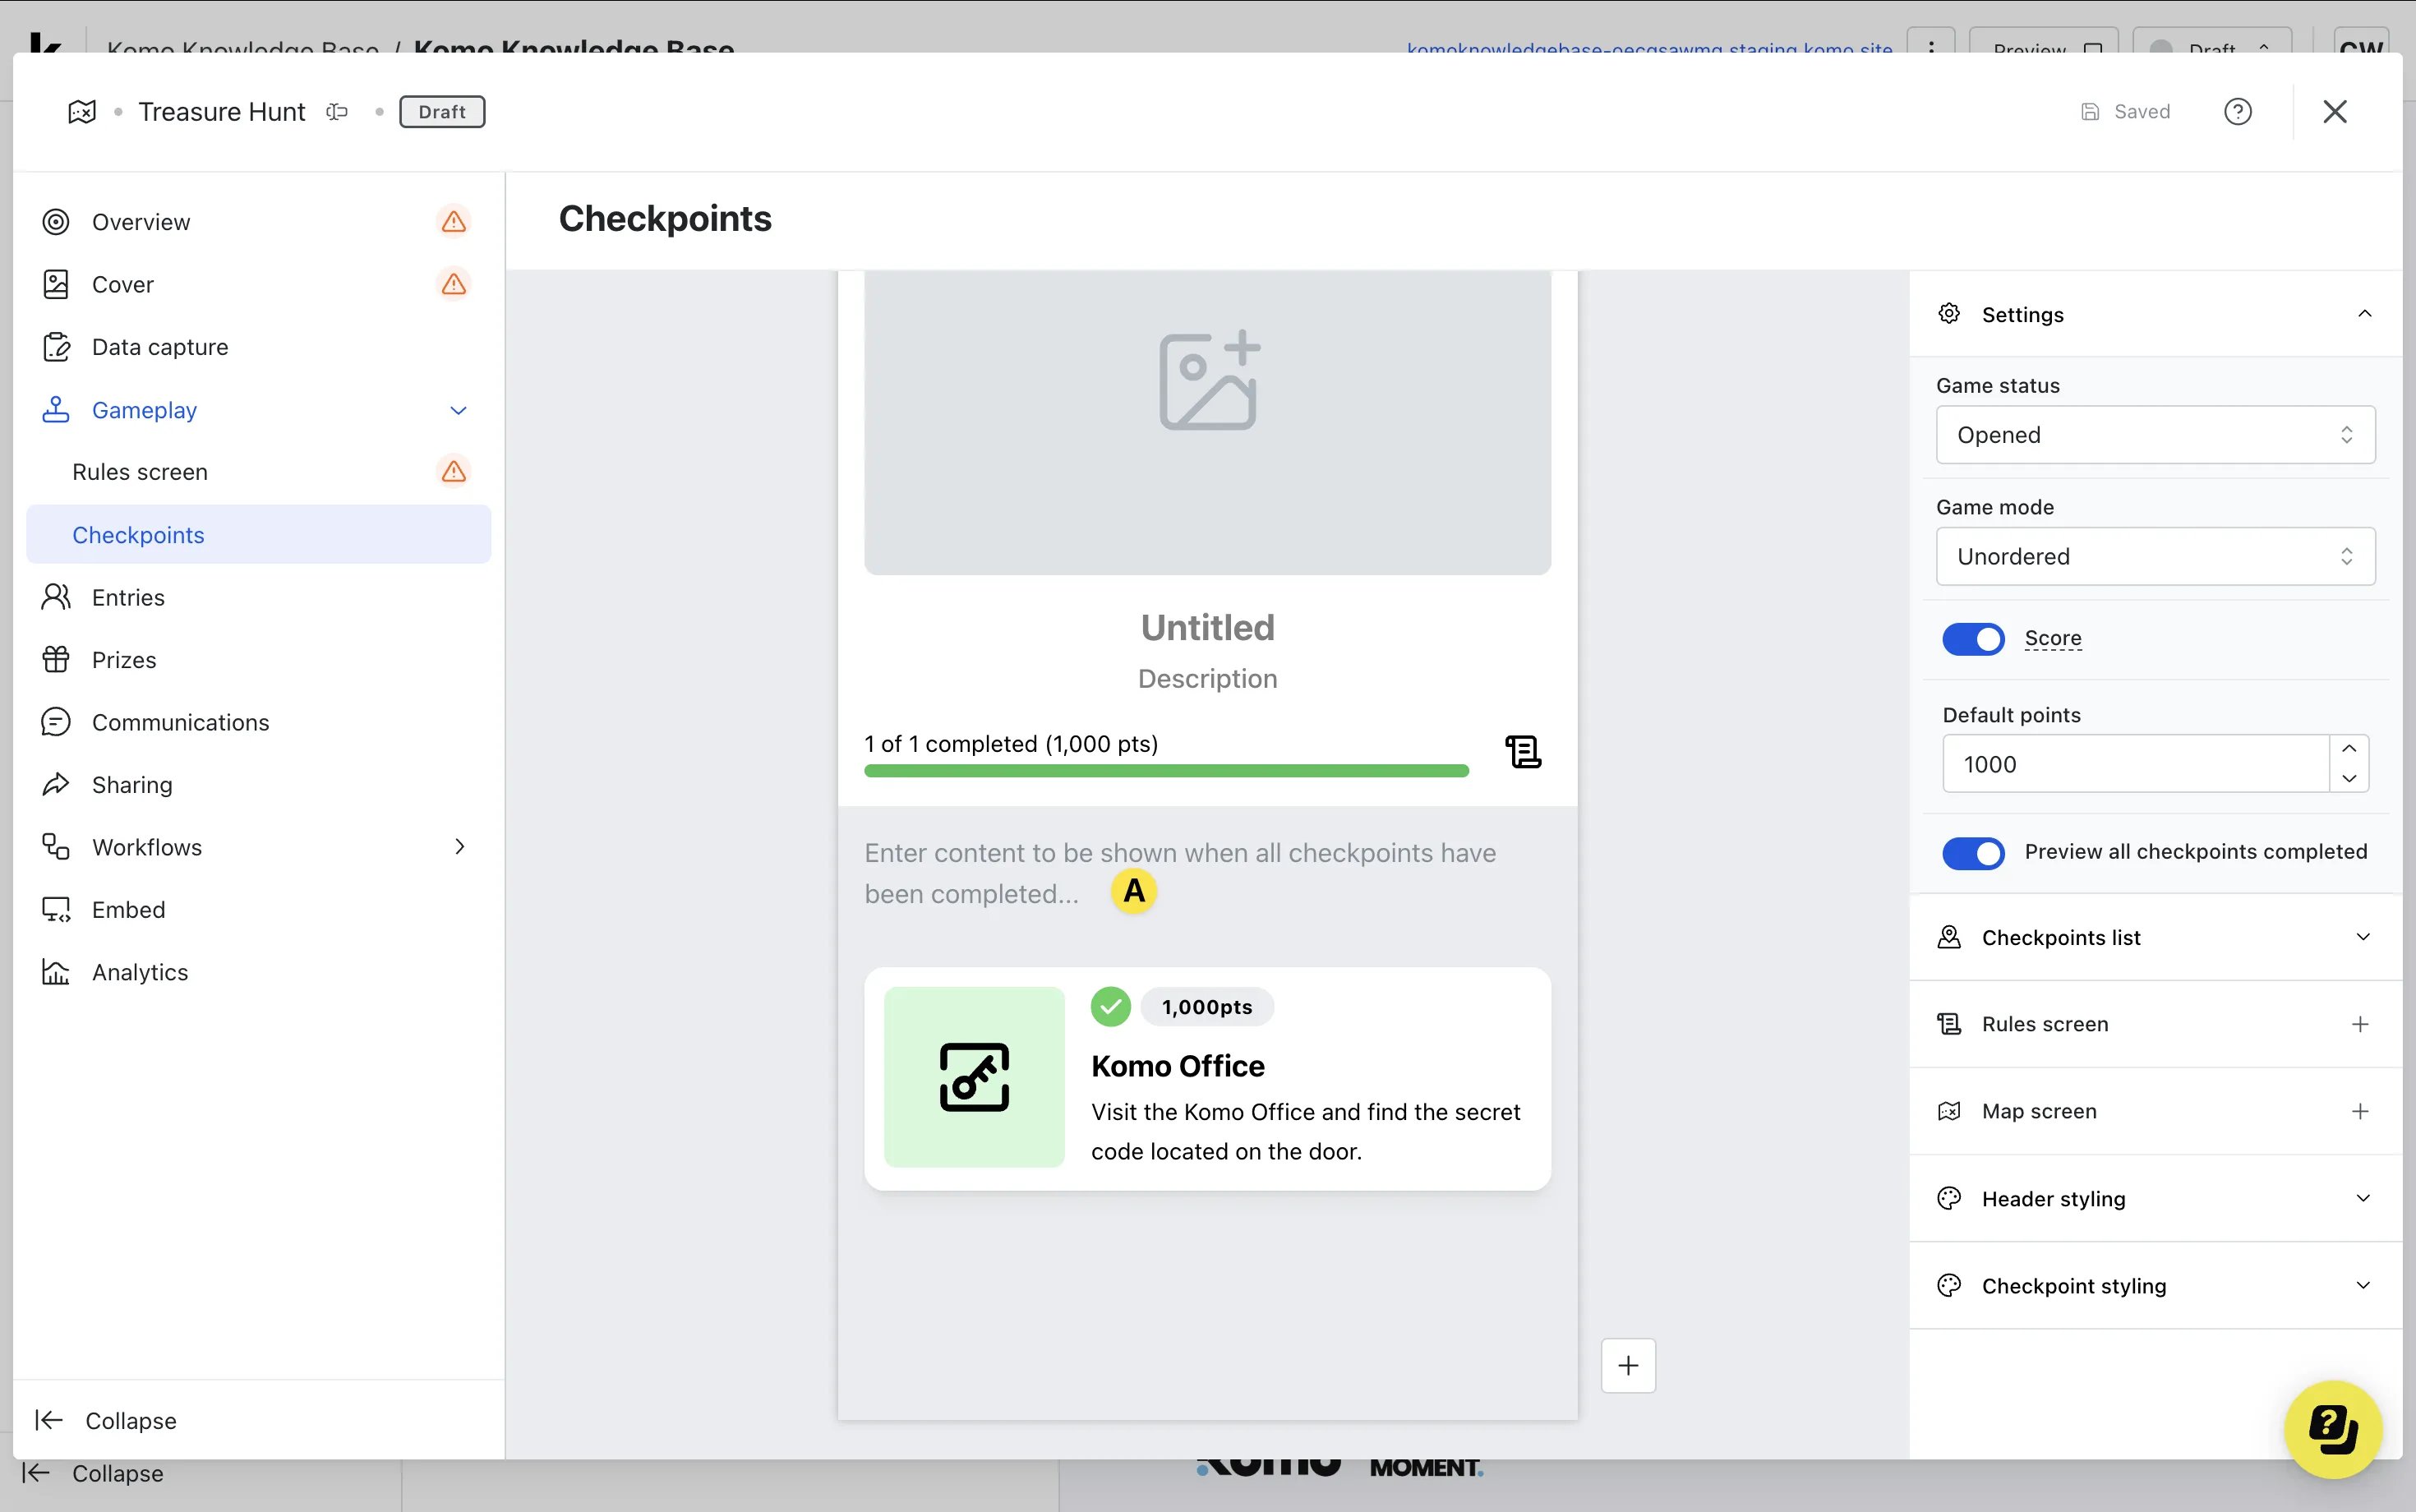 * **(A)** Click here to enter a completion banner or message.
 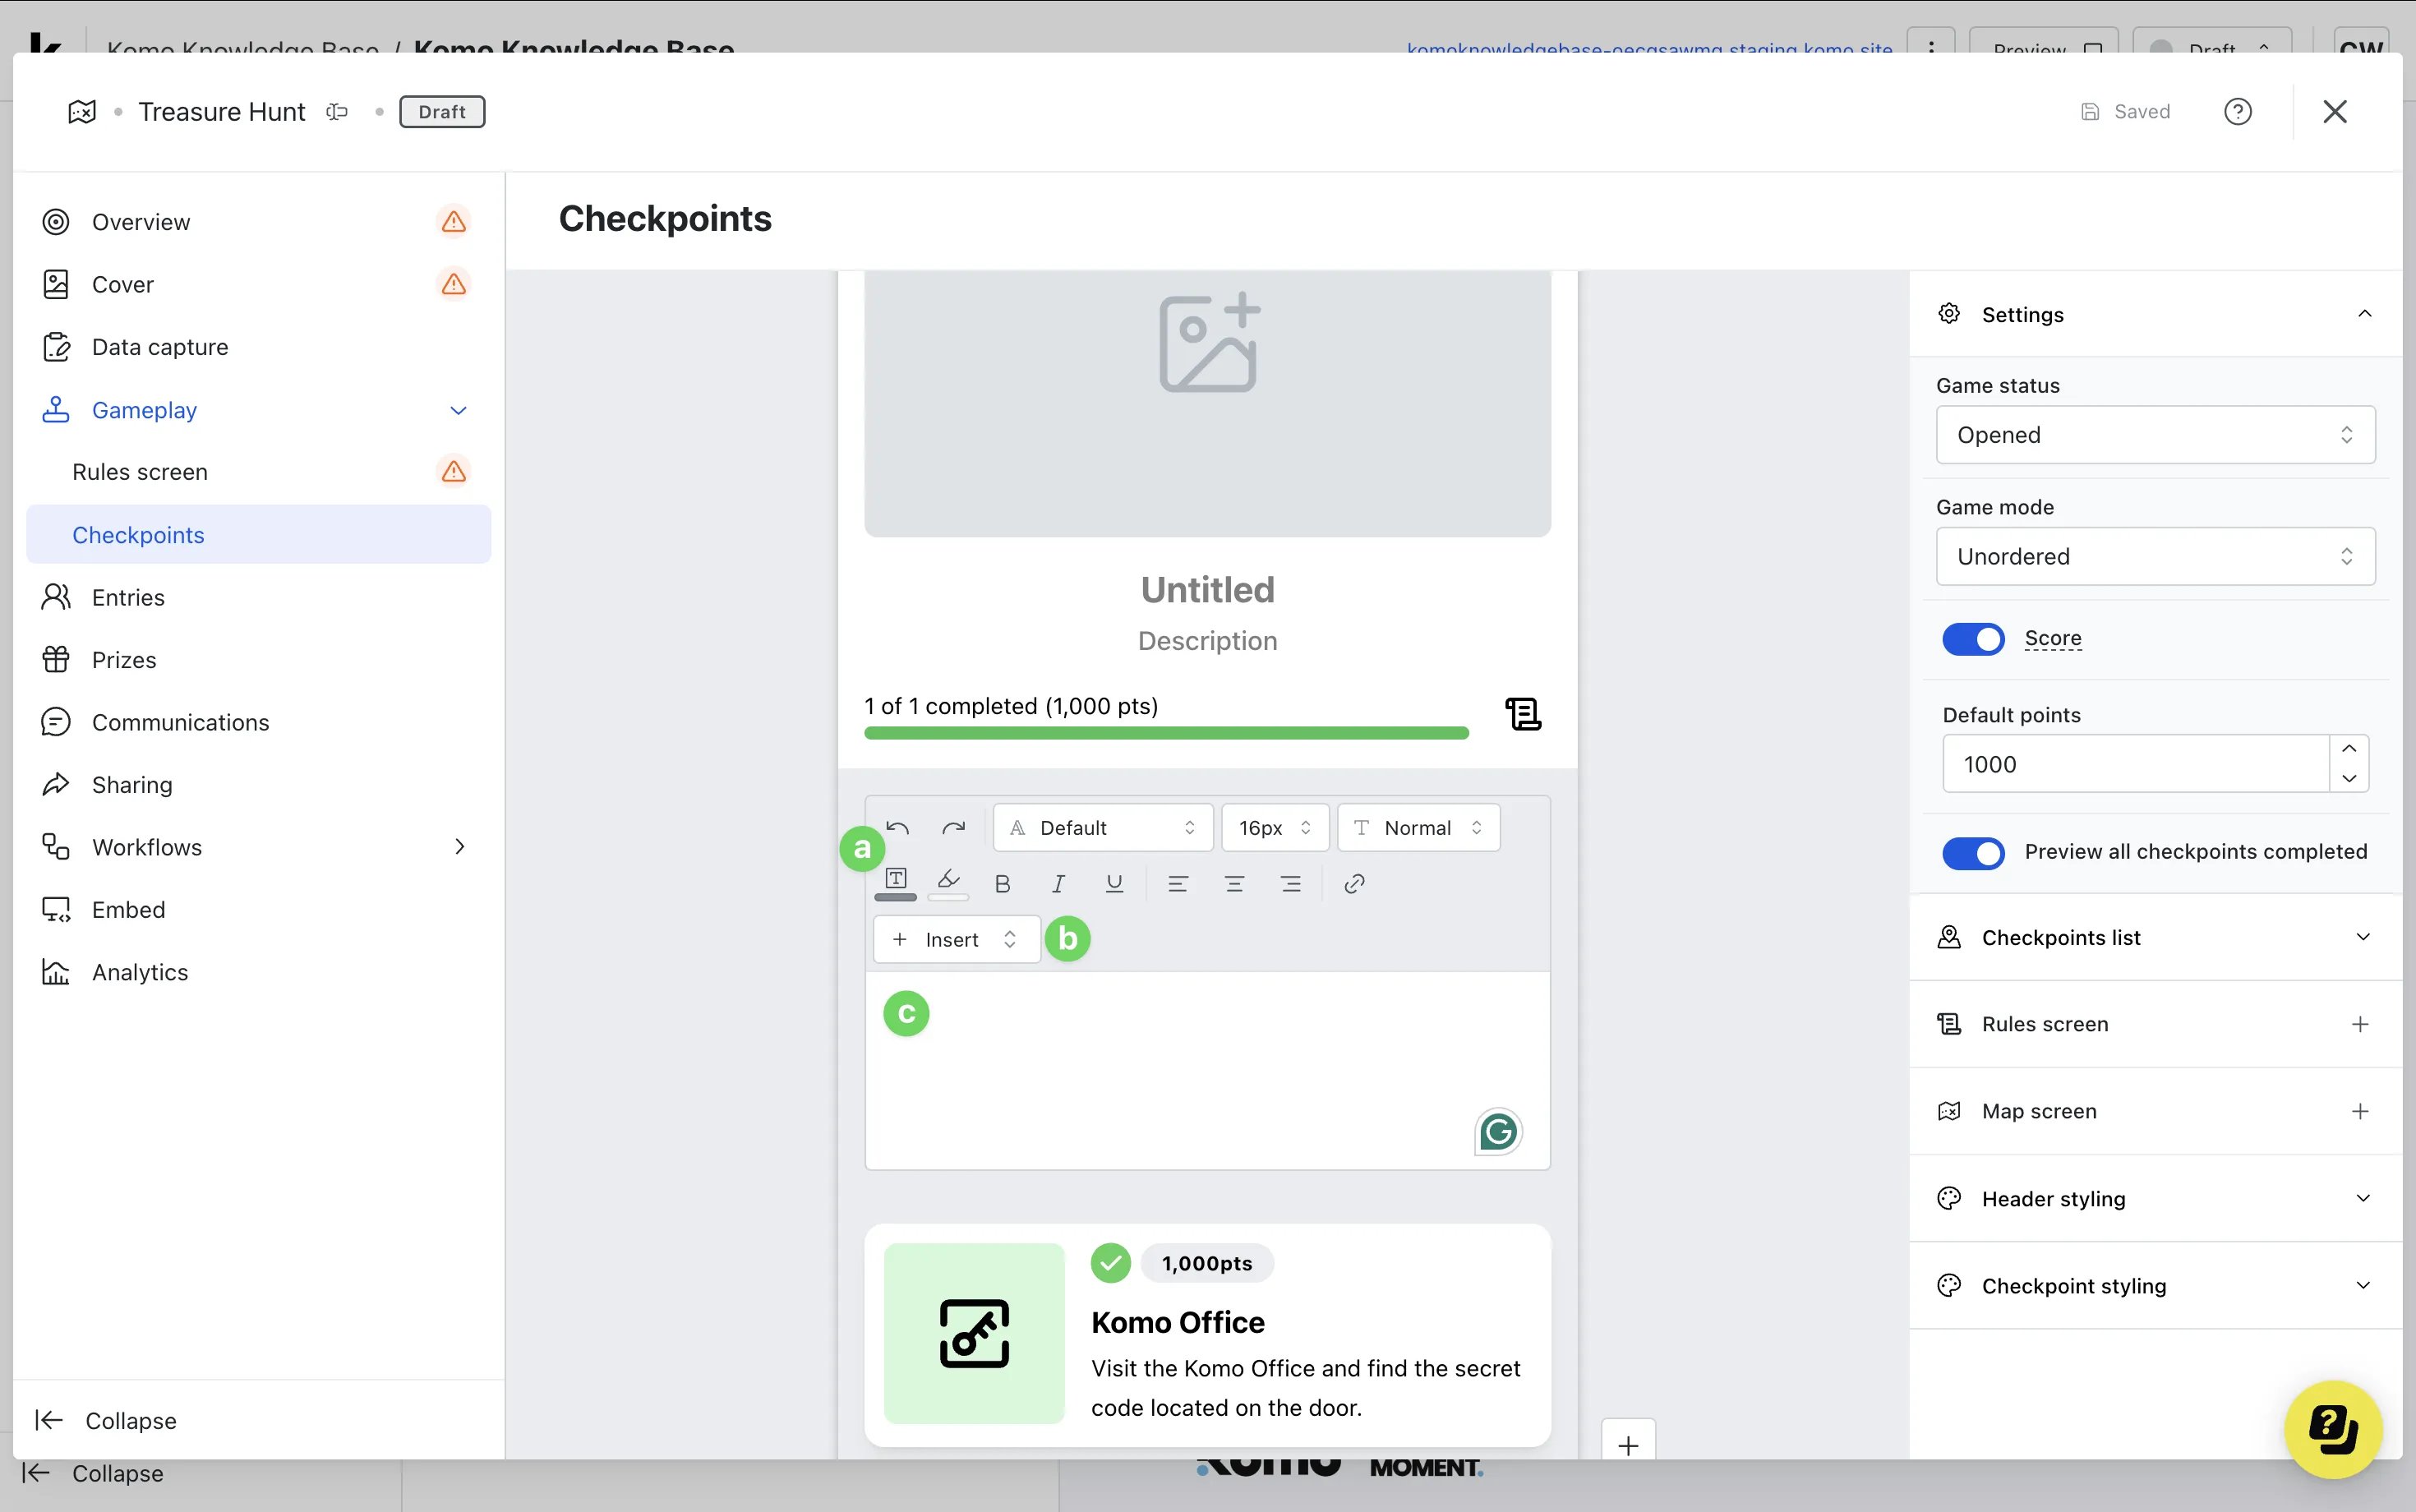 * **(a)** Here you can edit **text** and **alignment** settings for the **completion content.**
* **(b)** Click here to insert a **completion banner image** or **horizontal divider**.
We recommend uploading a completion banner that congratulates participants on finishing all checkpoints as well as detailing next steps (such as prizing process), rather than a plain text-based message. Images are much more captivating and offer greater engagement than text alone.
* **(c)** Here you can **add text** and **preview your banner image** once uploaded.
* **(10)** Edit the **rules screen** here.
* **(11)** Here you can upload a **map.**
* **(a)** Here you can edit **text** and **alignment** settings for the **completion content.**
* **(b)** Click here to insert a **completion banner image** or **horizontal divider**.
We recommend uploading a completion banner that congratulates participants on finishing all checkpoints as well as detailing next steps (such as prizing process), rather than a plain text-based message. Images are much more captivating and offer greater engagement than text alone.
* **(c)** Here you can **add text** and **preview your banner image** once uploaded.
* **(10)** Edit the **rules screen** here.
* **(11)** Here you can upload a **map.**
 If you are directing users around a physical location, mark the areas to outline where the checkpoints are to help users navigate through the game. If you are running a digital scavenger hunt, you can move on to the next step.
* **(A)** Here you can **upload** an image of the map.
* **(B)** You can disable **scaling the map** to the screen.
* **(C)** Edit the drawer **header and body colors** here.
* **(12)** Edit the **header** settings here.
If you are directing users around a physical location, mark the areas to outline where the checkpoints are to help users navigate through the game. If you are running a digital scavenger hunt, you can move on to the next step.
* **(A)** Here you can **upload** an image of the map.
* **(B)** You can disable **scaling the map** to the screen.
* **(C)** Edit the drawer **header and body colors** here.
* **(12)** Edit the **header** settings here.
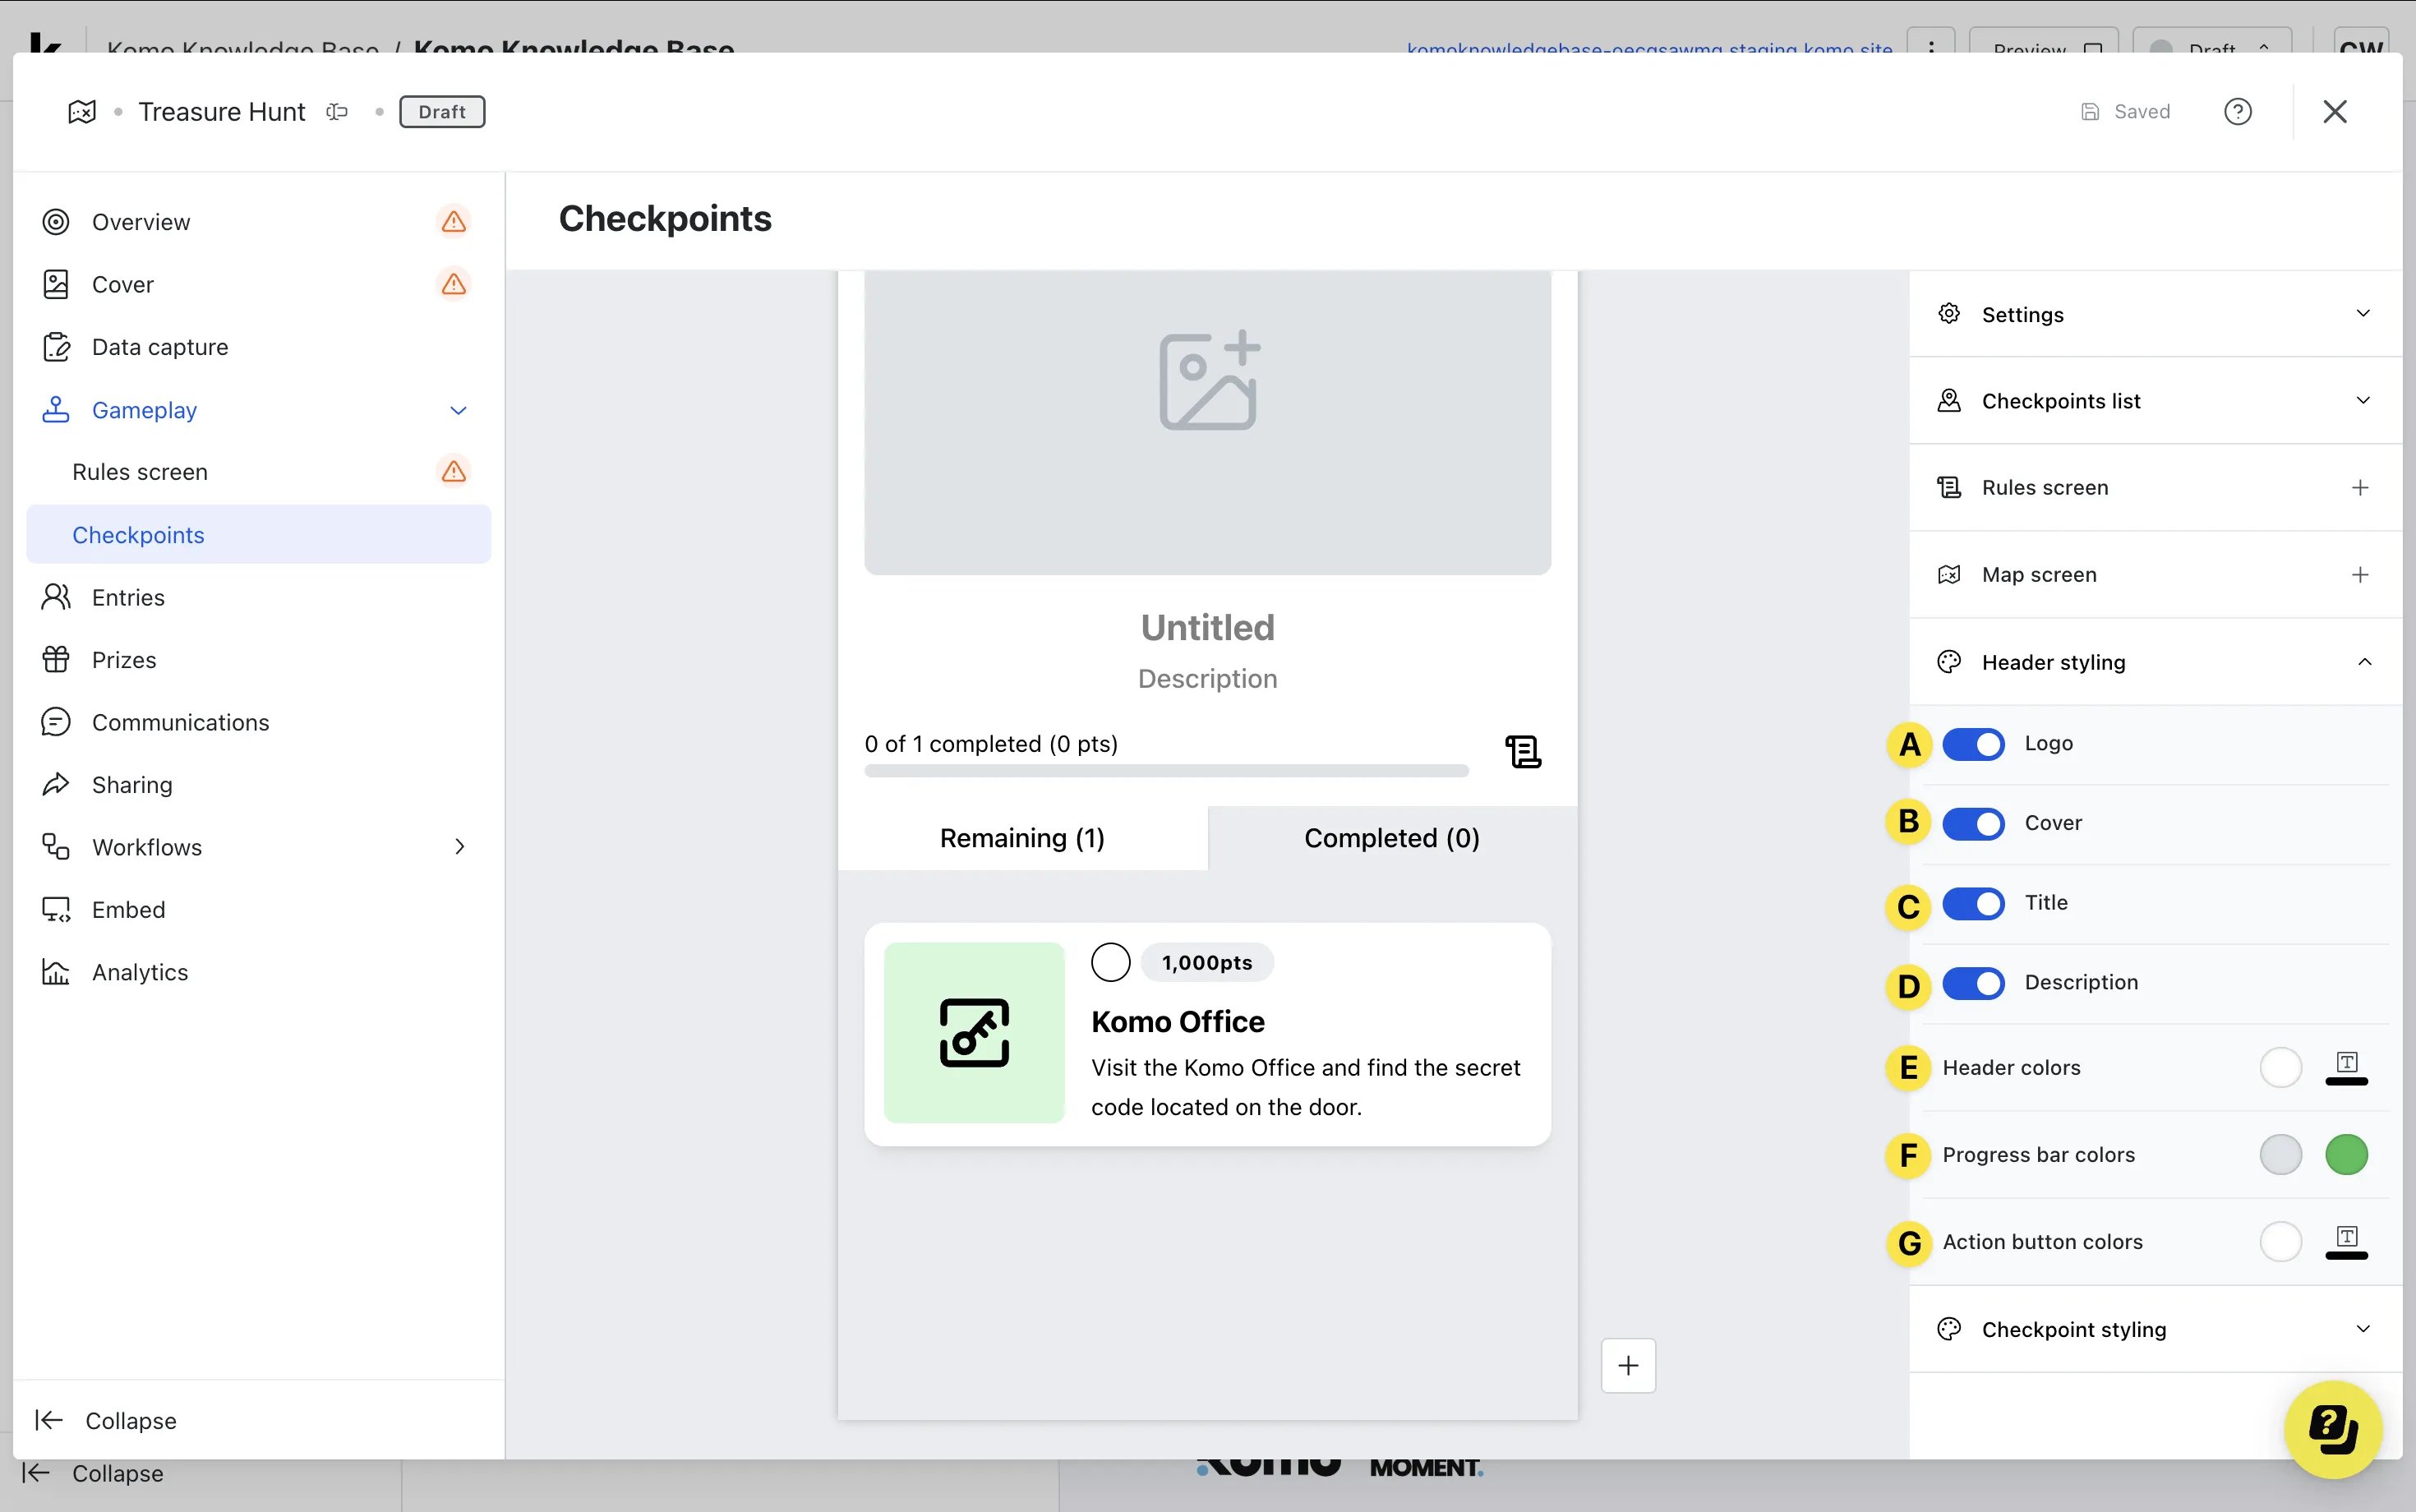 * **(A)** You can disable the **header logo** here.
* **(B)** Disable the **cover image** above the checkpoints.
* **(C)** Toggle off the **title** and **(D)** **description.**
* **(E)** Edit the **header colors** here.
* **(F)** Alter the **progress bar colors.**
The default green color is visible when checkpoints are completed.
* **(G)** Here you can edit the **action button colors** for the rules and maps icon.
* **(13)** Update the **checkpoint styling** settings here.
* **(A)** You can disable the **header logo** here.
* **(B)** Disable the **cover image** above the checkpoints.
* **(C)** Toggle off the **title** and **(D)** **description.**
* **(E)** Edit the **header colors** here.
* **(F)** Alter the **progress bar colors.**
The default green color is visible when checkpoints are completed.
* **(G)** Here you can edit the **action button colors** for the rules and maps icon.
* **(13)** Update the **checkpoint styling** settings here.
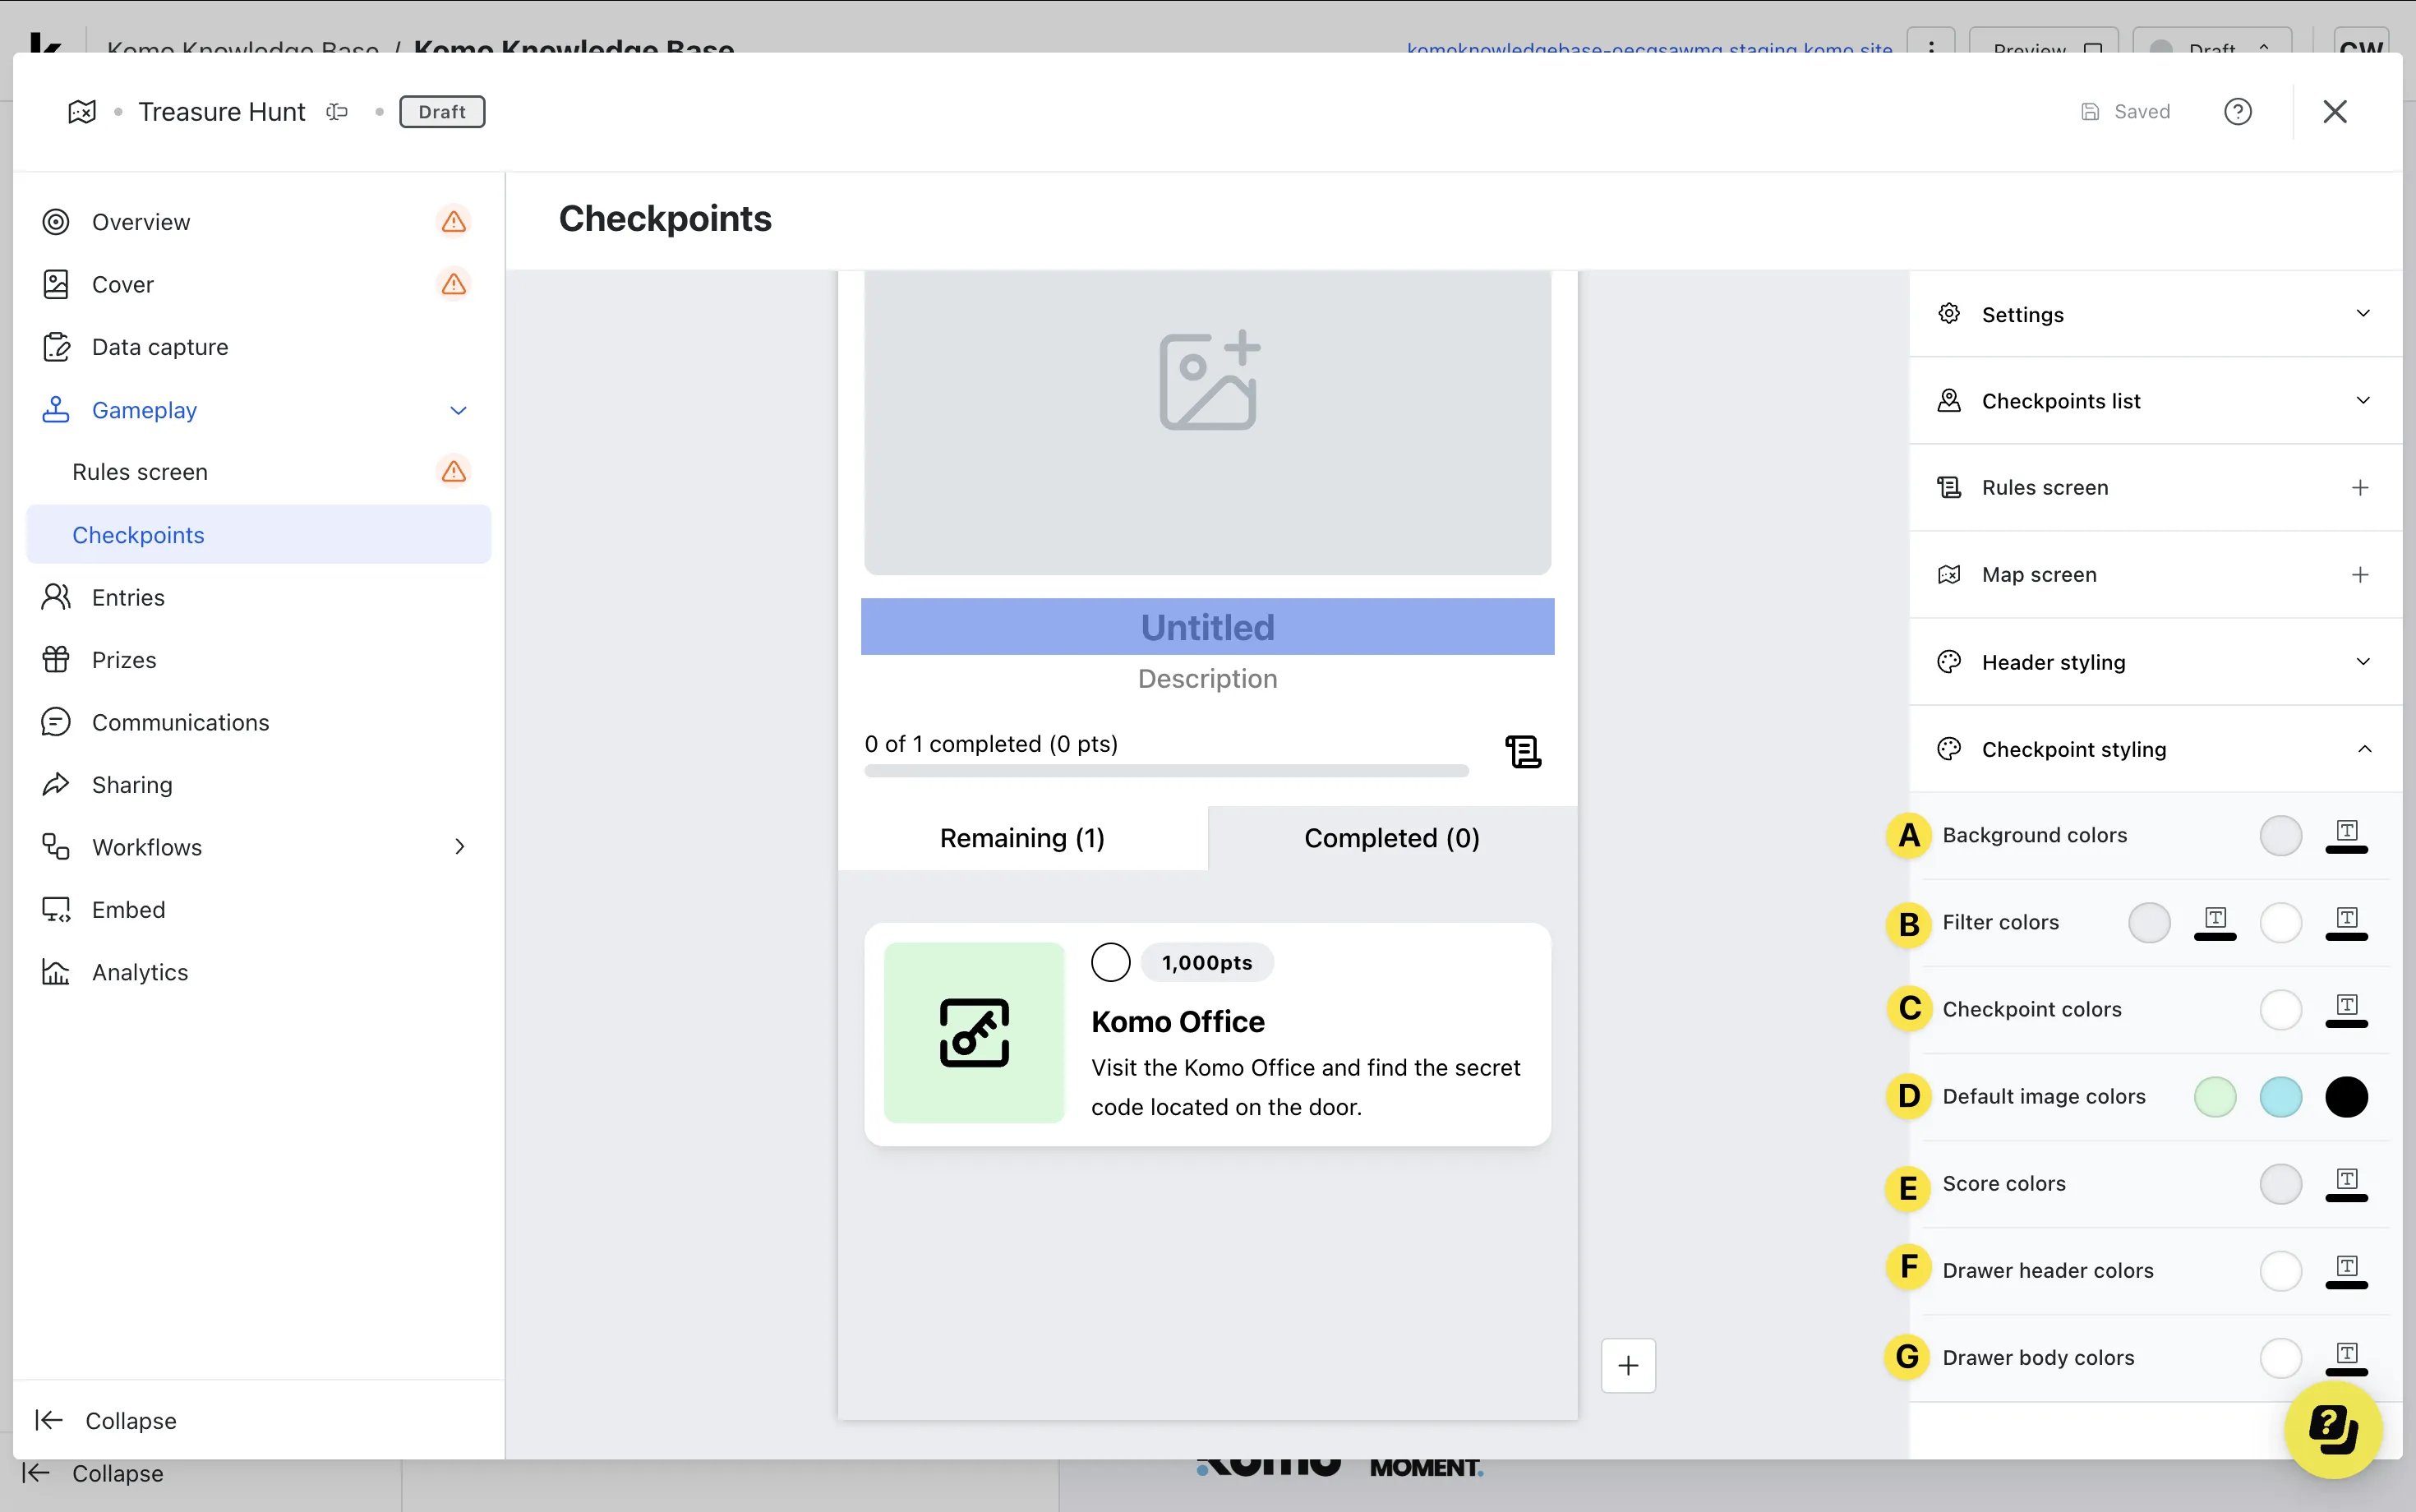 * **(A)** Update the **background color** of the checkpoint list.
* **(B)** Set the **filter colors** for when users switch between the remaining and completed tabs.
* **(C)** Edit the **background and text color** of the checkpoints.
* **(D)** Edit the **default image colors** here.
* **(E)** If you have points enabled, edit the **score background and text color** here.
* **(F)** Edit the **drawer header** and **(G) body colors** here.
### Step 8: **Create your Prizes and Communications**
Set up the prizes and communications you wish to send for the Treasure Hunt card. Learn how to create your prizes and communications [here](/competitions-promotions/setup-management/prizes-and-comms).
### Step 9: **Publish your card**
* **(A)** Update the **background color** of the checkpoint list.
* **(B)** Set the **filter colors** for when users switch between the remaining and completed tabs.
* **(C)** Edit the **background and text color** of the checkpoints.
* **(D)** Edit the **default image colors** here.
* **(E)** If you have points enabled, edit the **score background and text color** here.
* **(F)** Edit the **drawer header** and **(G) body colors** here.
### Step 8: **Create your Prizes and Communications**
Set up the prizes and communications you wish to send for the Treasure Hunt card. Learn how to create your prizes and communications [here](/competitions-promotions/setup-management/prizes-and-comms).
### Step 9: **Publish your card**
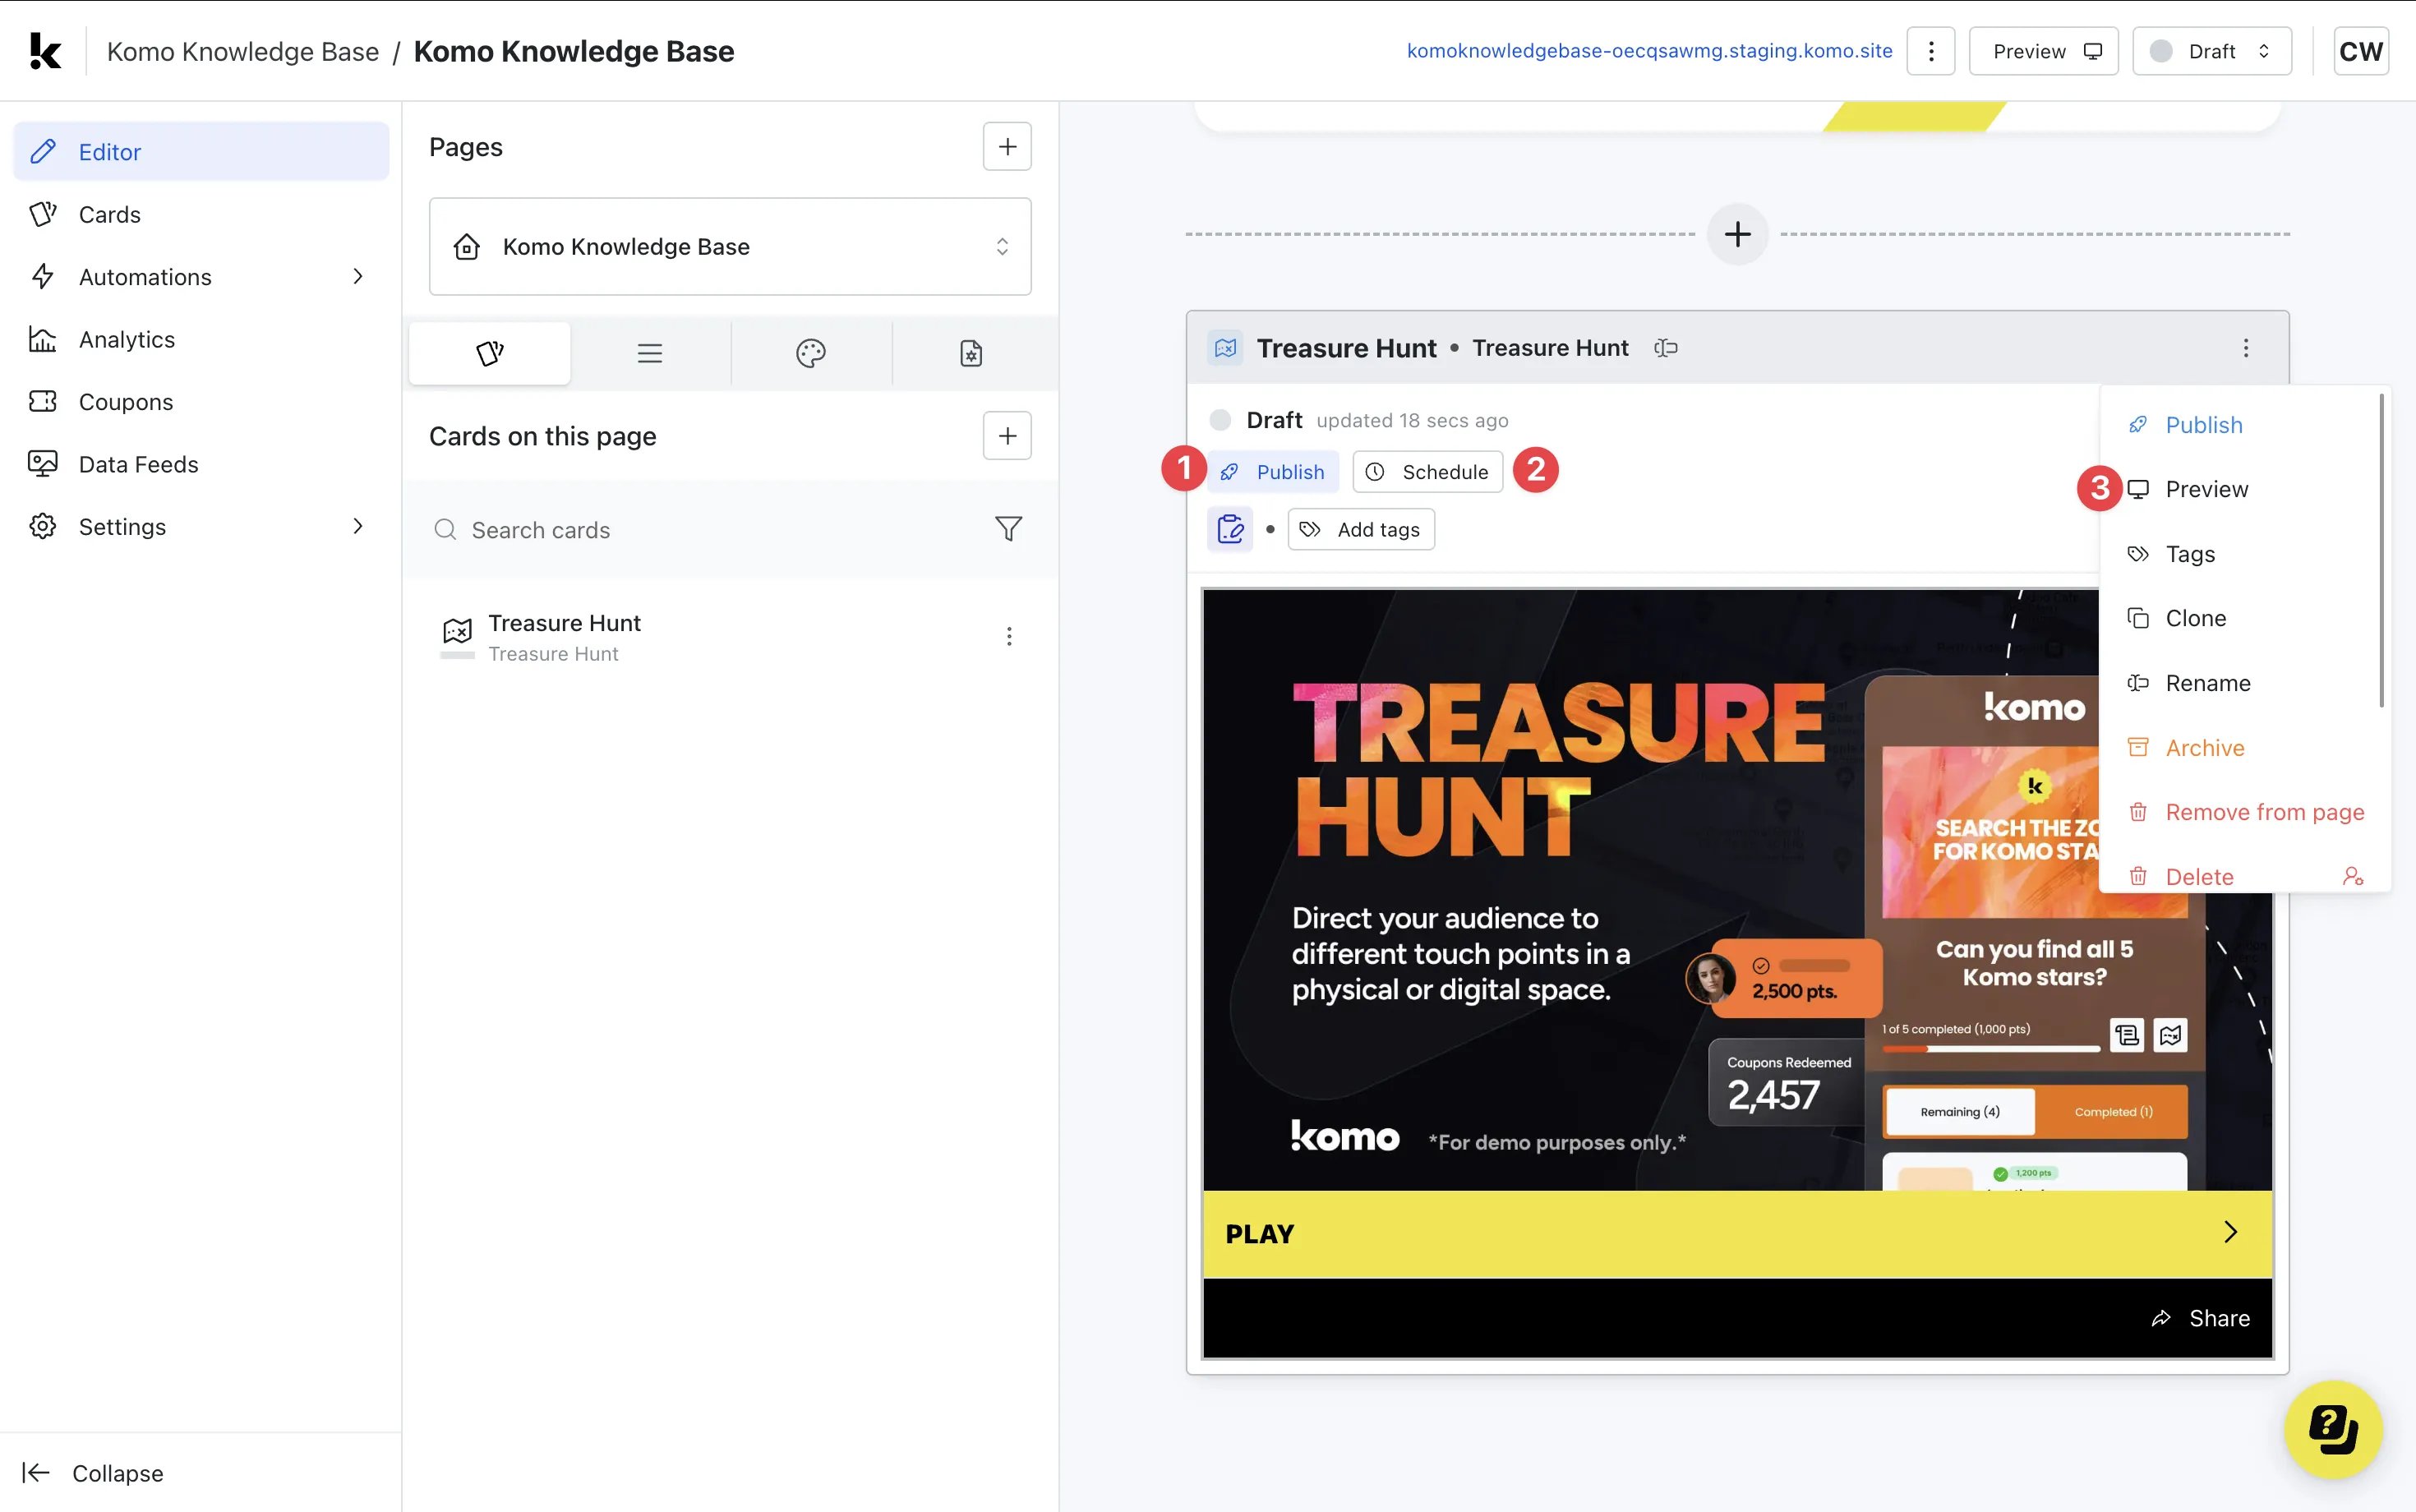 **Once you've completed all of these steps, played around with your card and are happy with all the aspects of your card, it's time to get your card live!**
* **(1) Publish** your card manually and instantly for the world to see.
* **(2) Schedule** your card to be published and unpublished at set dates and times.
* **(3)** Click on **...** to **Preview** and interact with the card on the front end from a user's perspective before publishing it. See how to test your card [here](/getting-started/hub-setup/card-testing).
All competition entries will be recorded and will impact the card analytics.
## "Go live" checklist
Ready to go live with your Treasure Hunt? We recommend reviewing the following list before launching and double-checking if you have:
* All images uploaded are the **correct dimensions**. Refer to our Design Guidelines which outline all recommended sizes.
* If you are using **QR codes**, ensure you have these **downloaded** to print and display at your location/s.
* If you are using **Secret codes**, ensure all the code words are **correct and connected** to each checkpoint.
* Your **instructions** to find each checkpoint are clear and specifies where to go to complete the checkpoint.
* Hyperlinked your [**T\&Cs**](/getting-started/resources/terms-conditions) to the opt-in-field, which is created in the **data capture** section of the settings tab if you have a competition attached.
* All your **communications** (Registration, Winner/s, Everybody Else) are fully set up and ready to send.
* Your **Prizes** and the awarding rules are set up correctly.
* If you are using **coupons**, make sure the coupons created are set up correctly. Check the coupon limits are set, the copy for each screen is right and you have linked the appropriate coupons to your communications.
## Promotion
## FAQ
**Can I have both a QR code and a Secret code on the Treasure Hunt?**
Yes, you can have a mixture of both types as your checkpoints.
**Do I need UTM parameters on the QR codes?**
UTM parameters allow you to track where the majority of your audience is coming from. However, as the QR code is connected to the Treasure Hunt as a checkpoint, the number of checkpoints completed will give you a good indication of which areas were visited the most.
**Is it required to have points enabled for the Treasure Hunt?**
No, the points functionality is optional. You can award standard points for each checkpoint and have either limited time or harder-to-find checkpoints worth more and award prizes to users based on the number of points received. To disable this feature, see [Step 7](#step-7-style-the-gameplay).
**Can I connect a prize to each checkpoint?**
Yes, you can! Under the Prizes tab, you can set a rule to award to all users who completed X checkpoint and create a communication to send with a coupon or steps on how to claim their prize.
**Once you've completed all of these steps, played around with your card and are happy with all the aspects of your card, it's time to get your card live!**
* **(1) Publish** your card manually and instantly for the world to see.
* **(2) Schedule** your card to be published and unpublished at set dates and times.
* **(3)** Click on **...** to **Preview** and interact with the card on the front end from a user's perspective before publishing it. See how to test your card [here](/getting-started/hub-setup/card-testing).
All competition entries will be recorded and will impact the card analytics.
## "Go live" checklist
Ready to go live with your Treasure Hunt? We recommend reviewing the following list before launching and double-checking if you have:
* All images uploaded are the **correct dimensions**. Refer to our Design Guidelines which outline all recommended sizes.
* If you are using **QR codes**, ensure you have these **downloaded** to print and display at your location/s.
* If you are using **Secret codes**, ensure all the code words are **correct and connected** to each checkpoint.
* Your **instructions** to find each checkpoint are clear and specifies where to go to complete the checkpoint.
* Hyperlinked your [**T\&Cs**](/getting-started/resources/terms-conditions) to the opt-in-field, which is created in the **data capture** section of the settings tab if you have a competition attached.
* All your **communications** (Registration, Winner/s, Everybody Else) are fully set up and ready to send.
* Your **Prizes** and the awarding rules are set up correctly.
* If you are using **coupons**, make sure the coupons created are set up correctly. Check the coupon limits are set, the copy for each screen is right and you have linked the appropriate coupons to your communications.
## Promotion
## FAQ
**Can I have both a QR code and a Secret code on the Treasure Hunt?**
Yes, you can have a mixture of both types as your checkpoints.
**Do I need UTM parameters on the QR codes?**
UTM parameters allow you to track where the majority of your audience is coming from. However, as the QR code is connected to the Treasure Hunt as a checkpoint, the number of checkpoints completed will give you a good indication of which areas were visited the most.
**Is it required to have points enabled for the Treasure Hunt?**
No, the points functionality is optional. You can award standard points for each checkpoint and have either limited time or harder-to-find checkpoints worth more and award prizes to users based on the number of points received. To disable this feature, see [Step 7](#step-7-style-the-gameplay).
**Can I connect a prize to each checkpoint?**
Yes, you can! Under the Prizes tab, you can set a rule to award to all users who completed X checkpoint and create a communication to send with a coupon or steps on how to claim their prize.