> ## Documentation Index
> Fetch the complete documentation index at: https://knowledge.komo.tech/llms.txt
> Use this file to discover all available pages before exploring further.
# UGC Upload Card
> Allow users to upload user-generated content.
## What is it?
The UGC Upload card allows users to upload images, videos and PDFs in an easy and intuitive manner. Once uploaded and approved, this content sits in your asset library.
One popular use for this content is sharing it in a [Vote ](/interactive-features/features/vote-card/index)or [Carousel ](/interactive-features/features/carousel-card/index)card.
### Watch it come to life
## How do I build one?
* [Step 1: Add a UGC Upload card to your Hub](#step-1-add-a-ugc-upload-card-to-your-hub)
* [Step 2: Set up your card settings](#step-2-set-up-your-card-settings)
* [Step 3: Add a Data capture](#step-3-add-a-data-capture)
* [Step 4: Publish your card](#step-4-publish-your-card)
### Step 1: Add a UGC Upload card to your hub
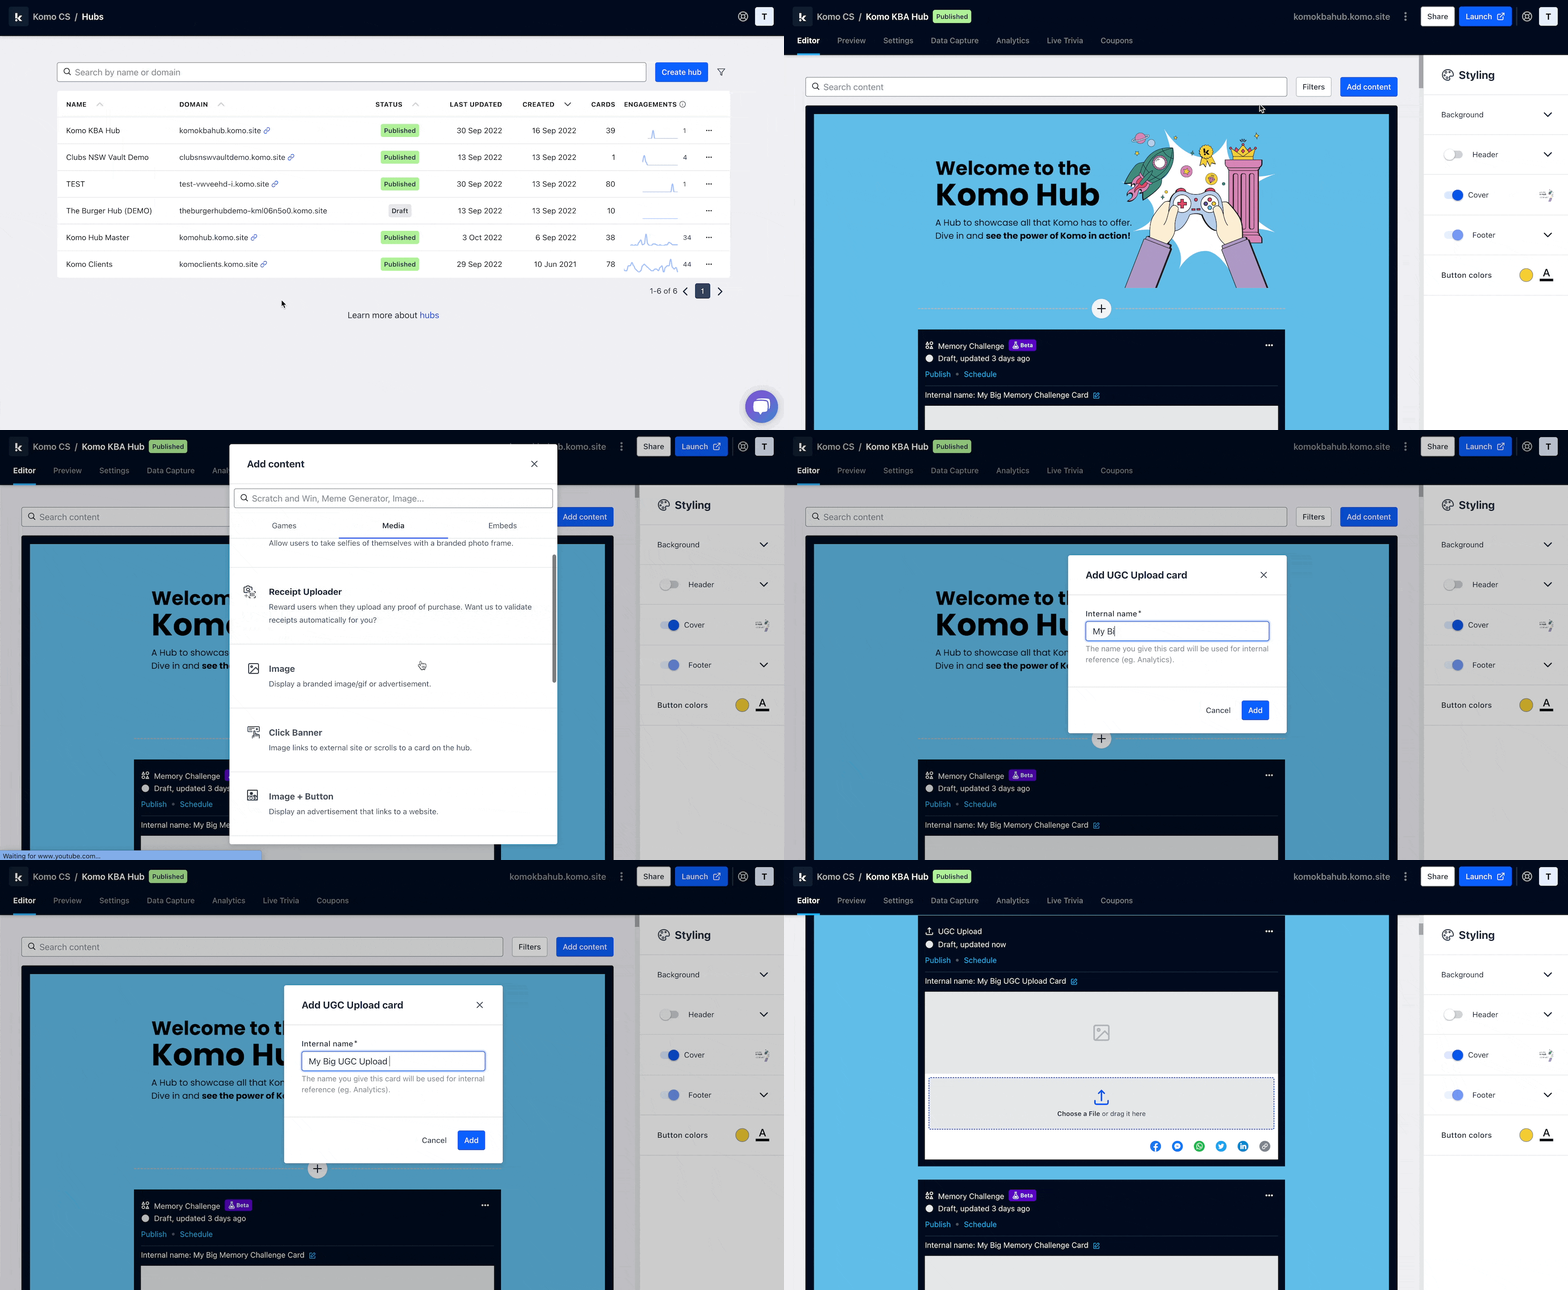 * Navigate to your **Engagement Hub**.
* Once there click **Add Content**, from here select **Media** and then **UGC Upload**.
* You will then see your new card has been added to your Hub.
### **Step 2: Set up your card settings**
* Navigate to your **Engagement Hub**.
* Once there click **Add Content**, from here select **Media** and then **UGC Upload**.
* You will then see your new card has been added to your Hub.
### **Step 2: Set up your card settings**
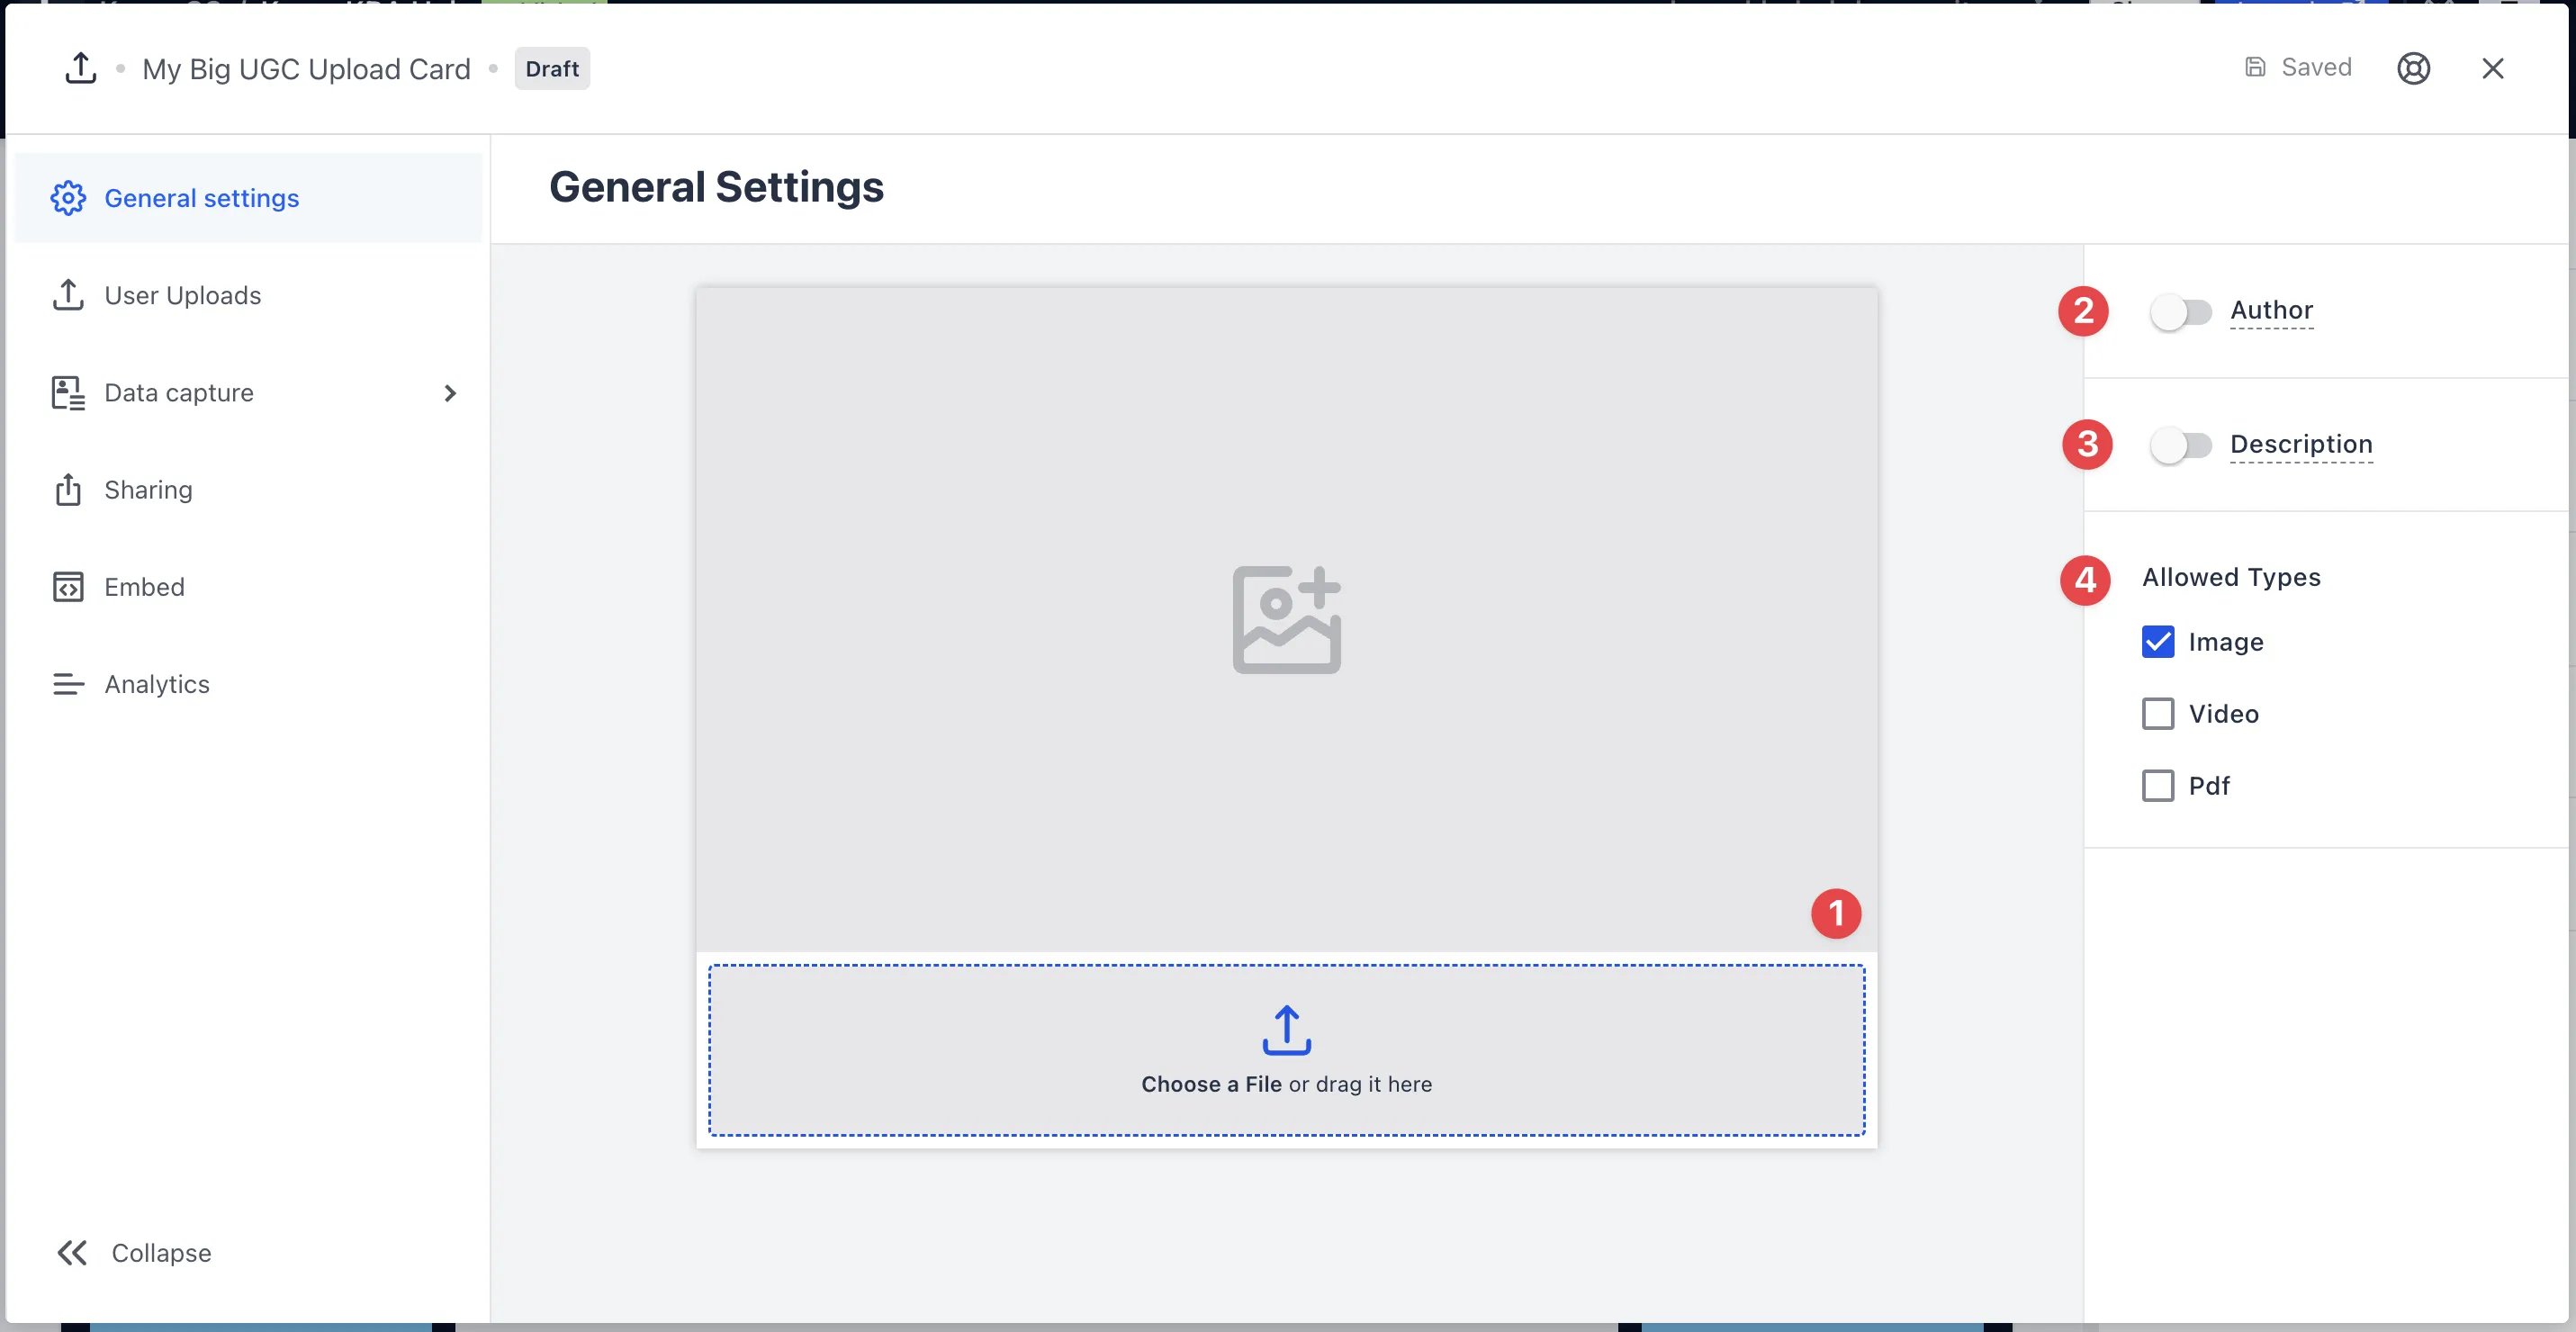 * Clicking on the **UGC Upload** will open the editing module. (1) Click here to add your **cover image**. (2) You can add an **author** tag by displaying the brand or person who's responsible for the card content. (3) Add a **description** to the card. (4) Here you can configure what **file types** users can upload. For a more detailed overview of compatible file, formats click [here](#faq).
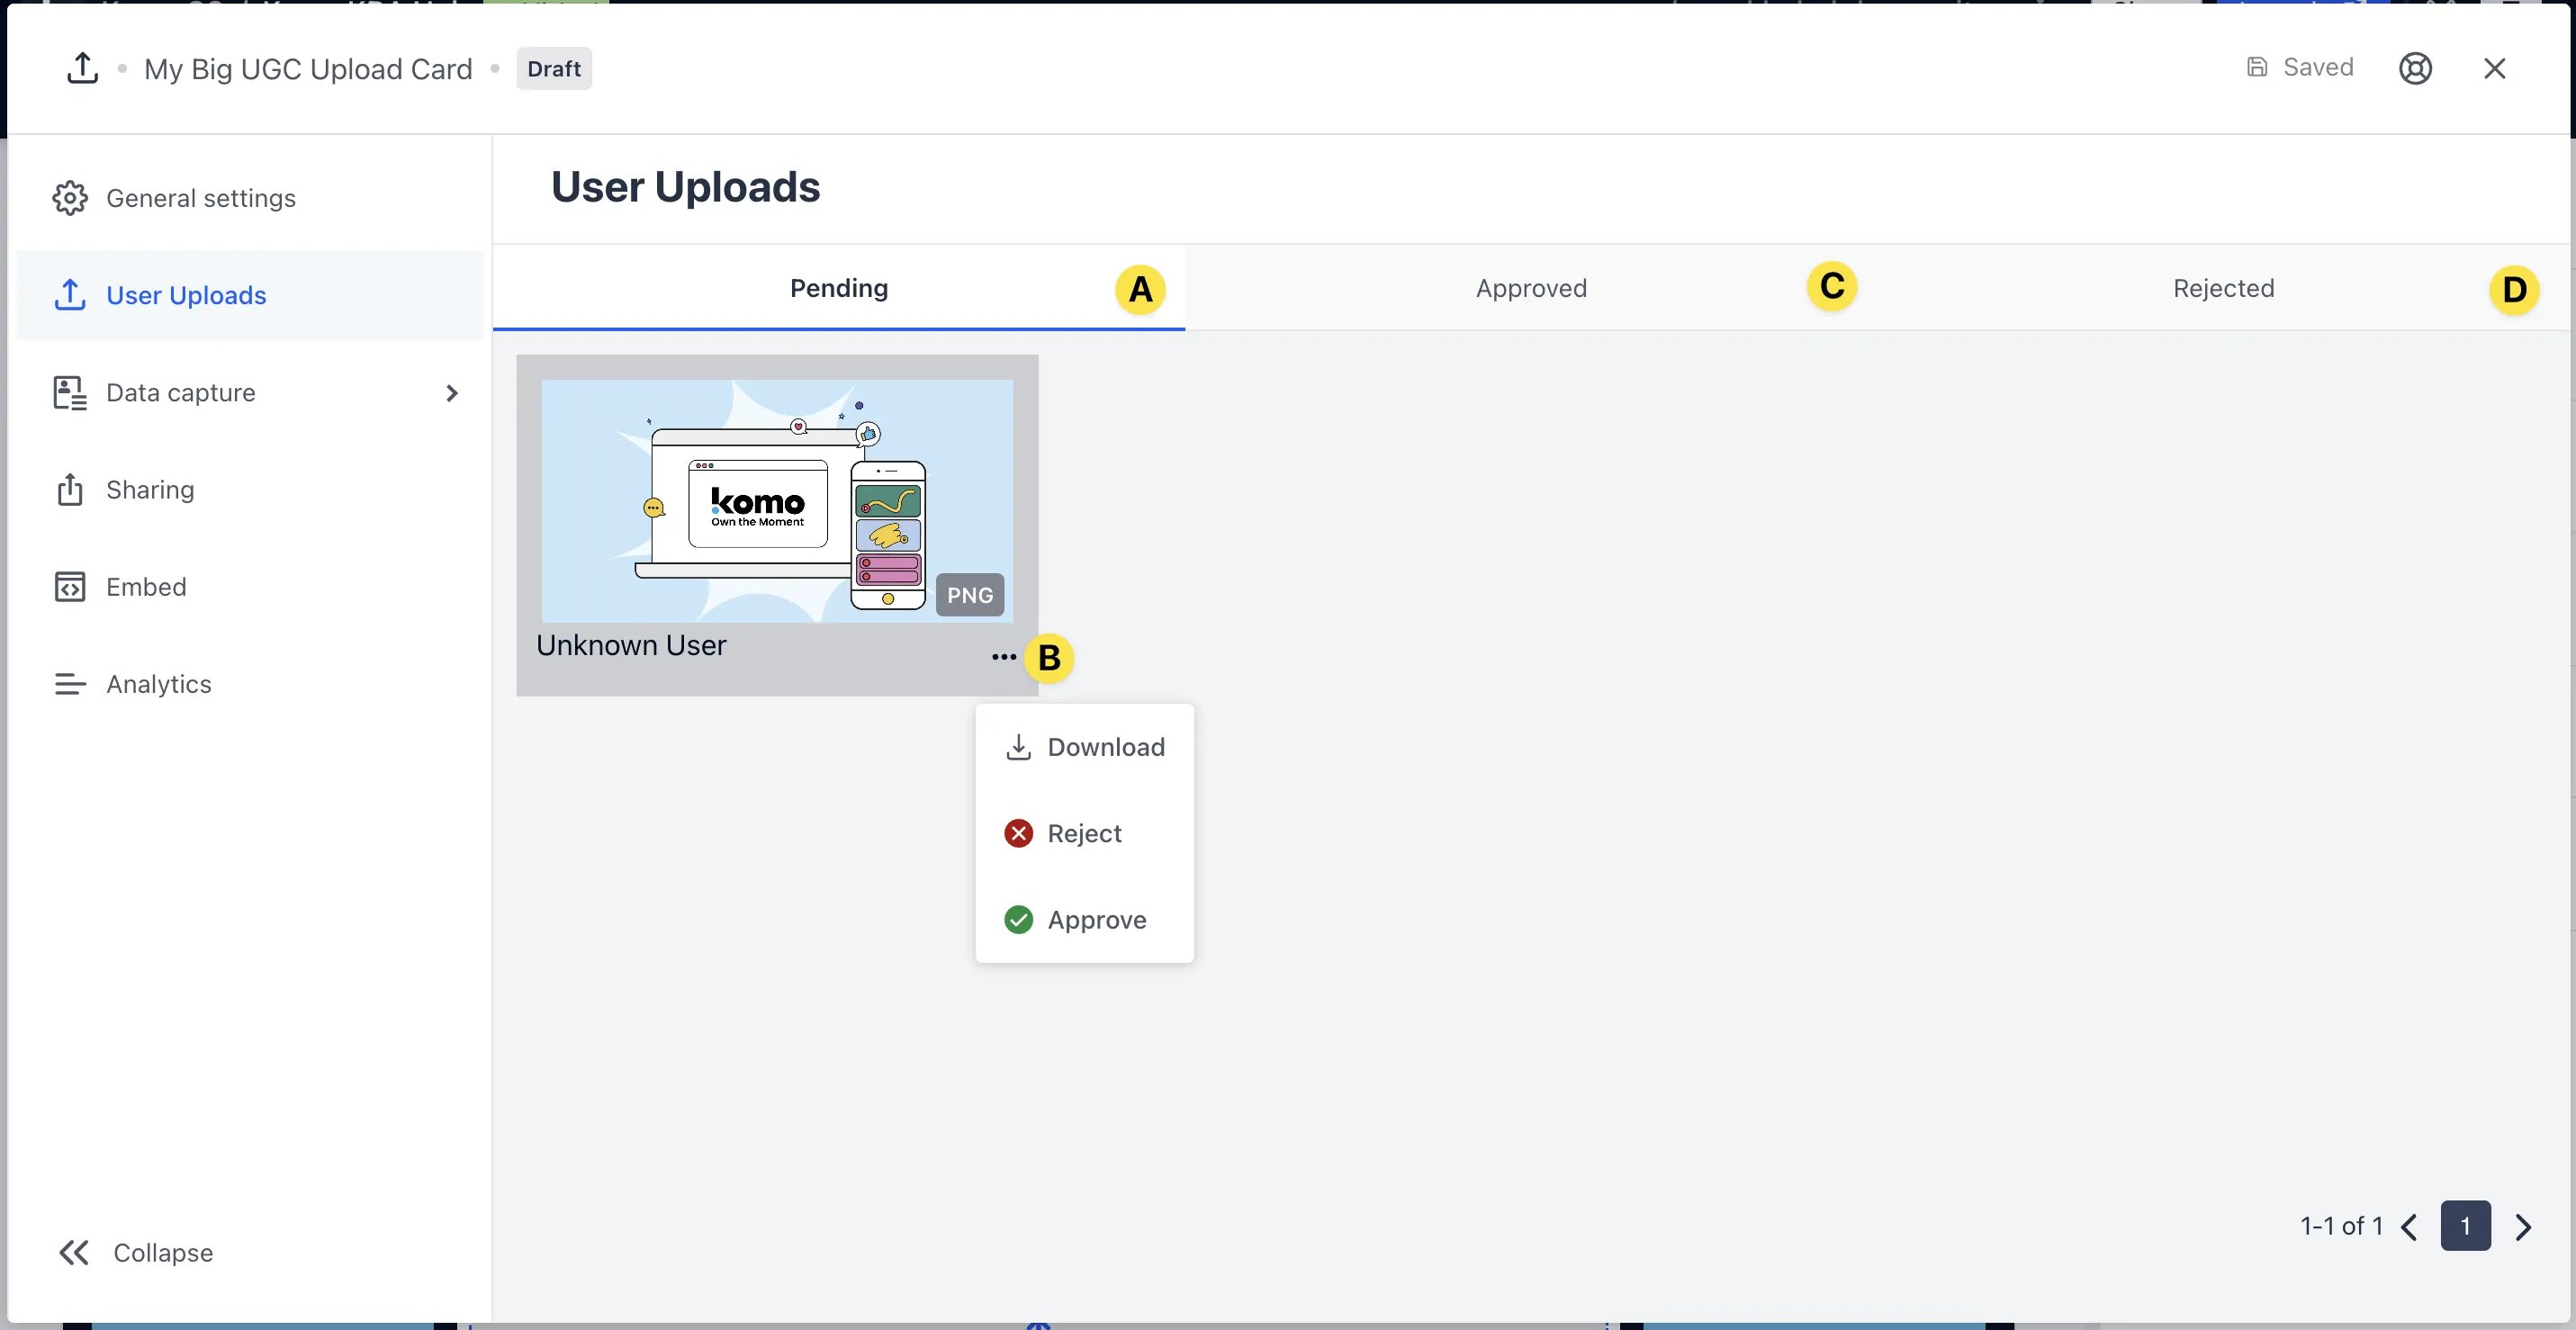 Once you have published your card. You can view uploaded by clicking **User uploads.**
* **(A**) Once a user has uploaded a piece of content you can view the submission in this tab.
* **(B)** Clicking on the three dots will provide options for you to organise the submissions. Clicking **Download** will download that piece of content, **Approve** will move that piece of content to the approved tab **(C)**, Reject will move that submission to the rejected tab **(D)**
* Content that has been approved will be added to your asset library which will enable you to instantly add it to the [**vote**](/interactive-features/features/vote-card/index) **and [carousel](/interactive-features/features/carousel-card/index)** cards.
### Step 3: Add a Data capture *(Optional)*
Add a Data Capture to your Vote card if you want to collect user data.
### Step 4: Publish your card
Once you have published your card. You can view uploaded by clicking **User uploads.**
* **(A**) Once a user has uploaded a piece of content you can view the submission in this tab.
* **(B)** Clicking on the three dots will provide options for you to organise the submissions. Clicking **Download** will download that piece of content, **Approve** will move that piece of content to the approved tab **(C)**, Reject will move that submission to the rejected tab **(D)**
* Content that has been approved will be added to your asset library which will enable you to instantly add it to the [**vote**](/interactive-features/features/vote-card/index) **and [carousel](/interactive-features/features/carousel-card/index)** cards.
### Step 3: Add a Data capture *(Optional)*
Add a Data Capture to your Vote card if you want to collect user data.
### Step 4: Publish your card
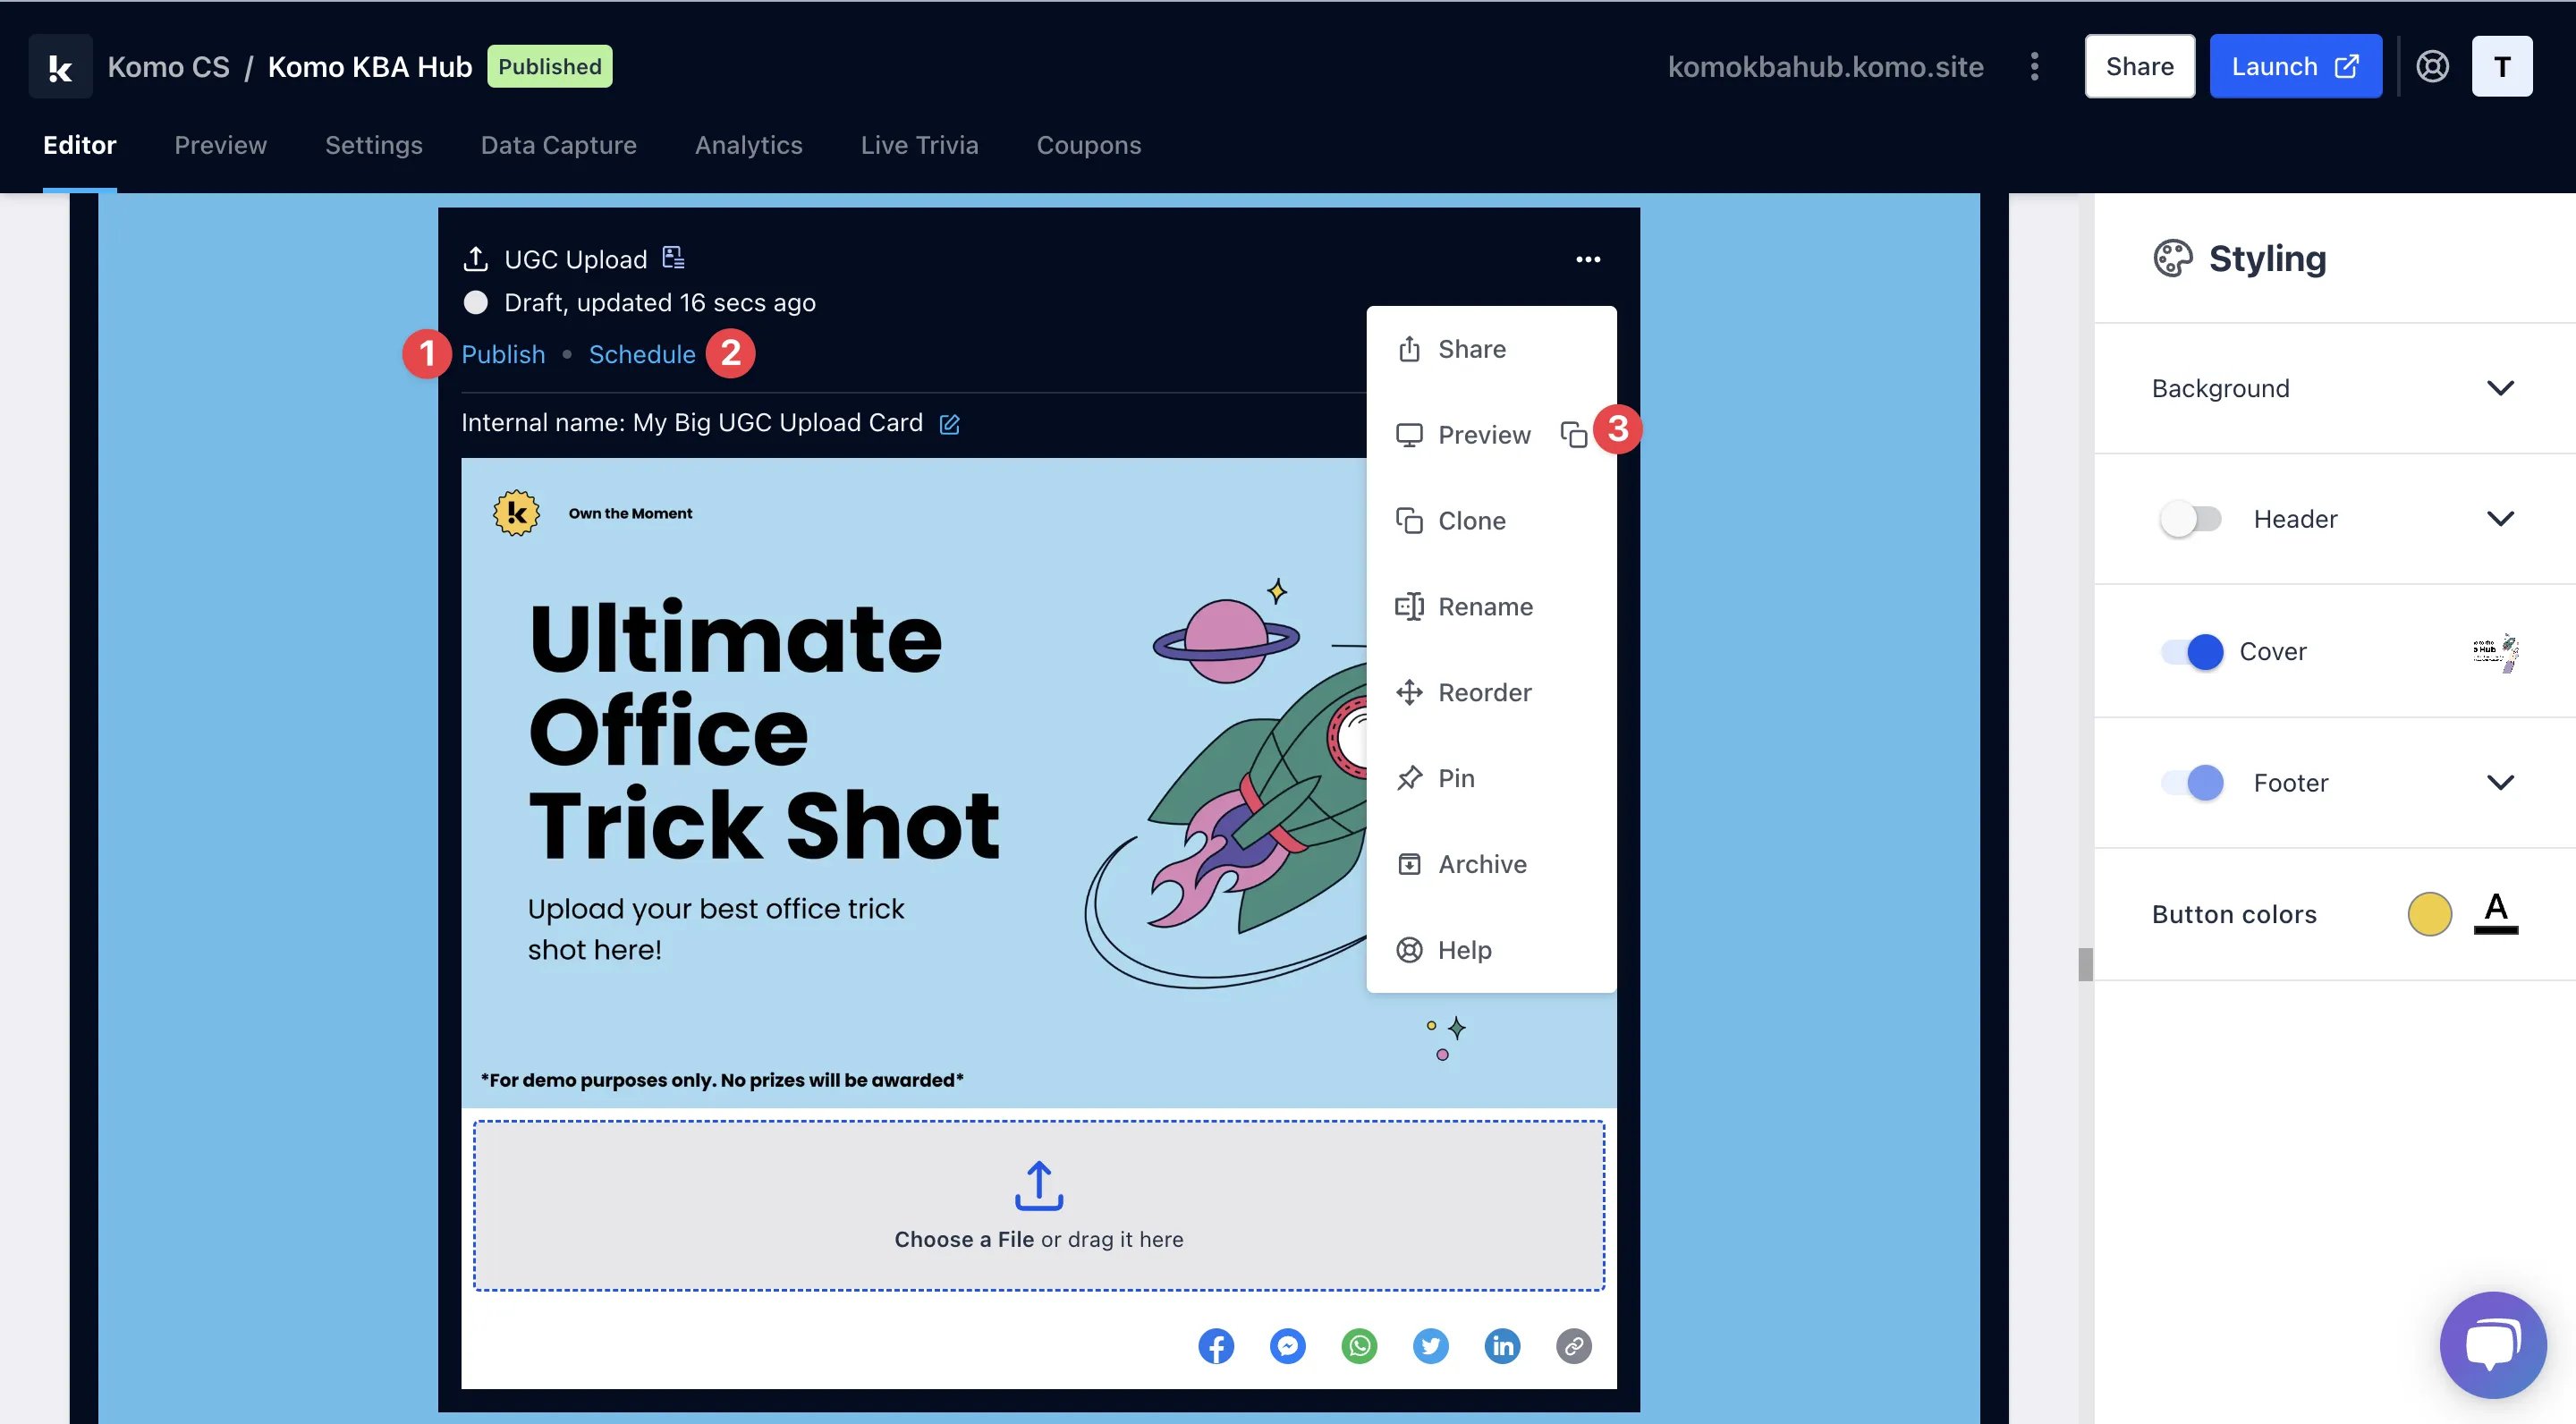 **Once you've completed all of these steps, played around with your card and are happy with all the aspects of your card, it's time to get your card live!**
* **(1) Publish** your card manually and instantly for the world to see.
* **(2) Schedule** your card to be published and unpublished at set dates and times.
* **(3)** Click on **...** to **Preview** and interact with the card on the front end from a user's perspective before publishing it. See how to test your card [here](/getting-started/hub-setup/card-testing).
All competition entries will be recorded and will impact the card analytics.
## Promotion
## FAQ
**What file formats can users upload?**
Users can upload a diverse array of file types such as; PNG, JPEG, JPG, WEBP, MP4, MPEG and PDF. Ensure you have granted permission for people to upload specific file types in the card's settings.
**How can I view the content submissions?**
Once users have begun submitting images and videos you can view the content by clicking on the card's **Settings** and then **User uploads**.
**Once you've completed all of these steps, played around with your card and are happy with all the aspects of your card, it's time to get your card live!**
* **(1) Publish** your card manually and instantly for the world to see.
* **(2) Schedule** your card to be published and unpublished at set dates and times.
* **(3)** Click on **...** to **Preview** and interact with the card on the front end from a user's perspective before publishing it. See how to test your card [here](/getting-started/hub-setup/card-testing).
All competition entries will be recorded and will impact the card analytics.
## Promotion
## FAQ
**What file formats can users upload?**
Users can upload a diverse array of file types such as; PNG, JPEG, JPG, WEBP, MP4, MPEG and PDF. Ensure you have granted permission for people to upload specific file types in the card's settings.
**How can I view the content submissions?**
Once users have begun submitting images and videos you can view the content by clicking on the card's **Settings** and then **User uploads**.