> ## Documentation Index
> Fetch the complete documentation index at: https://knowledge.komo.tech/llms.txt
> Use this file to discover all available pages before exploring further.
# Live Predictor (Advanced)
> Ask predictor questions and reveal the correct answers in real-time. Reward players for returning and engaging.
## What is it?
The Live Predictor is a game that requires users to correctly predict a series of outcomes based on a real-life event such as a sports game, reality TV show, or awards night.
There are two different kinds of the Predictor Card:
[**Basic**](/live-predictor-basic)**:** Users get predictions either right or wrong and the winner is typically drawn from those who got the most predictions correct.
**Advanced:** Each question has a different allocation of points based on previous responses to that prompt. The person who finishes with the most points when the competition closes is the winner.
This article will focus on building the **advanced** version of the Live Predictor card. To create a **basic** version of the Live Predictor card click [here](/interactive-features/games/live-predictor-card-basic).
## How do I build one?
### Step 1: Add a Live Predictor to your Hub
 * Navigate to your **Engagement Hub**.
* Once there, click the **Plus icon,** select **Games** and then **Live** **Predictor.**
* Add an internal name and select **Advanced** as your style. Following this click **Add**.
* You will then see your new card has been added to your Hub.
### Step 2: Add a Cover image
* Navigate to your **Engagement Hub**.
* Once there, click the **Plus icon,** select **Games** and then **Live** **Predictor.**
* Add an internal name and select **Advanced** as your style. Following this click **Add**.
* You will then see your new card has been added to your Hub.
### Step 2: Add a Cover image
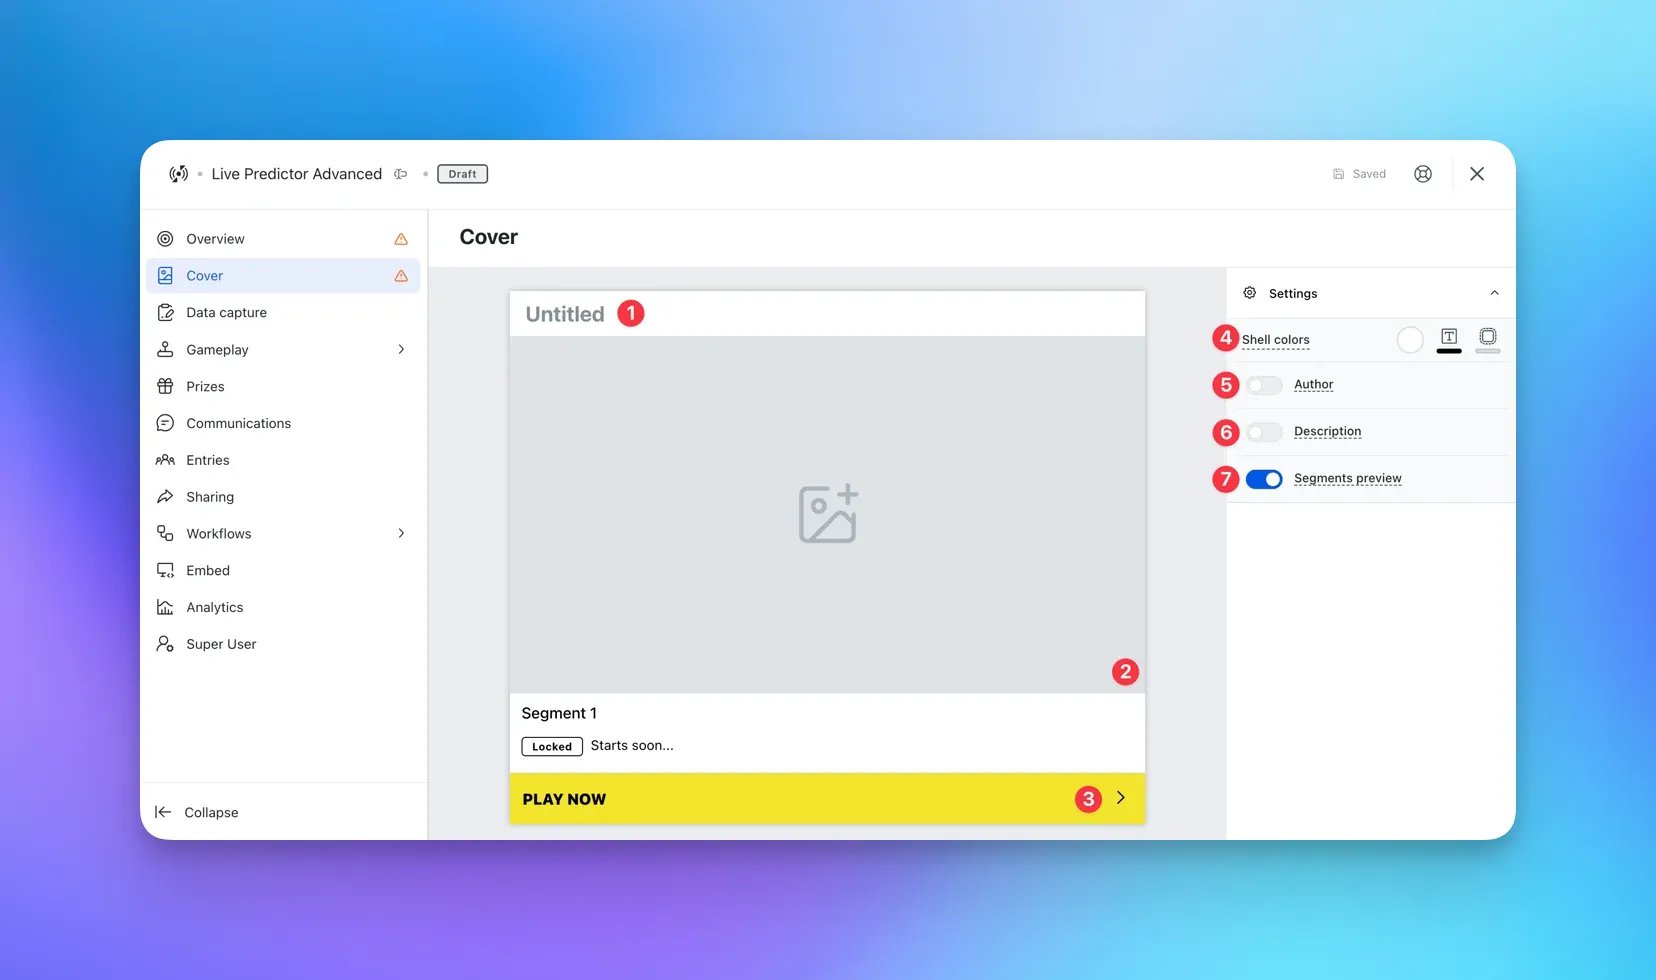 * Clicking on the **Live Predictor** will open the editing module.
* **(1)** By clicking here you can add a **title** to your Predictor card.
* **(2)** This is where you can upload a **cover image**.
* **(3)** Here you can edit the color and copy of the **call-to-action bar.**
* **(4)** Set the **outer card shell colours** (description and share bar).
* **(5)** You can add an **author** tag by displaying the brand or person who's responsible for the card content.
* **(6)** Add a **description** to the card.
* **(7)** Here you can choose to **toggle off the segments preview**.
### Step 3: Set up your Data capture
Unlike other cards the Live Predictor card comes with a data capture already added, you will just be required to finish setting it up. For a guide on how to do this check out our article below.
### Step 4: [Create ](/getting-started/hub-setup/data-capture/index)a Segment
A segment simply refers to a portion of your event/events. e.g. for a sports game, a segment may be an individual quarter or if you're running a season-long competition an individual game. For a reality TV show, one segment may be one episode. How you choose to break down your Live Predictor card is entirely up to you!
* **(1)** Here you will need to **name** the segment. For instance, if you're separating the segments by quarters you would name the segment "1st Quarter".
* **(2)** This **eye** marks whether or not this segment is visible to front-end users. Currently, it has a strike through it meaning this segment is currently hidden from users. Unmark this when you're ready to push a segment live.
* **(3)** By clicking on this icon you will be able to **schedule** the opening and closing times of this segment.\
**Note:** You will first need to add a question to the segment in order to use this feature.
* **(4)** This option allows you to add a **communication** associated with this segment. You can use this feature to notify users that a new segment has now opened.
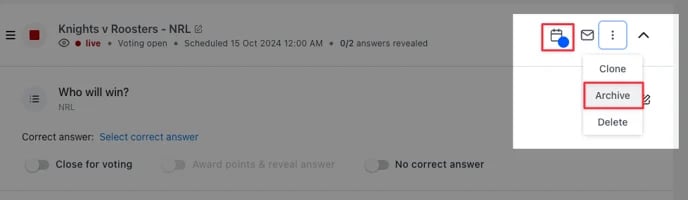
* **(5)** By clicking on the **three dots** you will have the option to **archive** and **delete segments**.
* **(6)** By clicking the **plus** **icon** you can then choose what question type you'd like to add to the segment.
* **(7)** This option adds a **multiple-choice-based** **question** to your segment.
* Clicking on the **Live Predictor** will open the editing module.
* **(1)** By clicking here you can add a **title** to your Predictor card.
* **(2)** This is where you can upload a **cover image**.
* **(3)** Here you can edit the color and copy of the **call-to-action bar.**
* **(4)** Set the **outer card shell colours** (description and share bar).
* **(5)** You can add an **author** tag by displaying the brand or person who's responsible for the card content.
* **(6)** Add a **description** to the card.
* **(7)** Here you can choose to **toggle off the segments preview**.
### Step 3: Set up your Data capture
Unlike other cards the Live Predictor card comes with a data capture already added, you will just be required to finish setting it up. For a guide on how to do this check out our article below.
### Step 4: [Create ](/getting-started/hub-setup/data-capture/index)a Segment
A segment simply refers to a portion of your event/events. e.g. for a sports game, a segment may be an individual quarter or if you're running a season-long competition an individual game. For a reality TV show, one segment may be one episode. How you choose to break down your Live Predictor card is entirely up to you!
* **(1)** Here you will need to **name** the segment. For instance, if you're separating the segments by quarters you would name the segment "1st Quarter".
* **(2)** This **eye** marks whether or not this segment is visible to front-end users. Currently, it has a strike through it meaning this segment is currently hidden from users. Unmark this when you're ready to push a segment live.
* **(3)** By clicking on this icon you will be able to **schedule** the opening and closing times of this segment.\
**Note:** You will first need to add a question to the segment in order to use this feature.
* **(4)** This option allows you to add a **communication** associated with this segment. You can use this feature to notify users that a new segment has now opened.
* **(5)** By clicking on the **three dots** you will have the option to **archive** and **delete segments**.
* **(6)** By clicking the **plus** **icon** you can then choose what question type you'd like to add to the segment.
* **(7)** This option adds a **multiple-choice-based** **question** to your segment.
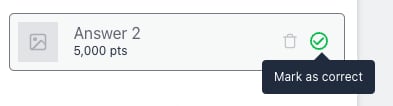
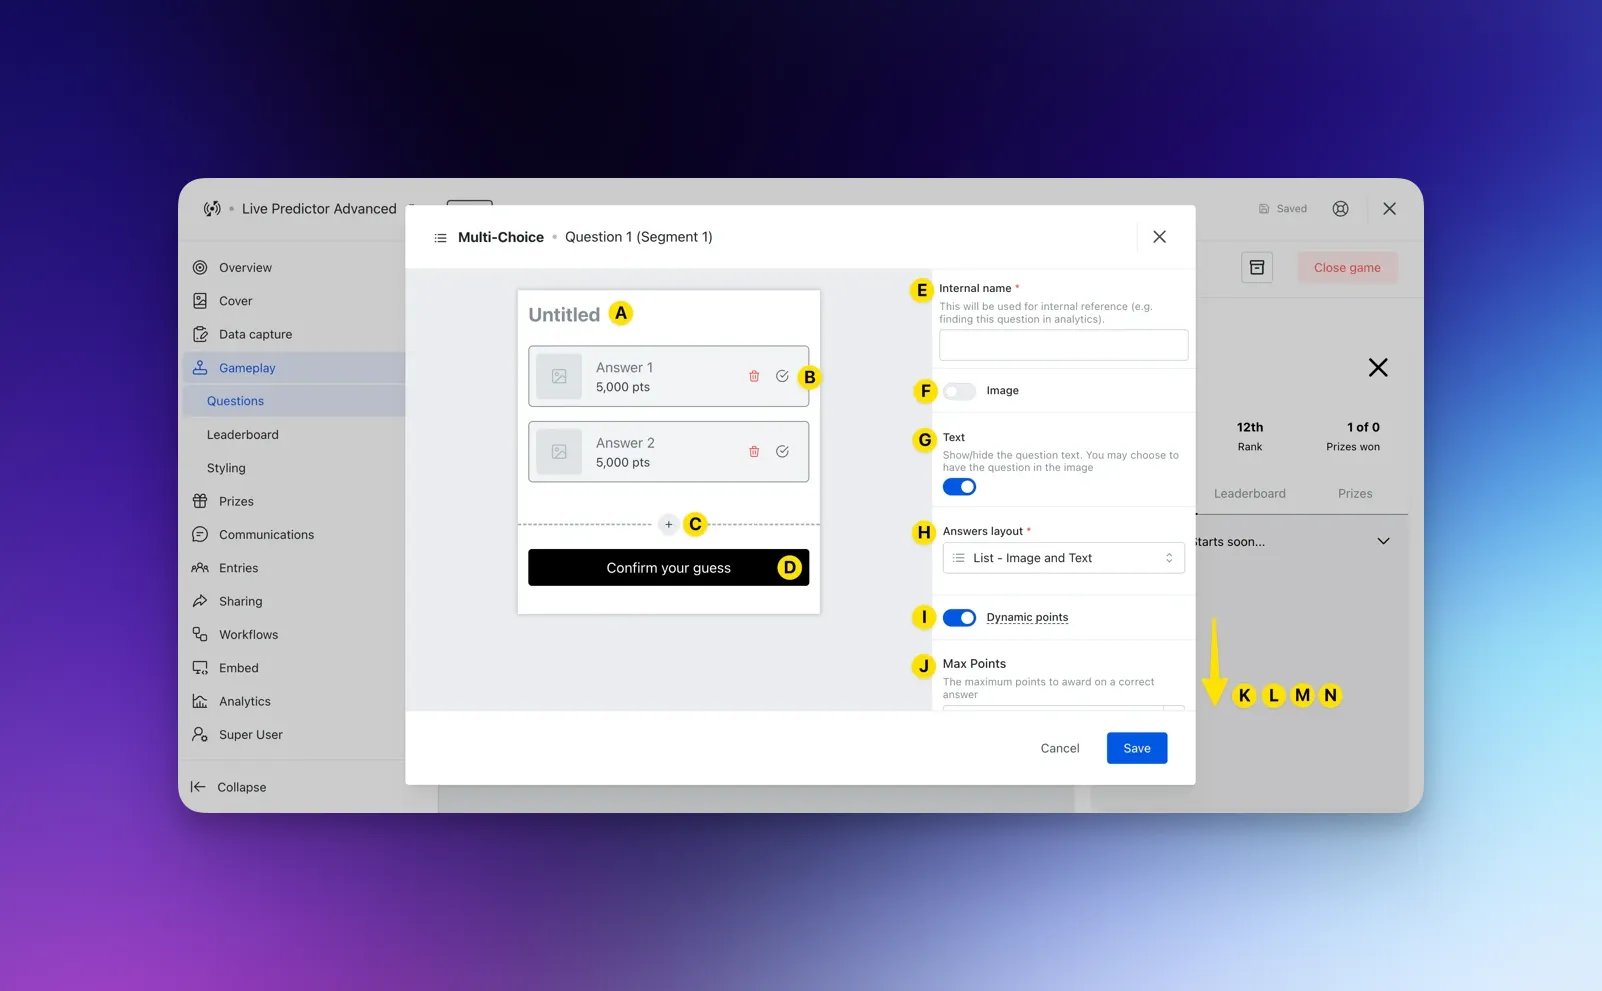 * **(A)** Write in your **question** here, ie: Which player will have the most disposals in the first quarter?
* **(B)** Here you can fill out your **potential answers**. If you'd like to you can turn this multi-choice question into a quiz question by selecting the tick icon next to the correct answer. Otherwise, you will come here following the segment finishing and nominate the correct answer.
* **(C)** Clicking the **+** icon will add another potential answer to the question.
* **(D)** Clicking here will allow you to change the colors of the **CTA bar**.
* **(E)** Here you can add an **internal name** for your question that makes it easy to keep track of.
* **(F)** Toggling this on will allow you to add a **cover image** to the multi-choice question.
* **(G)** You have the option to disable the **question text.**
* **(H)** Changes the **answer layout**.
* **(I)** Here is where the points a user receives will **fluctuate** depending on how popular a result is. You can disable this feature using the toggle.
* **(J)** Here you can adjust the **maximum points** to award an answer and the **minimum points** a correct answer can get.
* **(K)** Here you can alter the **starting point allocation** for each of the different responses, Eg. By setting an answer at 80% it will provide 2,000 pts. You may decide to do this if you want to lower the awarded points by selecting the favourite. Once your card goes live, these point allocations will automatically fluctuate based on user responses.
* **(L)** Here you will also find the option to add a **sponsor tag**, an option that can be used to brand your question.
* **(M)** Scrolling down you will find the option to configure the initial response count in relation to the initial responses score. This will automatically be set as 10 so that the first 10 responses will use the initial responses score before fluctuating based on user responses.
* **(N)** Here you can **delete** the question.
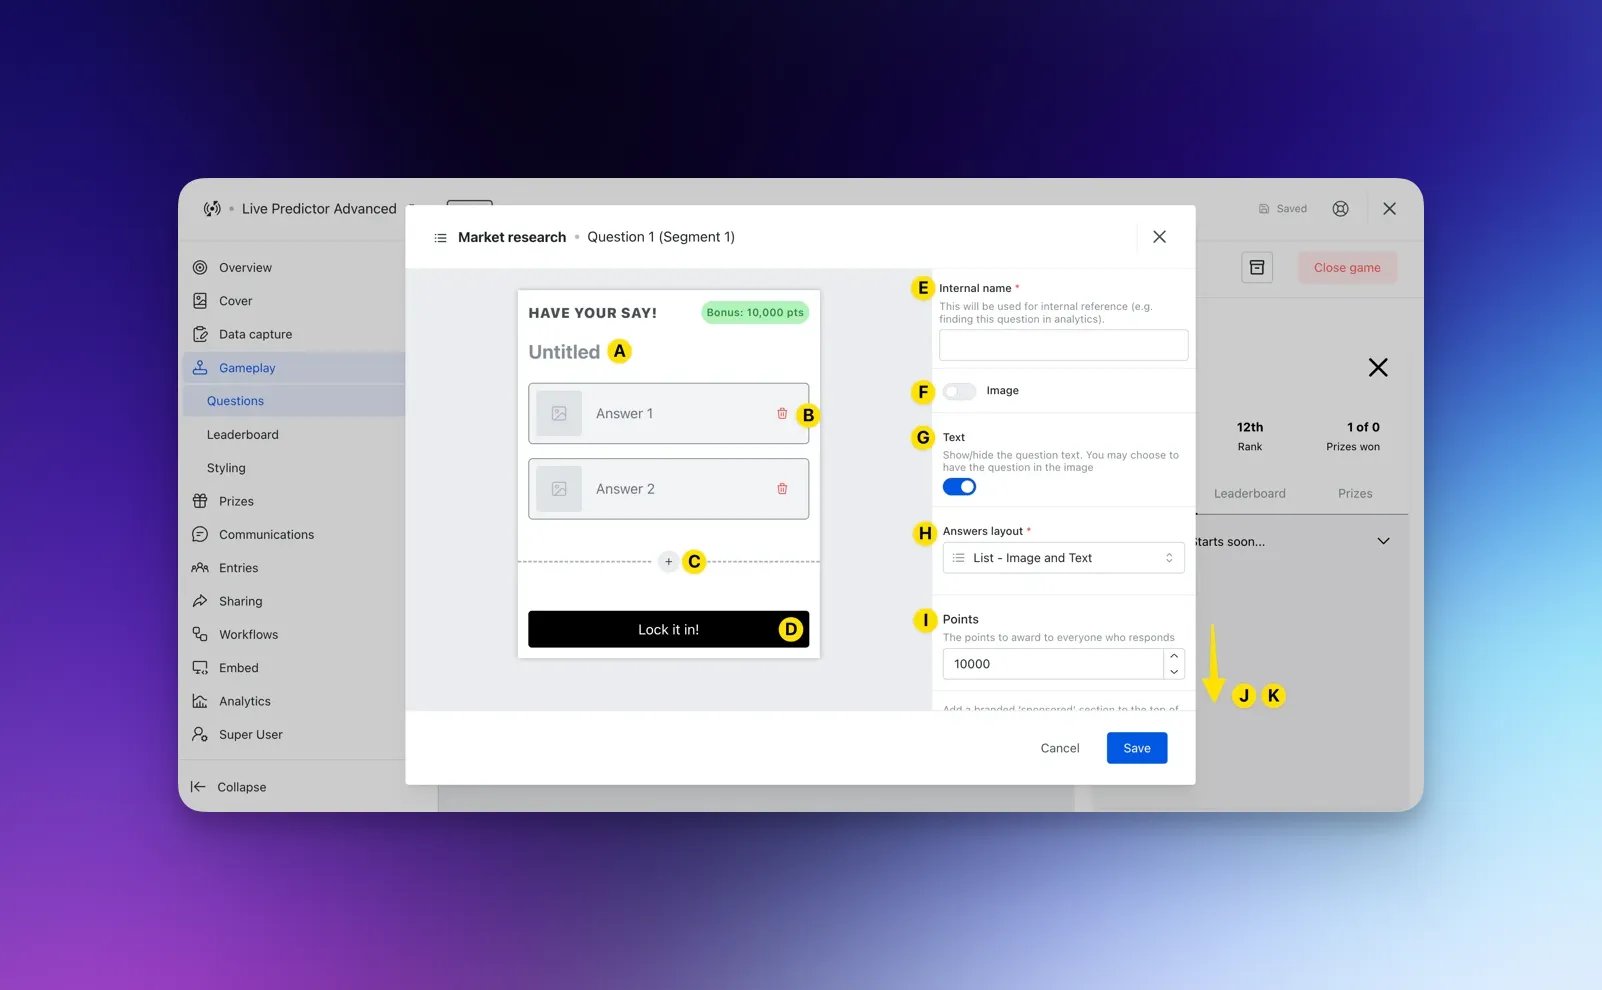
* **(8)** This option adds a **Market Research question (for bonus points)** to your Predictor card, which behaves just like a multi-choice question without the correct answer option.
* **(A)** Write in your **question** here, ie: Which player will have the most disposals in the first quarter?
* **(B)** Here you can fill out your **potential answers**. If you'd like to you can turn this multi-choice question into a quiz question by selecting the tick icon next to the correct answer. Otherwise, you will come here following the segment finishing and nominate the correct answer.
* **(C)** Clicking the **+** icon will add another potential answer to the question.
* **(D)** Clicking here will allow you to change the colors of the **CTA bar**.
* **(E)** Here you can add an **internal name** for your question that makes it easy to keep track of.
* **(F)** Toggling this on will allow you to add a **cover image** to the multi-choice question.
* **(G)** You have the option to disable the **question text.**
* **(H)** Changes the **answer layout**.
* **(I)** Here is where the points a user receives will **fluctuate** depending on how popular a result is. You can disable this feature using the toggle.
* **(J)** Here you can adjust the **maximum points** to award an answer and the **minimum points** a correct answer can get.
* **(K)** Here you can alter the **starting point allocation** for each of the different responses, Eg. By setting an answer at 80% it will provide 2,000 pts. You may decide to do this if you want to lower the awarded points by selecting the favourite. Once your card goes live, these point allocations will automatically fluctuate based on user responses.
* **(L)** Here you will also find the option to add a **sponsor tag**, an option that can be used to brand your question.
* **(M)** Scrolling down you will find the option to configure the initial response count in relation to the initial responses score. This will automatically be set as 10 so that the first 10 responses will use the initial responses score before fluctuating based on user responses.
* **(N)** Here you can **delete** the question.
* **(8)** This option adds a **Market Research question (for bonus points)** to your Predictor card, which behaves just like a multi-choice question without the correct answer option.
 * **(A)** Write in your **question** here, ie: What's your favourite thing about watching the footy?
* **(B)** Here you can fill out your potential **answers**.
* **(C)** Clicking the **+** icon will add another potential answer to the question.
* **(D)** Clicking here will allow you to change the **colors** of the CTA bar.
* **(E)** Here you can add an **internal name** for your question that makes it easier to keep track of.
* **(F)** Toggling this on will allow you to add a **cover image** to the survey question.
* **(G)** You have the option to disable the **question text.**
* **(H)** Changes the **answer layout**.
* **(I)** Here you can edit the number of **points to award** everyone who answers this question.
* **(J)** Toggling this on will allow you to add a **sponsor tag** to your question.
* **(K) Deletes** the question.
* **(9)** This option adds a **slider-based question** to your segment.
* **(A)** Write in your **question** here, ie: What's your favourite thing about watching the footy?
* **(B)** Here you can fill out your potential **answers**.
* **(C)** Clicking the **+** icon will add another potential answer to the question.
* **(D)** Clicking here will allow you to change the **colors** of the CTA bar.
* **(E)** Here you can add an **internal name** for your question that makes it easier to keep track of.
* **(F)** Toggling this on will allow you to add a **cover image** to the survey question.
* **(G)** You have the option to disable the **question text.**
* **(H)** Changes the **answer layout**.
* **(I)** Here you can edit the number of **points to award** everyone who answers this question.
* **(J)** Toggling this on will allow you to add a **sponsor tag** to your question.
* **(K) Deletes** the question.
* **(9)** This option adds a **slider-based question** to your segment.
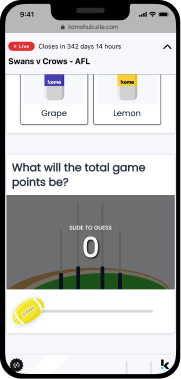
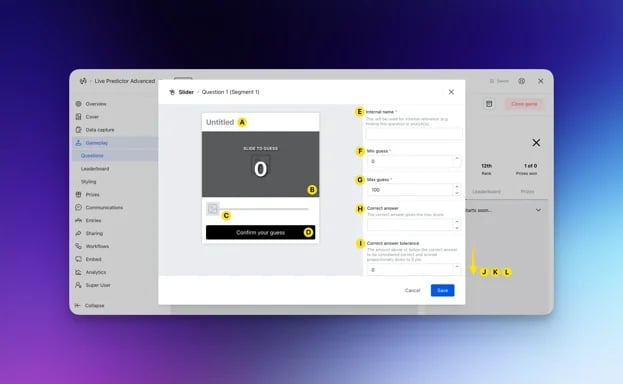 * **(A)** Write in your **question** here, ie: How many disposals will X have?
* **(B)** Add a **background image** here.
* **(C)** Add a **slider icon** here.
* **(D)** Clicking here will allow you to change the **colors** of the CTA bar.
* **(E)** Here you can set an **internal name** for your questions that makes it easier to keep track of.
* **(F)** Sets a **minimum point** in the guessing range.
* **(G)** Sets a **maximum point** in the guessing range.
* **(H)** Once you know the **correct response** to your question, you can set the correct answer here when revealing answers.
* **(I)** For number guess questions if entrants guess within the set **tolerance**. Users will receive more points for how close they are to the correct answer.
* **(J)** You can set the number of **points to award** the correct answer.
* **(K)** Toggling this on will allow you to add a **sponsor tag** to your question.
* **(L) Deletes** the question.
* **(10)** If you're wanting to push a segment to **go live manually**, click on the **play** **icon**. Alternatively, you can schedule the segment to go live by selecting the calendar icon.
* **(11)** Here you can view all **archived** segments.
* **(12)** This option **closes** the card.
### ***Step 5: Schedule and close Questions (Optional)***
* **(A)** Write in your **question** here, ie: How many disposals will X have?
* **(B)** Add a **background image** here.
* **(C)** Add a **slider icon** here.
* **(D)** Clicking here will allow you to change the **colors** of the CTA bar.
* **(E)** Here you can set an **internal name** for your questions that makes it easier to keep track of.
* **(F)** Sets a **minimum point** in the guessing range.
* **(G)** Sets a **maximum point** in the guessing range.
* **(H)** Once you know the **correct response** to your question, you can set the correct answer here when revealing answers.
* **(I)** For number guess questions if entrants guess within the set **tolerance**. Users will receive more points for how close they are to the correct answer.
* **(J)** You can set the number of **points to award** the correct answer.
* **(K)** Toggling this on will allow you to add a **sponsor tag** to your question.
* **(L) Deletes** the question.
* **(10)** If you're wanting to push a segment to **go live manually**, click on the **play** **icon**. Alternatively, you can schedule the segment to go live by selecting the calendar icon.
* **(11)** Here you can view all **archived** segments.
* **(12)** This option **closes** the card.
### ***Step 5: Schedule and close Questions (Optional)***
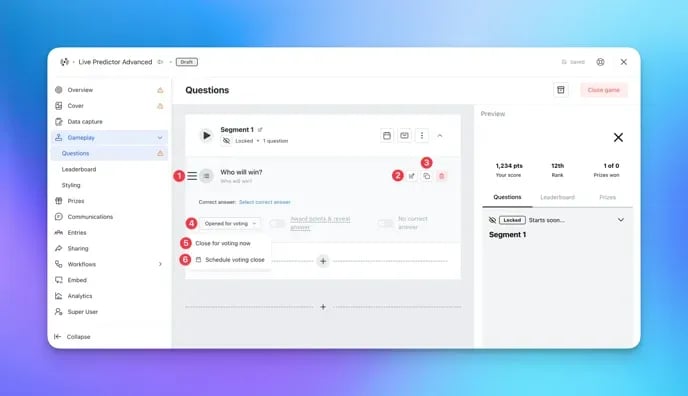 * **(1)** Using the burger menu, click and drag to **rearrange** questions.
* **(2) Edit** the question here.
* **(3)** Click here to **clone** the question.
* **(4)** Using the drop-down, you can **(5) manually close** the question or **(6) schedule** for the question to close.
### ***Step 6: Add another Segment (Optional)***
* **(1)** Using the burger menu, click and drag to **rearrange** questions.
* **(2) Edit** the question here.
* **(3)** Click here to **clone** the question.
* **(4)** Using the drop-down, you can **(5) manually close** the question or **(6) schedule** for the question to close.
### ***Step 6: Add another Segment (Optional)***
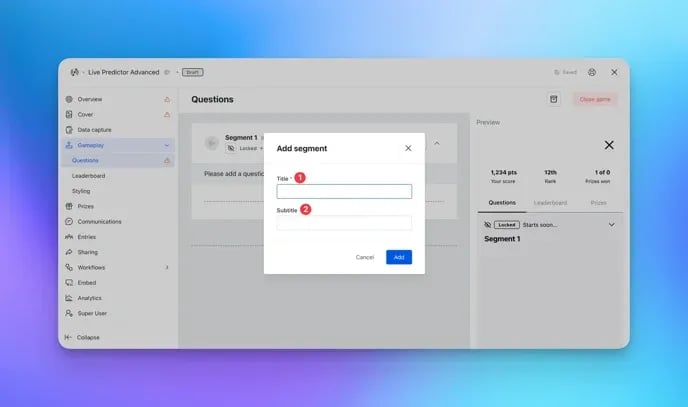 * If you'd like to add another segment to the card, do this by selecting the **plus icon** at the bottom in the grey area.
* **(1)** Add a **name** to your segment.
* **(2)** Add an option **subtitle** to your segment.
### **Step 7: Style your Leaderboard**
* If you'd like to add another segment to the card, do this by selecting the **plus icon** at the bottom in the grey area.
* **(1)** Add a **name** to your segment.
* **(2)** Add an option **subtitle** to your segment.
### **Step 7: Style your Leaderboard**
 * **(1)** Edit the number of **entries** that the leaderboard displays. If a user is currently placed outside the number of entries you select, they can still see where they placed by looking at the top of the leaderboard.
* **(2)** This option shortens displayed names to an **abbreviated** version.
* **(3)** This toggle allows you to **preview** names on the leaderboard before real participant data is available.
* **(4)** You can enable a leaderboard for every **active segment**.
* **(5)** Alters the **colors** of the ranking items.
### **Step 8: Style your Live Predictor**
* **(1)** Edit the number of **entries** that the leaderboard displays. If a user is currently placed outside the number of entries you select, they can still see where they placed by looking at the top of the leaderboard.
* **(2)** This option shortens displayed names to an **abbreviated** version.
* **(3)** This toggle allows you to **preview** names on the leaderboard before real participant data is available.
* **(4)** You can enable a leaderboard for every **active segment**.
* **(5)** Alters the **colors** of the ranking items.
### **Step 8: Style your Live Predictor**
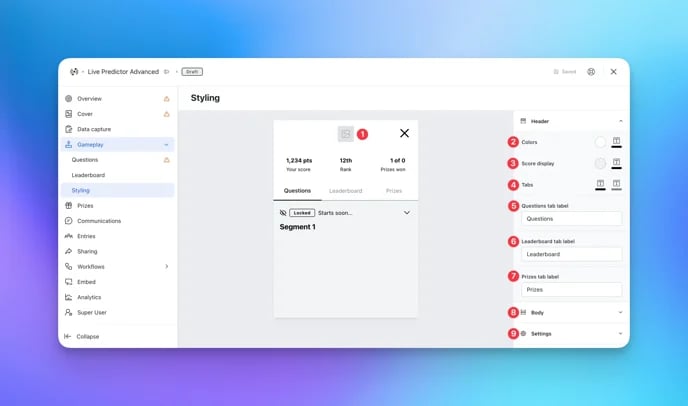 * **(1)** Add a **logo** to the header of the Predictor card.
* **(2)** Changing these colors will change the color of your Predictor card's title and **header background**.
* **(3)** Alter the **score background and text colors.**
* **(4)** Changes the highlighting color of the **active and inactive titles**.
* **(5)** + **(6) +(7)** Update the **title** for each tab.
* **(8)** Edit the **body** of the Live Predictor.
* **(1)** Add a **logo** to the header of the Predictor card.
* **(2)** Changing these colors will change the color of your Predictor card's title and **header background**.
* **(3)** Alter the **score background and text colors.**
* **(4)** Changes the highlighting color of the **active and inactive titles**.
* **(5)** + **(6) +(7)** Update the **title** for each tab.
* **(8)** Edit the **body** of the Live Predictor.
 * **(A)** Changes the colors of the **body**.
* **(B)** Toggles the ability to set a **background image** on your Predictor card.
* **(C)** Applies a colored **overlay** to the background of your Predictor card.
* **(D)** Add a **banner image** to the **footer** of your Predictor card.
* **(9)** Edit additional **settings** of your Live Predictor.
* **(A)** Changes the colors of the **body**.
* **(B)** Toggles the ability to set a **background image** on your Predictor card.
* **(C)** Applies a colored **overlay** to the background of your Predictor card.
* **(D)** Add a **banner image** to the **footer** of your Predictor card.
* **(9)** Edit additional **settings** of your Live Predictor.
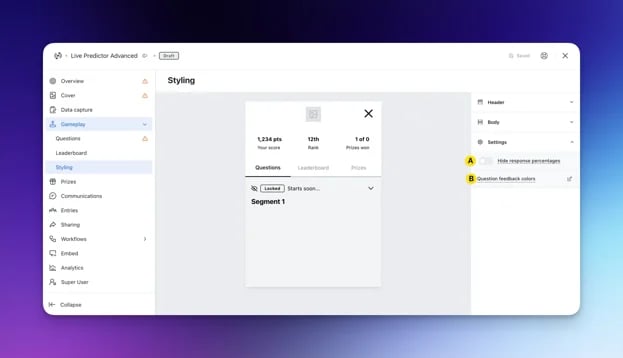 * **(A)** Here you have the option to **hide the response percentages**.
* **(B)** Here you can configure the color of the **answer borders** when a user submits their predictions.
* **(A)** Here you have the option to **hide the response percentages**.
* **(B)** Here you can configure the color of the **answer borders** when a user submits their predictions.  * **(a)** For each feedback, here you'll edit the **border** of a selected answer.
* **(b)** For each feedback, here you'll edit the **color** of text within the border.
### **Step 9: Add your Prizes**
* **(a)** For each feedback, here you'll edit the **border** of a selected answer.
* **(b)** For each feedback, here you'll edit the **color** of text within the border.
### **Step 9: Add your Prizes**
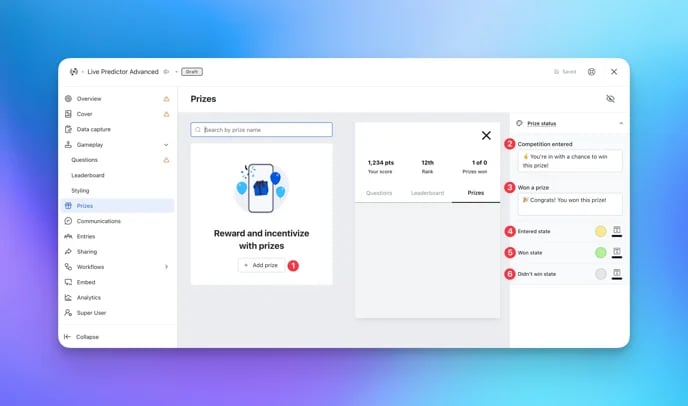 * **(1)** Here you can add your **prize/s.**
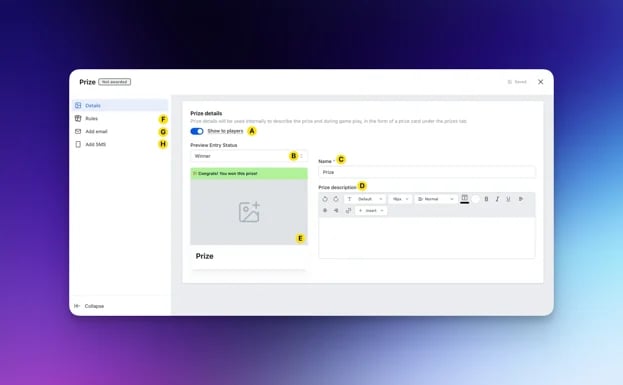 * **(A) Hide** this prize from end users.
* **(B)** This option will allow you to cycle and preview the different **entry status** options.
* **(C)** Set a **name** for the prize.
* **(D)** Provide a **description** and overview of the prize and include details on how to enter.
* **(E)** Upload an **image** for the prize.
* **(F)** This is where you will set the **awarding rule** for the prize, for an in-depth breakdown on how to correctly configure this setting click [here.](/competitions-promotions/setup-management/prizes-and-comms/index)
* **(G)** **+ (H)** Configure the **Communications** associated with the prize here. If you'd like an in-depth breakdown of Email or SMS communications click [here](/competitions-promotions/setup-management/prizes-and-comms/index).
* **(A) Hide** this prize from end users.
* **(B)** This option will allow you to cycle and preview the different **entry status** options.
* **(C)** Set a **name** for the prize.
* **(D)** Provide a **description** and overview of the prize and include details on how to enter.
* **(E)** Upload an **image** for the prize.
* **(F)** This is where you will set the **awarding rule** for the prize, for an in-depth breakdown on how to correctly configure this setting click [here.](/competitions-promotions/setup-management/prizes-and-comms/index)
* **(G)** **+ (H)** Configure the **Communications** associated with the prize here. If you'd like an in-depth breakdown of Email or SMS communications click [here](/competitions-promotions/setup-management/prizes-and-comms/index).
 You can set up **Live Prize Awarding**. Once a user reaches a certain threshold of points or answers x amount of questions (correct), they are awarded a prize instantly when the parameters are met.
* **(1)** Select **Live** **prize awarding** and set **limits** if you have a certain number of prizes to available.
* **(2)** Under **When** selecting the parameters on how to win this prize.
You can set up **Live Prize Awarding**. Once a user reaches a certain threshold of points or answers x amount of questions (correct), they are awarded a prize instantly when the parameters are met.
* **(1)** Select **Live** **prize awarding** and set **limits** if you have a certain number of prizes to available.
* **(2)** Under **When** selecting the parameters on how to win this prize.  When you save your live prize awarding rule, you will see the above message displayed and have the option to choose to start live prize awarding now or delay it. If you choose to delay live prize awarding, head back to the **Prizes** tab, click on the three dots next to the prize and then select **Enable prize awarding** when you are ready to begin.
* **(2) + (3)** Edit the prize status **banner copy**.
* **(4)** Here you can alter the colors associated with an **entered state**.
* **(5)** Alter the colors corresponding to a **won state**.
* **(6)** Alter the colors corresponding to the state where the **entrant hasn't won**.
### Step 10: Add your Communications
* To add email or SMS communications to your Live Predictor Card, follow the steps in [this Knowledge Base article](/competitions-promotions/setup-management/prizes-and-comms/index).
We see a lot of our customers use their communications to remind their users to return to the Hub to cast their predictions on new segments!
### **Step 11: Publish your card**
When you save your live prize awarding rule, you will see the above message displayed and have the option to choose to start live prize awarding now or delay it. If you choose to delay live prize awarding, head back to the **Prizes** tab, click on the three dots next to the prize and then select **Enable prize awarding** when you are ready to begin.
* **(2) + (3)** Edit the prize status **banner copy**.
* **(4)** Here you can alter the colors associated with an **entered state**.
* **(5)** Alter the colors corresponding to a **won state**.
* **(6)** Alter the colors corresponding to the state where the **entrant hasn't won**.
### Step 10: Add your Communications
* To add email or SMS communications to your Live Predictor Card, follow the steps in [this Knowledge Base article](/competitions-promotions/setup-management/prizes-and-comms/index).
We see a lot of our customers use their communications to remind their users to return to the Hub to cast their predictions on new segments!
### **Step 11: Publish your card**
 **Once you've completed all of these steps and are happy with all the aspects of your card, it's time to get it live!**
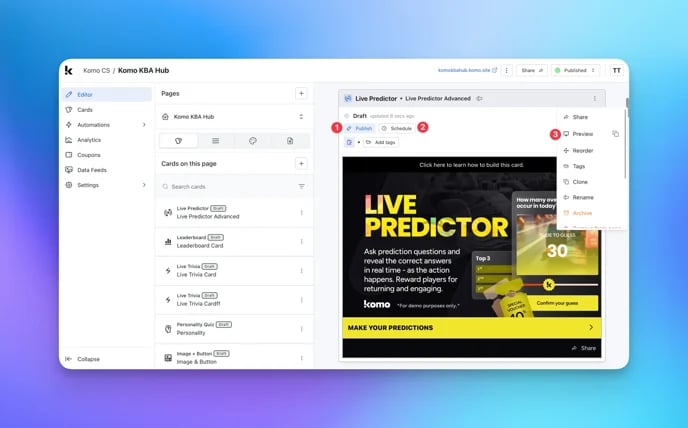
* **(1)** **Publish** your card manually and instantly for the world to see.
* **(2)** **Schedule** your card to be published and unpublished at set dates and times.
* **(3)** Click on **...** to **Preview** and interact with the card on the front end from a user's perspective before publishing it. See how to test your card [here](/getting-started/hub-setup/card-testing/index).
All competition entries will be recorded and will impact the card analytics.
## "Go live" checklist
Ready to go live with your Live Predictor? We recommend reviewing the following list before launching and double-checking if you have:
* All images uploaded are the **correct dimensions**. Export image files in 2x to ensure none of the images appear pixelated.
* Added all your questions (including imagery where possible).
* Used **survey** and [**market research**](https://blog.komo.tech/how-businesses-are-using-komo-for-market-research) questions to gain insights and user-generated social media content.
* Created [**personalized communications**](/interactive-features/features/personalised-prizing/index) for your market research questions.
* Each **segment is clearly labeled** based on your event e.g. for an AFL match it will be "Round 1 Melbourne vs Adelaide Crows".
* Make sure you have the **eye icon** marked as visible so your audience is able to see what segments you have ready or available. You can learn more about it [here](#step-4-create-a-segment).
* You have **scheduled the segment** to open and close, if you know the start and end date and time of your event. This is so you won't need forget or need to close the segment manually before your event is live.
* Change the color of the **question CTA bar** to your brand colors.
* Hyperlinked your [T\&C's](/getting-started/resources/terms-conditions/index) to the opt in-field, which is created in the **data capture** section of the settings tab.
* All your **communications** (Major Prize Winner, Minor Prize Winner, Everybody Else, Registration) are fully set up and ready to send. If you have communications scheduled for your segments, ensure these are ready to send at the correct date and time.
* If you are using **coupons**, make sure the coupons created are set up correctly. Check the coupon limits are set, the copy for each screen is right and you have linked the appropriate coupons to your communications.
* Ensure your **Prizes** and the awarding rules are set up correctly. If you have **Live prize awarding** as your award, make sure you **enable** this feature, you can see how to do so [here.](#step-6-add-another-segment-optional)
* Edit the **leaderboard** and **gameplay styling** to your brand colors. Make use of the **Advanced styling** tab to adjust the color of each border question feedback.
Then you're ready to go live!
Want to know how to run your predictor?
Click here for some promotion ideas
## FAQ
**What's the difference between a Basic and Advanced Live Predictor card?**
With the basic version of the card you will simply nominate a correct answer based on the event's outcome. However, with the advanced version there is a point allocation element that may encourage users to make strategic predictions.
**What does a segment refer to?**
A segment simply refers to a portion of your event/events. For a sports game a segment may be an individual quarter or if you're running a season-long competition an individual game. For a reality TV show, one segment may be one episode. how you choose to break down your Live Predictor card is entirely up to you.
## Top tips
* If you have multiple segments, it is recommended to have at least 3 questions in each segment. If you have just one segment, look at having a minimum of 5 questions for maximum engagement.
* Include at least one survey and/or slider question. Allowing your audience to answer questions in different ways makes things interesting instead of voting on multi-choice questions.
* Alter the point allocations for multi-choice questions. Make things interesting by allocating more points to the least favorite option and get people thinking about who/what to vote on!
**Once you've completed all of these steps and are happy with all the aspects of your card, it's time to get it live!**
* **(1)** **Publish** your card manually and instantly for the world to see.
* **(2)** **Schedule** your card to be published and unpublished at set dates and times.
* **(3)** Click on **...** to **Preview** and interact with the card on the front end from a user's perspective before publishing it. See how to test your card [here](/getting-started/hub-setup/card-testing/index).
All competition entries will be recorded and will impact the card analytics.
## "Go live" checklist
Ready to go live with your Live Predictor? We recommend reviewing the following list before launching and double-checking if you have:
* All images uploaded are the **correct dimensions**. Export image files in 2x to ensure none of the images appear pixelated.
* Added all your questions (including imagery where possible).
* Used **survey** and [**market research**](https://blog.komo.tech/how-businesses-are-using-komo-for-market-research) questions to gain insights and user-generated social media content.
* Created [**personalized communications**](/interactive-features/features/personalised-prizing/index) for your market research questions.
* Each **segment is clearly labeled** based on your event e.g. for an AFL match it will be "Round 1 Melbourne vs Adelaide Crows".
* Make sure you have the **eye icon** marked as visible so your audience is able to see what segments you have ready or available. You can learn more about it [here](#step-4-create-a-segment).
* You have **scheduled the segment** to open and close, if you know the start and end date and time of your event. This is so you won't need forget or need to close the segment manually before your event is live.
* Change the color of the **question CTA bar** to your brand colors.
* Hyperlinked your [T\&C's](/getting-started/resources/terms-conditions/index) to the opt in-field, which is created in the **data capture** section of the settings tab.
* All your **communications** (Major Prize Winner, Minor Prize Winner, Everybody Else, Registration) are fully set up and ready to send. If you have communications scheduled for your segments, ensure these are ready to send at the correct date and time.
* If you are using **coupons**, make sure the coupons created are set up correctly. Check the coupon limits are set, the copy for each screen is right and you have linked the appropriate coupons to your communications.
* Ensure your **Prizes** and the awarding rules are set up correctly. If you have **Live prize awarding** as your award, make sure you **enable** this feature, you can see how to do so [here.](#step-6-add-another-segment-optional)
* Edit the **leaderboard** and **gameplay styling** to your brand colors. Make use of the **Advanced styling** tab to adjust the color of each border question feedback.
Then you're ready to go live!
Want to know how to run your predictor?
Click here for some promotion ideas
## FAQ
**What's the difference between a Basic and Advanced Live Predictor card?**
With the basic version of the card you will simply nominate a correct answer based on the event's outcome. However, with the advanced version there is a point allocation element that may encourage users to make strategic predictions.
**What does a segment refer to?**
A segment simply refers to a portion of your event/events. For a sports game a segment may be an individual quarter or if you're running a season-long competition an individual game. For a reality TV show, one segment may be one episode. how you choose to break down your Live Predictor card is entirely up to you.
## Top tips
* If you have multiple segments, it is recommended to have at least 3 questions in each segment. If you have just one segment, look at having a minimum of 5 questions for maximum engagement.
* Include at least one survey and/or slider question. Allowing your audience to answer questions in different ways makes things interesting instead of voting on multi-choice questions.
* Alter the point allocations for multi-choice questions. Make things interesting by allocating more points to the least favorite option and get people thinking about who/what to vote on!
 * Alter the point allocations for multi-choice questions. Make things interesting by allocating more points to the least favorite option and get people thinking about who/what to vote on!
* Make use of the Live prize awarding. Reward your audience instantly throughout your event for them to use the prize in-venue/straight away!
* Make sure to enable Live prize-awarding. You can do this by clicking the **...** icon next to the prize and selecting Enable prize awarding.
* You can create quiz types of questions in your game. In your multi-choice question, click on the Tick icon located next to the answers to select the correct answer.
* Alter the point allocations for multi-choice questions. Make things interesting by allocating more points to the least favorite option and get people thinking about who/what to vote on!
* Make use of the Live prize awarding. Reward your audience instantly throughout your event for them to use the prize in-venue/straight away!
* Make sure to enable Live prize-awarding. You can do this by clicking the **...** icon next to the prize and selecting Enable prize awarding.
* You can create quiz types of questions in your game. In your multi-choice question, click on the Tick icon located next to the answers to select the correct answer.
 * Remember to close segments as particular games or events end. You can manually close segments or schedule them to close on a certain day and time. This is to prevent users from predicting questions that have already occurred.
 * You can only publish a segment to go live once! If you have a segment scheduled, double-check the date and time it is scheduled to publish, and if you are to publish it manually, make sure you are 100% sure you want to push it live. If you close a segment you accidentally pushed live, you will need to recreate that segment and push it live again at the right time.
* Display your prizes with the top/first prize on top and the other prizes below. This is so users know the grand prize they could potentially win when they play.
* Name each prize by rank e.g. 1st Prize - Tickets to the Finals, 2nd Prize - Gift Voucher etc. Include in the prize description how to win that prize e.g. Rank 1st, reach 10,000 points, everyone who enters etc.
* You can only publish a segment to go live once! If you have a segment scheduled, double-check the date and time it is scheduled to publish, and if you are to publish it manually, make sure you are 100% sure you want to push it live. If you close a segment you accidentally pushed live, you will need to recreate that segment and push it live again at the right time.
* Display your prizes with the top/first prize on top and the other prizes below. This is so users know the grand prize they could potentially win when they play.
* Name each prize by rank e.g. 1st Prize - Tickets to the Finals, 2nd Prize - Gift Voucher etc. Include in the prize description how to win that prize e.g. Rank 1st, reach 10,000 points, everyone who enters etc.