> ## Documentation Index
> Fetch the complete documentation index at: https://knowledge.komo.tech/llms.txt
> Use this file to discover all available pages before exploring further.
# Live Trivia
> Multiplayer trivia games to engage any audience.
## What is it?
Live Trivia allows you to run a multiplayer trivia game in real-time. It is a great tool to entertain and collect market research data. Live Trivia can be seamlessly integrated into a range of marketing campaigns and is excellent for in-venue activations.
## How do I build one?
### Step 1: Add a Live Trivia to your Hub
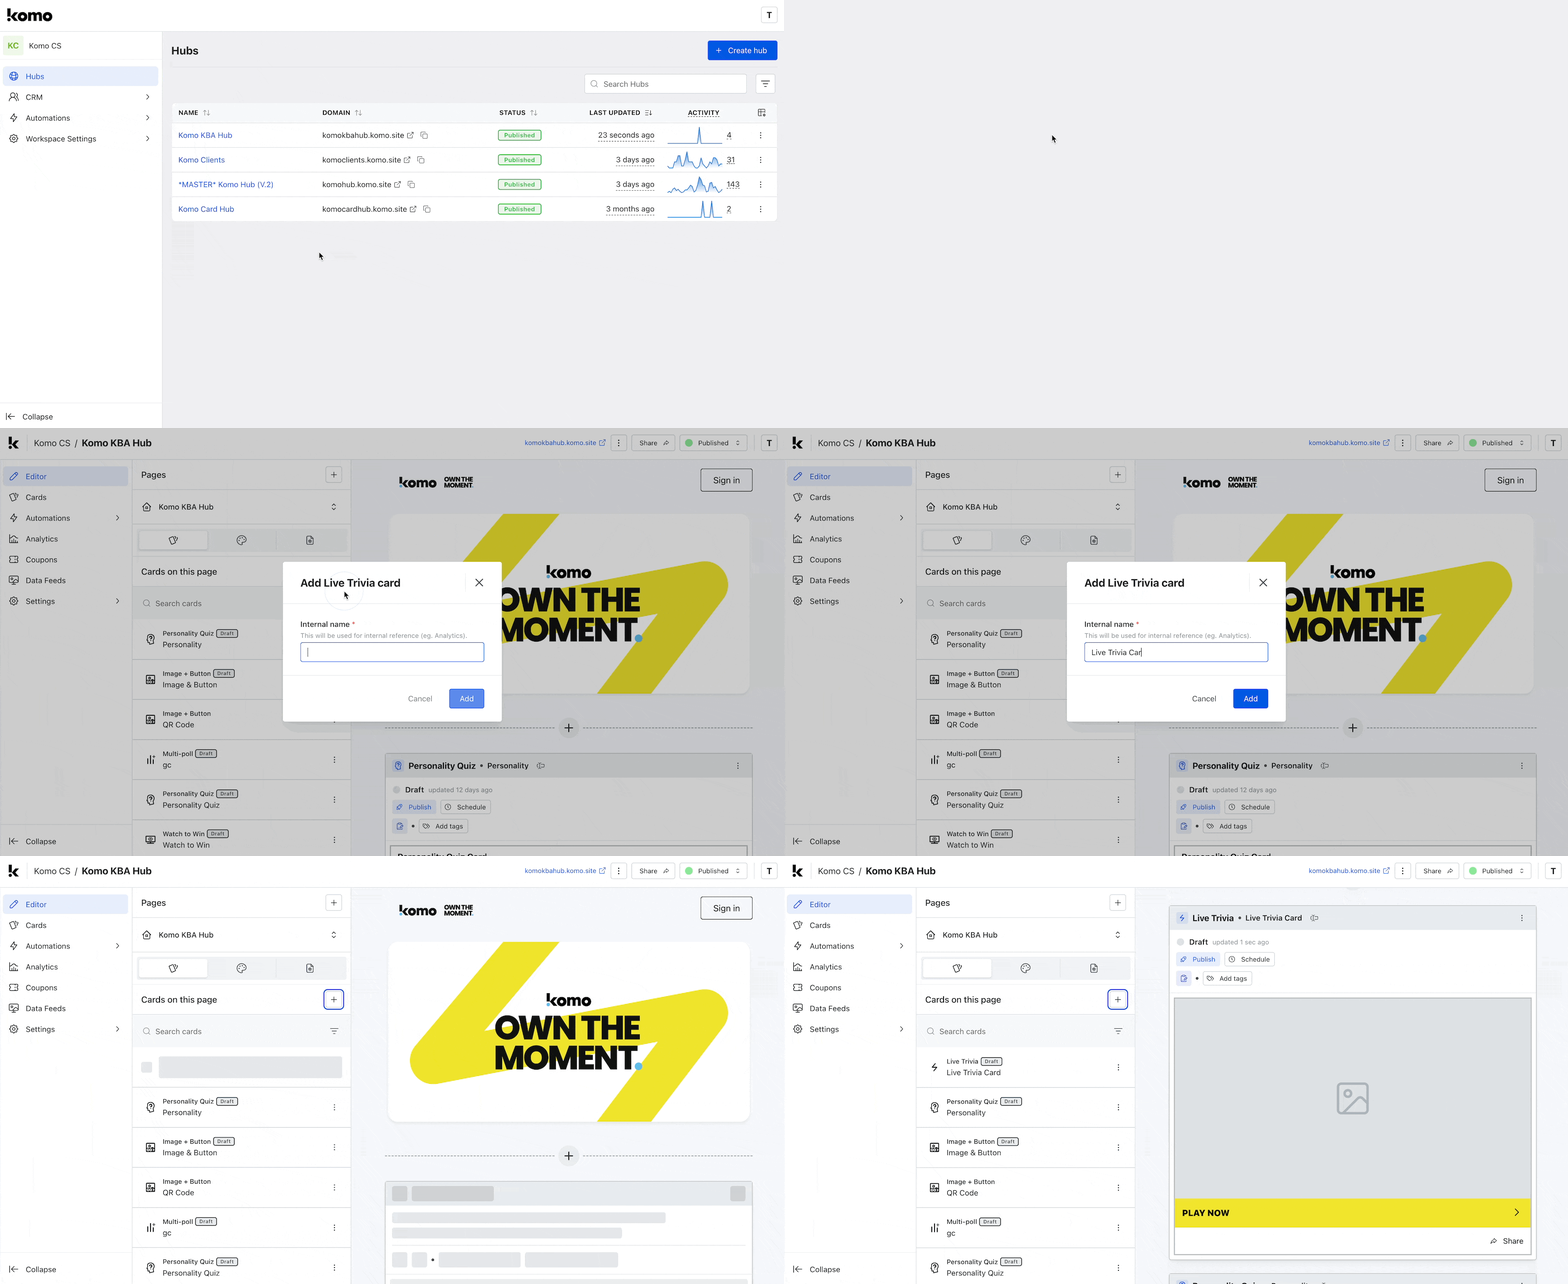 * Navigate to your **Engagement Hub**.
* Once there, click the **Plus icon,** select **Games** and then **Live Trivia.**
* Input an **internal name** for the card and click **Add.**
* You will then see your new card has been added to your Hub.
### **Step 2: Set up your Live Trivia start time**
* Clicking on the **Live Trivia** will open the editing module.
* **(1)** Allows you to set the **duration** and your Live Trivia's start/finish time.
* Navigate to your **Engagement Hub**.
* Once there, click the **Plus icon,** select **Games** and then **Live Trivia.**
* Input an **internal name** for the card and click **Add.**
* You will then see your new card has been added to your Hub.
### **Step 2: Set up your Live Trivia start time**
* Clicking on the **Live Trivia** will open the editing module.
* **(1)** Allows you to set the **duration** and your Live Trivia's start/finish time.
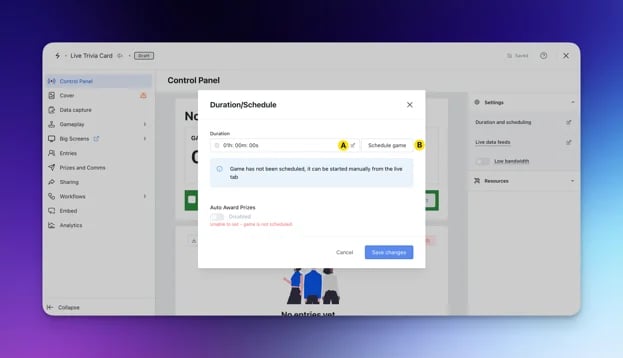 When running a Live Trivia in-venue we recommend setting a game duration of around 2 minutes and manually starting your trivia rather than scheduling it. For a guide on running your Live Trivia in-venue click [here](/support-resources/general/running-your-live-trivia-in-venue). When not running a Live Trivia in-venue, we recommend setting a game duration of 5 days and scheduling your Live Trivia.
* **(A)** Set how long your game will run for.
* **(B)** Set the start and finish time of your Live Trivia game.
When running a Live Trivia in-venue we recommend setting a game duration of around 2 minutes and manually starting your trivia rather than scheduling it. For a guide on running your Live Trivia in-venue click [here](/support-resources/general/running-your-live-trivia-in-venue). When not running a Live Trivia in-venue, we recommend setting a game duration of 5 days and scheduling your Live Trivia.
* **(A)** Set how long your game will run for.
* **(B)** Set the start and finish time of your Live Trivia game. 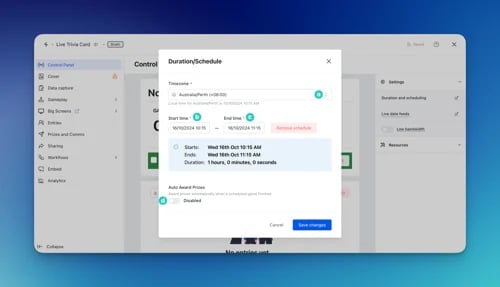 * **(a)** Select the **timezone**.
* **(b)** Set the **start** date and time of the trivia.
* **(c)** Set the **end** date and time for the trivia.
* **(d)** Toggling this option on will automatically award the prizes once the Live Trivia game ends.
This feature requires the Live Trivia to be scheduled to be enabled.
* **(2)** Add **live data feeds**. These are optional, however, we highly recommend adding them if you are running your Live Trivia in-venue as they provide an additional point of engagement for your audience.
Live data feeds work by pulling through data from your entrant's responses to your Live Trivia questions and then displaying it in a fun & engaging manner for your crowd. Below is a list of the live data feeds;
* **Leaderboard:** The Leaderboard screen will display the top 10 current high scores in your Komo Live competition.
* **Beat the expert:** To get your players excited at the possibility to beat the experts, use the 'beat the expert' screen. Simply input the expert's score in the screen set-up settings and your screen is ready to go.
* **Question results:** The question results screens pull the live results to a selected question and displays it on the big screen.
* **Hardest question:** This action screen shows the most challenging question and the percentage of people who answered incorrectly.
* **Smartest team:** The smartest team screen pits teams opposing each other by revealing which team has scored the highest.
* **(a)** Select the **timezone**.
* **(b)** Set the **start** date and time of the trivia.
* **(c)** Set the **end** date and time for the trivia.
* **(d)** Toggling this option on will automatically award the prizes once the Live Trivia game ends.
This feature requires the Live Trivia to be scheduled to be enabled.
* **(2)** Add **live data feeds**. These are optional, however, we highly recommend adding them if you are running your Live Trivia in-venue as they provide an additional point of engagement for your audience.
Live data feeds work by pulling through data from your entrant's responses to your Live Trivia questions and then displaying it in a fun & engaging manner for your crowd. Below is a list of the live data feeds;
* **Leaderboard:** The Leaderboard screen will display the top 10 current high scores in your Komo Live competition.
* **Beat the expert:** To get your players excited at the possibility to beat the experts, use the 'beat the expert' screen. Simply input the expert's score in the screen set-up settings and your screen is ready to go.
* **Question results:** The question results screens pull the live results to a selected question and displays it on the big screen.
* **Hardest question:** This action screen shows the most challenging question and the percentage of people who answered incorrectly.
* **Smartest team:** The smartest team screen pits teams opposing each other by revealing which team has scored the highest.
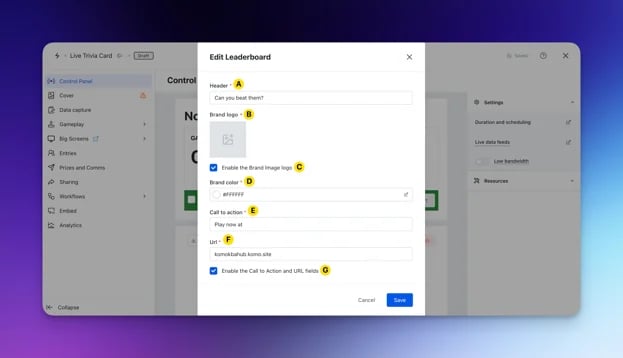 Each live data feed is set up a little bit different, however, as a basis, these are the general settings.
* **(A)** The live data feed's **header title**.
* **(B)** Upload your **brand's logo** or **(C)** disable the logo here.\
The recommended sizing is 300w x 300h with a transparent background.
* **(D)** Select your **brand's color**. We highly recommend not using black as it won't appear against the action screen's background.
* **(E)** Add a **call-to-action**.
* **(F)** Enter the **URL** people can enter to play your Live Trivia or **(G)** disable the URL here.
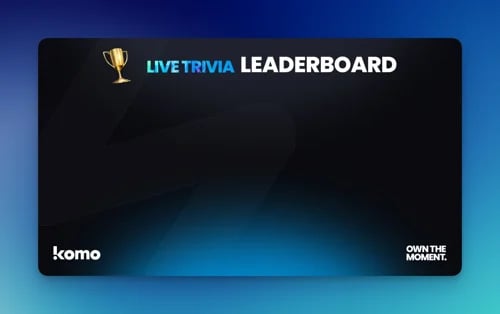
Below is an example of a Leaderboard live data feed.
Each live data feed is set up a little bit different, however, as a basis, these are the general settings.
* **(A)** The live data feed's **header title**.
* **(B)** Upload your **brand's logo** or **(C)** disable the logo here.\
The recommended sizing is 300w x 300h with a transparent background.
* **(D)** Select your **brand's color**. We highly recommend not using black as it won't appear against the action screen's background.
* **(E)** Add a **call-to-action**.
* **(F)** Enter the **URL** people can enter to play your Live Trivia or **(G)** disable the URL here.
Below is an example of a Leaderboard live data feed.
 * **(3)** Toggles **Low-bandwidth** mode on/off. You may decide to use this option in areas with poor mobile reception.
* **(4)** Here you can view the relevant **resources** to build the Live Trivia.
* **(5)** If you are **manually** starting your Live Trivia ie: at an in-venue event, this is where you will start the Live Trivia.
* **(6)** At any point throughout the Live Trivia, you can click this button to download a **.CSV file**. Within this file, you will receive all the information relating to users' responses to your form and Live Trivia questions.
* **(7)** Here you view all **disqualified** entrants.
### Step 3: Add a Cover to your Live Trivia card
* **(3)** Toggles **Low-bandwidth** mode on/off. You may decide to use this option in areas with poor mobile reception.
* **(4)** Here you can view the relevant **resources** to build the Live Trivia.
* **(5)** If you are **manually** starting your Live Trivia ie: at an in-venue event, this is where you will start the Live Trivia.
* **(6)** At any point throughout the Live Trivia, you can click this button to download a **.CSV file**. Within this file, you will receive all the information relating to users' responses to your form and Live Trivia questions.
* **(7)** Here you view all **disqualified** entrants.
### Step 3: Add a Cover to your Live Trivia card
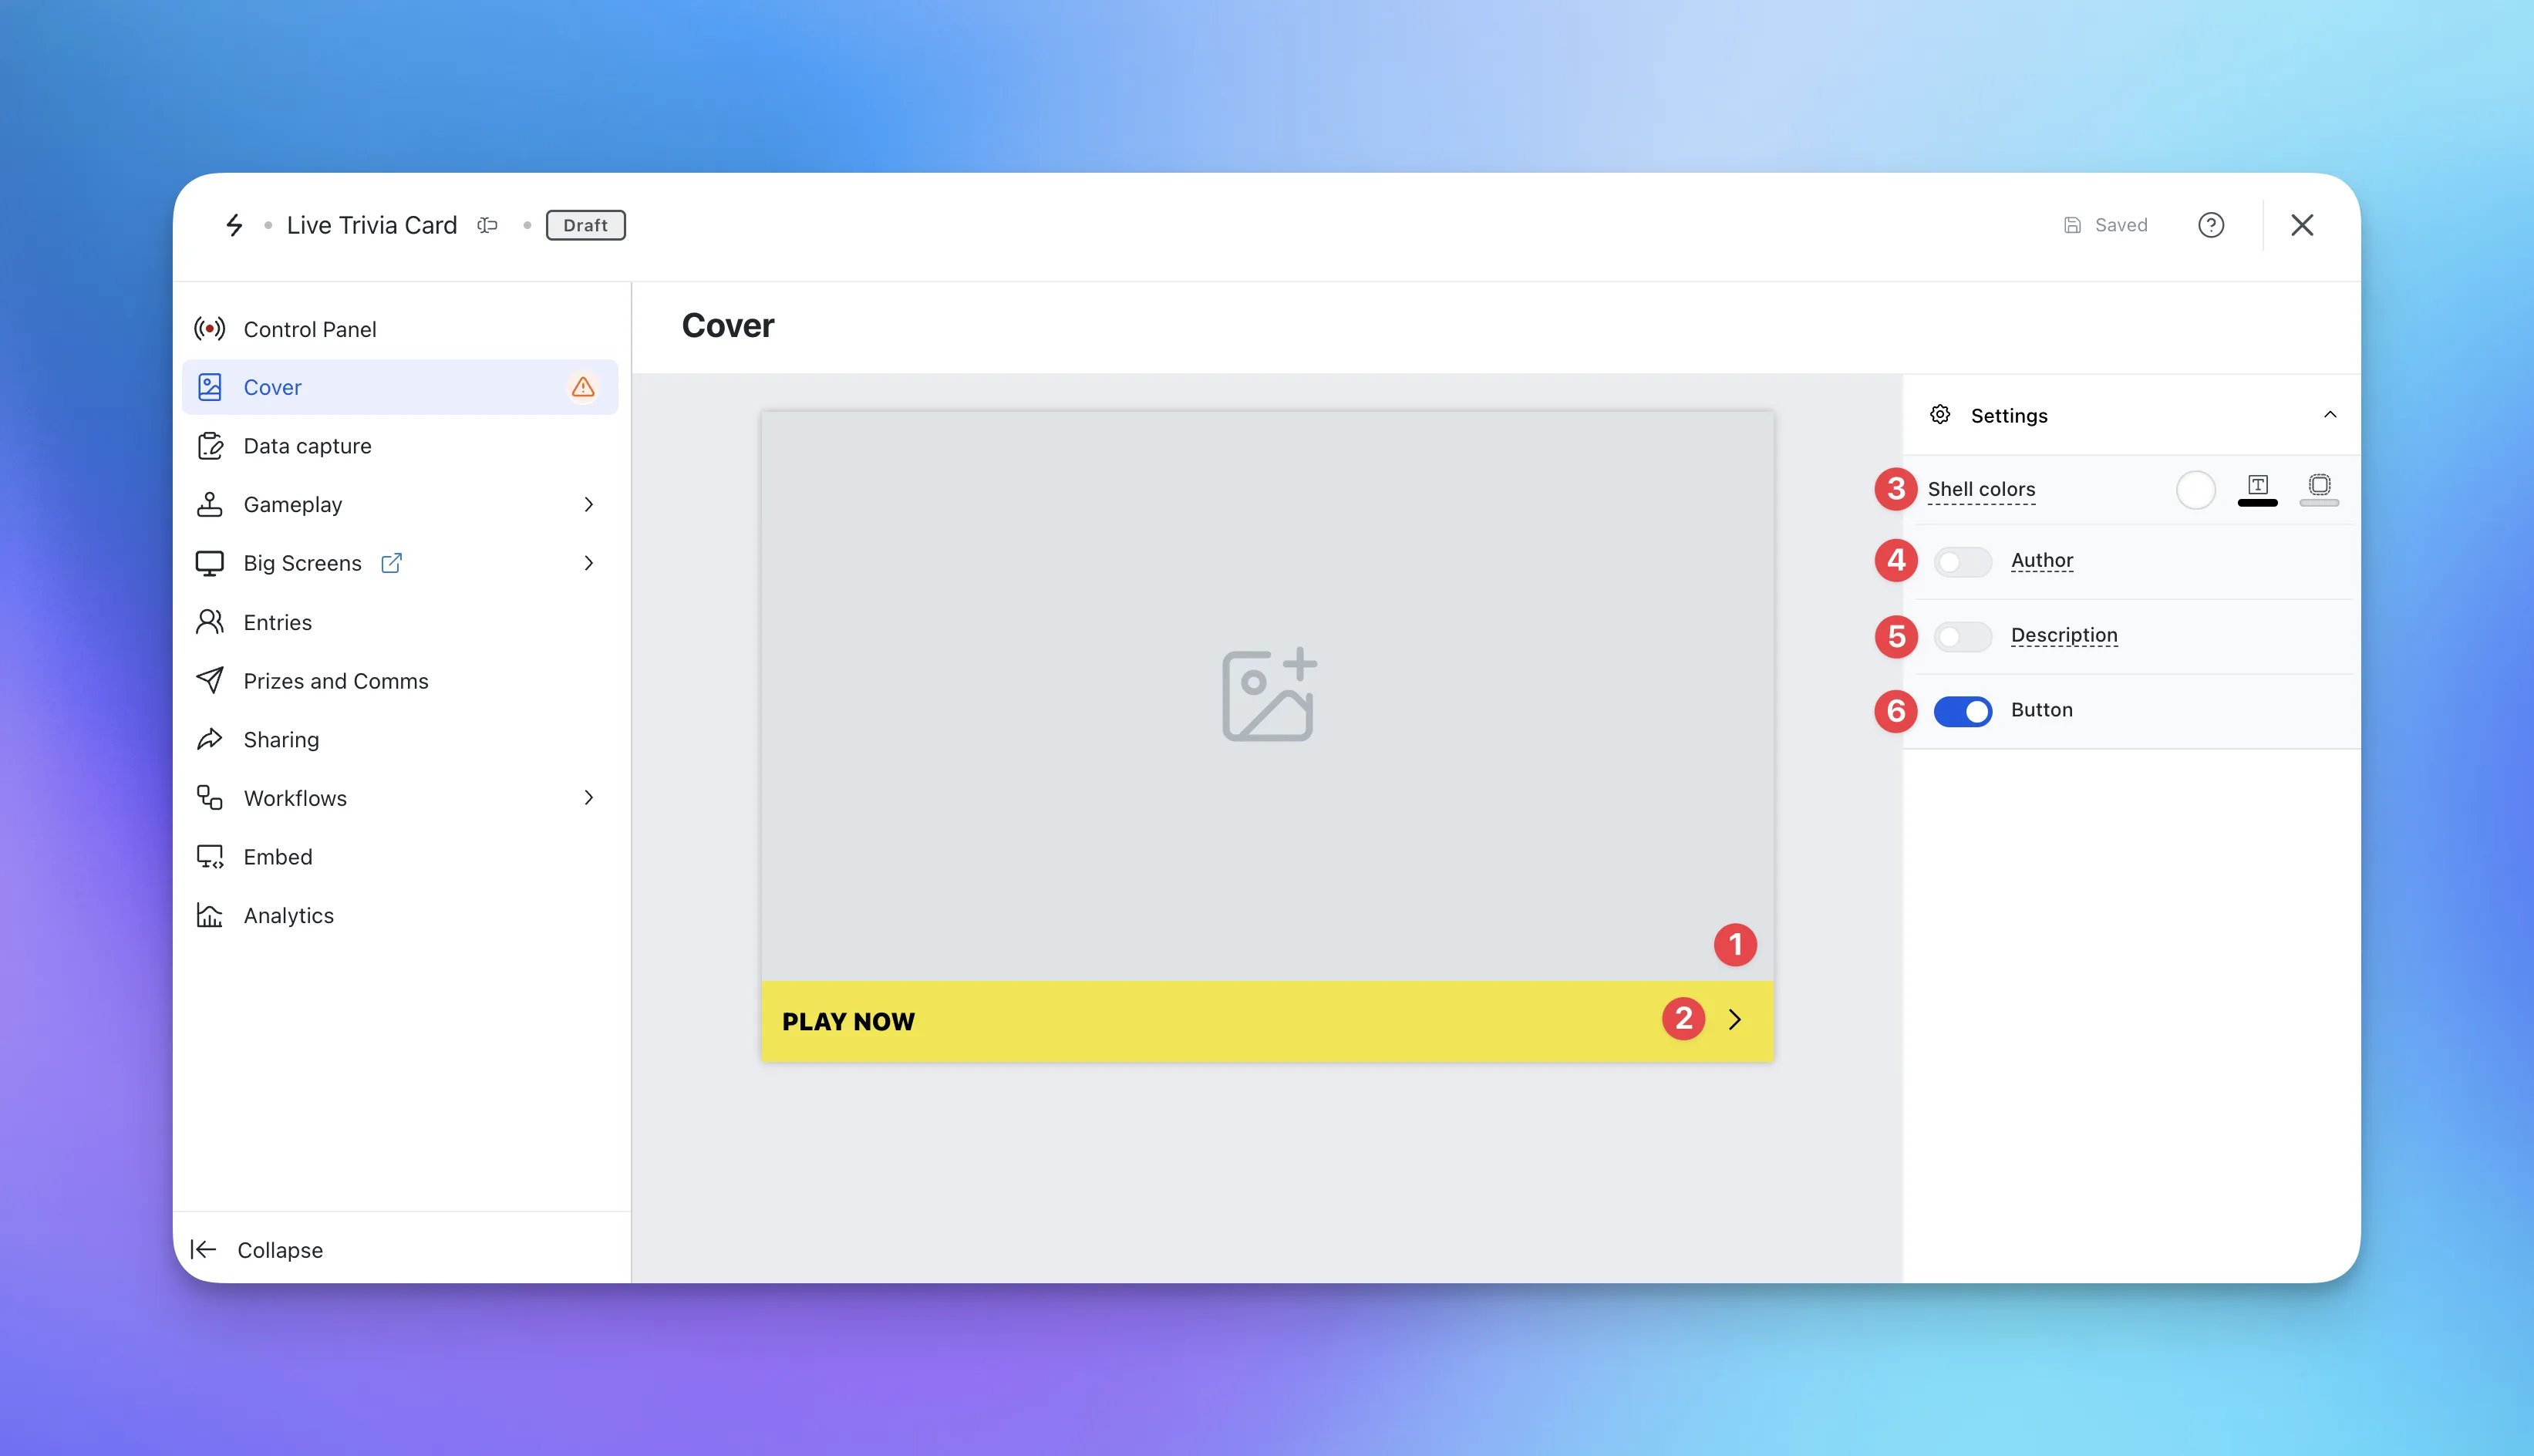 * Click on the **Cover** tab.
* **(1)** Here you can upload the **cover image** for the card, we recommend using your registration image.
The recommended size is 1920w x 1080h. We strongly encourage you to include the following information on the registration image;
* The name of your Live Trivia game
* Prizing details
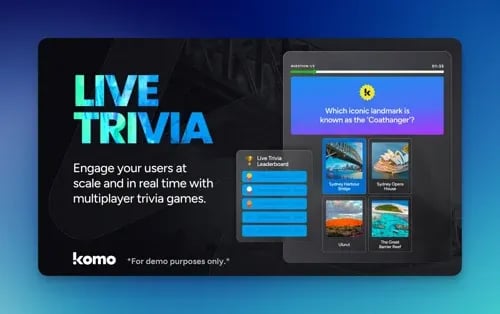
See below for an example of the cover image.
* Click on the **Cover** tab.
* **(1)** Here you can upload the **cover image** for the card, we recommend using your registration image.
The recommended size is 1920w x 1080h. We strongly encourage you to include the following information on the registration image;
* The name of your Live Trivia game
* Prizing details
See below for an example of the cover image.
 * **(2)** Here you can edit the color and copy of the **call-to-action** or **(6)** disable the bar.
* **(3)** Set the **Outer card shell colours** (description and share bar).
* **(4)** You can add an **Author** tag by displaying the brand or person who's responsible for the card content.
* **(5)** Add a **Description** to the card.
### Step 4: Set up your Data Capture Screen
Unlike other cards the Live Predictor card comes with a data capture already added, you will just be required to finish setting it up. For a guide on how to do this check out our article below.
Learn how to set up the data capture
### Step 5: Set up your Rules Screen
* **(2)** Here you can edit the color and copy of the **call-to-action** or **(6)** disable the bar.
* **(3)** Set the **Outer card shell colours** (description and share bar).
* **(4)** You can add an **Author** tag by displaying the brand or person who's responsible for the card content.
* **(5)** Add a **Description** to the card.
### Step 4: Set up your Data Capture Screen
Unlike other cards the Live Predictor card comes with a data capture already added, you will just be required to finish setting it up. For a guide on how to do this check out our article below.
Learn how to set up the data capture
### Step 5: Set up your Rules Screen
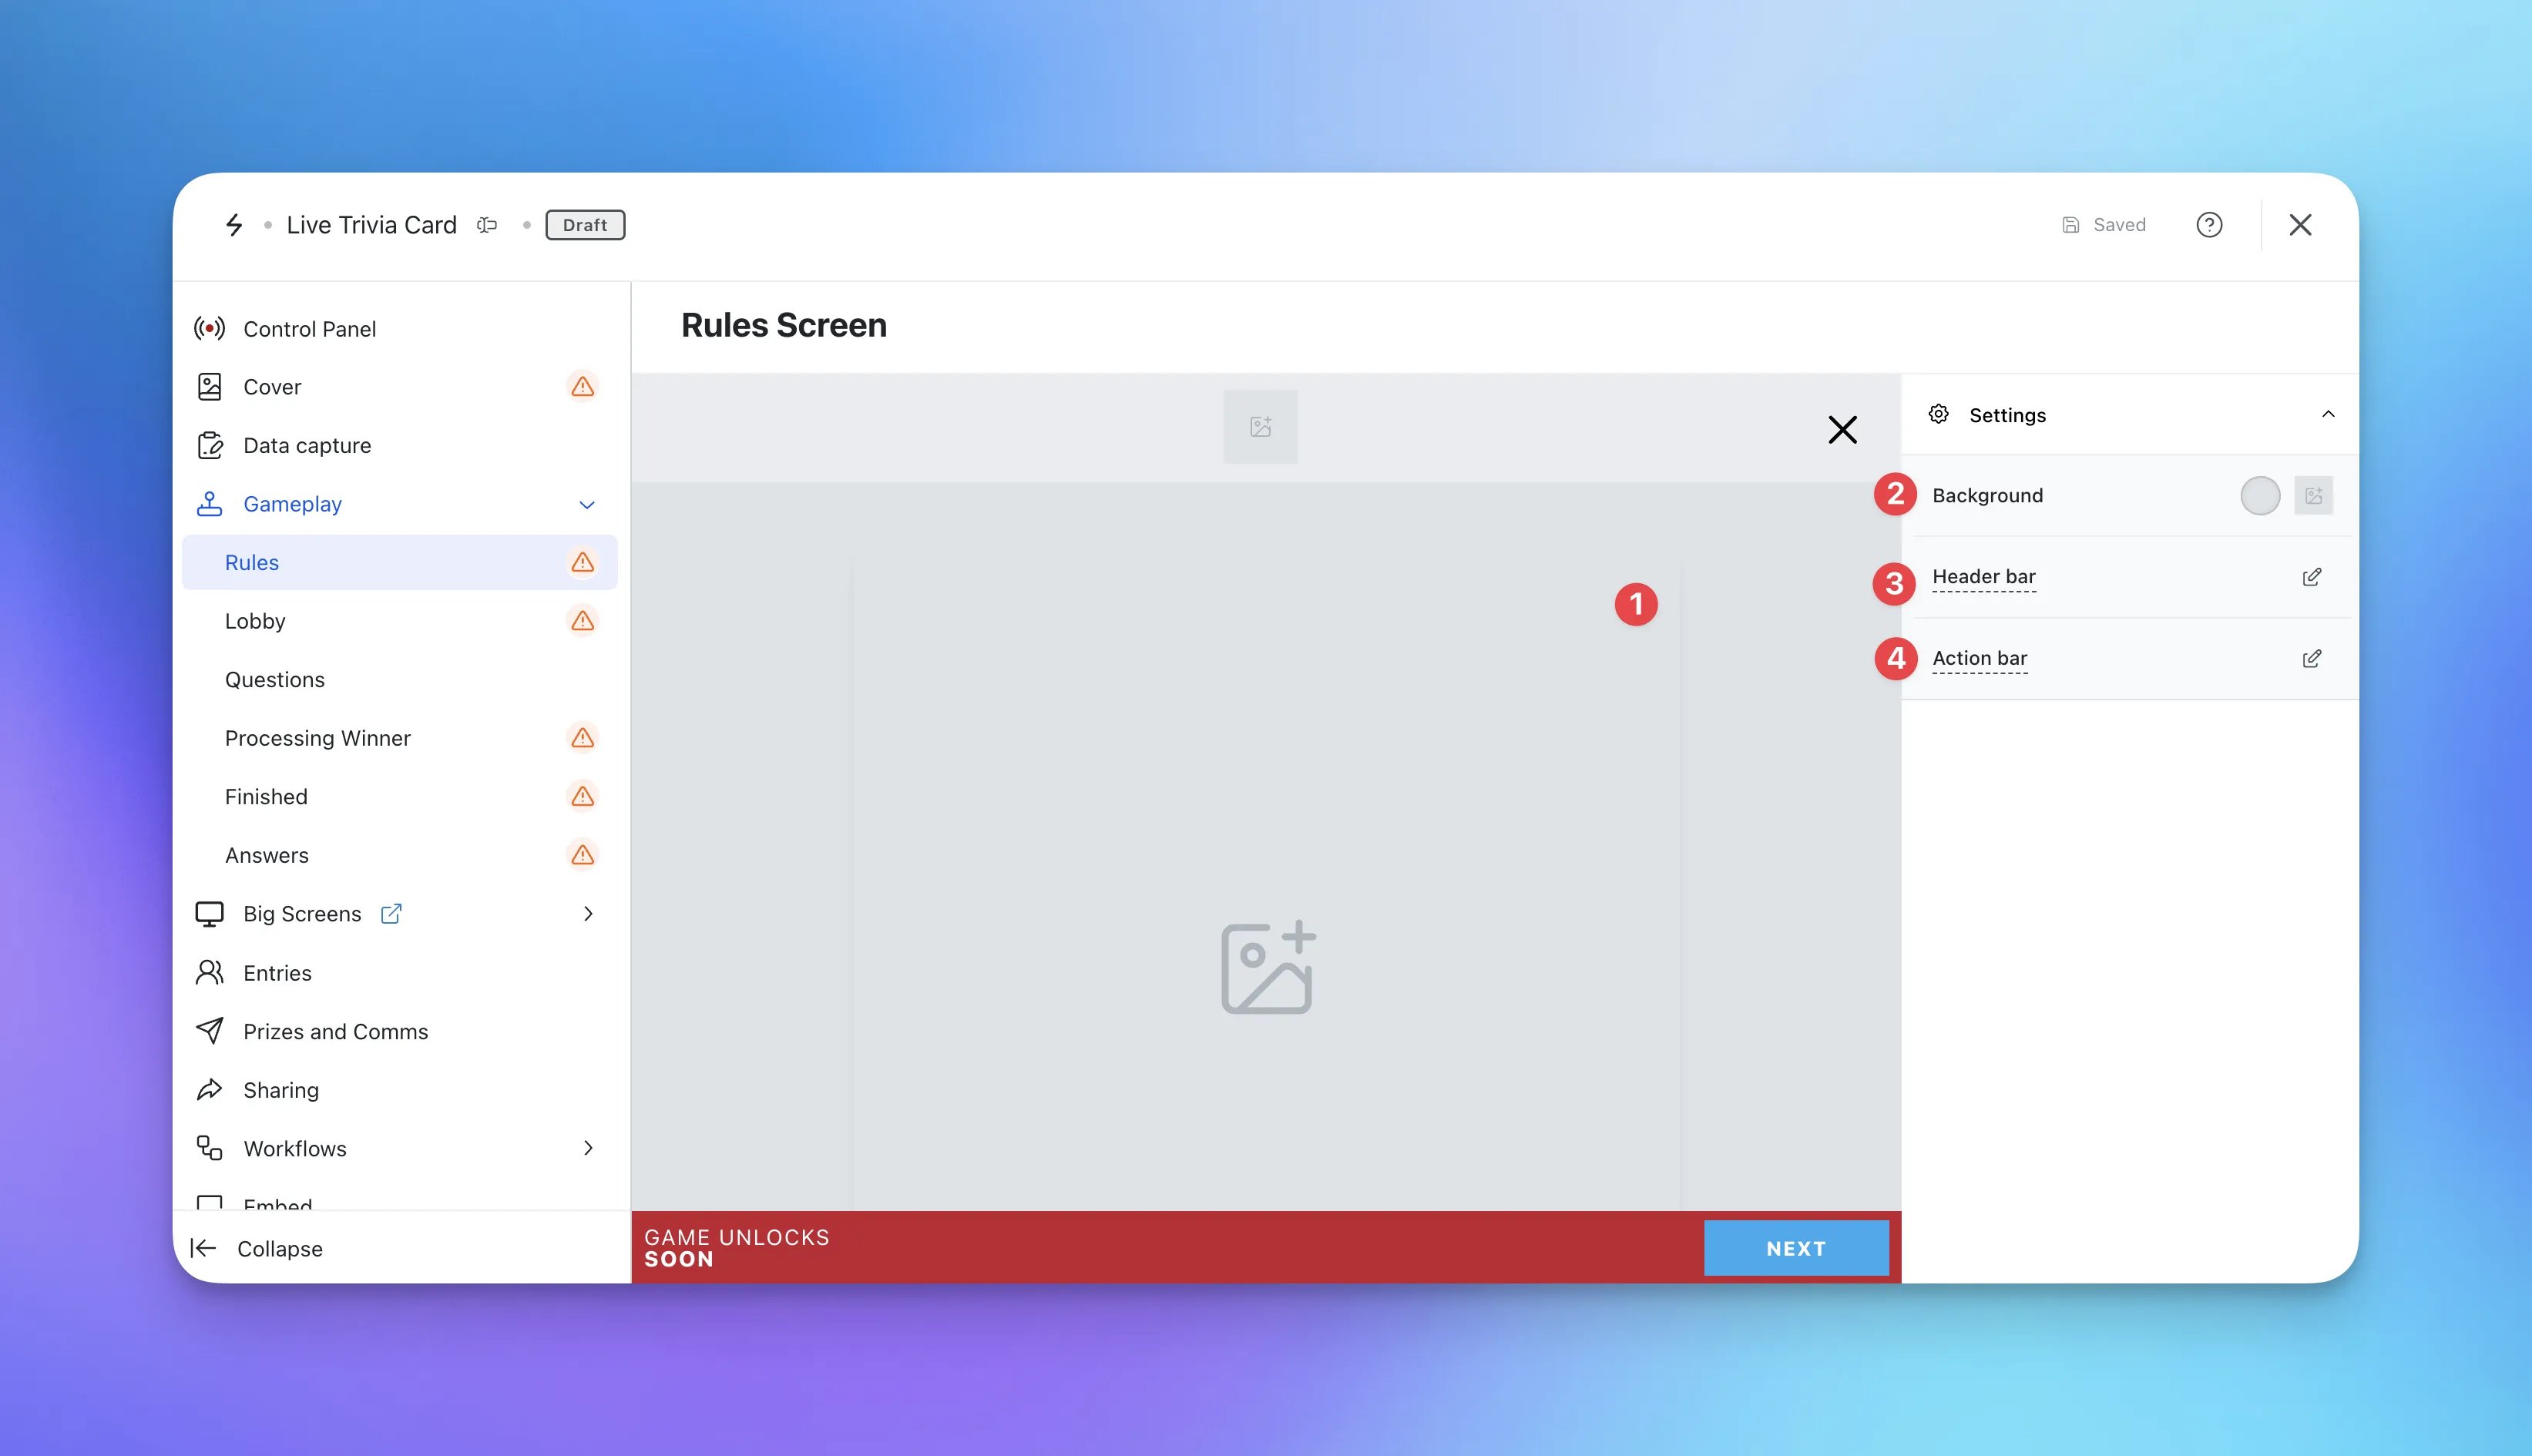 * Click on the **Gameplay** tab and then **Rules.**
* **(1)** Here you can set a **rules screen** image.
The recommended size is 1080w x 1080h. We strongly encourage you to include the following information on the rules screen image;
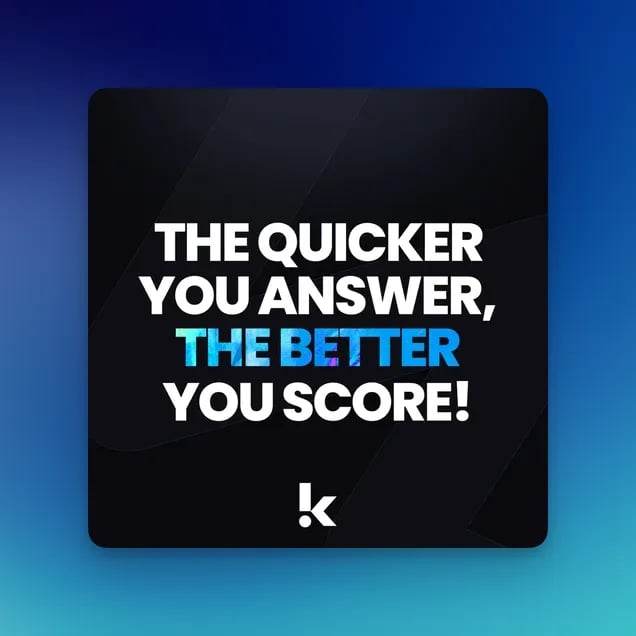
* Use the copy "The Quicker You Answer, The Better You Score"
See below for an example of a rules screen image.
* Click on the **Gameplay** tab and then **Rules.**
* **(1)** Here you can set a **rules screen** image.
The recommended size is 1080w x 1080h. We strongly encourage you to include the following information on the rules screen image;
* Use the copy "The Quicker You Answer, The Better You Score"
See below for an example of a rules screen image.
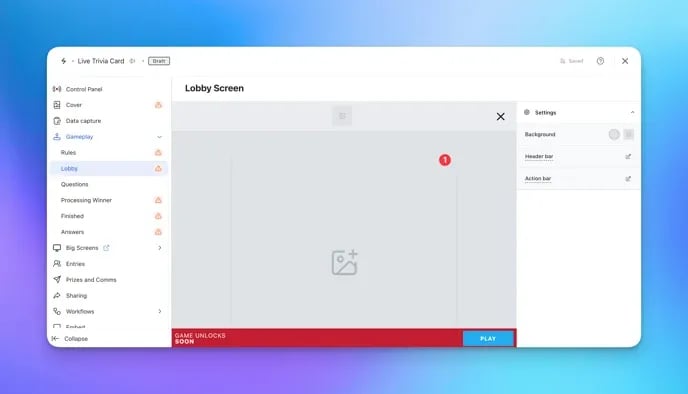
 * **(2)** Here you can configure the **background** of the trivia game.
* **(3)** Alter the **headerbar** color.
* **(4)** Edit the **game action bar** colors (the footer bar).
### Step 6: Set up your Lobby Screen
* **(2)** Here you can configure the **background** of the trivia game.
* **(3)** Alter the **headerbar** color.
* **(4)** Edit the **game action bar** colors (the footer bar).
### Step 6: Set up your Lobby Screen
 * Click on the **Lobby Screen** tab.
* **(1)** Here you can set a **lobby screen** image.
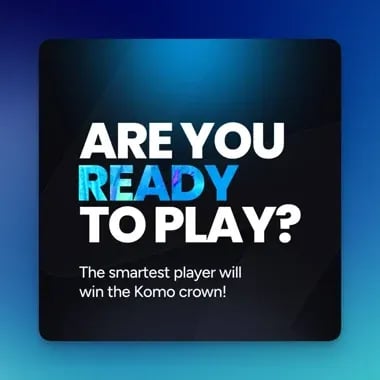
The recommended size is 1080w x 1080h. We strongly encourage you to include the following information on the lobby screen image;
* Prizing Information
See below for an example of a lobby screen image:
* Click on the **Lobby Screen** tab.
* **(1)** Here you can set a **lobby screen** image.
The recommended size is 1080w x 1080h. We strongly encourage you to include the following information on the lobby screen image;
* Prizing Information
See below for an example of a lobby screen image:
 ### Step 7: Write your questions
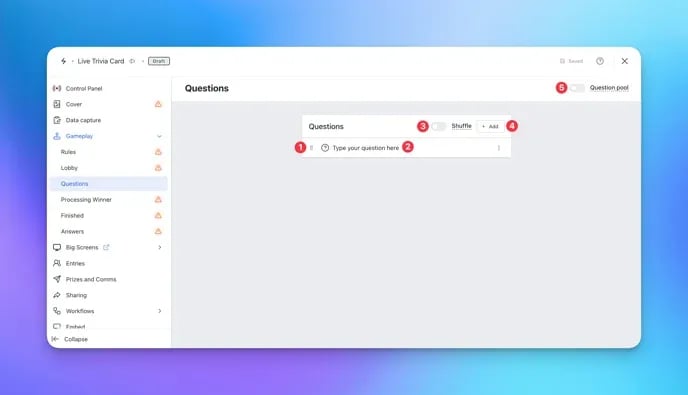 * Click on the **Questions** tab.
* **(1)** The **toggle** to the left of each question will allow you to reorder your questions by dragging and dropping them.
* **(2)** Clicking on a **question** will allow you to edit it.
* Click on the **Questions** tab.
* **(1)** The **toggle** to the left of each question will allow you to reorder your questions by dragging and dropping them.
* **(2)** Clicking on a **question** will allow you to edit it.
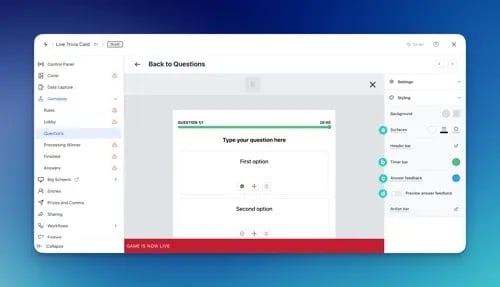 Once you select the **Quiz** or **Survey** question option, you will then be able to add your potential answers and edit your question.
* **(A)** This is where you write your desired **question**.
* **(B)** Type in a potential **answer**.
* **(C)** The options at the bottom of each answer allow you to nominate a **correct** answer, **delete** an answer and **move** the answer.
* **(D)** Scrolling down, click the **plus icon** to add another potential answer.
* **(E)** Toggling this option on/off allows you to upload an **image** associated with the question.
* **(F)** Here you can choose to **toggle off the question text** if you have chosen to display your question text in the cover image.
* **(G)** Connect quiz responses to **contact properties**.
* **(H)** Here you can change your **Quiz** question to a **Survey** question and vice-versa.
* **(I)** Changes the **answer layout**.
* **(J)** Alters the amount of **time** a user has to answer a particular question.
* **(K)** Scroll down the right sidebar, you can **shuffle** the potential answers' positions for each individual entrant.
* **(L)** Here you can **Style** the trivia question.
Once you select the **Quiz** or **Survey** question option, you will then be able to add your potential answers and edit your question.
* **(A)** This is where you write your desired **question**.
* **(B)** Type in a potential **answer**.
* **(C)** The options at the bottom of each answer allow you to nominate a **correct** answer, **delete** an answer and **move** the answer.
* **(D)** Scrolling down, click the **plus icon** to add another potential answer.
* **(E)** Toggling this option on/off allows you to upload an **image** associated with the question.
* **(F)** Here you can choose to **toggle off the question text** if you have chosen to display your question text in the cover image.
* **(G)** Connect quiz responses to **contact properties**.
* **(H)** Here you can change your **Quiz** question to a **Survey** question and vice-versa.
* **(I)** Changes the **answer layout**.
* **(J)** Alters the amount of **time** a user has to answer a particular question.
* **(K)** Scroll down the right sidebar, you can **shuffle** the potential answers' positions for each individual entrant.
* **(L)** Here you can **Style** the trivia question. 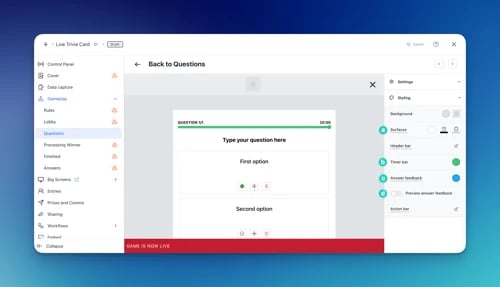 * **(a)** Set the **colors** behind the question and potential answers.
* **(b)** Alter the **Time bar color.**
* **(c)** Edit the **Answer feedback colour**, and
* **(d)** Toggle on to **preview** the color.
* **(3)** Toggling on the **shuffle** button will automatically and randomly shuffle your questions when showing them to your users.
* **(4)** Clicking the **Add button** will allow you to add additional questions. The different question types are as follows;
* **Quiz questions** - This allows you to create your own quiz questions and populate them within your Live Trivia.
* **Survey questions** - Typically utilized for Market Research questions but a great opportunity to create great user-generated content by utilizing divisive topics such as 'Does Pineapple belong on pizza?" (*Hint: It definitely does*)
* **Questions from the library** - Selecting this will open the Komo content library and give you access to over 40,000 pre-made questions.
* **(5)** By toggling on **Question Pools \[optional],** you can add as many questions as you like to a pool, feeding your users questions from this pool randomly. This combats cheating *and* introduces variety into your Live Trivia games!
* **(a)** Set the **colors** behind the question and potential answers.
* **(b)** Alter the **Time bar color.**
* **(c)** Edit the **Answer feedback colour**, and
* **(d)** Toggle on to **preview** the color.
* **(3)** Toggling on the **shuffle** button will automatically and randomly shuffle your questions when showing them to your users.
* **(4)** Clicking the **Add button** will allow you to add additional questions. The different question types are as follows;
* **Quiz questions** - This allows you to create your own quiz questions and populate them within your Live Trivia.
* **Survey questions** - Typically utilized for Market Research questions but a great opportunity to create great user-generated content by utilizing divisive topics such as 'Does Pineapple belong on pizza?" (*Hint: It definitely does*)
* **Questions from the library** - Selecting this will open the Komo content library and give you access to over 40,000 pre-made questions.
* **(5)** By toggling on **Question Pools \[optional],** you can add as many questions as you like to a pool, feeding your users questions from this pool randomly. This combats cheating *and* introduces variety into your Live Trivia games!
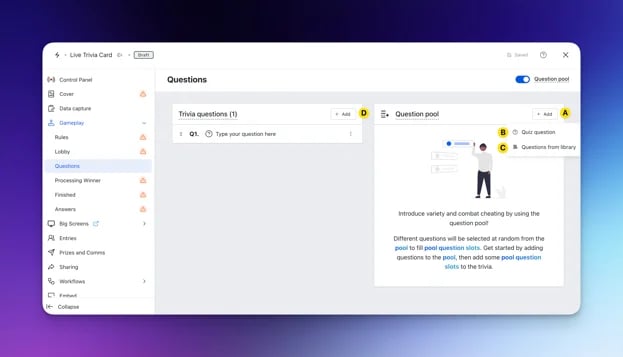 * **(A)** Click the **Add** button to add a question to the pool.
* **(B) + (C)** Choose from a **quiz question or a question from the library** to add to your pool.
* **(D)** Once you've added all desired questions to your pool, click the **Add** button and select the **Pool Question Slot** question type from the options provided.
**Note:** From here, your users will be fed a question from the Pool at random when they come across a Pool Question Slot in your Live Trivia game.
### Step 8: Upload your Processing Screen
* **(A)** Click the **Add** button to add a question to the pool.
* **(B) + (C)** Choose from a **quiz question or a question from the library** to add to your pool.
* **(D)** Once you've added all desired questions to your pool, click the **Add** button and select the **Pool Question Slot** question type from the options provided.
**Note:** From here, your users will be fed a question from the Pool at random when they come across a Pool Question Slot in your Live Trivia game.
### Step 8: Upload your Processing Screen
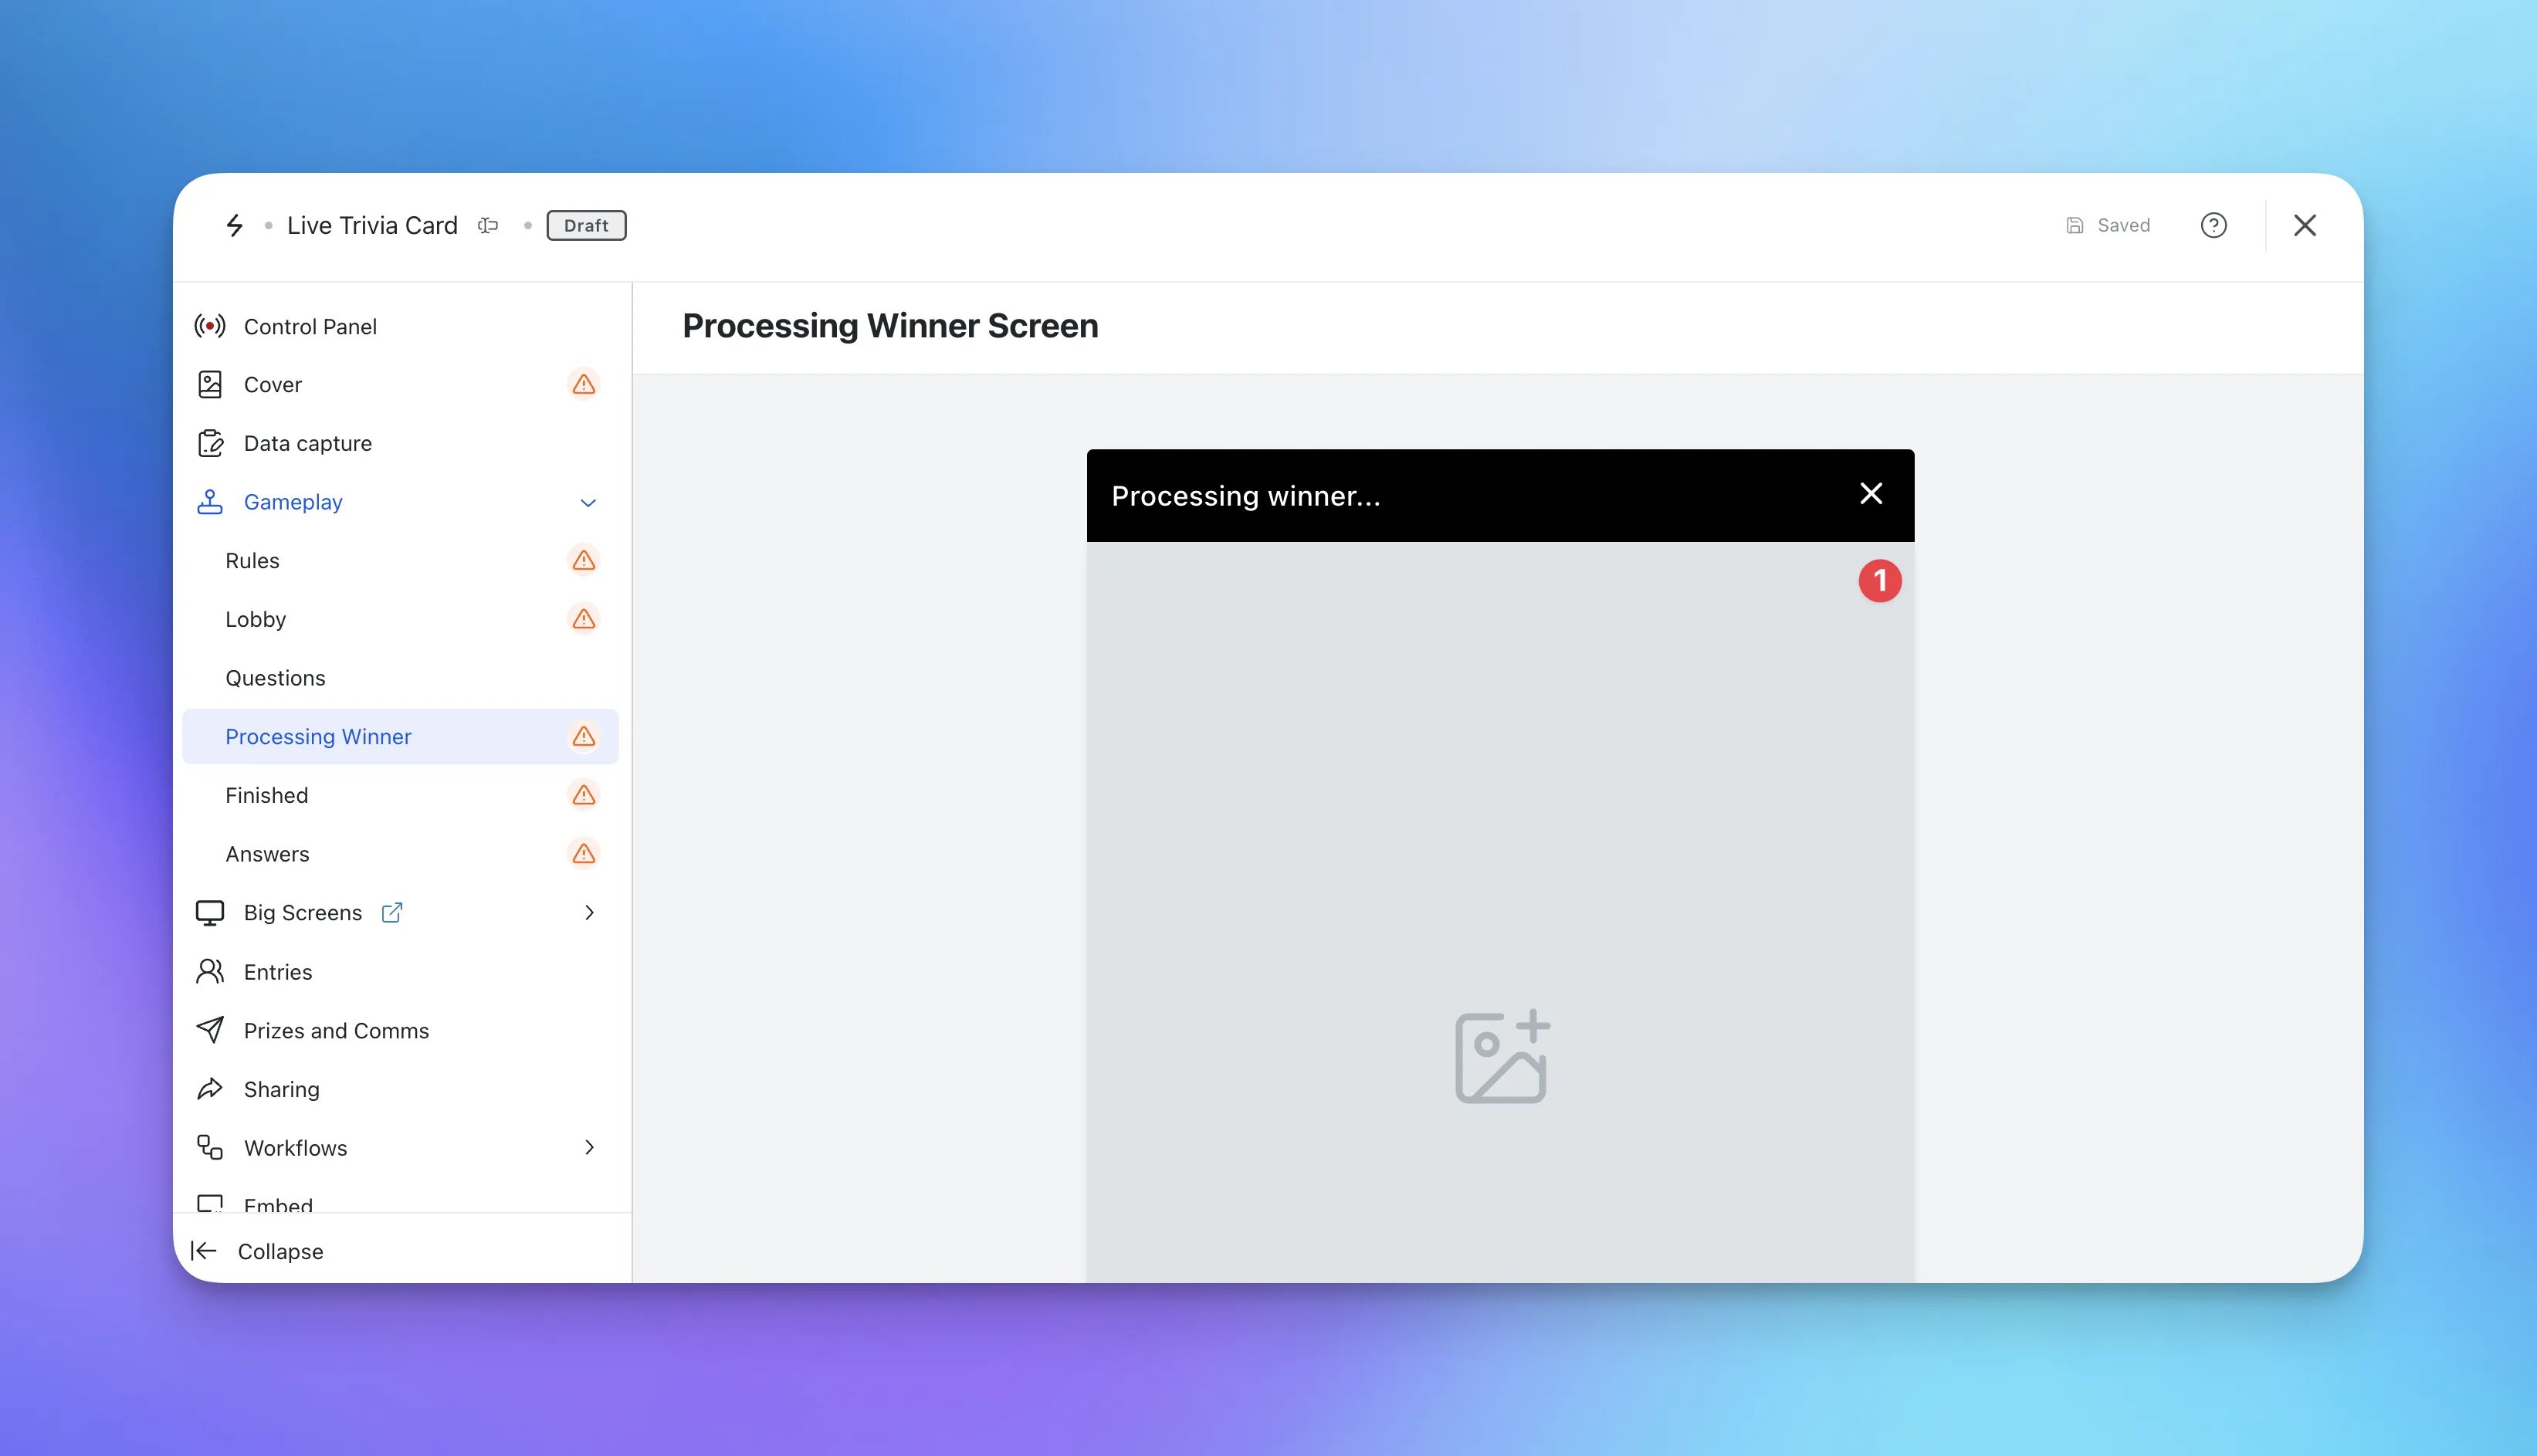 * Click on the **Processing Screen** tab.
* **(1)** Here you can set the **processing screen** image.
Add a naming sponsor or include your logo here. See below for an example of a processing screen image:
* Click on the **Processing Screen** tab.
* **(1)** Here you can set the **processing screen** image.
Add a naming sponsor or include your logo here. See below for an example of a processing screen image:
 ### Step 9: Set up your Finished Screen
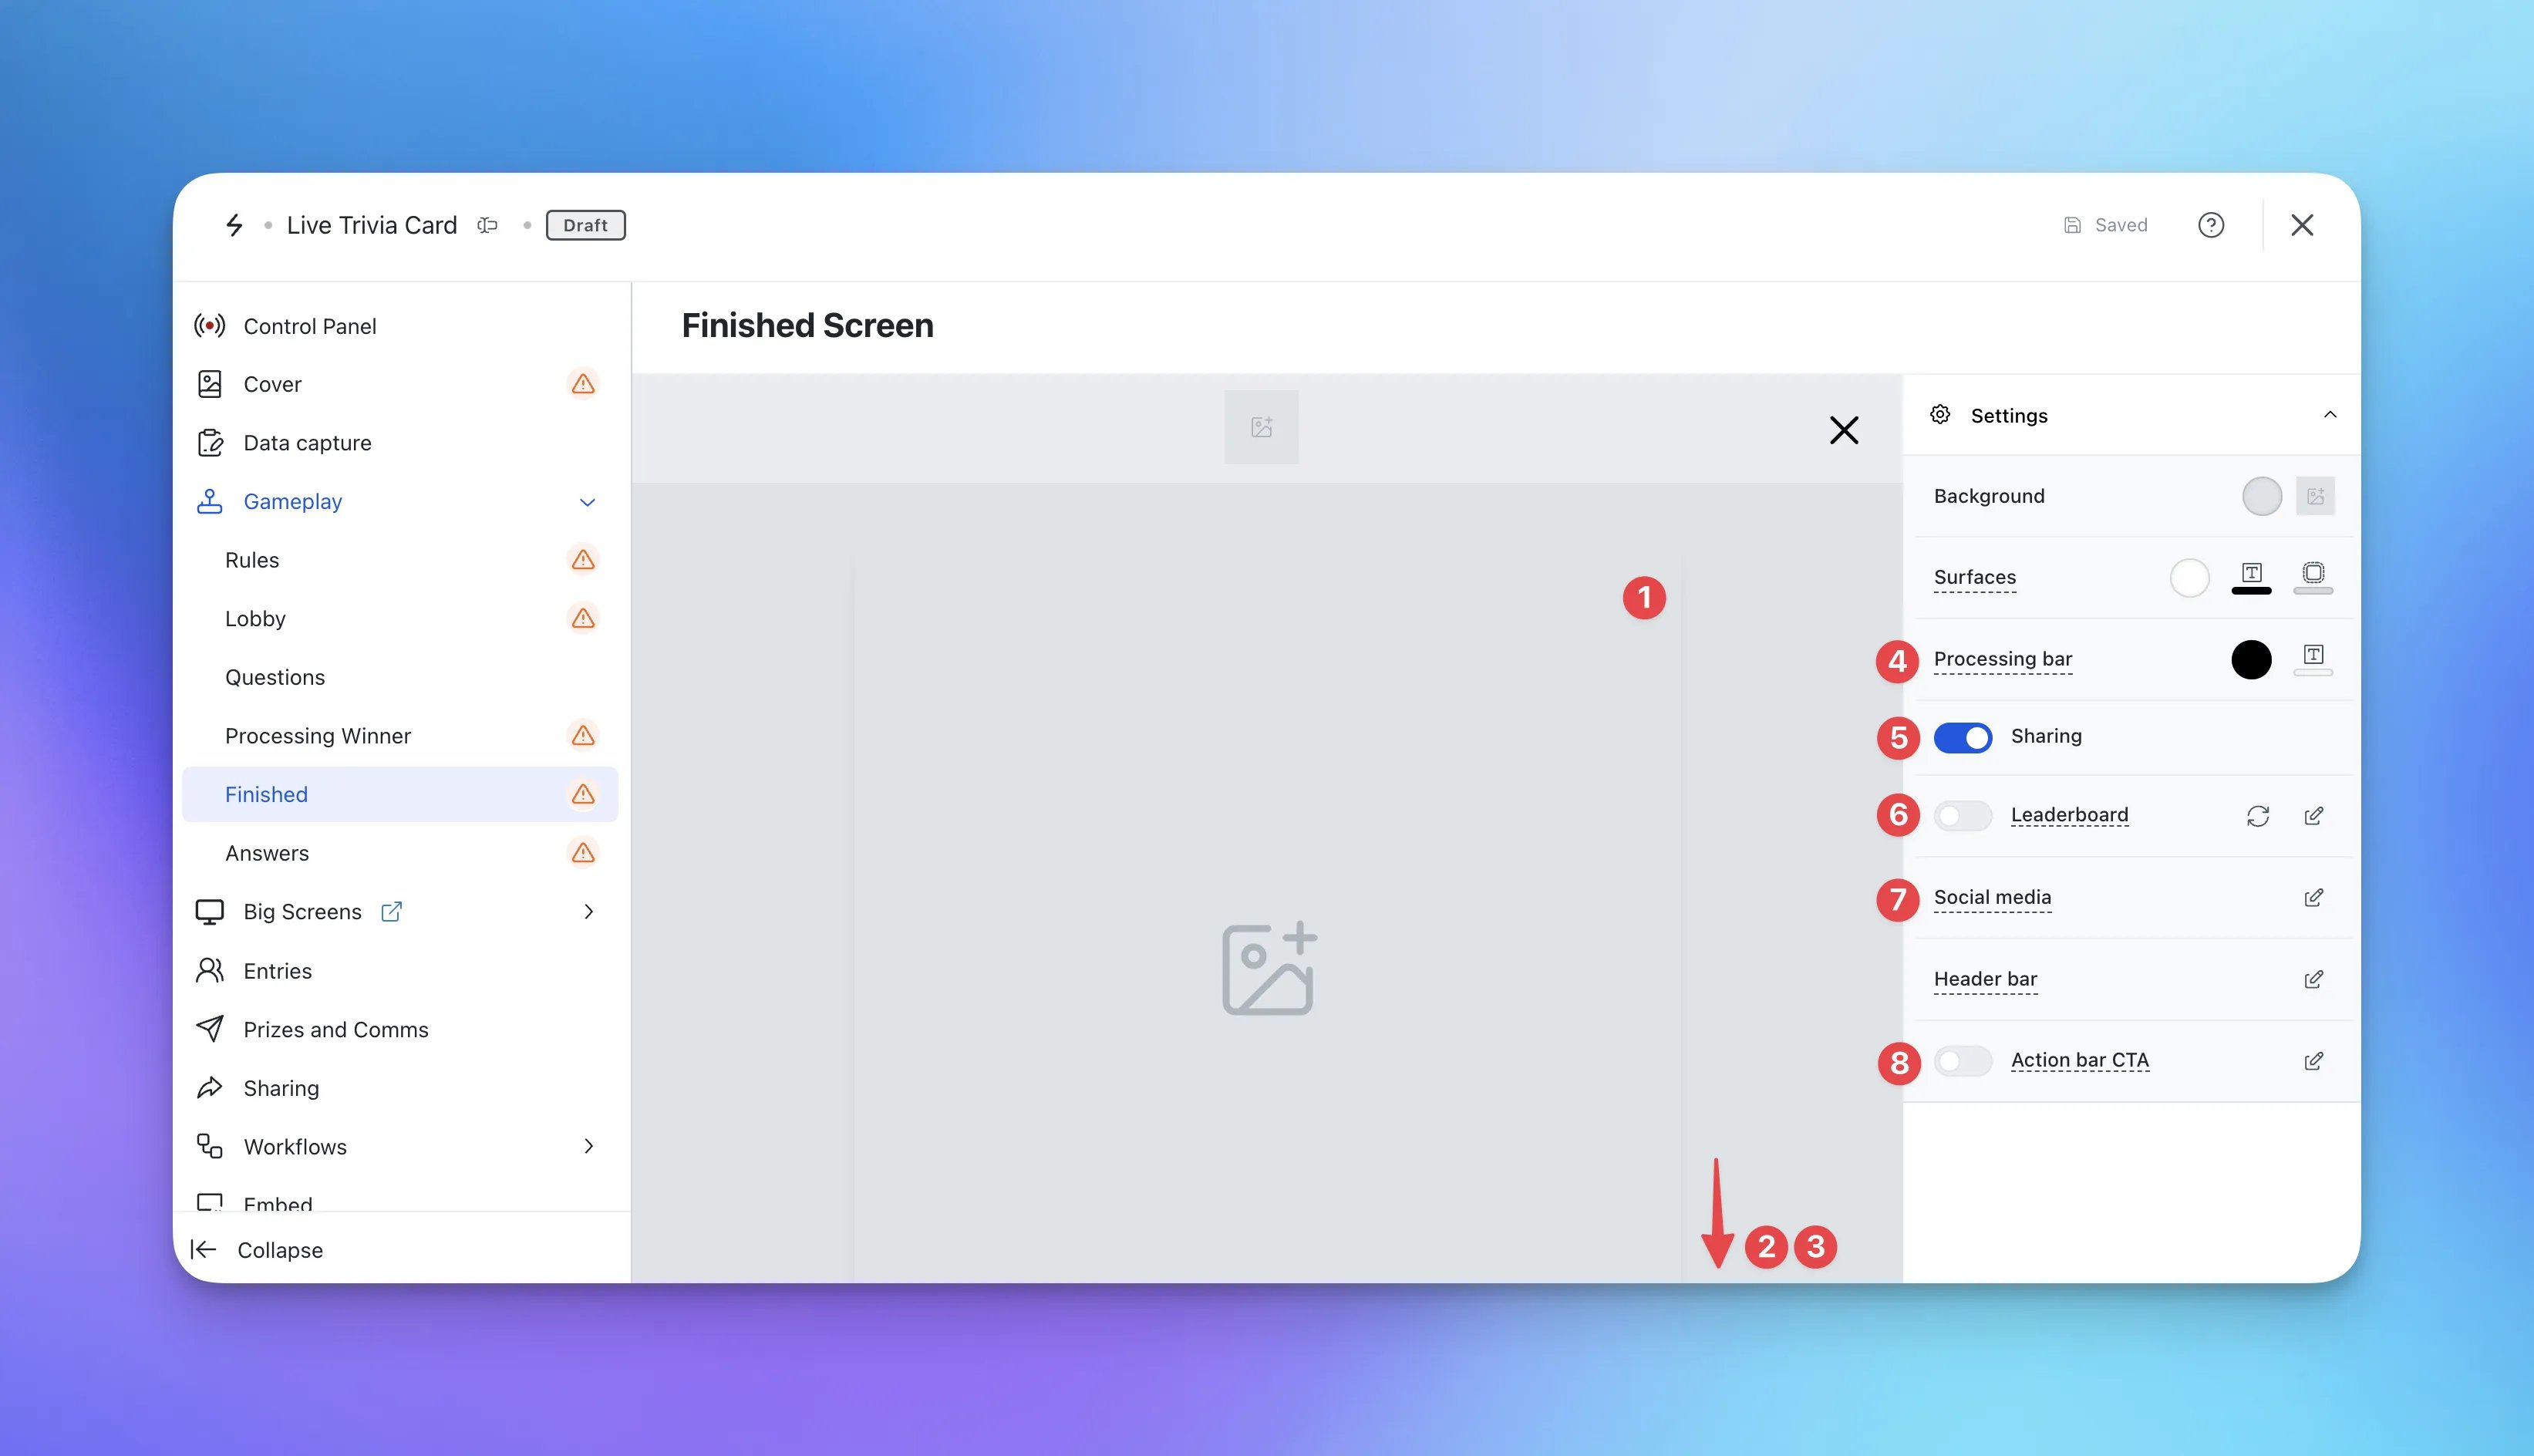 * Click on the **Finished Screen** tab.
* **(1)** Here you can set the **Finished screen** image.
The recommended size is 1080w x 1080h. We strongly encourage you to include the following information on the finished screen image. See below for an example of a finished screen image;
* Click on the **Finished Screen** tab.
* **(1)** Here you can set the **Finished screen** image.
The recommended size is 1080w x 1080h. We strongly encourage you to include the following information on the finished screen image. See below for an example of a finished screen image;  * **(2)** Scroll down to alter the **finished copy** here.
* **(3)** Edit the **Share CTA colors** or **(5)** disable the button here.
* **(4)** Set the **Processing bar colors.**
* **(6)** Click on the **edit icon** to set up the leaderboard.
* **(2)** Scroll down to alter the **finished copy** here.
* **(3)** Edit the **Share CTA colors** or **(5)** disable the button here.
* **(4)** Set the **Processing bar colors.**
* **(6)** Click on the **edit icon** to set up the leaderboard.
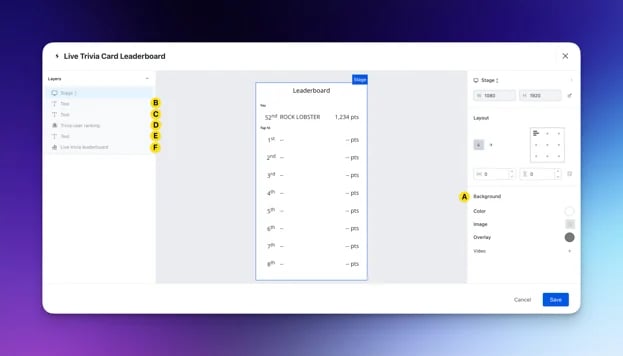 * **(A)** You can add a **background** to the leaderboard by setting a solid color or uploading an image.
* **(B)** Click here to enter the **Leaderboard title settings**.
* **(A)** You can add a **background** to the leaderboard by setting a solid color or uploading an image.
* **(B)** Click here to enter the **Leaderboard title settings**. 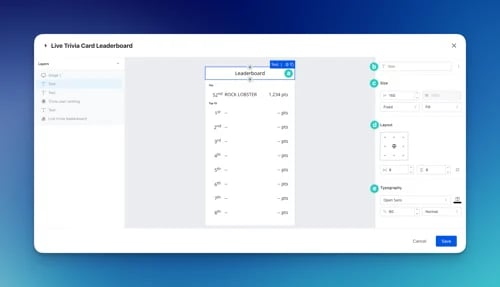 * **(a)** Here you can change the **title** of the leaderboard.
* **(b)** You can **label** the cell and clicking on **...**, you can clone and delete this layer.
* **(c)** Edit the **cell size** here.
* **(d)** Using the grid layout, you can select your preferred **text alignment.** The boxes below allow you to alter the **horizontal and vertical padding.**
* **(e)** Alter the **typography** here. Change the title font, size and color.
* **(C)** Click here to enter the **user ranking title settings**.
* **(D)** Here is where you'll edit the **user ranking settings.**
* **(a)** Here you can change the **title** of the leaderboard.
* **(b)** You can **label** the cell and clicking on **...**, you can clone and delete this layer.
* **(c)** Edit the **cell size** here.
* **(d)** Using the grid layout, you can select your preferred **text alignment.** The boxes below allow you to alter the **horizontal and vertical padding.**
* **(e)** Alter the **typography** here. Change the title font, size and color.
* **(C)** Click here to enter the **user ranking title settings**.
* **(D)** Here is where you'll edit the **user ranking settings.** 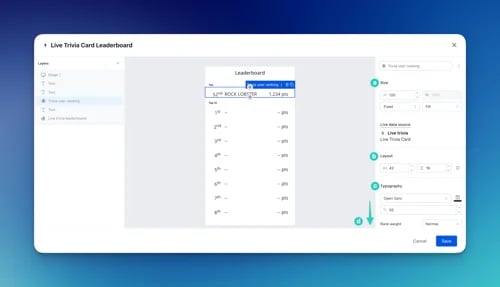 * This is an example of the user's ranking. This will update with the user's data once they have played the Memory Challenge.
* **(a)** Edit the **cell size** here.
* **(b)** Alter the **horizontal and vertical padding.**
* **(c)** Here you can edit the **typography**. Change the title font, size and color.
* **(d)** Scrolling down, you can add a **background color** to the user ranking and adjust the border radius.
* **(E)** Click here to enter the **leaderboard ranking title settings**.
* **(F)** Here is where you'll edit the **leaderboard ranking settings.**
* This is an example of the user's ranking. This will update with the user's data once they have played the Memory Challenge.
* **(a)** Edit the **cell size** here.
* **(b)** Alter the **horizontal and vertical padding.**
* **(c)** Here you can edit the **typography**. Change the title font, size and color.
* **(d)** Scrolling down, you can add a **background color** to the user ranking and adjust the border radius.
* **(E)** Click here to enter the **leaderboard ranking title settings**.
* **(F)** Here is where you'll edit the **leaderboard ranking settings.** 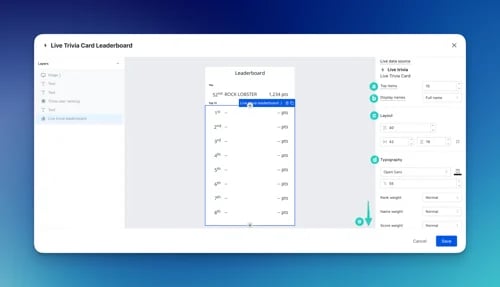 * **(a)** Adjust the number of **positions** shown on the leaderboard.
* **(b)** Here you can choose how to display the **entrant names.**
* **(c)** Alter the **spacing** between the rank items using the first setting, and the boxes below allow you to alter the **horizontal and vertical padding.**
* **(d)** Here you can edit the **typography**. Change the title font, size and color.
* **(e)** Scrolling down, you can edit the **animation.** Changing the **duration** of the scroll (milliseconds) and the **delay**.
This setting works best if you have more than 10 rank items, or if you can't view all the items on one page.
* **(8)** Here you can add an **call-to-action bar** that displays at the bottom of the entrant's screen once they've finished the trivia. Use this feature to push users to a destination of your choice.
### Step 10: Set up your Answers Screen
* **(a)** Adjust the number of **positions** shown on the leaderboard.
* **(b)** Here you can choose how to display the **entrant names.**
* **(c)** Alter the **spacing** between the rank items using the first setting, and the boxes below allow you to alter the **horizontal and vertical padding.**
* **(d)** Here you can edit the **typography**. Change the title font, size and color.
* **(e)** Scrolling down, you can edit the **animation.** Changing the **duration** of the scroll (milliseconds) and the **delay**.
This setting works best if you have more than 10 rank items, or if you can't view all the items on one page.
* **(8)** Here you can add an **call-to-action bar** that displays at the bottom of the entrant's screen once they've finished the trivia. Use this feature to push users to a destination of your choice.
### Step 10: Set up your Answers Screen
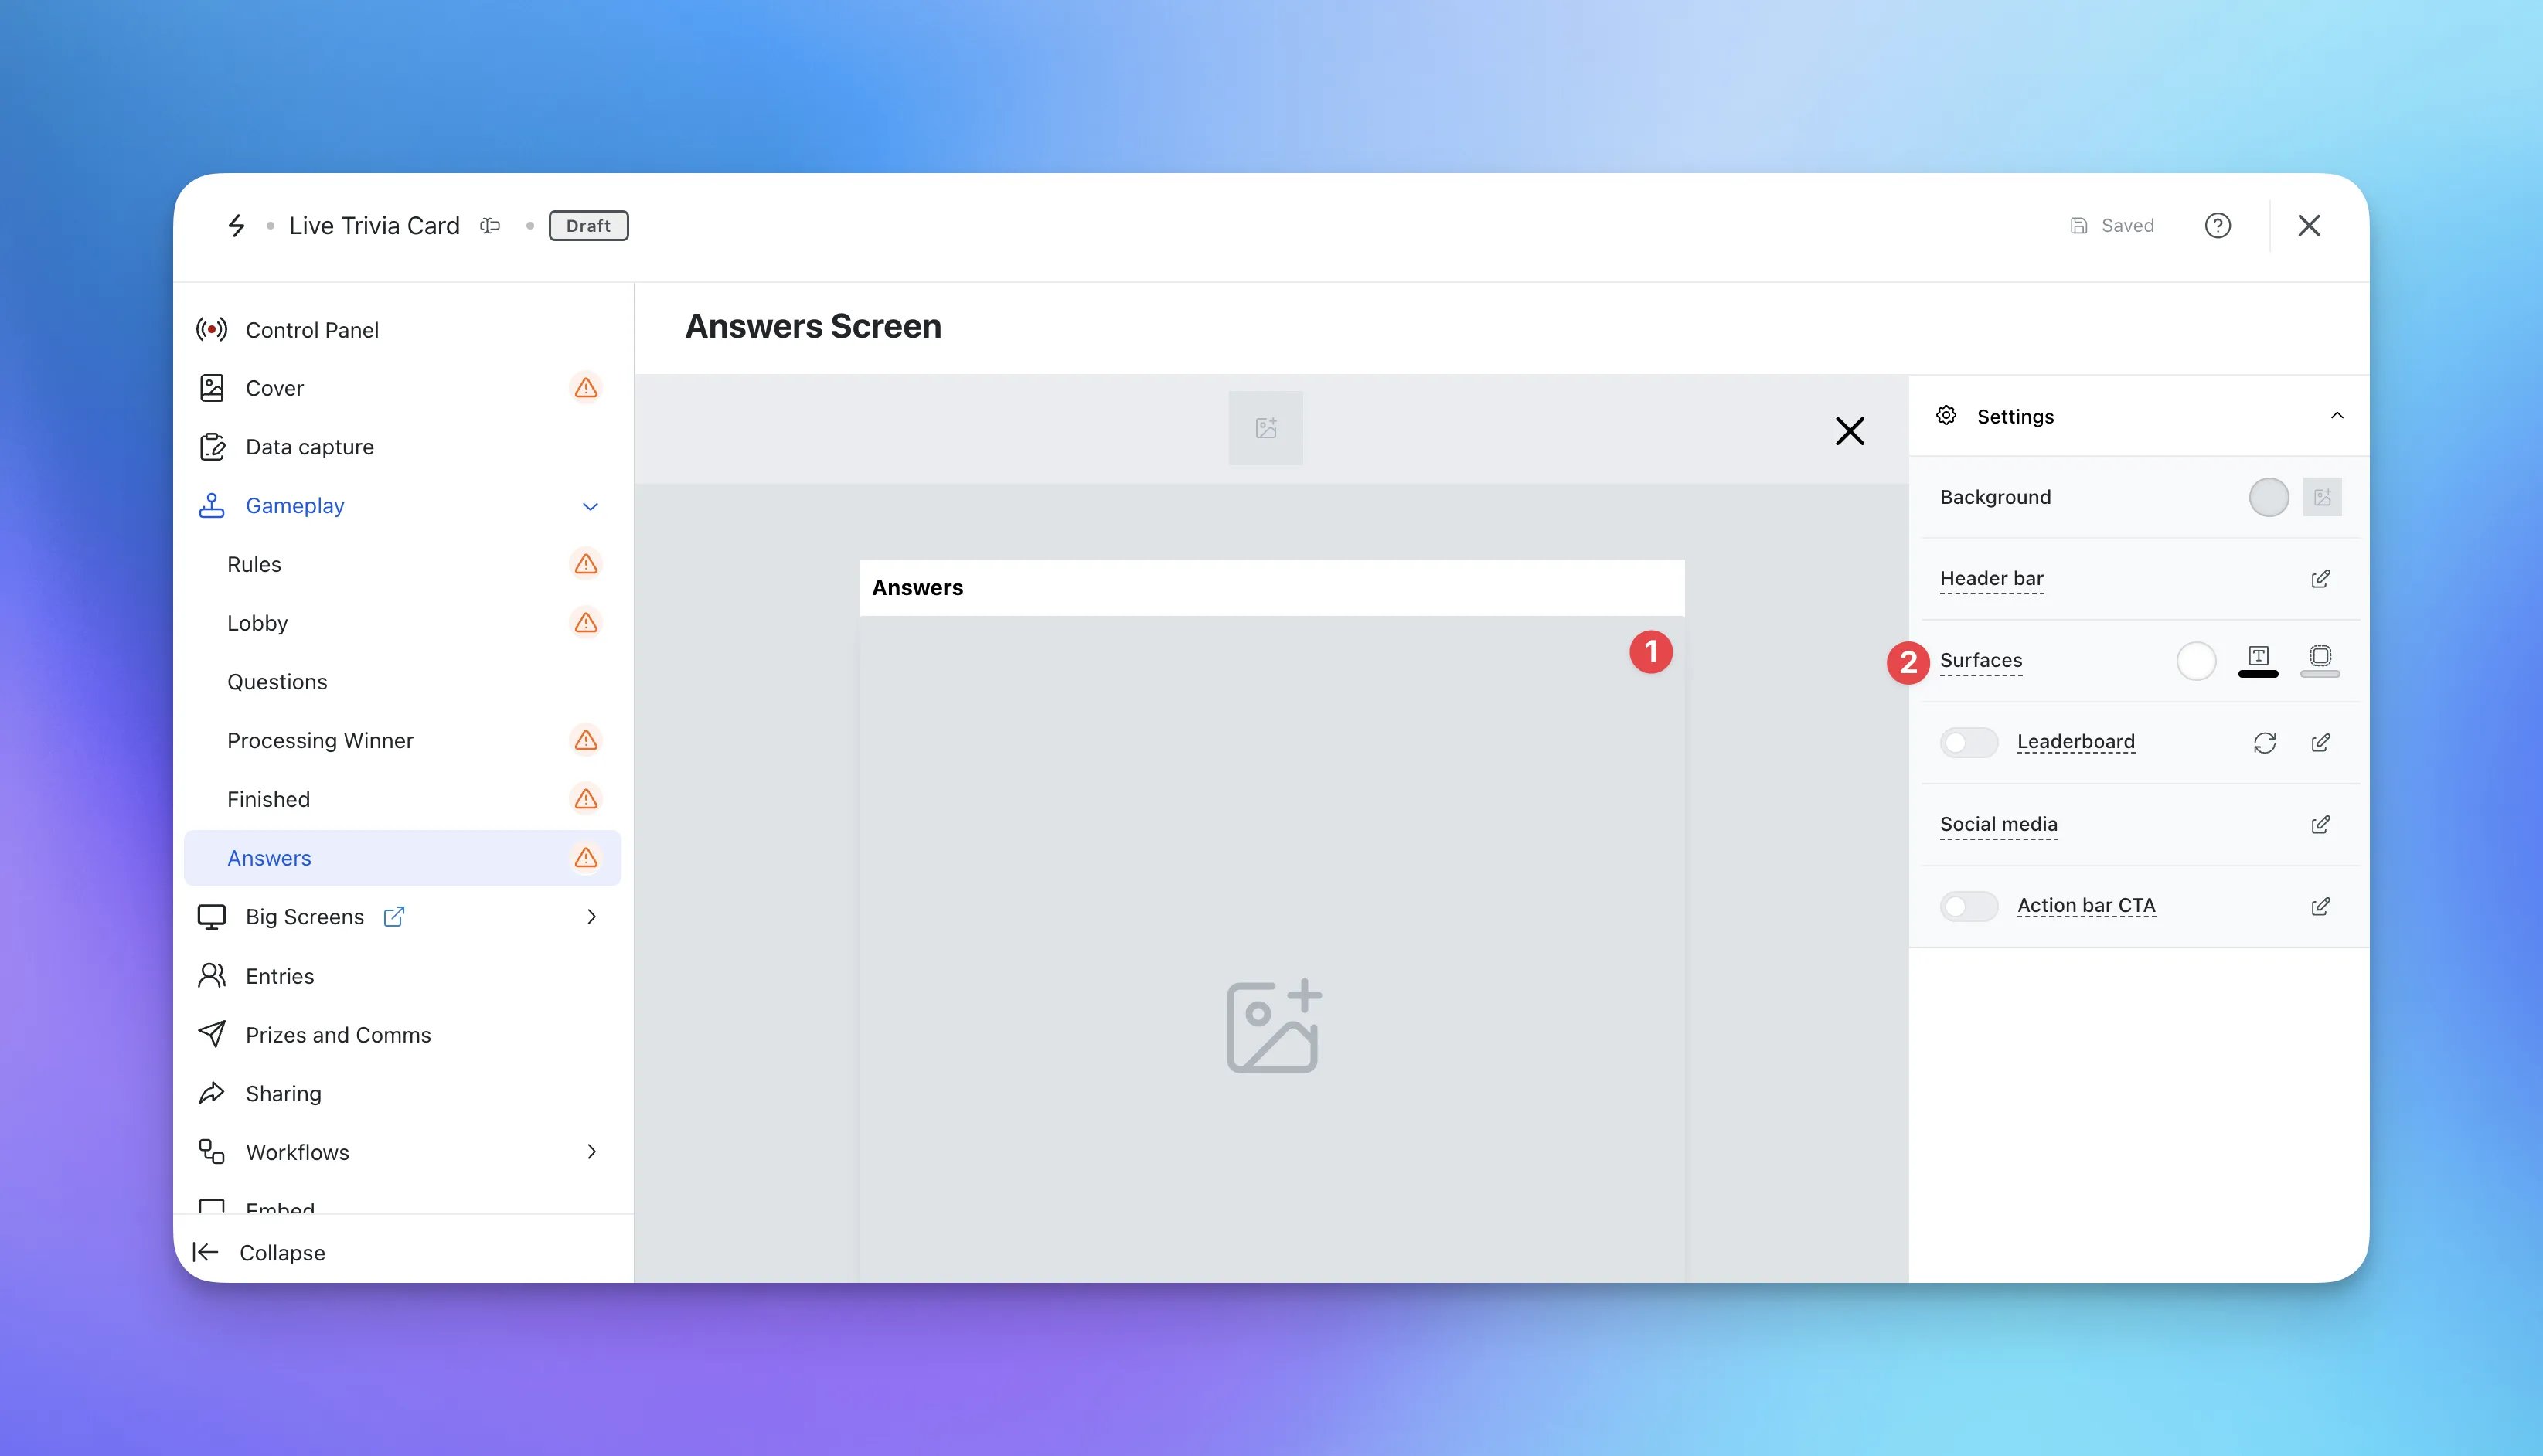 * Click on the **Answers Screen** tab.
* **(1)** Here you can set the **Answers screen** image.
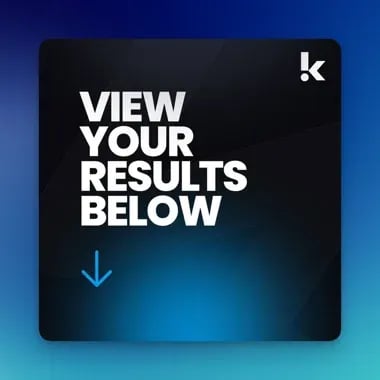
The recommended size is 1080w x 1080h. We strongly encourage you to include the following information on the answer screen image;
* Use the copy "View Results" with an arrow pointing down. See below for an example of an answer screen image.
* Click on the **Answers Screen** tab.
* **(1)** Here you can set the **Answers screen** image.
The recommended size is 1080w x 1080h. We strongly encourage you to include the following information on the answer screen image;
* Use the copy "View Results" with an arrow pointing down. See below for an example of an answer screen image.
 **(2)** Alter the **answer header colors.**
### Step 11: Set up your Big Screens *(optional)*
**(2)** Alter the **answer header colors.**
### Step 11: Set up your Big Screens *(optional)*
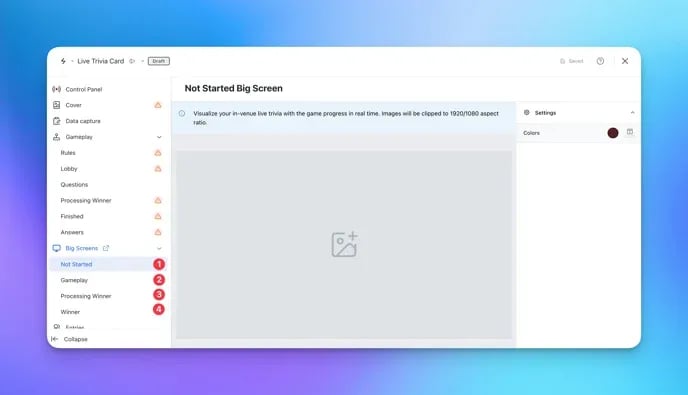 Here you can enable the Big Screens feature. These are the images that will appear on the in-venue screen if you want to run your Live Trivia in a stadium/crowd setting, click [here](/support-resources/general/running-your-live-trivia-in-venue) for a guide on running your game in-venue. These images simply sit on a URL and will automatically change as your Live Trivia progresses.
* **(1)** Click on the **big screens** tab and then **not started.**
Here you can enable the Big Screens feature. These are the images that will appear on the in-venue screen if you want to run your Live Trivia in a stadium/crowd setting, click [here](/support-resources/general/running-your-live-trivia-in-venue) for a guide on running your game in-venue. These images simply sit on a URL and will automatically change as your Live Trivia progresses.
* **(1)** Click on the **big screens** tab and then **not started.**
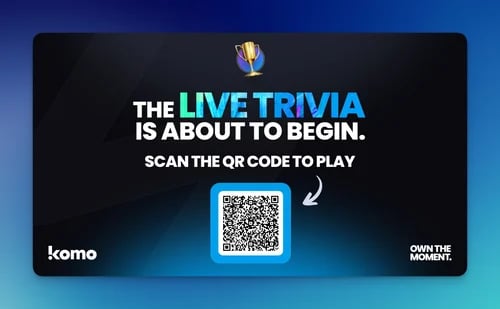
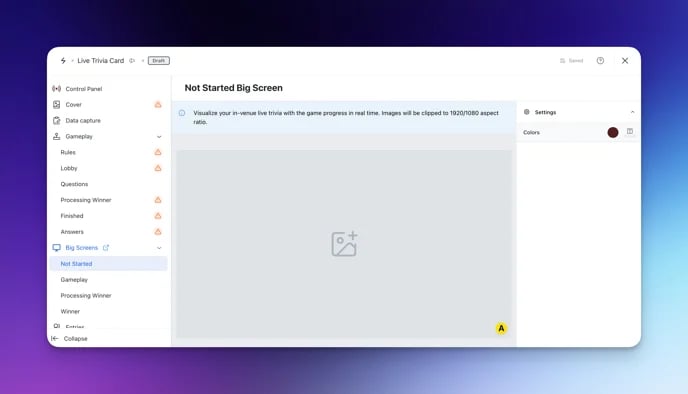 * The **not stated** screen. This is a holding screen that is displayed prior to starting the game. Provide details of the game and a QR code for users to register to play.
* **(A)** Upload a **background image** here.
See below for an example image;
* The **not stated** screen. This is a holding screen that is displayed prior to starting the game. Provide details of the game and a QR code for users to register to play.
* **(A)** Upload a **background image** here.
See below for an example image;
 * **(2)** Here you can edit the **gameplay screen.**
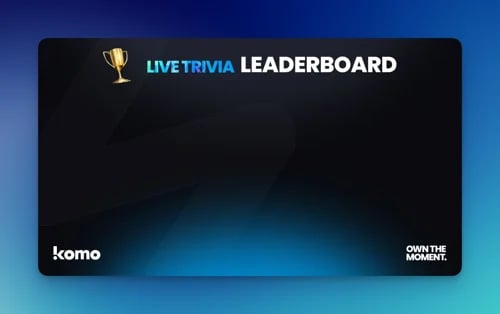
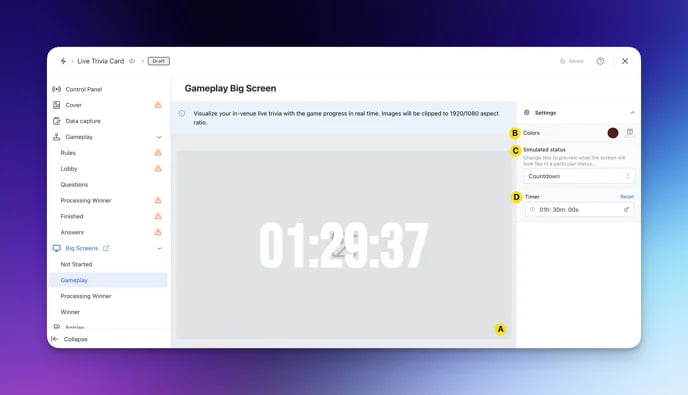 * The **game in progress** screen. This image will have the time left for live trivia placed as an overlay on top of the image. It will then countdown accordingly.
* **(A)** Upload a **background image** here.
See below for an example image;
* The **game in progress** screen. This image will have the time left for live trivia placed as an overlay on top of the image. It will then countdown accordingly.
* **(A)** Upload a **background image** here.
See below for an example image;
 * **(B)** Alter the **countdown clock** colors.
* **(C)** Using the drop-down, preview the different **gameplay statuses**.
* **(D)** Update the **timer** to preview.
* **(3)** Here you can edit the **processing winner screen.**
* **(B)** Alter the **countdown clock** colors.
* **(C)** Using the drop-down, preview the different **gameplay statuses**.
* **(D)** Update the **timer** to preview.
* **(3)** Here you can edit the **processing winner screen.**
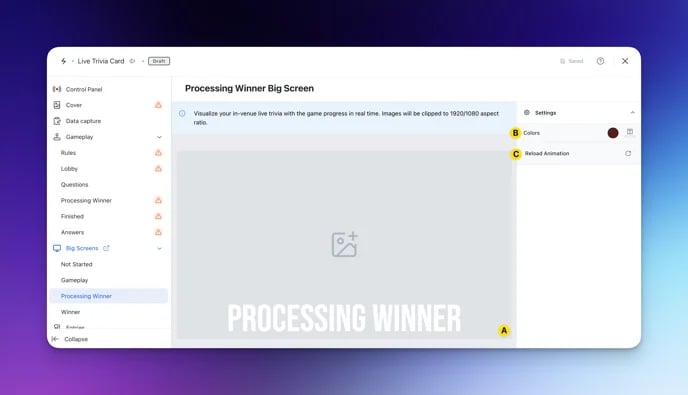 * The **processing** screen. The processing screen is shown at the end of the Live Trivia but prior to the prizes being awarded. it acts as a holding screen whilst the person running the Live Trivia awards the prizes.
* **(A)** Upload a **background image** here.
See below for an example image;
* The **processing** screen. The processing screen is shown at the end of the Live Trivia but prior to the prizes being awarded. it acts as a holding screen whilst the person running the Live Trivia awards the prizes.
* **(A)** Upload a **background image** here.
See below for an example image;
 * **(B)** Alter the **processing winner** text color.
* **(C)** Here you can reload the **processing winner animation.**
* **(4)** Here you can edit the **winner screen.**
* **(B)** Alter the **processing winner** text color.
* **(C)** Here you can reload the **processing winner animation.**
* **(4)** Here you can edit the **winner screen.**
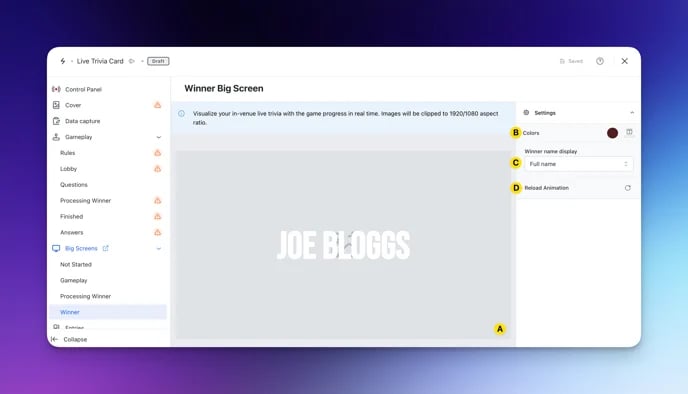 * The **winner screen** is shown once the prize is awarded and displays the Live Trivia winner's name as an overlay on your uploaded image.
* **(A)** Upload a **background image** here.
See below for an example image;
* The **winner screen** is shown once the prize is awarded and displays the Live Trivia winner's name as an overlay on your uploaded image.
* **(A)** Upload a **background image** here.
See below for an example image;
 * **(B)** Alter the **winner** text color.
* **(C)** Here you can reload the **winner animation.**
### Step 12: Set up your prizes and communications
* Ready to set up your Prizes and Communications? [Click here to learn more](/getting-started/hub-setup/data-capture#step-4-create-your-communications).
When setting up prizes for Live Trivia, you have the additional option to add images to represent each prize.
### **Step 13: Publish your Card**
* **(B)** Alter the **winner** text color.
* **(C)** Here you can reload the **winner animation.**
### Step 12: Set up your prizes and communications
* Ready to set up your Prizes and Communications? [Click here to learn more](/getting-started/hub-setup/data-capture#step-4-create-your-communications).
When setting up prizes for Live Trivia, you have the additional option to add images to represent each prize.
### **Step 13: Publish your Card**
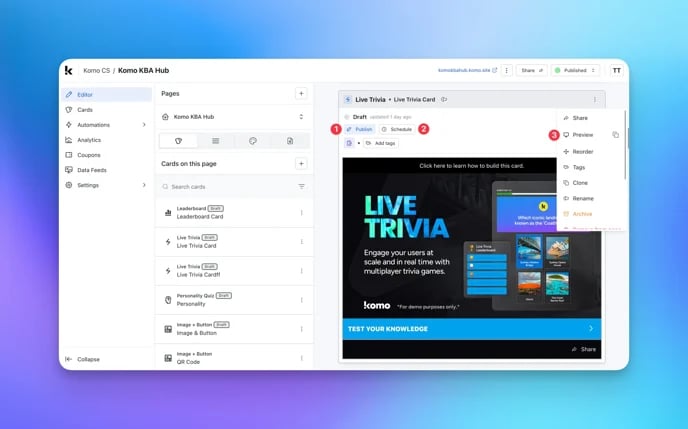 **Once you've completed all of these steps and are happy with all the aspects of your card, it's time to publish your Live Trivia.**
* **(1)** **Publish** your card manually and instantly for the world to see.
* **(2)** **Schedule** your card to be published and unpublished at set dates and times.
* **(3)** Click on **...** to **Preview** and interact with the card on the front end from a user's perspective before publishing it. See how to test your card [here](/getting-started/hub-setup/card-testing).
All competition entries will be recorded and will impact the card analytics.
## "Go live" checklist
Ready to go live with your Live Trivia? We recommend reviewing the following list before launching and double-checking if you have:
* All images uploaded to each screen are the **correct dimensions**. Export image files in 2x to ensure none of the images appear pixelated.
* Added all your trivia questions (including imagery where possible).
* Used **survey** and [**market research**](https://blog.komo.tech/how-businesses-are-using-komo-for-market-research) questions to gain insights and user-generated social media content. (Consider including a Prefix in front of these sorts of questions, e.g. 'BONUS POINTS', 'HAVE YOUR SAY?', or 'FAN POLL')
* Created [**personalized communications**](/interactive-features/features/personalised-prizing/index) for your market research questions.
* Add all your brand/social links to the **Social media** tab on the Finished screen.
* Added your **social sharing** copy in the settings tab, giving users the best experience and increasing the likelihood of your game being shared.
* Added a **Call to action** bar on the Finished screen. This is shown at the end of the Live Trivia when people are reviewing their scores. This can be one of the most potent commercial tools in the game - it is a simple CTA that always receives a great click-through rate.
* Hyperlinked your [**T\&Cs**](/getting-started/resources/terms-conditions/index) to the opt-in-field, which is created in the **data capture** section of the settings tab.
* All your **communications** (Major Prize Winner, Minor Prize Winner, Everybody Else, Registration) are fully set up and ready to send with the **unique gameplay link** included. The **unique gameplay link** allows the player to come back after the game is completed to check their score.
* You have added and attached a **Leaderboard** to your Live Trivia game.
* If you are using **coupons**, make sure the coupons created are set up correctly. Check the coupon limits are set, the copy for each screen is right and you have linked the appropriate coupons to your communications.
* Ensure your **Prize** awarding rules are set up correctly.
* Uploaded **images** for all 'prize' recipients and those not winning a prize with a "thanks for playing image."
* Uploaded images to the **Big screens** (if running an in-venue trivia). Make sure to include your logo on the bottom of each image and the copy "Congratulations" on the top for the **Winner** screen as the winner's name will appear in the middle.
* Set up the **action screens** which pull live data from the trivia game. These can be used to promote your current game or to promote pre-registrations for future games. Example action screens include: "The Top 10", "The Hardest Question", "Team Game Results", "Fan Poll Results."
* **Tested through your game** with a couple of people to ensure all of your communications and images are as you wish them to be. You can [see how to test your game here](/getting-started/hub-setup/card-testing/index). Then you're ready to go live!
## Promotion
## FAQ
**What happens in the event of a tie?**
Answers in Live Trivia are recorded using millisecond accuracy, but they are normalized into points. i.e. For a 20-second question, points are calculated by `(time remaining in ms)/ 20,000 \* 10,000`. Therefore, a tie on points is unlikely. However, if it does occur, whichever user entered first is awarded first place.
**What are the recommended sizes for each image?**
Click [here](https://docs.google.com/presentation/d/1o91hAIgitUKO7jhpfO5aFD-cDjgYiRrLXIKGgwZKVIE/edit?usp=sharing) to view our Live Trivia design guidelines.
**What's the difference between a Quiz Card and a Live Trivia game?**
The Quiz Card allows you to challenge your audience at any time, it is always open, and users can take as long as they like to answer questions.
The Live Trivia is best described as a 'pub quiz' available to anyone, anywhere. The Live Trivia is open for a set amount of time (this can be as little or as long as you like), and then once started, users have a set amount of time to answer and be crowned the smartest *Insert topic/team* Fan.
**What is an invite-only Live Trivia game and why would I want to do this?**
An invite-only Live-trivia is when you want only a subset of your community to be able to take part in a trivia competition - this is often done when running larger campaigns and users can 'win' entry into a final private trivia game to crown a winner. You can see [how to set this up here](/interactive-features/quizzes/live-trivia-invite-only/index).
**How do I run my Live Trivia in-venue?**
Click [here](/support-resources/general/running-your-live-trivia-in-venue/index) for a step-by-step guide to running your Live Trivia in-venue.
**How do I attach terms & conditions to my Live Trivia game?**
Simply send through your terms and conditions in a .PDF format to your Customer Success Specialist and they will take care of it for you. Download your Live Trivia terms and conditions [here](/getting-started/resources/terms-conditions/index).
## Top tips
* Aim to have 8-12 questions for maximum engagement.
* Base your Live Trivia on a topic that's fun and interesting e.g. TV show, movies, Christmas etc.
* Use images in your questions - a cover photo and/or images for each answer. This brings your game to life! You don't want to play a game that's just plain text...
* Include survey questions. Get to know your audience by asking specific questions about your business or anything you're curious about knowing. This is a bonus points question, your audience will definitely answer it as whatever answer they select, they will get points for!
* Design your Cover and Data Capture Form screen early so you are able to promote your game for users to register. You can then design the rest of the game while promoting it at the same time. Your game will remain closed until you decide to publish it live.
* We highly recommend adding prizing details to your designs, ie: First place wins X.
* Create test games of your trivia so you can see how it will look from your audience's perspective. This allows you to see the game in action and spot any changes you may need to do.
* Set up a Call to Action bar on the Finished screen to direct users back to your Hub to view their position on the Leaderboard or to take part in other competitions and games.
* Use your Data Capture screen as your cover image. This should include the name and type of your Live Trivia and prizing details. Make sure to follow the sizing recommendations for the Cover and Data Capture screen as they will be different!
* Ensure the 'Shuffle answers' option is on to avoid cheating!
**Once you've completed all of these steps and are happy with all the aspects of your card, it's time to publish your Live Trivia.**
* **(1)** **Publish** your card manually and instantly for the world to see.
* **(2)** **Schedule** your card to be published and unpublished at set dates and times.
* **(3)** Click on **...** to **Preview** and interact with the card on the front end from a user's perspective before publishing it. See how to test your card [here](/getting-started/hub-setup/card-testing).
All competition entries will be recorded and will impact the card analytics.
## "Go live" checklist
Ready to go live with your Live Trivia? We recommend reviewing the following list before launching and double-checking if you have:
* All images uploaded to each screen are the **correct dimensions**. Export image files in 2x to ensure none of the images appear pixelated.
* Added all your trivia questions (including imagery where possible).
* Used **survey** and [**market research**](https://blog.komo.tech/how-businesses-are-using-komo-for-market-research) questions to gain insights and user-generated social media content. (Consider including a Prefix in front of these sorts of questions, e.g. 'BONUS POINTS', 'HAVE YOUR SAY?', or 'FAN POLL')
* Created [**personalized communications**](/interactive-features/features/personalised-prizing/index) for your market research questions.
* Add all your brand/social links to the **Social media** tab on the Finished screen.
* Added your **social sharing** copy in the settings tab, giving users the best experience and increasing the likelihood of your game being shared.
* Added a **Call to action** bar on the Finished screen. This is shown at the end of the Live Trivia when people are reviewing their scores. This can be one of the most potent commercial tools in the game - it is a simple CTA that always receives a great click-through rate.
* Hyperlinked your [**T\&Cs**](/getting-started/resources/terms-conditions/index) to the opt-in-field, which is created in the **data capture** section of the settings tab.
* All your **communications** (Major Prize Winner, Minor Prize Winner, Everybody Else, Registration) are fully set up and ready to send with the **unique gameplay link** included. The **unique gameplay link** allows the player to come back after the game is completed to check their score.
* You have added and attached a **Leaderboard** to your Live Trivia game.
* If you are using **coupons**, make sure the coupons created are set up correctly. Check the coupon limits are set, the copy for each screen is right and you have linked the appropriate coupons to your communications.
* Ensure your **Prize** awarding rules are set up correctly.
* Uploaded **images** for all 'prize' recipients and those not winning a prize with a "thanks for playing image."
* Uploaded images to the **Big screens** (if running an in-venue trivia). Make sure to include your logo on the bottom of each image and the copy "Congratulations" on the top for the **Winner** screen as the winner's name will appear in the middle.
* Set up the **action screens** which pull live data from the trivia game. These can be used to promote your current game or to promote pre-registrations for future games. Example action screens include: "The Top 10", "The Hardest Question", "Team Game Results", "Fan Poll Results."
* **Tested through your game** with a couple of people to ensure all of your communications and images are as you wish them to be. You can [see how to test your game here](/getting-started/hub-setup/card-testing/index). Then you're ready to go live!
## Promotion
## FAQ
**What happens in the event of a tie?**
Answers in Live Trivia are recorded using millisecond accuracy, but they are normalized into points. i.e. For a 20-second question, points are calculated by `(time remaining in ms)/ 20,000 \* 10,000`. Therefore, a tie on points is unlikely. However, if it does occur, whichever user entered first is awarded first place.
**What are the recommended sizes for each image?**
Click [here](https://docs.google.com/presentation/d/1o91hAIgitUKO7jhpfO5aFD-cDjgYiRrLXIKGgwZKVIE/edit?usp=sharing) to view our Live Trivia design guidelines.
**What's the difference between a Quiz Card and a Live Trivia game?**
The Quiz Card allows you to challenge your audience at any time, it is always open, and users can take as long as they like to answer questions.
The Live Trivia is best described as a 'pub quiz' available to anyone, anywhere. The Live Trivia is open for a set amount of time (this can be as little or as long as you like), and then once started, users have a set amount of time to answer and be crowned the smartest *Insert topic/team* Fan.
**What is an invite-only Live Trivia game and why would I want to do this?**
An invite-only Live-trivia is when you want only a subset of your community to be able to take part in a trivia competition - this is often done when running larger campaigns and users can 'win' entry into a final private trivia game to crown a winner. You can see [how to set this up here](/interactive-features/quizzes/live-trivia-invite-only/index).
**How do I run my Live Trivia in-venue?**
Click [here](/support-resources/general/running-your-live-trivia-in-venue/index) for a step-by-step guide to running your Live Trivia in-venue.
**How do I attach terms & conditions to my Live Trivia game?**
Simply send through your terms and conditions in a .PDF format to your Customer Success Specialist and they will take care of it for you. Download your Live Trivia terms and conditions [here](/getting-started/resources/terms-conditions/index).
## Top tips
* Aim to have 8-12 questions for maximum engagement.
* Base your Live Trivia on a topic that's fun and interesting e.g. TV show, movies, Christmas etc.
* Use images in your questions - a cover photo and/or images for each answer. This brings your game to life! You don't want to play a game that's just plain text...
* Include survey questions. Get to know your audience by asking specific questions about your business or anything you're curious about knowing. This is a bonus points question, your audience will definitely answer it as whatever answer they select, they will get points for!
* Design your Cover and Data Capture Form screen early so you are able to promote your game for users to register. You can then design the rest of the game while promoting it at the same time. Your game will remain closed until you decide to publish it live.
* We highly recommend adding prizing details to your designs, ie: First place wins X.
* Create test games of your trivia so you can see how it will look from your audience's perspective. This allows you to see the game in action and spot any changes you may need to do.
* Set up a Call to Action bar on the Finished screen to direct users back to your Hub to view their position on the Leaderboard or to take part in other competitions and games.
* Use your Data Capture screen as your cover image. This should include the name and type of your Live Trivia and prizing details. Make sure to follow the sizing recommendations for the Cover and Data Capture screen as they will be different!
* Ensure the 'Shuffle answers' option is on to avoid cheating!