> ## Documentation Index
> Fetch the complete documentation index at: https://knowledge.komo.tech/llms.txt
> Use this file to discover all available pages before exploring further.
# Personality Quiz
> This highly shareable quiz type shows users results that best suit them based on their choices throughout the quiz.
## What is it?
The Personality Quiz card asks users a series of questions that in turn provide the user with a customisable outcome based on what responses they select.
## How do I build one?
### Step 1: Adding a Personality Quiz to your Hub
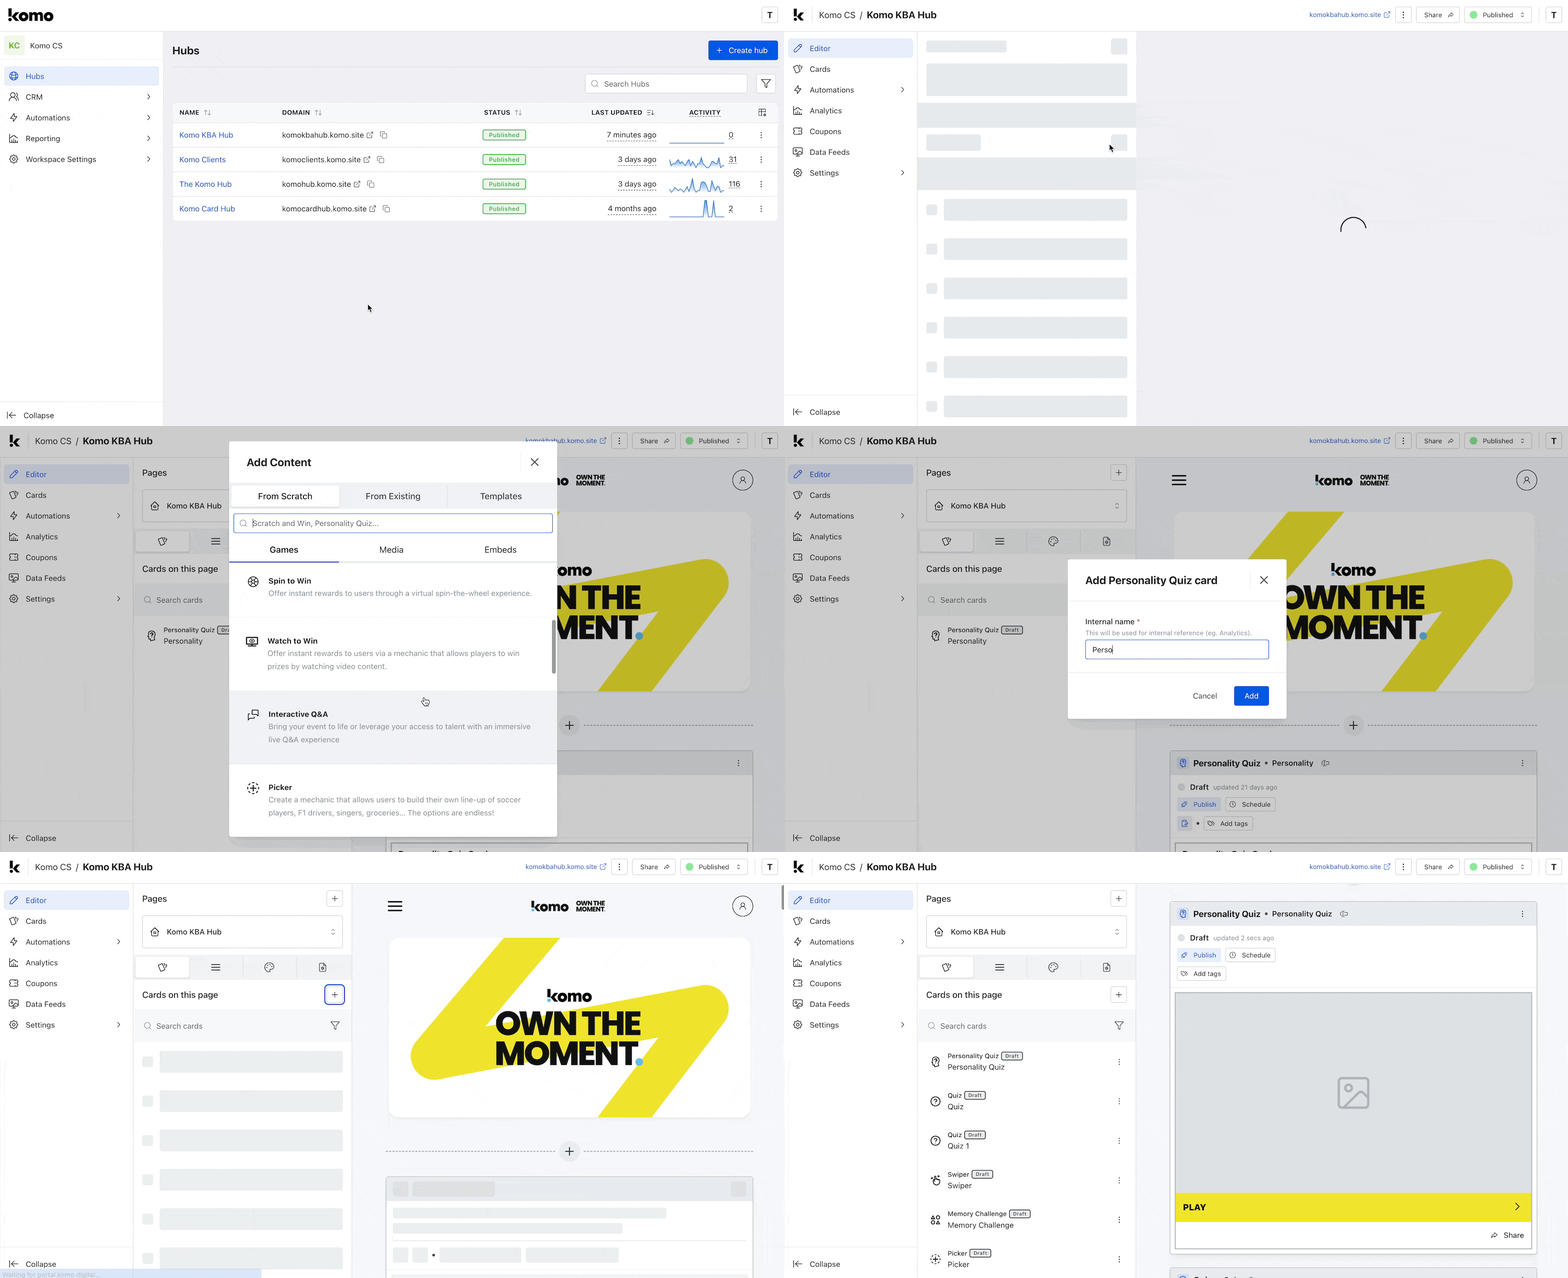 * Navigate to your **Engagement Hub**.
* Once there click the **Plus icon**, from here select **Games** and then **Personality Quiz.**
* You will then see your new card has been added to your Hub.
### Step 2: Adding a Cover image *(Optional)*
* Navigate to your **Engagement Hub**.
* Once there click the **Plus icon**, from here select **Games** and then **Personality Quiz.**
* You will then see your new card has been added to your Hub.
### Step 2: Adding a Cover image *(Optional)*
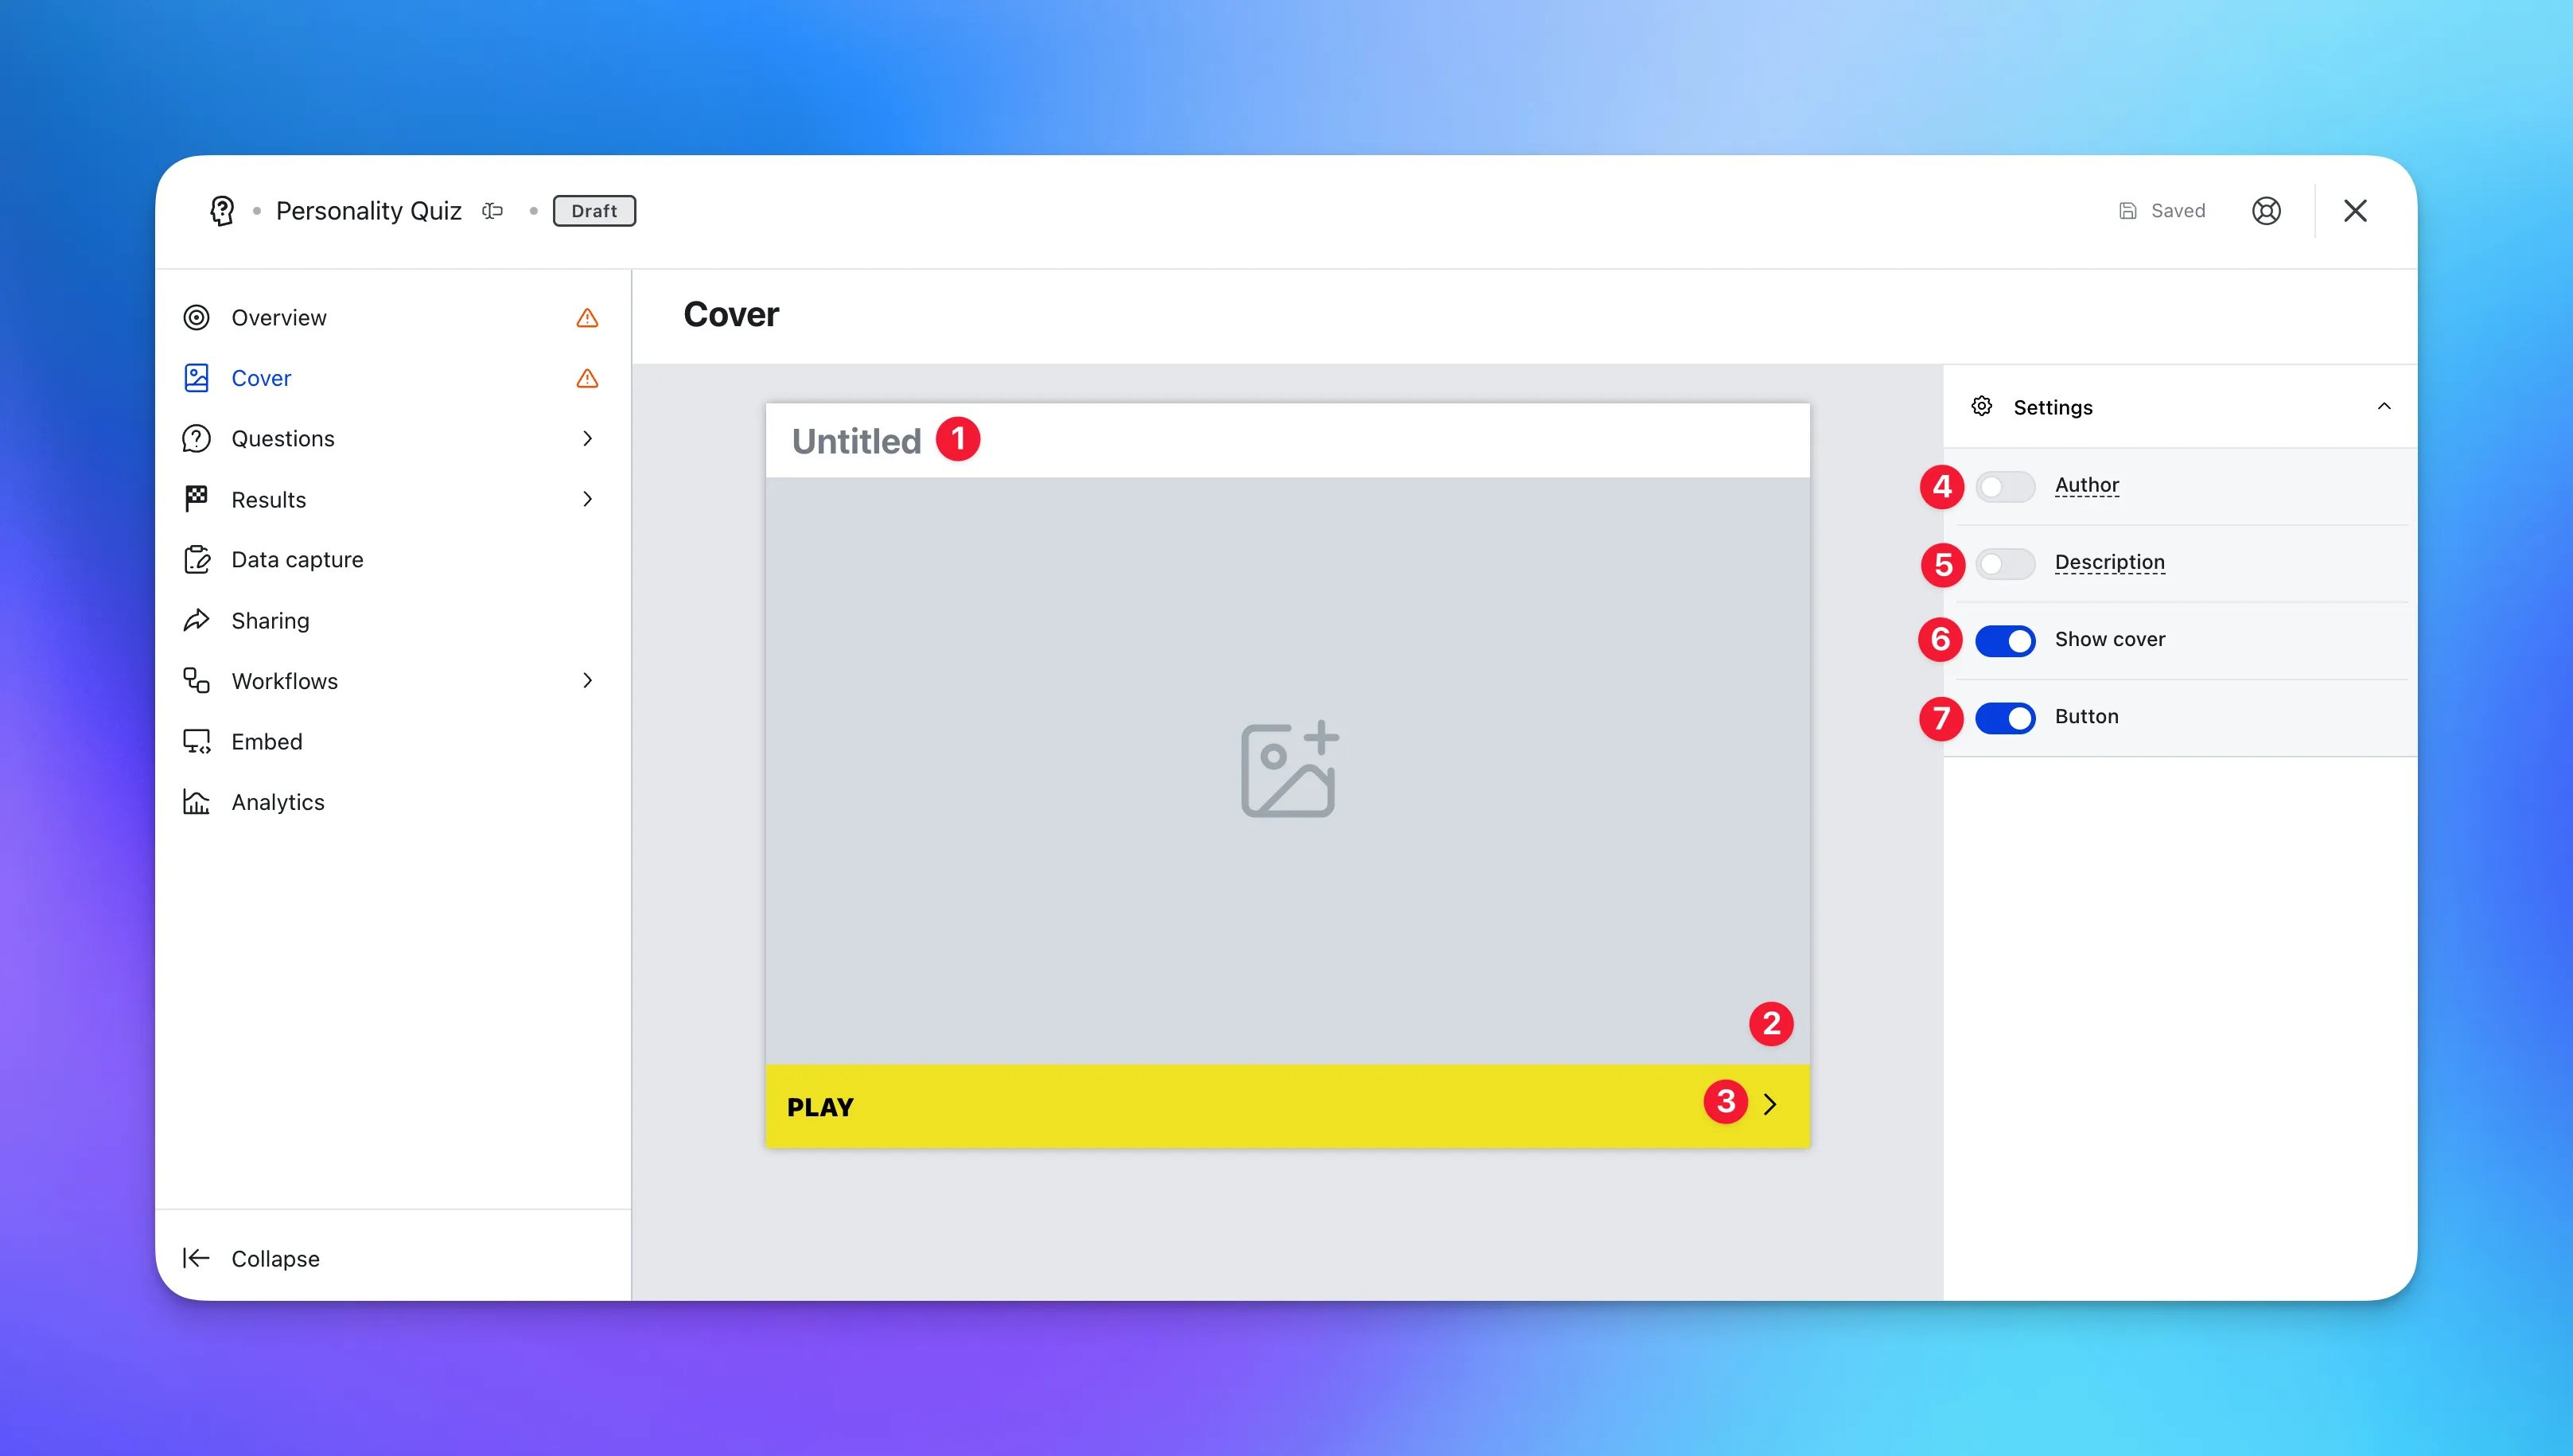 * Clicking on the **Personality Quiz** will open the editing module.
* **(1)** You have the option to give your **Quiz** a title.
* **(2)** Here you add your **Cover** image or **(6)** you can turn off the **Cover** image here.
* **(3)** And the ability to alter the colour and copy on the **call-to-action** bar or **(7)** disable the bar here.
* **(4)** You can add an **author** tag by displaying the brand or person who's responsible for the card content.
* **(5)** Add a **description** to the card.
### Step 3: Setting up your Results
* Clicking on the **Personality Quiz** will open the editing module.
* **(1)** You have the option to give your **Quiz** a title.
* **(2)** Here you add your **Cover** image or **(6)** you can turn off the **Cover** image here.
* **(3)** And the ability to alter the colour and copy on the **call-to-action** bar or **(7)** disable the bar here.
* **(4)** You can add an **author** tag by displaying the brand or person who's responsible for the card content.
* **(5)** Add a **description** to the card.
### Step 3: Setting up your Results
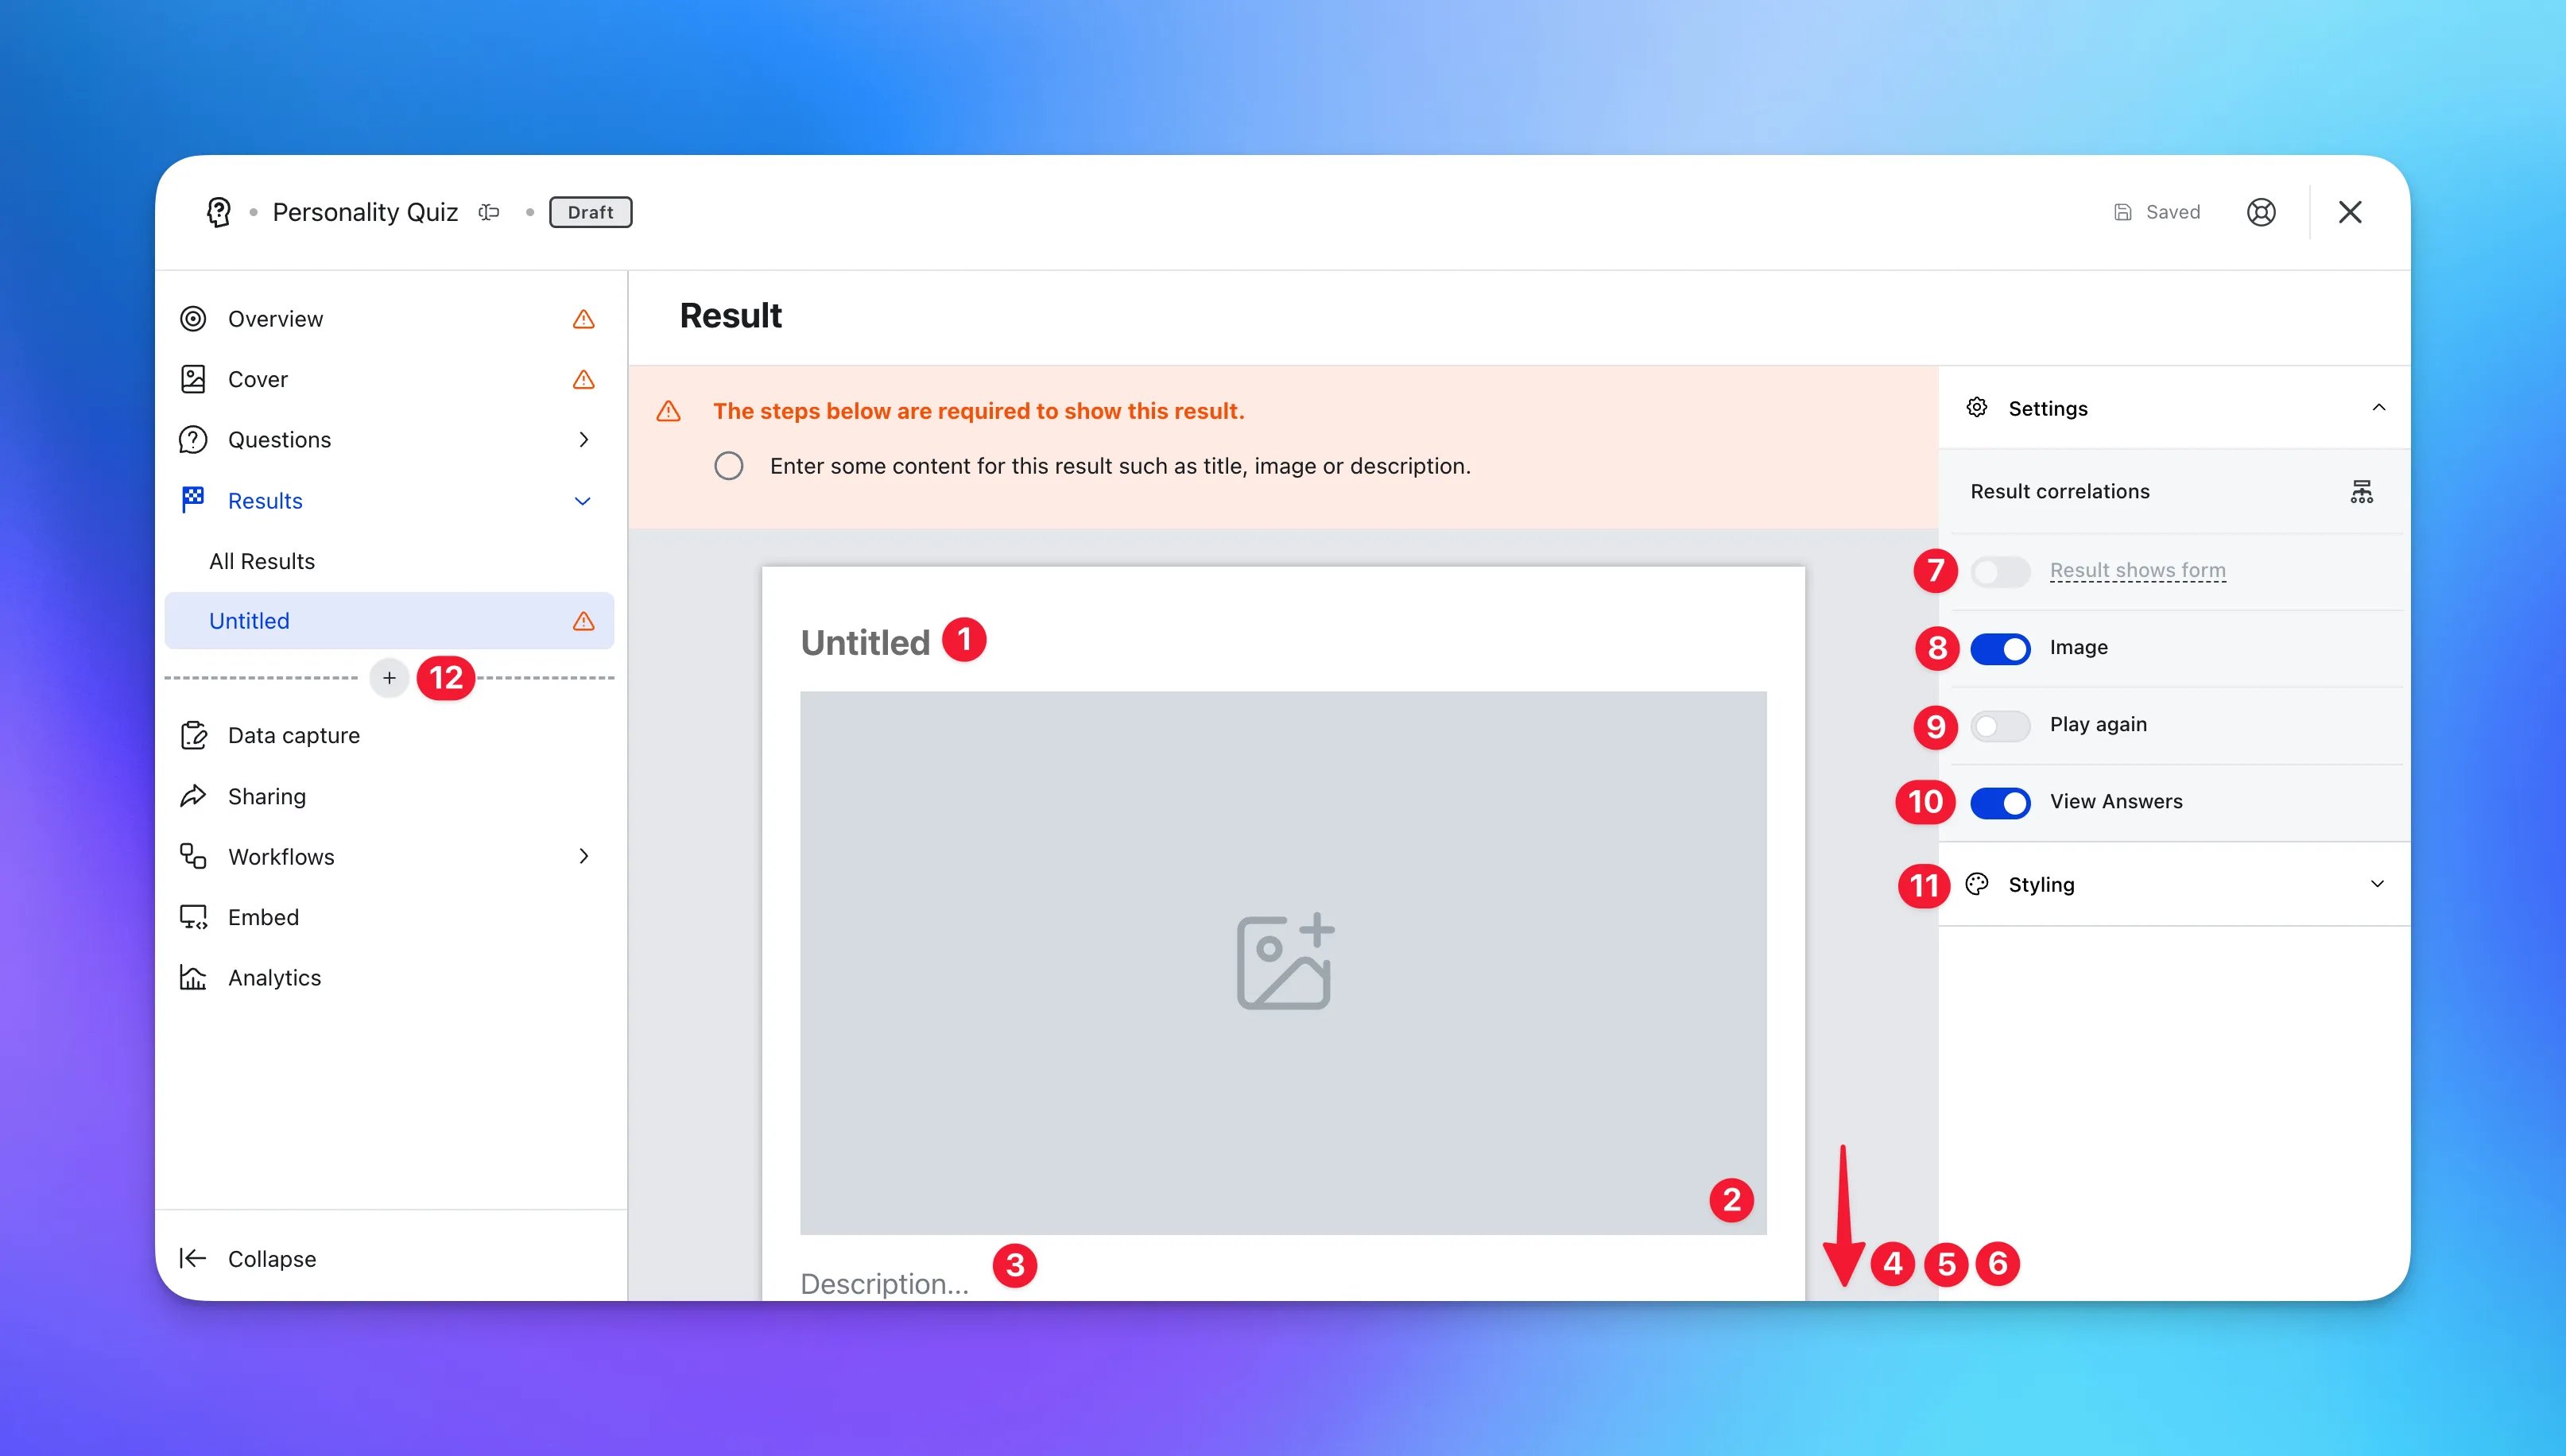 * Your results are what all of your questions will be designed to work towards.
We highly recommend adding at least 4 outcomes, however, the more you add the more unique and shareable your content will feel.
* **(1)** Give your result a **title.**
* **(2)** Here you can bring your result to life with an **image or gif** or **(8)** toggle the result image off here.
* **(3)** Give more context and value to your outcomes by adding a **description** that gives more detail about the outcome.
* **(4)** Scrolling down, you can alter the colour and copy of the **share button.**
* **(5)** Change the **outline color and text** of the view answers button or **(10)** disable this button here.
* **(6)** Scroll down, click on the **plus icon** to add a button and to drive traffic to a particular website or to a specific card.
* Your results are what all of your questions will be designed to work towards.
We highly recommend adding at least 4 outcomes, however, the more you add the more unique and shareable your content will feel.
* **(1)** Give your result a **title.**
* **(2)** Here you can bring your result to life with an **image or gif** or **(8)** toggle the result image off here.
* **(3)** Give more context and value to your outcomes by adding a **description** that gives more detail about the outcome.
* **(4)** Scrolling down, you can alter the colour and copy of the **share button.**
* **(5)** Change the **outline color and text** of the view answers button or **(10)** disable this button here.
* **(6)** Scroll down, click on the **plus icon** to add a button and to drive traffic to a particular website or to a specific card.
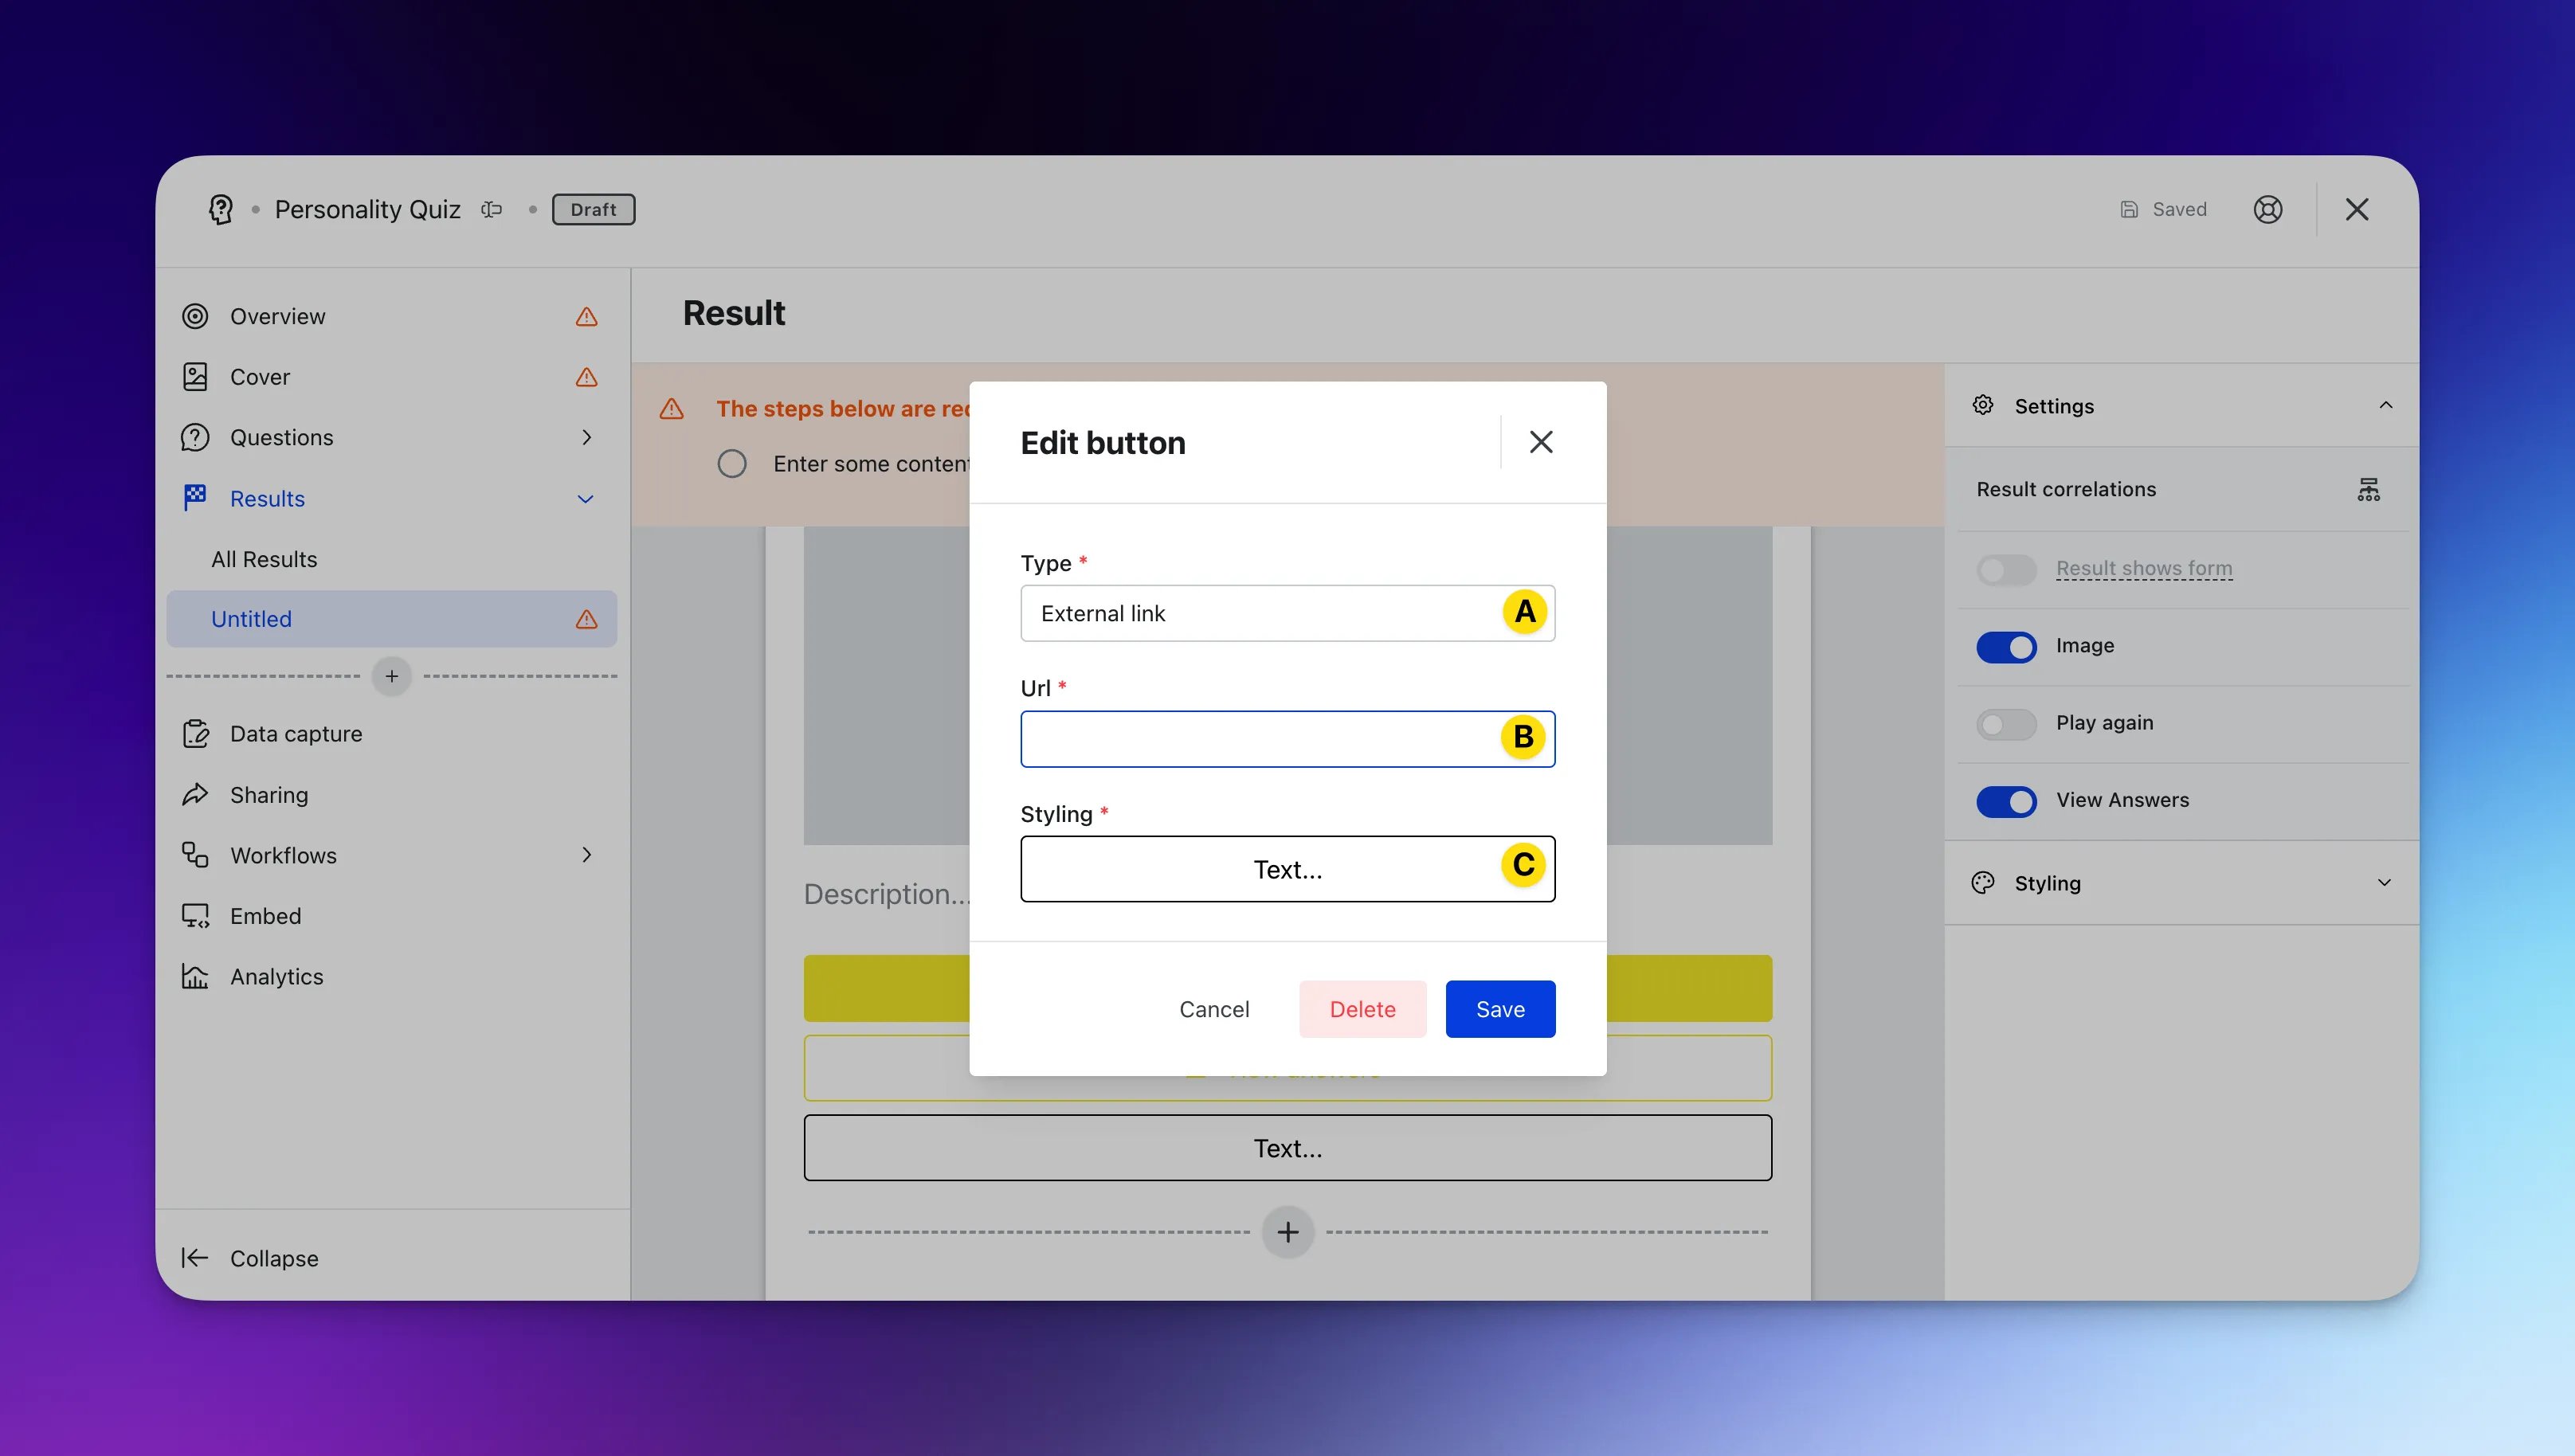 * **(A)** Insert your **URL.**
* **(B)** Add the **call-to-action** for the button.
* **(C)** Customise the **button color.**
* **(7)** Here you can decide whether or not this result should allow users to enter a **competition**.
In order to have a result lead to a data capture, you will need to first set this up.
* **(9)** Enable the **play again** button for this specific result screen.
* **(11)** Alter the **result styling colors.**
* **(A)** Insert your **URL.**
* **(B)** Add the **call-to-action** for the button.
* **(C)** Customise the **button color.**
* **(7)** Here you can decide whether or not this result should allow users to enter a **competition**.
In order to have a result lead to a data capture, you will need to first set this up.
* **(9)** Enable the **play again** button for this specific result screen.
* **(11)** Alter the **result styling colors.**
 This setting will apply to all results.
* **(a)** Edit the **header bar color**.
* **(b)** Here you can update the **result background colors**
This setting will apply to all results.
* **(a)** Edit the **header bar color**.
* **(b)** Here you can update the **result background colors**
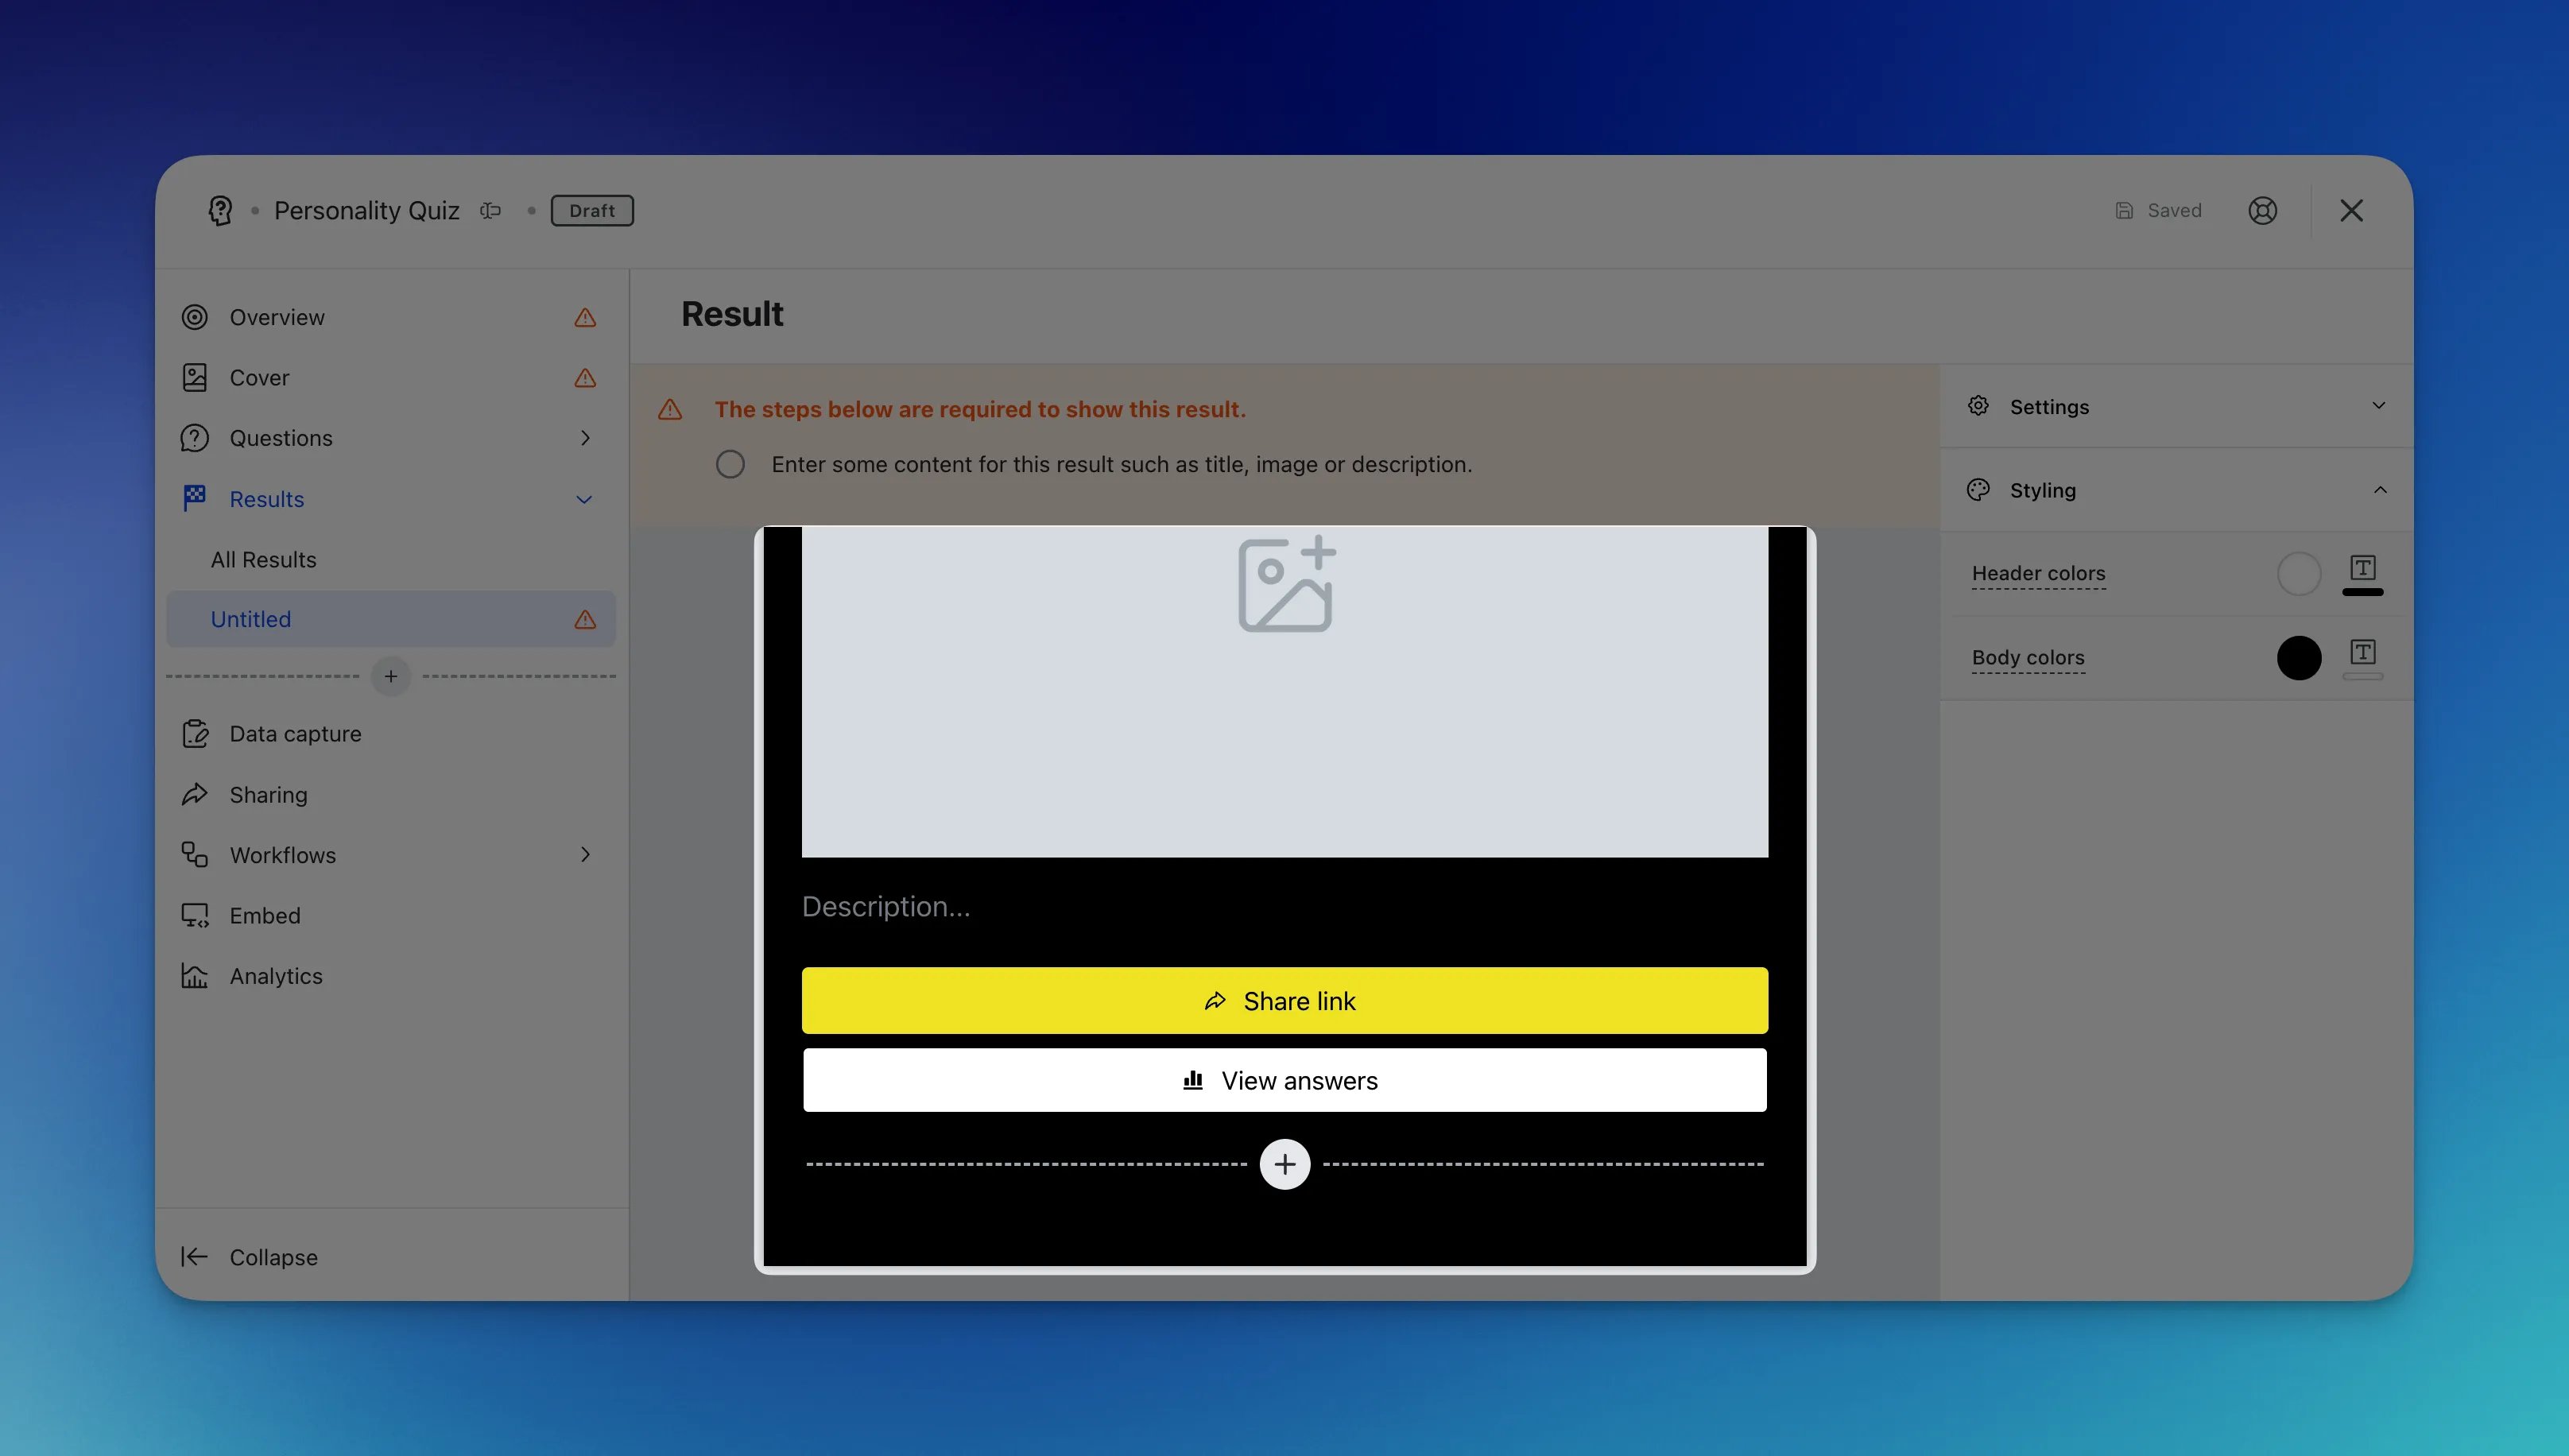 * **(12)** Here you can add **additional result** screens.
### Step 4: Adding Questions
* Now your outcomes are set up, it's time to start adding your content. When adding content to your quiz you have 2 options;
* **(1) Question** - This allows you to add your questions to your Quiz.
* **(A)** Click the cover image area to upload a **video** from your device or using a video URL, or **(H)** toggle off the question image here.
* **(B)** Here you will be able to **input** your question.
* **(C)** Here you will input your question **answers** and imagery (by clicking the placeholder image icon associated with that answer).
* **(D)** Allows you to add additional **questions.**
* **(E)** Give the question an **Internal name** for analytics purposes.
* **(F)** Connect question responses to a **contact property.**
* **(G)** Here you will be able to see every question set up within your quiz and allocate the number of points each answer should give to each outcome.
* **(a)** The current **questions** you are assigning responses for.
* **(b)** These are your currently set up results, to add additional options here see **step 3**.
* **(c)** This refers to the **total number of points** you are assigning to each result based on the user's response.
* **(I)** Here you can optionally add an **Explainer** which will pop up after the user answers this particular question.
* **(a)** Add your **description/explainer** text here.
* **(b)** Here you can alter the colour of the **Next** button.
* **(J)** Here you can toggle off the **Question** heading. Use this feature if you add a question into your question image.
* **(K)** Toggling this option on will randomly **shuffle** each of the different answer options for every user.
* **(L)** You can show the **response percentage** per answer option.
* **(M)** Scrolling down, if you don't have any result screens, you can enable a **play again** for the last question of the quiz to allow users to play again.
* **(N)** You can alter the **layout** of the answers by selecting from the options here.
* **(O)** Allows you to configure **logic**. The logic jump allows you to take users to different questions within your Quiz based on responses to certain questions. [**Click here to learn more.**](/interactive-features/features/branching-logic/index)
* **(P)** Brand the experience by altering the personality quiz **styling colors.**\
**Note:** This setting will apply to all questions.
* **(12)** Here you can add **additional result** screens.
### Step 4: Adding Questions
* Now your outcomes are set up, it's time to start adding your content. When adding content to your quiz you have 2 options;
* **(1) Question** - This allows you to add your questions to your Quiz.
* **(A)** Click the cover image area to upload a **video** from your device or using a video URL, or **(H)** toggle off the question image here.
* **(B)** Here you will be able to **input** your question.
* **(C)** Here you will input your question **answers** and imagery (by clicking the placeholder image icon associated with that answer).
* **(D)** Allows you to add additional **questions.**
* **(E)** Give the question an **Internal name** for analytics purposes.
* **(F)** Connect question responses to a **contact property.**
* **(G)** Here you will be able to see every question set up within your quiz and allocate the number of points each answer should give to each outcome.
* **(a)** The current **questions** you are assigning responses for.
* **(b)** These are your currently set up results, to add additional options here see **step 3**.
* **(c)** This refers to the **total number of points** you are assigning to each result based on the user's response.
* **(I)** Here you can optionally add an **Explainer** which will pop up after the user answers this particular question.
* **(a)** Add your **description/explainer** text here.
* **(b)** Here you can alter the colour of the **Next** button.
* **(J)** Here you can toggle off the **Question** heading. Use this feature if you add a question into your question image.
* **(K)** Toggling this option on will randomly **shuffle** each of the different answer options for every user.
* **(L)** You can show the **response percentage** per answer option.
* **(M)** Scrolling down, if you don't have any result screens, you can enable a **play again** for the last question of the quiz to allow users to play again.
* **(N)** You can alter the **layout** of the answers by selecting from the options here.
* **(O)** Allows you to configure **logic**. The logic jump allows you to take users to different questions within your Quiz based on responses to certain questions. [**Click here to learn more.**](/interactive-features/features/branching-logic/index)
* **(P)** Brand the experience by altering the personality quiz **styling colors.**\
**Note:** This setting will apply to all questions.
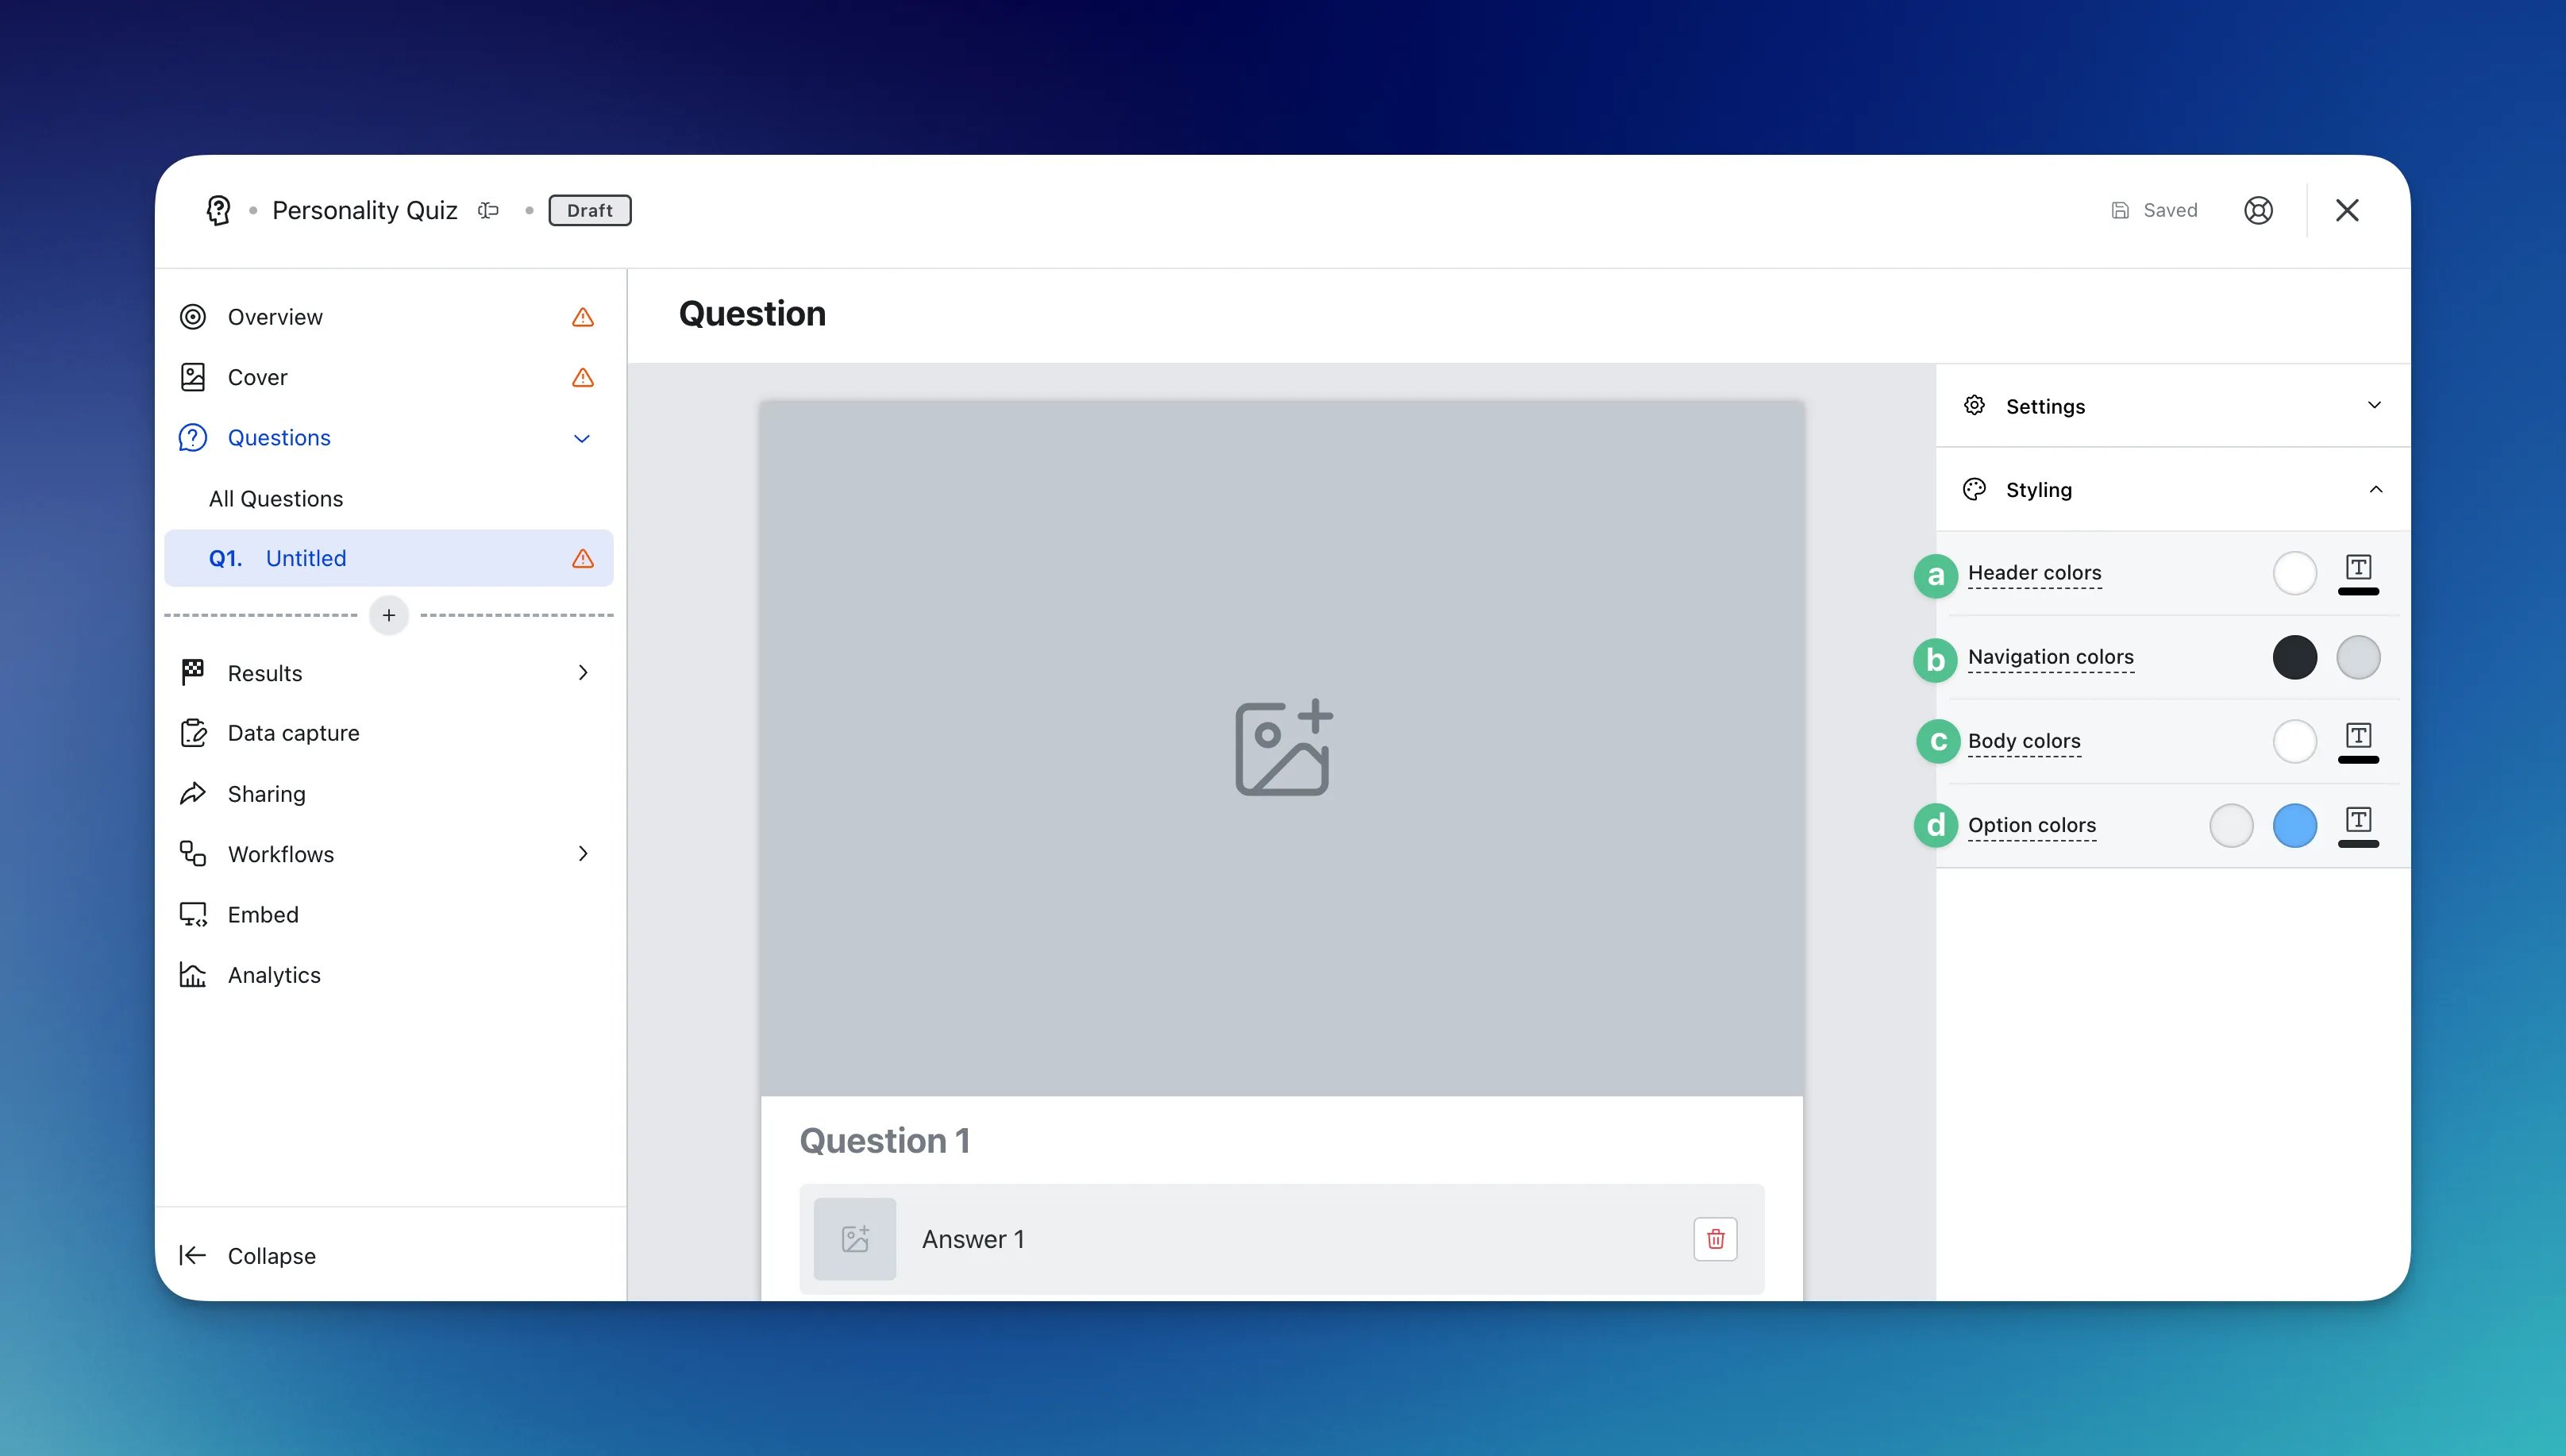 * **(a)** Edit the **header** colors.
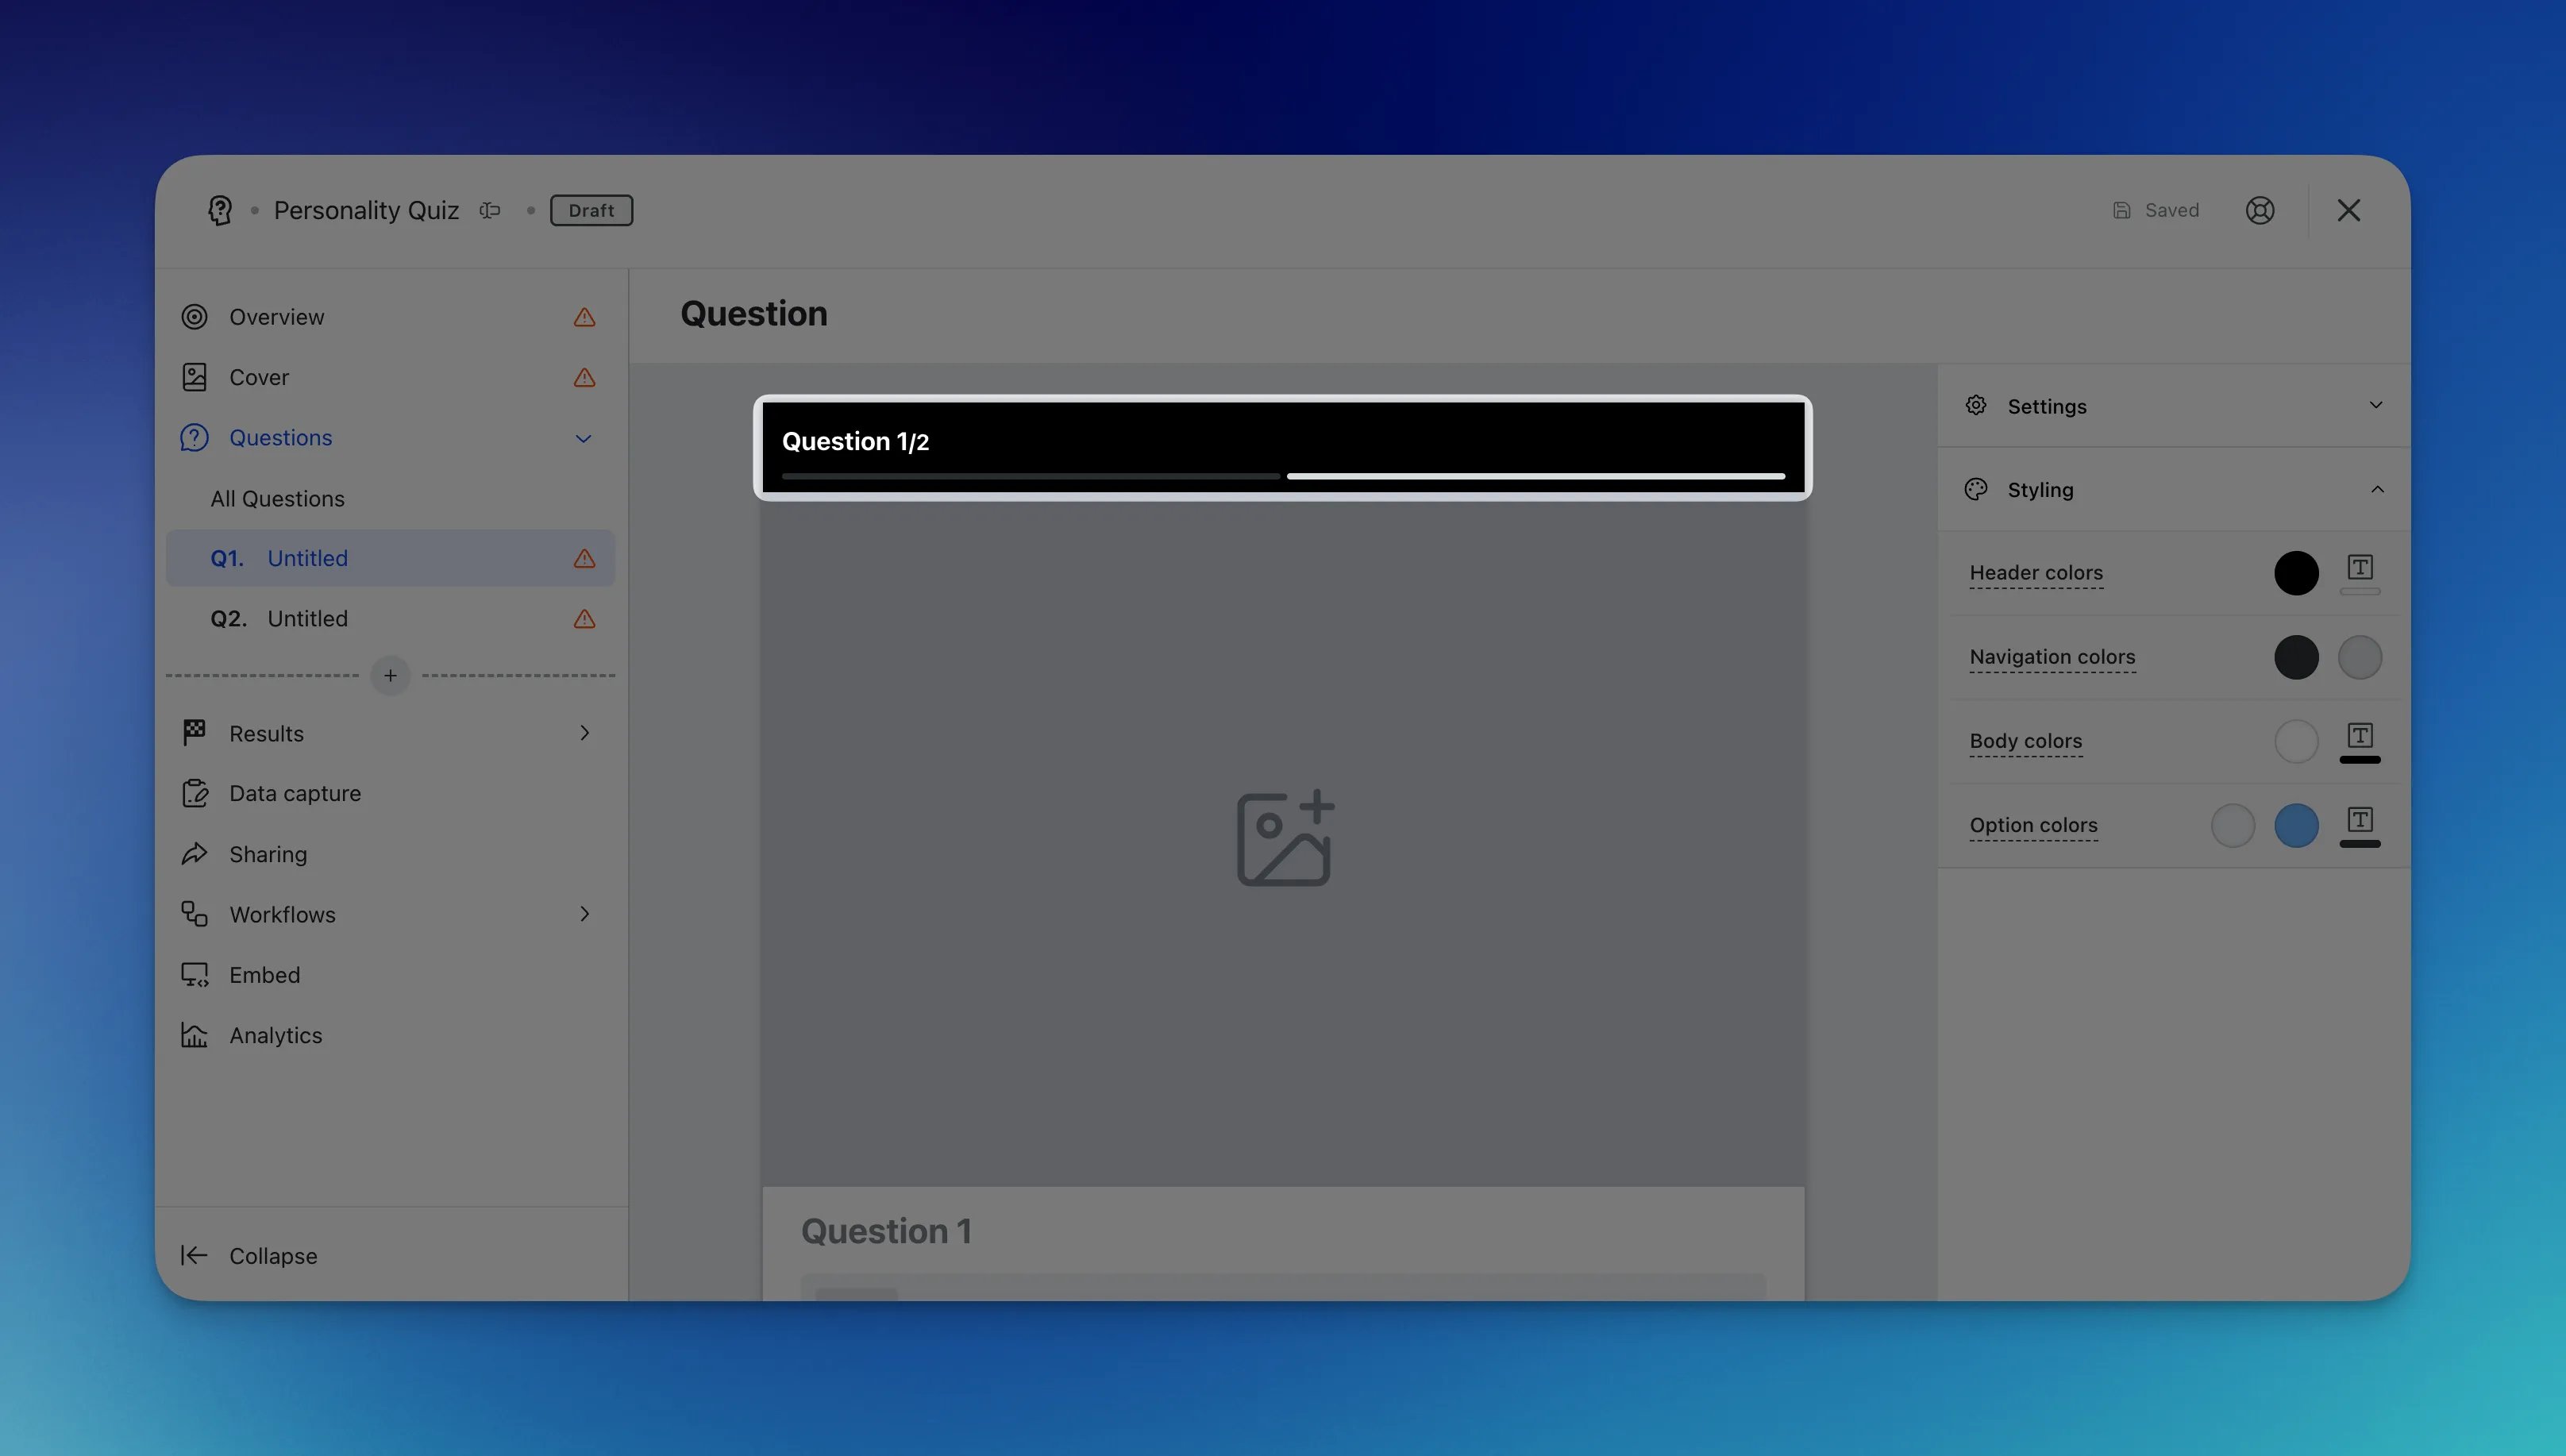 * **(b)** Alter the colours of the question **progress bar**.
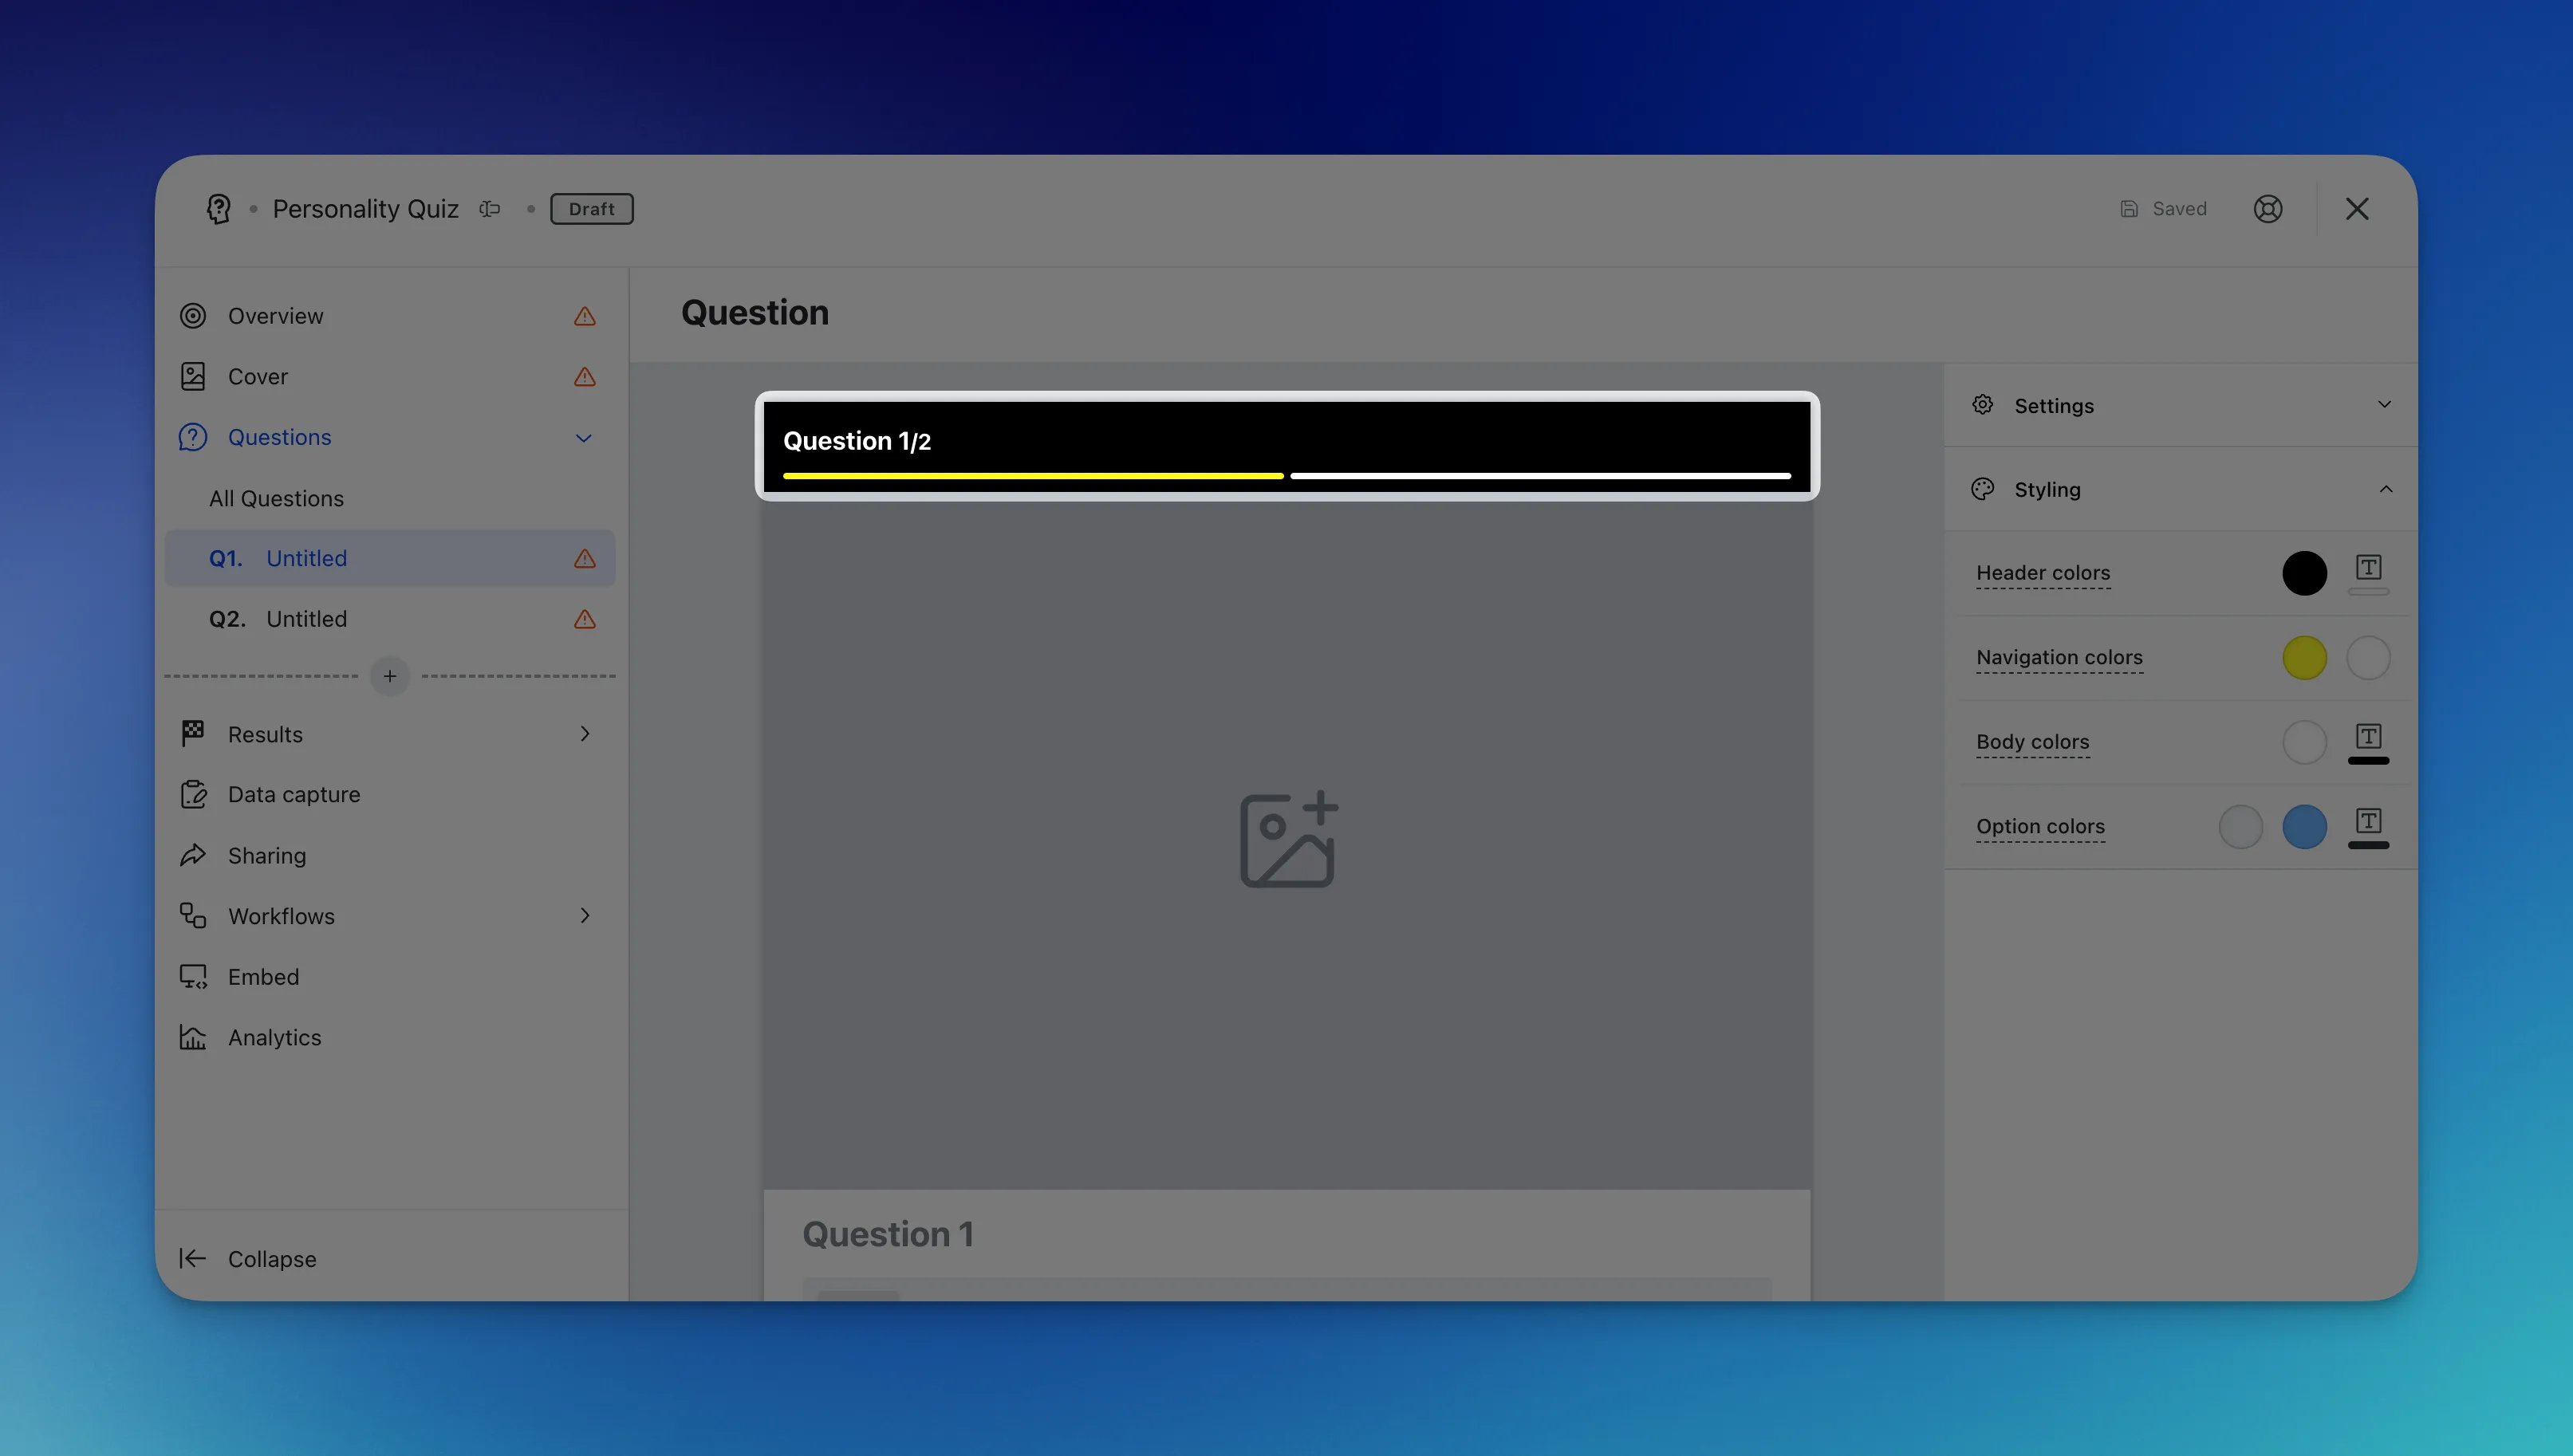 * **(c)** Edit the **background color** for the question.
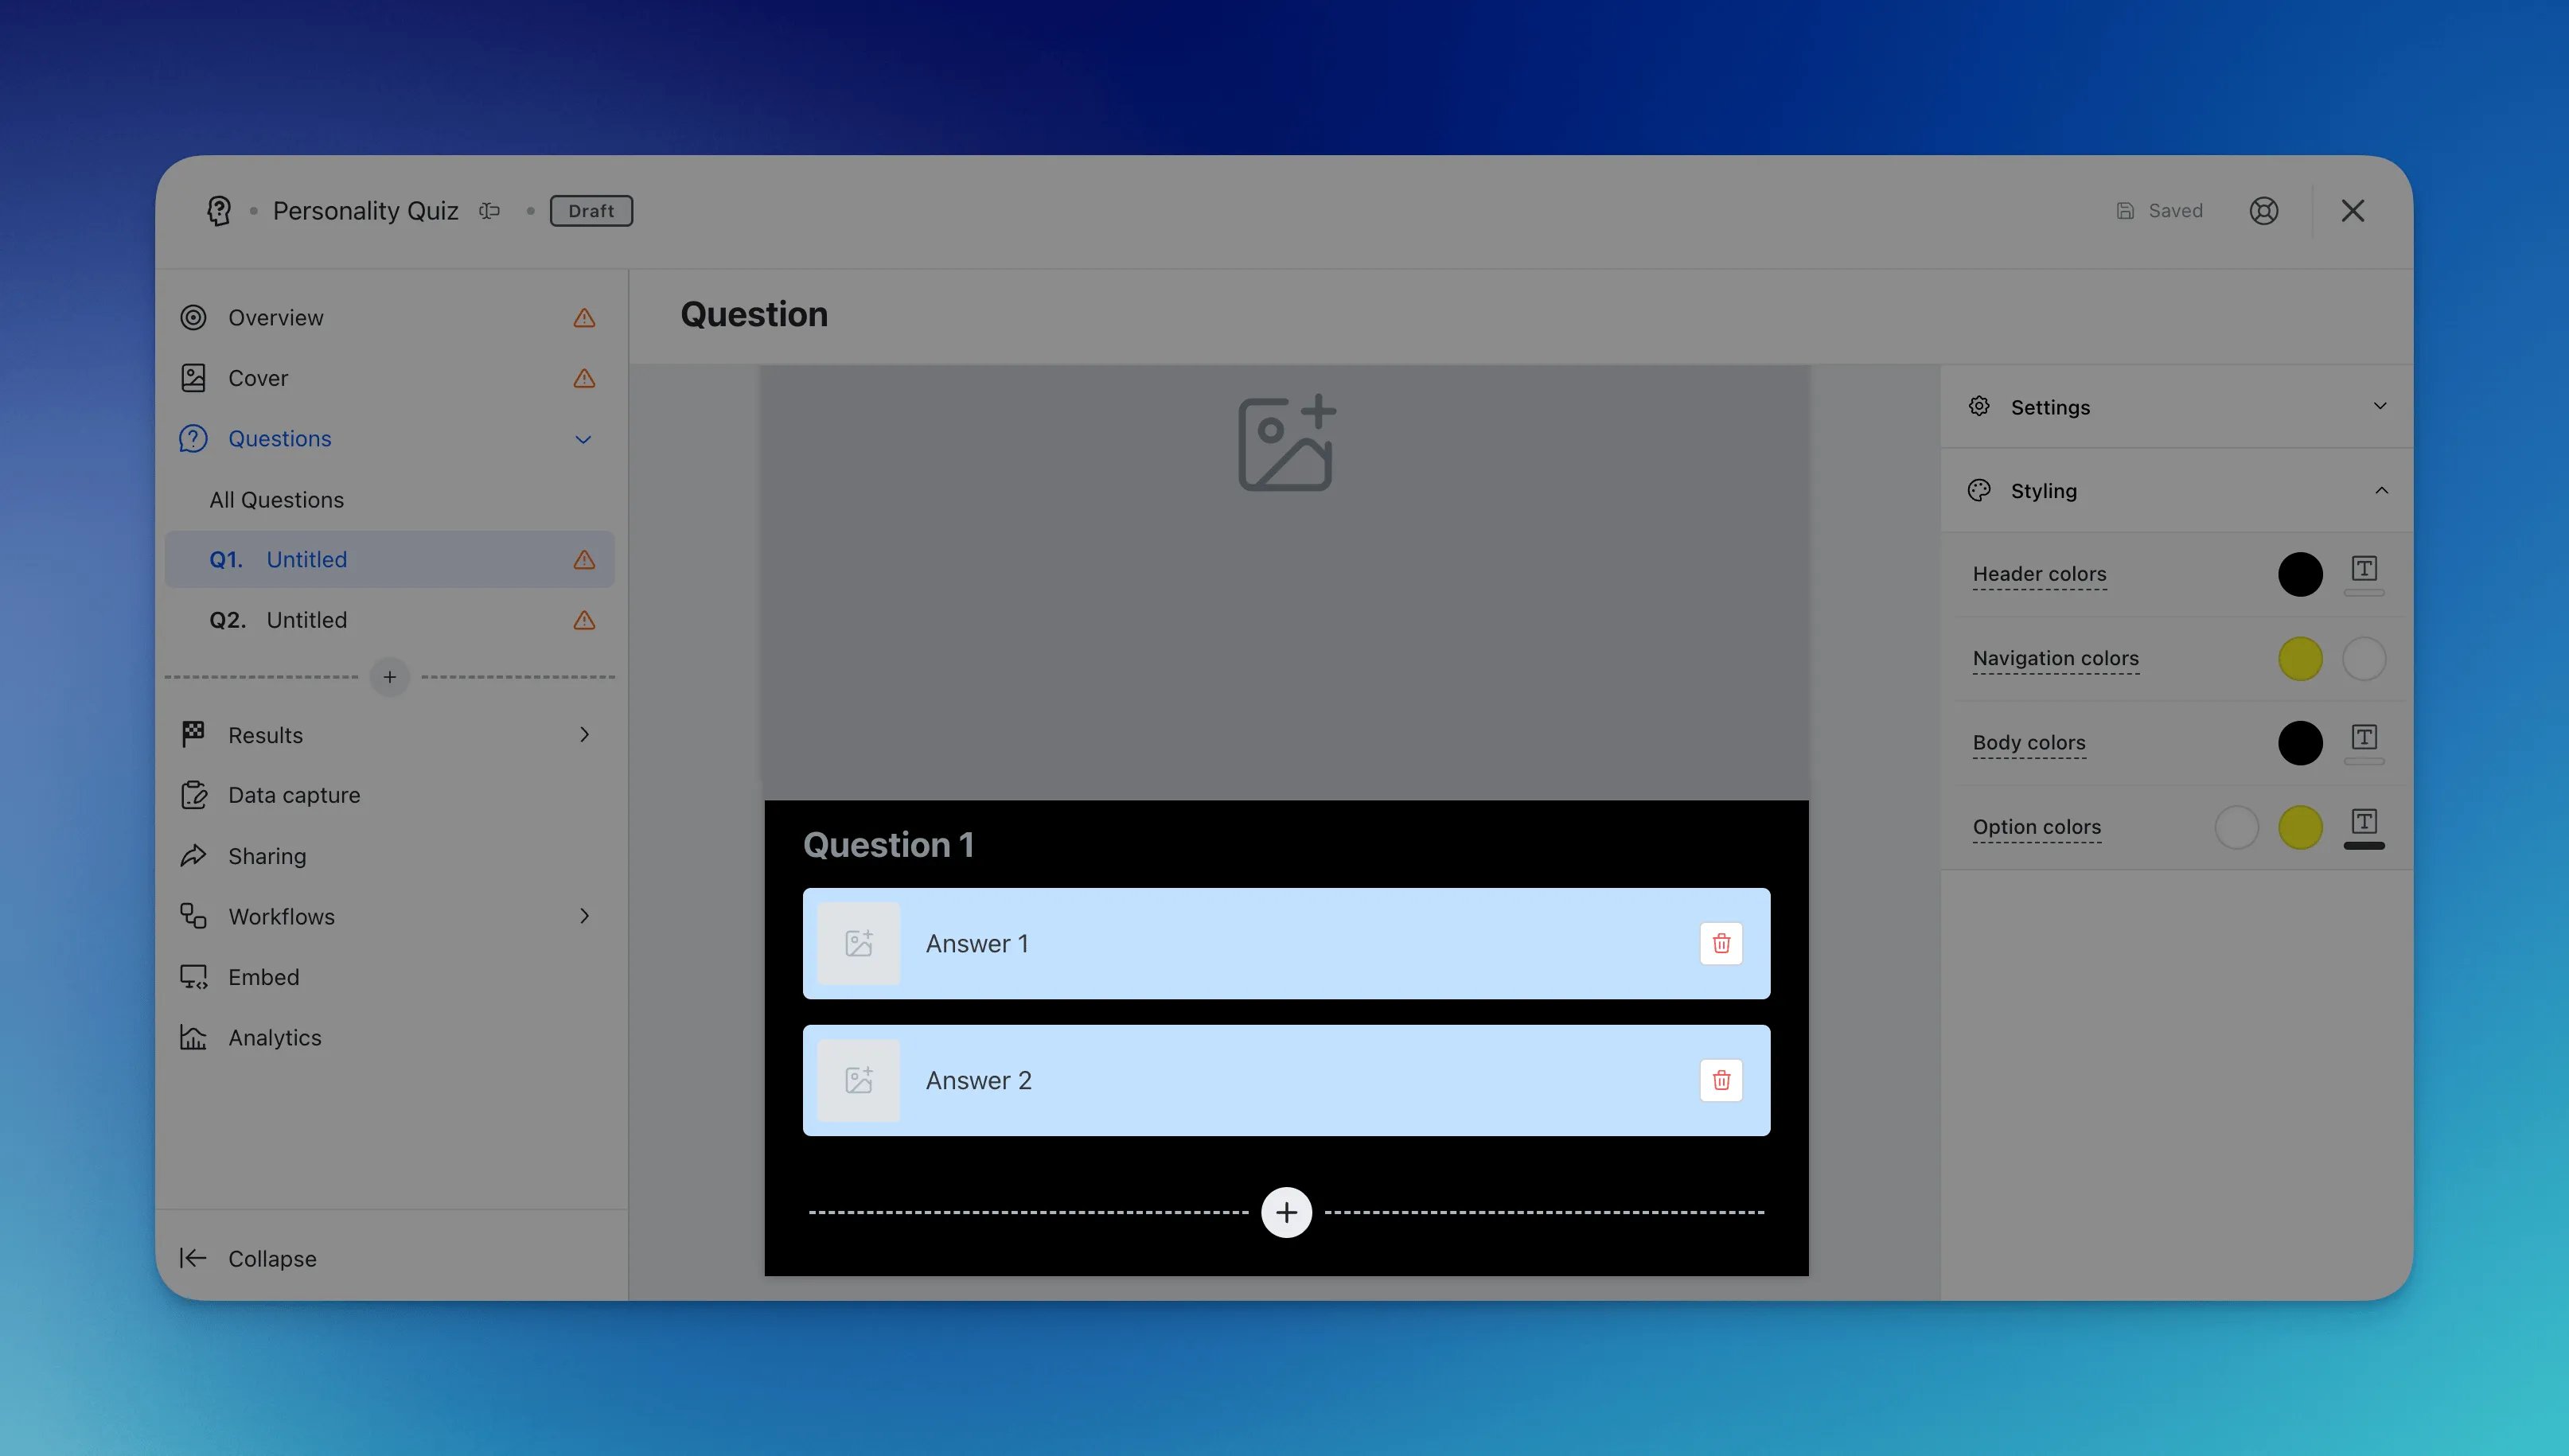
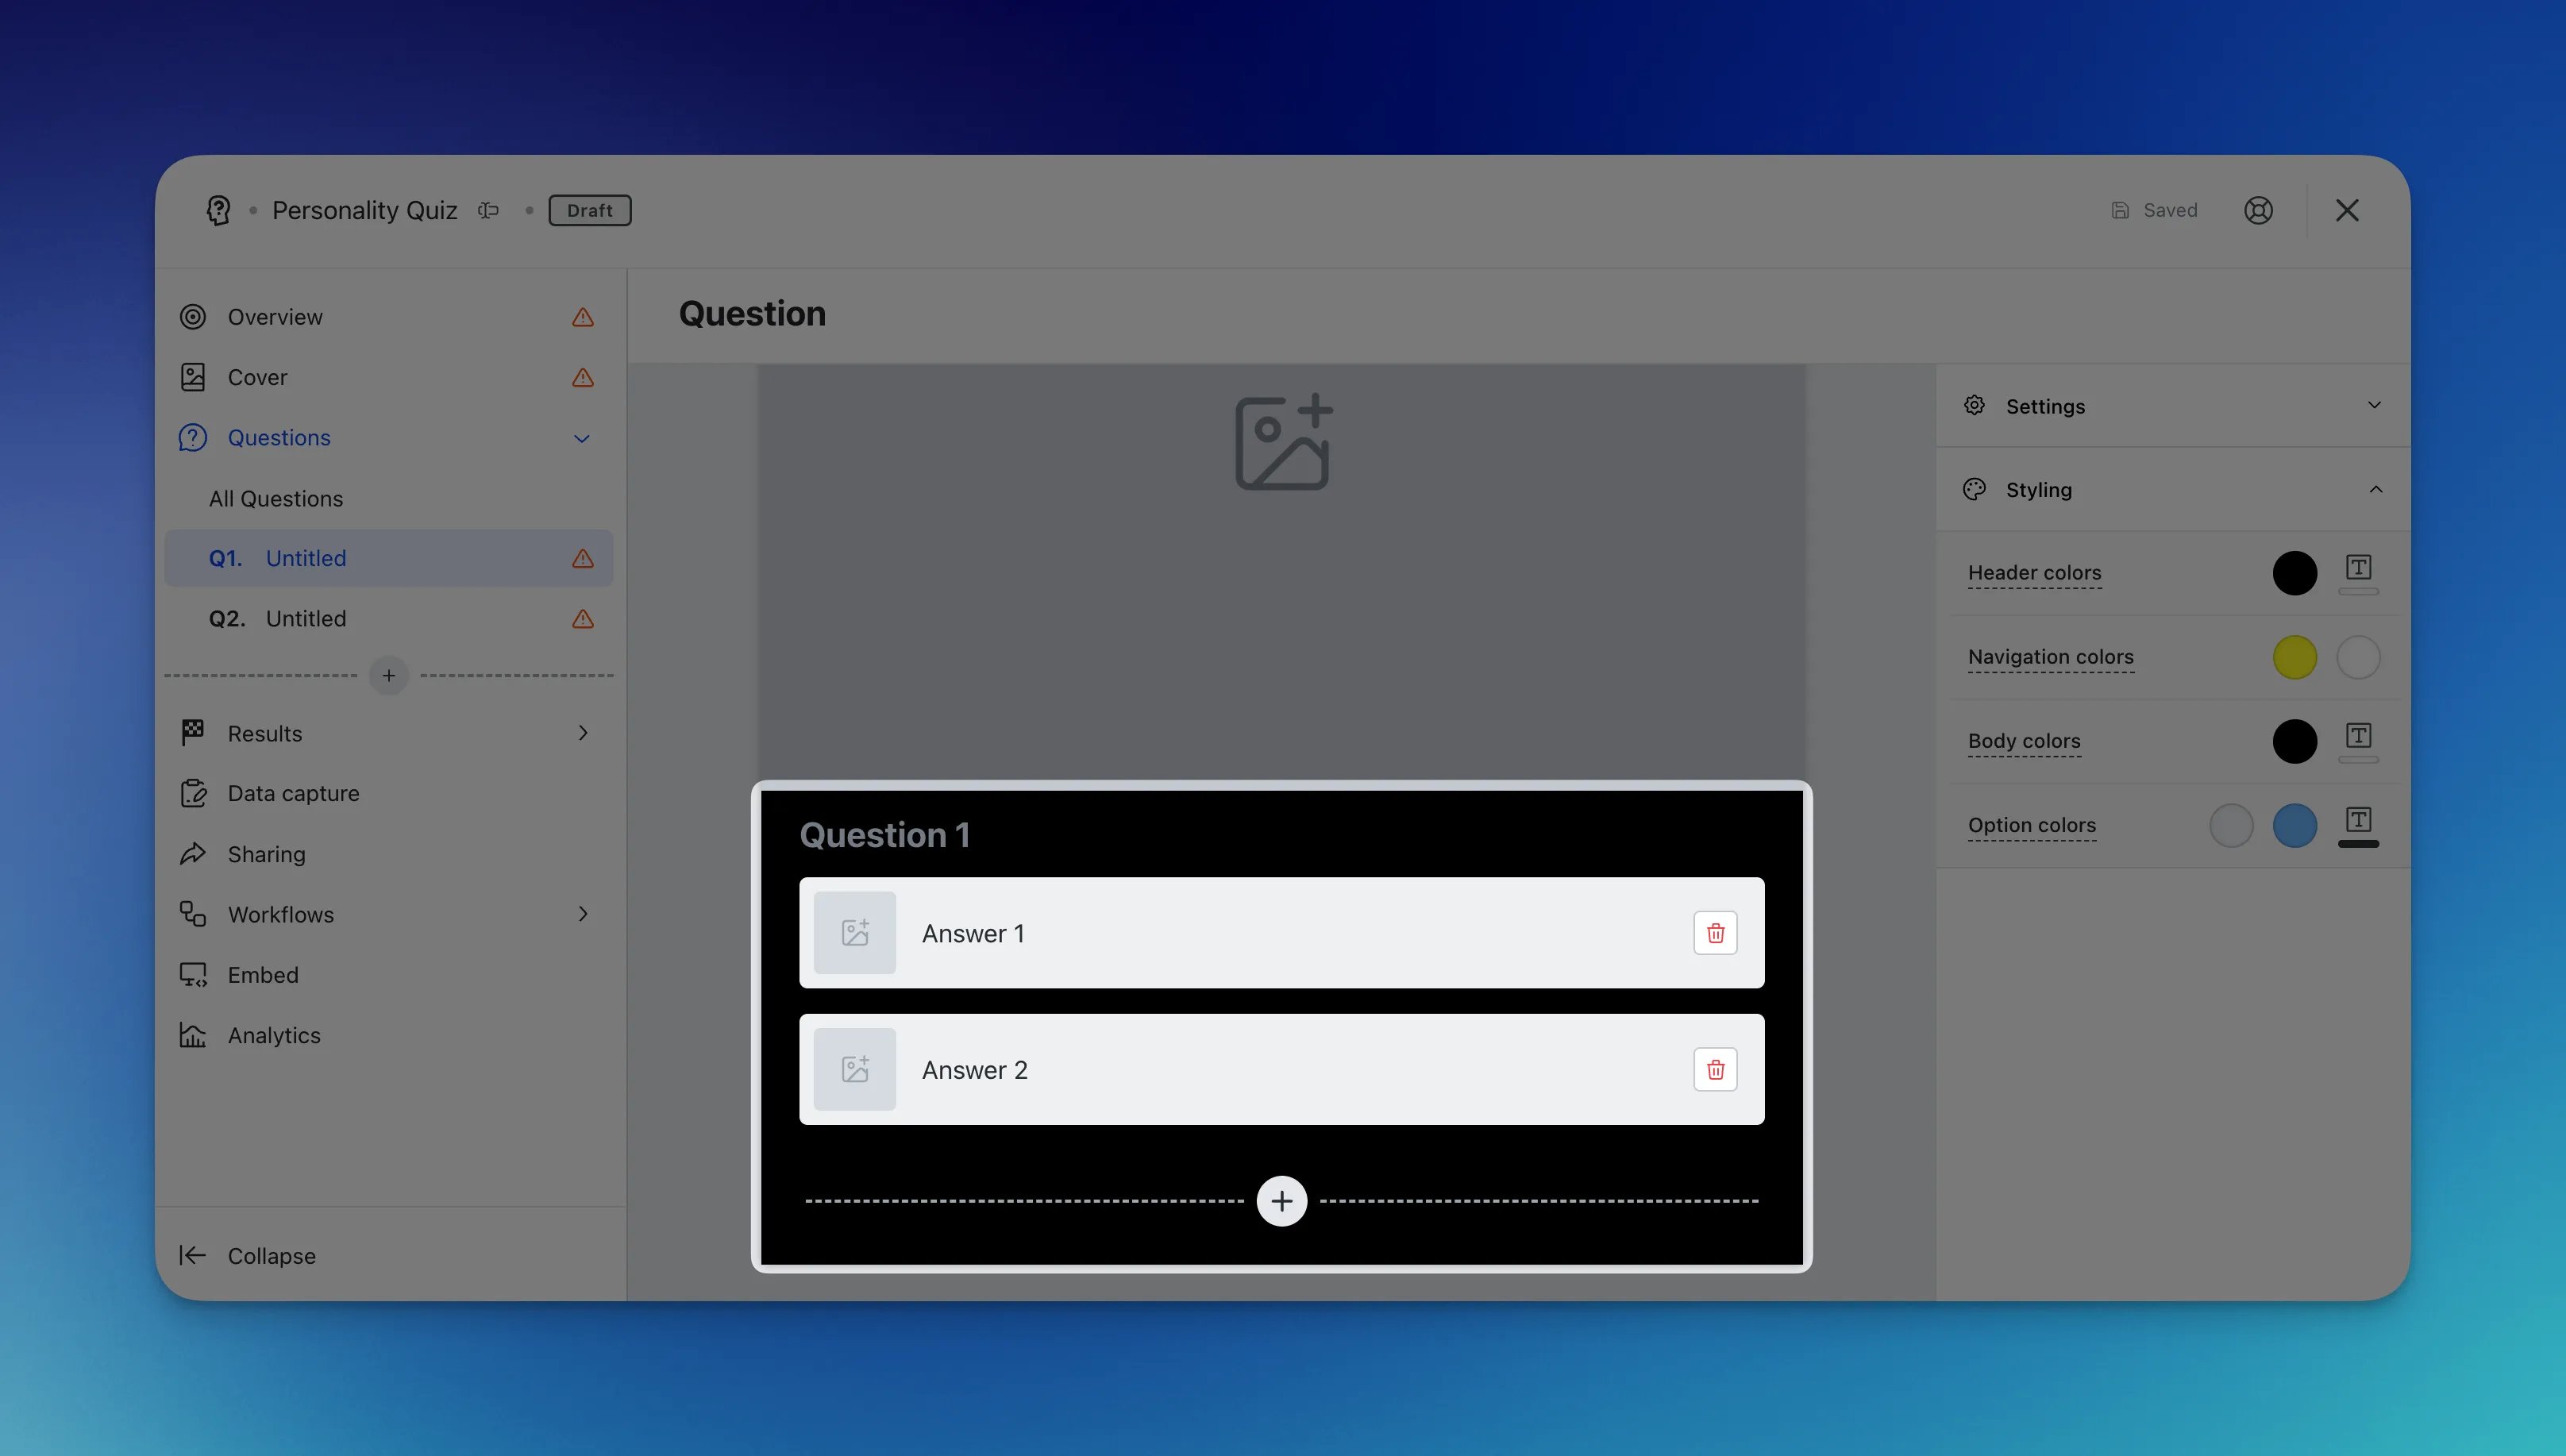 * **(d)** Set the answer option colors and the feedback color.
 * **(2) Bridge screen** - Gives you the ability to add a bridging screen between questions. This is a great opportunity to place adverts and promotional images within your Personality Quiz.
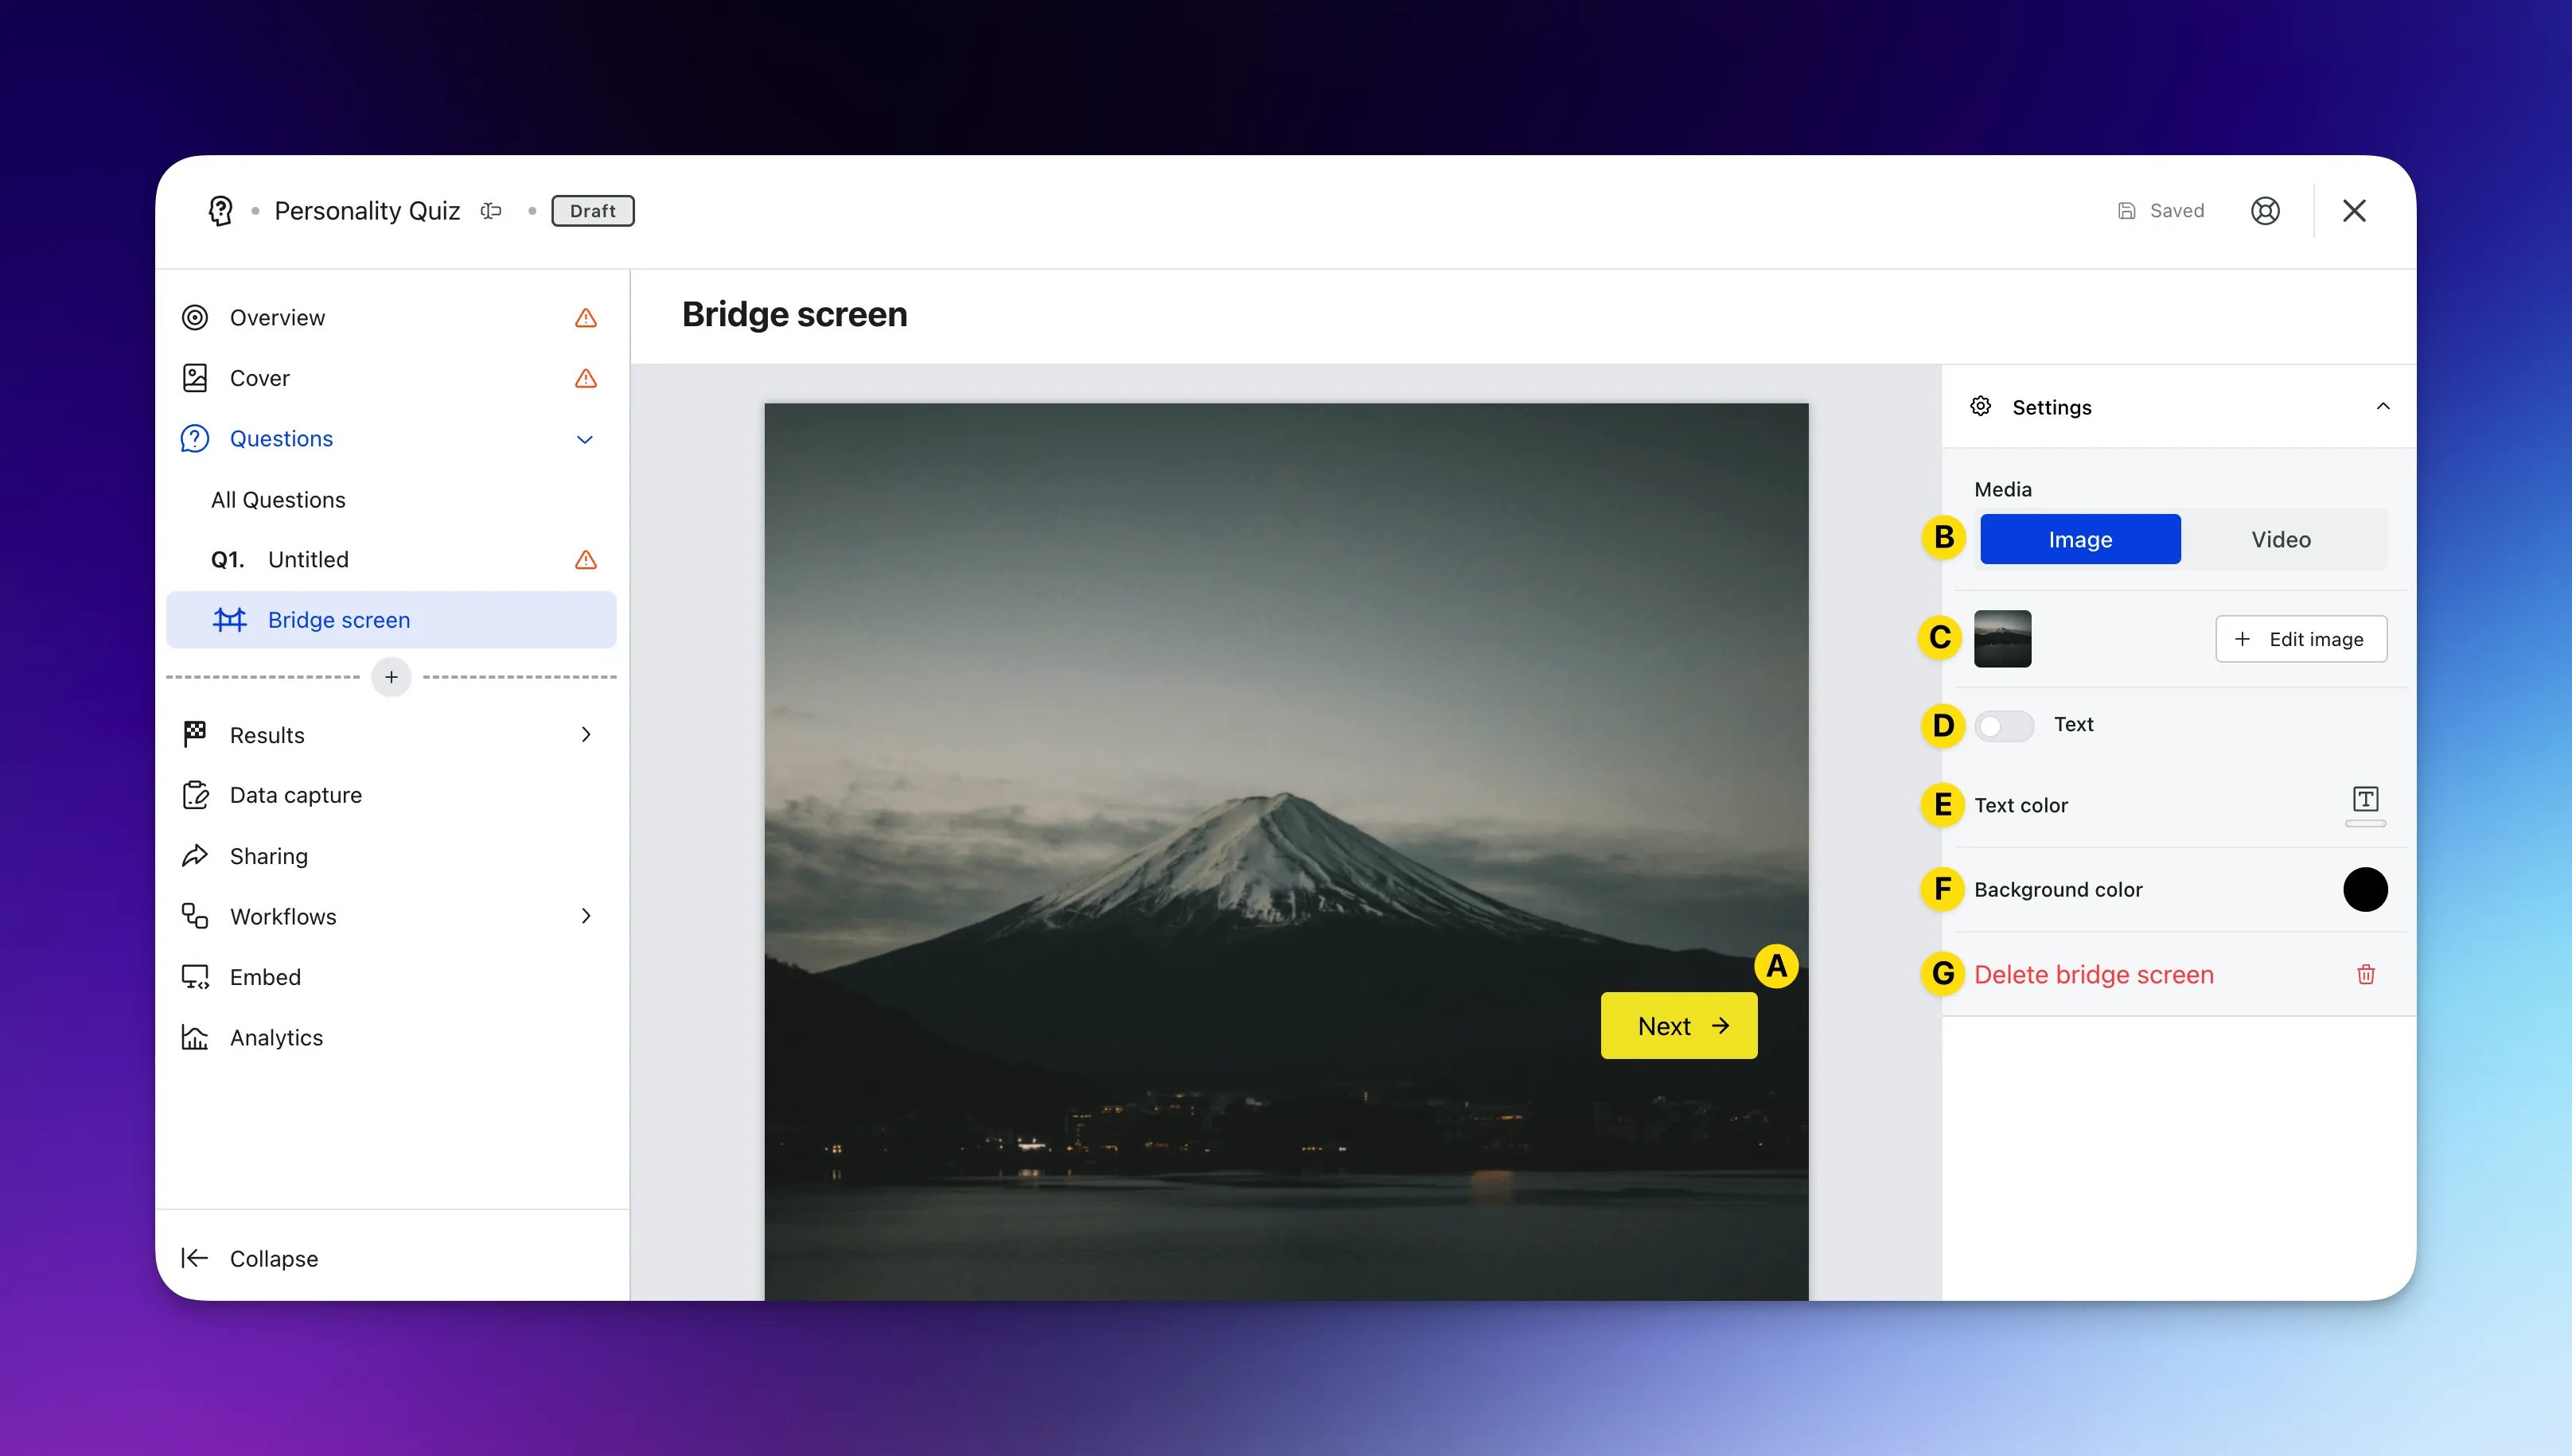 * **(A)** Here you can customize the color of the **Next** button.
* **(B)** Here you have the option to have an **image** to the Bridge screen or upload a **video** from your device or using a video URL.
* **(C)** Here you **upload or remove** an image. (*We highly recommend having an image uploaded.*)
* **(D)** Add a **description** which sits on top of the image. **Note:** We recommend toggling this off and adding any text you wish to be included here directly into your design).
* **(E)** Alter the **text color** which will sit above the imagery.
* **(F)** Alter the color of the **background**. *Note:* This color will only be seen if there is no image in step **(C).**
* **(G)** You can **delete** the screen here.
### Step 5: Set your Data capture *(Optional)*
Whilst adding a competition to your Personality Quiz is recommended to collect data, it is not always required and can be used purely as an engagement piece.
### Step 6: Publish your Card
**Once you've completed all of these steps, played around with your card and are happy with all the aspects of your card, it's time to get your card live!**
* **(1) Publish** your card manually for the world to see!
* **(2) Schedule** your card to be published and unpublished at set dates and times.
* **(3)** Click on the **...** to **Preview** and interact with the card on the front end from a user's perspective before publishing it. See how to test your card [here](/getting-started/hub-setup/card-testing).
All competition entries will be recorded and will impact the card analytics.
### "Go live" checklist
Ready to go live with your Personality Quiz? We recommend reviewing the following list before launching and double-checking if you have:
* All images uploaded are the **correct dimensions**. Export image files in 2x to ensure none of the images appear pixelated.
* Added all your **questions** (including imagery where possible).
* All your [**result screens**](#step-1-adding-a-personality-quiz-to-your-hub) are set up with imagery, copy and the result correlation.
* If you are using videos in the questions, ensure you have uploaded or copied and pasted the correct **video/URL**. You can play the video in the preview section to check if it is the correct video.
* If you have added a **Bridge screen,** check if you have uploaded an image or a video with a description to explain the content.
If you have a competition and a data capture attached:
* All your **communications** (Registration, Winner/s, Everybody Else) are fully set up and ready to send.
* You have hyperlinked your [**T\&Cs**](/getting-started/resources/terms-conditions) to the opt-in-field, which is created in the **data capture** section of the settings tab.
* Ensure your **Prizes** and the awarding rules are set up correctly. If you have **Live prize awarding** as your award, make sure you **enable** this feature, you can see how to do so [here.](/interactive-features/games/live-predictor-card-advanced)
* If you are using **coupons**, make sure the coupons created are set up correctly. Check the coupon limits are set, the copy for each screen is right and you have linked the appropriate coupons to your communications.
Then you're ready to go live!
## Promotion
## FAQ
**How long should my Personality Quiz be?** Whilst there is no correct answer we recommend 6-8 questions long with 4/5 results to ensure there is significant variation in the outcomes.
**How many points should I be assigning to each answer?** This is entirely up to you. As long as you are consistent throughout your quiz you'll be fine.
## Top tips
* Leaving the card cover on. This makes the Hub look neater and it gives your audience information about the card and game.
* Use images for your question cover and/or for the answers. Images are appealing and make it more fun compared to playing a game that's just plain text...
* Set up the results screen first before your questions. This is so you base your questions on each result.
* Have at least 4 result screens. Having more results where you are able to specify the reasoning for that outcome makes each result unique.
* Include at least 6 questions for maximum engagement. This allows you to go in-depth with the result correlations.
* Add a Bridge screen to promote a product or service. We recommend using an image with text on it than using the text box located on the Bridge screen. This is so you can place the text any way you want with your own font.
* **(A)** Here you can customize the color of the **Next** button.
* **(B)** Here you have the option to have an **image** to the Bridge screen or upload a **video** from your device or using a video URL.
* **(C)** Here you **upload or remove** an image. (*We highly recommend having an image uploaded.*)
* **(D)** Add a **description** which sits on top of the image. **Note:** We recommend toggling this off and adding any text you wish to be included here directly into your design).
* **(E)** Alter the **text color** which will sit above the imagery.
* **(F)** Alter the color of the **background**. *Note:* This color will only be seen if there is no image in step **(C).**
* **(G)** You can **delete** the screen here.
### Step 5: Set your Data capture *(Optional)*
Whilst adding a competition to your Personality Quiz is recommended to collect data, it is not always required and can be used purely as an engagement piece.
### Step 6: Publish your Card
**Once you've completed all of these steps, played around with your card and are happy with all the aspects of your card, it's time to get your card live!**
* **(1) Publish** your card manually for the world to see!
* **(2) Schedule** your card to be published and unpublished at set dates and times.
* **(3)** Click on the **...** to **Preview** and interact with the card on the front end from a user's perspective before publishing it. See how to test your card [here](/getting-started/hub-setup/card-testing).
All competition entries will be recorded and will impact the card analytics.
### "Go live" checklist
Ready to go live with your Personality Quiz? We recommend reviewing the following list before launching and double-checking if you have:
* All images uploaded are the **correct dimensions**. Export image files in 2x to ensure none of the images appear pixelated.
* Added all your **questions** (including imagery where possible).
* All your [**result screens**](#step-1-adding-a-personality-quiz-to-your-hub) are set up with imagery, copy and the result correlation.
* If you are using videos in the questions, ensure you have uploaded or copied and pasted the correct **video/URL**. You can play the video in the preview section to check if it is the correct video.
* If you have added a **Bridge screen,** check if you have uploaded an image or a video with a description to explain the content.
If you have a competition and a data capture attached:
* All your **communications** (Registration, Winner/s, Everybody Else) are fully set up and ready to send.
* You have hyperlinked your [**T\&Cs**](/getting-started/resources/terms-conditions) to the opt-in-field, which is created in the **data capture** section of the settings tab.
* Ensure your **Prizes** and the awarding rules are set up correctly. If you have **Live prize awarding** as your award, make sure you **enable** this feature, you can see how to do so [here.](/interactive-features/games/live-predictor-card-advanced)
* If you are using **coupons**, make sure the coupons created are set up correctly. Check the coupon limits are set, the copy for each screen is right and you have linked the appropriate coupons to your communications.
Then you're ready to go live!
## Promotion
## FAQ
**How long should my Personality Quiz be?** Whilst there is no correct answer we recommend 6-8 questions long with 4/5 results to ensure there is significant variation in the outcomes.
**How many points should I be assigning to each answer?** This is entirely up to you. As long as you are consistent throughout your quiz you'll be fine.
## Top tips
* Leaving the card cover on. This makes the Hub look neater and it gives your audience information about the card and game.
* Use images for your question cover and/or for the answers. Images are appealing and make it more fun compared to playing a game that's just plain text...
* Set up the results screen first before your questions. This is so you base your questions on each result.
* Have at least 4 result screens. Having more results where you are able to specify the reasoning for that outcome makes each result unique.
* Include at least 6 questions for maximum engagement. This allows you to go in-depth with the result correlations.
* Add a Bridge screen to promote a product or service. We recommend using an image with text on it than using the text box located on the Bridge screen. This is so you can place the text any way you want with your own font.