> ## Documentation Index
> Fetch the complete documentation index at: https://knowledge.komo.tech/llms.txt
> Use this file to discover all available pages before exploring further.
# Swiper
> Put your audience's knowledge to the test with a fun swiping game
## What is it?
The Swiper card allows you to ask your audience 'yes or no' type questions where they get to swipe left or right to answer. This interactive format creates an engaging game-like experience that encourages participation and can be used for quizzes, surveys, or entertainment.
## How do I build one?
### Step 1: Add a Swiper to your Hub
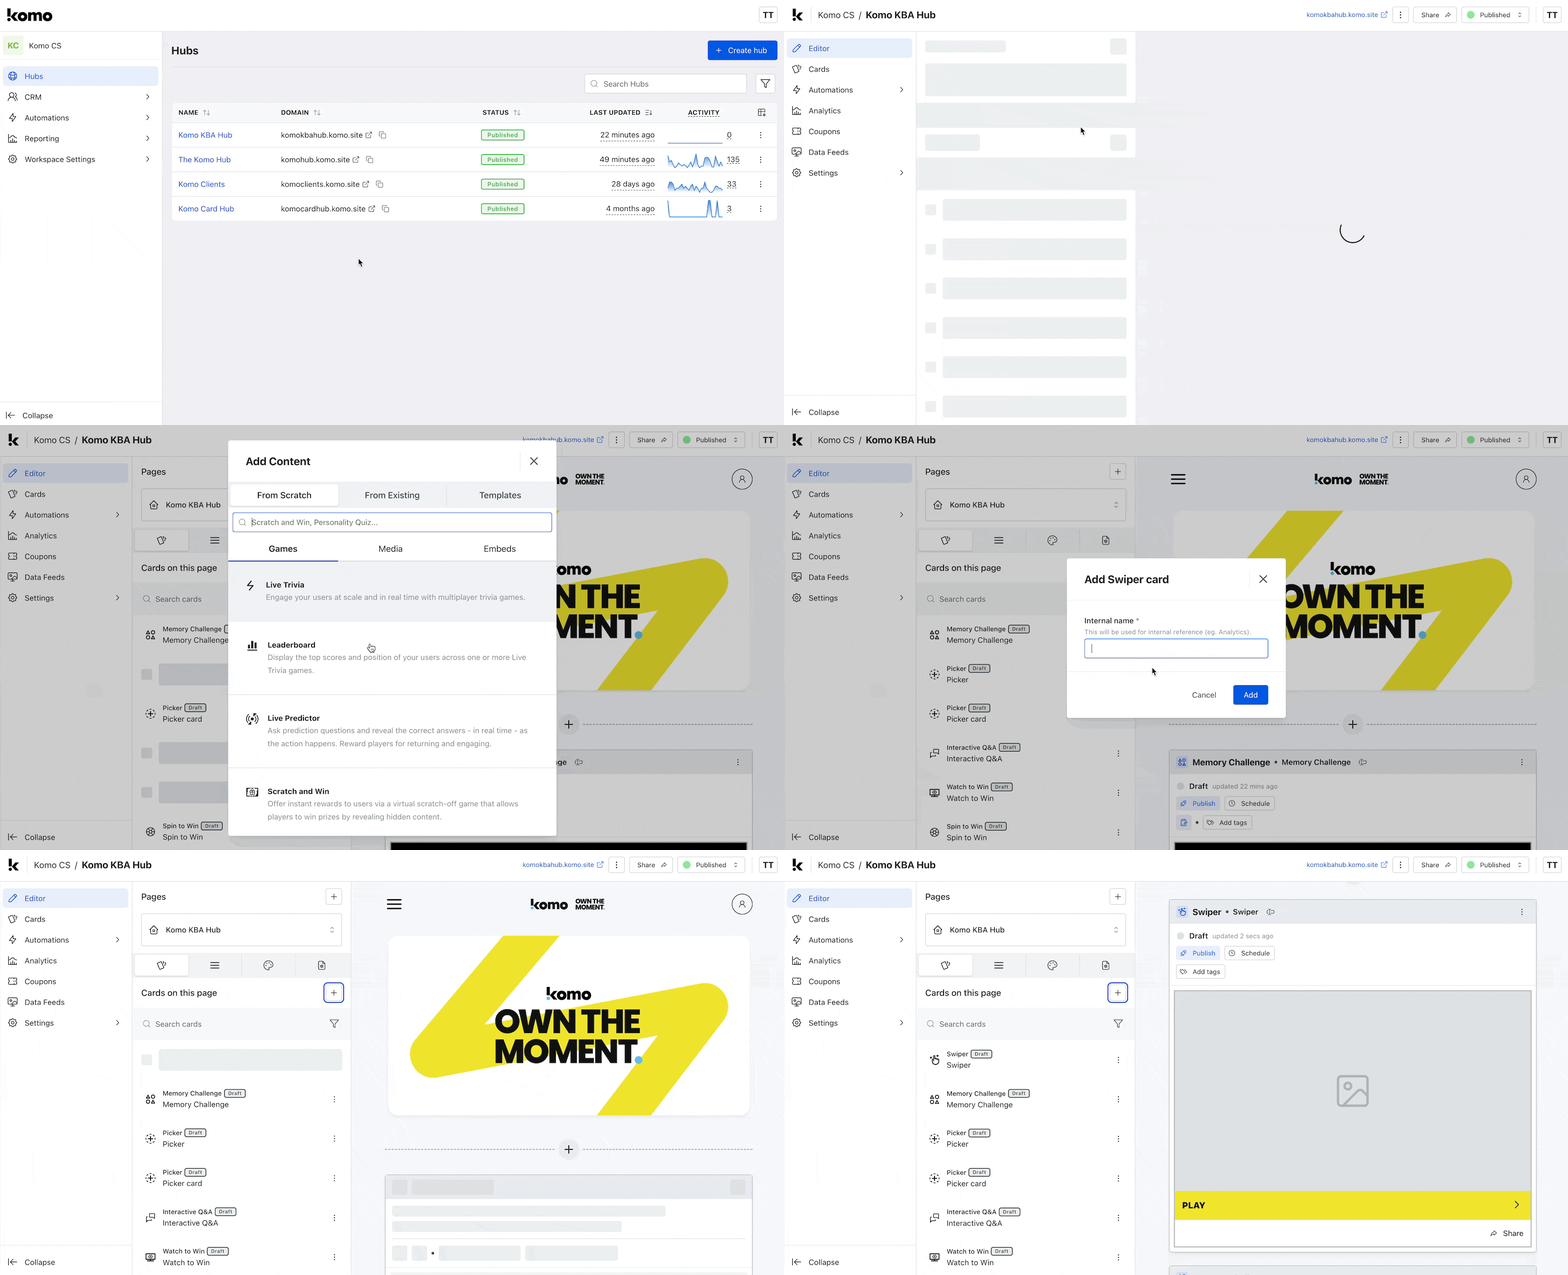 * Navigate to your **Engagement Hub**
* Once there, click **Add content**, and from here select **Games** and then **Swiper**
* Provide an **internal name** for the card
* You will then see your new card has been added to your Hub
### Step 2: Add a Cover image
* Navigate to your **Engagement Hub**
* Once there, click **Add content**, and from here select **Games** and then **Swiper**
* Provide an **internal name** for the card
* You will then see your new card has been added to your Hub
### Step 2: Add a Cover image
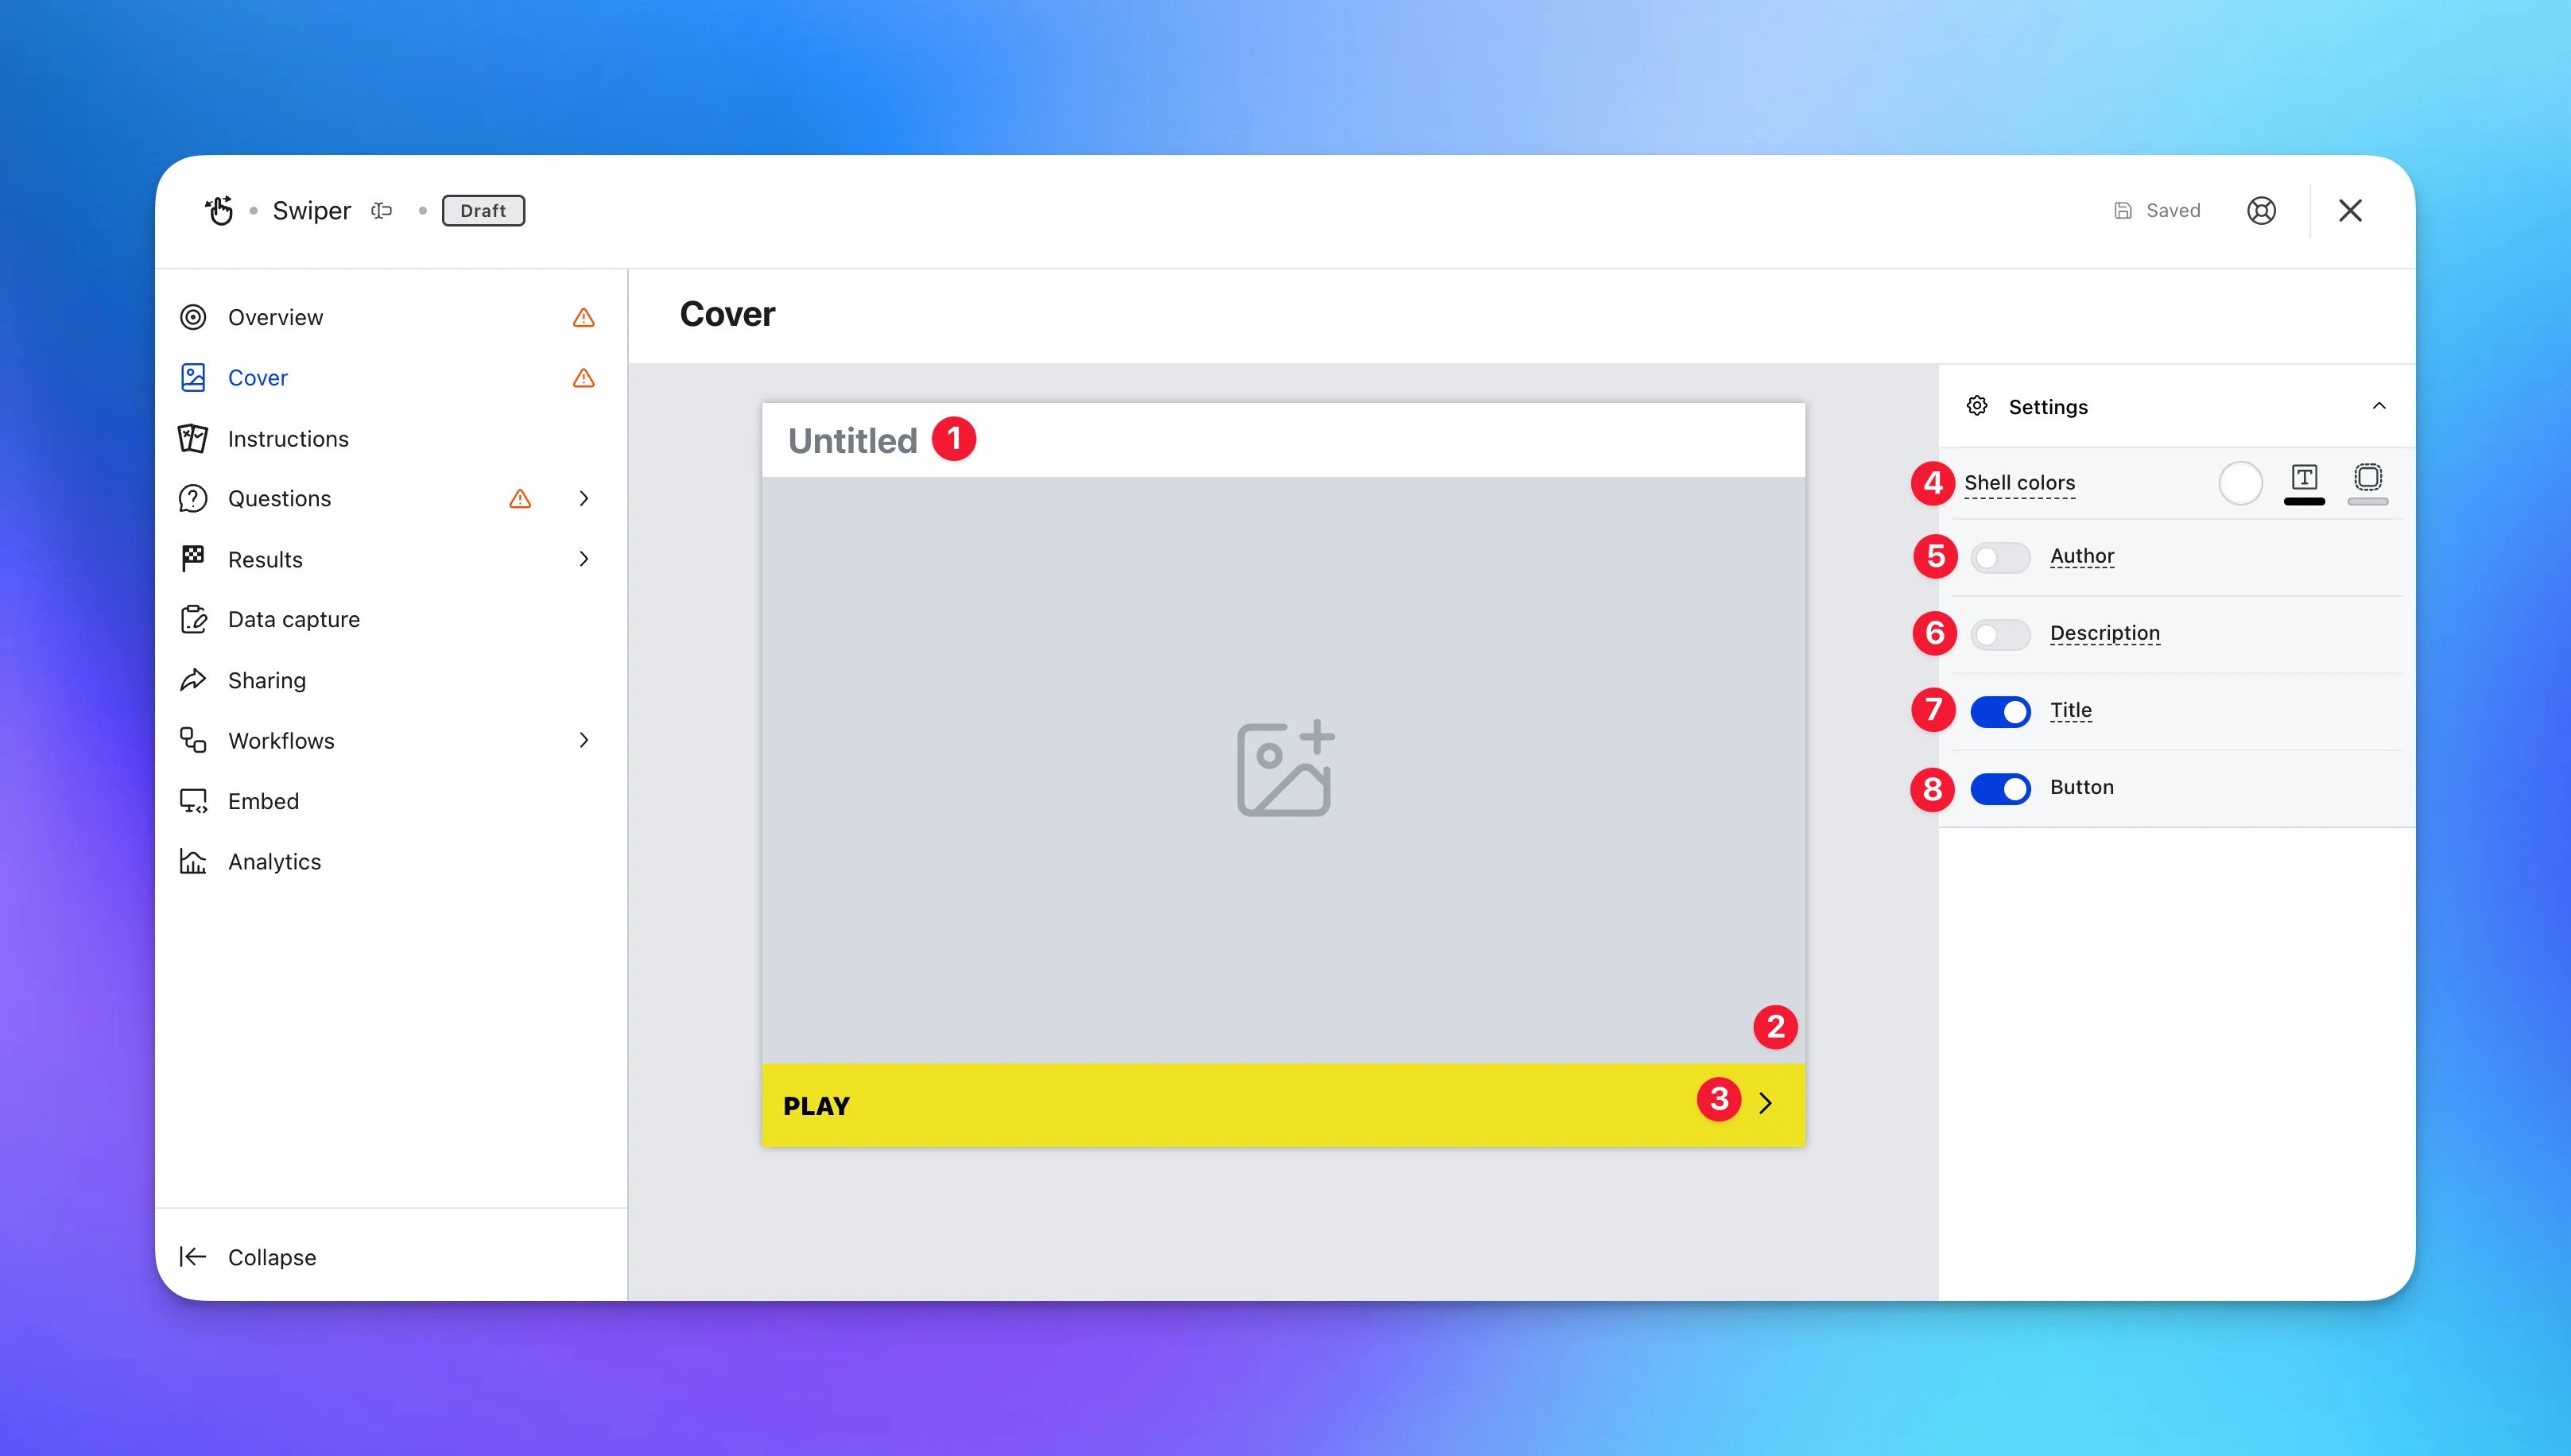 * Clicking on the **Swiper** will open the editing module
* **(1)** By clicking here you can add a **title** to your Swiper card
* **(2)** This is where you can upload a **cover image**
* **(3)** Here you can edit the color and copy of the **call-to-action bar** or **(8)** toggle this off here
* **(4)** Set the **Outer card shell colors** (description and share bar)
* **(5)** You can add an **Author** tag by displaying the brand or person who's responsible for the card content
* **(6)** Add a **Description** to the card
* **(7)** Here you can **disable** the title
### Step 3: Edit the Instructions screen
* Clicking on the **Swiper** will open the editing module
* **(1)** By clicking here you can add a **title** to your Swiper card
* **(2)** This is where you can upload a **cover image**
* **(3)** Here you can edit the color and copy of the **call-to-action bar** or **(8)** toggle this off here
* **(4)** Set the **Outer card shell colors** (description and share bar)
* **(5)** You can add an **Author** tag by displaying the brand or person who's responsible for the card content
* **(6)** Add a **Description** to the card
* **(7)** Here you can **disable** the title
### Step 3: Edit the Instructions screen
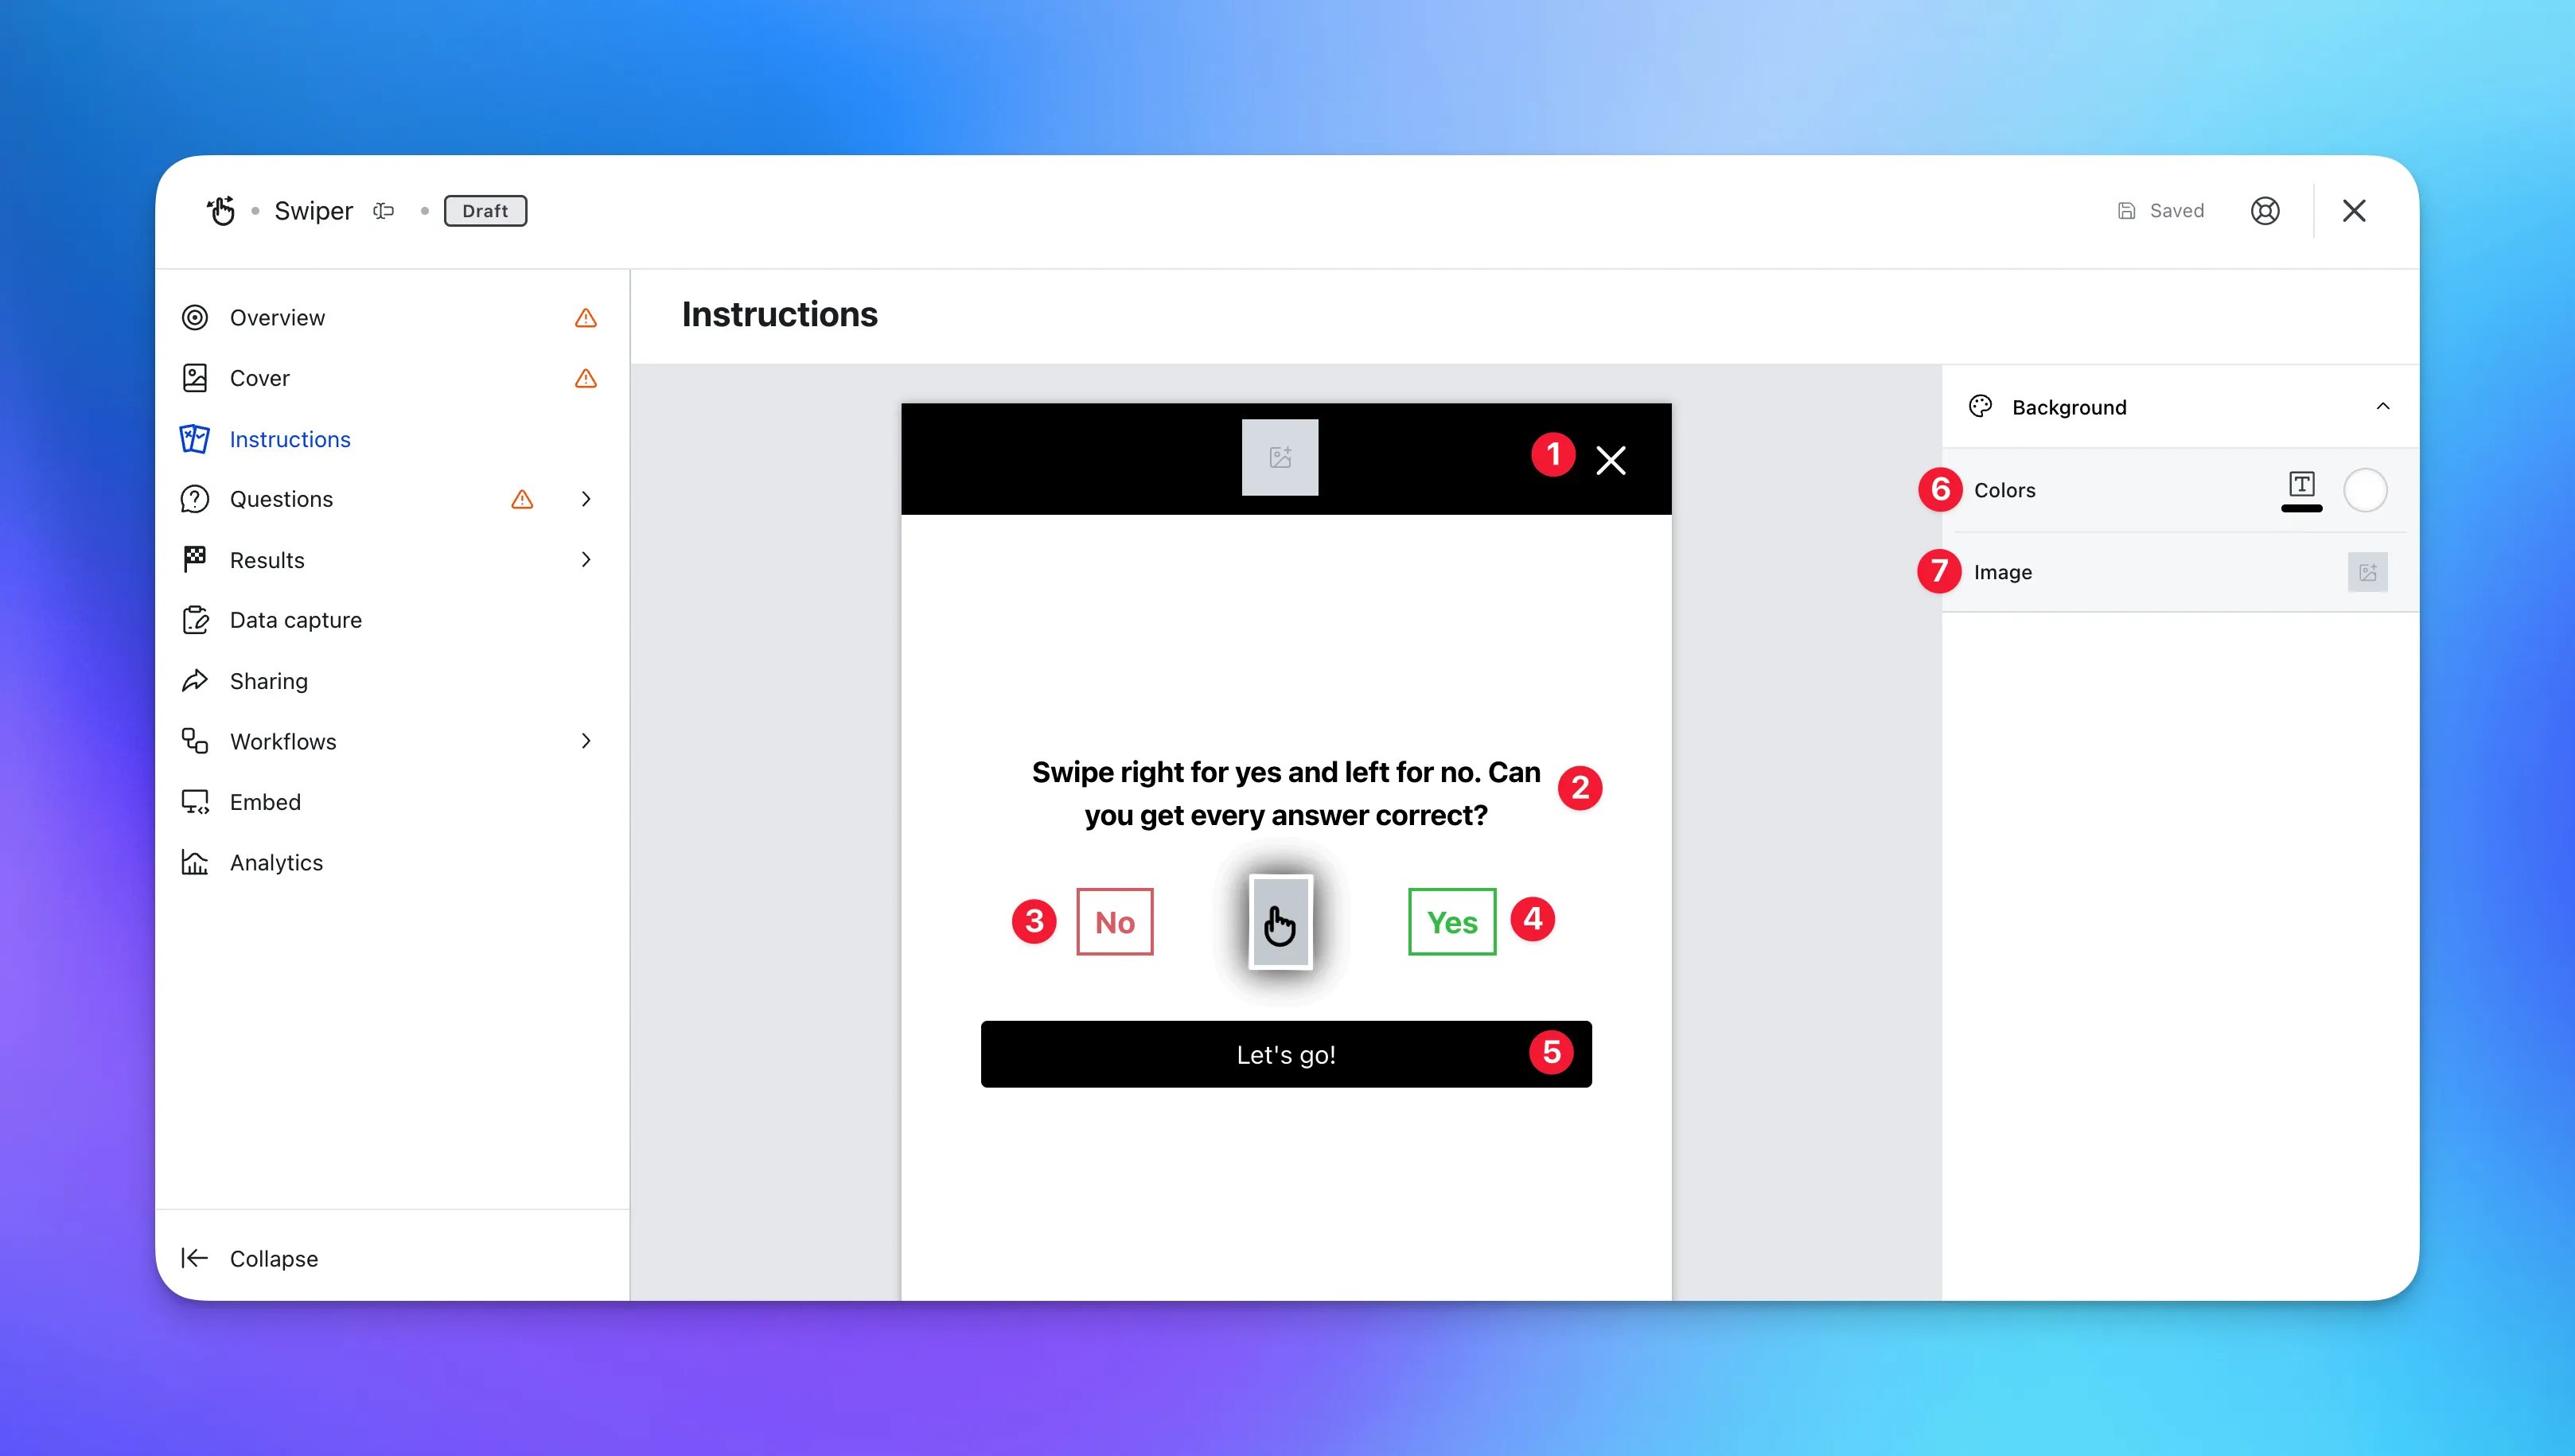 * **(1)** You can edit the **header** background color and add your imagery here
* **(2)** Edit the **instructions** for the game here
* **(3)+(4)** Alter the color and copy of the 'Yes and No' swiper buttons
* **(5)** Edit the **call-to-action** bar here
* **(6)** You can edit the **background color** and instruction text color here
* **(7)** Or you can upload a **background image**
### Step 4: Add your Question
* **(1)** You can edit the **header** background color and add your imagery here
* **(2)** Edit the **instructions** for the game here
* **(3)+(4)** Alter the color and copy of the 'Yes and No' swiper buttons
* **(5)** Edit the **call-to-action** bar here
* **(6)** You can edit the **background color** and instruction text color here
* **(7)** Or you can upload a **background image**
### Step 4: Add your Question
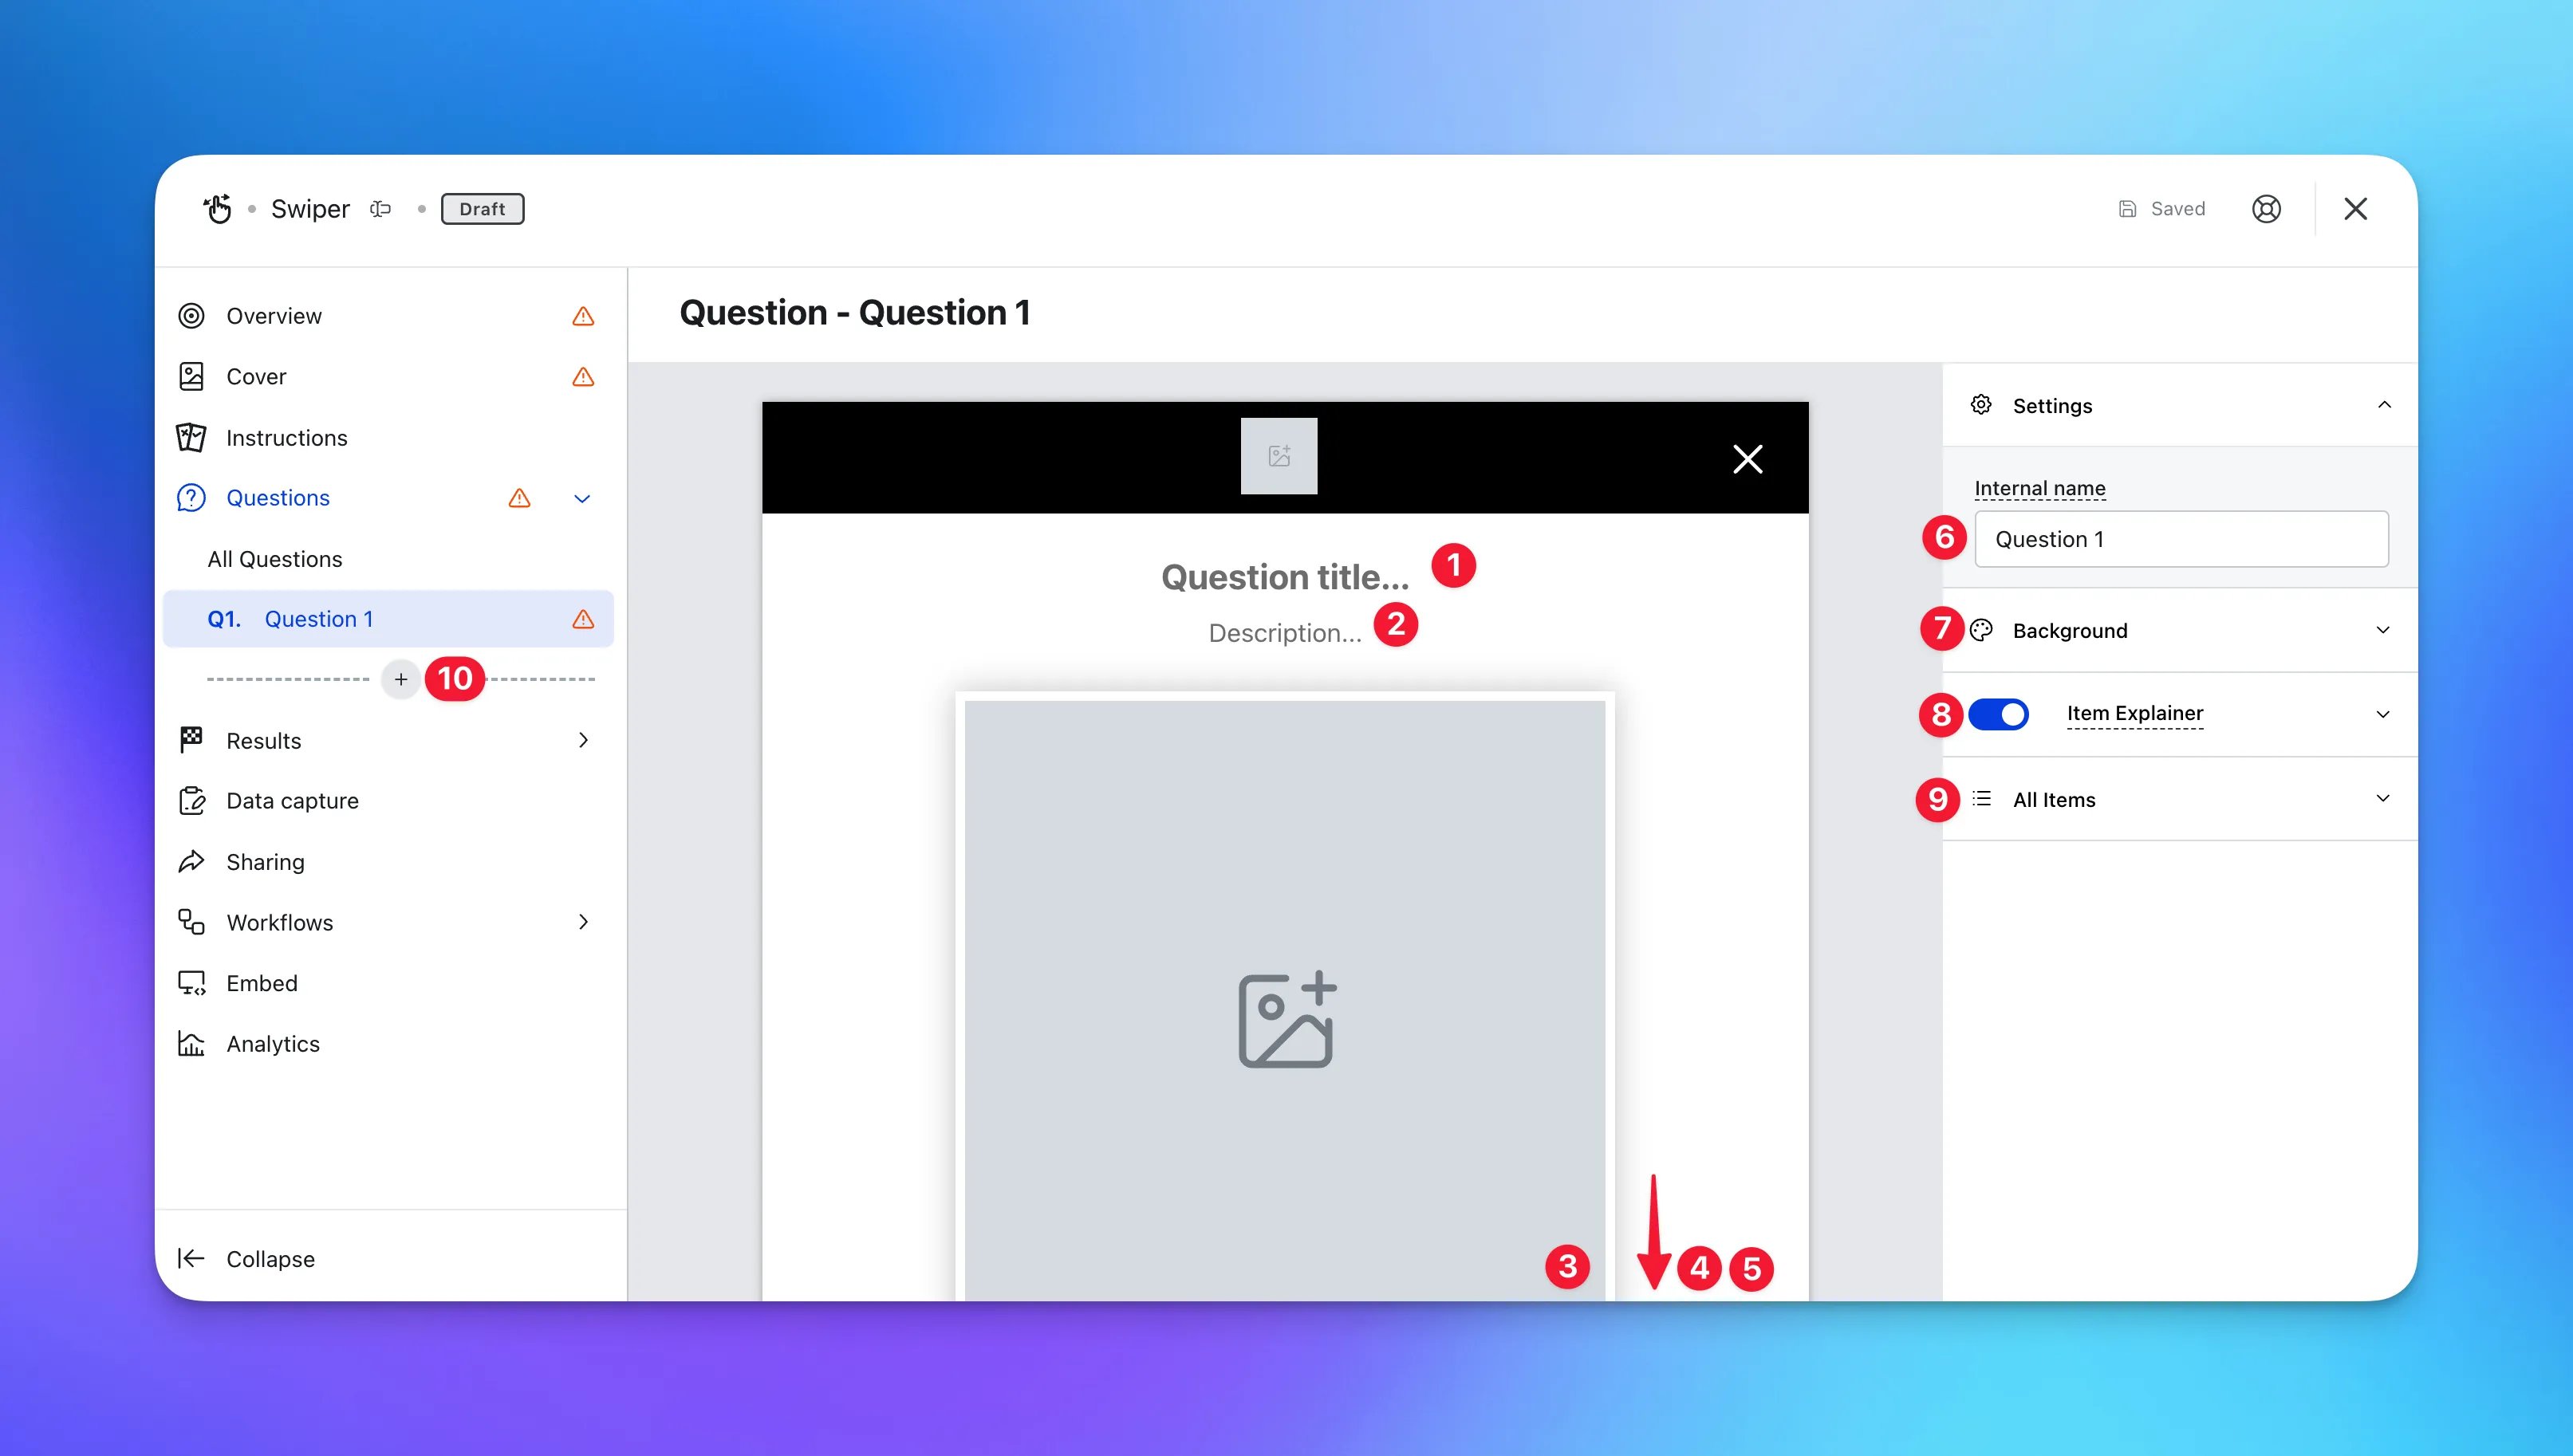 * **(1)** Here you can write your **question**
* **(2)** You can include a **description** here
* **(3)** Add your **swipe options** here
* **(1)** Here you can write your **question**
* **(2)** You can include a **description** here
* **(3)** Add your **swipe options** here
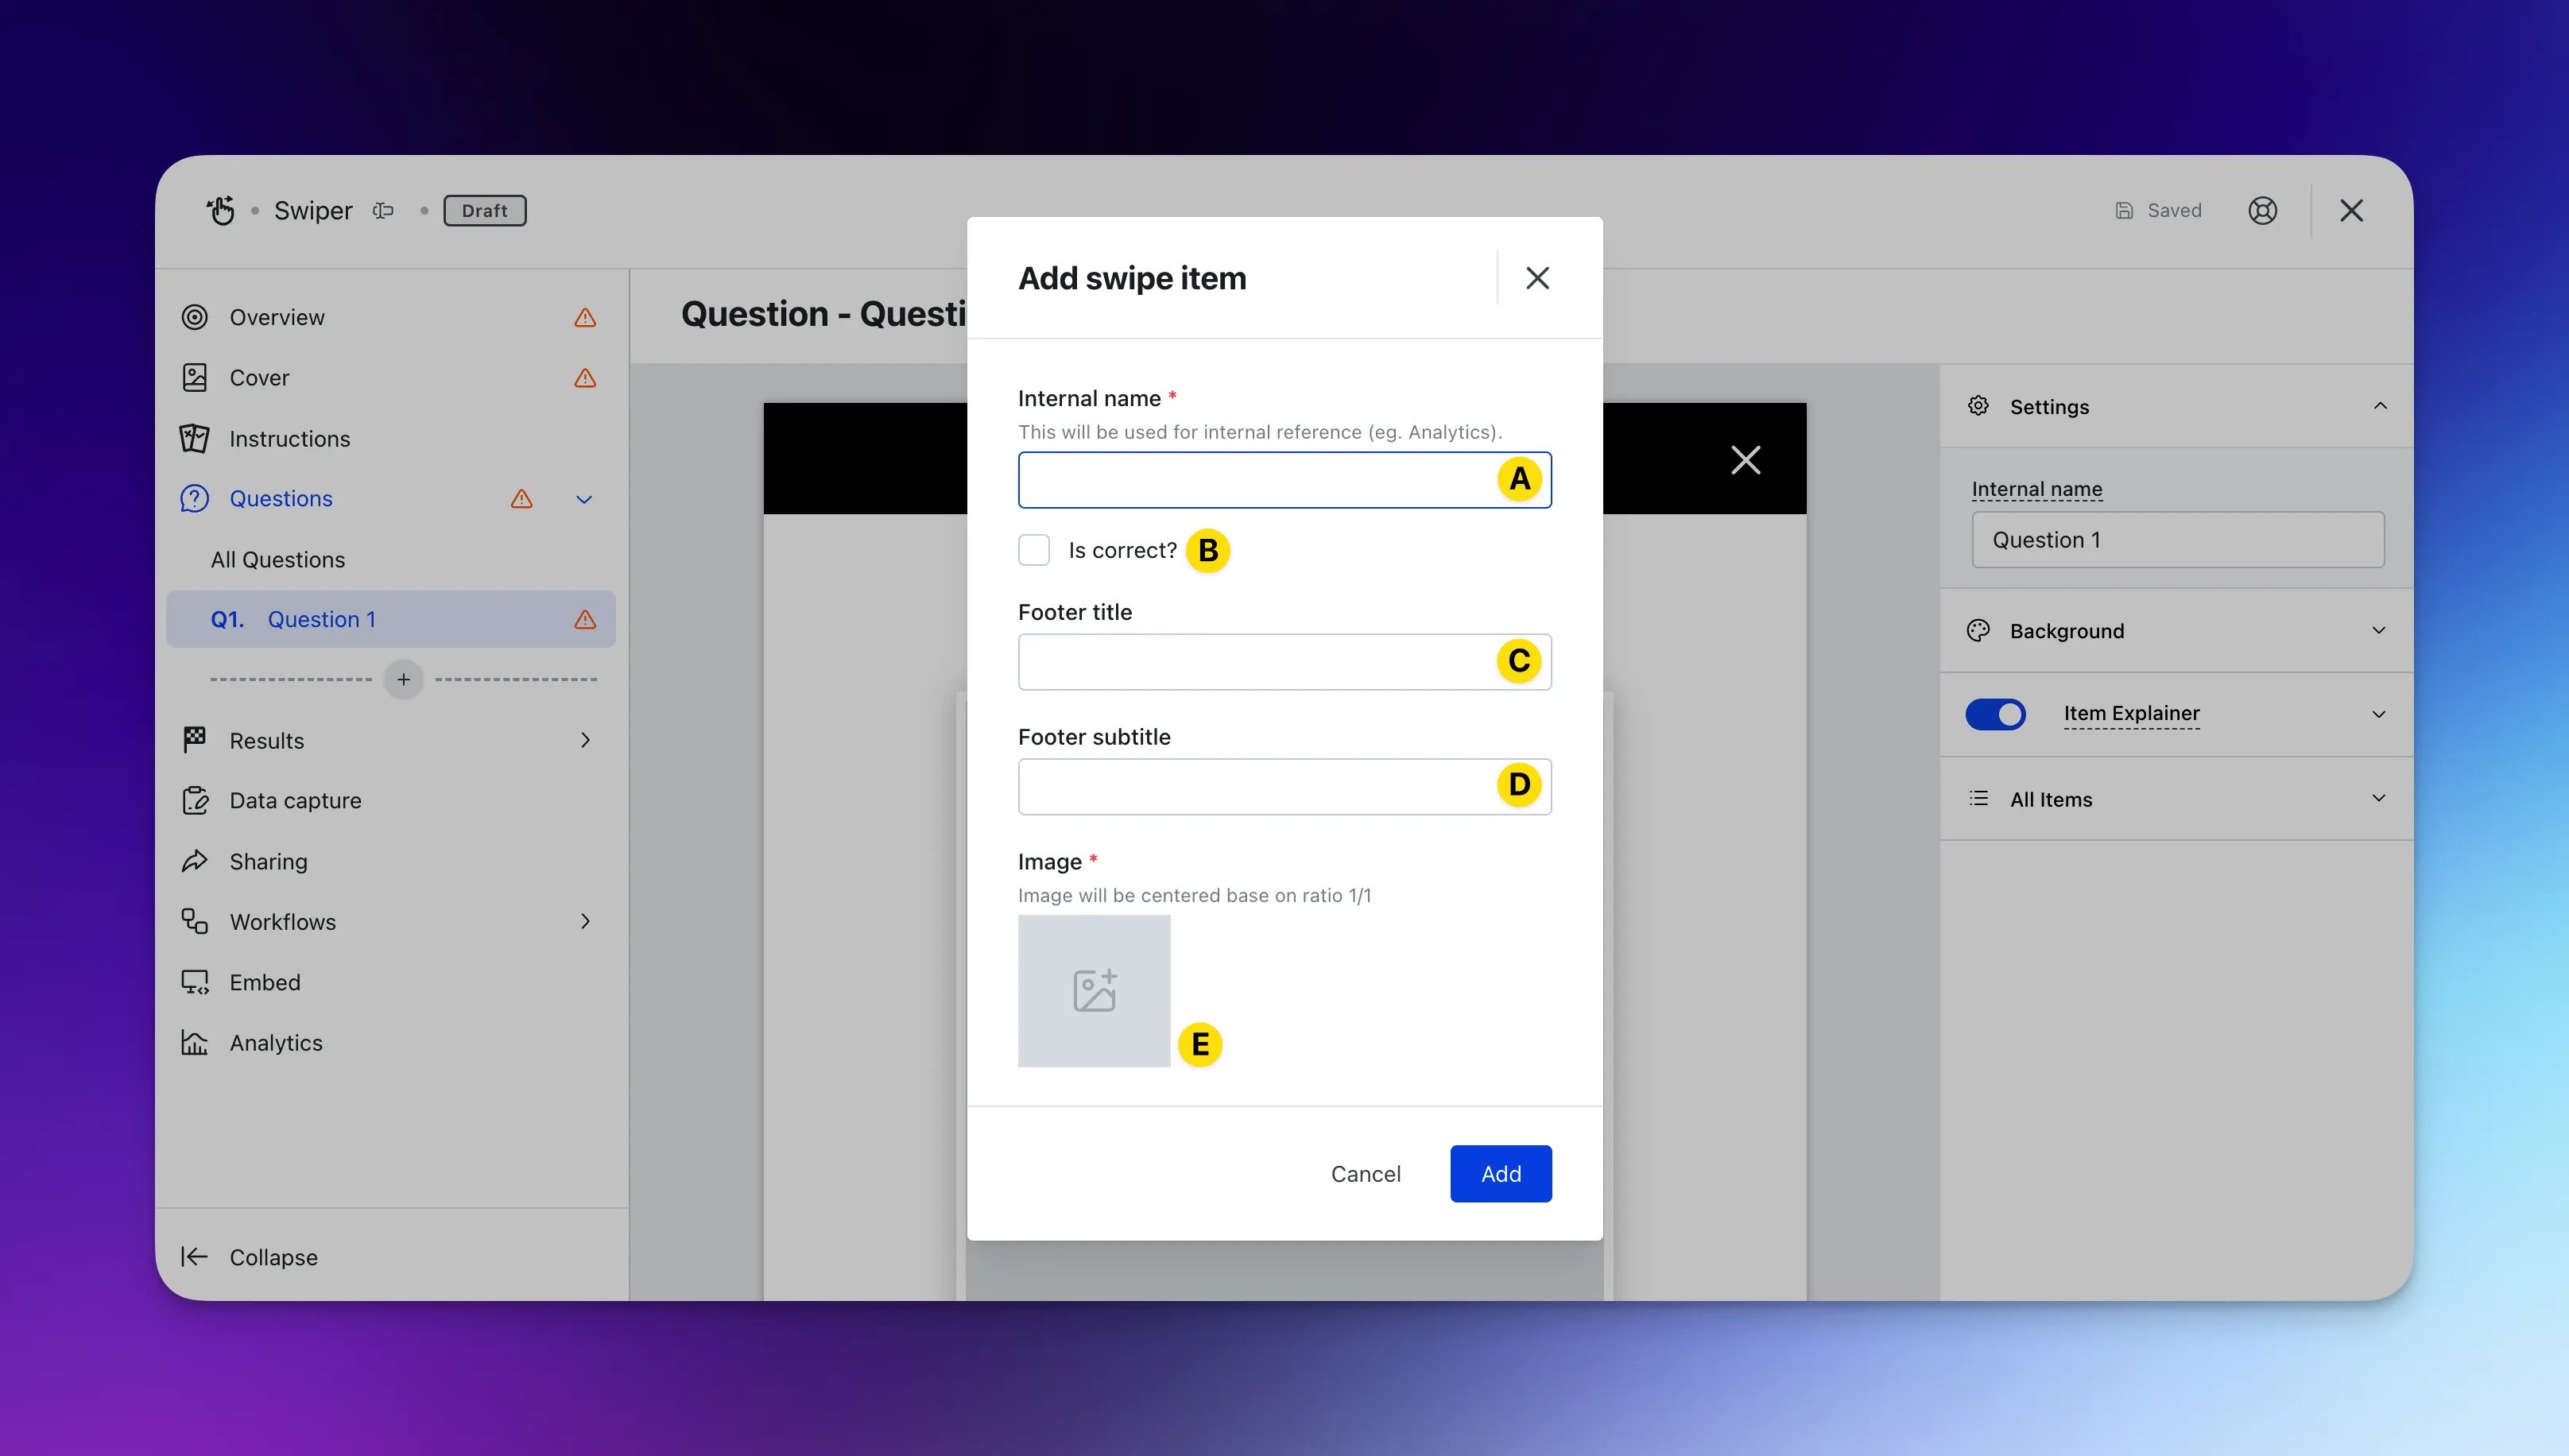 * **(A)** Give this option an **internal name**
* **(B)** Mark this option as **correct**
* **(C)** You can add a **title** to this option that will appear on the bottom right of the option
* **(D)** And add a **subtitle** below the footer title
* **(E)** Upload an **image** for the option here
* **(4)+(5)** Alter the color and copy of the **swipe buttons**
* **(6)** Give the question an **internal name**
* **(7)** Here you can edit the **background settings**
**Note:** The settings made in **Step 3(6)** will follow through here.
* **(8)** Here you can **edit** and toggle off the **Item explainer**
* **(A)** Give this option an **internal name**
* **(B)** Mark this option as **correct**
* **(C)** You can add a **title** to this option that will appear on the bottom right of the option
* **(D)** And add a **subtitle** below the footer title
* **(E)** Upload an **image** for the option here
* **(4)+(5)** Alter the color and copy of the **swipe buttons**
* **(6)** Give the question an **internal name**
* **(7)** Here you can edit the **background settings**
**Note:** The settings made in **Step 3(6)** will follow through here.
* **(8)** Here you can **edit** and toggle off the **Item explainer**
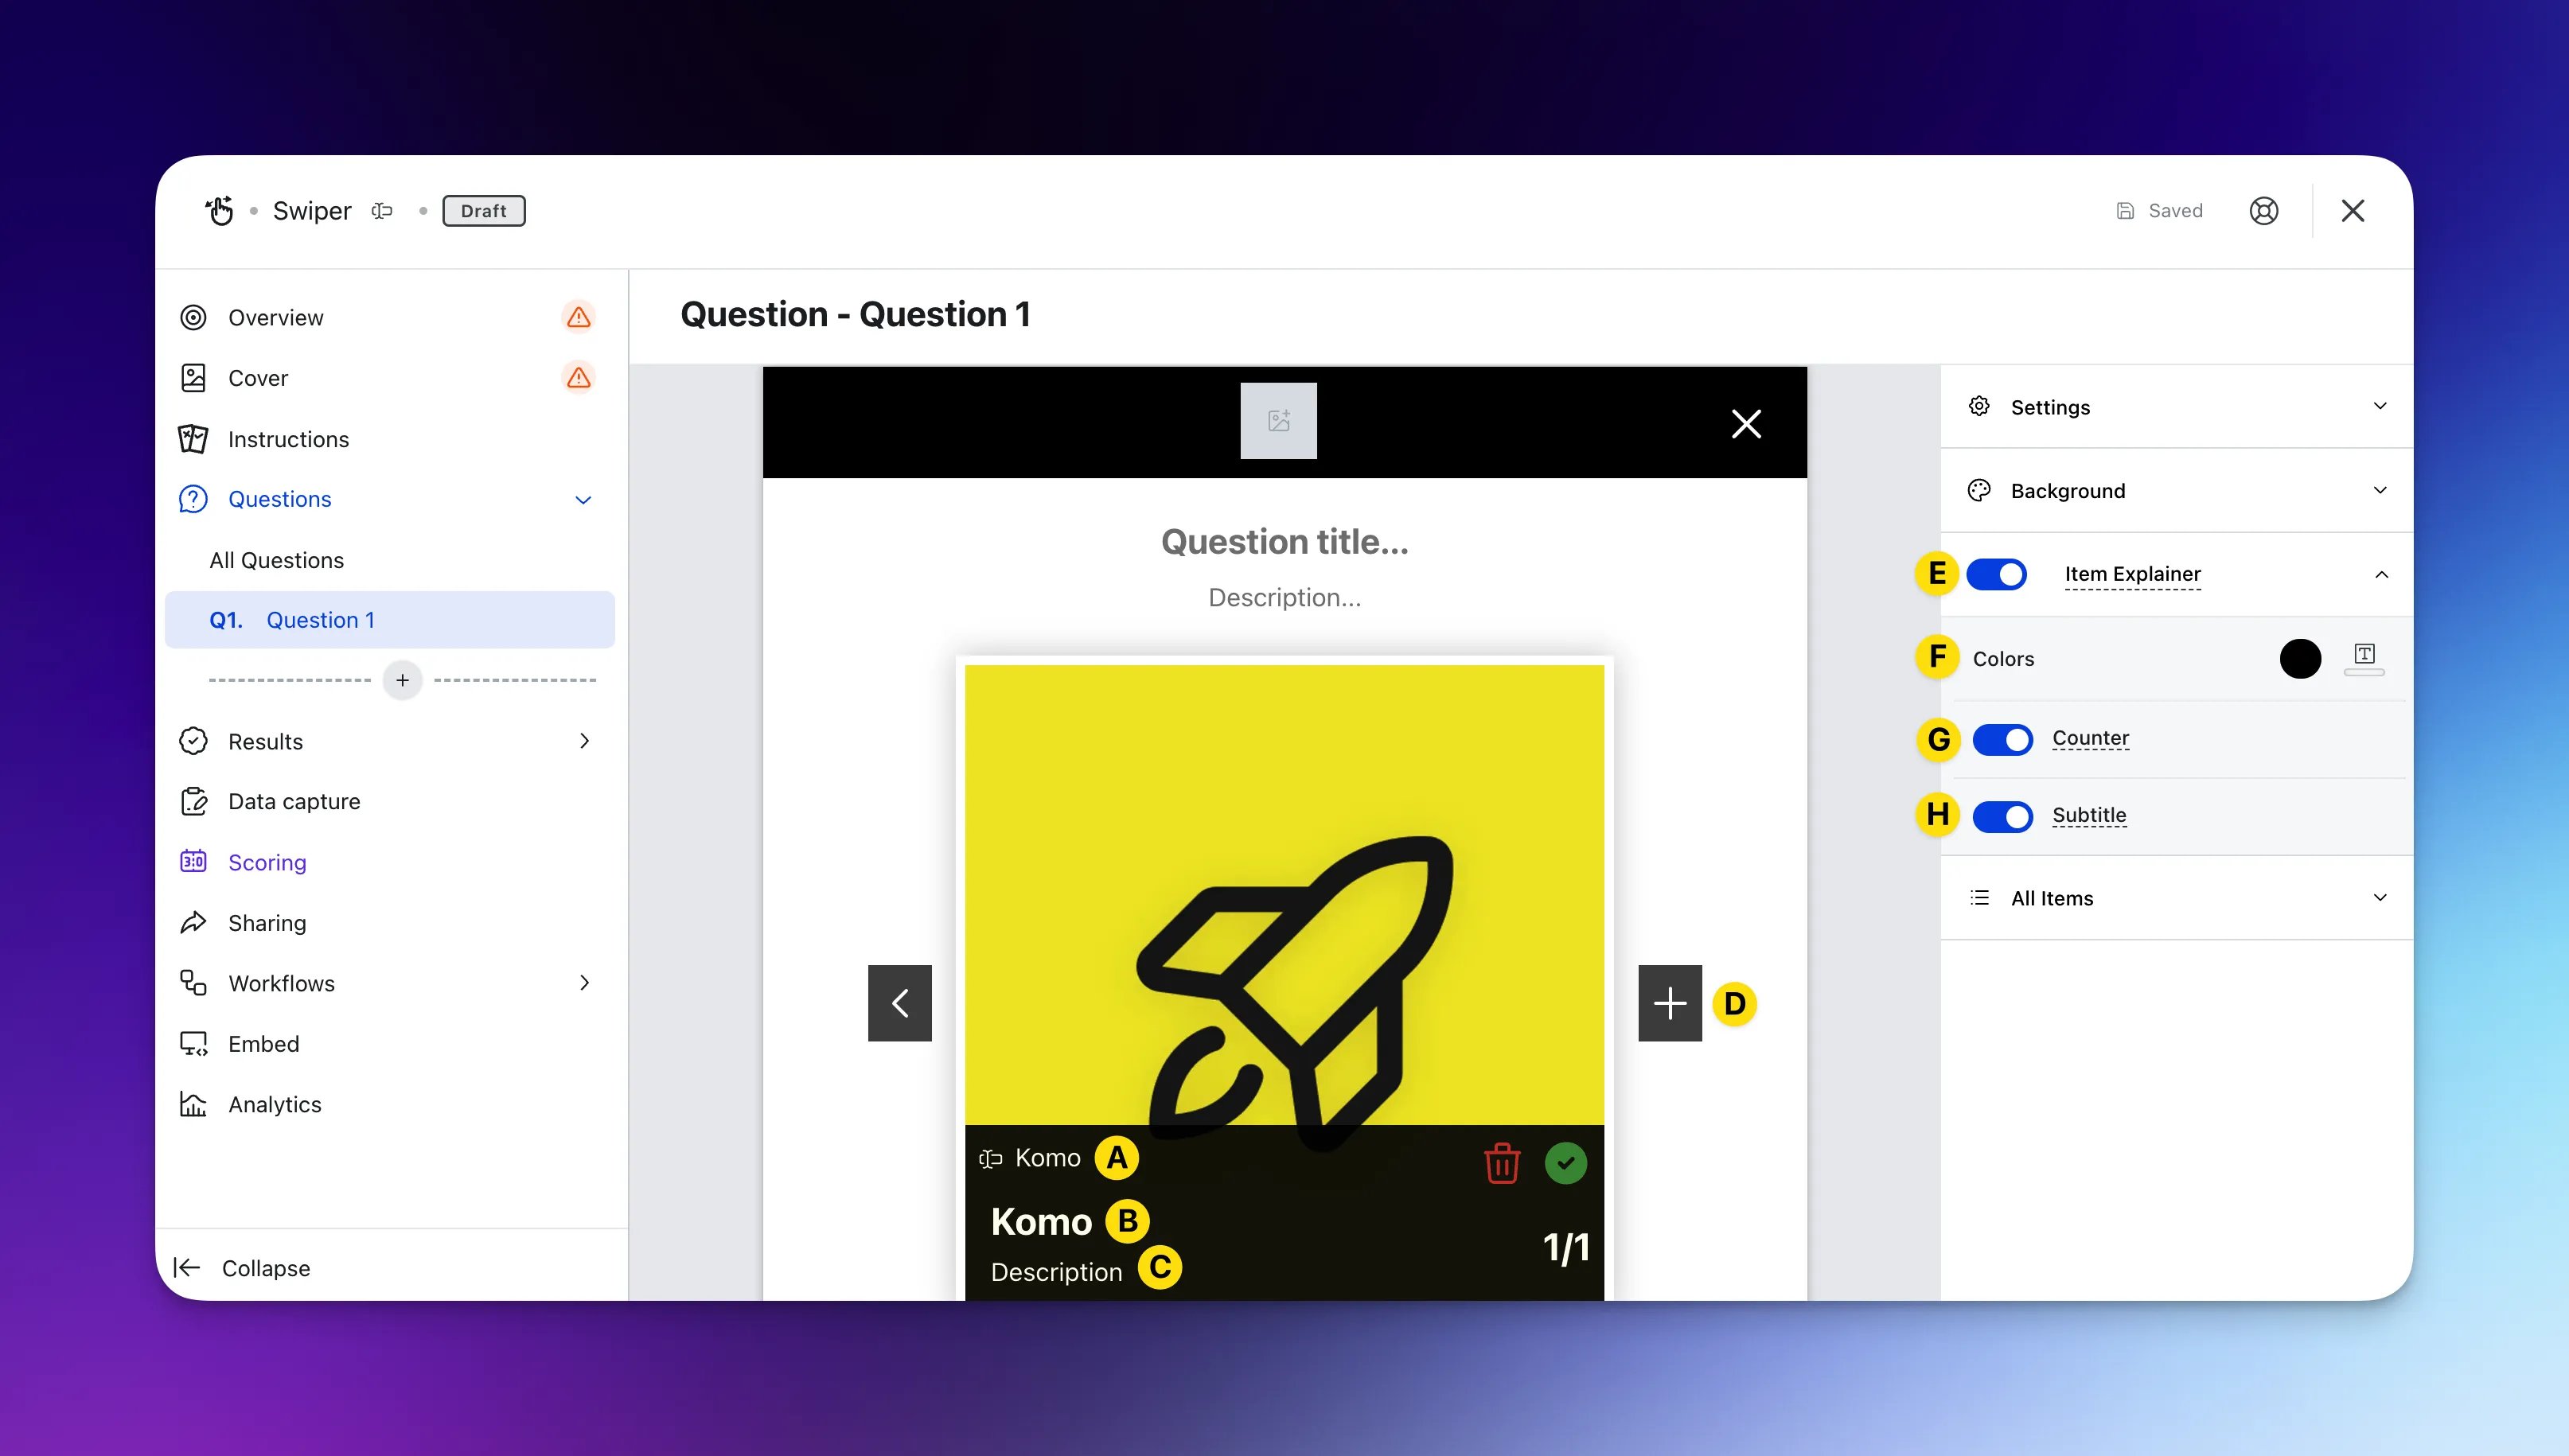 * **(A)** Update the **internal name**
* **(B)** Edit the item **title** here
* **(C)** Here you can add a **subtitle/description** and **(H)** toggle off the subtitle option
* **(D)** Click on the **plus icon** to add another item
* **(E)** Here you can disable the **item explainer**
* **(F)** Edit the footer background color and text color
* **(G)** Here you can toggle off the counter located on the bottom right
* **(9)** View all the **items** for the question
* **(A)** Update the **internal name**
* **(B)** Edit the item **title** here
* **(C)** Here you can add a **subtitle/description** and **(H)** toggle off the subtitle option
* **(D)** Click on the **plus icon** to add another item
* **(E)** Here you can disable the **item explainer**
* **(F)** Edit the footer background color and text color
* **(G)** Here you can toggle off the counter located on the bottom right
* **(9)** View all the **items** for the question
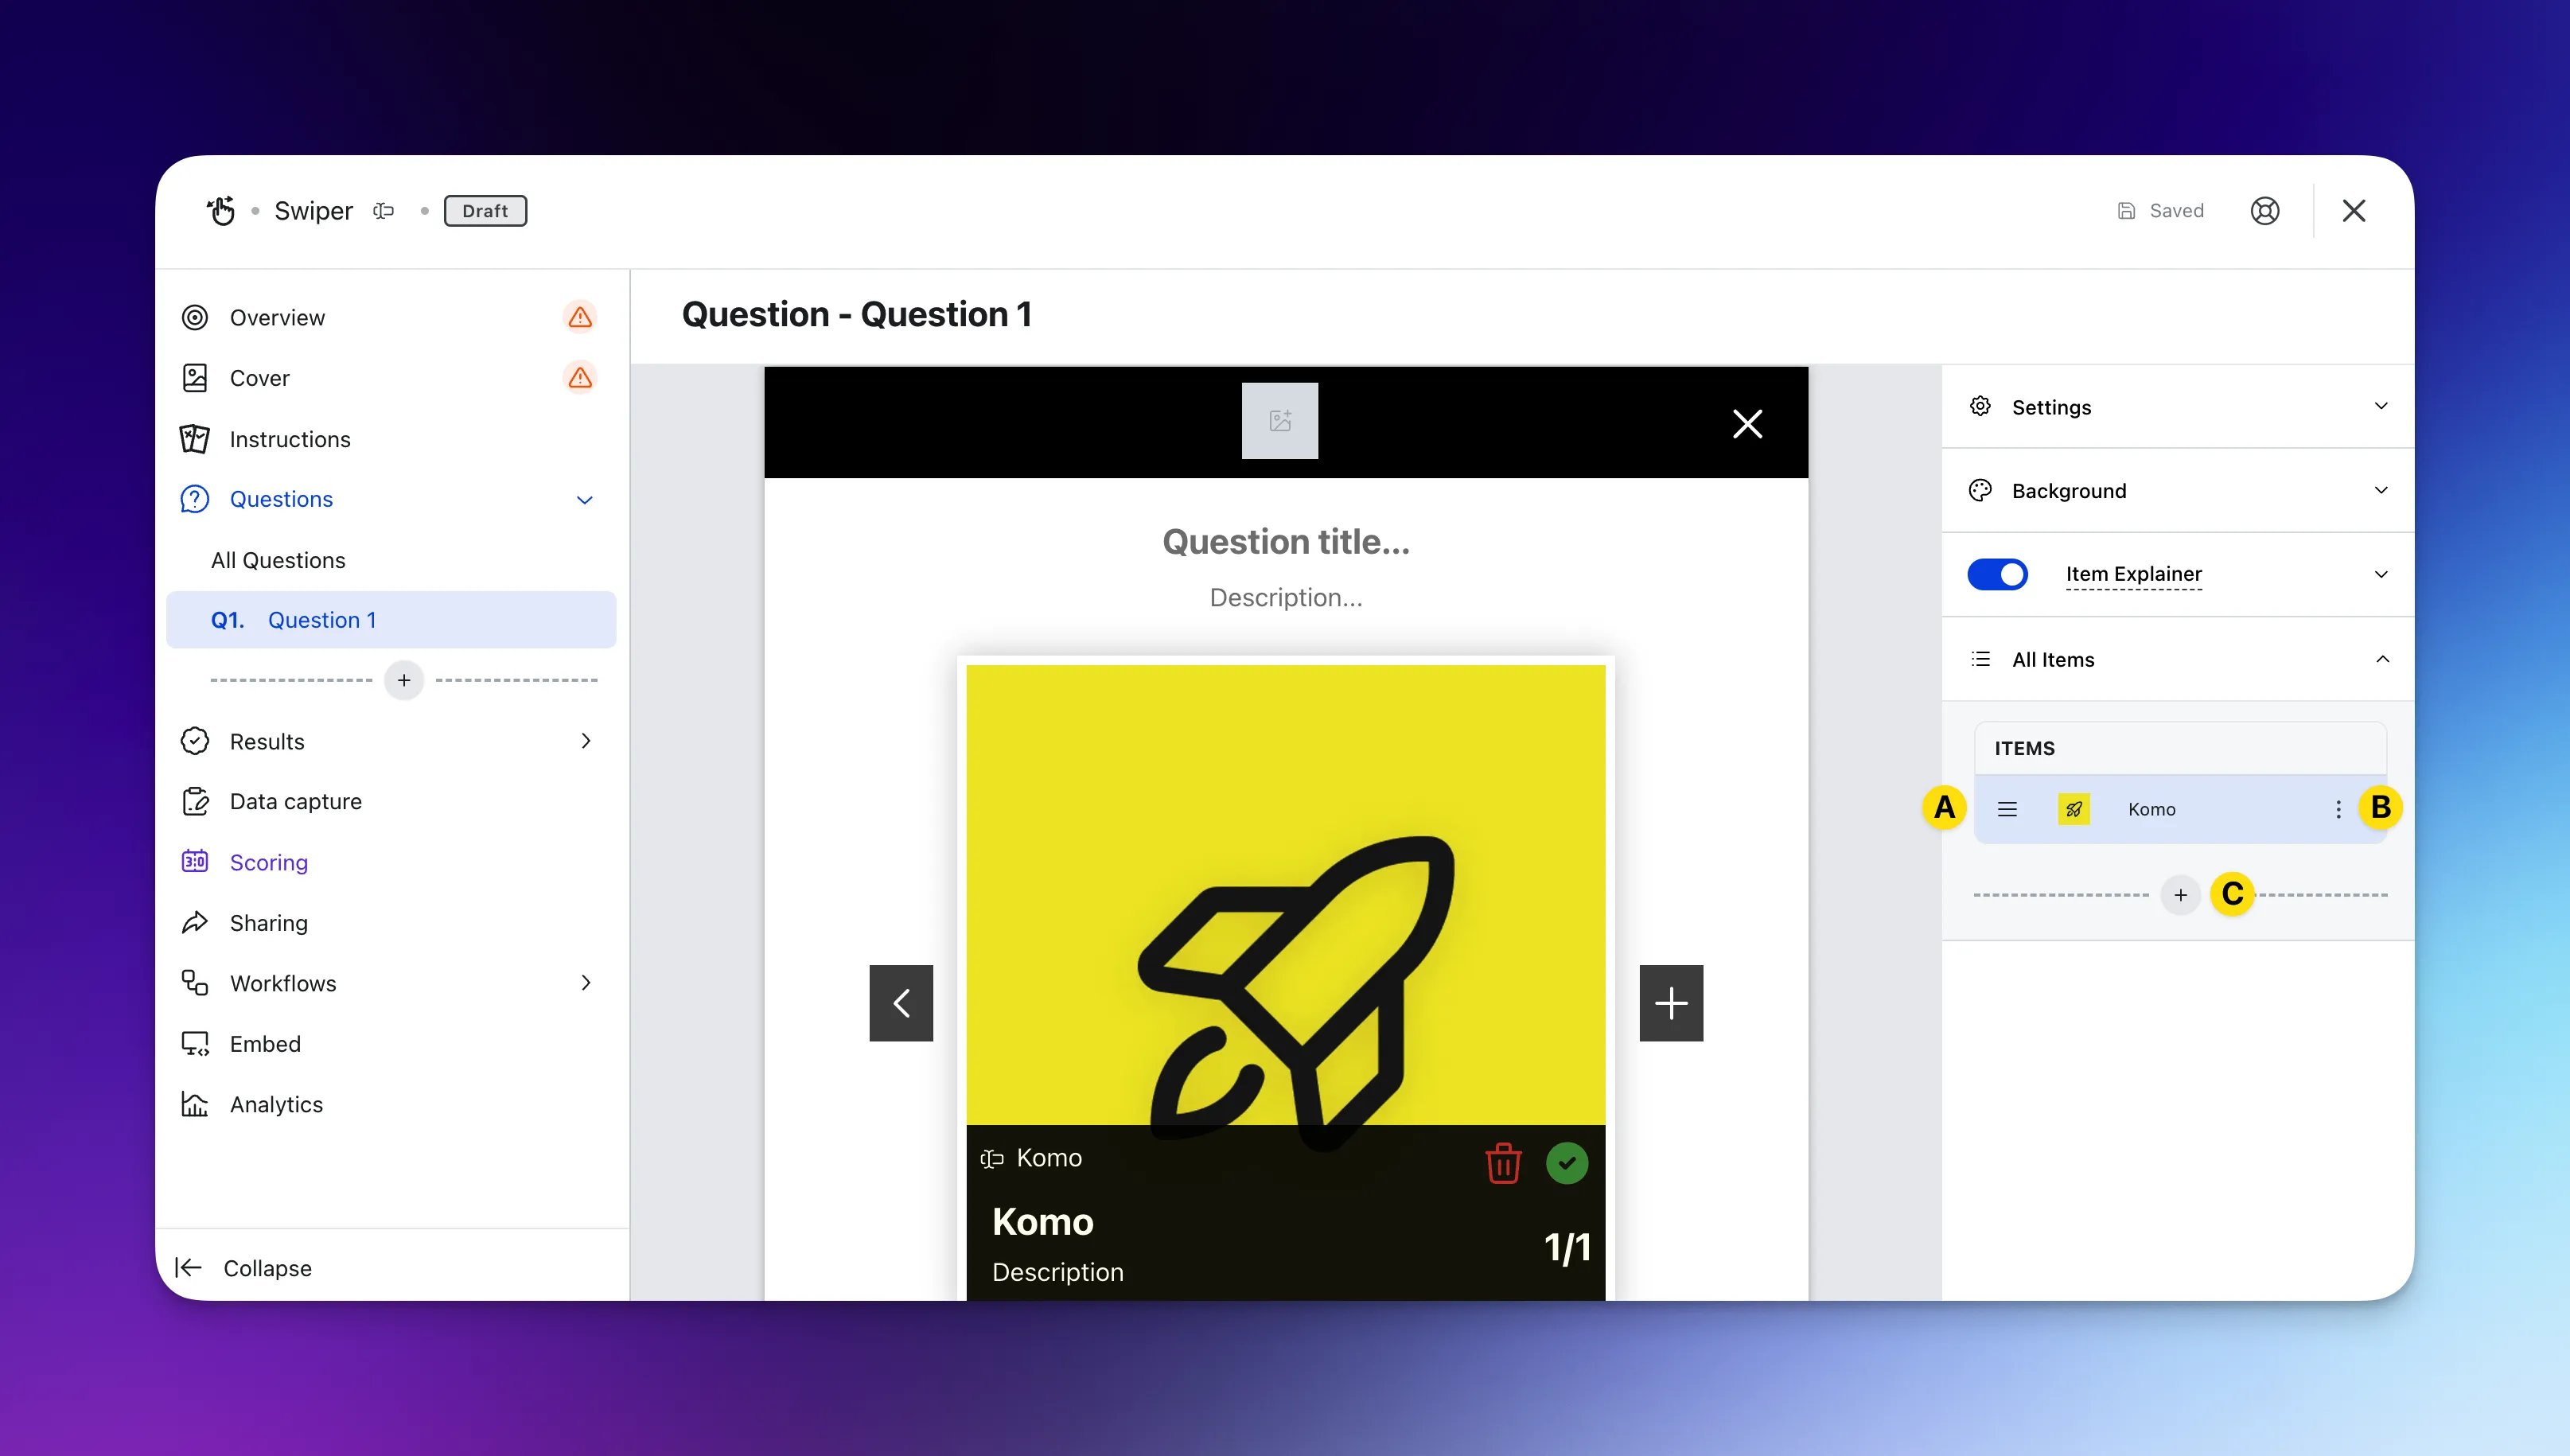 * **(A)** Using the burger menu to **move and rearrange** the order of the items
* **(B)** Here you can **update, clone or delete** the item
* **(C)** Click the **plus icon** to add more items
### Step 5: Set up your Results
* **(A)** Using the burger menu to **move and rearrange** the order of the items
* **(B)** Here you can **update, clone or delete** the item
* **(C)** Click the **plus icon** to add more items
### Step 5: Set up your Results
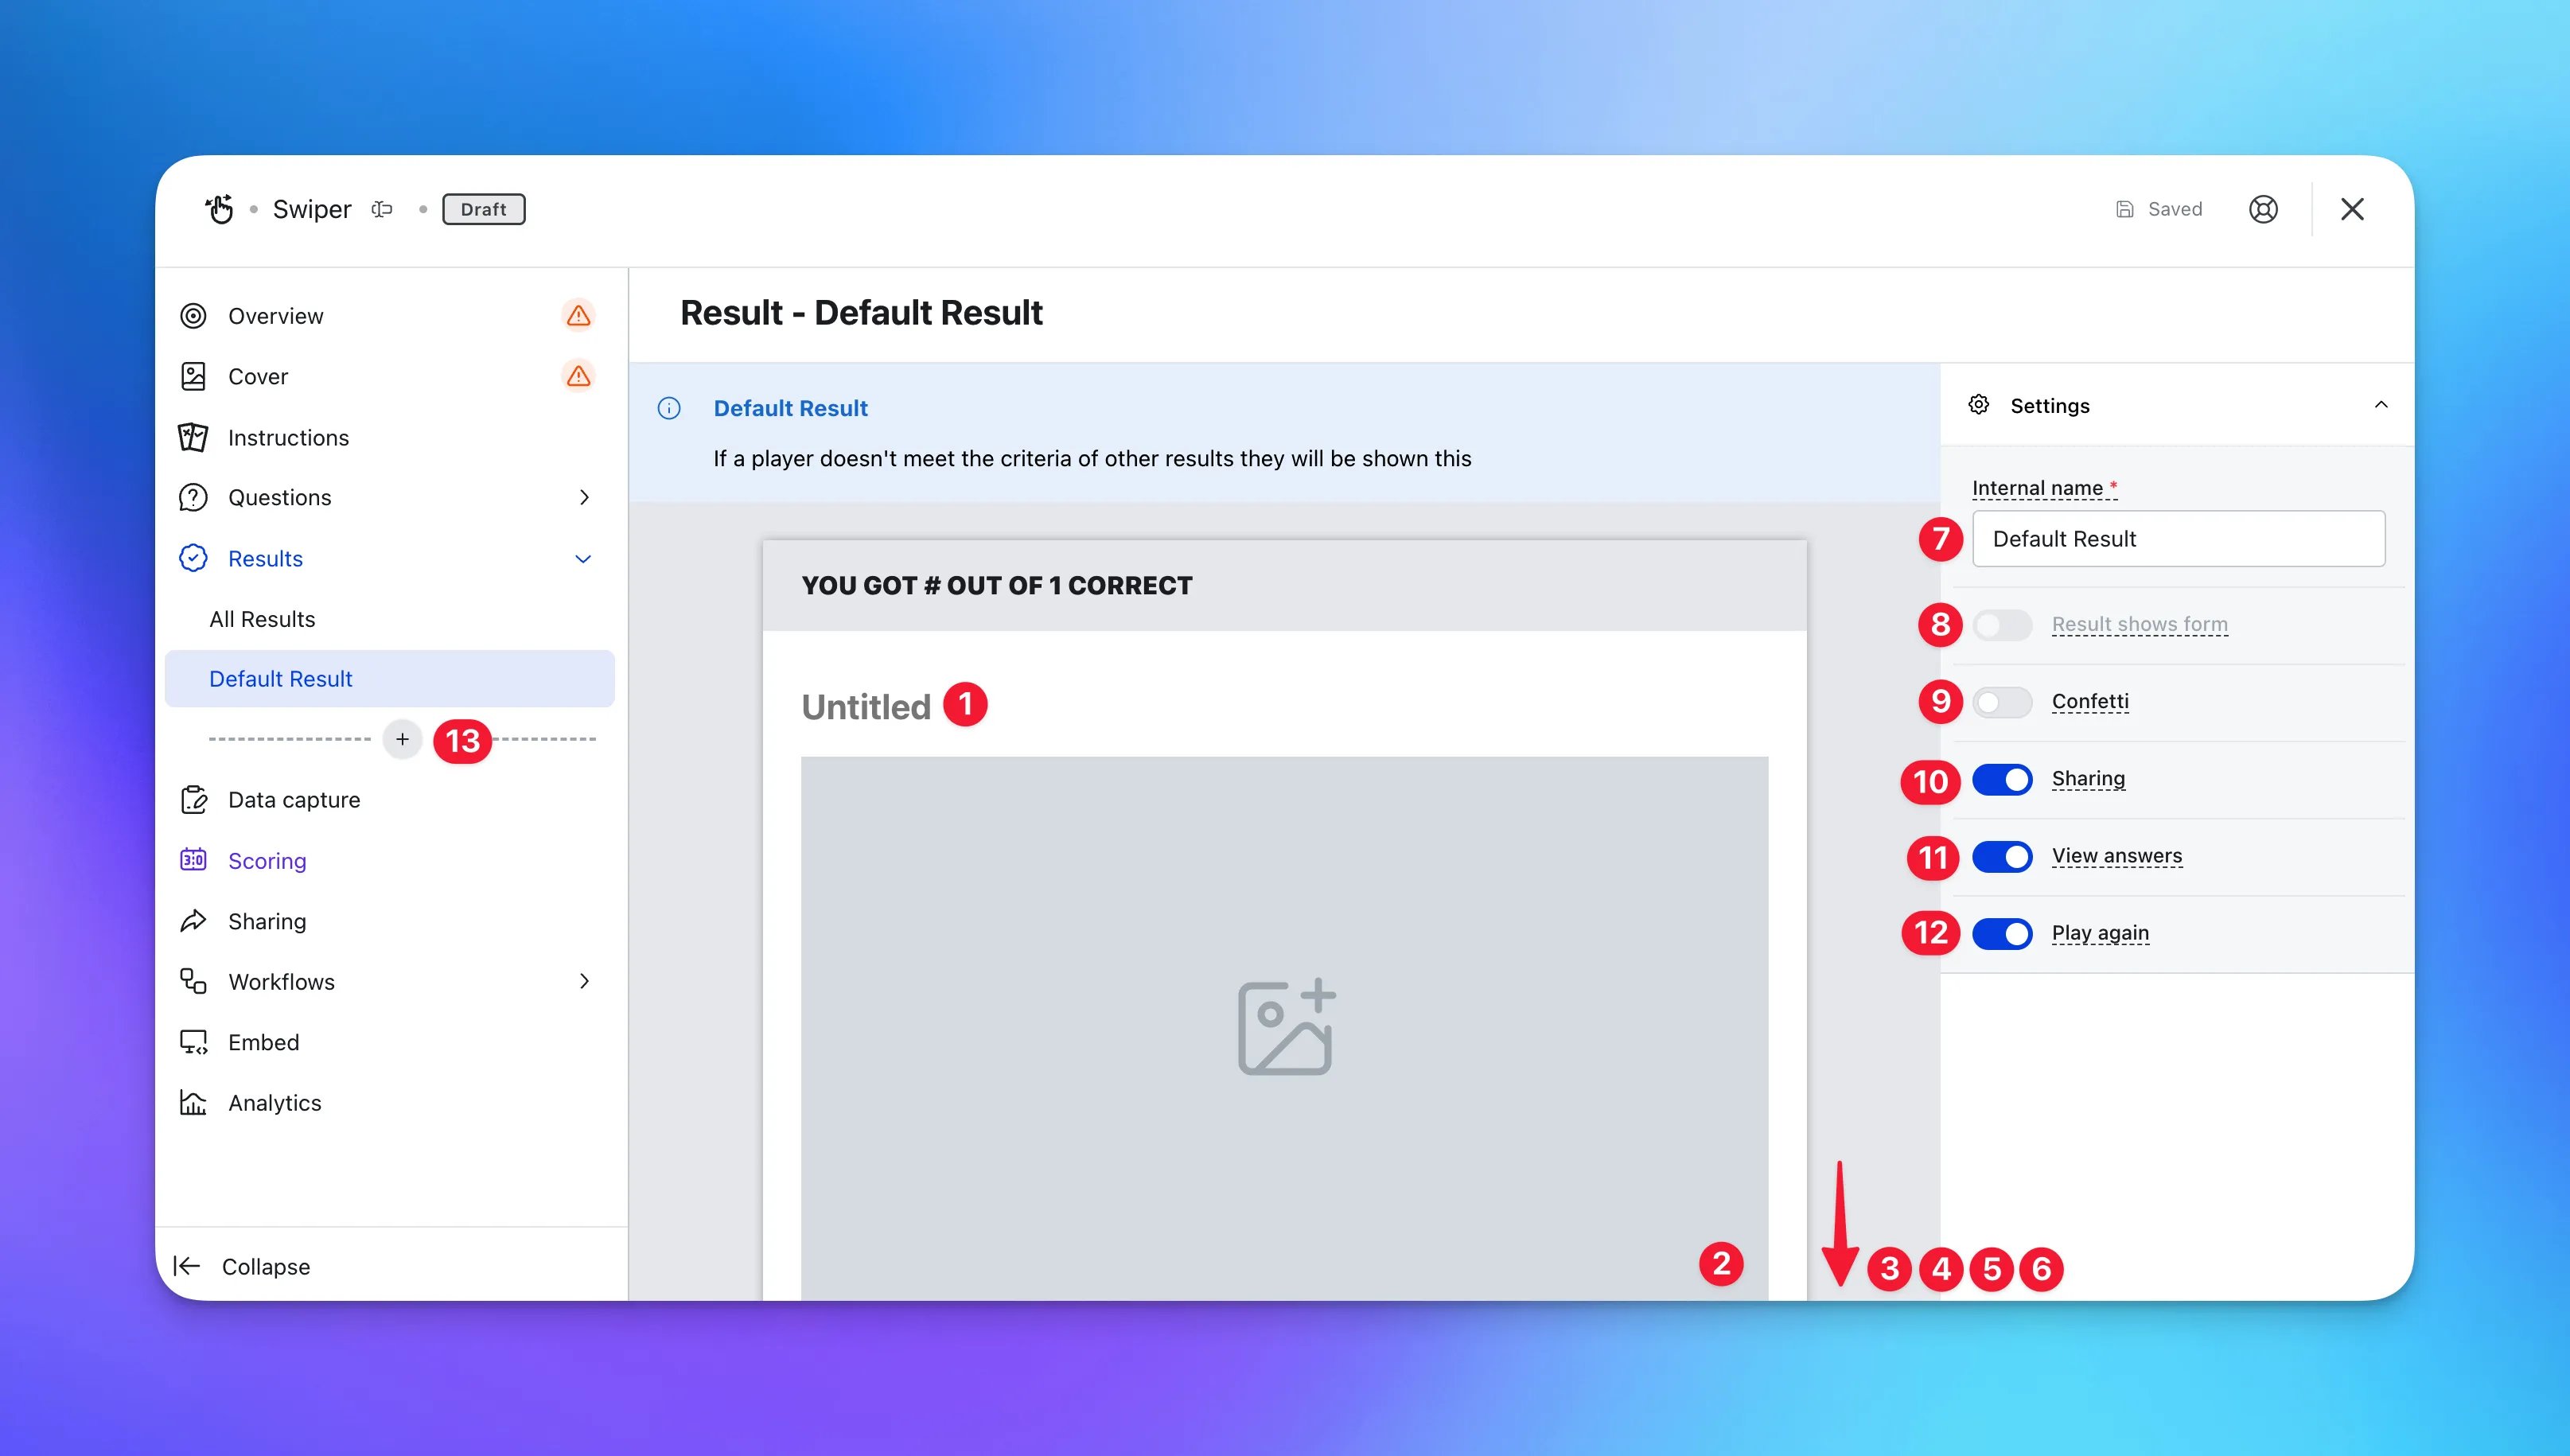 Here you will edit the Default Result screen.
We recommend using this screen as the **failure** screen. You can change the internal name to read as failure result.
* **(1)** Give this result a **title**
* **(2)** Upload an **image** to the result
* **(3)** Scrolling down, you can include a **description** to this result
* **(4)** Alter the color and copy of the **Share** call-to-action or **(10)** remove the bar here
* **(5)** Alter the color and copy of the **View answers** call-to-action or **(11)** you can hide this button here
* **(6)** Alter the color and copy of the **Play again** call-to-action or **(12)** you can hide this button here
* **(7)** You can give this result an **internal name**
* **(8)** Have this result lead to a **data capture form**
You will need to enable the data capture prior to toggling this on. Follow [Step 6](#step-6-set-up-your-data-capture) to activate.
* **(9)** Toggle the **confetti** on if you want to show on this result
* **(13)** Click on the **plus icon** to add another result screen
* When adding another result screen, the settings are the same as the default result
* **(A)** You will need to set a **range** that will trigger this result
Here you will edit the Default Result screen.
We recommend using this screen as the **failure** screen. You can change the internal name to read as failure result.
* **(1)** Give this result a **title**
* **(2)** Upload an **image** to the result
* **(3)** Scrolling down, you can include a **description** to this result
* **(4)** Alter the color and copy of the **Share** call-to-action or **(10)** remove the bar here
* **(5)** Alter the color and copy of the **View answers** call-to-action or **(11)** you can hide this button here
* **(6)** Alter the color and copy of the **Play again** call-to-action or **(12)** you can hide this button here
* **(7)** You can give this result an **internal name**
* **(8)** Have this result lead to a **data capture form**
You will need to enable the data capture prior to toggling this on. Follow [Step 6](#step-6-set-up-your-data-capture) to activate.
* **(9)** Toggle the **confetti** on if you want to show on this result
* **(13)** Click on the **plus icon** to add another result screen
* When adding another result screen, the settings are the same as the default result
* **(A)** You will need to set a **range** that will trigger this result 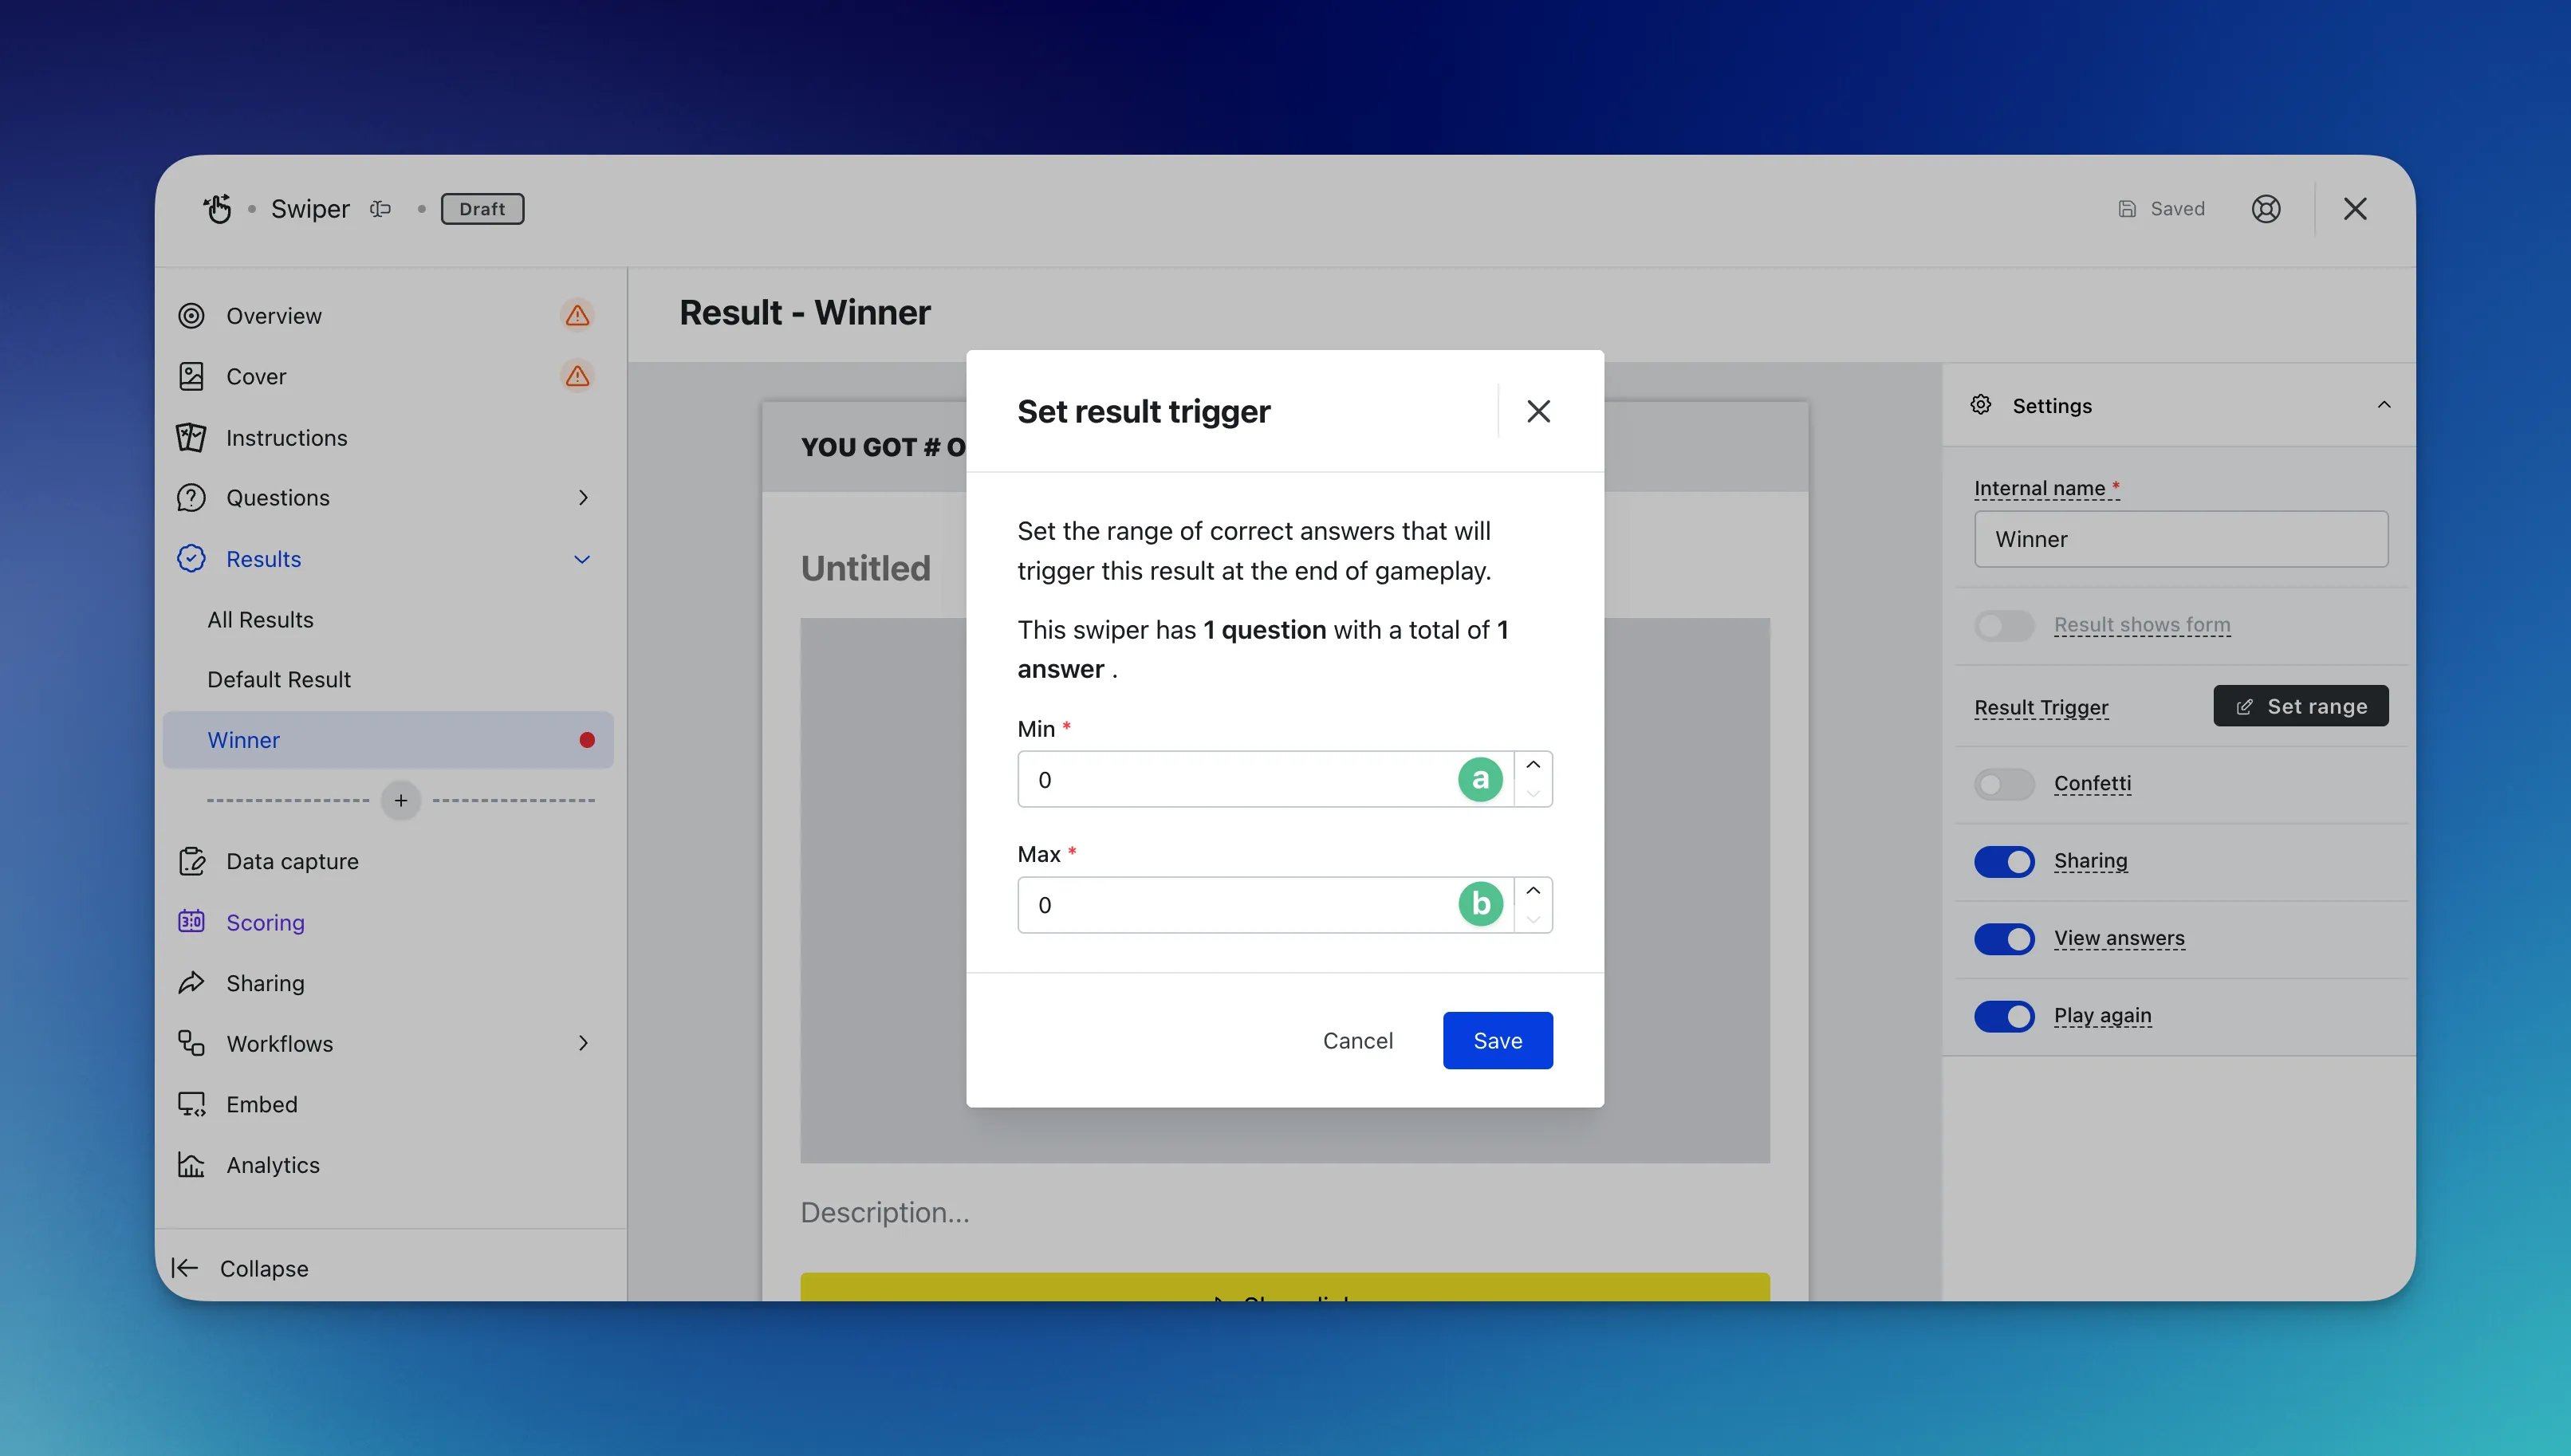 * **(a)** Set the **minimum correct answer** needed to show this result
* **(b)** And then set the **maximum correct** answers needed
### Step 6: Set up your Data capture *(Optional)*
Whilst adding a competition to your Swiper is recommended to collect data, it is not always required and can be used purely as an engagement piece.
### Step 7: Publish your Card
Once you've completed all of these steps, played around with your card and are happy with all the aspects of your card, it's time to get your card live!
* **(1)Publish** your card manually and instantly for the world to see
* **(2)Schedule** your card to be published and unpublished at set dates and times
* **(3)** Click on **...** to **Preview** and interact with the card on the front end from a user's perspective before publishing it. See how to test your card [here](/getting-started/hub-setup/card-testing)
All competition entries will be recorded and will impact the card analytics.
## "Go live" checklist
Ready to go live with your Swiper? We recommend reviewing the following list before launching and double-checking if you have:
* All images uploaded are the **correct dimensions**. Export image files in 2x to ensure none of the images appear pixelated
* Added all your **questions** and **options**
* Hyperlinked your [T\&Cs](/getting-started/resources/terms-conditions) to the opt-in-field, which is created in the **data capture** section of the settings tab if you have a competition attached
* Selected the **correct answer** for all the options
* All your **result screens** are set up with imagery, copy and the result range
* All your **communications** (Registration, Winner/s, Everybody Else) are fully set up and ready to send
* If you have a competition attached, ensure your **Prizes** and the awarding rules are set up correctly
* If you are using **coupons**, make sure the coupons created are set up correctly. Check the coupon limits are set, the copy for each screen is right and you have linked the appropriate coupons to your communications
Then you're ready to go live!
## Promotion
## FAQ
**What can I use the Swiper card for?**
The swiper can be used in a variety of ways such as asking users who is on x team, who is in or out next round, was x player on x team etc., is x item on the menu, who was in x movie etc. You can ask any questions and create a fun and engaging game!
**Why would I use the footer subtitle?**
You can use the footer subtitle to add additional information about the option e.g. an image of a sports player, the footer title displays the player's name and the subtitle states the team they play for.
* **(a)** Set the **minimum correct answer** needed to show this result
* **(b)** And then set the **maximum correct** answers needed
### Step 6: Set up your Data capture *(Optional)*
Whilst adding a competition to your Swiper is recommended to collect data, it is not always required and can be used purely as an engagement piece.
### Step 7: Publish your Card
Once you've completed all of these steps, played around with your card and are happy with all the aspects of your card, it's time to get your card live!
* **(1)Publish** your card manually and instantly for the world to see
* **(2)Schedule** your card to be published and unpublished at set dates and times
* **(3)** Click on **...** to **Preview** and interact with the card on the front end from a user's perspective before publishing it. See how to test your card [here](/getting-started/hub-setup/card-testing)
All competition entries will be recorded and will impact the card analytics.
## "Go live" checklist
Ready to go live with your Swiper? We recommend reviewing the following list before launching and double-checking if you have:
* All images uploaded are the **correct dimensions**. Export image files in 2x to ensure none of the images appear pixelated
* Added all your **questions** and **options**
* Hyperlinked your [T\&Cs](/getting-started/resources/terms-conditions) to the opt-in-field, which is created in the **data capture** section of the settings tab if you have a competition attached
* Selected the **correct answer** for all the options
* All your **result screens** are set up with imagery, copy and the result range
* All your **communications** (Registration, Winner/s, Everybody Else) are fully set up and ready to send
* If you have a competition attached, ensure your **Prizes** and the awarding rules are set up correctly
* If you are using **coupons**, make sure the coupons created are set up correctly. Check the coupon limits are set, the copy for each screen is right and you have linked the appropriate coupons to your communications
Then you're ready to go live!
## Promotion
## FAQ
**What can I use the Swiper card for?**
The swiper can be used in a variety of ways such as asking users who is on x team, who is in or out next round, was x player on x team etc., is x item on the menu, who was in x movie etc. You can ask any questions and create a fun and engaging game!
**Why would I use the footer subtitle?**
You can use the footer subtitle to add additional information about the option e.g. an image of a sports player, the footer title displays the player's name and the subtitle states the team they play for.