
What is it?
The Picker Card allows users to select and create their dream sports team, burger of the month, new cocktail and many more! This interactive experience lets users build their perfect combination by selecting items and placing them in designated positions on a visual formation.How do I build one?
Step 1: Add a Picker to your Hub
- Navigate to your Engagement Hub
- Once there, click the Plus icon, then select Games and then Picker
- You will then see your new card has been added to your Hub
Step 2: Add a Cover image
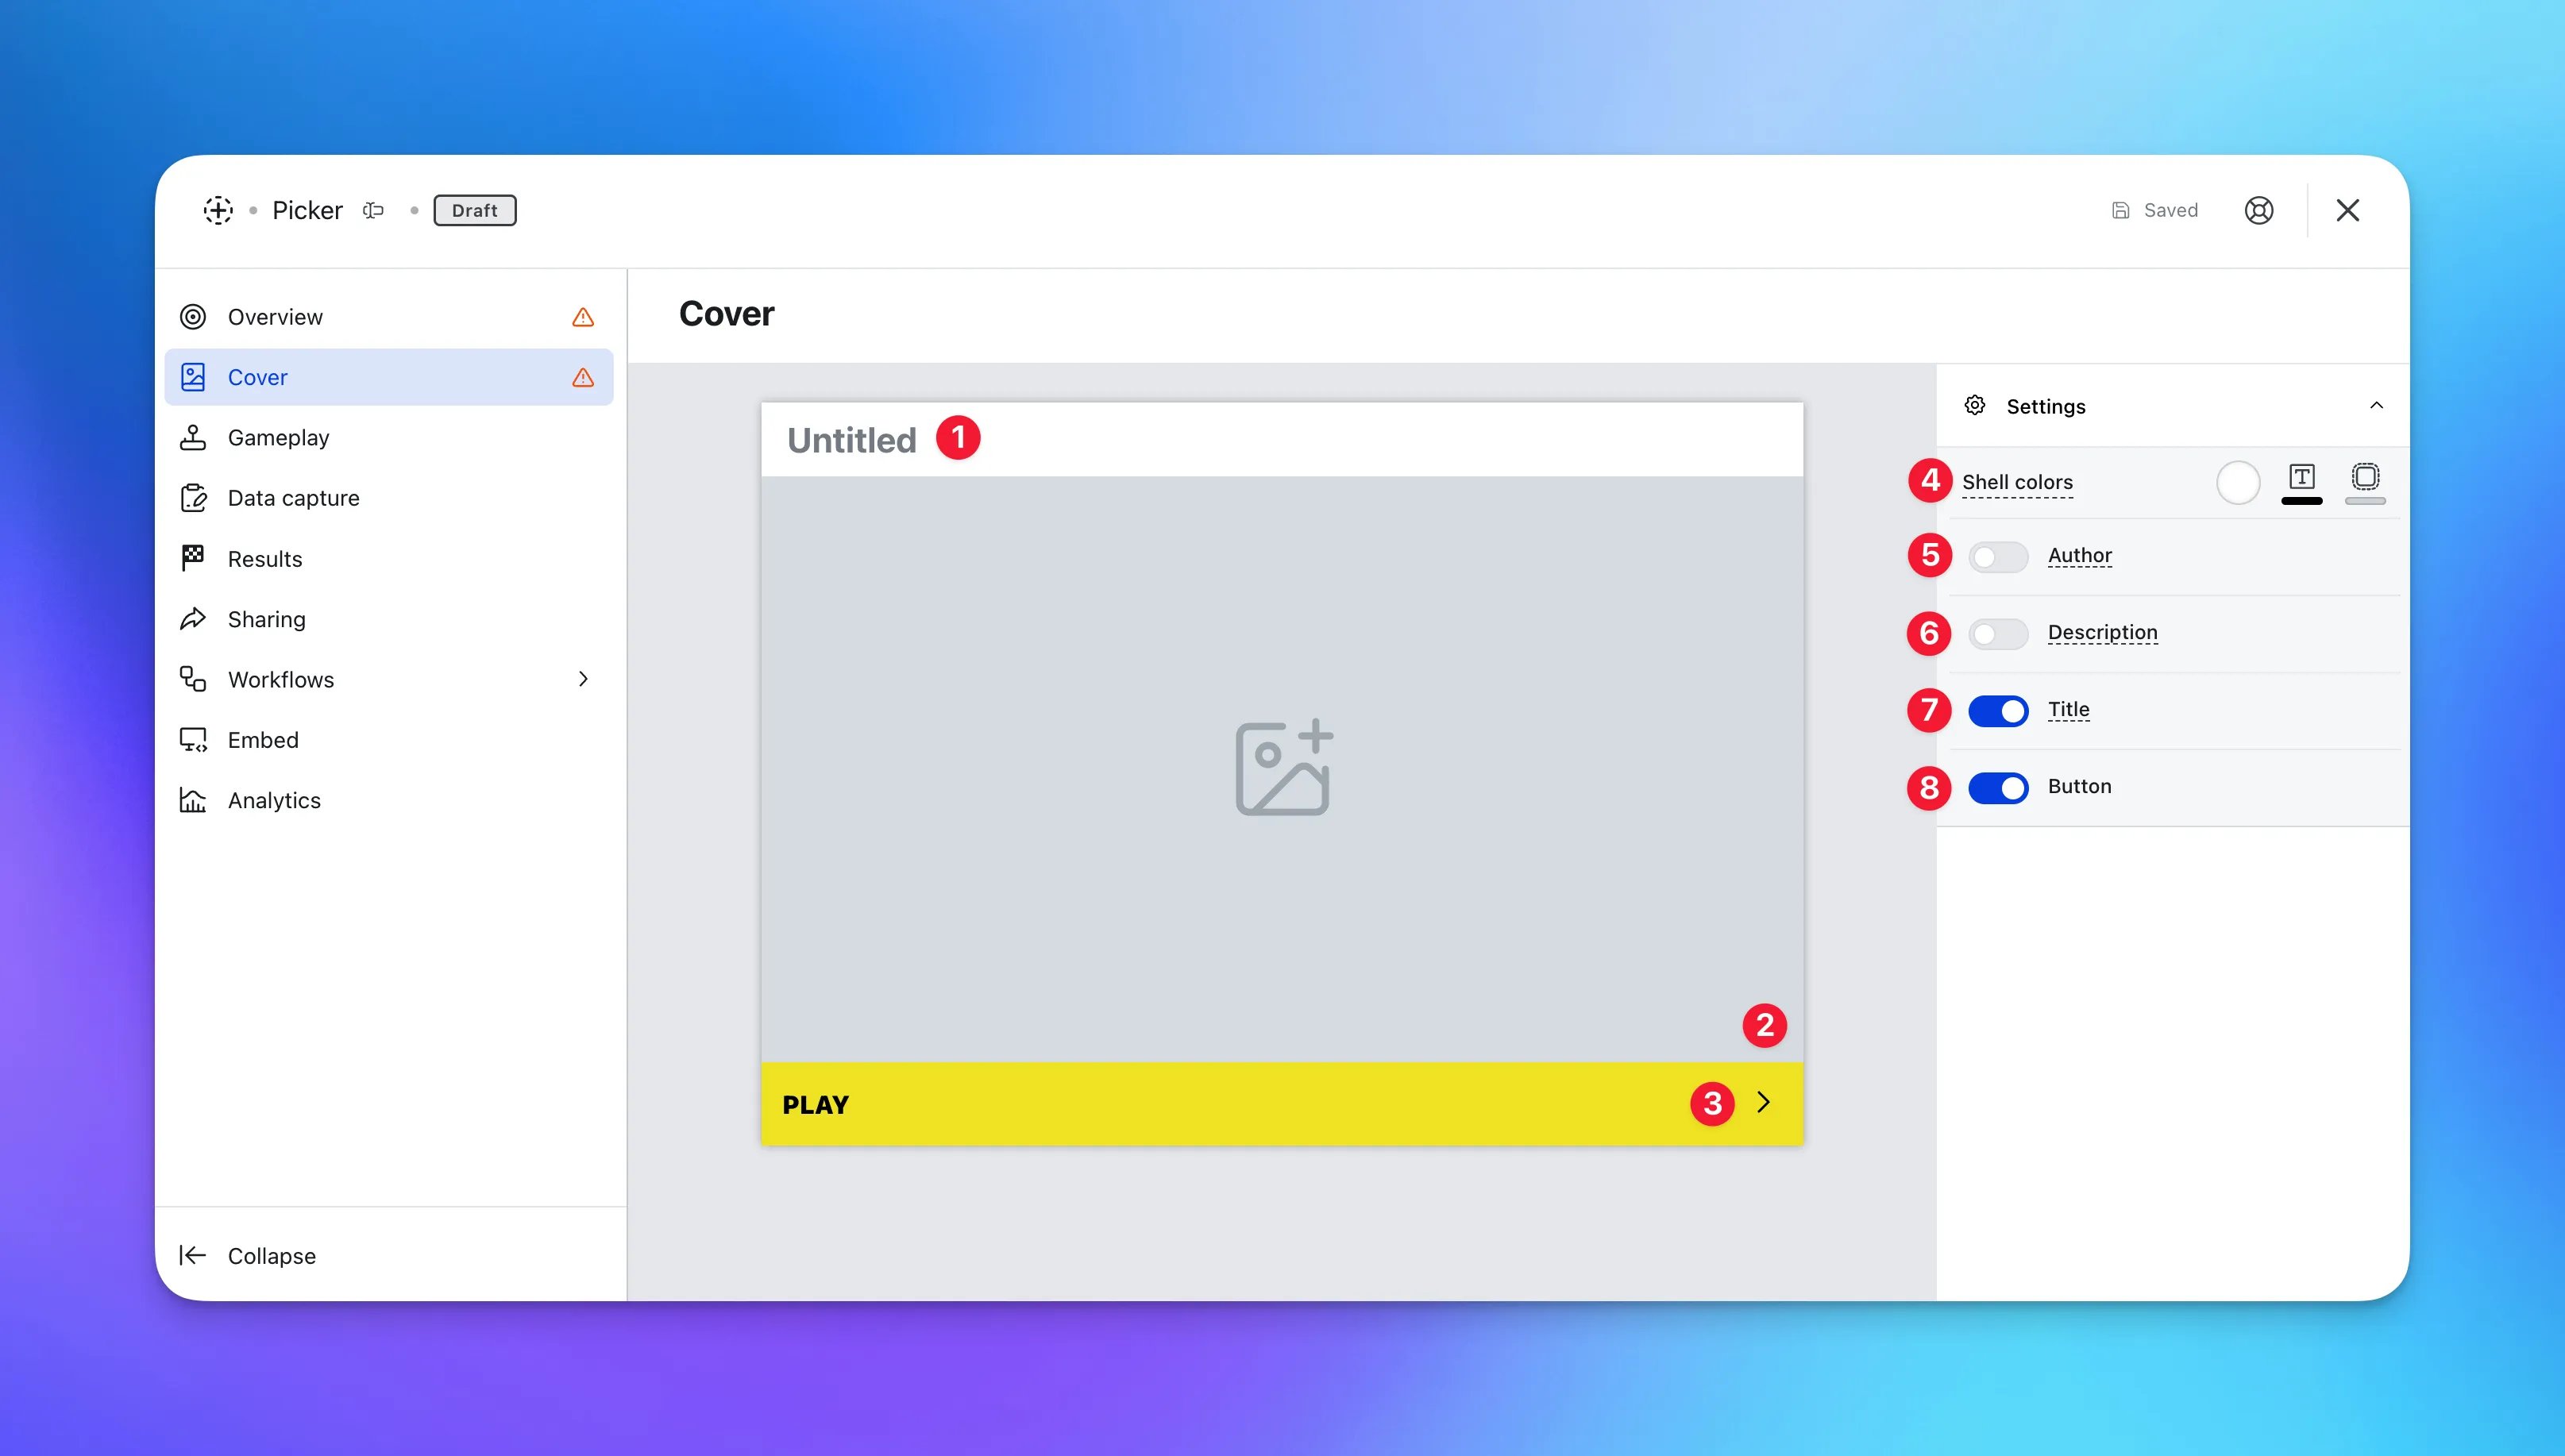
- Clicking on the Picker will open the editing module
- (1) By clicking here you can add a title to your Picker Card
- (2) This is where you can upload a cover image
- (3) Here you can edit the color and copy of the call-to-action bar or (8) toggle this off here
- (4) Set the Outer card shell colors (description and share bar)
- (5) You can add an Author tag by displaying the brand or person who’s responsible for the card content
- (6) Add a Description to the card
- (7) Here you can disable the title
Step 3: Formation and picker settings
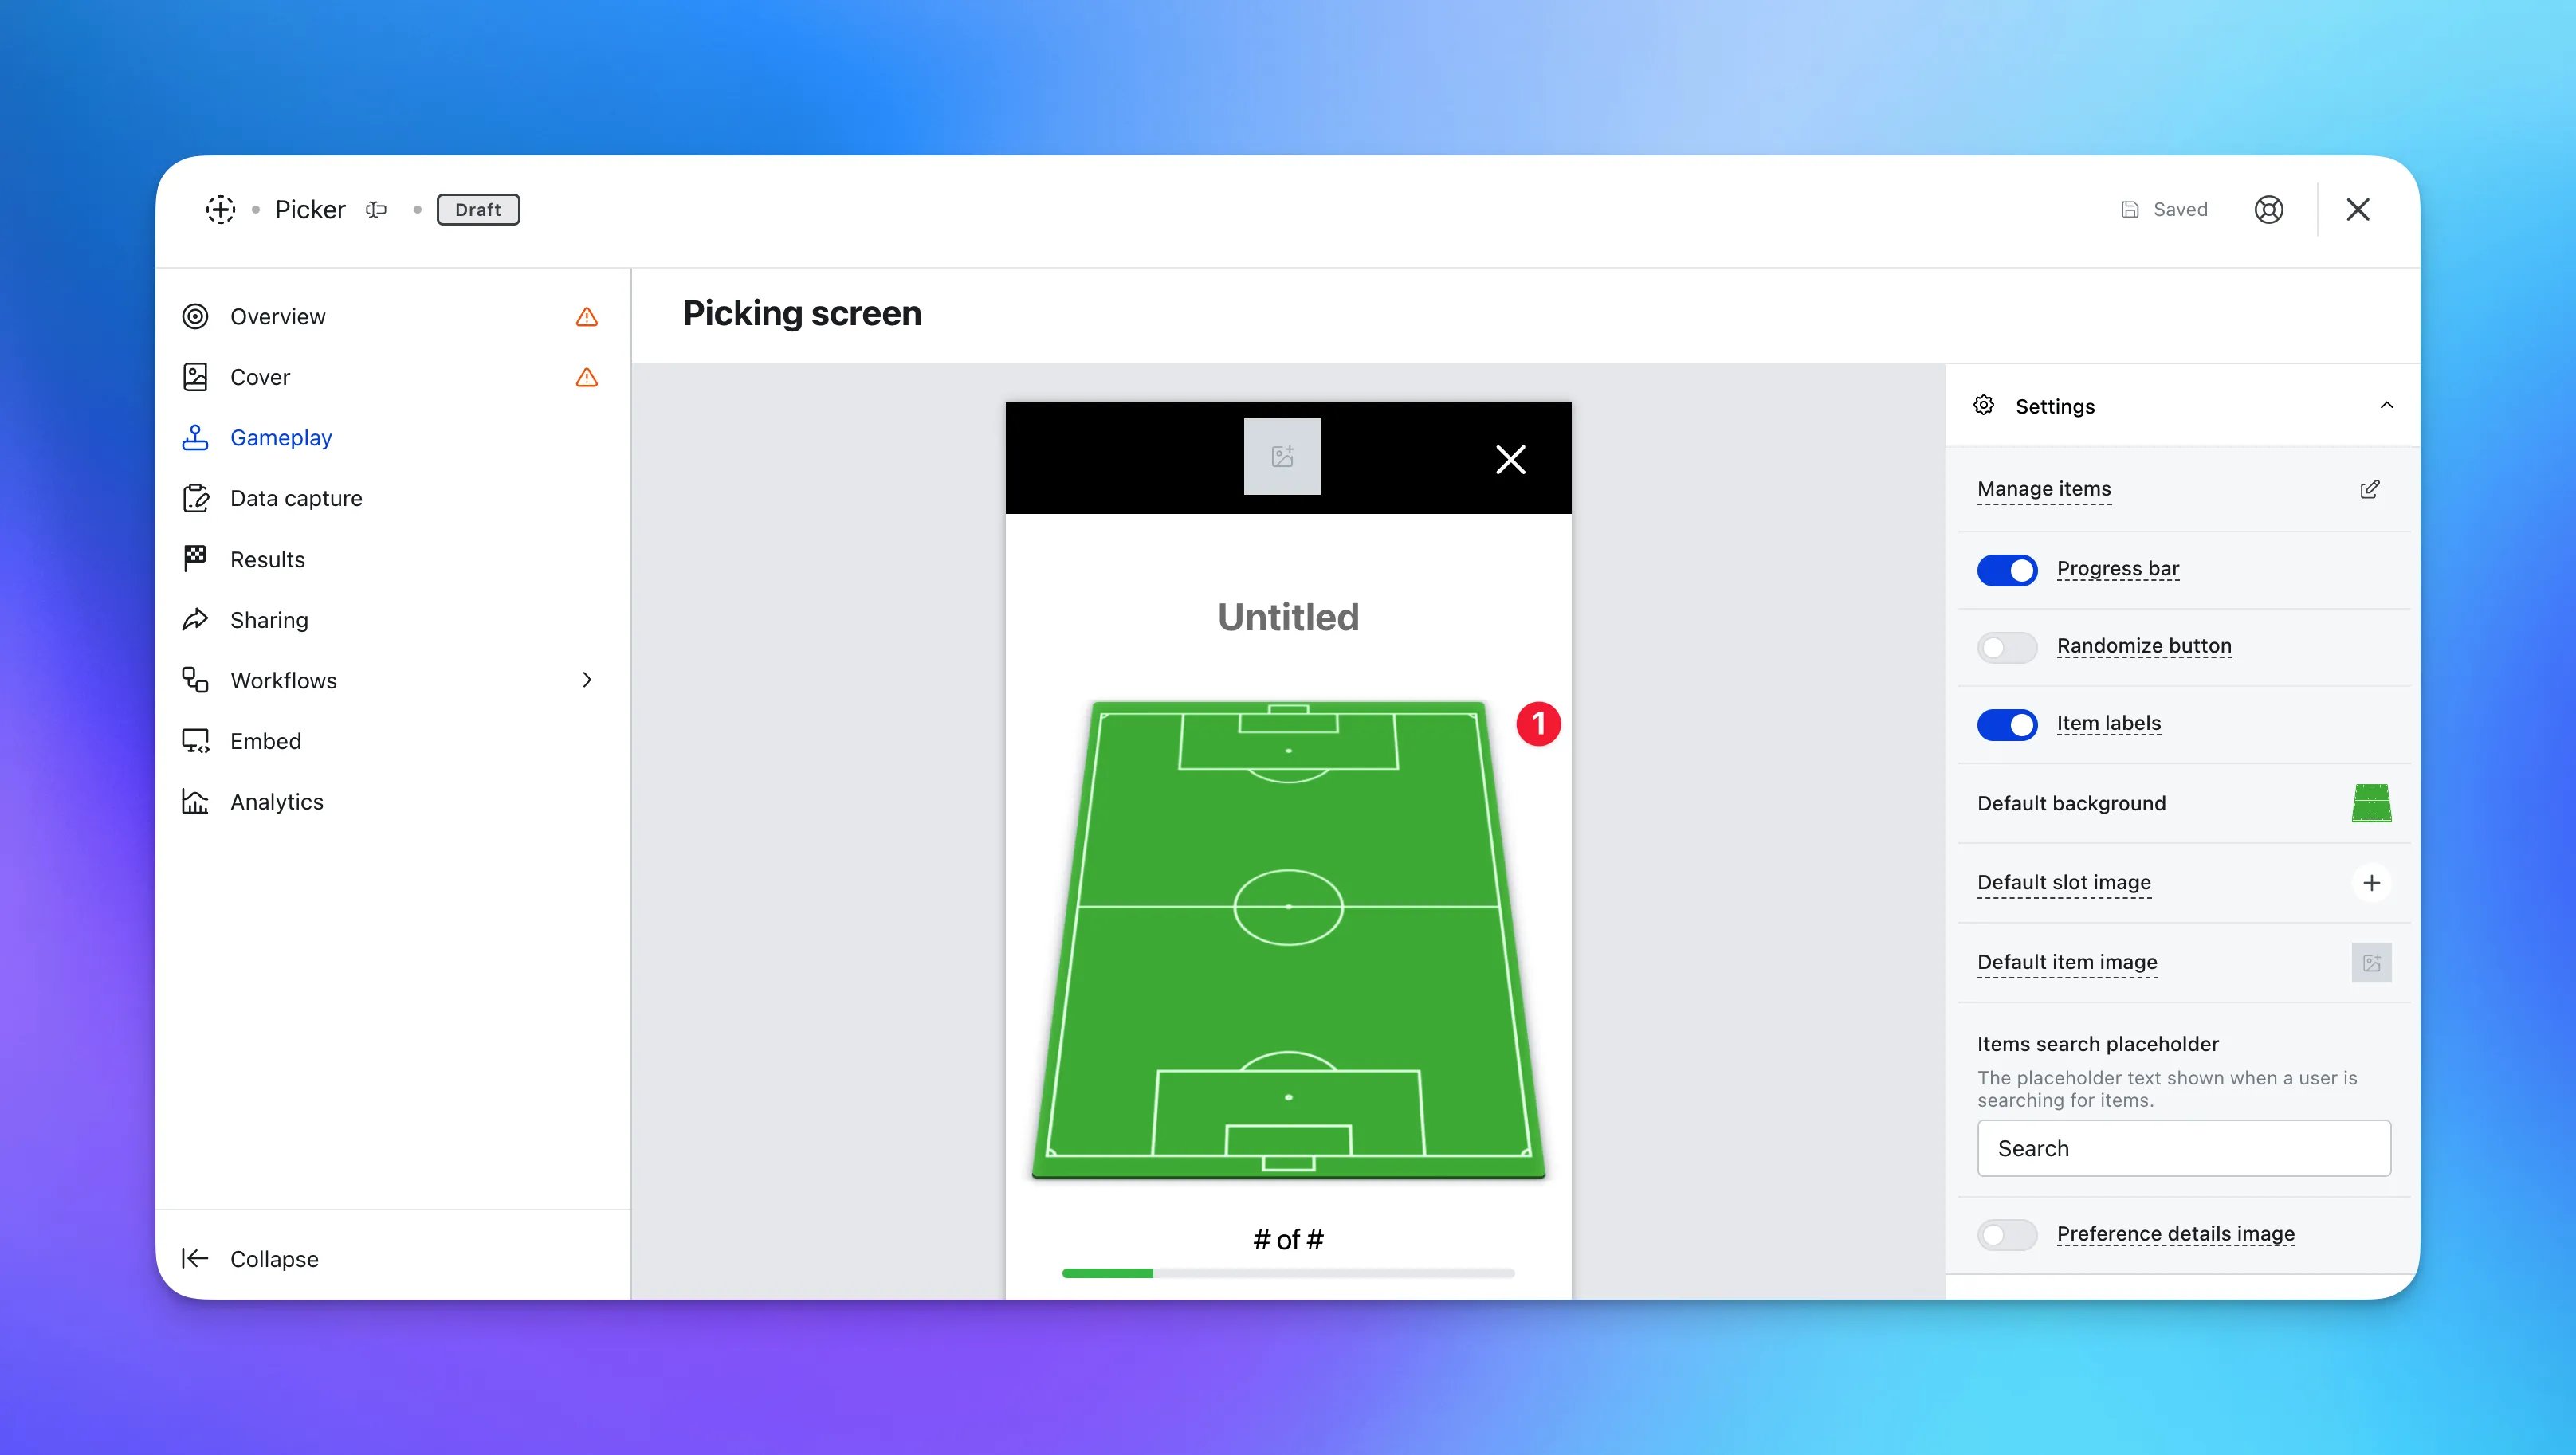
- (1) Click here to edit the positions and formations
Editing Positions and Formations
Editing Positions and Formations
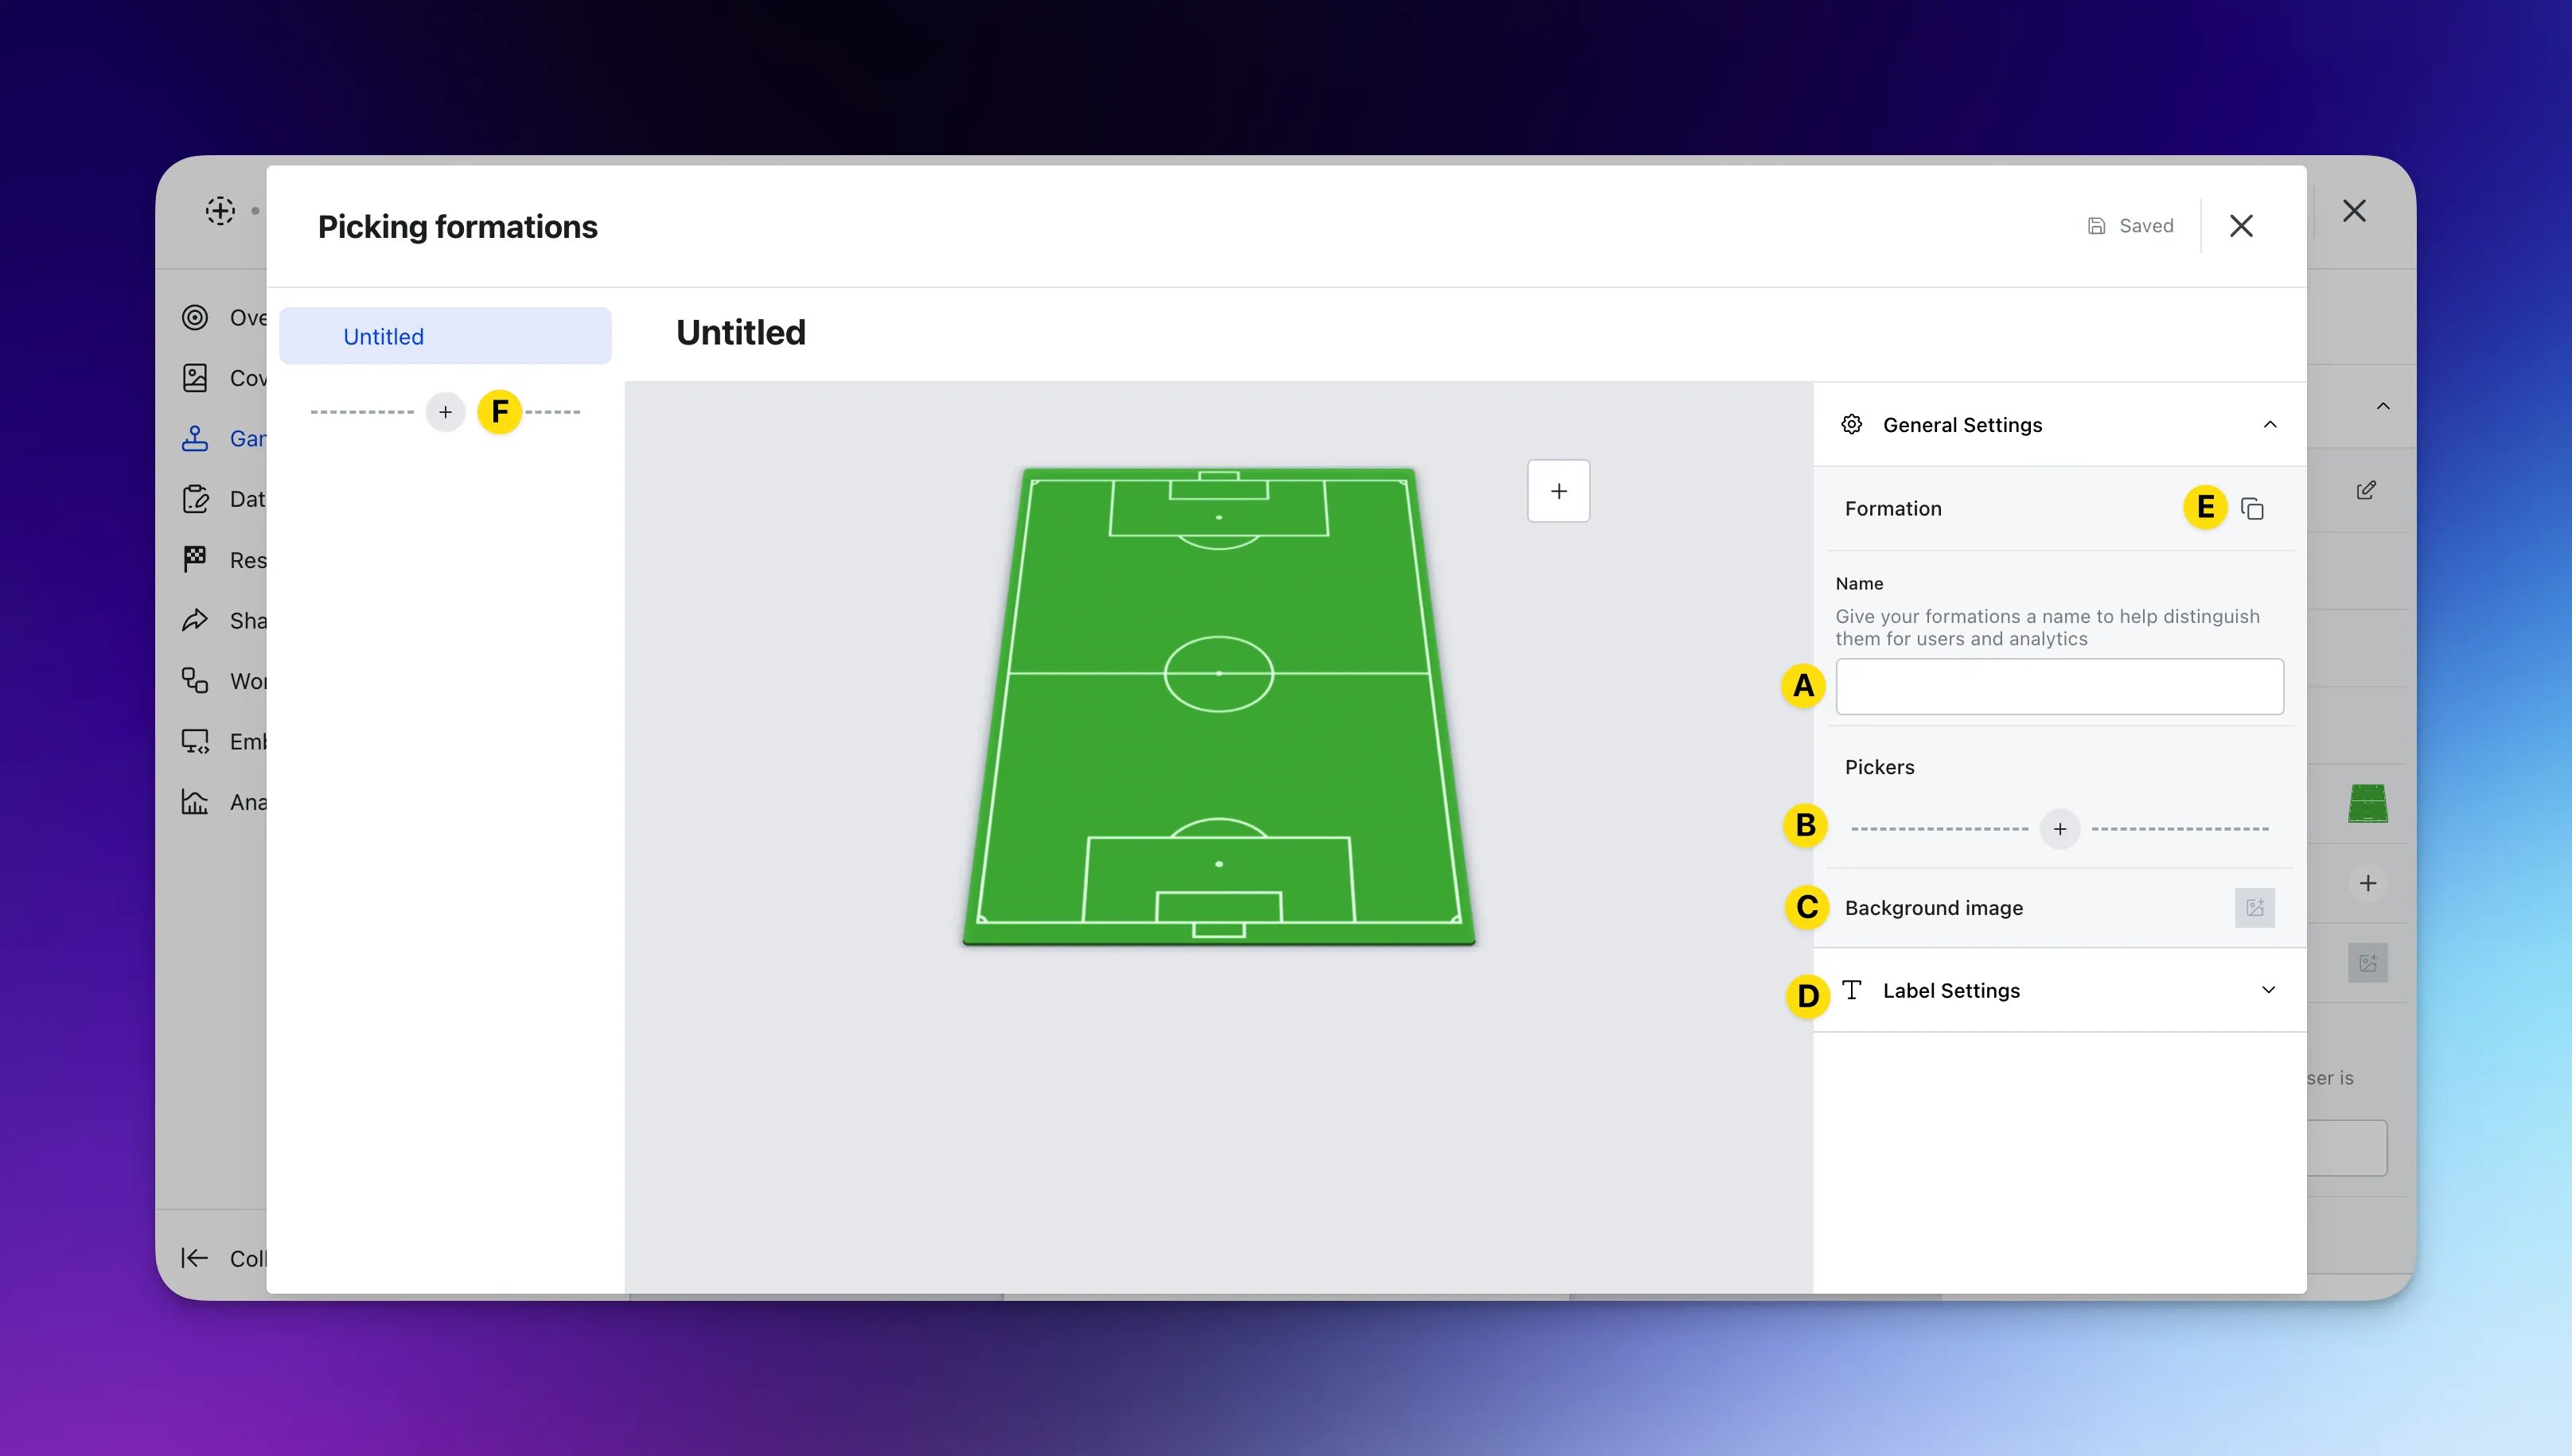
- (A) Give the formation a name
- (B) Add Pickers to the image according to your formation.
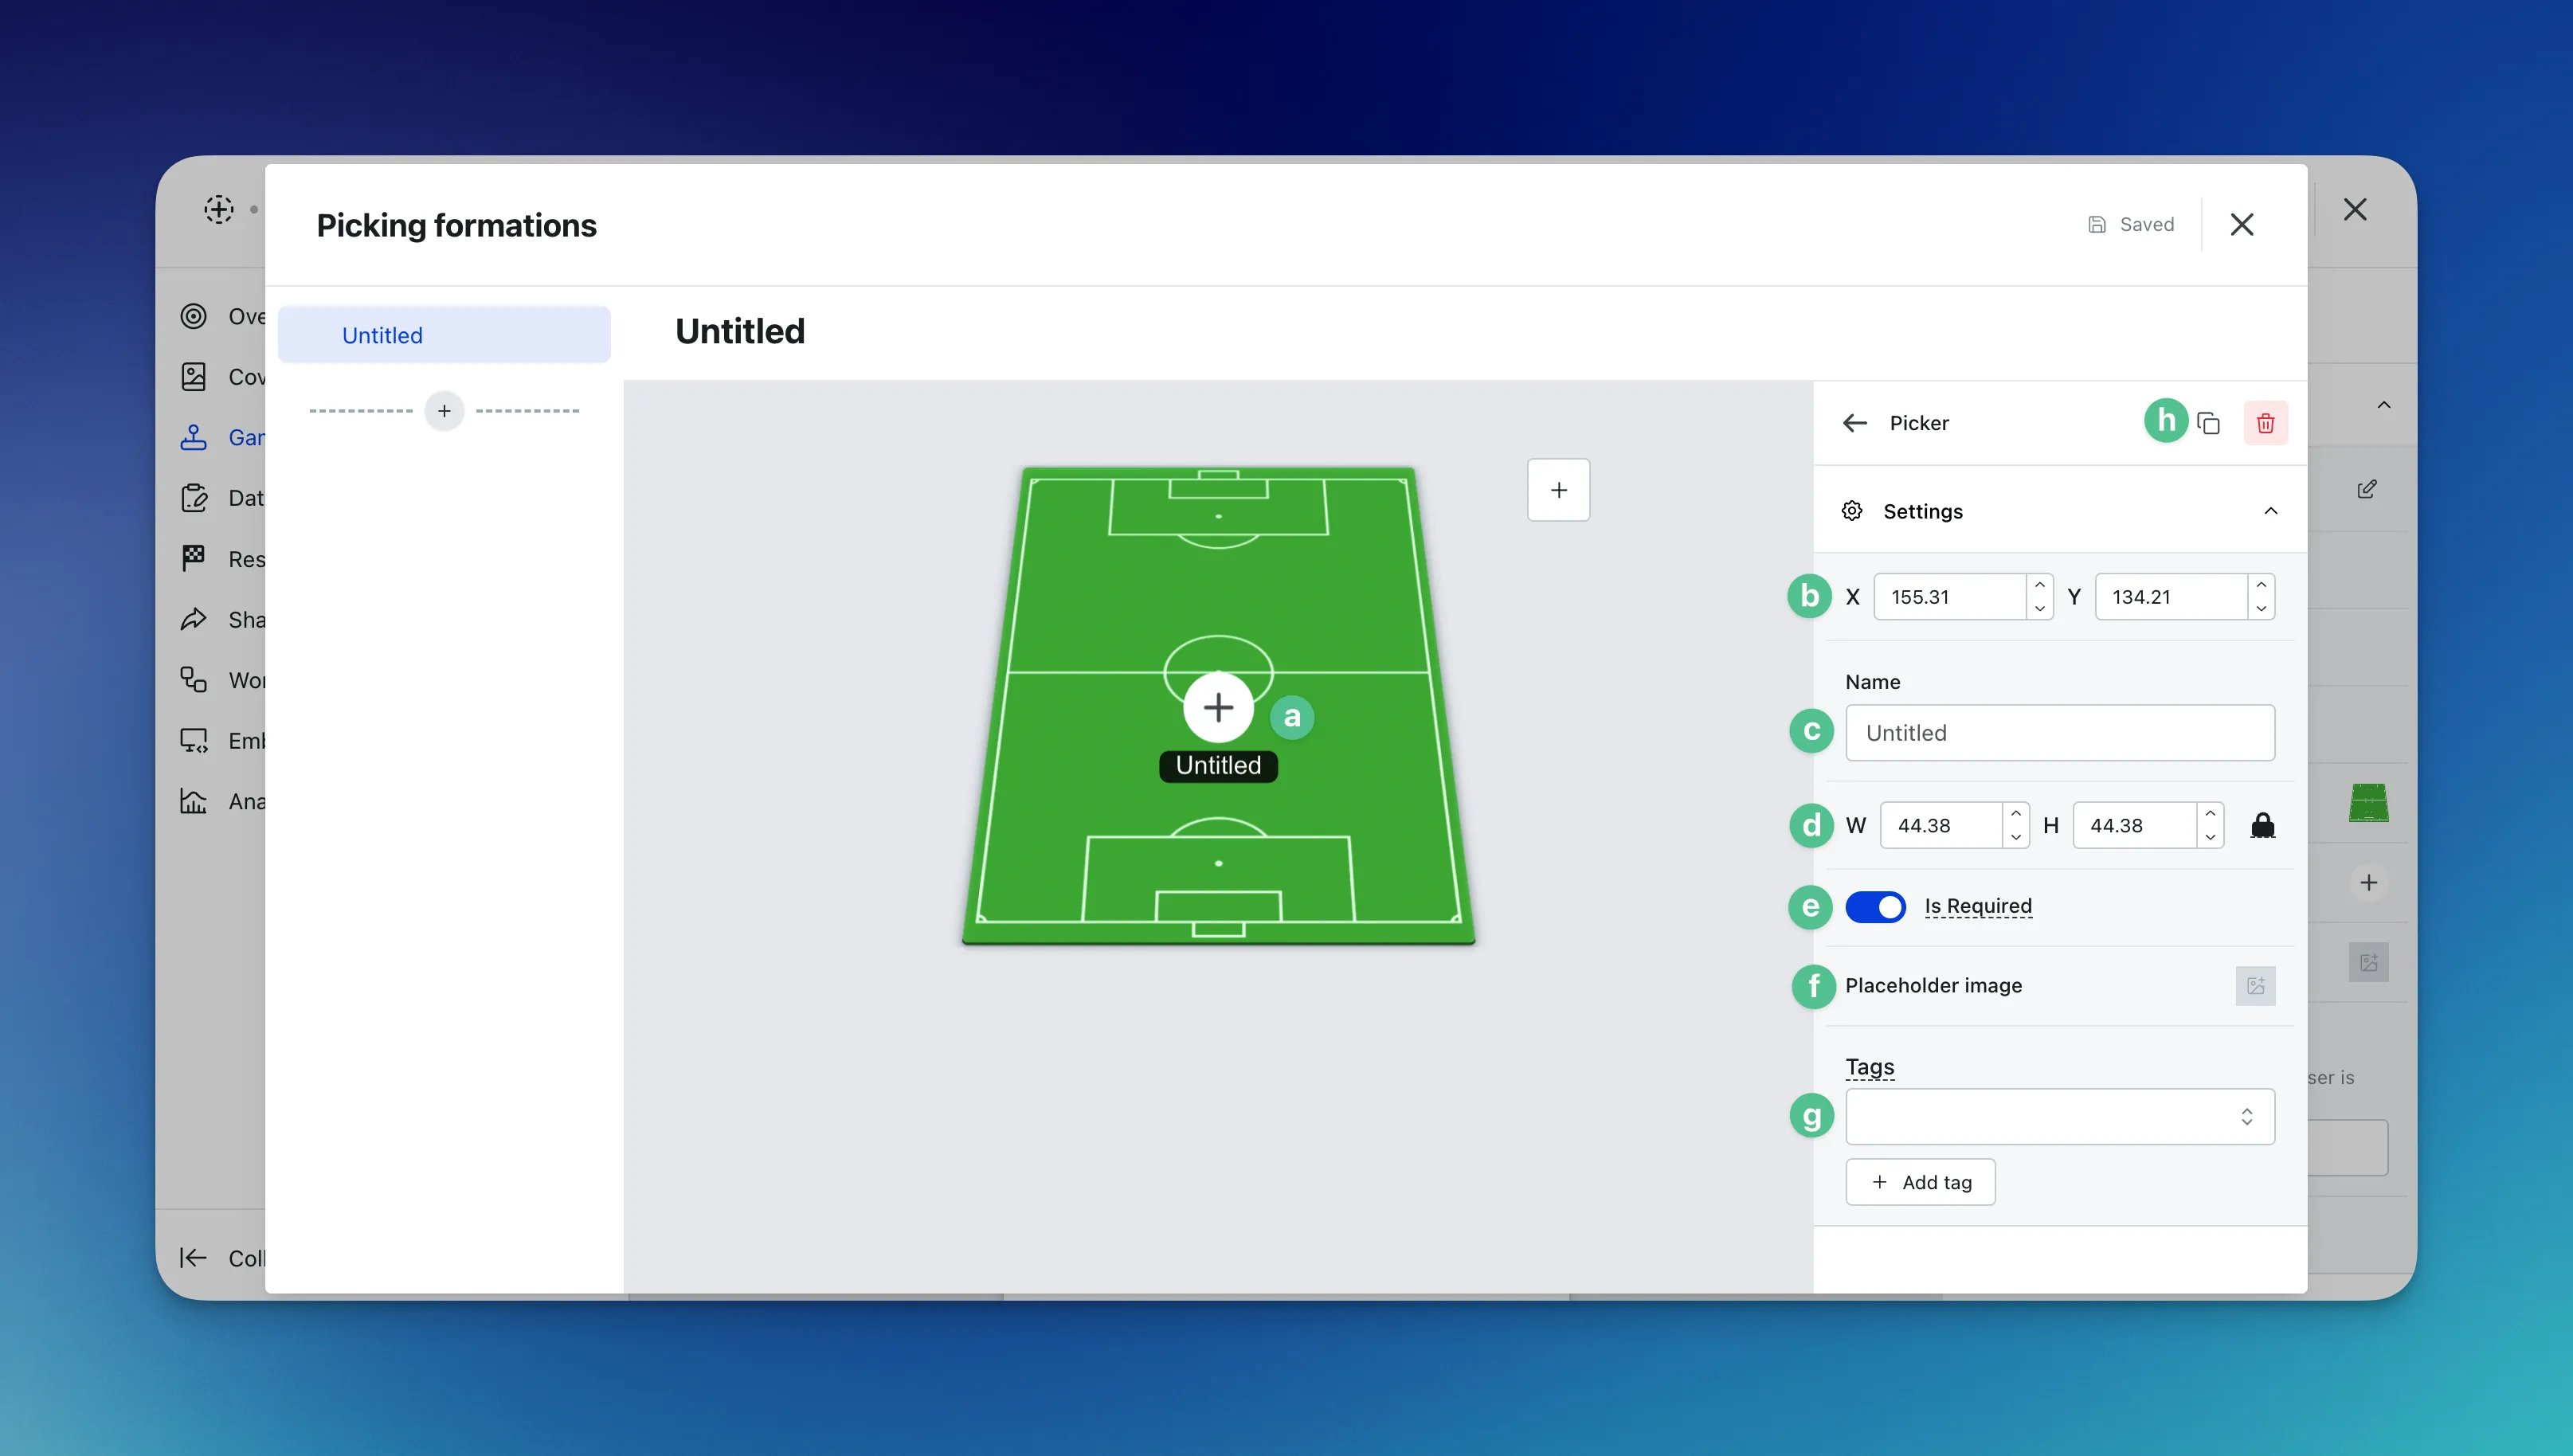
- (a) Select the picker to move the position. When you move the picker, (b) the X and Y axis will update according to its position on the image
- (c) Here you can name the picker position e.g. defender
- (d) You can adjust the size of the picker. Note: We have kept the aspect ratio lock to ensure the image is symmetrical
- (e) Here you can choose if you want a certain position to be a required pick or optional
- (f) Edit the placeholder picker image here
- (g) You can add and assign tags e.g. midfielder and goalkeeper under various pickers to filter through the total pickers
- (h) You can delete or clone the picker here
- (C) Here you can upload a background image for this formation to replace the default soccer field
- (D) Here is where you can edit the picker label settings.
- (a) Here you can change the picker label placement
- (b) Alter the text color and background color of the picker label
- (c) + (d) Alter the width and height of the picker label
- (e) Change the label text alignment here
- (f) Here you can change the font size of the picker label
- (g) Here you have the opportunity to shorten the label of the picker e.g. L. Messi or Lionel M.
- (E) Here you can delete or clone the formation
- (F) Click here to add additional formations
Step 4: Edit the Modal settings
- (1) You can edit the modal header settings and upload your logo/imagery here
- (2) You can add the title here
- (3) Here you can alter the color and copy of the call-to-action bar
- (4) Here you can manage the settings of your Picker
Managing Picker Settings
Managing Picker Settings
-
(A) Here, you can manage your items and tags.
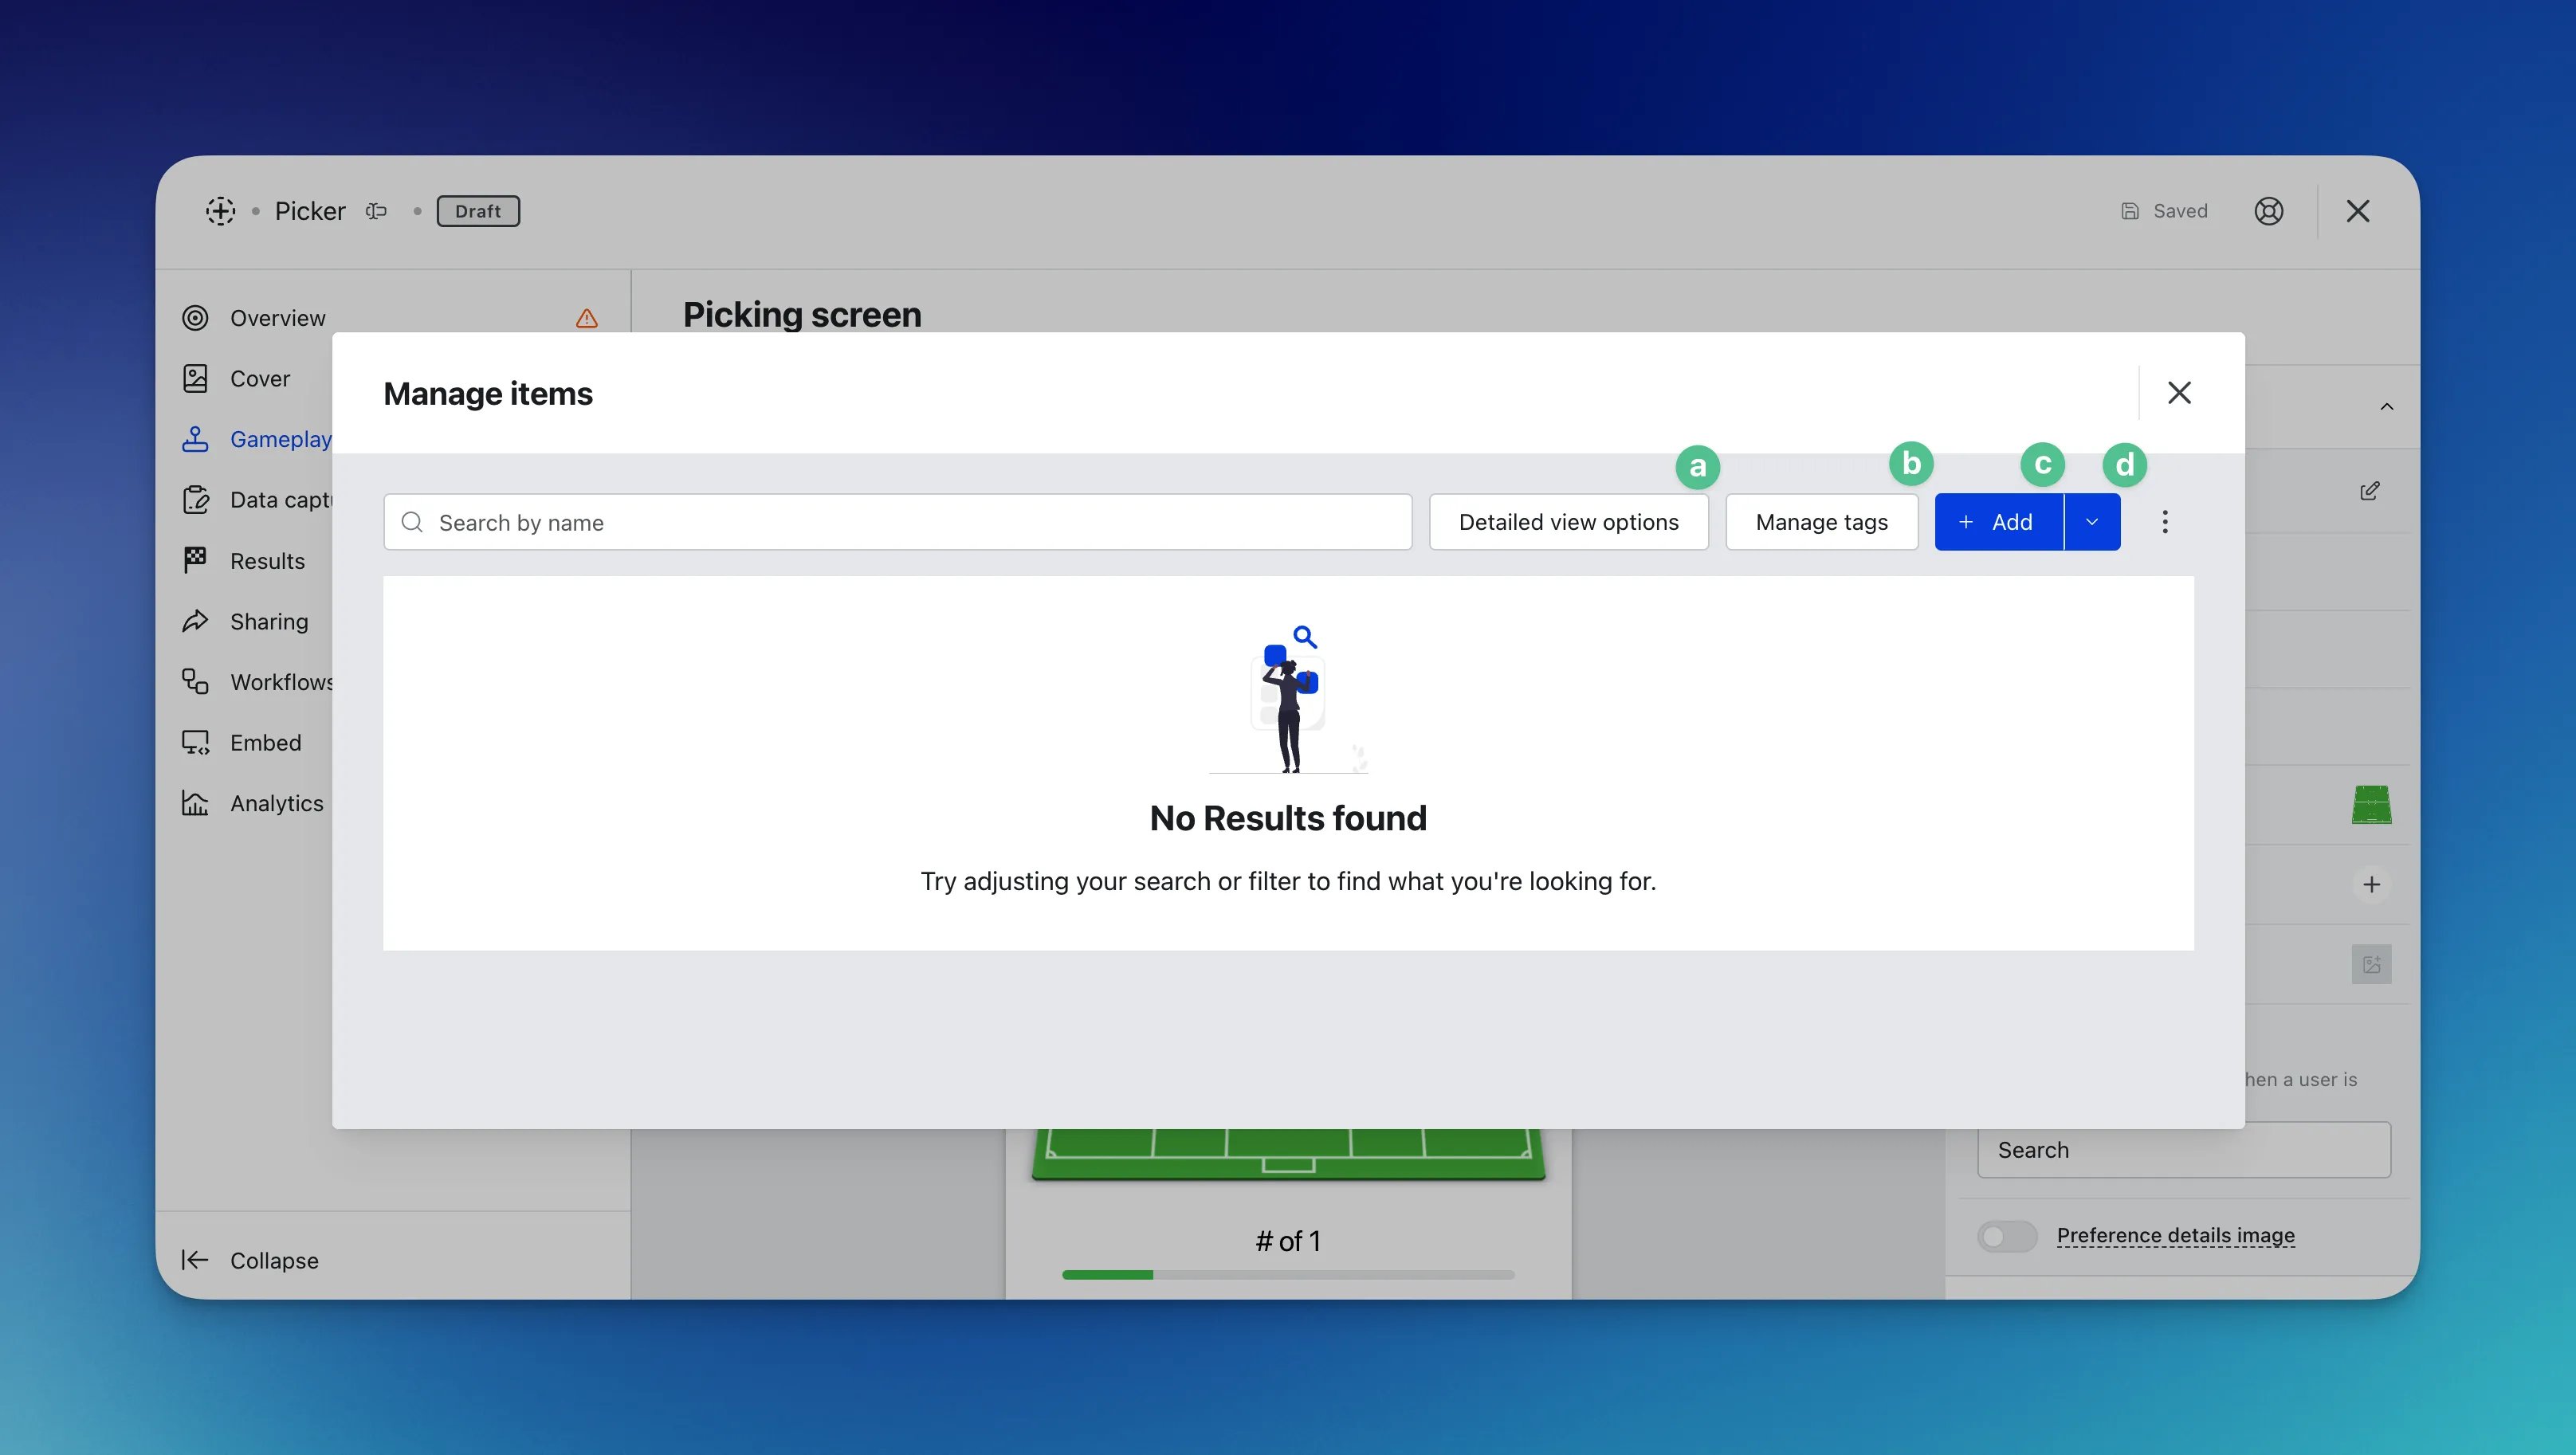
- Click on Manage items, select Manage tags and click on Add tag.
- (a) Here you can include additional details to the item such as stats, videos and a bio
- (b) Add all your tags e.g. midfielder and attacker to allow items to be filtered by tags
- (c) Individually add items by clicking Add
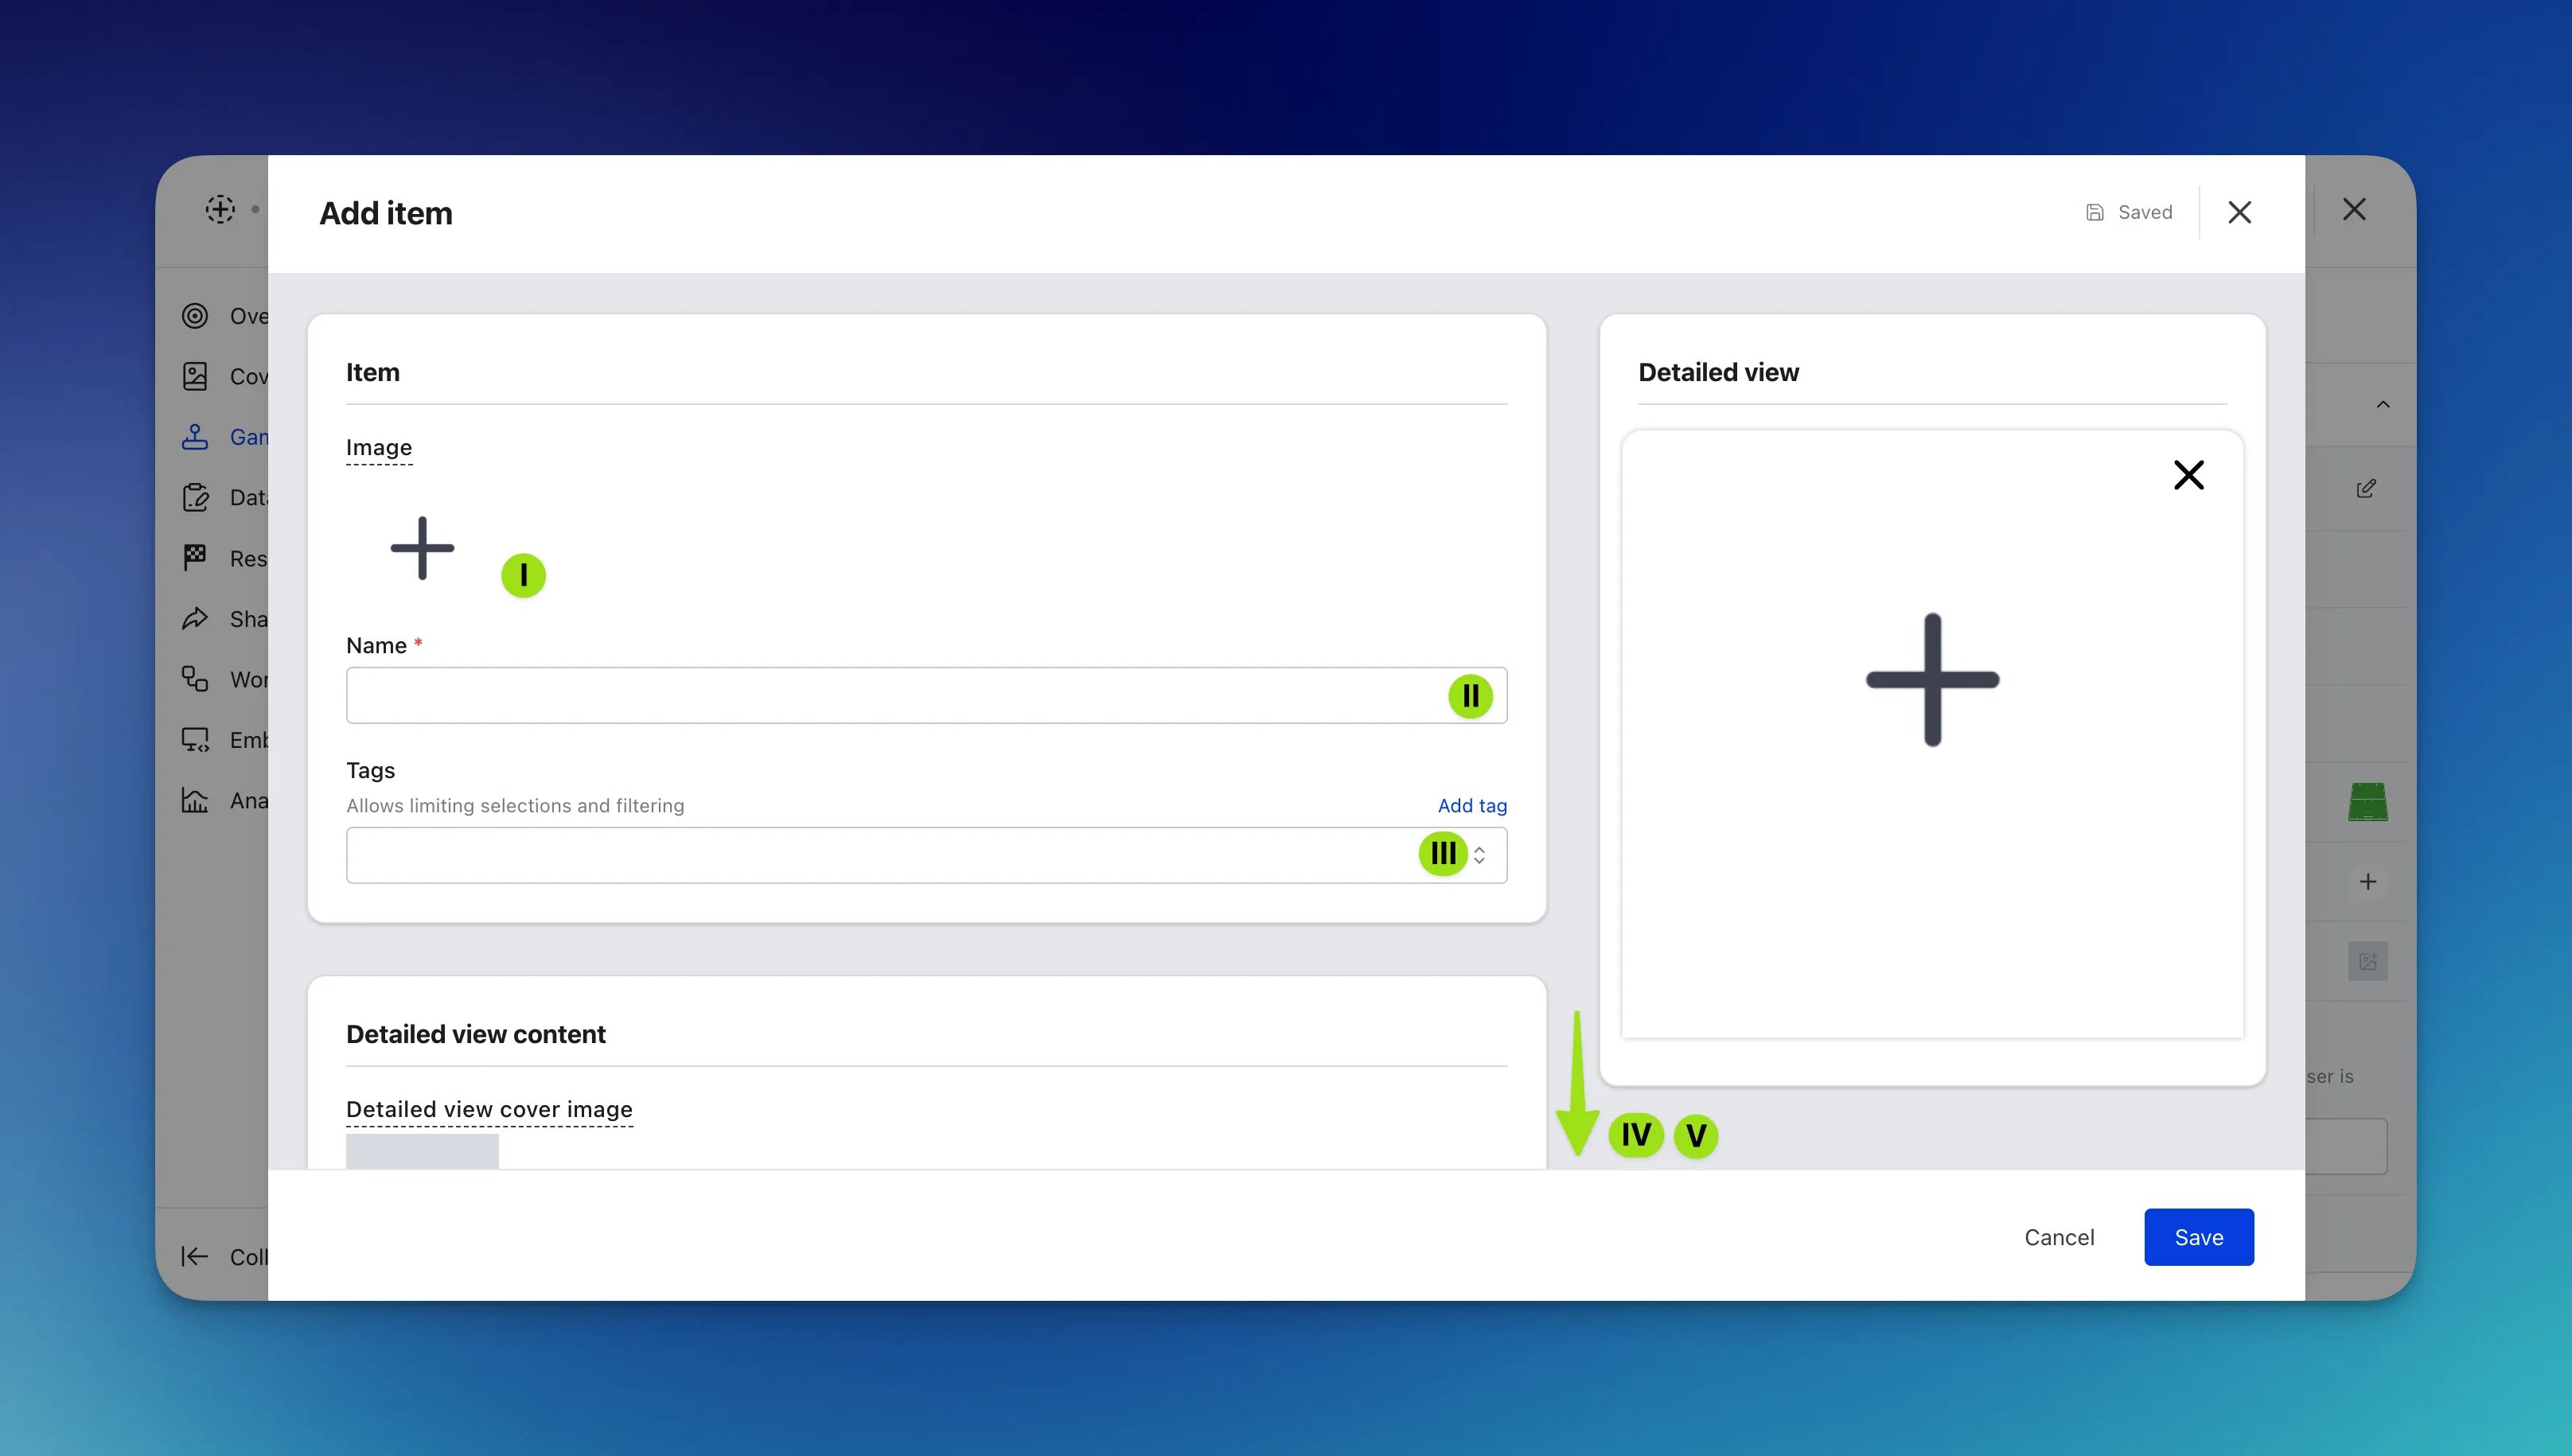
- (I) Upload an image for the picker item
- (II) Name the picker item e.g. Lionel Messi
- (III) Select the tags relevant to the picker item
- (IV) Add an item cover image. Note: This image appears above the picker’s information and content
- (V) Add a background color to the picker’s information and content
- (d) Using the arrow, bulk upload items using a CSV file
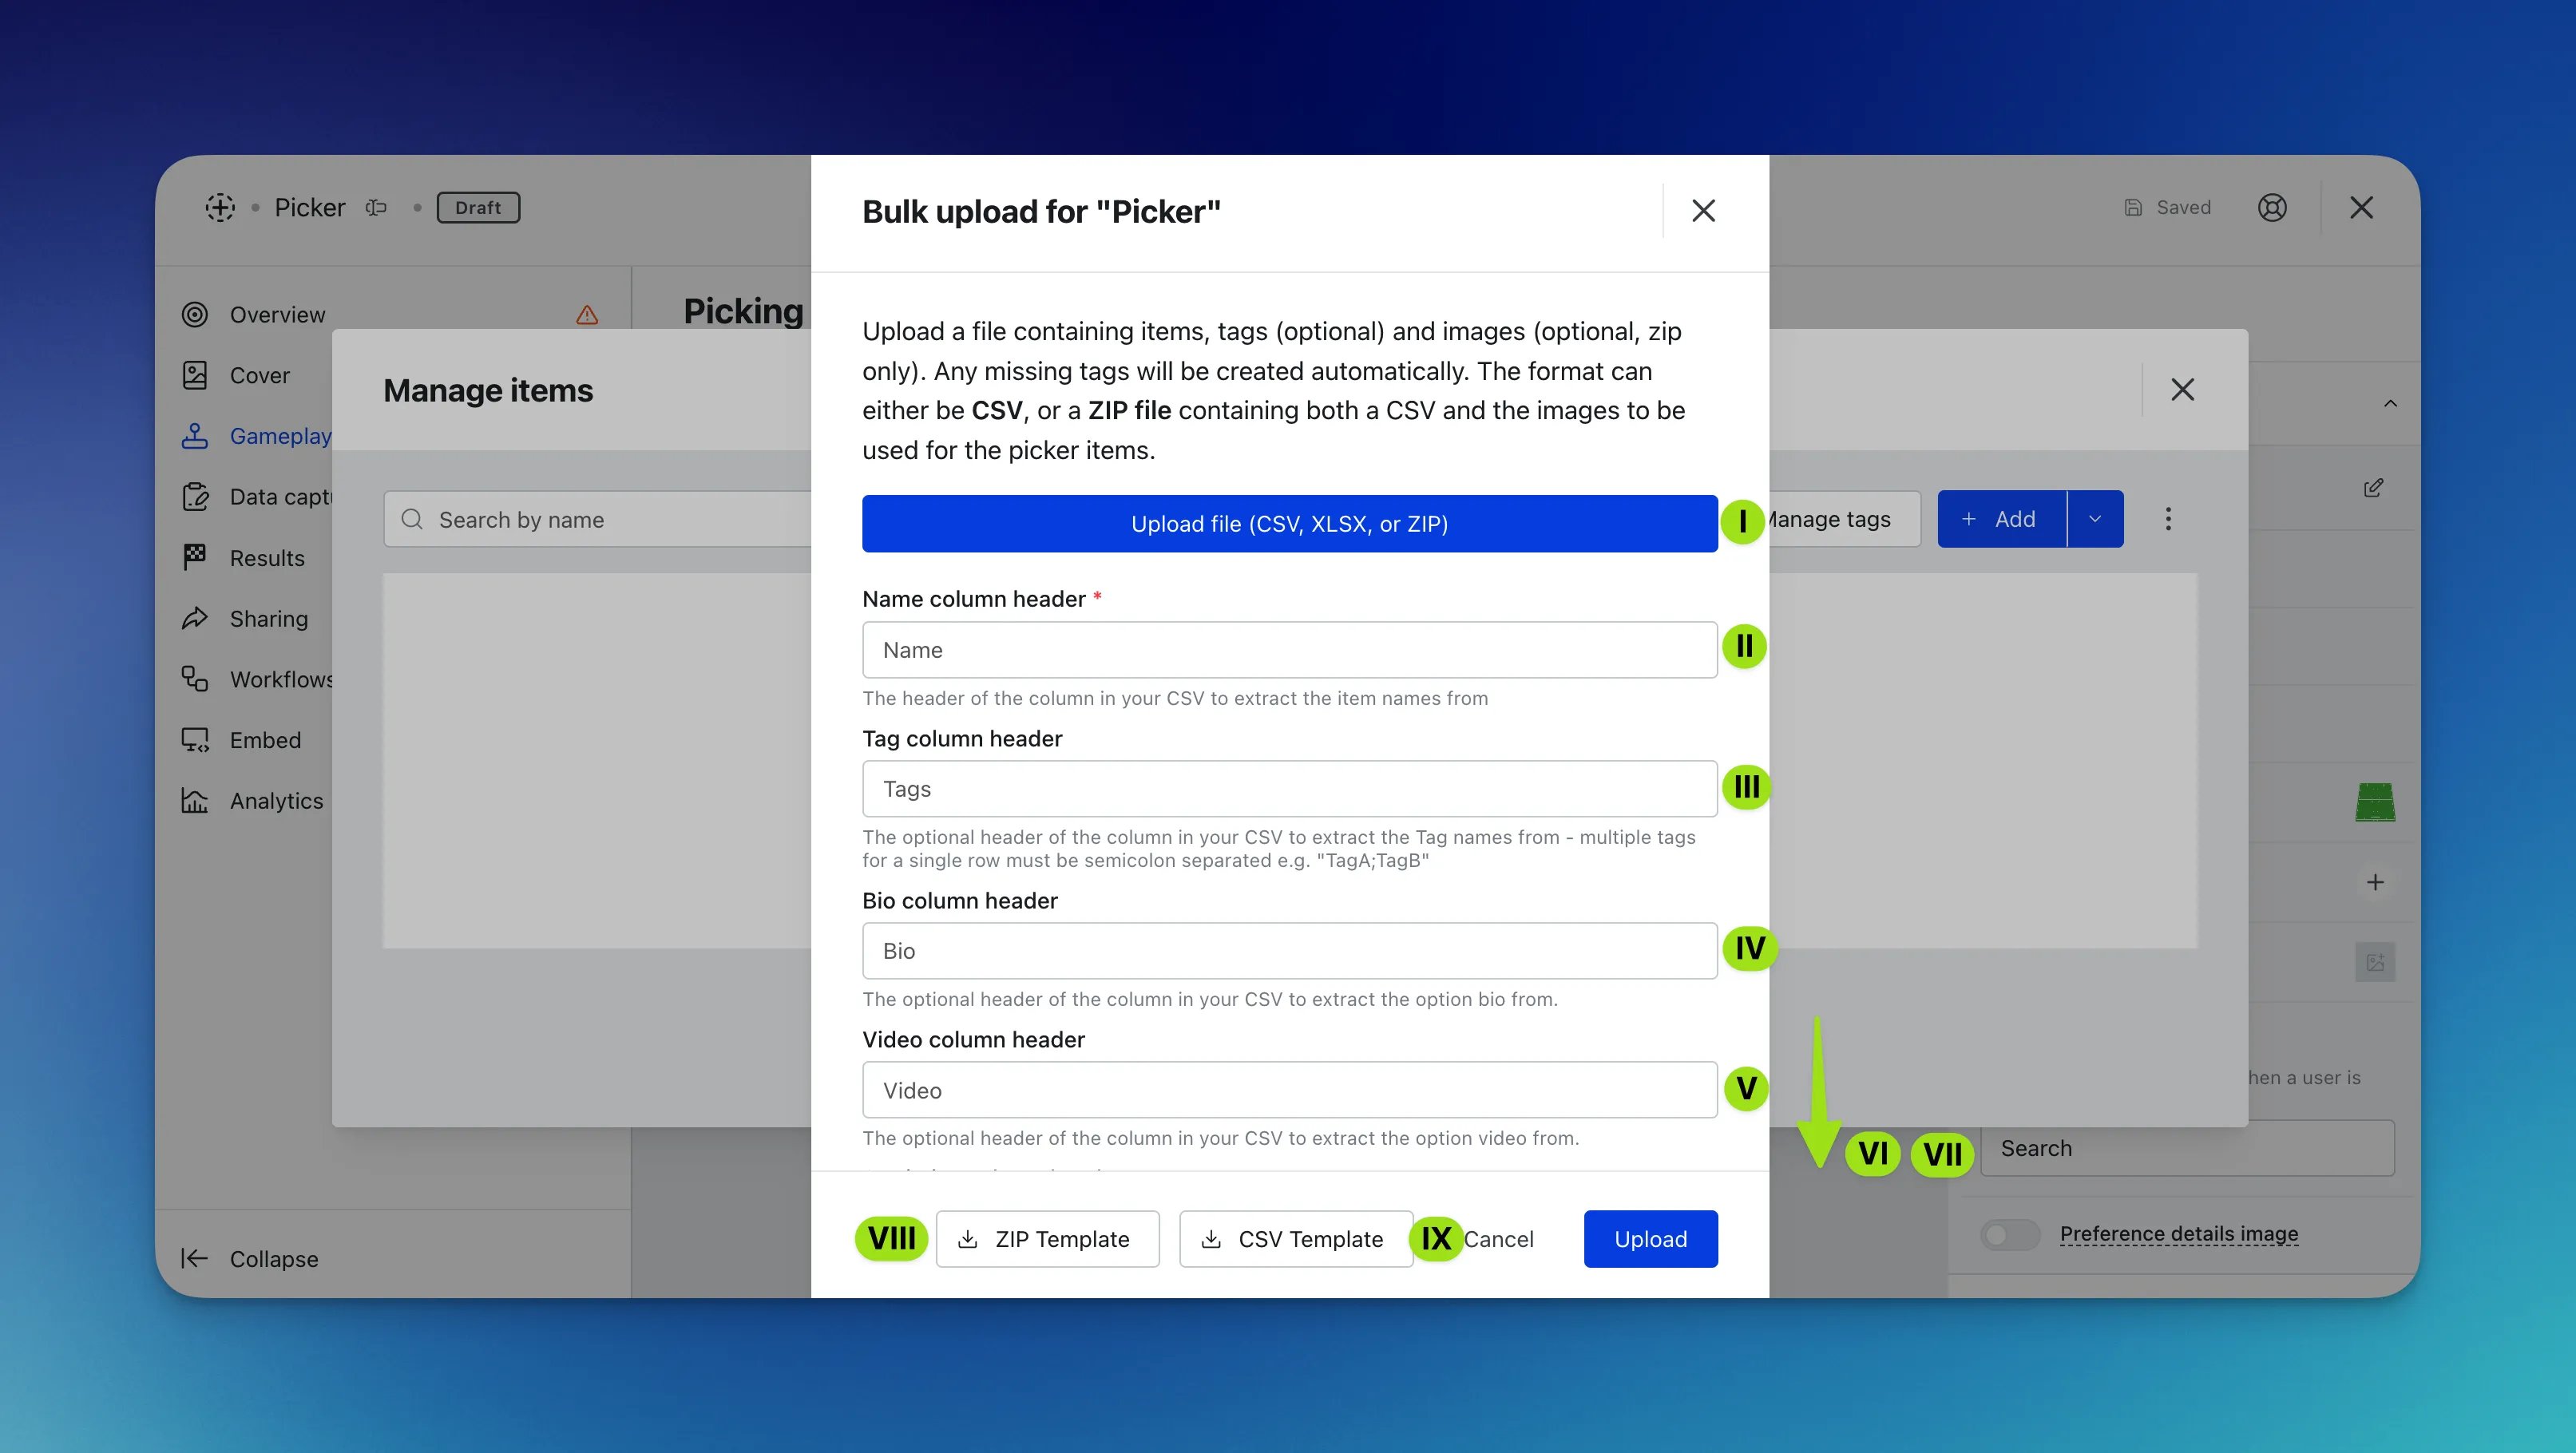
We highly recommend doing a bulk upload as it will save you a lot of time from manually uploading!
- (I) Here is where you’ll upload the file in CSV, XLSX or ZIP format
- (II) Enter the title of the column header in your CSV to extract the picker’s names from
- (III) Enter the title of the column header in your CSV to extract the tags from
- (IV) Enter the title of the column header in your CSV to extract the bio from
- (V) Enter the title of the column header in your CSV to extract the video from.
You will need to copy and paste the video URL under this column in the Excel file
- (VI) Enter the title of the column header in your CSV to extract the statistics from
- (VII) Enter the title of the column header in your CSV to extract the images from. Note: The name of the images need to be entered in the Excel file next to the corresponding picker. The file with the Excel file and images need to be uploaded as a ZIP file
- (VIII) Here you can download a template of what the ZIP file should look like/contain
- (IX) Download a template of what the CSV/XLSX file should look like
- (B) You can disable this button to hide the progress bar above the call-to-action
- (C) Enable a randomized button where the platform will pick items for the user
- (D) You can disable the item labels under the picker here
- (E) Here you can upload the default picker background image that will be added to each new formation
- (F) Upload a default picker image
- (G) Upload an item default image here for items that you may not have an image for
- (H) Here you can add a placeholder text that will appear in the search bar
- (I) Here you can choose to preference the details image. This means that when searching for an item, a user will see the details image instead of the items image
- (5) Edit the styling settings for the modal
- (A) Edit the color of the Picker background and text
- (B) Here you upload a background image that sits behind the formations
Step 5: Set up your Result screen
- (1) Here you can alter the color and copy of the Share call-to-action or (4) toggle this off
- (2) Here you can alter the color and copy of the Download call-to-action or (5) toggle this off
- (3) Here you can alter the color and copy of the Play again call-to-action or (6) toggle this off
- (7) Toggle this on to show users which items are most popular! Make sure you update the styling of this if you decide to switch it on!
Step 6: Set up your data capture (Optional)
Whilst adding competition to your Picker Card is recommended to collect data, it is not always required and can be used purely as an engagement piece.Ready to set up your competition?
Step 7: Publish your card
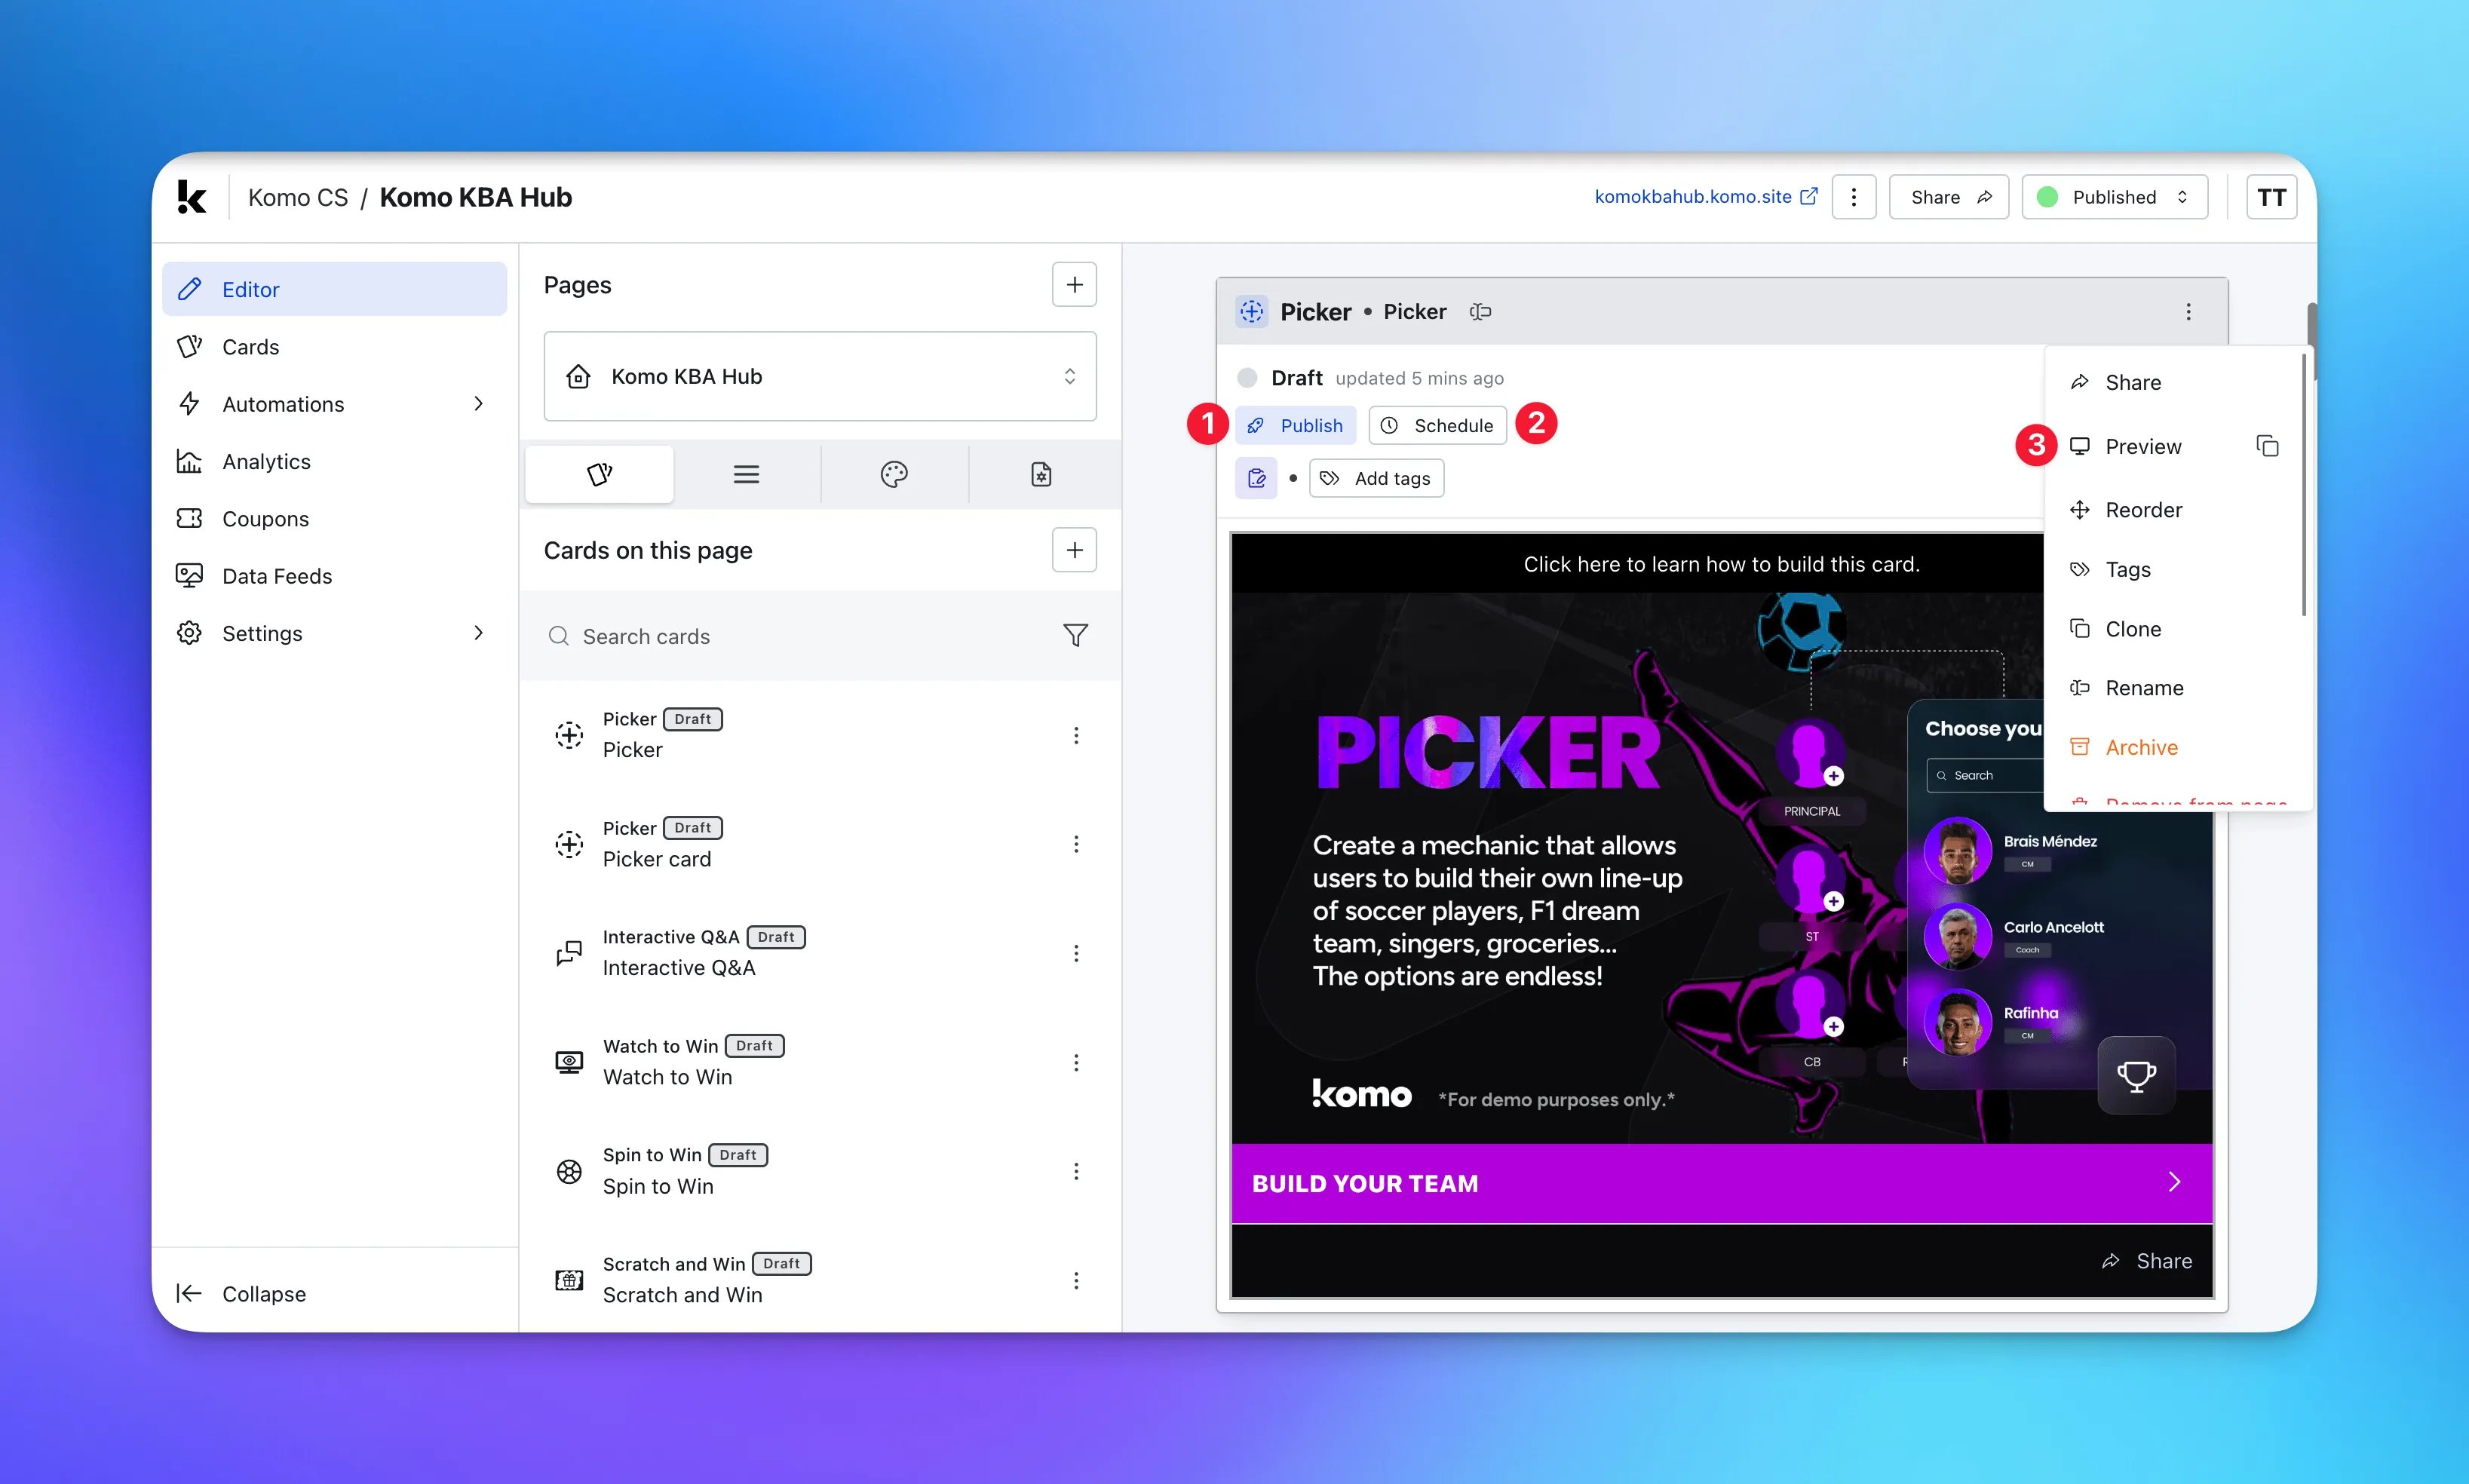
- (1)Publish your card manually and instantly for the world to see
- (2)Schedule your card to be published and unpublished at set dates and times
- (3) Click on … to Preview and interact with the card on the front end from a user’s perspective before publishing it. See how to test your card here
All competition entries will be recorded and will impact the card analytics.
”Go live” checklist
Ready to go live with your Picker? We recommend reviewing the following list before launching and double-checking if you have:- All images uploaded are the correct dimensions. Export image files in 2x to ensure none of the images appear pixelated
- Ensure you have uploaded all your picking items with the correct name, relevant tags and imagery
- You have named all pickers with the relevant positions or labels so users are aware of the positions they are filling
- If you have different formations, ensure each formation is labeled
- You have altered the modal settings to your branding by adding a background, changing the text color and the picker default image
- Make sure you have the correct pickers marked as required. This is so users will pick an item for that position and not leave it blank
- Each picker is the same size - width and height
- You have edited the result screen with the call-to-action bars in line with your brand colors
- All your communications (Registration, Winner/s, Everybody Else) are fully set up and ready to send
- You have hyperlinked your T&Cs to the opt-in-field, which is created in the data capture section of the settings tab
- Ensure your Prizes and the awarding rules are set up correctly. If you have Live prize awarding as your award, make sure you enable this feature, you can see how to do so here
- If you are using coupons, make sure the coupons created are set up correctly. Check the coupon limits are set, the copy for each screen is right and you have linked the appropriate coupons to your communications