Please note that the information and advice that Komo provides regarding Sender IDs or any other matter of this nature is of a general basis only, and we suggest you seek your own legal advice specific to your needs.
Contents:
What is it?
SMS Sender IDs, also known as Alphanumeric Sender Names are the "from name" you see on your device when you receive an SMS. This could be a business name like "Komo", rather than a numeric phone number. This makes your messages feel far more professional and trustworthy.
There are many regulations around these Sender IDs for businesses and these laws have changed for Australian businesses in 2023. Alphanumeric Sender Names must now be pre-registered to send messages to customers.
The problem is, up until this year, anyone has been able to send SMS messages from any "From name" they like, whether that's a bank, the ATO or any other organization. This is clearly a problem, so we welcome this regulation. SMS scams are sadly not uncommon, and these reduce consumer trust in the medium, which otherwise is such a powerful way of connecting with customers.
We have worked with our nominated SMS web service API provider, Twilio, to ensure this process is as easy as possible and aligns with these new regulations.
Why should I have my own Twilio account?
Having your own Twilio account to set up individual sender IDs on the Komo platform provides complete control over meeting new laws and regulations. It ensures that you are well informed about the necessary steps for setting it up.
By having your own account, you become the sole owner of the sender ID, allowing you to establish a distinct and recognizable identity for your SMS messages. This level of ownership empowers you to maintain compliance with evolving legal requirements, such as data protection and anti-spam regulations, as you have direct control over the messaging practices associated with your sender ID.
Additionally, by being aware of the entire setup process, you gain a deeper understanding of the technical aspects involved, enabling you to troubleshoot any issues that may arise and optimize the performance of your SMS communications. Overall, having your own Twilio account for setting up individual sender IDs gives you the autonomy and knowledge necessary to navigate and adapt to the changing landscape of laws and regulations governing SMS messaging.
How do I set it up?
Creating your own Twilio account is simple, but there are a few steps that involve uploading documentation and proof that you are entitled to use your designated Sender ID. We will walk you through these steps next.
- Step 1: Set up your Twilio account
- Step 2: Set up your Messaging Service
- Step 3: Connect your Twilio account to Komo using Connected Apps
- Step 4: Choose your Sender ID when setting up communications
Step 1: Set up your Twilio account
- (1) Go to Twilio.com and click 'start for free'.
- Once you have created an account using your personal contact information, your window will automatically take you to your organization's Console.
- (2) From here follow the following menu items on screen: Account > Trust Hub > Customer Profile and click Create Primary Business Profile to start the process.
- (3) Once here, configure your Primary Business Profile by following the prompts on screen.
Note: You can set up Secondary Business Profiles for any other regions your organization may operate in.
- (4) Your next step is to register a Sender ID for your Primary Business Profile here.
- (A) Fill out all form fields on screen.
- (B) Supply all necessary documentation to prove your organization has the right to use your Sender ID. This will include a registration form and the LOA for Sender ID specific to your region.
Note: Your Primary Business Profile bundle and registration form and documents need to be reviewed manually by Twilio, one at a time. Consequently, you will need to complete Step 3, leaving time for review before starting Step 4. Please allow upwards of 7 business days for Twilio to manually approve these assets. Do not proceed with Step 5 until you have received approval on Steps 3 and 4.
Once the above Steps have been completed and approved by Twilio, you're ready to configure your messaging service.
Step 2: Set up your Messaging Service
Note from Twilio:
Sending a high volume of messages in the United States and globally quickly becomes complex. As the complexity of your messaging application grows, it’s helpful to organize your account and message logs into separate Messaging Services using Twilio Programmable Messaging.
You can think of a Messaging Service as a higher-level “bundling” of messaging functionality around a common set of senders, features, and configuration. The same settings and feature configuration apply to all of the senders (long code numbers, short codes, toll-free numbers, etc.) in the Messaging Service’s pool.
A Messaging Service’s features can be managed and configured directly through the Console as well as using the REST API.
- Once your Sender ID has been approved, it is connected to a Messaging Service. This is a recommended step of the Sender ID process.
- (1) Head to your Console within Twilio, where you will be able to add Messaging Services.
- (2) For every Messaging Service you add to your account, you will need to configure its incoming message handling and status callback URL. These can be configured in the Integration section of your Messaging Service's settings.
- (3) You’ll also need to associate one or more phone numbers or short codes to the Service to send messages.
Note: As an example, you may have numerous Australian phone numbers or short codes associated with your Messaging Service. This is so that when you're sending a lot of SMS messages at the same time, Twilio can spread them across all the phone numbers in the pool.
You may also have numerous phone numbers or short codes in other regions to target SMS recipients in those regions. This Service has intelligent rules about which numbers it will choose to send your SMS messages from (note: this happens automatically).
Once you have completed the above steps in Twilio, you're ready to connect your account within the Komo ecosystem!
Step 3: Connect your Twilio account to Komo using Connected Apps
- Navigate to the Komo Dashboard and click on your admin icon on the top right.
- Click on Account Settings, navigate to Connected Apps and then click on Connect below Twilio SMS.
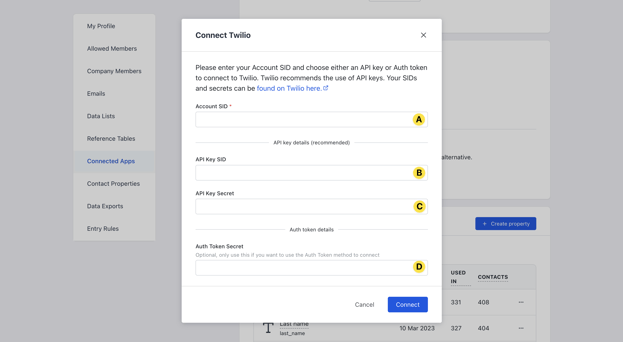
- (A) Enter your Twilio Account SID. This step is required.
- (B) Enter your Twilio API Key SID. This step is recommended.
- (C) Enter your Twilio API Key Secret. This step is recommended.
- (D) Adding your Auth Token Secret is optional and is only required if you want to use the Auth Token method to connect then click Add.
- Once you've completed the above steps, you're ready to send your SMS comms to customers via the Komo Platform, supported by Twilio and in accordance with Australia's new Sender ID laws and regulations!
Step 4: Choose your Sender ID when setting up communications
- (1) To start sending SMS messages using your new and approved Sender ID, navigate to any of your Cards in the portal. Click on the Card to open its editing modal.
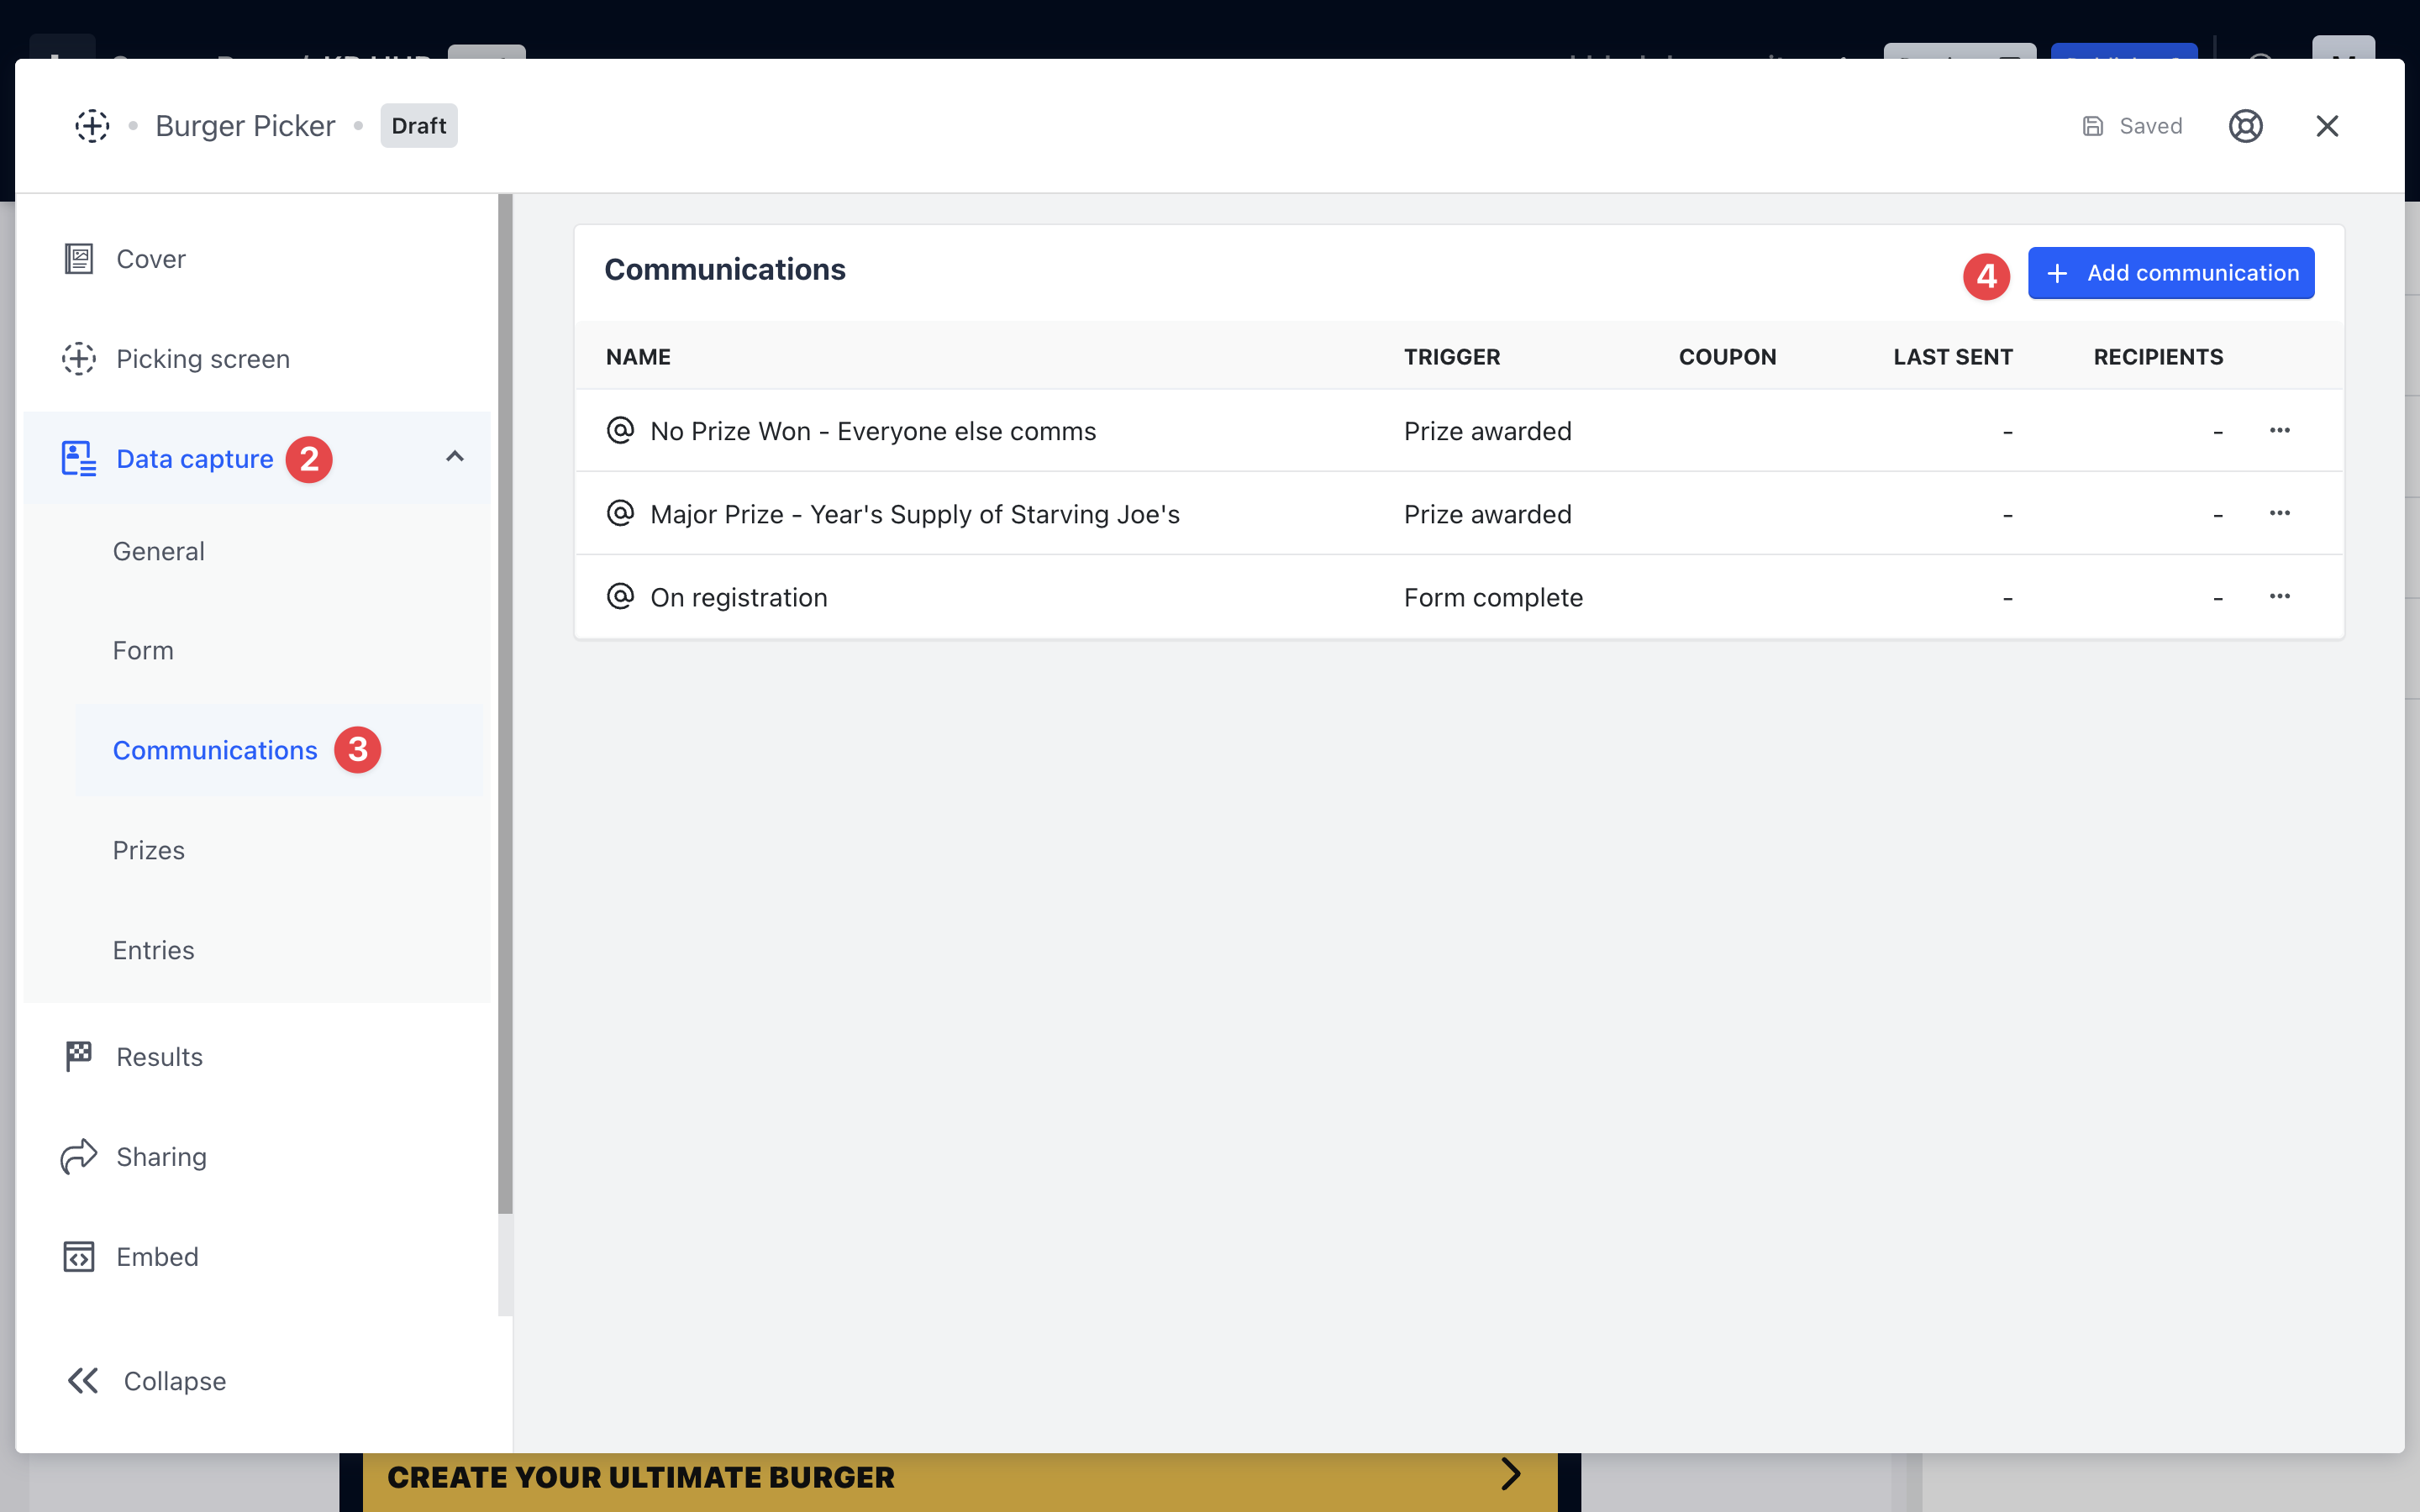
- (2) Click on the Data Capture tab of the editing modal.
- (3) Then choose the Communications tab that appears from the dropdown menu.
- (4) Click on the + Add Communication button.
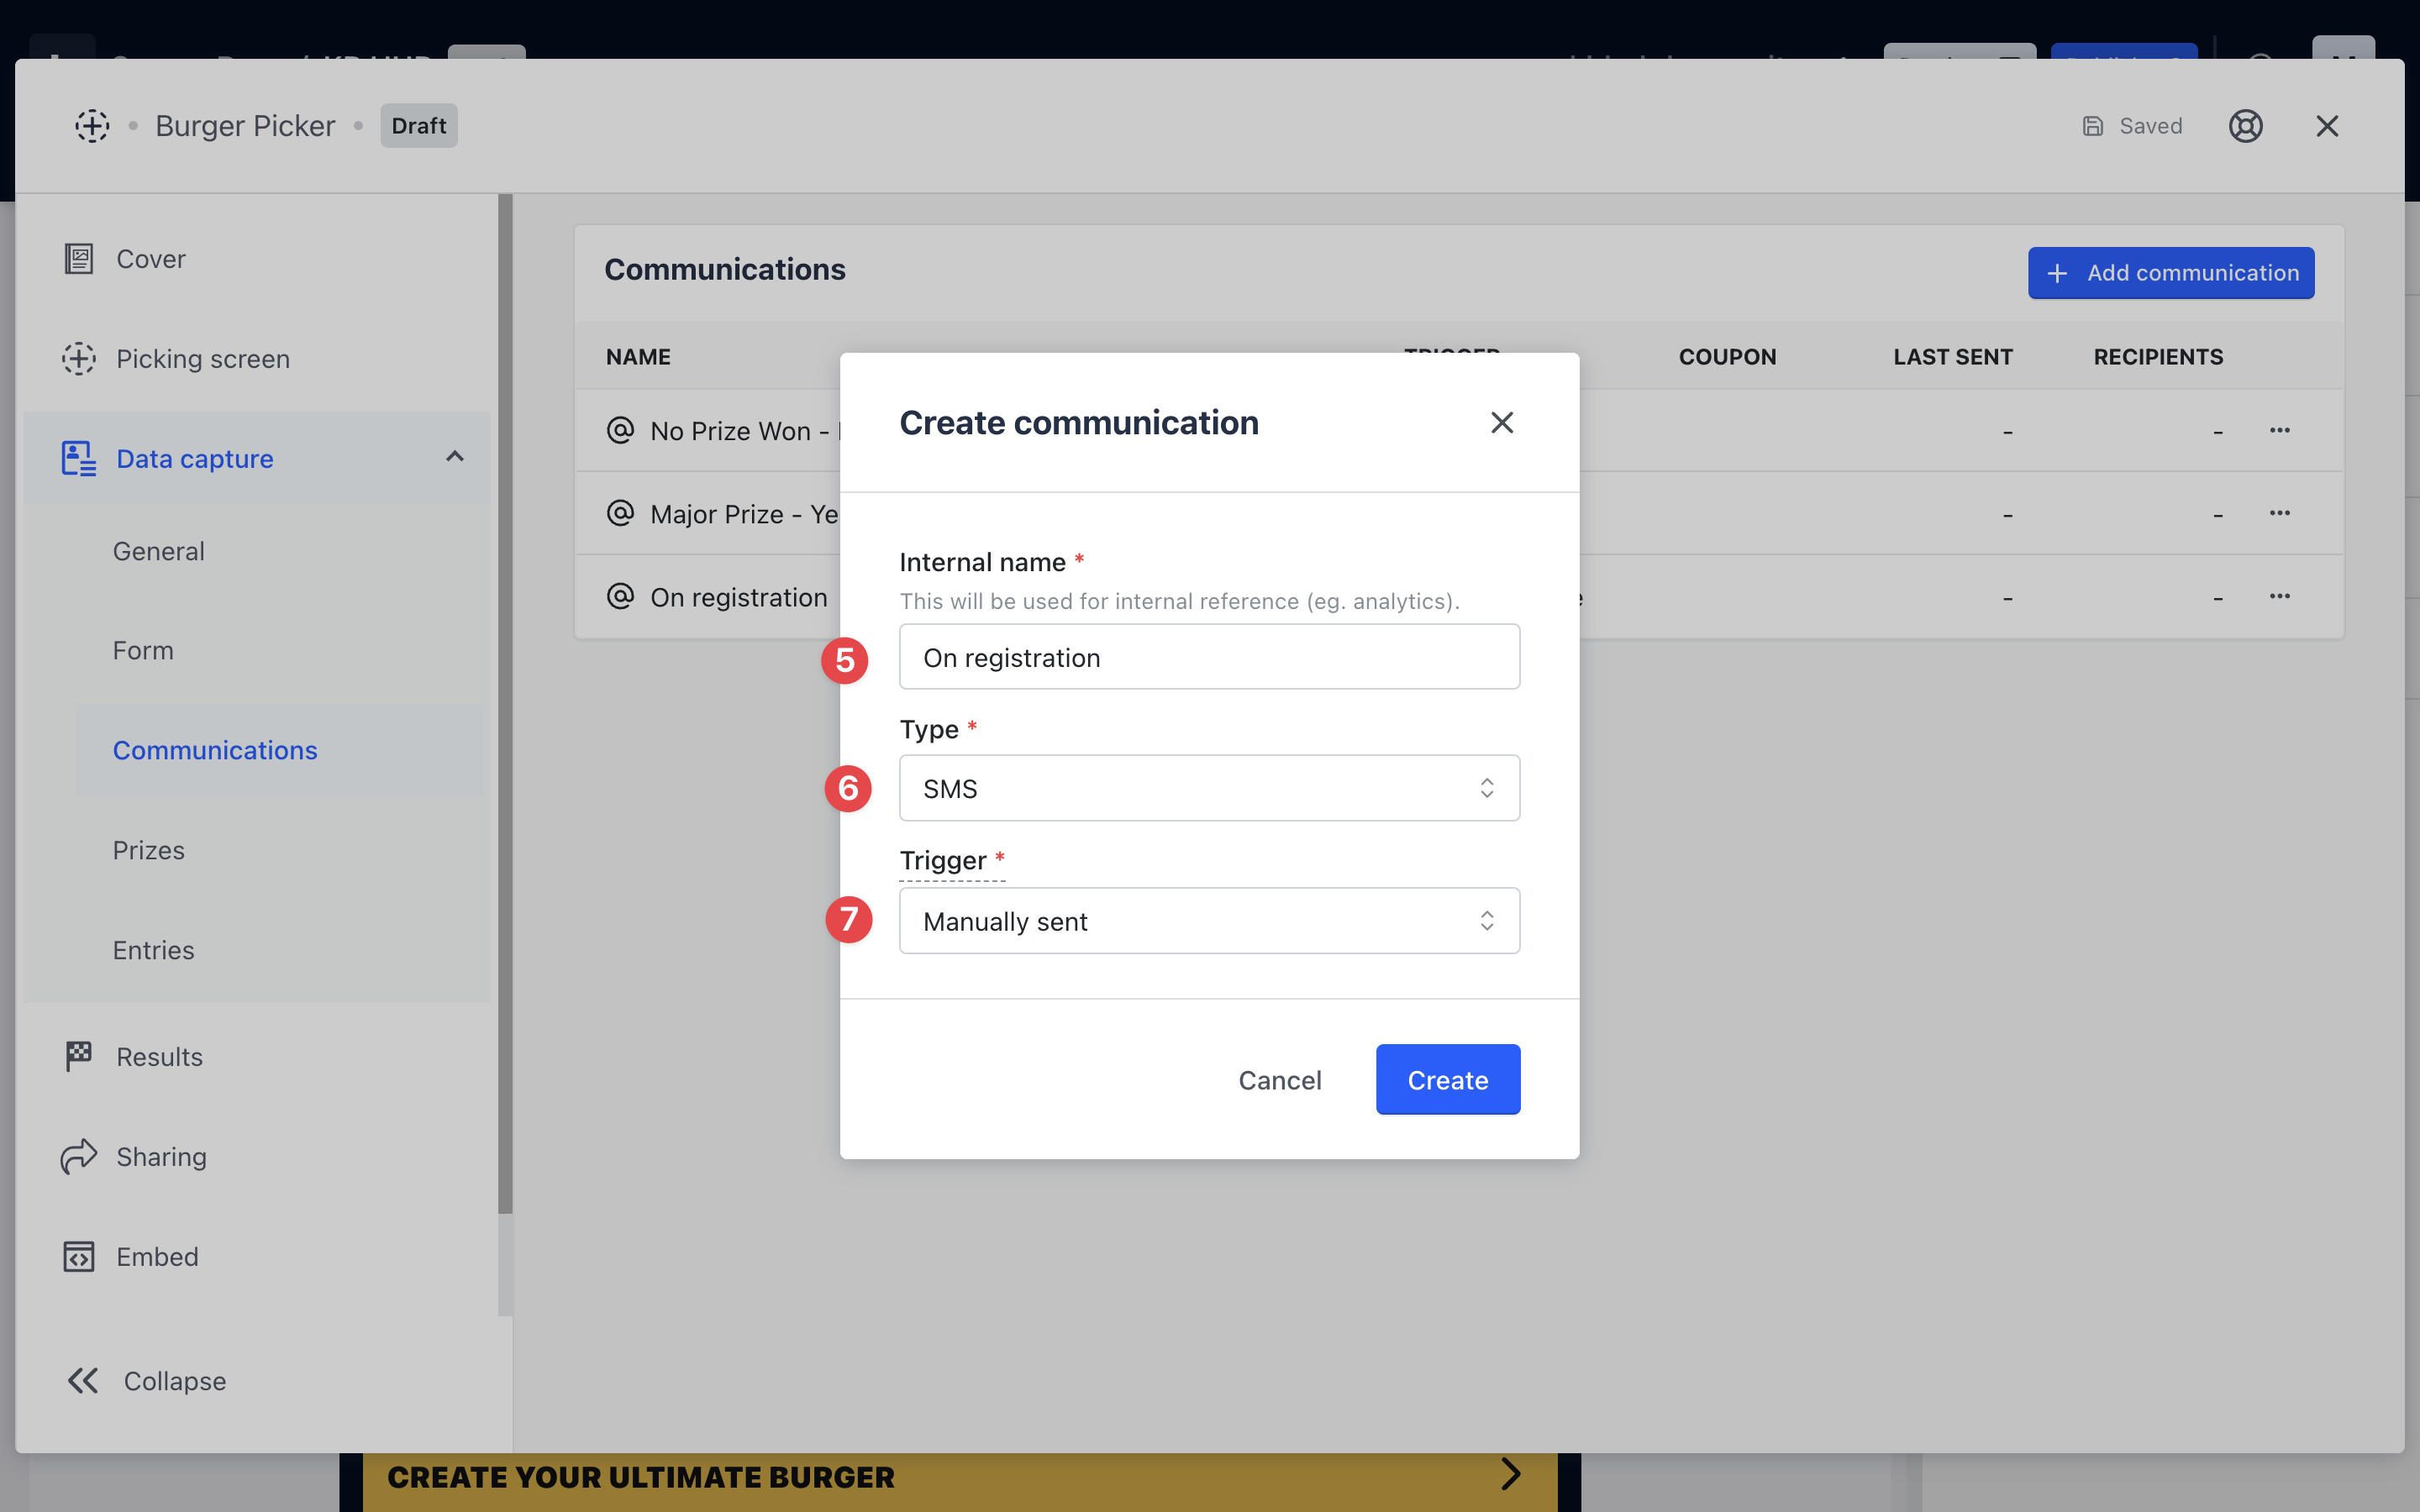
- (5) Give your communication an internal name.
- (6) Choose the type of communication you wish to create. In this case, you would choose SMS.
- (7) Choose the trigger that will send your communication.
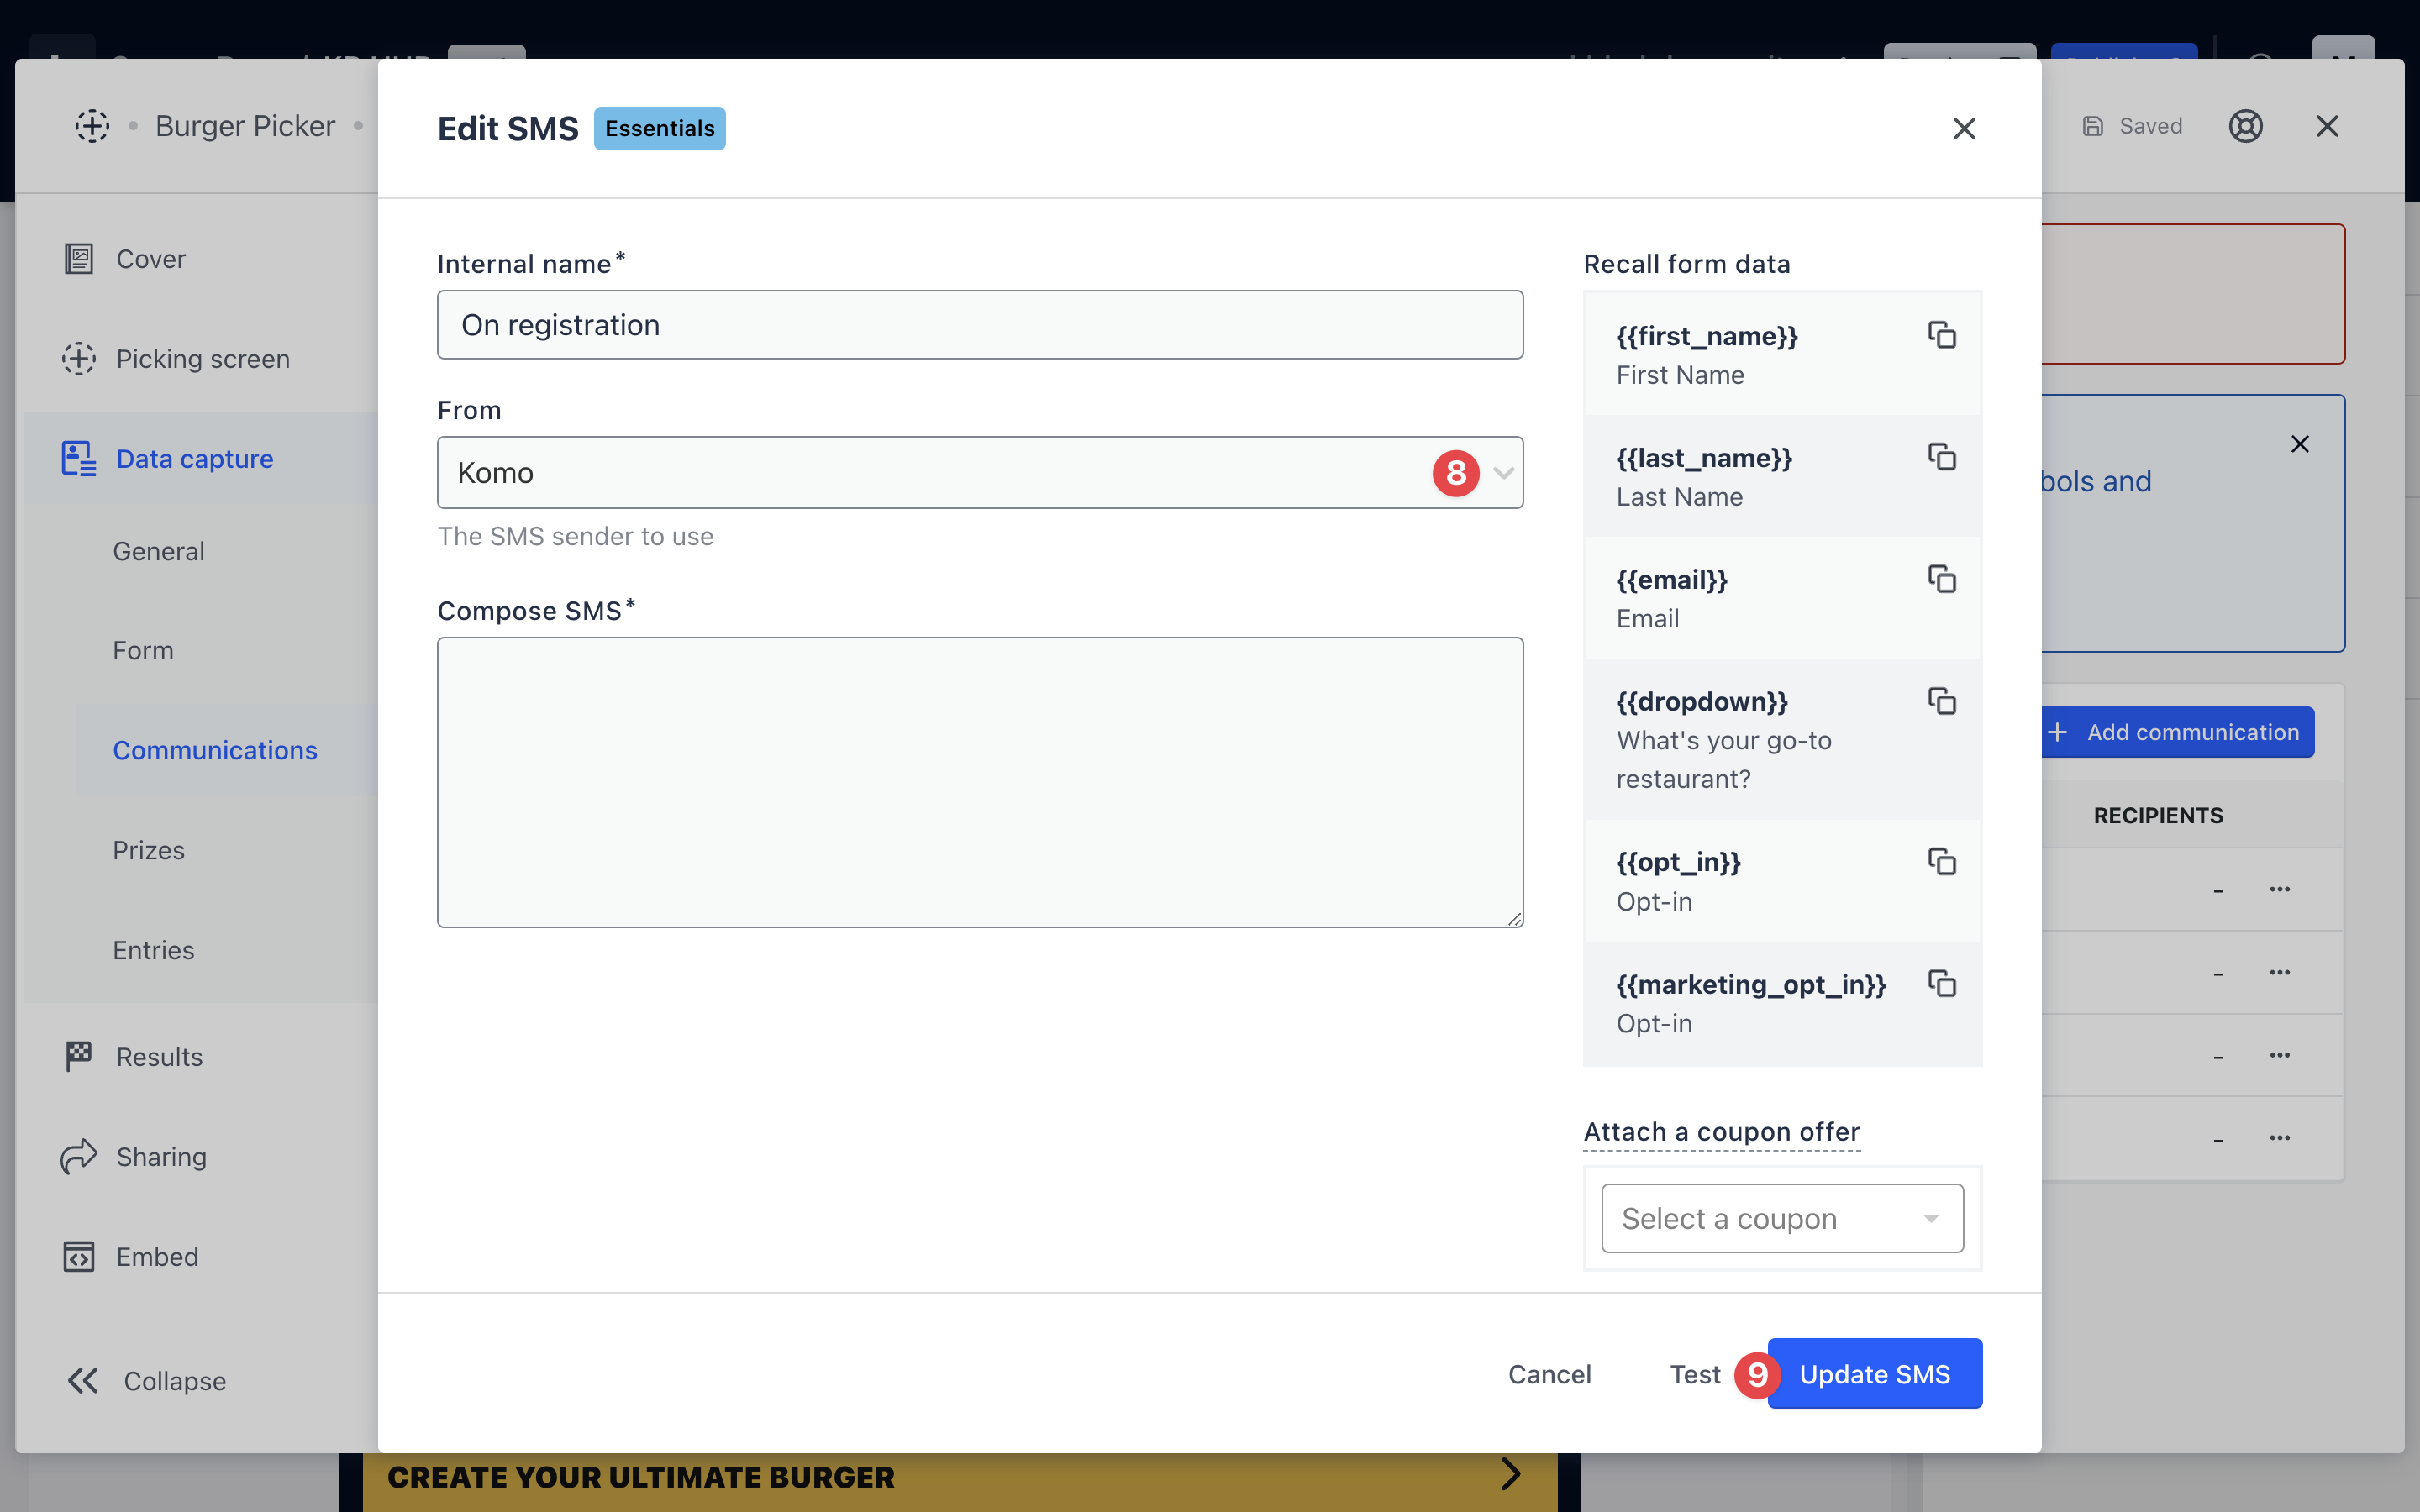
- (8) Here is where you will choose your Sender ID from the 'From' Dropdown menu.
- (9) Click Update SMS.
Congratulations - You've prepared your SMS to send from your newly registered Alphanumeric Sender ID! 🎉
One last note:
At Komo, we pride ourselves on not only the results our clients achieve with us but the service they receive whilst bringing their hubs to life.
If you ever have any questions about an upcoming activation, how you can best utilize Komo to get the best possible outcome or just a general query, please don't hesitate to reach out to your Customer Success Specialist or email us at support@komo.tech
We also love your feedback, so please let us know if this article helped you by selecting from the options below.
Louis Docherty
Head of Customer Success