As you begin your Hub-building journey, your Hub settings are a great place to start. These default settings will save you time and energy in the long run and set you up for success from the start!
Contents
- Hub Settings
- Styling Settings
- User Settings
- Site Domain
- Data Capture Settings
- Terms and Conditions
- GDPR Settings
- Integrations
Hub Settings
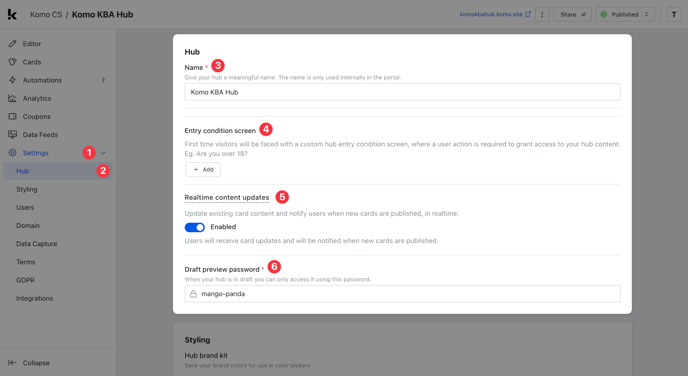
- (1) Head to the Settings tab and (2) click on Hub to access the settings.
- (3) Edit the Internal Name of the Hub you have just created.
- (4) Add a custom Hub entry condition screen. As an example, some of our customers use this to ensure users are over 18 before they're granted entry to their Hub. This will appear as soon as a user tries to access your Hub and content. Click here to learn more.
- (5) Enable real-time content updates, which will update content on your Hub and alert your users of this new content in real-time with a 'new content available' notification.
- (6) Set your draft preview password, allowing your internal team or clients to view your completed Hub as a draft without using an open URL that could be accessed by your consumers before you're ready. We provide a pre-generated one for you, but you can always change it!
Styling Settings

- (1) Click on Styling to navigate to these settings.
- (2) Here you can add your brand colors making styling your Hub easier.
When you alter colors on the Hub, your brand colors will appear as options to select from.

- (3) Select the font for the text on your Hub to display in. You can read more about setting this up here.
- (4) Upload custom fonts. This will allow you to use your own brand's font instead of one of the fonts we have provided for you. You can read more about setting this up here.
User Settings

- (1) Click Users to enter the settings.
- (2) Here you can enable Profiles allowing users to identify themselves with an avatar while they engage with the games across your hub. You can read more about setting up this feature here.
- (3) Enable Badges allowing you to assign achievements to certain users based on their activity within your hub. You can read more about setting up this feature here.
- (4) Edit the contact verification process. It's a way to verify that a person is who they say they are so we can keep all customer data secure (our first priority) and provide a smooth experience for returning contacts. You can learn more about setting up this feature here.
Site Domain
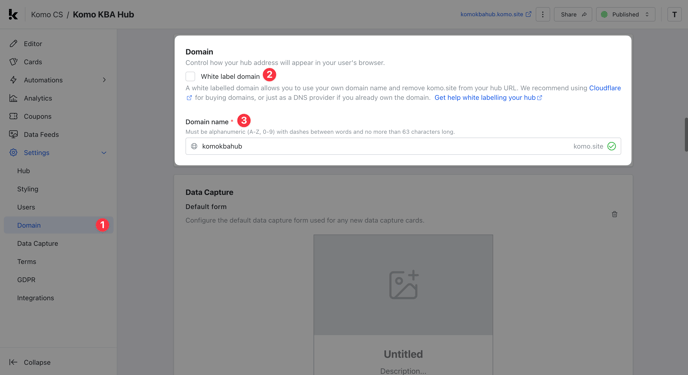
- (1) Head to the Domain tab of your Hub Settings.
- (2) White label if you wish to purchase a new URL for your Hub (e.g. ACME.com). This is where you can configure this. Click here to learn more about this.
- (3) Set or edit the .komo.site domain name.
Data Capture Settings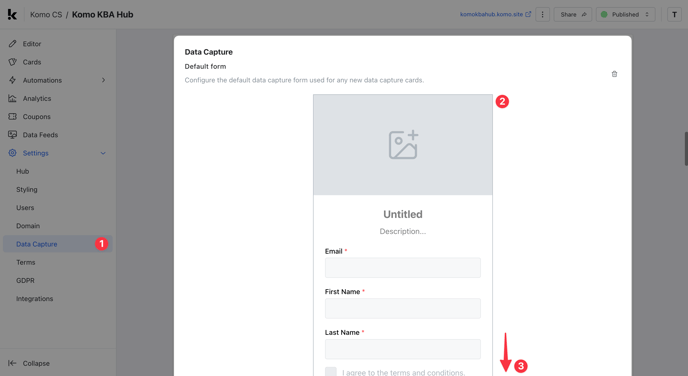
- (1) Head to the Data Capture tab of your Hub Settings.
- (2) Create the Default Form that will be added to any Data Capture you create after this point. Click here to learn more about this.
We highly recommend setting up your Default Form prior to building content cards - it will save you a lot of time in the long run!
- (3) Scrolling down, you can configure your reference table validation [optional]. You can learn more about this here.
Terms and Conditions

- (1) Head to the Terms tab of your Hub Settings.
- (2) Upload your terms and conditions to the Hub and hyperlink these terms to your competitions. Click here to learn more about this.
GDPR Settings

- (1) Head to the GDPR tab of your Hub Settings.
- (2) Enable and configure your Cookie Consent banners.
Once enabled, click the Edit Cookie Consent Banner button and follow the steps below:

- (A) To edit the copy of the banner, click on the text input modal.
- (B) Here you can edit the background and text colors of your banner.
- (C) Here you can edit the text and background colors of the CTAs.
Integrations

- (1) Head to the Integrations tab of your Hub Settings.
- (2) Connect your Google Tag Manager, Webhooks, Slack, Zaps, external CRM, and other external software to the Komo ecosystem. Click here to learn more about integrations and webhooks.
Once you've got all your Settings ready it's time to start building your Engagement Hub!
Head back to the Editor tab, look for the Add Content button, and start playing around with the ever-growing list of Komo content cards and begin engaging your community!
One last note:
At Komo, we pride ourselves on not only the results our clients achieve with us but the service they receive whilst bringing their hubs to life.
If you ever have any questions about an upcoming activation, how you can best utilize Komo to get the best possible outcome or just a general query, please don't hesitate to reach out to your Customer Success Specialist or email us at support@komo.tech
We also love your feedback, so please let us know if this article helped you by selecting from the options below.
Louis Docherty
Head of Customer Success