Contents:
What is it?
If you're wanting to run a competition on your card you'll need to add a data capture form. This form allows you to gather entrant information whilst also granting the ability to send communications and prizing.
Tip: Create a Default Form and save yourself time by not having to set this up each time you create a new competition, you can learn how to do this here.
How do I set it up?
- Step 1: Add a Data capture to your card
- Step 2: Configure your data capture settings
- Step 3: Set up your Form
- Step 4: Create your Communications
- Step 5: Set up your Prizes
Step 1: Add a Data capture to your card

- Once you have created your card's content and are ready to edit the data capture form, navigate to the Data capture tab of your Card's editing modal.
- Click on Form
Note: If you're using a card where a data capture form is optional, you will need to click + Add Data Capture which will appear when selecting the Data capture dropdown.
- This will reveal additional settings on the right-hand side that you will use to set up your competition.
Step 2: Configure your data capture settings

- (1) By clicking on the pencil icon here, you can configure how many times you'd like users to be able to enter your competition. The options are as follows:
- Single - Users can only enter once.
- Throttled using a rolling window - Entries are throttled based on a specified frequency from the current time. i.e. once per hour, once per day, etc.
- Throttled using a start time - Entries are throttled based on a specified frequency from a specified start time. i.e. if the start time was less than one hour ago but entries are throttled for every hour, users cannot enter again until the next hour.
- Unlimited - Users can enter as many times as they like.
- (2) Adding a close time will prevent people from entering the competition after a certain point.
Note: This is only relevant for content cards with an optional data capture element. Users will still be able to play through the card, the data capture will just not appear after completion. If you don't want users to play through after the close time has passed, you can schedule this card to expire at a set time.
- (3) Here you can configure the unique entry validation rule that will detect if a user has already entered your competition.
Note: Email and mobile number will be applied by default depending on the fields included in the data capture.
- (4) Here you can also attach a reference table that validates each data capture entry against a reference table entry. This is optional and can be set up following this Knowledge Base Article.
- (5) Here you can choose the form fields to be updated when a reference table match is found.
- (6) Here you can remove the data capture.
Note: This is only possible for content cards with an optional data capture element. This will delete the entire competition element attached to this card.
- (7) Clicking here will allow you to edit the call to action text.
Step 3: Set up your form

- (1) By clicking Form you are able to alter the journey your users will take when entering your competition.
- (2) This section allows you to customize your form.
- (3) Click here to upload a header image.
- (4) Here you can customize the copy within the header of your form, e.g. 'Enter to win'.
- (5) Here you can also add a description to go below the header of your form, e.g. 'Fill in the form below to go in the draw to win x!'
- (6) These are your data fields and comprise the information the user will need to supply in order to enter your competition. You can edit these fields by clicking on them.
- (7) Scrolling down, there is a terms and conditions opt-in. By clicking on this field, you'll be able to attach your competition's terms and conditions.
- (8) You can add to these fields by clicking the + icon.

There's nothing that can't be asked in this form in some way or format!
- (A) Firstly, you have the ability to select existing properties or consent fields (marketing opt-ins) to include in your form. Displayed here will be all the contact properties created for your company.
- (B) Click here to create a new contact property. Learn how to create contact properties here.
- (9) Here you can edit the color and copy of the call-to-action.
- (10) Here you can edit the confirmation message banner content.

- (A) Click here to edit the confirmation banner image.
- (B) Click here to edit the copy that appears when a user has completed the form.
- (C) Here you can toggle on and off whether you want the confirmation message banner to be displayed.
- (11) Here you can edit the closed message banner content.
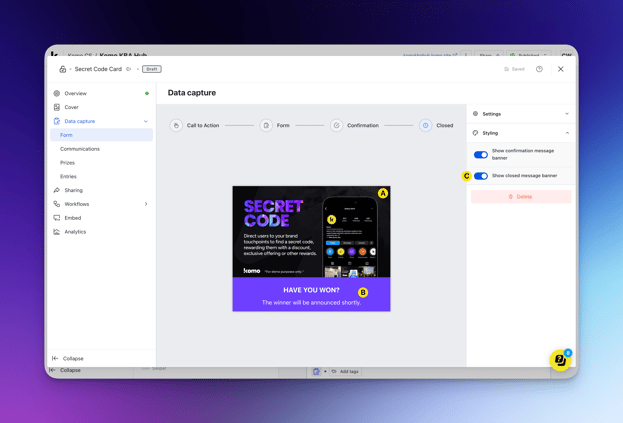
- (A) Click here to edit the closed banner image.
- (B) Click here to edit the copy that appears when the completion is closed (if you have a close time set to your card).
- (C) Here you can toggle on and off whether you want the closed message banner to be displayed.
Step 4: Create your Communications

Clicking on the Communications tab will provide an overview of all the communications participants could receive by engaging with your card.
- (1) Navigate to the Communications tab of the Data Capture dropdown menu.
- (2) Click on + Add communication to begin creating a new communication.
- (3) Add an internal name. This is internal and the name won't be seen by the recipients.
- (4) Here you can set whether your recipients will receive the particular communication via a transactional email, marketing email, or SMS.
- (5) Set the conditions that need to be met in order for an entrant to receive this communication. The three options here are:
- Manually Sent - Requires you to select an entrant/entrants to receive the communication.
- On form complete - Once a user submits the form they will trigger this communication.
- At a scheduled time - All entrants will receive the communication at the set time.

For email:
- To send email communications, you'll need to have the email field on your form.
- (A) Update your communication internal name.
- (B) Select the sender's name. By default, this is set to your Company name in the portal. If you can't find a sender name, click on Add or edit senders to add to your current list.
- (C) Here is where you'll add a subject line.
- (D) Here you can enter the Preheader which is the first line of text that appears in the inbox after the subject line.
- (E) Mark this checkbox if you want to paste an HTML code to create your email. Design and create your email on your CRM, copy the HTML code and paste it in the text box.
- (F) Use this area to construct your email. Utilize the toolbar to format and style your email.
- (G) Here you can insert images and buttons and edit the email layout. You can also insert email variables. Copy and paste these codes into your email to personalize your communications by pulling data collected when your user fills out the form.
- (H) Here you can edit the body and container colors.
- (I) (Optional) Attach a coupon to be sent out within your communication by copying the coupon code.
Tip: You can add this code within a button to hide the URL. - (J) This option allows you to test the communication.
Note: If sending a marketing email, you will also need to select which Communication Subscription Group your email should be sent to and include an unsubscribe URL code in the email body to give users an option to opt-out. This will ensure the email is only sent to users who have opted in to the selected subscription communications.
For more information on setting up Communication Subscriptions, read this article.
For SMS:

- To send SMS communications you'll need to add an SMS field to your form.
Note: To send SMS communications and with the new laws and regulations, you will need to have a Twilio account. Click here to learn more on how to set this up. - (A) Update your communication internal name.
- (B) Select the SMS sender name.
- (C) Construct your SMS message here.
- (D) Copy and paste these codes into your email to personalize your communications by pulling data collected when your user fills out the form.
- (E) (Optional) Attach a coupon to be sent out within your communication by copying the coupon code.
- (F) Here you can test the SMS.
Step 5: Set up your Prizes
 By clicking on the prizes tab within the Data capture dropdown, you will see an overview of your competition's prizes.
- Create your first prize by clicking on + Add Prize.
- (1) Give your prize an internal name that makes it easy to keep track of.
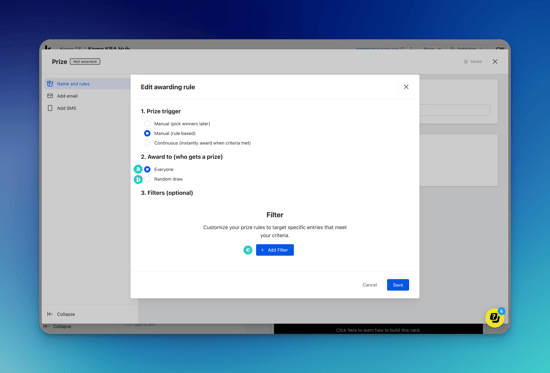
- (2) Click on the Edit prize rules button to set your rules.

- Decide how you want to award your prize. You can choose one of the following:
- (A) Manual - Allows you to pick a winner later and manually select an entrant/entrants to receive the prize.
- (B) Manual (rule based) - Allows you to manually award a prize to everyone or randomly drawn entrants who meet pre-determined filter criteria.
-
- (a) Here you can select whether you would like to manually award the prize to everyone who meets the filter criteria set in Step c below.
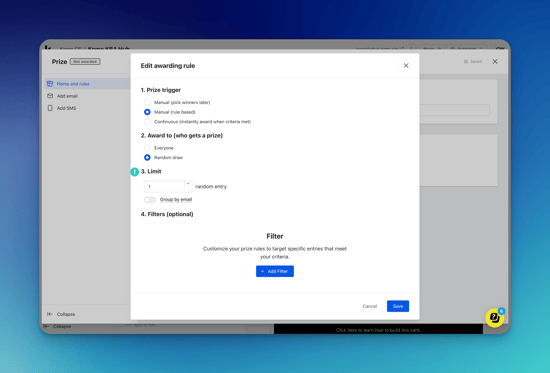
- (b) Here you can opt to award the prize to a user who meets the filter criteria set in Step c drawn at random.
-
-
- (I) In the Limit section you can set the total number of random users who can be awarded the prize. You also have the ability to toggle on or off the Group by email toggle to ensure each user with a unique email is only counted once when randomly awarding prizes.
- (c) Here you can set the filter criteria users must meet to be eligible for the prize.
-
- (C) Continuous (instantly award when criteria met) - Allows you to automatically award prizes to all users as soon as they meet pre-determined filter criteria.
Note: If using continuous prizing, you will need to ensure this is enabled prior to go-live.

- (a) Here you can limit the total number of random users who can be awarded the prize when they meet the criteria set in Step b.
- (b) Here you can set the filter criteria users must meet to be eligible for the prize.
- Once your satisfied with your settings, click Save.
- (3) + (4) Refer back to Step 4 to configure comms.
FAQ
What is the difference between a marketing and transactional email?
A marketing email is any email that is intended to promote your brand and push recipients to perform an action you want them to take. A transactional email differs in that it provides necessary information that the recipient requires in order for you to adequately complete a transaction or deliver your service. Transactional emails tend to be initiated off the back of an action taken by the recipient.
What happens when a user unsubscribes?
If a user clicks through and unsubscribes from communications, they will automatically be removed from the communication subscription they opted out of and will no longer receive the emails sent to that list.
One last note:
At Komo, we pride ourselves on not only the results our clients achieve with us but the service they receive whilst bringing their hubs to life.
If you ever have any questions about an upcoming activation, how you can best utilize Komo to get the best possible outcome, or just a general query, please don't hesitate to reach out to your Customer Success Specialist or email us at support@komo.tech
We also love your feedback, so please let us know if this article helped you by selecting from the options below.
Louis Docherty
Head of Customer Success