Digital Coupons
Set up your first Digital Coupon!
Contents
What is it?
Komo's Digital Coupons offer our customers a way to reward their Hub users! Digital Coupons are completely customizable and offer:
- Detailed tracking - Use a swipe, a unique code, a barcode, or a QR code to be scanned to redeem - coupons can even connect directly to your POS system!
- Seamless redemption - Track clicks and redemptions along every stage of the coupon funnel so you can better understand how consumers are interacting with your offers.
- Email and SMS automation - Send coupons directly to your consumers via email or SMS. Simply set up a trigger event, and when that event occurs, the consumer can receive their coupon.
- Anti-screenshot technology - Limit coupon fraud with the use of our anti-screenshot technology. The pulsing dots ensure that the coupon you’re redeeming is legitimate and not a screenshot.
- Promotional screens - Use promotional screens before your coupon is viewed to promote and upsell customers during the coupon redemption process.
Read more about Digital Coupons here.
How do I build one?
- Step 1: Create a Digital Coupon
- Step 2: Configure your Settings
- Step 3: Input your Locations
- Step 4: Set up your Screens
- Step 5: Create Coupon Reminders
- Step 6: Connect your Coupon to a competition
Step 1: Create a Digital Coupon

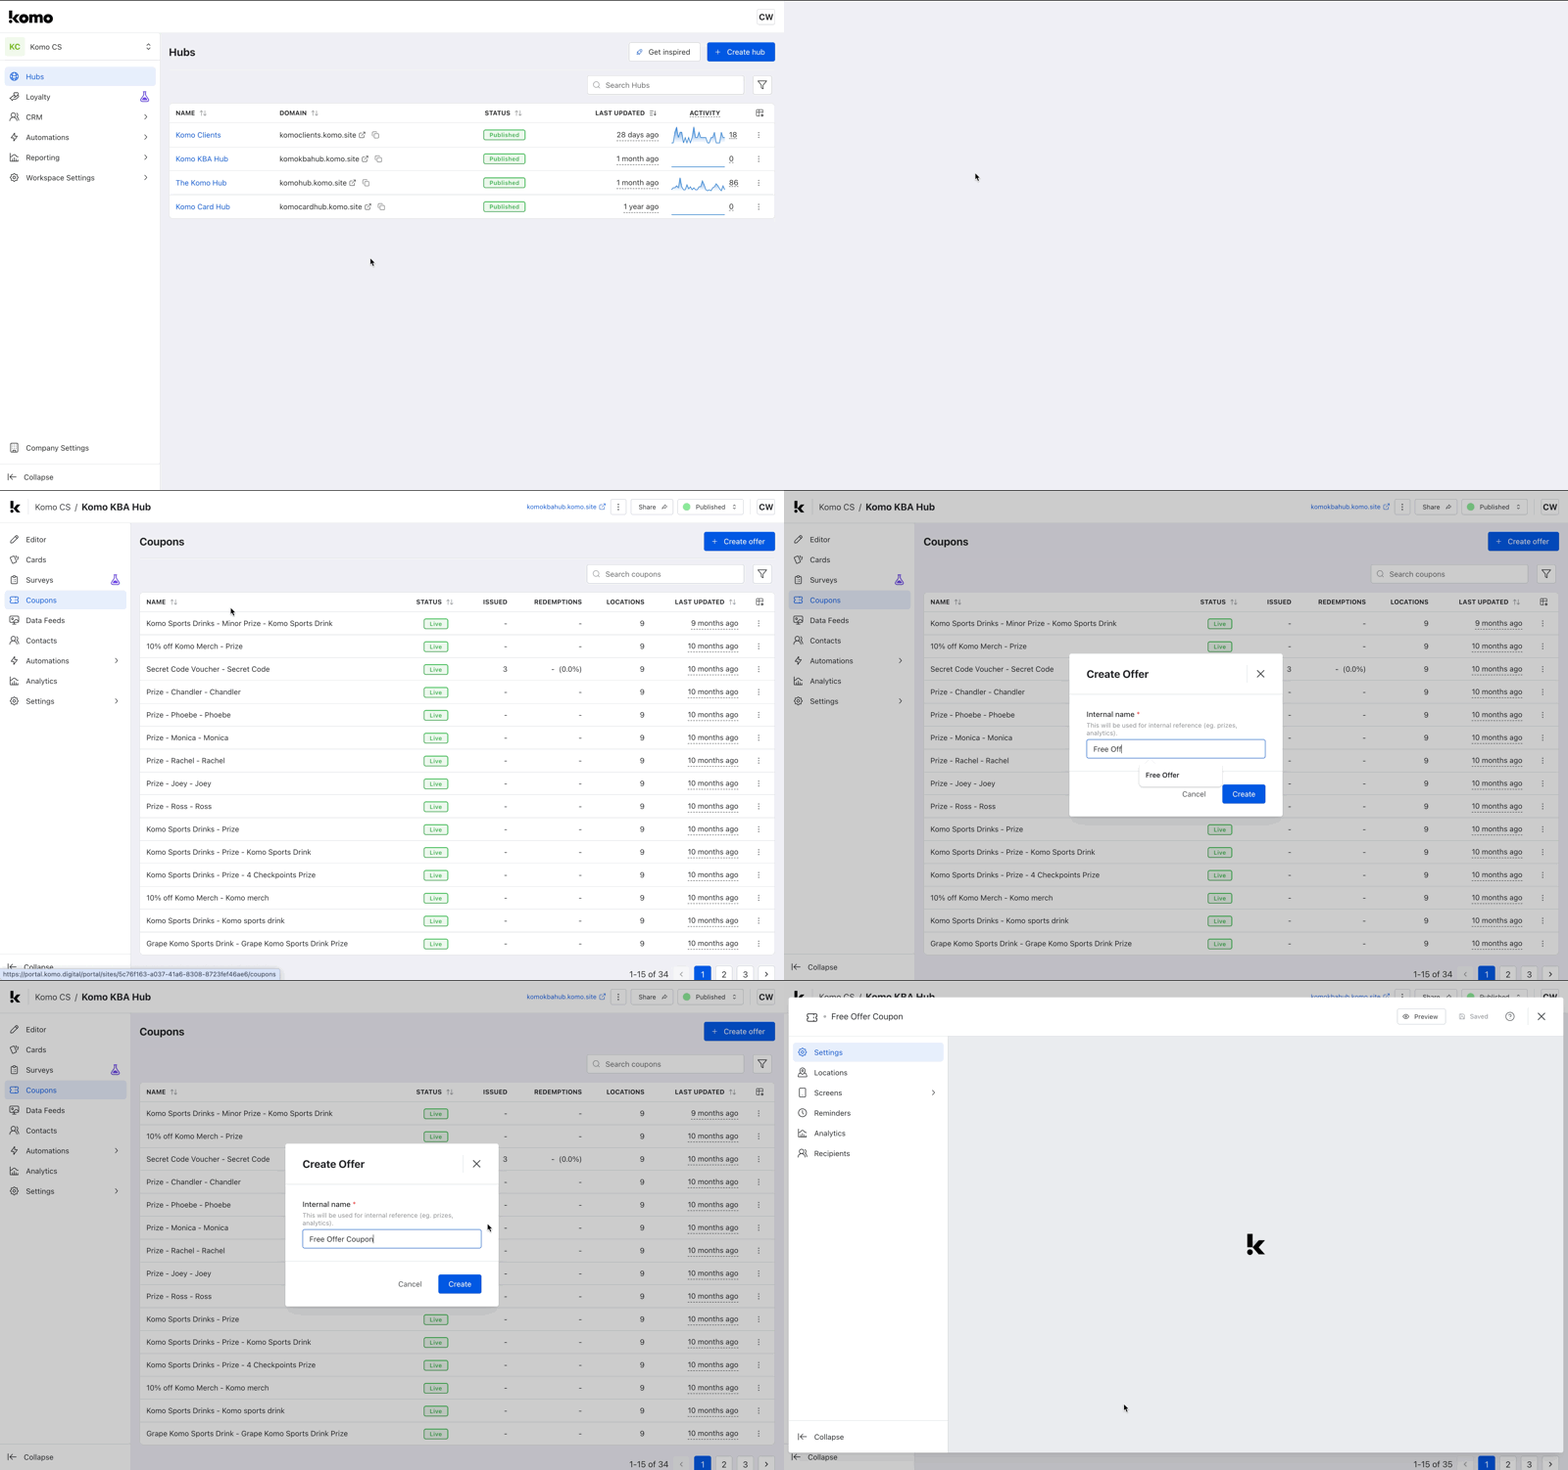
- Navigate to your Engagement Hub, then head to the Coupons tab.
- Click + Create offer, give your Coupon an internal name that will make it easy to track against others you may create, then click Create.
Step 2: Configure your Offer

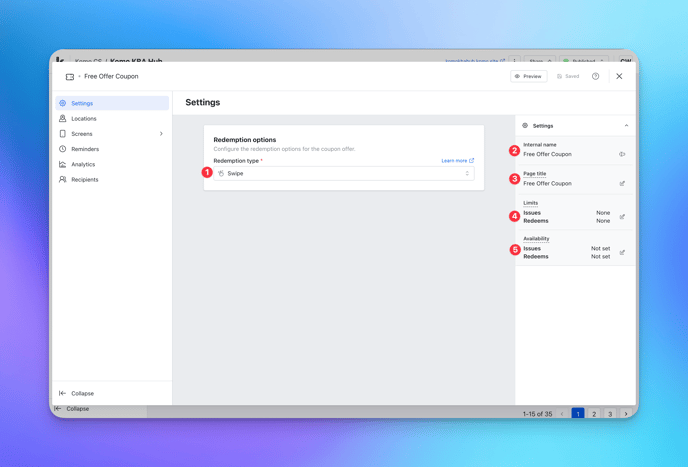
- (1) Configure your redemption option. Choose one of the following from the drop-down menu:
- Swipe - This redemption option invites users to simply swipe to redeem their Coupon.
- Barcode Unique - This redemption option invites users to use a barcode unique to them to redeem their Coupon.

- (A) Clicking Manage codes allows you to add your barcodes through a range of different options.

- (a) Add single allows you to manually type in a single barcode and an optional PIN.
- (b) Add multiple allows you to manually type in multiple barcodes.
- (c) Generate From Pattern allows you to define parameters which will automatically add all possible barcodes based on your defined pattern.
- (d) Upload CSV allows you to add barcodes from an existing list of barcodes stored in CSV format.
- (B) Select the type of barcode to communicate with your POS system.
-
- Barcode Shared - This redemption option invites users to use a barcode that is shared among the recipients. This option works well for inserting a discount code at checkout!

- (A) Select the type of barcode you wish to use.
- (B) Allow your consumers to revisit the coupon.
- (C) Enter the code for users to use to redeem their coupon. This can be letters, numbers, and/or symbols!
- (2) Here, you can update the internal name of the offer. This is for internal use only; we recommend setting a descriptive name that will make your reporting easier.
- (3) Give your Coupon a page title. This is the name that appears at the top of a user's browser when they view the coupon.
- (4) Set your offer limits. This is a limit on the total number of coupons issued and redeemable across the campaign. Within these settings, you can also add Offer limits and add contacts who should be notified by email once the issue limit has been reached so you can remove the competition or promotional collateral.
Tip: Run a "first-in, best-dressed" campaign, and increase your coupon redemption limit. To do so, set the redemption limit only, with no issue limit.
- (5) Configure the Availability. This is the time and duration of your coupon issuing and redemption.
Caution: We highly recommend chatting with our customer success team before using this feature, as this can prevent your coupons from being sent.
Step 3: Input your Locations

- (1) Here, you can choose to enable a redemption locations list and (2) to show geo location markers as a part of the redemption process.
- (3) Use the manage locations button to add locations manually or upload a .CSV file of multiple locations.

- (A) Click here to begin adding your redemption locations.

-
- (a) Select the country of your location.
- (b) Start typing the address of your location. As you type the address, (c) + (d) will automatically populate once you select an address.
- (e) You can have the option to include additional information for this location. For example trading hours, specific directions of the location in-center (next to Kmart), or what is available for redemption if it is a restaurant!
- (B) Click here to upload a CSV file and add multiple locations.
- (4) + (5) Here, you can also set a default limit per location. This is very handy if you have certain stock limits at certain locations.
Step 4: Set up your Screens

- (1) Set up your Select Locations screen.
- (2) Upload an image that will appear at the top of your Digital Coupon.
Note: This is a great place to really bring your brand assets into your rewards. Use your color palette and other visual assets to bring the Coupon to life!
- (3) Here you can edit the text that appears when end users are looking for the closest location to redeem their coupon.
- (4) Edit the color of the messaging bar and text.
- (5) Update the background color and text of the coupon.
Note: Any updates made to the styling colors will apply to all screens.
- (6) Set up your Ready to Redeem screen.

- (A) Alter the copy of the messaging.
- (B) Add any additional copy you wish to share with your consumers.
Note: Any updates made to the styling colors will apply to all screens.
- (7) Set up your Not Ready to Redeem screen.

- (A) Alter the copy of the messaging.
- (B) Add any additional copy you wish to share with your consumers.
Note: Any updates made to the styling colors will apply to all screens.
- (8) Set up your Swipe to Redeem screen.

- (A) Update the title here.
- (B) Edit the swipe to redeem copy here.
Note: Any updates made to the styling colors will apply to all screens.
- (9) Set up your Coupon Code screen.

- (A) Update the title here.
- (B) Edit the sub title copy here.
- (C) You have the option to add call-to-action buttons on this screen. Click on the + icon to add a back to Hub button or an external link button.
- (D) Here you can type in your barcode content if required.
Note: Any updates made to the styling colors will apply to all screens.
- (10) Set up your Coupon Already Redeemed screen.

- (A) Update the title here.
- (B) You have the option to add call-to-action buttons on this screen. Click on the + icon to add a back to Hub button or an external link button.
Note: Any updates made to the styling colors will apply to all screens.
- (11) Set up your Coupon Exhausted screen.

- (A) Update the title here.
- (B) Edit the coupon exhausted copy here.
Note: Any updates made to the styling colors will apply to all screens.
Step 5: Create your Coupon Reminders

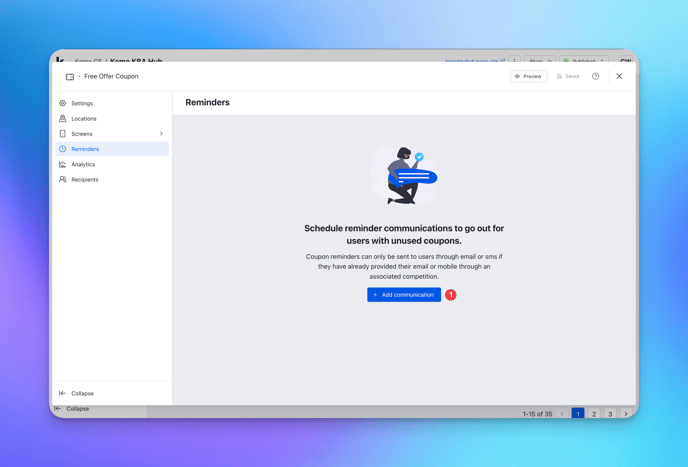
- (1) Click on add communication to set up your reminders.
Learn how to set up coupon reminders here.
Step 6: Connect your Coupon to a competition

- Now that you've created your Digital Coupon, it's time to connect them to a competition!
- Navigate to your competition, open the data capture dropdown menu, and click on prizes.
- Click the + Add prize button and add an email communication.
Tip: If you need assistance in configuring your prizes, head to the Data Capture Knowledge Base Article.

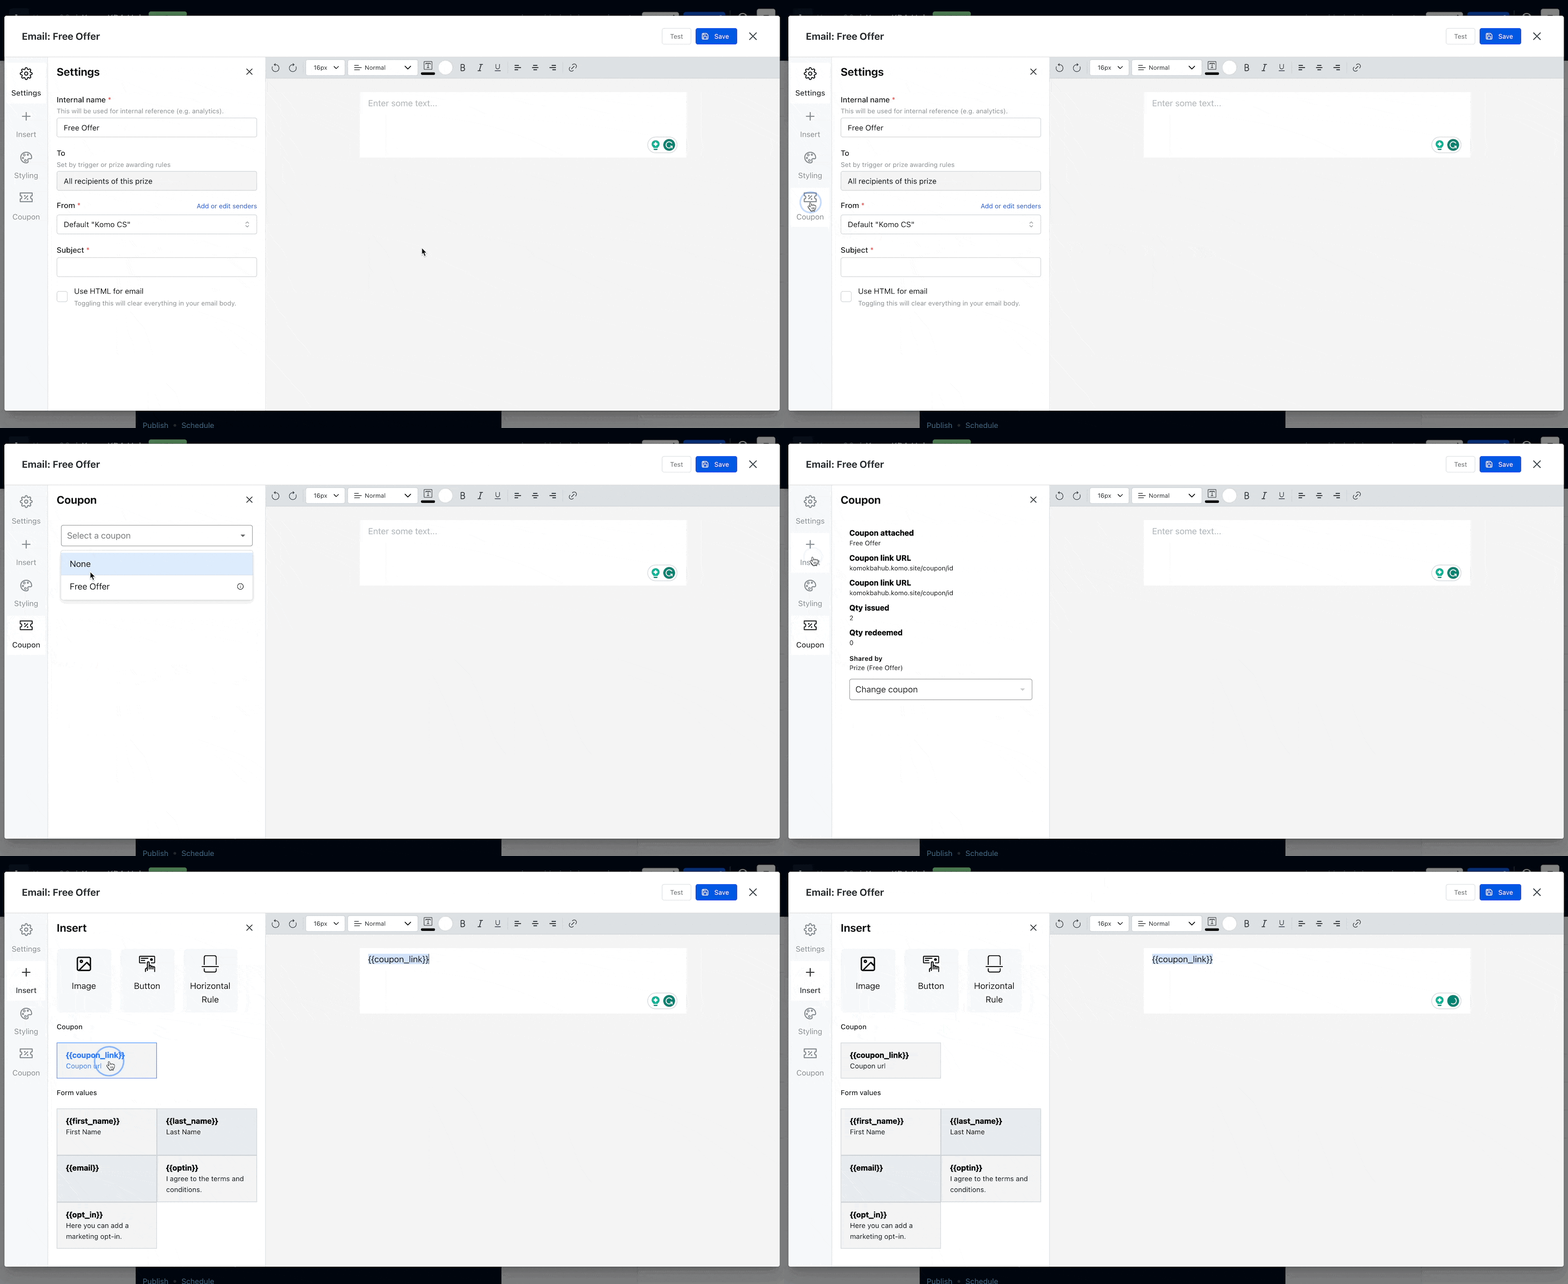
- Use this modal to edit your prizing communication. This is the email or SMS your users will receive upon winning a prize. Learn more on how to set up email communications.
- Navigate to the coupon tab, select the coupon you configured earlier and go to insert to paste the coupon code to the email.
Note: We highly recommend presenting this in a button format.

One last note:
At Komo, we pride ourselves on not only the results our clients achieve with us but the service they receive whilst bringing their Hubs to life.
If you ever have any questions about an upcoming activation, how you can best utilize Komo to get the best possible outcome, or just a general query, please don't hesitate to reach out to your Customer Success Specialist or email us at support@komo.tech
We also love your feedback, so please let us know if this article helped you by selecting from the options below.
Louis Docherty
Head of Customer Success