Contents
- What is it?
- How do I build one?
- "Go Live" checklist
- How can I promote it?
- Terms & Conditions Template
- Card Design Guidelines
- FAQ
- Top Tips
What is it?
Interactive Q&A allows you to create and share questions with your audience. Your audience can also submit and vote for their own questions. Ideal for live events, live panels and webinars, it is a simple and fun way to interact with your audience and get their feedback.
See it in action
See it come to life
How do I build one?
Pre-event:
- Step 1: Add the Interactive Q&A to your Hub
- Step 2: Add a Cover image
- Step 3: Add a Data capture form
- Step 4: Configure your Gameplay screens
- Step 5: Add Communications to your Card
- Step 6: Create Live Data Feeds for your Q&A
- Step 7: Publish your Card
On the Day:
- Step 1: Configure your Moderator settings
- Step 2: Moderate your Q&A
- Step 3: Display your Live Data Feed
- Step 4: Make your Q&A closed for questions
Pre-Event Steps
Step 1: Add the Interactive Q&A to your Hub
- Navigate to your Engagement Hub.
- Once there click the Plus icon, from here select Games and then Interactive Q&A.
- You will then see your new card has been added to your Hub.
Step 2: Add a Cover image

- Clicking on the Interactive Q&A card will open the editing module.
- (1) Navigate to the Cover tab of the editing module.
- (2) Input text above the cover image to add an option title, or (8) turn this off here.
- (3) This is where you can upload a cover image by clicking on the add image icon.
- (4) Clicking on the call-to-action button will allow you to edit the copy and colors of this section or (9) you can toggle this off in the righthand toolbar.
- (5) Set the Outer card shell colours (description and share bar).
- (6) You can add an Author tag by displaying the brand or person who's responsible for the card content.
- (7) Add a Description to the card.
Step 3: Add a Data capture form
- Data capture is required for this card. This will be on by default but will require you to configure additional settings.

Step 4: Configure your Gameplay screens
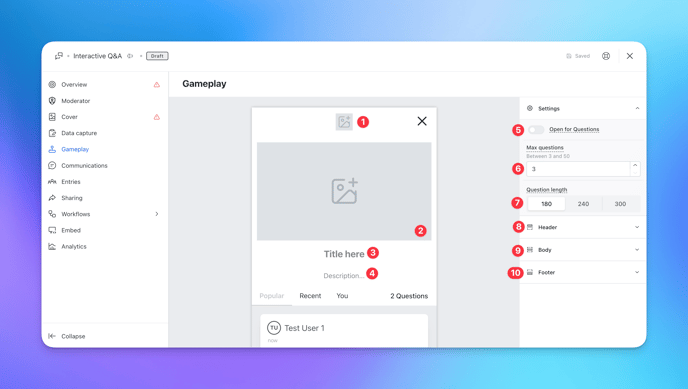
- Here is where you will set up all the screens which your users will see.
- (1) Add your logo to the header of the gameplay screen by uploading an image.
- (2) Add a Cover Image to your gameplay screen by uploading an image.
Tip: This cover image is a great place to lay out some ground rules, or include some photos of your talent, etc.
- (3) Add a title to your gameplay screen by inputting text below the cover image.
- (4) Add a description to your gameplay screen by inputting text below the title.
- (5) Navigate to the settings toolbar on the righthand side of the editing modal. Here you can toggle on or off the submitting of questions from your audience (more on this later!).
- (6) Configure the maximum number of questions users can have pending approval at one time.
- (7) Here you can also configure the question length limit in characters.
- (8) By clicking on the header drop-down menu in the settings toolbar, you can configure the header settings.

- (A) Here you can toggle off the logo for your gameplay screen.
- (B) Edit the background color of your gameplay screen.
- (C) Alter the text colors within your header.
- (D) Set the active and inactive tab colors.
- (E) Here you can change the question count color.
- (9) You can configure the body settings by clicking on the body drop-down menu in the settings toolbar.

- (A) Edit the background color or image of the body section.
- (B) Change the question background color.
- (C) Alter the question text colors.
- (D) Here you can edit the color of the like button.
- (10) By clicking on the footer drop-down menu in the settings toolbar, you can configure the footer settings.

- (A) Edit the question placeholder text.
- (B) Change the colors of your question box.
Step 5: Add Communications to your Card
- To add email or SMS communications to your Q&A Card, follow the steps in this Knowledge Base article.
Tip: A great way we've seen the comms used for this card is to send an SMS with some Q&A ground rules once a user fills out the data capture form!
Step 6: Create Live Data Feeds for your Q&A (optional)
- Live Data Feeds are an incredible way to present your submitted questions on the big screen at your event! Learn how to set them up using this article.
Step 7: Publish your Card

Once you've completed all of these steps, have tested your card and are happy with all the aspects, it's time to make your Interactive Q&A live!
- (1) Publish your card manually and instantly for the world to see.
- (2) Schedule your card to be published and unpublished at set dates and times.
- (3) Click on ... to Preview and interact with the card on the front end from a user's perspective before publishing it. See how to test your card here.
Note: All competition entries will be recorded and will impact the card analytics.
On the Day:
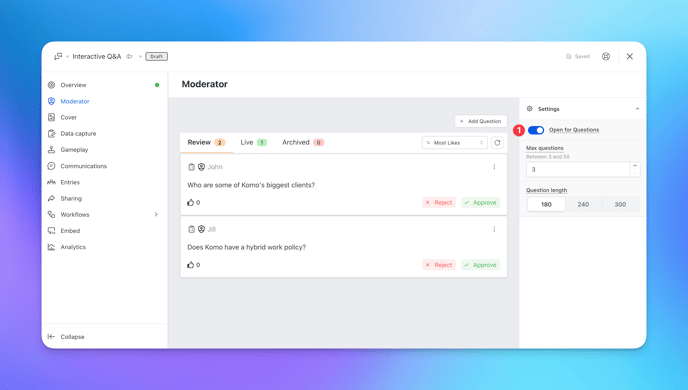
Step 1: Configure your Moderator settings
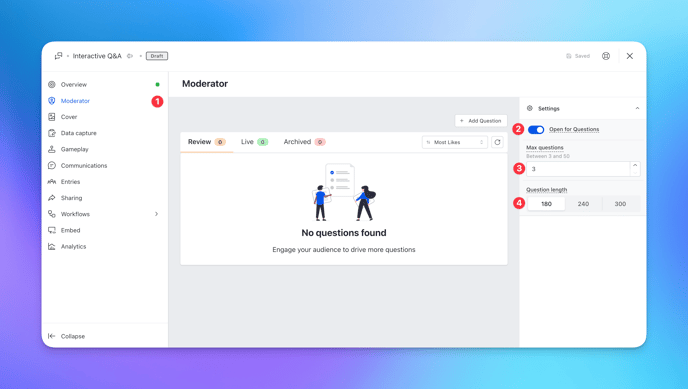
- (1) Navigate to the moderator tab of the editing modal.
- (2) In the Settings panel on the right-hand side of the editing modal, toggle on the 'open for questions' setting to allow users to submit questions to your Q&A.
- (3) Here you can also select the maximum number of questions a user can have pending approval.
- (4) Here you can configure the length of user questions in characters.
Step 2: Moderate your Q&A
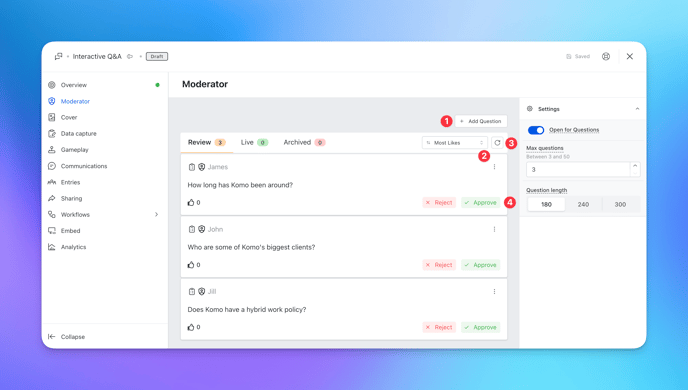
- (1) Here you can add your own questions by clicking the + Add Question button.
- (2) Filter the question order here.
- (3) Here you can also refresh the list of incoming questions in the review tab as you go to ensure all questions come through to moderation.
- (4) Reject or Approve questions here.

- (A) As questions are answered, navigate to the Live tab of the moderating panel.
- (B) The questions you select as answered will move automatically into the archived tab of the moderating panel.
- (C) Here you can also pin questions to the top of your audience's live question feed.
- (D) When a question has been answered, simply click the answer button to remove it from the live tab.
Step 3: Display your Live Data Feed
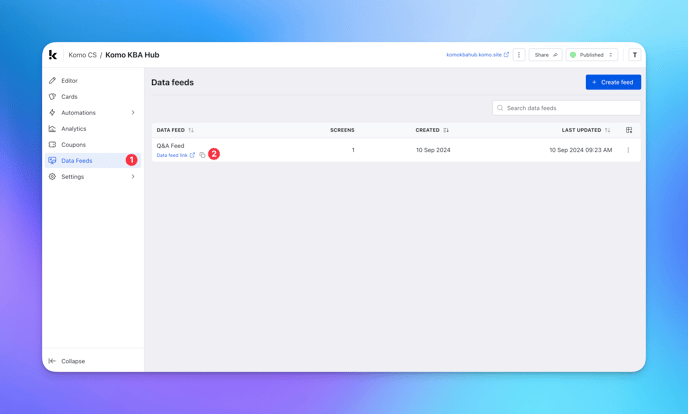
- (1) Navigate to the Live Feeds tab of your Engagement Hub.
- (2) To open a Live Data Feed, click on the Link hyperlink and it will automatically populate in a new window. The screens within this feed will automatically switch using the duration in seconds that you set in Part 1.
Tip: Depending on your browser and/or device, follow the necessary tips to hide your browser toolbar. This will ensure your Data Feed is displayed in full-screen.
Step 4: Make your Q&A closed for questions
- Once your Q&A has concluded, or you've reached your limit of questions, it's time to close your Q&A for questions.
- (1) On the right-hand settings panel, toggle off the open for questions setting.
"Go Live" Checklist
Ready to go live with your Interactive Q&A? We recommend reviewing the following list before launching and double-checking that you have:
- If you're using your Interactive Q&A as a competition, ensure you've updated the T&Cs template accessible here, and hyperlinked them to the opt-in-field, which is created in the data capture section of the settings tab.
- All images uploaded to each screen are the correct dimensions. Export image files in 2x to ensure none of the images appear pixelated.
- All your communications are fully set up and ready to send.
- Ensured you have set your Q&A open for questions so that users can submit questions.
- Set up your data capture form to gather the user data you're looking to collect.
- Ensured that you have nominated a moderator to approve/ reject questions and keep track of the back end of the mechanic.
- Ensured that you have set the question and question character limits to your liking.
- Edited the Gameplay screen of the Interactive Q&A to reflect your branding.
- Checked the overview tab to make sure that all required settings of the Interactive Q&A card have been configured.
Then you're ready to go live!
How can I promote it?

FAQ
Is there a limit to the number of questions audience members can submit?
You can set your own limit to the number of questions an individual user can submit (between 3 and 5). However, there is no limit to the number of questions that can be submitted from users in general! As with any Card on the Komo Platform, the Interactive Q&A is built to scale with you, no matter the size of your event.
Can I reject a question once it's in the live tab?
We have provided this feature, just in case your moderator accidentally approves a question that should have been rejected. Simply navigate to the live hub and reject any question you wish to archive immediately.
What's the difference between the different tabs in gameplay?
The Popular tab of the gameplay screen will show those questions that have the most 'likes' or 'votes'. This tab makes it easy for users and moderators alike to identify the audience's most burning questions.
The Recent tab will simply show the questions that have most recently been approved and made live.
The 'You' tab will display questions the user has submitted, either with a 'waiting for approval' status or simply displaying as live.
Top Tips
- Plan a seamless Q&A session in advance by embedding your Interactive Q&A card in an email to your audience pre-event and having them submit their questions before your event starts!
- This way, you can also moderate questions in advance and go straight into answering.
- Try pre-populating your Q&A with a few questions before you invite your users to submit their own questions. This will give them some inspiration and make asking their own question feel less intimidating!
- Use your cover image and gameplay screen to give your audience some context. Use these graphics to make the theme of your Q&A clear.
- Send your users an SMS after filling in the data capture form to set some ground rules for your Q&A. A tactic as simple as this can make a huge difference in reducing the number of inappropriate questions you'll have to weed through!
One last note:
At Komo, we pride ourselves on not only the results our clients achieve with us but the service they receive whilst bringing their Hubs to life.
If you ever have any questions about an upcoming activation, how you can best utilize Komo to get the best possible outcome or just a general query, please don't hesitate to reach out to your Customer Success Specialist or email us at support@komo.tech
We also love your feedback, so please let us know if this article helped you by selecting from the options below.
Louis Docherty
Head of Customer Success