Contents:
What is it?
Using Komo’s Surveys tool, you can create and customize surveys with flexible screens and question types, then distribute them via unique links to capture insights within the flow of engagement. Read on to learn how to set yours up.
How do I build one?
Step 1: Add a survey to your Hub

- Navigate to your Engagement Hub.
- Once there click Surveys in the left-hand menu.
- Click + Create survey.
- Give your survey an appropriate name (this will be visible to end users) and click Create.
- You will now see your survey has been created. Click the survey you just created to access and begin editing.
Step 2: Adding screens

- When creating surveys, screens are the pages that house questions and content for your survey. You can add all your questions to one screen or have individual screens for each question, depending on your needs.
- (1) Click here to access an overview of all screens.
- (2) Clicking the + sign allows you to add additional screens.
Note: When you create your survey, an intro screen will always be created by default. You have the ability to edit and customize this screen to meet your requirements.
- (3) Clicking the bin icon allows you to delete screens.
Note: If you only have one screen, you will not be able to delete it until further screens have been added.
Step 3: Adding questions

- (1) Click on the screen you would like to add questions to.
- (2) Clicking on the title of the screen allows you to edit it.
- (3) Click the + sign to add content to your screen. You will have 3 options;
- (4) Text - This option allows you to add text to the screen which is particularly useful if you want to add context to questions or add welcome or closing messages.

- (A) By clicking here you can add and edit your text.
- (B) Click and drag to reorder your content (when additional content is added).
- (C) Click the bin to delete your content.
- (5) Image - This option allows you to add an image or gif to your screen by uploading your own or accessing the various stock options available.
- (6) Field - This option allows you to add survey questions and data capture fields to your screen.

- (A) By clicking Existing you can access all your existing data capture fields that can be added to the survey.
- (B) Clicking Create allows you to add new data capture fields as well as survey questions to your screen.
-
- Scrolling down you will see the available data capture fields as well as the survey question types that are available to be used.
- Click on your desired question type to add it to your screen.
-
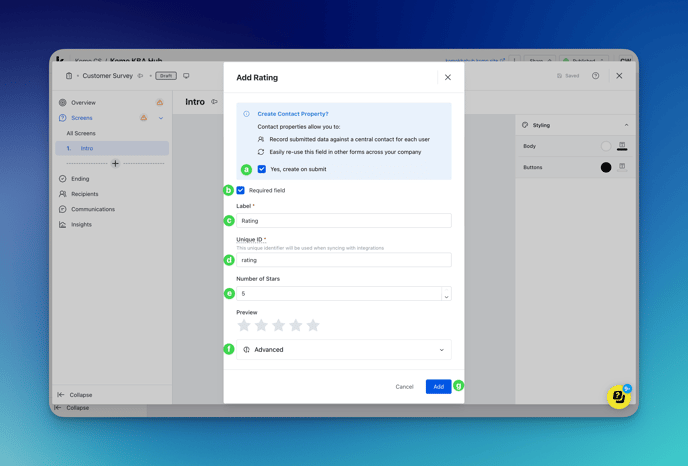
- You will now be able to edit your survey question.
- (a) Checking this box allows you to create a Contact Property for this survey question. When users submit their answers, this will be automatically added to their contact profile.
- (b) You can choose to make the question a Required field by checking this box.
- (c) Within the label box type in the question you are asking end users. This will be publicly visible.
- (d) Give your question a Unique_ID this will not be publicly visible but will be used to identify the question when syncing with integrations.
- (e) Within this section, you will be able to further customize your question and answering experience, depending on the question type.
- (f) By clicking the Advanced dropdrown, you will have the ability to make the field Read-Only, Hide the field if the contact already has a value for it, Pre-fill with data from the contact profile as well as advanced question customization.
- (g) Click Add to finalize adding the question to your screen.
- (7) Clicking on the button gives you the ability to edit the color and button text.
Note: When you add more screens, additional buttons will be added to allow users to navigate between questions as well as submitting when it's the final question. You still have the ability to customize these buttons.
- (8) Here you can customize the background color and text color for the screen.
- (9) Here you can customize the button background color and text color.
- (10) Click the + sign to add additional screens to your survey.
Step 4: Create your Ending screen

- (1) Click Ending to begin editing your Ending Screen.
- (2) Click here to customize and edit your ending screen text.
- (3) Click the + sign to insert additional text, images, or buttons.
Step 5: Publish your survey

- Once you're happy with your survey, you're ready to publish!
- (1) Click Overview in the left-hand menu.
- (2) Double check the setup guide which will alert you if any steps have not been completed.
- (3) Check if your survey meets accessibility requirements. If the survey does not meet these requirements, it will provide detail on the areas that require attention.
- (4) Hit Publish and Publish again when the modal appears.
Note: You also have the ability to publish your survey by clicking the three dots next to the survey (accessed via the Survey tab within the Hub).
Here you can also copy the survey URL. It is recommended that you do this before setting up recipients or communications. This then gives you the ability to include the URL in communications if required, or directly share the URL through other channels for distribution.
Copying the URL also gives you the ability to view and test the end user experience prior to distributing.
Step 6: Add survey Recipients and Communications (optional)

- (1) Click Recipients in the left-hand menu.
- (2) Click Add recipients.

- (A) Here you can search for contacts you would like to receive the survey.
- (B) If you'd like to filter the contacts (ie. based on a list) you can click here.
- (C) Tick the checkbox for all recipients you would like to distribute the survey to. This contact data is pulled directly from your contact list within the Komo CRM. You can also check the top checkbox to select all contact in the displayed list.
- (D) If you need to add additional contacts who are not currently in the list click here. This will take you to the CRM where you can add more contacts. For more information on adding contact, please read this article.
- (E) Once you have selected your recipients, click Next.

- (a) To add email communications, click + Add email. For more information on creating email communications, please read this article.
- (b) By clicking the down arrow, you can also (c) Add SMS communications. For more details on creating SMS Communications, please read this article.
Note: When creating communications, you can paste the {{targeted_survey_link}} link token within the body text or use it within a button. This will generate a personalized link for each recipient, allowing individual tracking. Alternatively, you can include a generic URL (copied in Step 5).
-
- (d) If you choose not to set up communications, you can click skip.

- Once you have set up your communications you can click Add recipients.
- The recipient has now been created. Once they have completed the survey, you will see a Completed tag under the Completion Status tab.
- (d) If you choose not to set up communications, you can click skip.
If you need to edit, add, or send follow up communications, you can do so under the Communications tab in the left-hand menu.
Step 7: View survey Insights

- (1) Click the Insights tab in the left-hand menu.
- (2) Here you can see a breakdown of the survey question responses.
- (3) If you would like to drill down even further, or export your survey responses in CSV format, you can do so by clicking here.
Note: If you request any customer data throughout your survey (ie. first name or email) or send the survey using the recipients tab, you will be able to see their responses on the CSV export and individual Contact Profiles within the CRM. If you don't request any customer data, and send the survey using the generic survey link, all responses will be anonymous.
FAQ
Do Surveys live at the Hub or Workspace level?
Surveys are created at the Hub level because only Hubs support unique URLs, and each survey generates its own shareable link as an extension of the Hub’s URL.
How many questions can I create?
You can add as many questions as you like to your surveys!
Will you be rolling out more question types in future?
Yes! This is the first iteration of our Surveys offering. We intend to progressively release more question types in the near future. On top of this, the user experience will continue to be improved and streamlined.
Do Surveys currently support advanced logic?
The current iteration of the Surveys offering does not support advanced logic for displaying and hiding questions. We intend to release this capability in the near future.
One last note:
At Komo, we pride ourselves on not only the results our clients achieve with us but the service they receive whilst bringing their hubs to life.
If you ever have any questions about an upcoming activation, how you can best utilize Komo to get the best possible outcome or just a general query, please don't hesitate to reach out to your Customer Success Specialist or email us at support@komo.tech
We also love your feedback, so please let us know if this article helped you by selecting from the options below.
Louis Docherty
Head of Customer Success