
What is it?
For every card with a data capture attached, you can create prizes to send to the winners with communications.How do I set it up?
- Step 1: Add a Data capture
- Step 2: Set up your Prizes
- Step 3: Set up your Prize communications
- Step 4: Add additional Communications
- Step 5: Set up Marketing Email Communications
Step 1: Add a Data capture
- Navigate to your Engagement Hub.
- Go into the card settings, click on Data capture, and then + Add Data Capture.
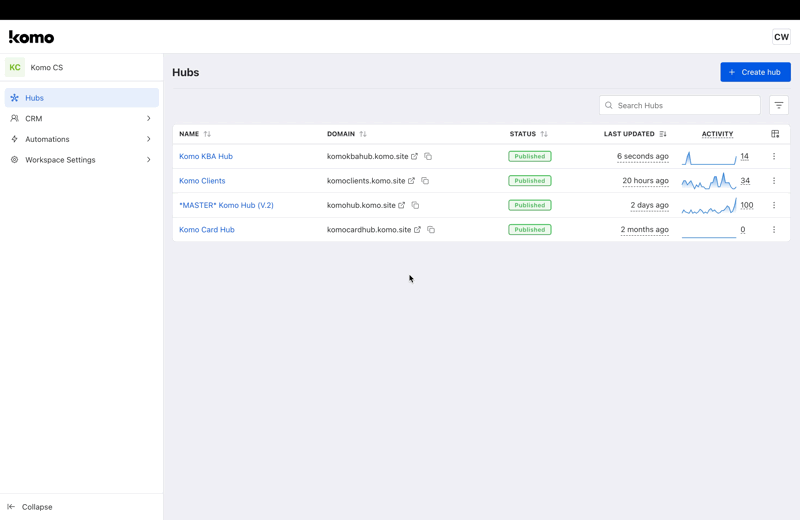
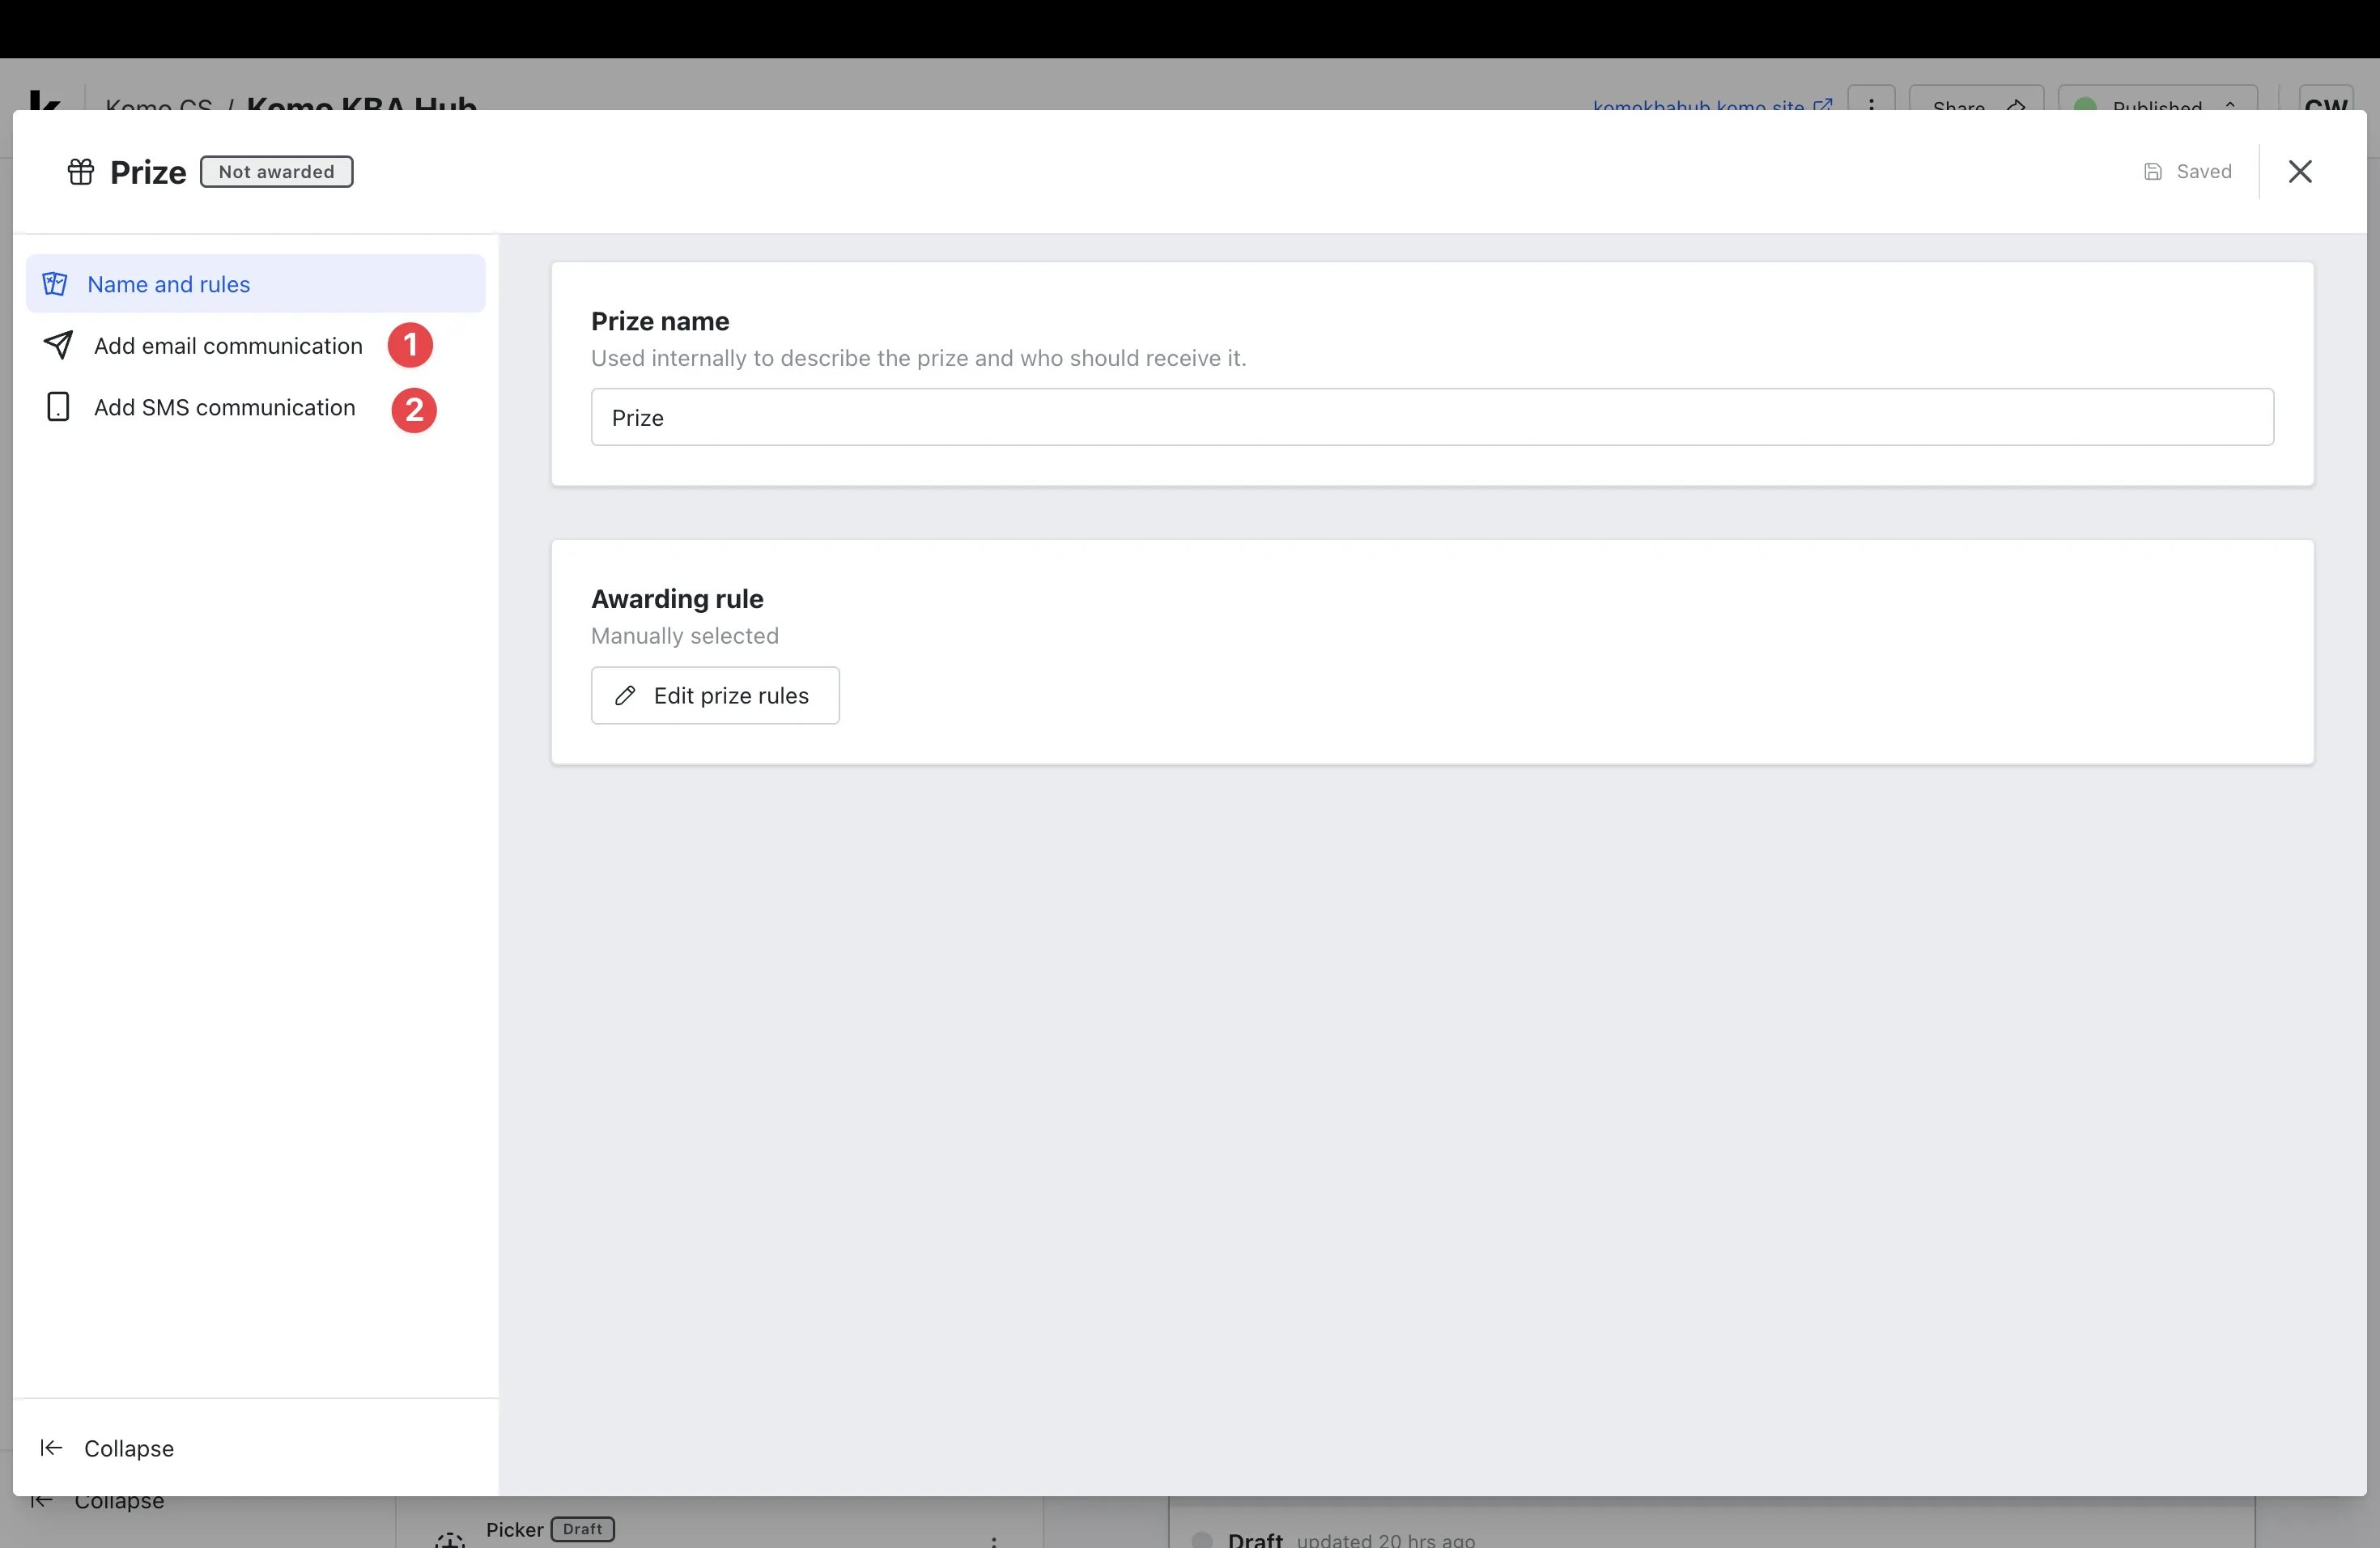
Step 2: Set up your Prizes
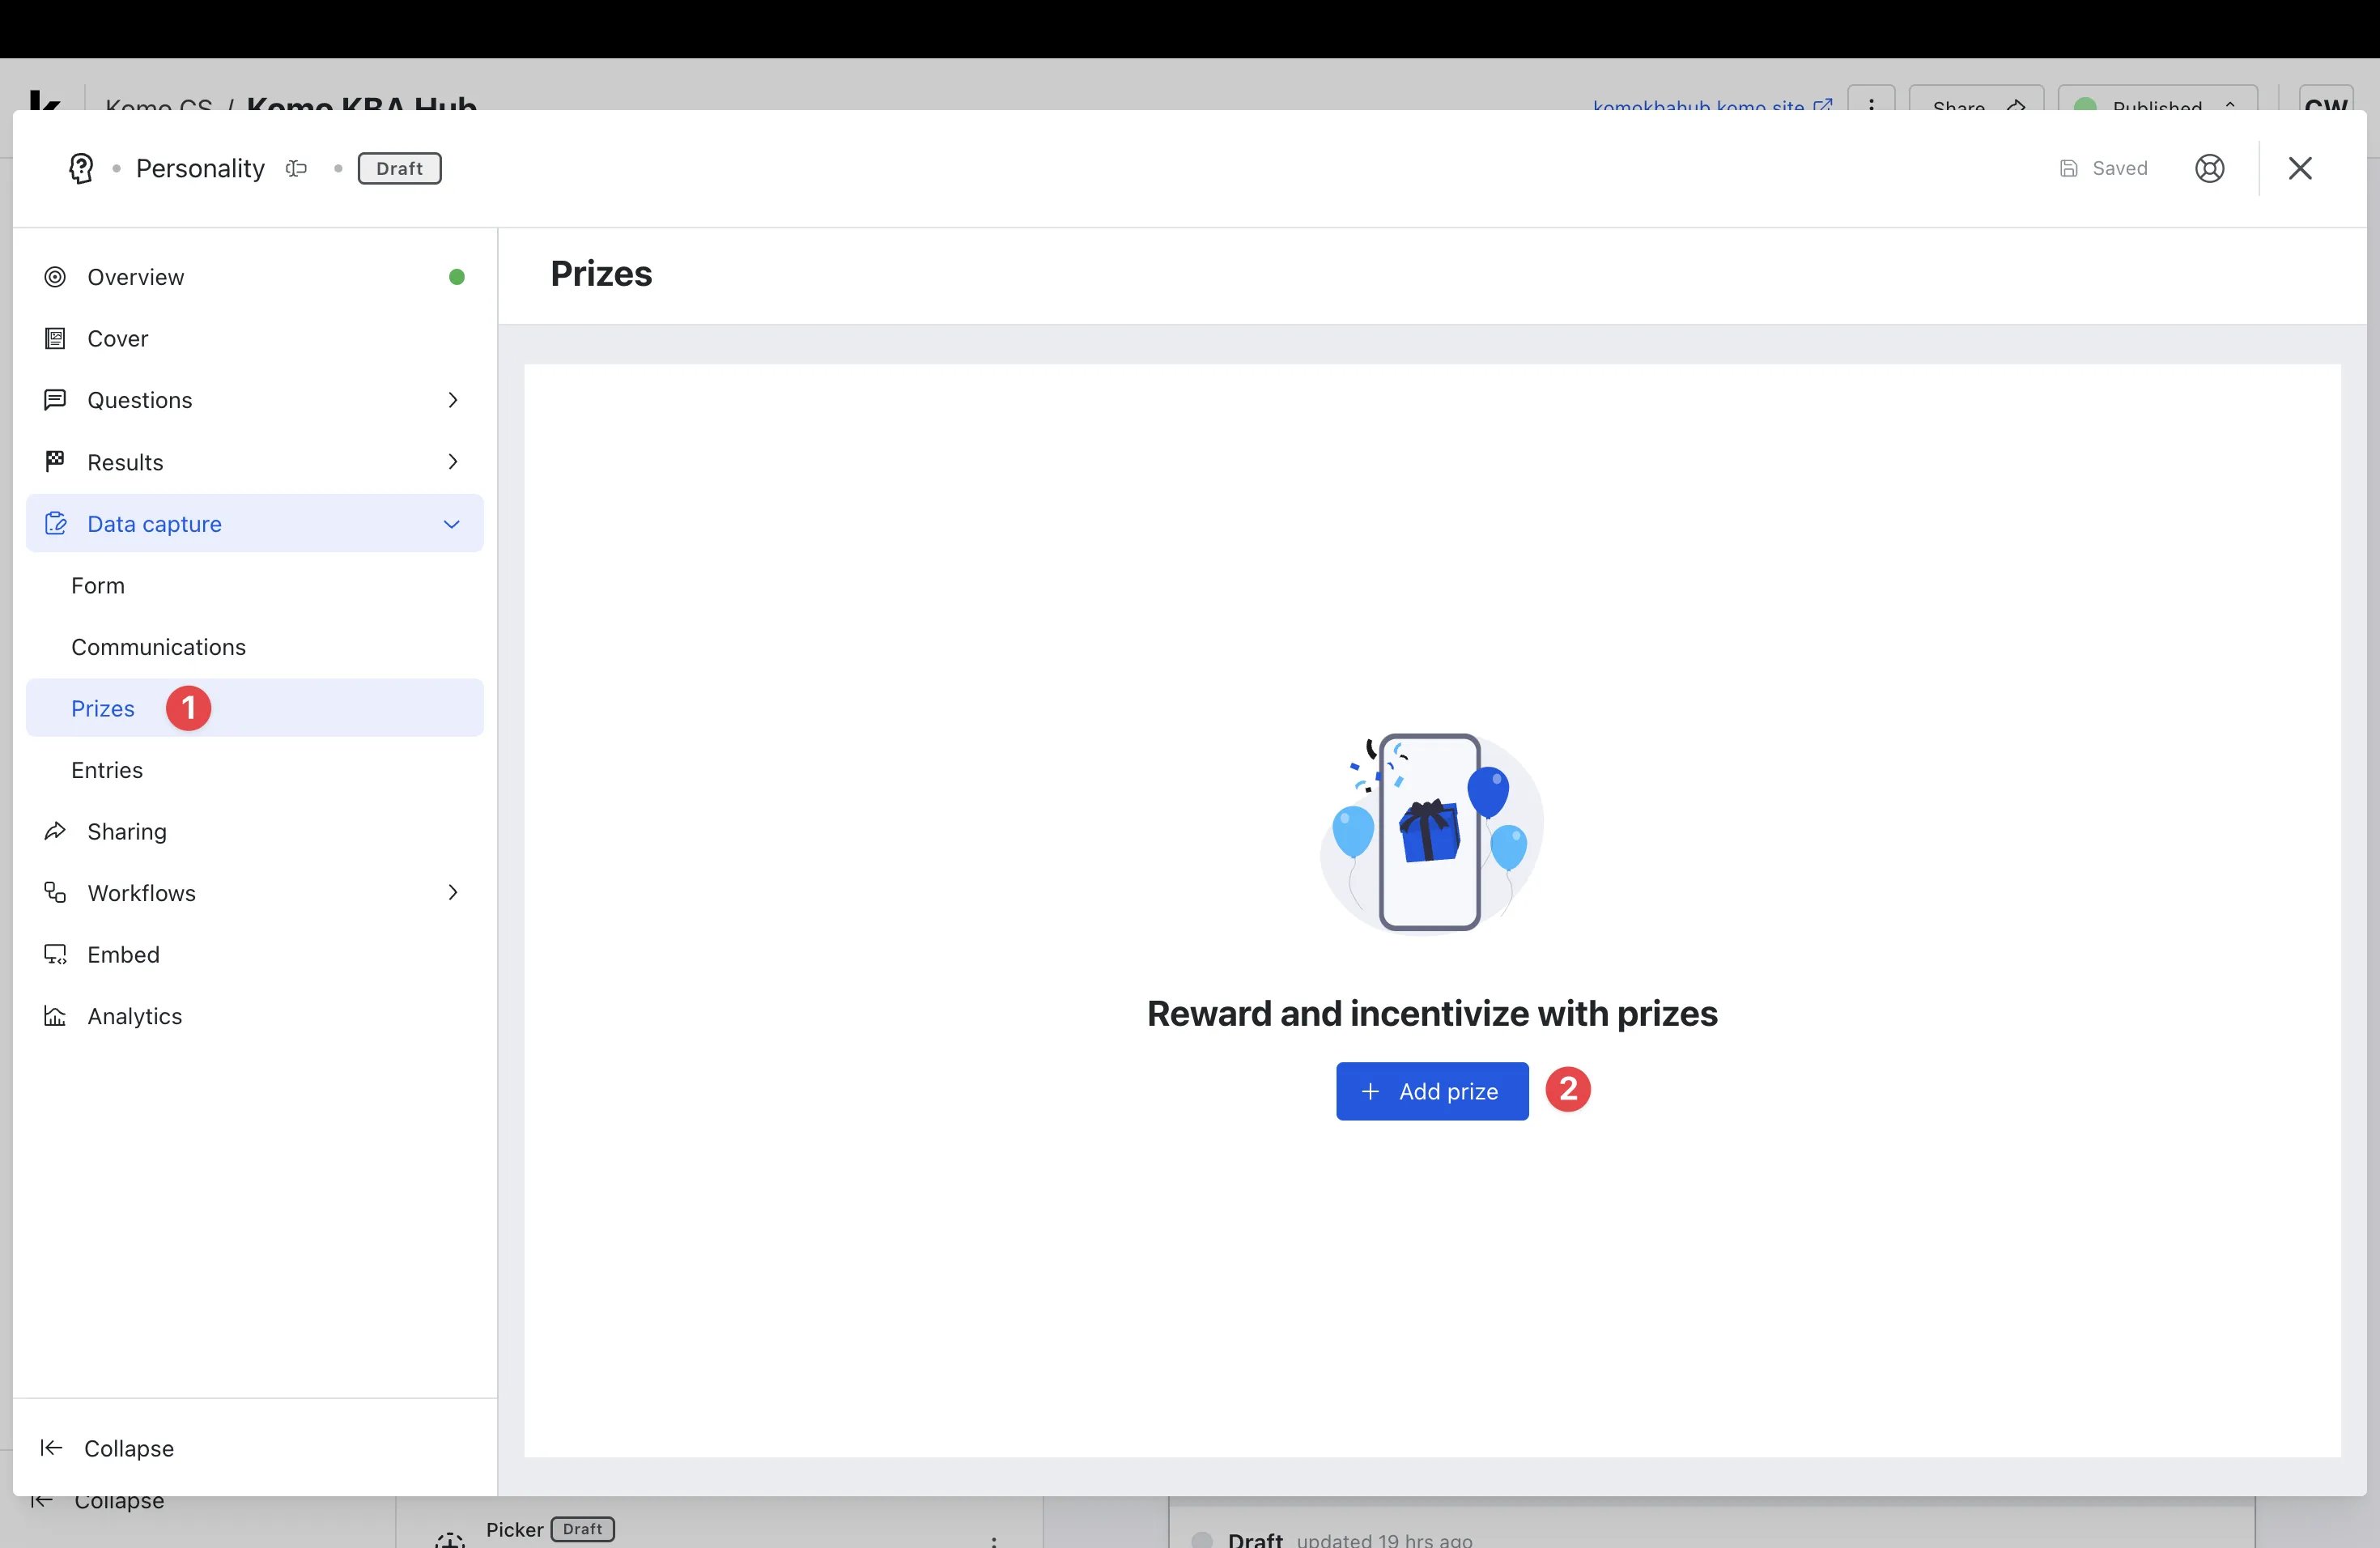
- (1) Click on the Prizes tab under the Data Capture dropdown.
- (2) Click + Add prize.
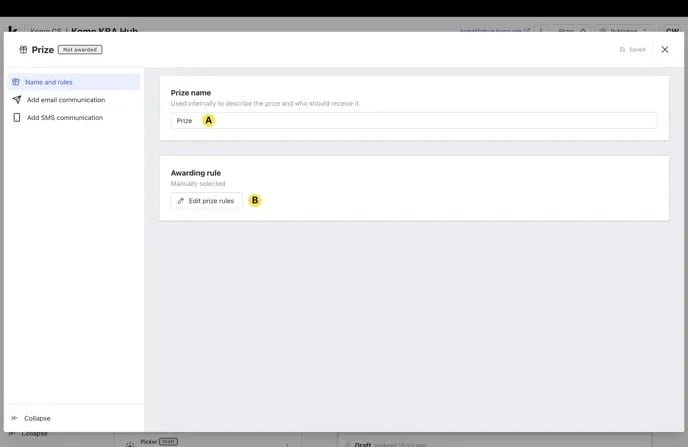
- (A) Give the prize Prize Name (this will be internal only)
- (B) Click Edit prize rules.
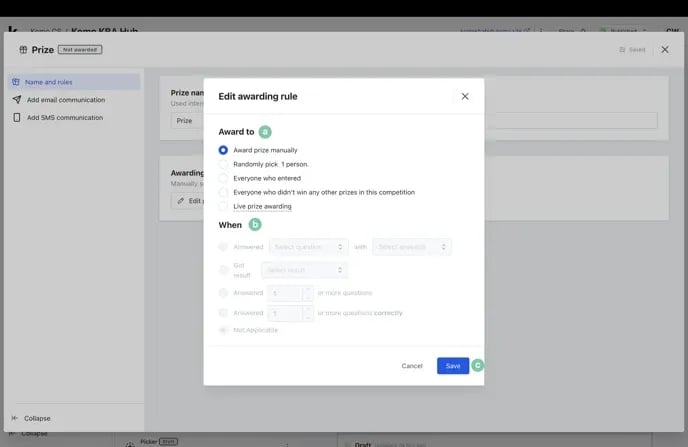
- (a) Set your awarding rule under Award to. This refers to what group of entrants you want a particular prize to be awarded to.
Awarding Rule
- Award prize manually:
This allows you to manually select a particular entrant or group of entrants to receive the prize. This prizing rule cannot be automated and requires you to select the recipients post-game. - Random pick X person/s:
This option randomly awards the prize to entrants. The number of entrants who receive this prize is completely up to you and can even be automatically awarded post-game using scheduling. - Everyone who entered:
This rule simply provides everyone who has entered with the prize you’ve created. - Everyone who didn’t win any other prizes in this competition:
Use this rule to provide a particular communication to entrants who didn’t win a prize in your competition. - Live prize awarding:
This option allows you to send prizes to users live/instantly while they engage with your content.If you select this option, you will need to enable this prize once it is all setup. You can see how to enable live prizing here.
- Award prize manually:
- (a) Set your awarding rule under Award to. This refers to what group of entrants you want a particular prize to be awarded to.
- (b) Select when to award the prize. This is where you’ll set additional parameters that need to be met.
This is what is mainly used for personalized prizing.
Prize Parameters
- Answered ‘select question’ with ‘select answer’:
This option awards the particular prize to entrants who respond with a selected answer to one of your questions. Ie: In your Live Trivia game you may have asked “What’s your favorite ACME sports drink flavor?”, with the potential answers being lime or apple. By using this parameter you can provide users who responded with ‘lime’ a lime coupon in the prize. - Got result x:
Award prizes based on a result they receive. Ie: In your Personality Quiz, a result could be “You’re a shoe shopper”, and reward users with a discount voucher to spend at a shoe store. - Answered X or more questions:
This option simply allows you to reward people who answered a predetermined number of questions. - Answered X or more questions correctly:
Awards the prize to people who answered a predetermined number of questions correctly. - (c) Click Save to confirm your awarding rule.
- Answered ‘select question’ with ‘select answer’:
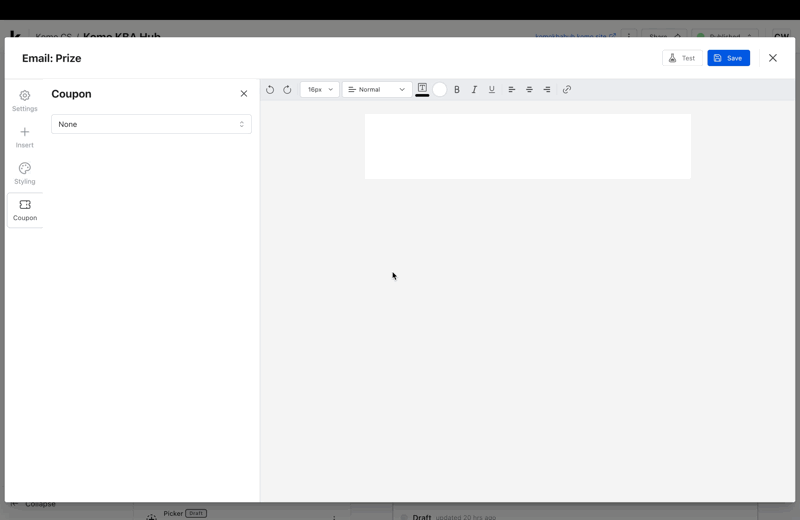
Step 3: Set up your Prize Communications
-
(1) Here you will create your Email communication for this prize.
Setting your Email Communication
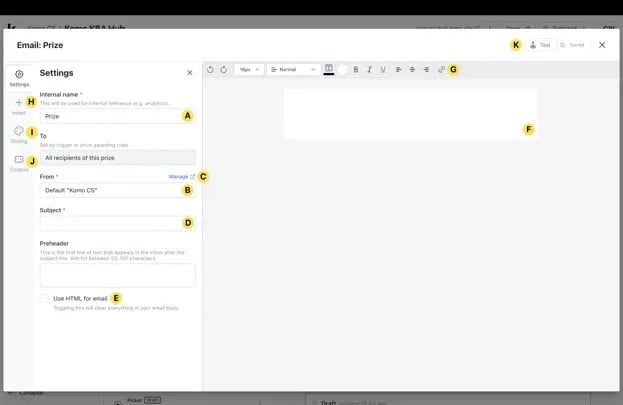
- (A) Here you can give your prize communication an Internal name.
- (B) Select a sender name. If you don’t have one listed, (C) click Manage to add a new name.
- (D) Enter your email subject line here.
- (E) You have the option to use HTML code for your email.

- (a) Paste your HTML email code here.
- (b) Test your email and preview the code.
- (F) Build out your email here.
- (G) Utilize the toolbar to construct your email body.
- (H) Here you can add additional features to your email body
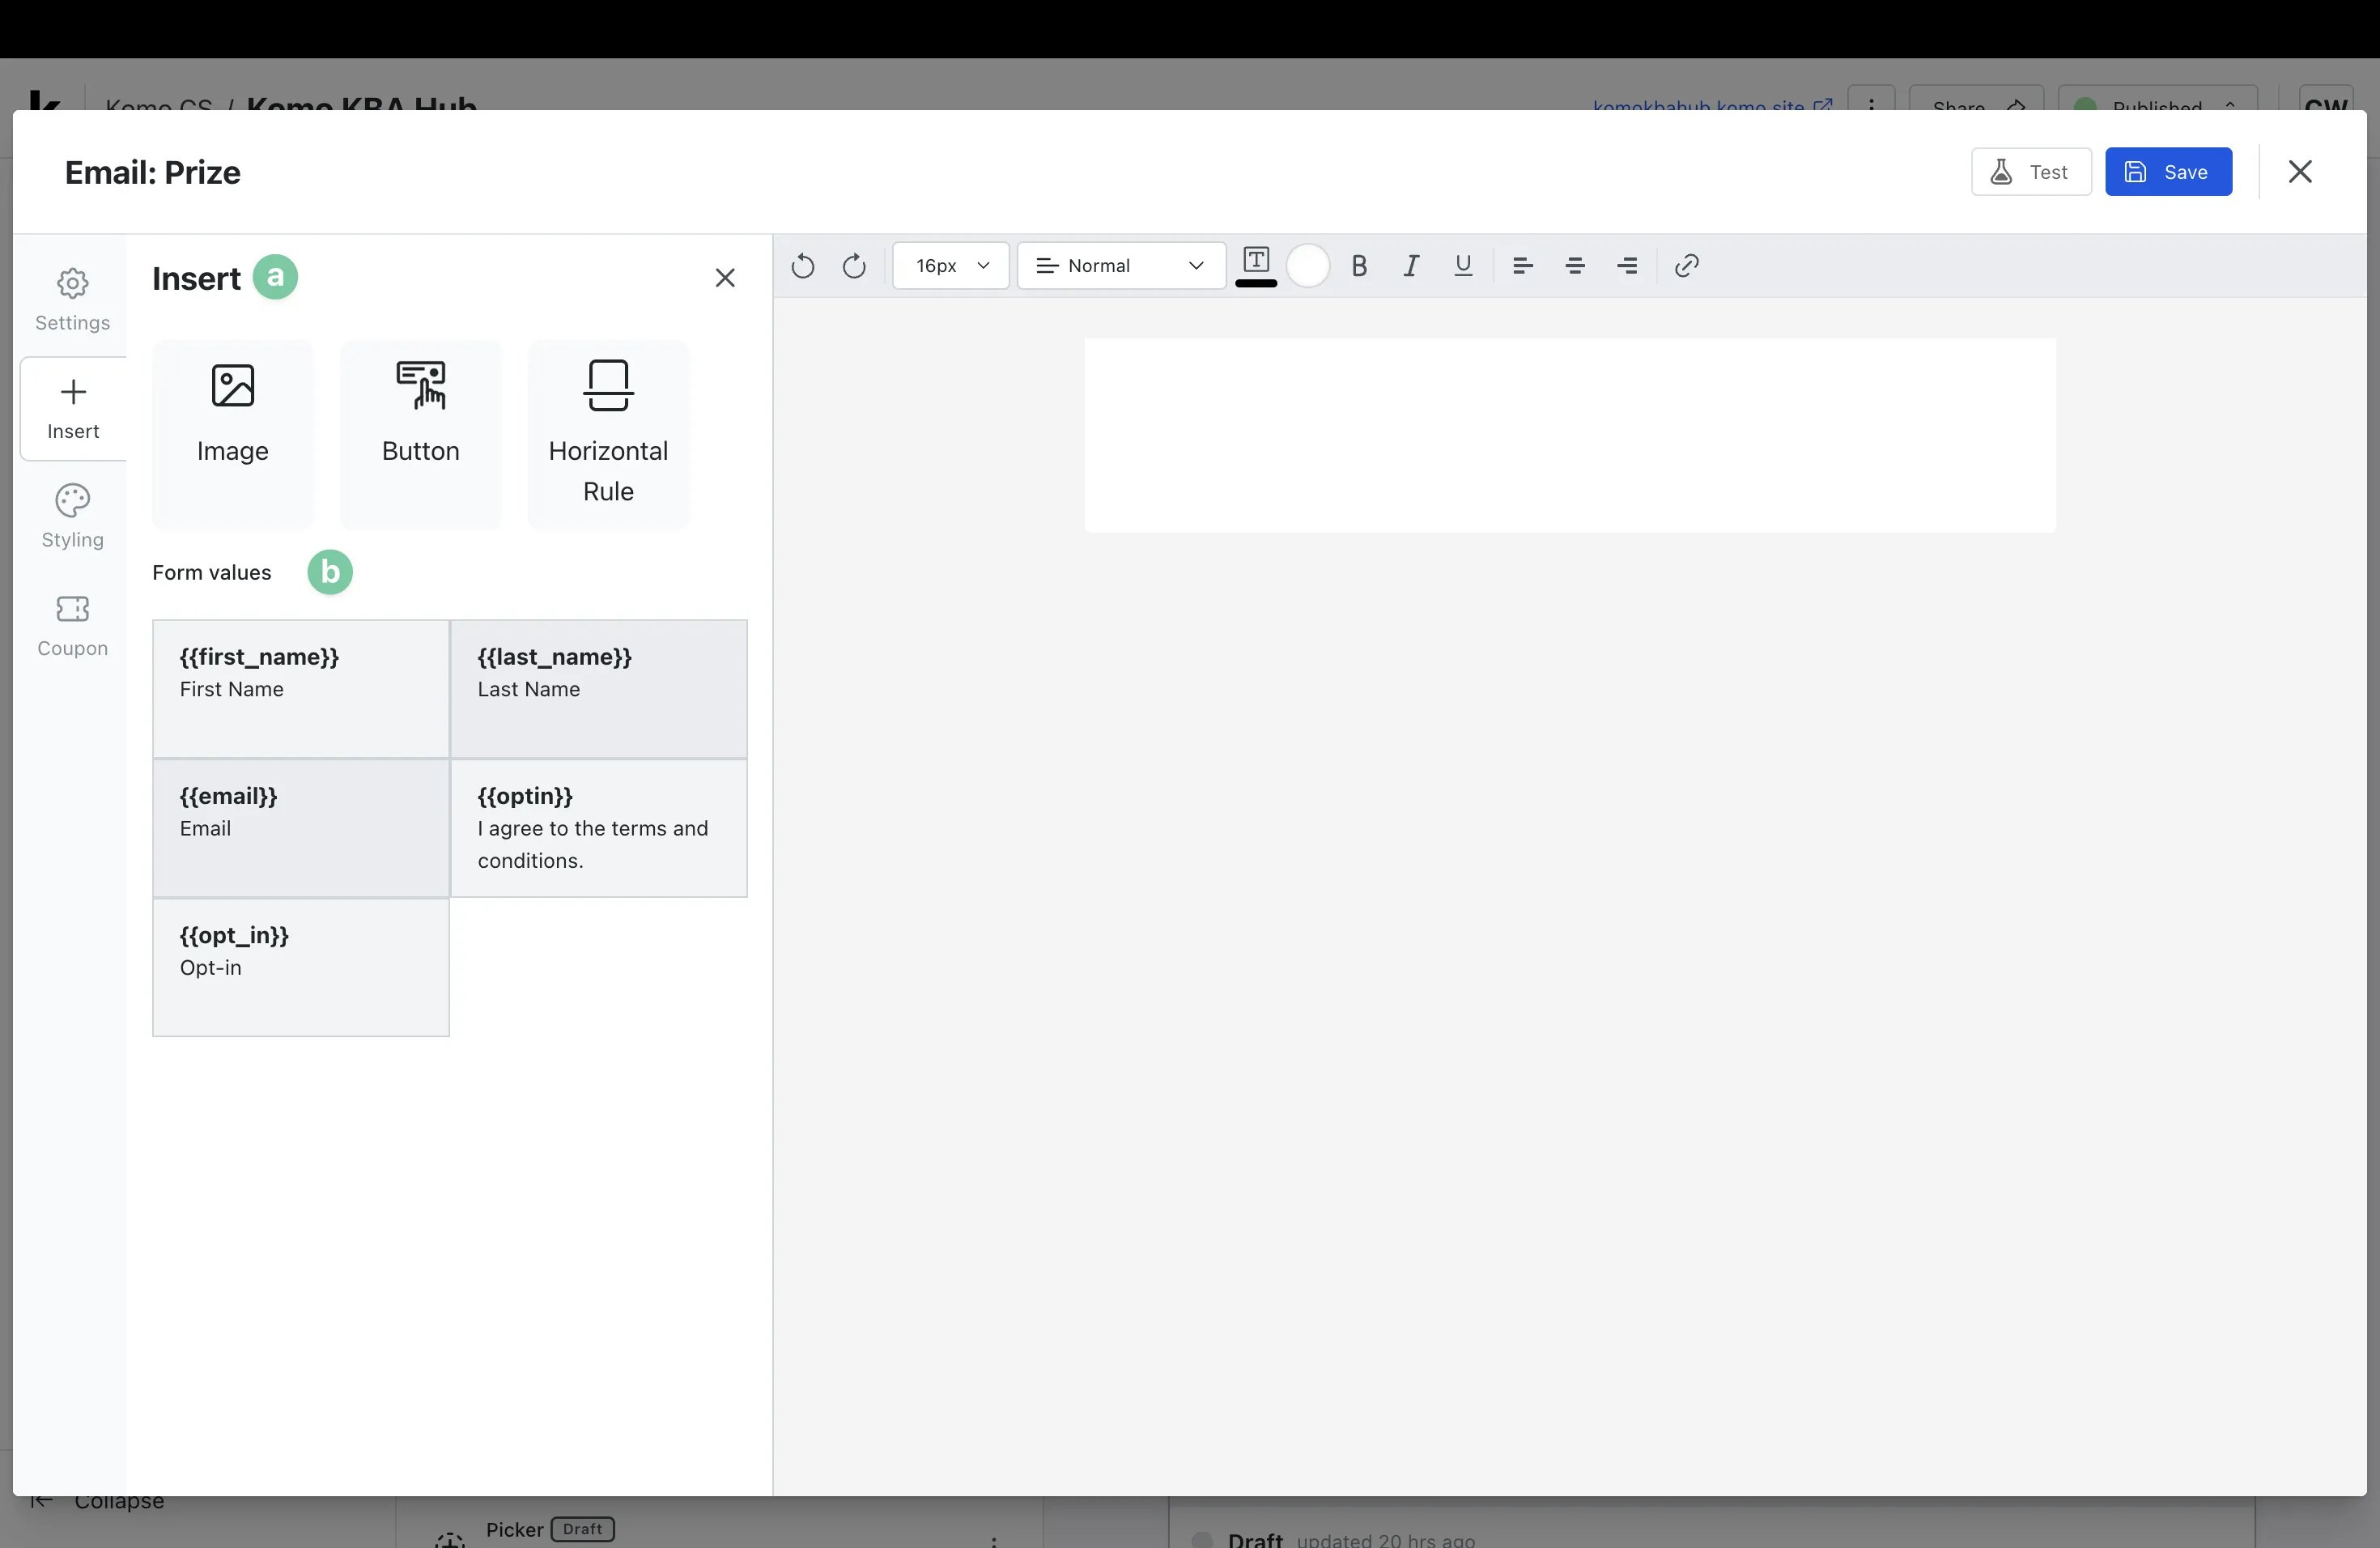
- (a) Add images, call-to-action buttons, or horizontal rule.
- (b) To personalize the experience, pull the entrant’s responses to your data capture form from the recall form data section.
- (I) Edit the body and container colors.
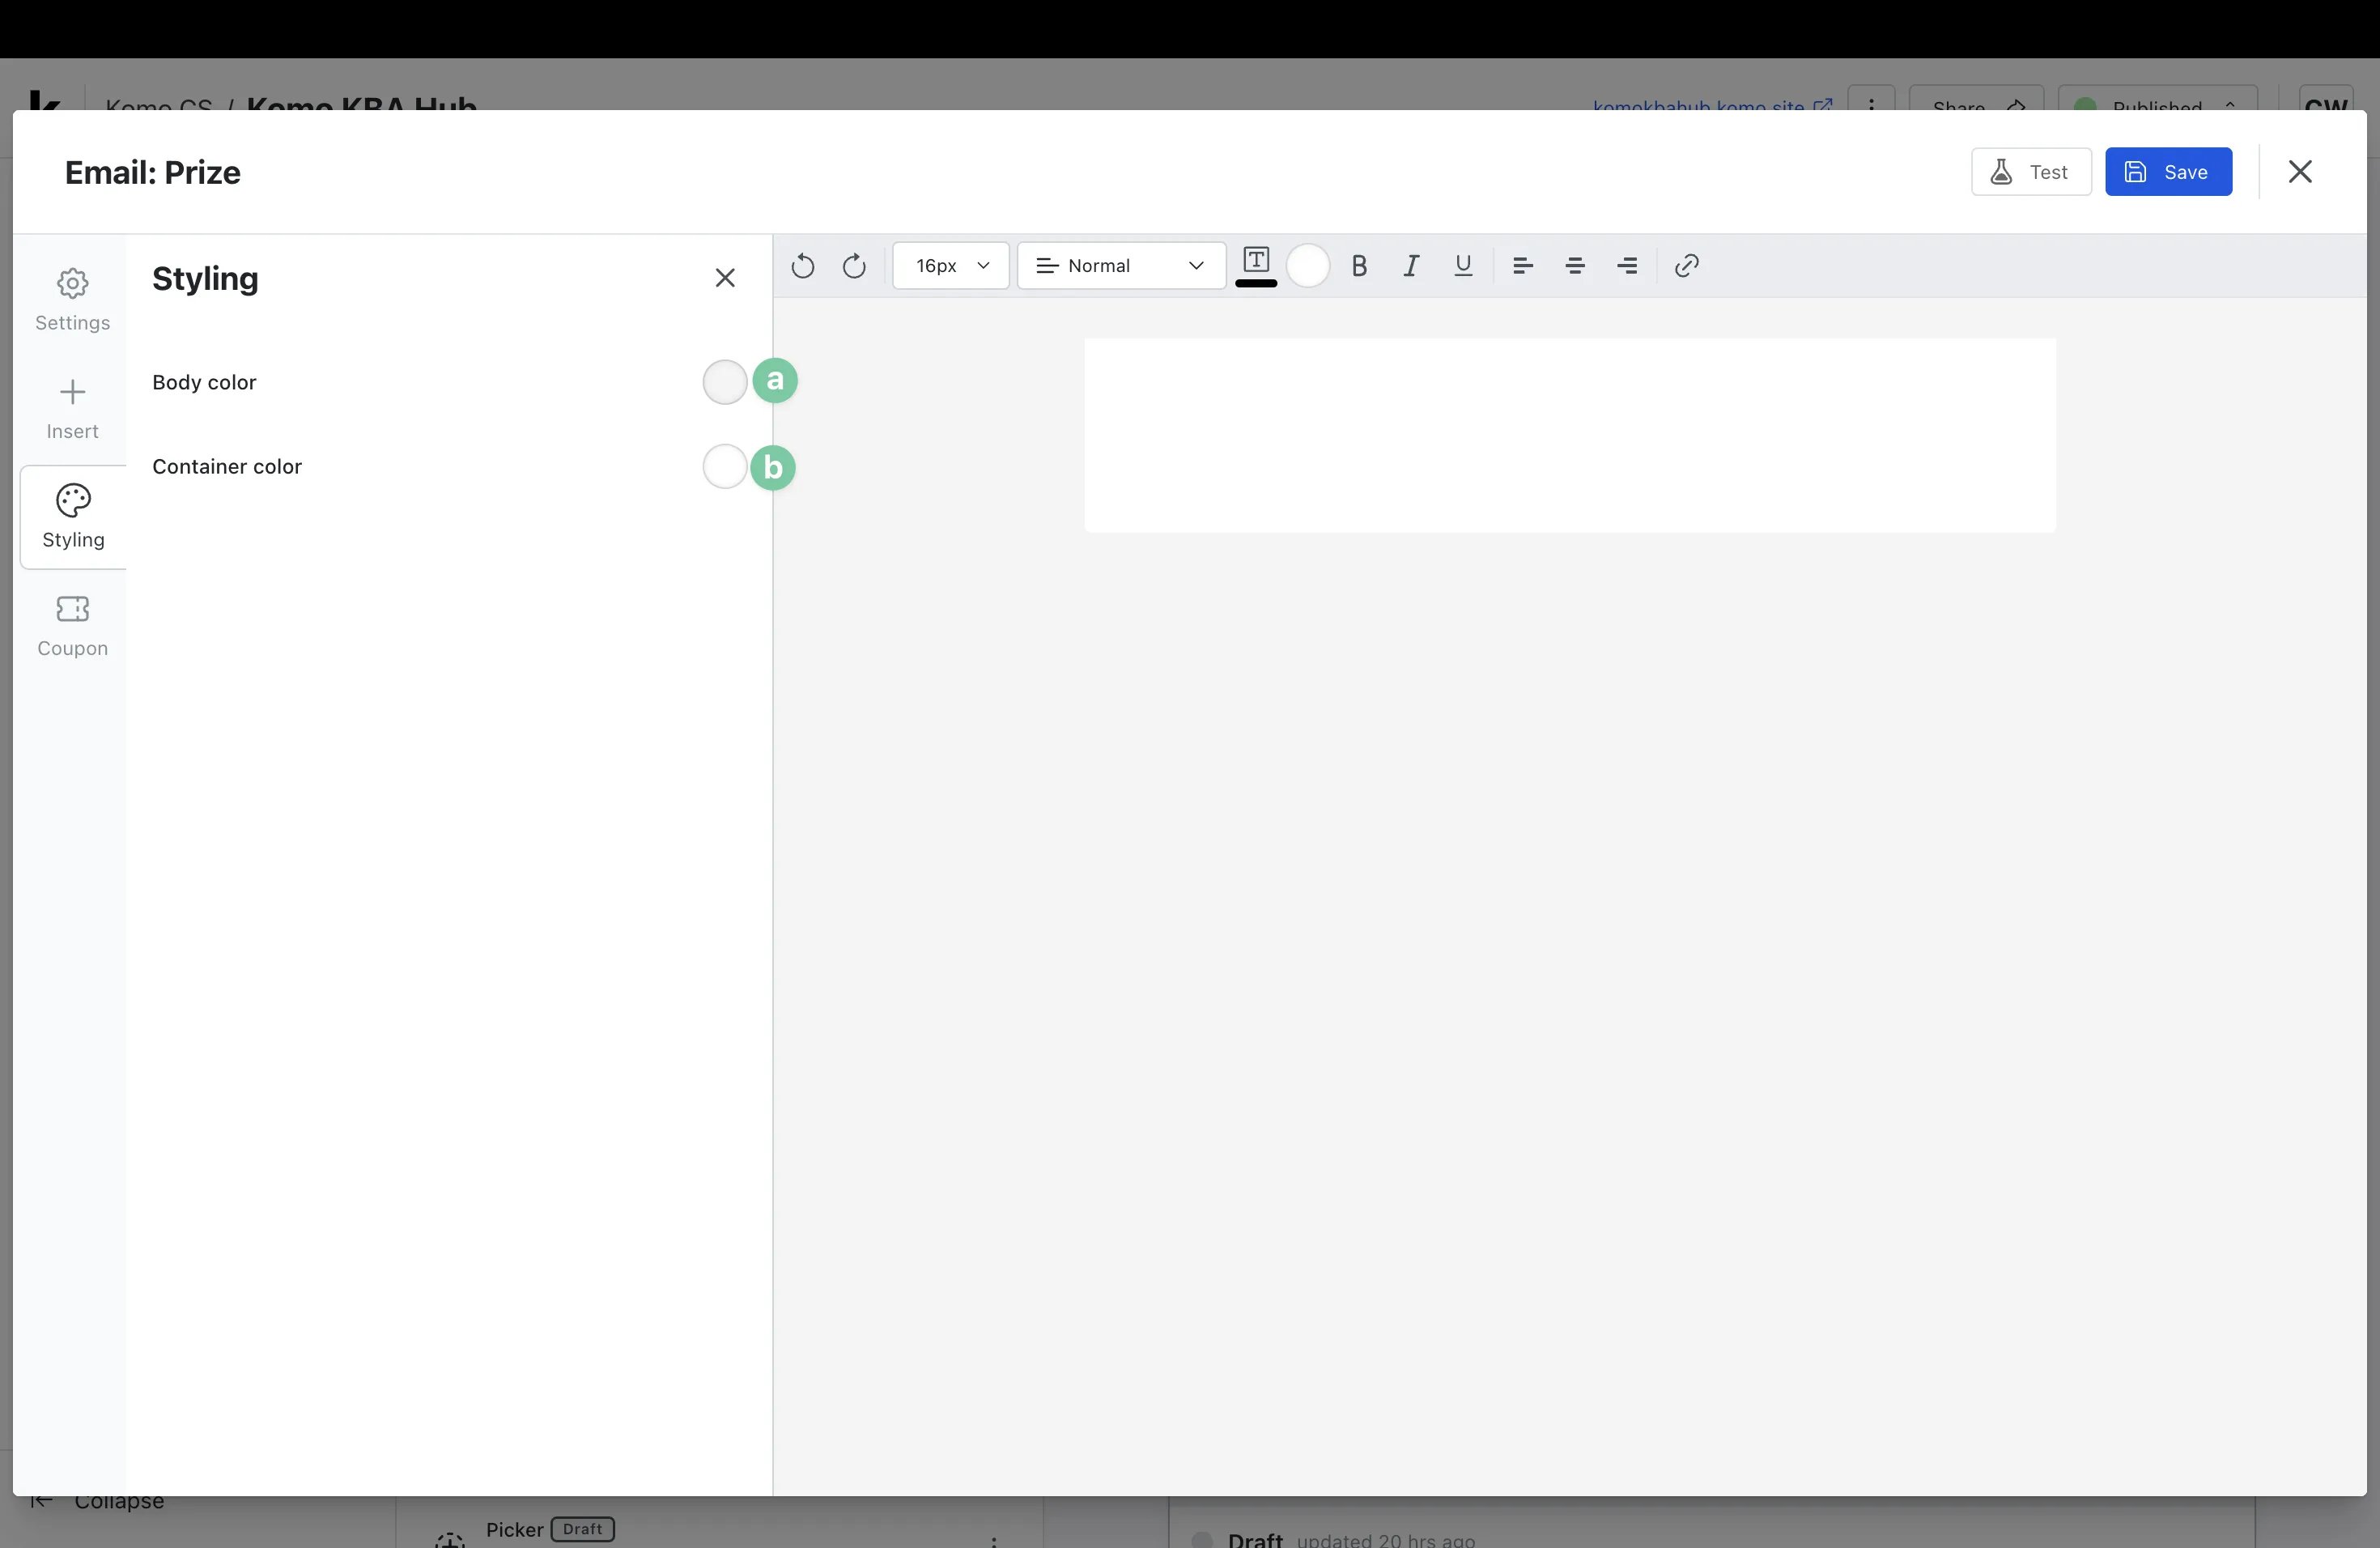
- (a) Alter this will change the background color behind the email container.
- (b) Update this to change the background color behind the email body.
- (J) Here you can attach a coupon to the prize. Select your desired coupon from the drop-down and then head back to the Insert tab and paste the code into the email body.
- (K) Test the communication here.
- (2) Or you can send out an SMS communication here.
Setting your SMSCommunication
Setting your SMSCommunication
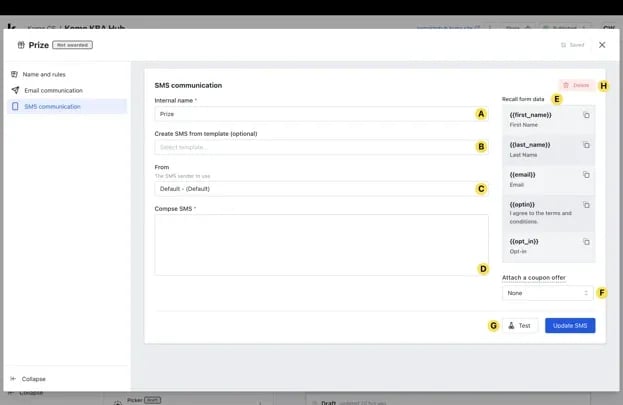
To send SMS communications and with the new laws and regulations, you will need to have a Twilio account. Click here to learn more on how to set this up.
- (A) Here you can give your prize communication an Internal name.
- (B) You can create an SMS from our templates.
- (C) Select the sender name from your Twilio account.
- (D) Create your SMS copy here.
- (E) Pull the entrant’s responses to your data capture form from the recall form data section. This means you can automatically personalize communications to the entrant by simply copying and pasting the code into the email body.
- (F) Here you can attach a coupon to the prize. Select your desired coupon from the drop-down and then copy and paste the code into the email body.
- (G) Test your SMS communication.
- (H) Delete the SMS communication here.
Step 4: Add additional Communications
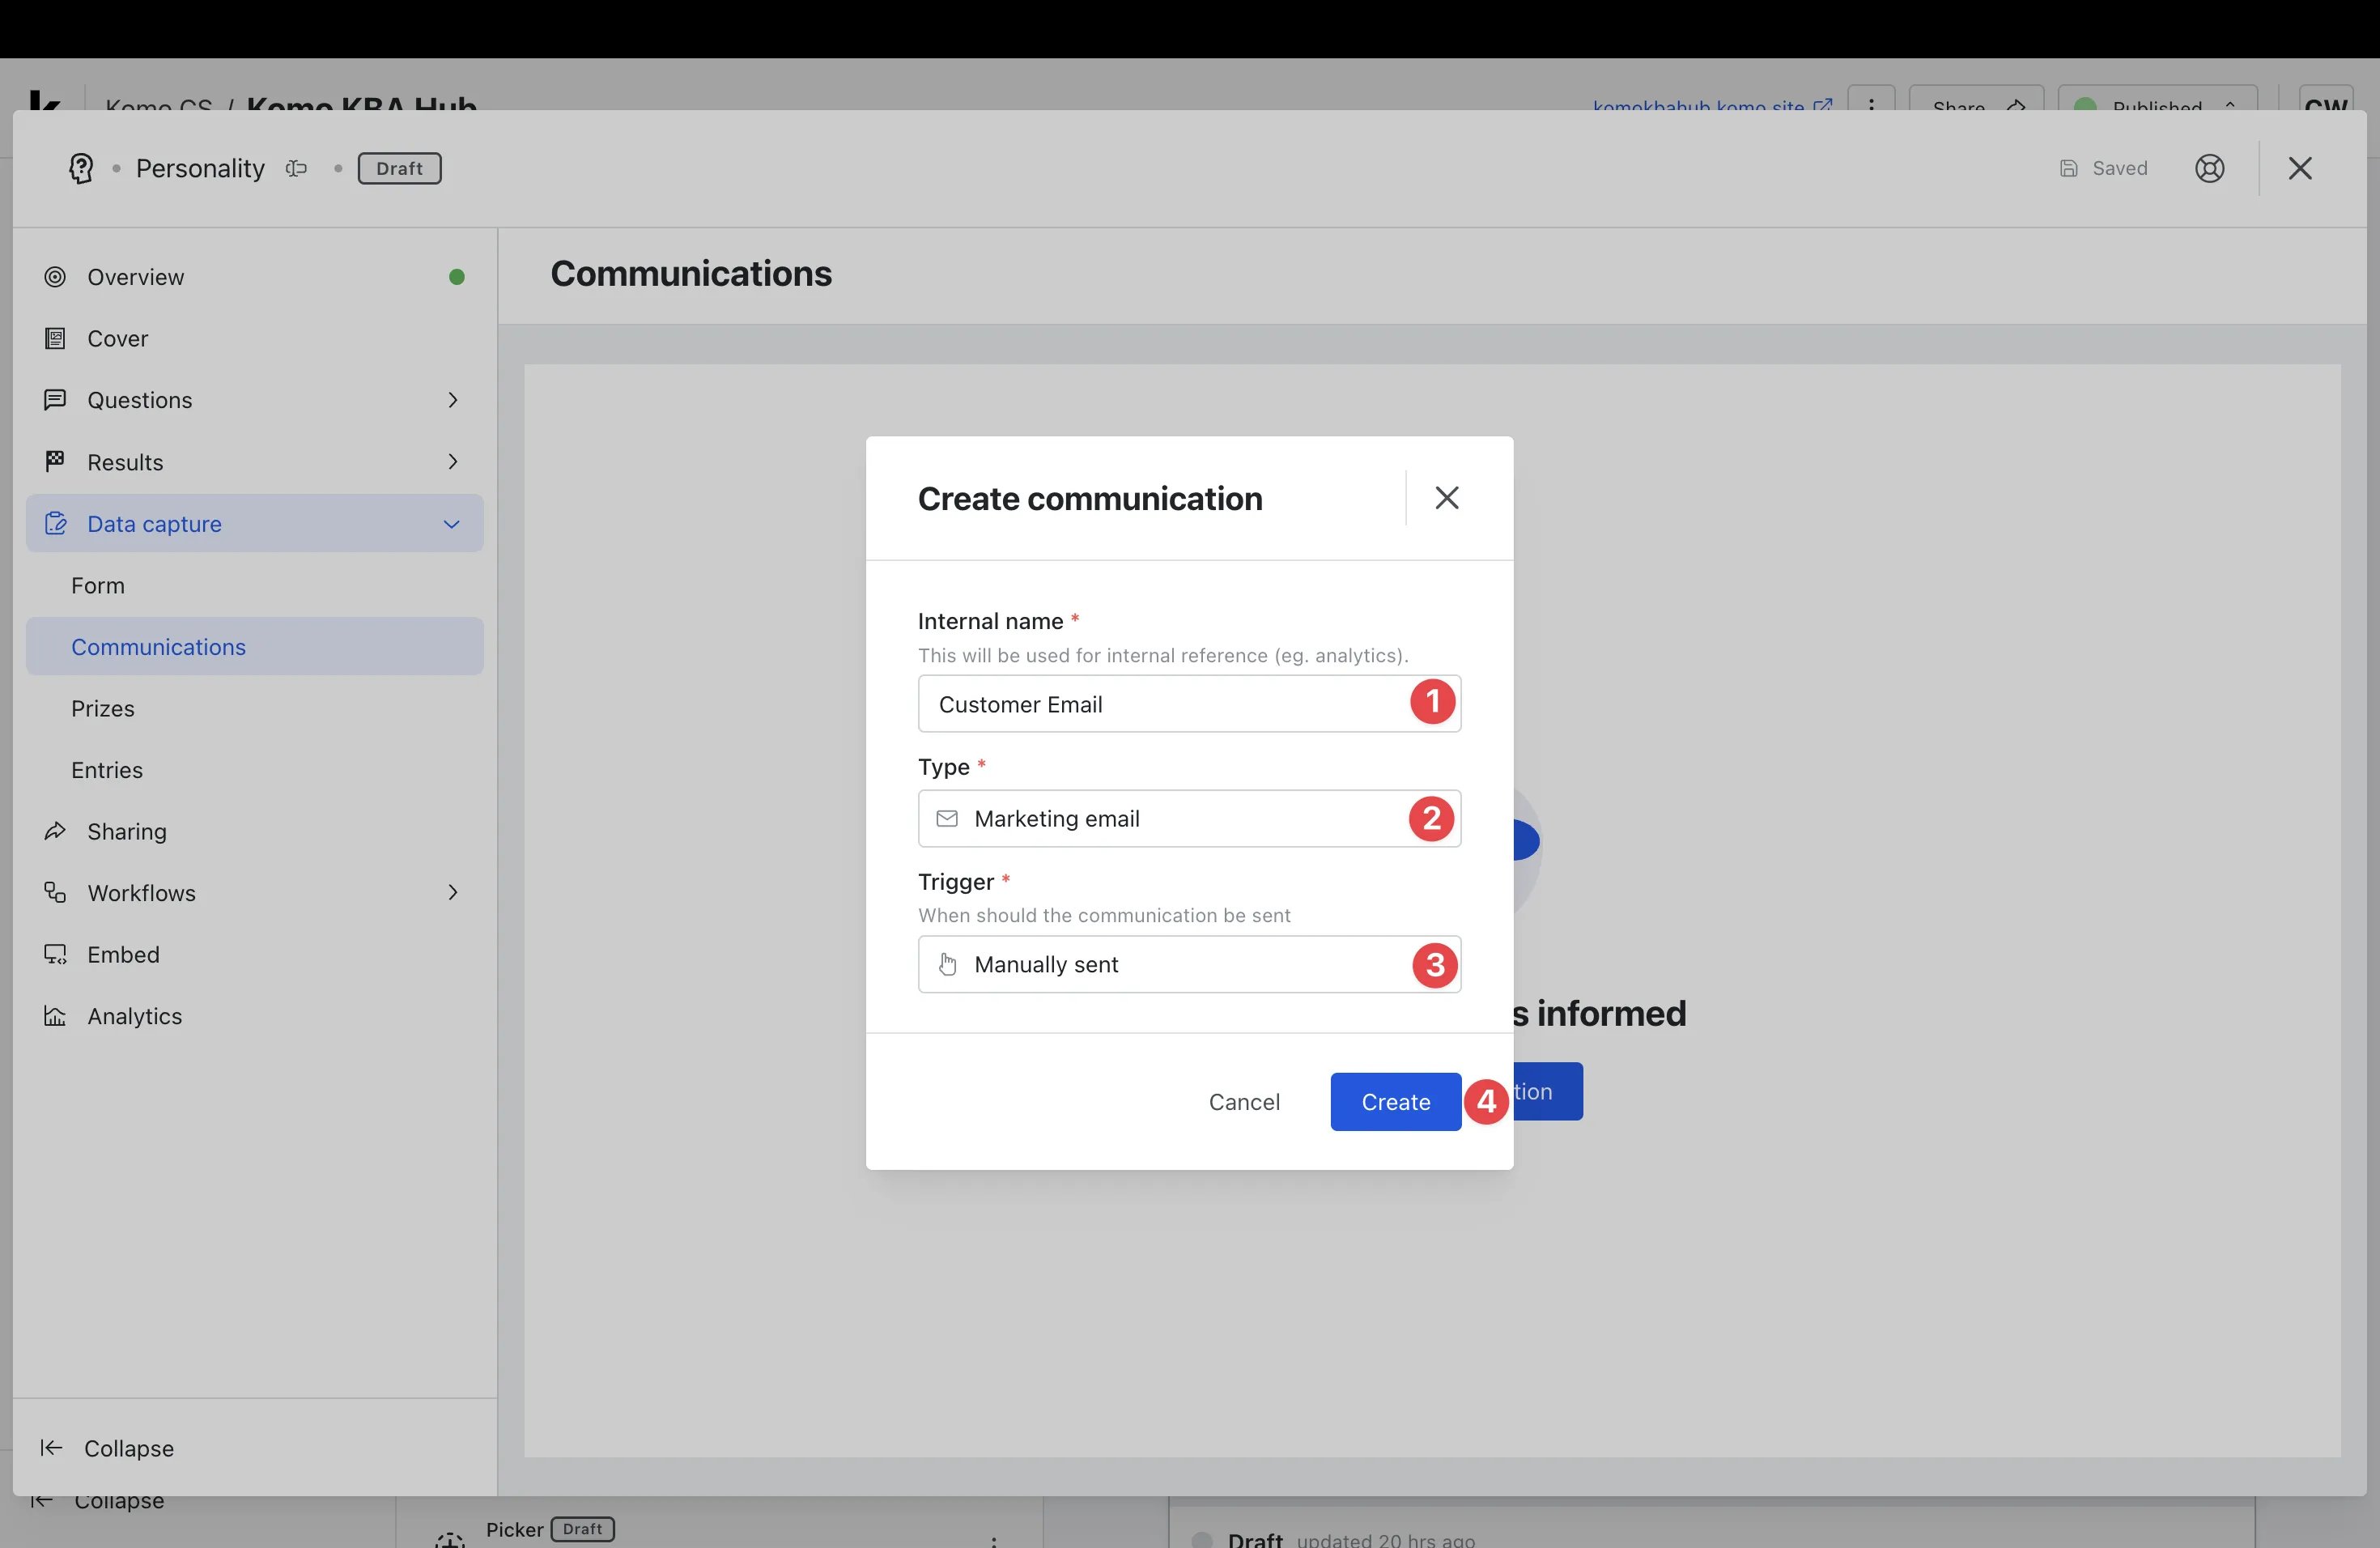
- Click on the Communications tab and then + Add Communication.
- (1) Give the communication an Internal name.
- (2) Select the type of communication want to send - transactional or marketing email or SMS.
A transaction email is triggered by an action taken by a user while a marketing email is sent to a user outside of the campaign.
- (3) Choose when you want this communication to be sent.
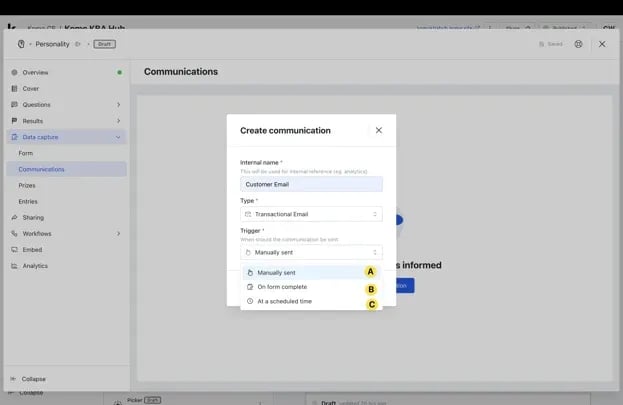
- (A) Manually send this communication to users.
- (B) Send this communication once a user completes the data capture form.
- (C) Have the communication sent out at a scheduled time and day.
- (4) Click Create.
Step 5: Set up Marketing Email Communications
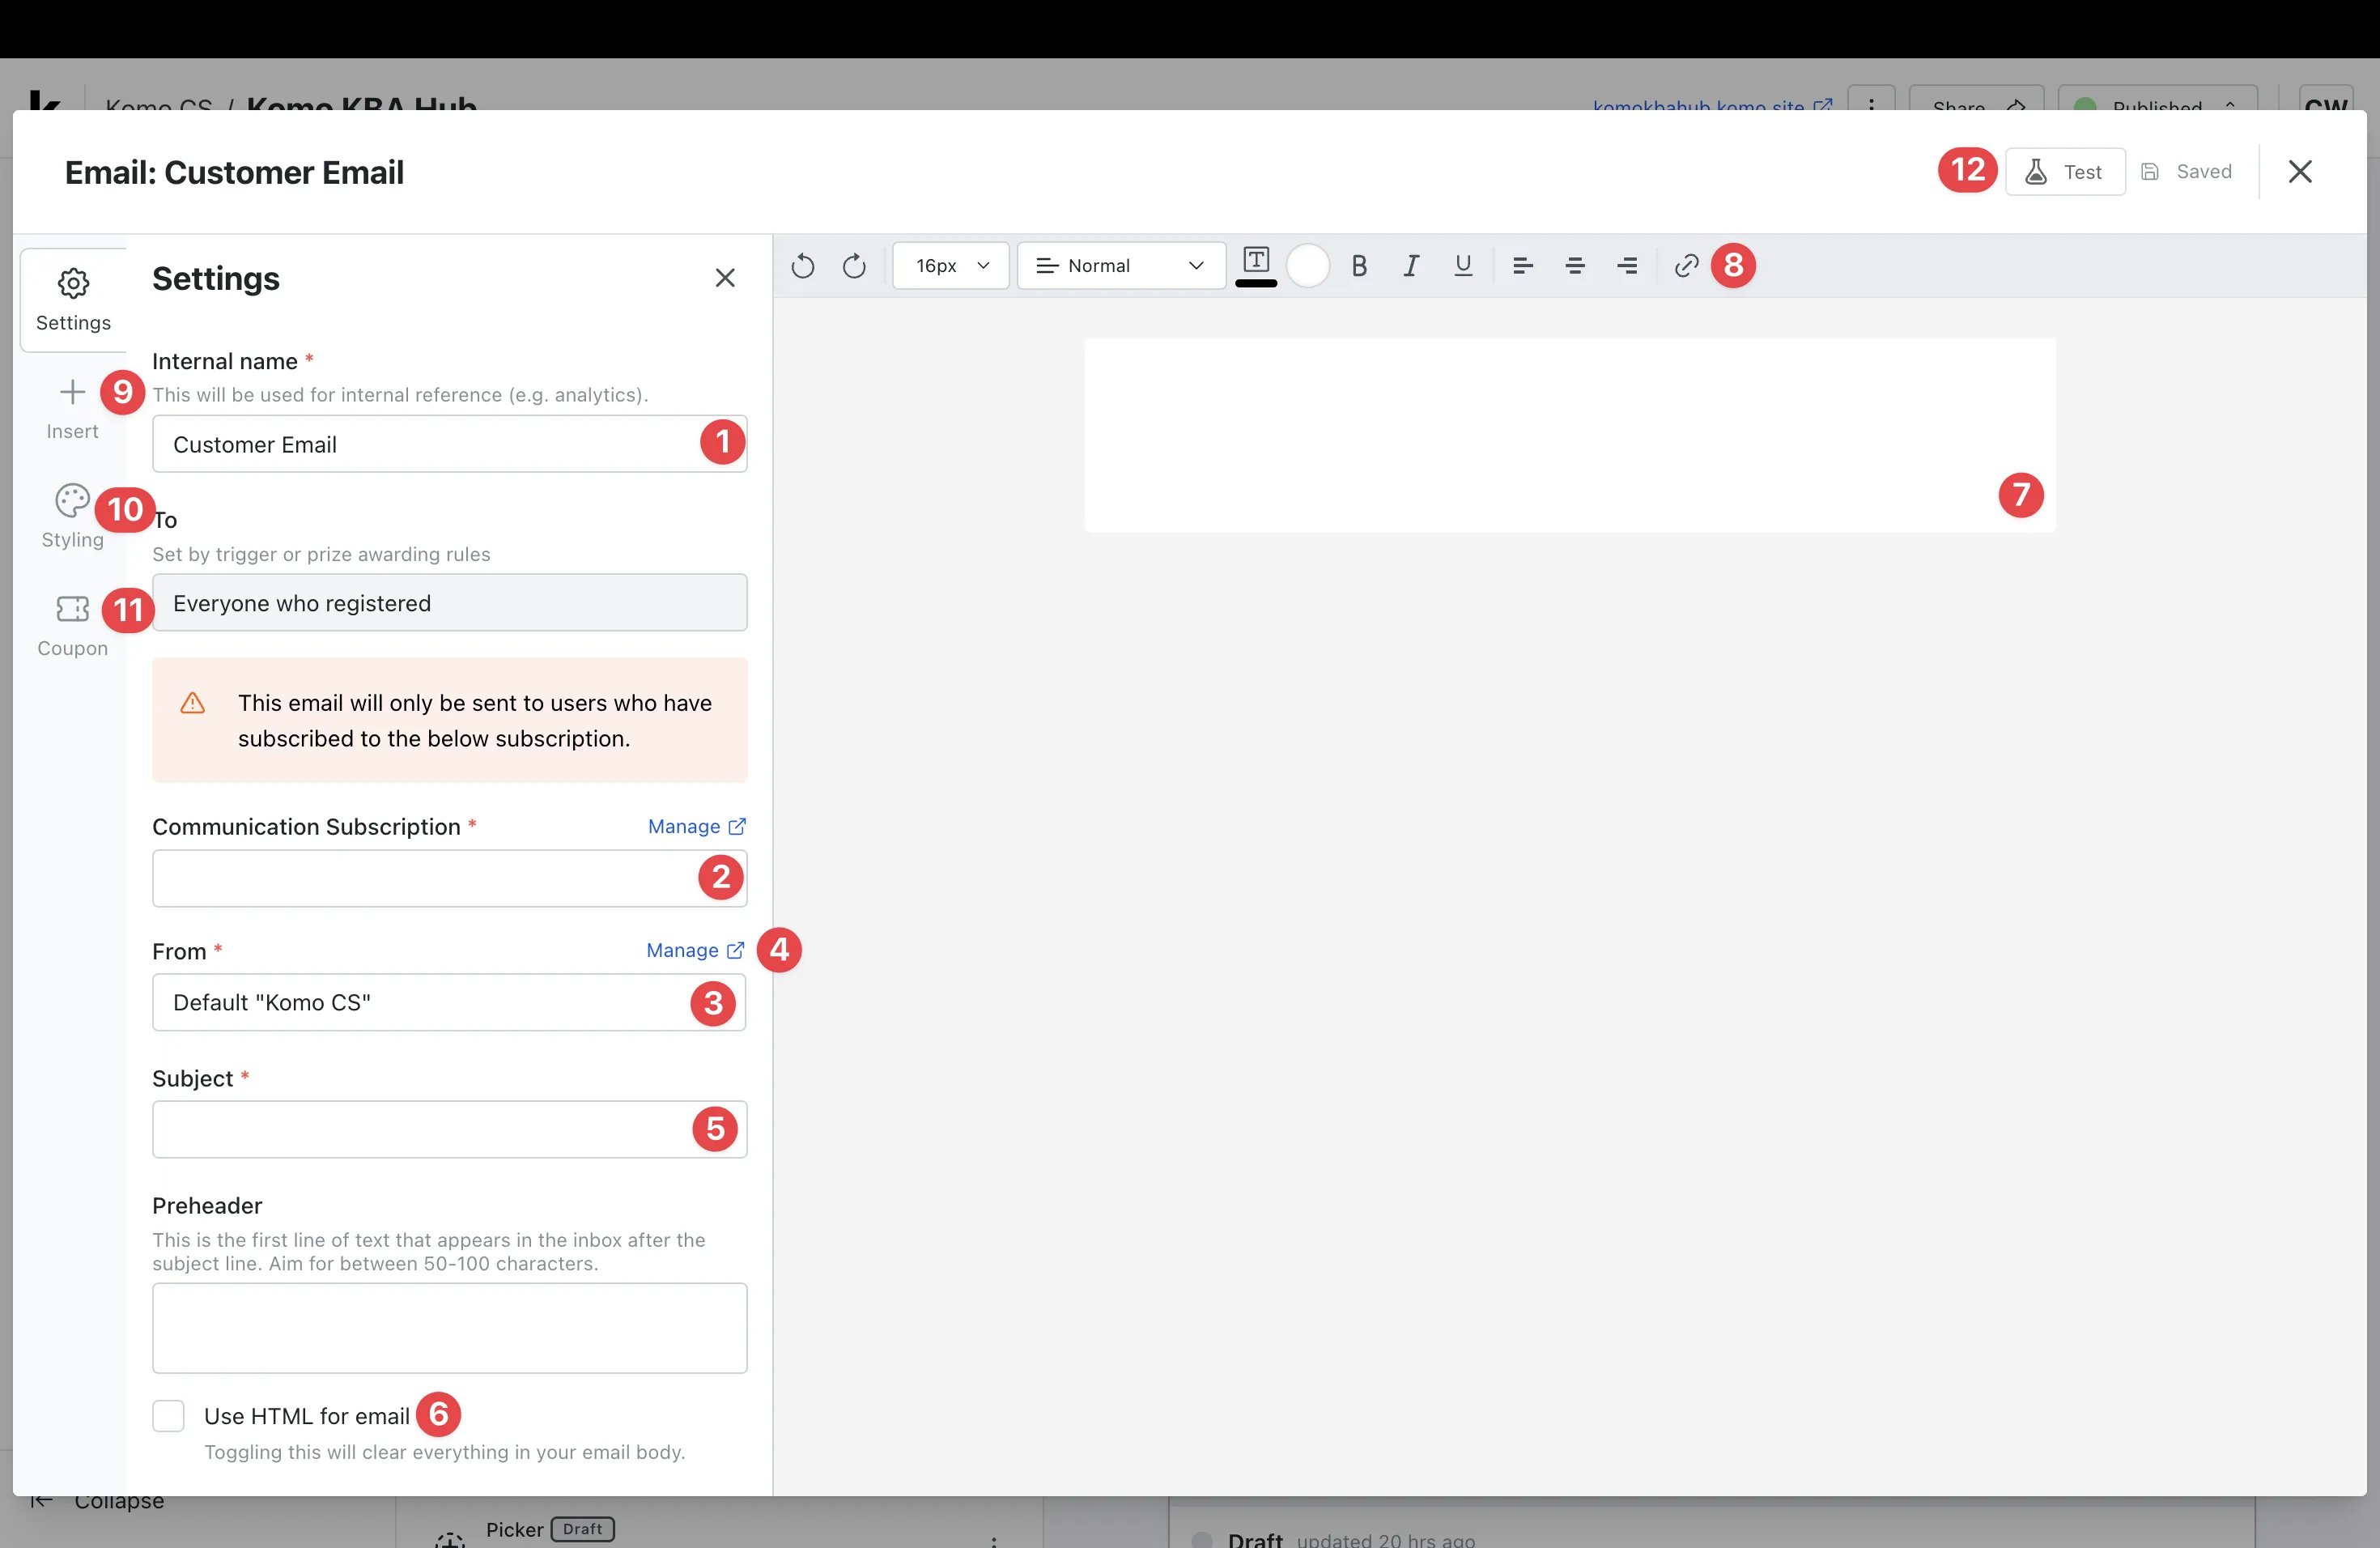
- (1) Here you can give your prize communication an Internal name.
- (2) Select which Communication Subscription Group your email should be sent to.
This will ensure your email is only sent to users who have opted in to the selected subscription communications.
For more information on setting up Communication Subscriptions, read this article - (3) Select a sender name. If you don’t have one listed, (4) click Manage to add a new name.
- (5) Enter your email subject line here.
- (6) You have the option to use HTML code for your email. If using HTML code, follow the process outlined in Step 3.
- (7) Build out your email here.
- (8) Utilize the toolbar to construct your email body.
- (9) Here you can add additional features to your email body. You will need to insert the unsubscribe URL code in the email to provide users with the option to unsubscribe from communications. It is recommended that you hyperlink the to the unsubscribe text. Follow Step 3 to continue building your email.
Example of unsubscribe URL code
The below screenshot is an example of how to include an unsubscribe URL code in your email body.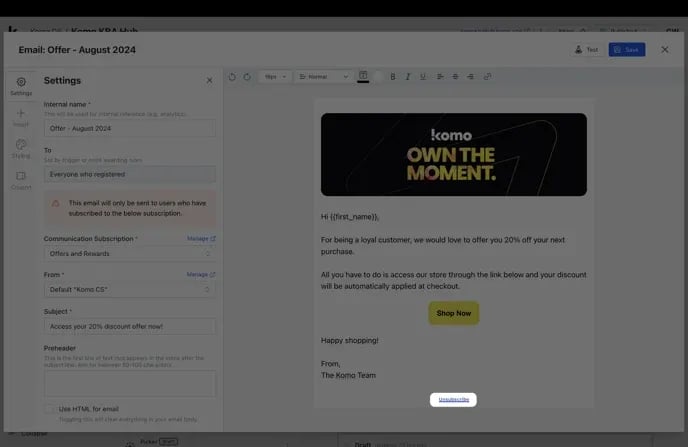
Communication Design Guidelines
Learn different communication materials sent to players and users